内容很长各位大老爷耐心观看
本章主要介绍ansible中最常见模块的使用
- 文件管理模块
- 软件包管理模块
- 服务管理模块
- 磁盘管理模块
- 用户管理模块
- 防火墙管理模块
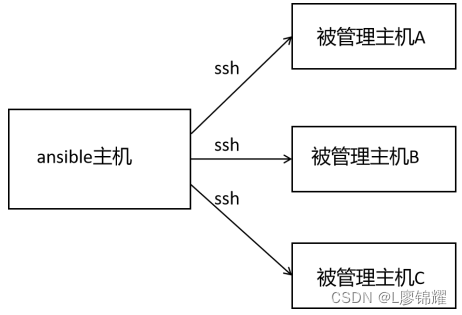
ansible的基本用法如下
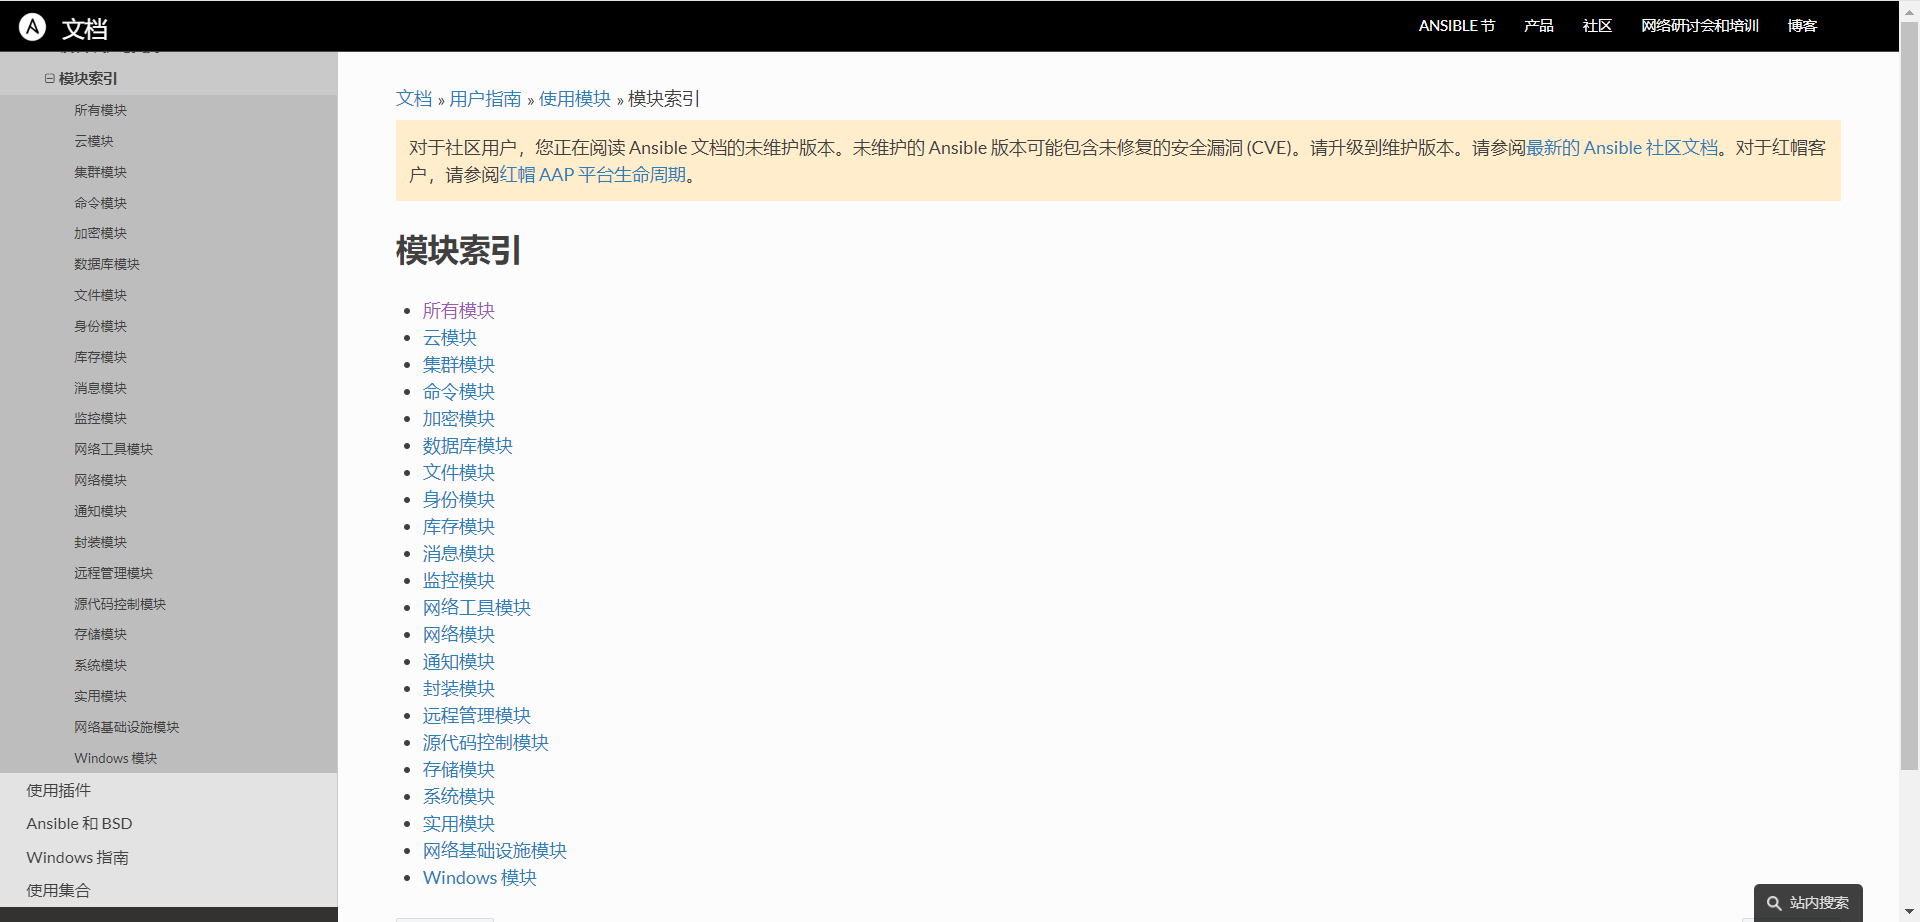
ansible 机器名 -m 模块x -a “模块的参数”对被管理机器执行不同的操作,只需要调用不同的模块就可以了。ansible中内置了很多 的模块,可以通过ansible-doc -l查看系统中所有的模块
[jin@rhel801 ~]$ ansible-doc -l
a10_server                                                    Manage A10 Ne.>
a10_server_axapi3                                             Manage A10 Ne.>
a10_service_group                                             Manage A10 Ne.>
a10_virtual_server                                            Manage A10 Ne.>
aci_aaa_user                                                  Manage AAA us.>
按【Enter】键会一行一行地往下显示,按空格键会一页一页地往下显示,按【q】键退 出
不同的模块有不同的参数,如果要查看某个模块的参数,可以通过如下语法来查看
ansible-doc 模块名
nsible中有很多模块,每个模块也有很多参数,我们是不可能把所有的模块、每个模块的所有参数都掌握的。所以,下面我们只讲解最常见的模块及这些模块中最常见的参数的使 用方法
1.1 shell模块
shell模块可以在远端执行操作系统命令,具体用法如下
ansible 主机组 ‐m shell ‐a "系统命令"练习1:在rhel802上执行hostname命令
[jin@rhel801 ~]$ ansible rhel802 -m shell -a "hostname"
rhel802 | CHANGED | rc=0 >>
rhel802
[jin@rhel801 ~]$
这里rc=0的意思是执行此命令之后的返回值为0,rc的意思是returm code(返回值),为0说明正确执行了,非零说明没有正确执行
练习2:在 server2上执行一个错误的命令
[jin@rhel801 ~]$ ansible rhel802 -m shell -a "hostnamebb"
rhel802 | FAILED | rc=127 >>
/bin/sh: hostnamebb: 未找到命令non-zero return code
[jin@rhel801 ~]$
这里rc=127的意思是执行此命令之后的返回值为127,非零说明没有正确执行
1.2 文件管理的file模块
file模块用于创建和删除文件/目录,修改文件/目录属性,其常见的参数包括以下几个
(1)path:用于指定文件/目录的路径,此选项可以用name或dest替代
(2)state:指定行为
(3)touch:创建文件
(4)directory:创建目录
(5)file:对已存文件进行修改
(6)absent:删除
(7)link:软链接
(8)hard:硬链接
(9)其他参数:owner指定所有者,group指定所属组,mode指定权限,setype指定上下 文
练习1:在rhel802上创建一个文件/opt/hosts,并设置所有者为root,所属组为jin,权限为444
[jin@rhel801 ~]$ ansible rhel802 -m file -a "path=/opt/hosts owner=root group=jin mode=444 state=touch"
rhel802 | CHANGED => {
    "ansible_facts": {
        "discovered_interpreter_python": "/usr/libexec/platform-python"
    },
    "changed": true,
    "dest": "/opt/hosts",
    "gid": 1000,
    "group": "jin",
    "mode": "0444",
    "owner": "root",
    "secontext": "unconfined_u:object_r:usr_t:s0",
    "size": 0,
    "state": "file",
    "uid": 0
}
[jin@rhel801 ~]$
需要注意的是,此处用path指定的文件,替换成name也是可以的,即name=/opt/hosts。查看文件的属性
[jin@rhel801 ~]$ ansible rhel802 -m shell -a "ls -l /opt/hosts"
rhel802 | CHANGED | rc=0 >>
-r--r--r--. 1 root jin 0 12月 15 11:50 /opt/hosts
[jin@rhel801 ~]$
练习2:在rhel802上为/opt/hosts创建一个软链接/opt/hosts123
[jin@rhel801 ~]$ ansible rhel802 -m file -a "src=/opt/hosts dest=/opt/hosts123 state=link"
rhel802 | CHANGED => {
    "ansible_facts": {
        "discovered_interpreter_python": "/usr/libexec/platform-python"
    },
    "changed": true,
    "dest": "/opt/hosts123",
    "gid": 0,
    "group": "root",
    "mode": "0777",
    "owner": "root",
    "secontext": "unconfined_u:object_r:usr_t:s0",
    "size": 10,
    "src": "/opt/hosts",
    "state": "link",
    "uid": 0
}
[jin@rhel801 ~]$
验证
[jin@rhel801 ~]$ ansible rhel802 -m shell -a "ls -l /opt/"
rhel802 | CHANGED | rc=0 >>
总用量 0
-r--r--r--. 1 root jin   0 12月 15 11:50 hosts
lrwxrwxrwx. 1 root root 10 12月 15 11:52 hosts123 -> /opt/hosts
[jin@rhel801 ~]$
练习3:删除/opt/hosts123
[jin@rhel801 ~]$ ansible rhel802 -m file -a 'name=/opt/hosts123 state=absent'
rhel802 | CHANGED => {
    "ansible_facts": {
        "discovered_interpreter_python": "/usr/libexec/platform-python"
    },
    "changed": true,
    "path": "/opt/hosts123",
    "state": "absent"
}
[jin@rhel801 ~]$
练习4:创建目录/op/xx,上下文设置为default_t
[jin@rhel801 ~]$ ansible rhel802 -m file -a 'name=/opt/xx state=directory setype=default_t'
rhel802 | CHANGED => {
    "ansible_facts": {
        "discovered_interpreter_python": "/usr/libexec/platform-python"
    },
    "changed": true,
    "gid": 0,
    "group": "root",
    "mode": "0755",
    "owner": "root",
    "path": "/opt/xx",
    "secontext": "unconfined_u:object_r:default_t:s0",
    "size": 6,
    "state": "directory",
    "uid": 0
}
[jin@rhel801 ~]$
练习5:把/opt/hosts的权限改成000,所有者改成tom,所属组改成jin
[jin@rhel801 ~]$ ansible rhel802 -m file -a "name=/opt/hosts owner=tom group=jin mode=000"
rhel802 | CHANGED => {
    "ansible_facts": {
        "discovered_interpreter_python": "/usr/libexec/platform-python"
    },
    "changed": true,
    "gid": 1000,
    "group": "jin",
    "mode": "0000",
    "owner": "tom",
    "path": "/opt/hosts",
    "secontext": "unconfined_u:object_r:usr_t:s0",
    "size": 0,
    "state": "file",
    "uid": 1001
}
[jin@rhel801 ~]$
验证
[jin@rhel801 ~]$ ansible rhel802 -m shell -a "ls -l /opt/hosts"
rhel802 | CHANGED | rc=0 >>
----------. 1 tom jin 0 12月 15 11:50 /opt/hosts
[jin@rhel801 ~]$
注意:指定文件时用name或 path都是可以的。
清空rhel802 上/opt中所有的内容
[jin@rhel801 ~]$ ansible rhel802 -m shell -a "rm -rf /opt/*"
[WARNING]: Consider using the file module with state=absent rather than running
'rm'.  If you need to use command because file is insufficient you can add
'warn: false' to this command task or set 'command_warnings=False' in
ansible.cfg to get rid of this message.
rhel802 | CHANGED | rc=0 >>

[jin@rhel801 ~]$
上面的WARNING可以忽略不管,如果不想显示此消息,则在ansible.cfg的[defaults]字段下添加 command warnings=False即可
1.3 copy和fetch模块
copy用于把本地的文件拷贝到被管理机器,语法如下
ansible 主机组 ‐m copy ‐a "src=/path1/file1 dest=path2/"作用是把本地的/path1/file1拷贝到目的主机的/path2中
copy模块常见的参数包括以下几个
(1) src:源文件
(2)dest:目的地,即拷贝到哪里
(3)owner:所有者
(4)group:所属组
(5)mode:权限
练习1:把本地的文件/etc/ansible/hosts拷贝到目标机器的/opt目录中,并设置权限为 000,所有者为tom
[jin@rhel801 ~]$ ansible rhel802 -m copy -a "src=/etc/ansible/hosts mode=000 owner=tom dest=/opt"
rhel802 | CHANGED => {
    "ansible_facts": {
        "discovered_interpreter_python": "/usr/libexec/platform-python"
    },
    "changed": true,
    "checksum": "da996f1a52dbae3b6b43a6c50d761e4ed5ec9a9f",
    "dest": "/opt/hosts",
    "gid": 0,
    "group": "root",
    "md5sum": "1564b951dc7c8511c6f9ee842653c541",
    "mode": "0000",
    "owner": "tom",
    "secontext": "system_u:object_r:usr_t:s0",
    "size": 1016,
    "src": "/home/jin/.ansible/tmp/ansible-tmp-1702613995.966468-3971-61055203260128/source",
    "state": "file",
    "uid": 1001
}
[jin@rhel801 ~]$
验证
[jin@rhel801 ~]$ ansible rhel802 -m shell -a "ls -l /opt/hosts"
rhel802 | CHANGED | rc=0 >>
----------. 1 tom root 1016 12月 15 12:19 /opt/hosts
[jin@rhel801 ~]$
copy模块也可以利用content参数往某个文件中写内容,如果此文件不存在则会创建出来
练习2:在被管理机器的/opt目录中创建11.txt,内容为123123
[jin@rhel801 ~]$ ansible rhel802 -m copy -a 'content="123123" dest=/opt/11.txt'
rhel802 | CHANGED => {
    "ansible_facts": {
        "discovered_interpreter_python": "/usr/libexec/platform-python"
    },
    "changed": true,
    "checksum": "601f1889667efaebb33b8c12572835da3f027f78",
    "dest": "/opt/11.txt",
    "gid": 0,
    "group": "root",
    "md5sum": "4297f44b13955235245b2497399d7a93",
    "mode": "0644",
    "owner": "root",
    "secontext": "system_u:object_r:usr_t:s0",
    "size": 6,
    "src": "/home/jin/.ansible/tmp/ansible-tmp-1702614112.9510114-4040-185606194802467/source",
    "state": "file",
    "uid": 0
}
[jin@rhel801 ~]$
验证/opt/11.txt的内容
[jin@rhel801 ~]$ ansible rhel802 -m shell -a "cat /opt/11.txt"
rhel802 | CHANGED | rc=0 >>
123123
[jin@rhel801 ~]$
fetch用于把文件从被管理机器拷贝到本机当前目录中,命令如下
[jin@rhel801 ~]$ ansible rhel802 -m fetch -a "src=/opt/hosts dest=."
rhel802 | CHANGED => {
    "changed": true,
    "checksum": "da996f1a52dbae3b6b43a6c50d761e4ed5ec9a9f",
    "dest": "/home/jin/rhel802/opt/hosts",
    "md5sum": "1564b951dc7c8511c6f9ee842653c541",
    "remote_checksum": "da996f1a52dbae3b6b43a6c50d761e4ed5ec9a9f",
    "remote_md5sum": null
}
[jin@rhel801 ~]$
查看
[jin@rhel801 ~]$ tree rhel802
rhel802
└── opt
    └── hosts

1 directory, 1 file
[jin@rhel801 ~]$
1.4 yum_repository模块
利用yum_repository设置yum 源,一个标准的repo配置文件如下所示
[jin@rhel801 ~]$ cat /etc/yum.repos.d/aa.repo
[aa]
name=aa
baseurl=file:///mnt/AppStream
enabled=1
gpgcheck=0

[bb]
name=bb
baseurl=file:///mnt/BaseOS
enabled=1
gpgcheck=0
[jin@rhel801 ~]$
其中门中的名称用于区分不同的yum 源。这里参数的含义如下。
(1)name:此 yum 源的描述信息
(2) baseurl:用于指定yum源的具体地址
(3)enabled:用于指定是否启用此 yum 源
(4)gpgcheck:用于指定在安装软件包时,是否要进行数字签名的验证,一般设置为0 即可
对于yum_repository模块来说,常见的参数包括以下几个
(1)name:repo配置文件里 [] 中的名称
(2)description:repo配置文件里name字段的描述信息
(3)baseurl :用于指定yum源的位置
(4)enabled :是否启用源,值为true 或false
(5)gpgcheck:是否启用数字签名验证,值为true或falsc
练习:给rhel802配置yum源,地址是ftp://192.168.161.16/dvd/AppStream,所需要的密钥文件为ftp://192.168.161.16/dvd/RPM-GPG-KEY-redhat-release
[jin@rhel801 ~]$ ansible rhel802 -m yum_repository -a "name=app description='this is appstream' baseurl=ftp://192.168.161.16/dvd/AppStream gpgcheck=yes gpgkey=ftp://192.168.161.16/dvd/RPM-GPG-KEY-redhat-release"
rhel802 | CHANGED => {
    "ansible_facts": {
        "discovered_interpreter_python": "/usr/libexec/platform-python"
    },
    "changed": true,
    "repo": "app",
    "state": "present"
}
[jin@rhel801 ~]$
执行之后的效果如下
[jin@rhel801 ~]$ ansible rhel802 -m shell -a "ls /etc/yum.repos.d/"
rhel802 | CHANGED | rc=0 >>
app.repo
redhat.repo
[jin@rhel801 ~]$ ansible rhel802 -m shell -a "cat /etc/yum.repos.d/app.repo"
rhel802 | CHANGED | rc=0 >>
[app]
baseurl = ftp://192.168.161.16/dvd/AppStream
gpgcheck = 1
gpgkey = ftp://192.168.161.16/dvd/RPM-GPG-KEY-redhat-release
name = this is appstream
[jin@rhel801 ~]$
给rhel802配置第二个yum源,地址是 ftp://192.168.161.16/dvd/BaseOS,所需要的密钥文件为fip://192.168.161.16/dvd/RPM-GPG-KEY-redhat-release
[jin@rhel801 ~]$ ansible rhel802 -m yum_repository -a "name=baseos description='this is baseos' baseurl=ftp://192.168.161.16/dvd/BaseOS gpgcheck=yes gpgkey=ftp://192.168.161.16/dvd/RPM-GPG-KEY-redhat-release"
rhel802 | CHANGED => {
    "ansible_facts": {
        "discovered_interpreter_python": "/usr/libexec/platform-python"
    },
    "changed": true,
    "repo": "baseos",
    "state": "present"
}
[jin@rhel801 ~]$
1.5 使用yum模块管理软件包
yum模块常见的参数包括以下几个
(1)name:用于指定软件包的名称
(2)state:此参数的值如下
① present或installed:用于安装软件包,没有指定state时的默认值就是installed
② absent或removed:用于卸载软件包
③ latest:用于更新
注意:yum模块可以用package模块替代,用于在 Ubuntu等其他系统上管理软件包
练习1:在rhel802上安装vsftpd
[jin@rhel801 ~]$ ansible rhel802 -m yum -a "name=vsftpd state=installed"
rhel802 | CHANGED => {
    "ansible_facts": {
        "discovered_interpreter_python": "/usr/libexec/platform-python"
    },
    "changed": true,
    "msg": "",
    "rc": 0,
    "results": [
        "Installed: vsftpd-3.0.3-34.el8.x86_64"
    ]
}
[jin@rhel801 ~]$
验证
[jin@rhel801 ~]$ ansible rhel802 -m shell -a "rpm -qa | grep vsftpd"
rhel802 | CHANGED | rc=0 >>
vsftpd-3.0.3-34.el8.x86_64
[jin@rhel801 ~]$
练习2:在rhel802上卸载vsftpd
[jin@rhel801 ~]$ ansible rhel802 -m yum -a "name=vsftpd state=absent"
rhel802 | CHANGED => {
    "ansible_facts": {
        "discovered_interpreter_python": "/usr/libexec/platform-python"
    },
    "changed": true,
    "msg": "",
    "rc": 0,
    "results": [
        "Removed: vsftpd-3.0.3-34.el8.x86_64"
    ]
}
[jin@rhel801 ~]$
如果本机没有安装vsftpd,下面的命令就是安装,如果已经安装则更新到最新版
[jin@rhel801 ~]$ ansible rhel802 -m yum -a "name=vsftpd state=latest"
rhel802 | CHANGED => {
    "ansible_facts": {
        "discovered_interpreter_python": "/usr/libexec/platform-python"
    },
    "changed": true,
    "msg": "",
    "rc": 0,
    "results": [
        "Installed: vsftpd-3.0.3-34.el8.x86_64"
    ]
}
[jin@rhel801 ~]$
如果要安装组或模块,需要在组名或模块名前加@,这个模块要使用引号引起来
练习3:安装RPM开发工具
[jin@rhel801 ~]$ ansible rhel802 -m yum -a "name='@RPM 开发工具' state=installed"
rhel802 | CHANGED => {
    "ansible_facts": {
        "discovered_interpreter_python": "/usr/libexec/platform-python"
    },
    "changed": true,
    "msg": "",
    "rc": 0,
    "results": [
        "Group rpm-development-tools installed.",
        "Installed: rpmdevtools-8.10-8.el8.noarch"
    ]
}
[jin@rhel801 ~]$
1.6 使用service模块管理服务
可以通过systemctl对服务进行启动、重启、关闭等操作,在ansible中可以调用service模块来实现对服务的管理,service模块常见的参数包括以下几个
(1)name:指定对哪个服务进行管理
(2)enabled:用于设置此服务是否开机自动启动,值为yes或no,默认值为空
(3)state:用于启动或关闭服务,其值包括started、stopped、restated
首先判断rhel802上的vsftpd是否启动
[jin@rhel801 ~]$ ansible rhel802 -m shell -a "systemctl is-active vsftpd"
rhel802 | FAILED | rc=3 >>
inactivenon-zero return code
[jin@rhel801 ~]$
这里返回值为3(rc=3),说明vsftpd没有启动
练习:启动vsftpd并设置开机自动启动
[jin@rhel801 ~]$ ansible rhel802 -m service -a "name=vsftpd state=started enabled=yes"
rhel802 | CHANGED => {
    "ansible_facts": {
        "discovered_interpreter_python": "/usr/libexec/platform-python"
    },
    "changed": true,
    "enabled": true,
    "name": "vsftpd",
    "state": "started",
    "status": {
        "ActiveEnterTimestampMonotonic": "0",
        "ActiveExitTimestampMonotonic": "0",
        "ActiveState": "inactive",
        "After": "network-online.target basic.target sysinit.target system.sl
.....输出信息.....
[jin@rhel801 ~]$
验证
[jin@rhel801 ~]$ ansible rhel802 -m shell -a "systemctl is-active vsftpd"
rhel802 | CHANGED | rc=0 >>
active
[jin@rhel801 ~]$
或者到rhel802上进行验证
[jin@rhel802 ~]$ systemctl is-active vsftpd
active
[jin@rhel802 ~]$ systemctl is-enabled vsftpd
enabled
[jin@rhel802 ~]$
1.7 使用parted模块对硬盘分区
在ansible中如果对分区进行管理,使用的是parted模块,parted模块常见的参数包括以下几个
(1)device:指的是哪块磁盘
(2)number:第几个分区
(3)part_start:指的是从硬盘的什么位置开始划分,不写默认为从头开始(0%)
(4)part_end:指的是到硬盘的什么位置作为分区的结束点
(5)state:用于指定操作,present是创建,absent是删除
自行在rhel802上新添加一块类型为SCSI、大小为20G的硬盘
练习1:在rhel802上对/devIsdb创建一个大小为2GiB的分区/dev/sdb1
[jin@rhel801 ~]$ ansible rhel802 -m parted -a "device=/dev/sda number=1 part_end=2GiB state=present"
rhel802 | CHANGED => {
    "ansible_facts": {
        "discovered_interpreter_python": "/usr/libexec/platform-python"
    },
    "changed": true,
    "disk": {
        "dev": "/dev/sda",
        "logical_block": 512,
        "model": "VMware, VMware Virtual S",
        "physical_block": 512,
        "size": 20971520.0,
        "table": "msdos",
        "unit": "kib"
    },
    "partitions": [
        {
            "begin": 1024.0,
            "end": 2097152.0,
            "flags": [],
            "fstype": "",
            "name": "",
            "num": 1,
            "size": 2096128.0,
            "unit": "kib"
        }
    ],
    "script": "unit KiB mklabel msdos mkpart primary 0% 2GiB"
}
[jin@rhel801 ~]$
此例是对/dev/sda创建第一个分区,因为从硬盘头开始,所以不需要指定part_start,此 分区到2GB位置结束
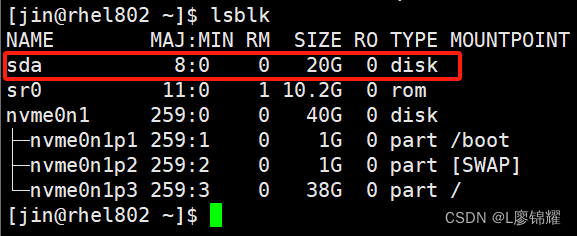
[jin@rhel801 ~]$ ansible rhel802 -m shell -a "lsblk"
rhel802 | CHANGED | rc=0 >>
NAME        MAJ:MIN RM  SIZE RO TYPE MOUNTPOINT
sda           8:0    0   20G  0 disk
└─sda1        8:1    0    2G  0 part
sr0          11:0    1 10.2G  0 rom
nvme0n1     259:0    0   40G  0 disk
├─nvme0n1p1 259:1    0    1G  0 part /boot
├─nvme0n1p2 259:2    0    1G  0 part [SWAP]
└─nvme0n1p3 259:3    0   38G  0 part /
[jin@rhel801 ~]$
练习2:在rhel802上对/dev/sda创建一个大小为2GB的分区/dev/sda2
[jin@rhel801 ~]$ ansible rhel802 -m parted -a "device=/dev/sda number=2 part_start=2GiB part_end=4GiB state=present"
rhel802 | CHANGED => {
    "ansible_facts": {
        "discovered_interpreter_python": "/usr/libexec/platform-python"
    },
    "changed": true,
    "disk": {
        "dev": "/dev/sda",
        "logical_block": 512,
        "model": "VMware, VMware Virtual S",
        "physical_block": 512,
        "size": 20971520.0,
....输出信息....
            "unit": "kib"
        }
    ],
    "script": "unit KiB mkpart primary 2GiB 4GiB"
}
[jin@rhel801 ~]$
此例是对/dev/sda创建第二个分区,从2GiB位置开始,到4GiB位置结束
在rhel802上查看分区
[jin@rhel801 ~]$ ansible rhel802 -m shell -a "lsblk"
rhel802 | CHANGED | rc=0 >>
NAME        MAJ:MIN RM  SIZE RO TYPE MOUNTPOINT
sda           8:0    0   20G  0 disk
├─sda1        8:1    0    2G  0 part
└─sda2        8:2    0    2G  0 part
sr0          11:0    1 10.2G  0 rom
nvme0n1     259:0    0   40G  0 disk
├─nvme0n1p1 259:1    0    1G  0 part /boot
├─nvme0n1p2 259:2    0    1G  0 part [SWAP]
└─nvme0n1p3 259:3    0   38G  0 part /
[jin@rhel801 ~]$
练习3:删除rhel802上的/dev/sda2
[jin@rhel801 ~]$ ansible rhel802 -m parted -a "device=/dev/sda number=2 state=absent"
rhel802 | CHANGED => {
    "ansible_facts": {
        "discovered_interpreter_python": "/usr/libexec/platform-python"
    },
    "changed": true,
    "disk": {
        "dev": "/dev/sda",
....输出信息....
        }
    ],
    "script": "rm 2"
}
[jin@rhel801 ~]$
验证
[jin@rhel801 ~]$ ansible rhel802 -m shell -a "lsblk"
rhel802 | CHANGED | rc=0 >>
NAME        MAJ:MIN RM  SIZE RO TYPE MOUNTPOINT
sda           8:0    0   20G  0 disk
└─sda1        8:1    0    2G  0 part
sr0          11:0    1 10.2G  0 rom
nvme0n1     259:0    0   40G  0 disk
├─nvme0n1p1 259:1    0    1G  0 part /boot
├─nvme0n1p2 259:2    0    1G  0 part [SWAP]
└─nvme0n1p3 259:3    0   38G  0 part /
[jin@rhel801 ~]$
可以看到,/dev/sda2已经被删除了
请自行创建出/dev/sda2和/dev/sda3备用
[jin@rhel801 ~]$ ansible rhel802 -m shell -a "lsblk"
rhel802 | CHANGED | rc=0 >>
NAME        MAJ:MIN RM  SIZE RO TYPE MOUNTPOINT
sda           8:0    0   20G  0 disk
├─sda1        8:1    0    2G  0 part
├─sda2        8:2    0    2G  0 part
└─sda3        8:3    0    2G  0 part
sr0          11:0    1 10.2G  0 rom
nvme0n1     259:0    0   40G  0 disk
├─nvme0n1p1 259:1    0    1G  0 part /boot
├─nvme0n1p2 259:2    0    1G  0 part [SWAP]
└─nvme0n1p3 259:3    0   38G  0 part /
[jin@rhel801 ~]$
1.8 使用filesystem模块格式化
分区创建好之后,需要对分区进行格式化操作,格式化的模块为filesystem,filesystem模块常见的参数包括以下几个
(1)dev:用于指定对哪个设备进行格式化
(2)fstype:用于指定用什么文件系统进行格式化
(3)force:是否强制格式化,默认为no
练习:把 rhel802上的/dev/sda3格式化为XFS文件系统
[jin@rhel801 ~]$ ansible rhel802 -m filesystem -a "dev=/dev/sda3 fstype=xfs"
rhel802 | CHANGED => {
    "ansible_facts": {
        "discovered_interpreter_python": "/usr/libexec/platform-python"
    },
    "changed": true
}
[jin@rhel801 ~]$
如果想重新格式化,需要加上 force选项
[jin@rhel801 ~]$ ansible rhel802 -m filesystem -a "dev=/dev/sda3 fstype=xfs force=yes"
rhel802 | CHANGED => {
    "ansible_facts": {
        "discovered_interpreter_python": "/usr/libexec/platform-python"
    },
    "changed": true
}
[jin@rhel801 ~]$
1.9 使用mount模块挂载文件系统
格式化之后就需要挂载分区,挂载用的是mount模块,mount模块常见的参数包括以下几个
(1)src:用于指定挂载哪个设备
(2)path:用于指定挂载点
(3)fstype:用于指定挂载的文件系统,这个选项一定要指定
(4)opts:用于指定挂载选择,如果不指定则为defaults
(5)state:此参数的值如下
① mounted:挂载的同时,也会写入/etc/fstab
② present:只是写入/etc/fstab,但当前并没有挂载
③ unmounted:只卸载,并不会把条目从/etc/fstab中删除
④ absent:卸载并从/etc/fstab中删除
练习1:把rhel802上的/dev/sda3挂载到/123目录上,挂载选项为只读
[jin@rhel801 ~]$ ansible rhel802 -m shell -a 'mkdir /123'
rhel802 | CHANGED | rc=0 >>

[jin@rhel801 ~]$
[jin@rhel801 ~]$ ansible rhel802 -m mount -a "src=/dev/sda3 path=/123 state=mounted fstype=xfs opts=defaults,ro"
rhel802 | CHANGED => {
"ansible_facts": {
"discovered_interpreter_python": "/usr/libexec/platform-python"
},
"changed": true,
"dump": "0",
"fstab": "/etc/fstab",
"fstype": "xfs",
"name": "/123",
"opts": "defaults,ro",
"passno": "0",
"src": "/dev/sda3"
}
[jin@rhel801 ~]$这里指定了挂载选项为defaults,ro,多个选项用逗号隔开
验证
[jin@rhel801 ~]$ ansible rhel802 -m shell -a "df -Th | grep sda3"
rhel802 | CHANGED | rc=0 >>
/dev/sda3      xfs       2.0G  256K  2.0G    1% /123
[jin@rhel801 ~]$ ansible rhel802 -m shell -a "grep sda3 /etc/fstab"
rhel802 | CHANGED | rc=0 >>
/dev/sda3 /123 xfs defaults,ro 0 0
[jin@rhel801 ~]$
因为挂载时state的值是mounted,所以不仅把/dev/sda3挂载了,也写人/etc/fstab 了
练习2:在rhel802上卸载并从/etc/fstab中删除/dev/sda3
[jin@rhel801 ~]$ ansible rhel802 -m mount -a "src=/dev/sda3 path=/123 state=absent"
rhel802 | CHANGED => {
    "ansible_facts": {
        "discovered_interpreter_python": "/usr/libexec/platform-python"
    },
    "changed": true,
    "dump": "0",
    "fstab": "/etc/fstab",
    "name": "/123",
    "opts": "defaults",
    "passno": "0",
    "src": "/dev/sda3"
}
[jin@rhel801 ~]$
注意:如果卸载,path是一定要指定的,src指不指定无所谓
1.10 使用lvg模块对卷组进行管理
使用lvg模块管理卷组,此模块常见的参数包括以下几个
(1)pvs:用于指定物理卷,如果有多个PV则用逗号隔开,不需要提前创建PV,此命令 会自动创建PV
(2)vg:用于指定卷组的名称
(3)pesize:用于指定PE的大小
(4)state:此参数的值如下。
present:用于创建卷组,默认
absent:用于删除卷组
练习1:在rhel802上创建名称为vg0的卷组,所使用的分区/dev/sda1和/dev/sda2 pesize指定为16M
首先确认rhel802上不存在任何PV和VG
[jin@rhel801 ~]$ ansible rhel802 -m shell -a "vgs"
rhel802 | CHANGED | rc=0 >>

[jin@rhel801 ~]$
开始创建vg0
[jin@rhel801 ~]$ ansible rhel802 -m lvg -a "pvs=/dev/sda1,/dev/sda2 vg=vg0 pesize=16 state=present"
rhel802 | CHANGED => {
    "ansible_facts": {
        "discovered_interpreter_python": "/usr/libexec/platform-python"
    },
    "changed": true
}
[jin@rhel801 ~]$
这里如果不指定pesize选项,则默认为4
验证
[jin@rhel801 ~]$ ansible rhel802 -m shell -a "vgs"
rhel802 | CHANGED | rc=0 >>
  VG  #PV #LV #SN Attr   VSize  VFree
  vg0   2   0   0 wz--n- <3.97g <3.97g
[jin@rhel801 ~]$
练习2:删除卷组vg0
[jin@rhel801 ~]$ ansible rhel802 -m lvg -a "vg=vg0 pesize=16 state=absent"
rhel802 | CHANGED => {
    "ansible_facts": {
        "discovered_interpreter_python": "/usr/libexec/platform-python"
    },
    "changed": true
}
[jin@rhel801 ~]$
验证
[jin@rhel801 ~]$ ansible rhel802 -m shell -a "vgs"
rhel802 | CHANGED | rc=0 >>

[jin@rhel801 ~]$
可以看到,vg0已经没有了
自行使用命令再次把vg0创建出来
1.11 使用lvol模块管理逻辑卷
卷组创建好之后就要创建逻辑卷了,管理逻辑卷的模块是Ivol,lvol模块常见的参数包含以下几个
(1)vg:用于指定在哪个卷组上划分逻辑卷
(2)lv:用于指定逻辑卷的名称
(3)size:用于指定逻辑卷的大小
(4)state:此参数的值如下。
present :用于创建逻辑卷
absent :用于删除逻辑卷
练习1:在rhel802的卷组 vg0上,创建大小为1G、名称为lv0的逻辑卷
先查看rhel802上是否存在逻辑卷
[jin@rhel801 ~]$ ansible rhel802 -m shell -a "lvs"
rhel802 | CHANGED | rc=0 >>

[jin@rhel801 ~]$
可以看到,不存在任何逻辑卷。下面开始创建逻辑卷
[jin@rhel801 ~]$ ansible rhel802 -m lvol -a "vg=vg0 lv=lv0 size=1G"
rhel802 | CHANGED => {
    "ansible_facts": {
        "discovered_interpreter_python": "/usr/libexec/platform-python"
    },
    "changed": true,
    "msg": ""
}
[jin@rhel801 ~]$
验证
[jin@rhel801 ~]$ ansible rhel802 -m shell -a "lvs"
rhel802 | CHANGED | rc=0 >>
  LV   VG  Attr       LSize Pool Origin Data%  Meta%  Move Log Cpy%Sync Convert
  lv0  vg0 -wi-a----- 1.00g
[jin@rhel801 ~]$
可以看到,此逻辑卷已经创建出来了
练习2:在 rhel802上删除逻辑卷/dev/vg0/lv0
[jin@rhel801 ~]$ ansible rhel802 -m lvol -a "vg=vg0 lv=lv0 size=1G state=absent force=yes"
rhel802 | CHANGED => {
    "ansible_facts": {
        "discovered_interpreter_python": "/usr/libexec/platform-python"
    },
    "changed": true
}
[jin@rhel801 ~]$
1.12 使用firewalld模块管理防火墙
在ansible中可以通过firewalld模块对防火墙进行管理,firewalld模块常见的参数包括以下几个
(1)service:开放哪个服务
(2)port:开放哪个端口,用法为port=80/tcp
(3)permanent=yes:设置永久生效,不存在默认值
(4)immediate=yes:设置当前生效,默认为不生效
(5)state:此参数的值如下
enabled:用于创建规则
disabled:用于删除规则
(6)rich_rule:富规则
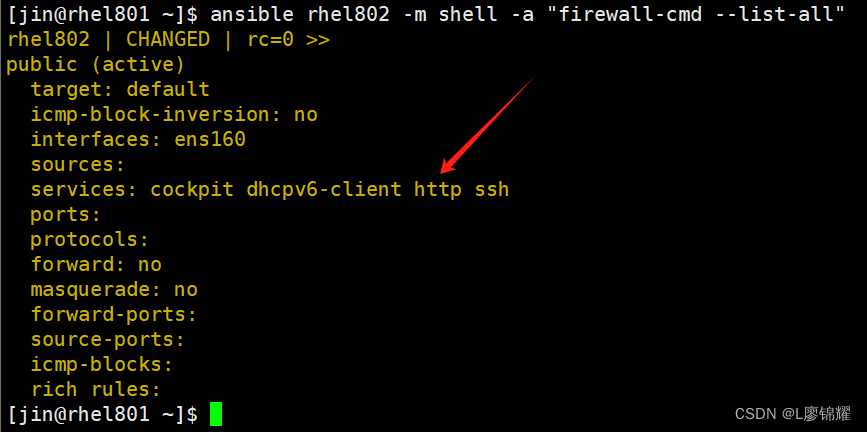
练习1:在rhel802上开放服务http
[jin@rhel801 ~]$ ansible rhel802 -m firewalld -a "service=http immediate=yes permanent=yes state=enabled"
rhel802 | CHANGED => {
    "ansible_facts": {
        "discovered_interpreter_python": "/usr/libexec/platform-python"
    },
    "changed": true,
    "msg": "Permanent and Non-Permanent(immediate) operation, Changed service http to enabled"
}
[jin@rhel801 ~]$
验证
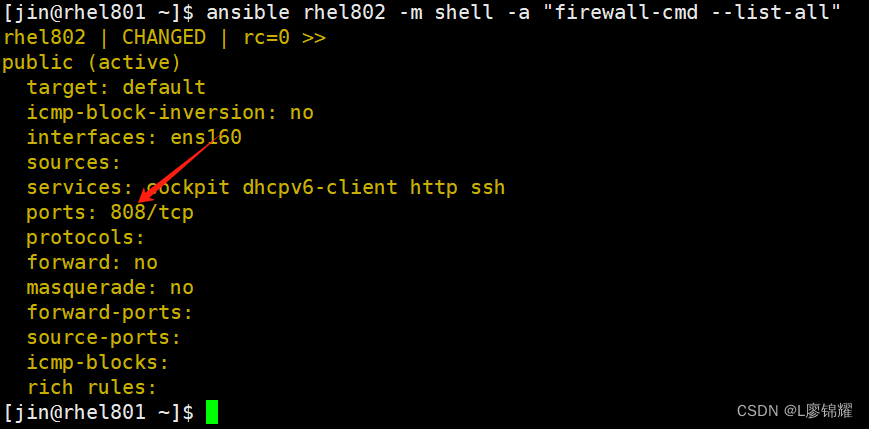
练习2:在rhel802上配置防火墙,允许tcp端口808通过
[jin@rhel801 ~]$ ansible rhel802 -m firewalld -a "port=808/tcp immediate=yes permanent=yes state=enabled"
rhel802 | CHANGED => {
    "ansible_facts": {
        "discovered_interpreter_python": "/usr/libexec/platform-python"
    },
    "changed": true,
    "msg": "Permanent and Non-Permanent(immediate) operation, Changed port 808/tcp to enabled"
}
[jin@rhel801 ~]$
验证
练习3:在rhel802上配置防火墙,删除开放的端口808和服务http
[jin@rhel801 ~]$ ansible rhel802 -m firewalld -a "port=808/tcp immediate=yes permanent=yes state=disabled"
rhel802 | CHANGED => {
    "ansible_facts": {
        "discovered_interpreter_python": "/usr/libexec/platform-python"
    },
    "changed": true,
    "msg": "Permanent and Non-Permanent(immediate) operation, Changed port 808/tcp to disabled"
}
[jin@rhel801 ~]$
1.13 替换模块replace
平时写shell脚本时,要替换文件的内容,可以直接使用vim或sed命令来进行替换操作。 在 ansible中也有相关的替换模块:replace和 lineinfile,这里先讲replace模块的使用
replace模块常见的参数包括以下几个
(1)path:指明编辑的文件
(2)regexp:正则表达式,指定要替换哪些内容
(3)replace:替换后的字符
练习1:把rhel802 上 /opt/aa.txt中开头为aa那行的内容替换为xx=666
在rhel802的lopt目录中创建aa.txt,内容如下
[root@rhel802 opt]# cat aa.txt
aa=111
bb=222
[root@rhel802 opt]#
在ansible主机上执行replace模块
[jin@rhel801 ~]$ ansible rhel802 -m replace -a "path=/opt/aa.txt regexp=^aa replace=xx=666"
rhel802 | CHANGED => {
    "ansible_facts": {
        "discovered_interpreter_python": "/usr/libexec/platform-python"
    },
    "changed": true,
    "msg": "1 replacements made"
}
[jin@rhel801 ~]$
这里的意思是把rhel802 上/opt/aa.txt这个文件中行开头是aa的字符替换成xx=666。记 住,这里只是对regexp表示的字符进行替换,替换之后的内容如下
[jin@rhel801 ~]$ ansible rhel802 -m shell -a "cat /opt/aa.txt"
rhel802 | CHANGED | rc=0 >>
xx=666=111
bb=222
[jin@rhel801 ~]$
可以看到,只是把原来的字符aa替换成replace后面的内容了,并不是把这行内容替换掉。 如果想把整行内容进行替换,需要在regexp后面表示出来整行内容
练习2:把 rhel802上 /opt/aa.txt中开头为bb那行的内容替换为xx=666
[jin@rhel801 ~]$ ansible rhel802 -m replace -a "path=/opt/aa.txt regexp=^bb.+ replace=xx=666"
rhel802 | CHANGED => {
    "ansible_facts": {
        "discovered_interpreter_python": "/usr/libexec/platform-python"
    },
    "changed": true,
    "msg": "1 replacements made"
}
[jin@rhel801 ~]$
这里path指明了要替换的文件,regexp的写法是^bb.+,比上面的例子中多了.+,意思是开头是bb及后续所有的字符(这就表示以bb开头的那一整行内容),替换成xx=666,运行 结果如下
[jin@rhel801 ~]$ ansible rhel802 -m shell -a "cat /opt/aa.txt"
rhel802 | CHANGED | rc=0 >>
xx=666=111
xx=666
[jin@rhel801 ~]$
1.14 替换模块lineinfile
lineinfile模块的用法与replace基本一致,也是用于替换的,常见的参数包括以下几个
(1)path:指明编辑的文件
(2)regexp:正则表达式
(3)line:替换后的字符
练习:把rhel802上/opt/bb.txt中开头为aa=111那行的内容替换为xx=666
在rhel802上创建文件/opt/bb.txt
[root@rhel802 opt]# cat bb.txt
aa=111
bb=222
[root@rhel802 opt]#
在ansible主机上执行lineinfile模块,命令如下
[jin@rhel801 ~]$ ansible rhel802 -m lineinfile -a "path=/opt/bb.txt regexp=^aa line=xx=666"
rhel802 | CHANGED => {
    "ansible_facts": {
        "discovered_interpreter_python": "/usr/libexec/platform-python"
    },
    "backup": "",
    "changed": true,
    "msg": "line replaced"
}
[jin@rhel801 ~]$
这里的意思是把path所指定的文件/opt/bb.txt,regexp后面跟的^aa,即以aa开头的行 (需要注意的是,这里和 replace模块有区别),替换成xx=666
[jin@rhel801 ~]$ ansible rhel802 -m shell -a "cat /opt/bb.txt"
rhel802 | CHANGED | rc=0 >>
xx=666
bb=222
[jin@rhel801 ~]$
总结:replace是对字符进行替换,lineinfile是对行进行替换,如果replace想对行进行替换,在regexp后面必须写上正则表达式来表示一整行内容
1.15 打印模块debug
debug模块一般用于打印提示信息,类似于shell 中的echo命令,其他语言如Python等 中的print,其常见的参数包括以下几个
(1)msg:后面跟具体内容
(2)var:后面跟变量
注意:var和msg不可以同时使用
练习:在rhel802上打印“111
[jin@rhel801 ~]$ ansible rhel802 -m debug -a "msg='hello ansible'"
rhel802 | SUCCESS => {
    "msg": "hello ansible"
}
[jin@rhel801 ~]$
1.16 使用script模块在远端执行脚本
如果在本地写了一个脚本,想在所有被管理节点上执行,没有必要事先把脚本分发到被管理机器上,使用script模块即可快速实现
先写一个简单的脚本test1.sh 用于显示主机名
[root@rhel801 ~]# cat test1.sh
#!/bin/bash
hostname
[root@rhel801 ~]# chmod +x test1.sh
下面在db主机上执行
[jin@rhel801 ~]$ ansible db -m script -a "./test1.sh"
rhel802 | CHANGED => {
    "changed": true,
    "rc": 0,
    "stderr": "Shared connection to rhel802 closed.\r\n",
    "stderr_lines": [
        "Shared connection to rhel802 closed."
    ],
    "stdout": "rhel802\r\n",
    "stdout_lines": [
        "rhel802"
    ]
}
[jin@rhel801 ~]$
1.17 使用group模块对组进行管理
如果对系统的组进行管理,那么可以使用group模块。group模块常见的参数包括以下几个
(1)name:指定组名
(2)state:此参数的值如下
present:用于创建组
absent:用于删除组
下面在rhel802上创建组group1
先看看在rhel802上是否存在group1
[jin@rhel801 ~]$ ansible rhel802 -m shell -a "grep group1 /etc/group"
rhel802 | FAILED | rc=1 >>
non-zero return code
[jin@rhel801 ~]$
没有任何输出,说明rhel802上是没有group1这个组的。下面创建组group1,命令如下
[jin@rhel801 ~]$ ansible rhel802 -m group -a "name=group1 state=present"
rhel802 | CHANGED => {
    "ansible_facts": {
        "discovered_interpreter_python": "/usr/libexec/platform-python"
    },
    "changed": true,
    "gid": 1002,
    "name": "group1",
    "state": "present",
    "system": false
}
[jin@rhel801 ~]$
验证
[jin@rhel801 ~]$ ansible rhel802 -m shell -a "grep group1 /etc/group"
rhel802 | CHANGED | rc=0 >>
group1:x:1002:
[jin@rhel801 ~]$
删除这个组
[jin@rhel801 ~]$ ansible rhel802 -m group -a "name=group1 state=absent"
rhel802 | CHANGED => {
    "ansible_facts": {
        "discovered_interpreter_python": "/usr/libexec/platform-python"
    },
    "changed": true,
    "name": "group1",
    "state": "absent"
}
[jin@rhel801 ~]$
1.18 使用user模块对用户进行管理
对用户的管理可以使用user模块,对于user模块来说,常见的参数包括以下几个
(1)name:指定用户名
(2)comment:指定注释信息
(3)group:指定用户的主组
(4)groups:指定用户的附属组
(5)password:指定密码,但是必须对密码进行加密
(6)state:此参数的值如下
present:用于创建用户
absent:用于删除用户
下面创建一个lisi用户
[jin@rhel801 ~]$ ansible rhel802 -m user -a "name=lisi group=root password={
  {'123.123' | password_hash('sha512')}} state=present"
rhel802 | CHANGED => {
    "ansible_facts": {
        "discovered_interpreter_python": "/usr/libexec/platform-python"
    },
    "changed": true,
    "comment": "",
    "create_home": true,
    "group": 0,
    "home": "/home/lisi",
    "name": "lisi",
    "password": "NOT_LOGGING_PASSWORD",
    "shell": "/bin/bash",
    "state": "present",
    "system": false,
    "uid": 1002
}
[jin@rhel801 ~]$
这里password=({’123.123'| password hash('sha512')}}的意思是,用password hash 函数调用sha512这个哈希算法对字符串 123.123进行加密
到rhel802 上验证,因为root用su命令切换到任何用户都不需要密码,所以这里先切换到 jin用户,然后再切换到lisi用户,测试密码是不是正确
[jin@rhel802 ~]$ su - lisi
密码:
[lisi@rhel802 ~]$ exit
注销
[jin@rhel802 ~]$
可以看到,用户的密码是123.123
下面把lisi用户删除
[jin@rhel801 ~]$ ansible rhel802 -m user -a "name=lisi state=absent remove=yes"
rhel802 | CHANGED => {
    "ansible_facts": {
        "discovered_interpreter_python": "/usr/libexec/platform-python"
    },
    "changed": true,
    "force": false,
    "name": "lisi",
    "remove": true,
    "state": "absent"
}
[jin@rhel801 ~]$
这里remove=yes的意思类似于userdel 中的-r选项,删除用户的同时把家目录也删除
1.19 使用get url模块下载文件
如果想从服务器上下载到被管理机器上,需要使用到get_url模块。get_url模块常见的参数包括以下几个
(1)url:指定文件的URL连接
(2)dest:指定存储在哪里
例如,现在要把ftp://ftp.rhce.cc/auto/web.tar.gz下载到rhel802的/opt目录中
[jin@rhel801 ~]$ ansible rhel802 -m get_url -a "url=ftp://ftp.rhce.cc/auto/web.tar.gz dest=/opt/"
rhel802 | CHANGED => {
    "ansible_facts": {
        "discovered_interpreter_python": "/usr/libexec/platform-python"
    },
    "changed": true,
    "checksum_dest": null,
    "checksum_src": "0453d8c9e9ce9bda838b659b901b74a2e709fb15",
    "dest": "/opt/web.tar.gz",
    "elapsed": 5,
    "gid": 0,
    "group": "root",
    "md5sum": "41c019324f7b8160ce6944102a755de8",
    "mode": "0644",
    "msg": "OK (1406 bytes)",
    "owner": "root",
    "secontext": "system_u:object_r:usr_t:s0",
    "size": 1406,
    "src": "/home/jin/.ansible/tmp/ansible-tmp-1702885221.721928-7550-63454645142962/tmpr4sgnf7v",
    "state": "file",
    "status_code": null,
    "uid": 0,
    "url": "ftp://ftp.rhce.cc/auto/web.tar.gz"
}
[jin@rhel801 ~]$
验证
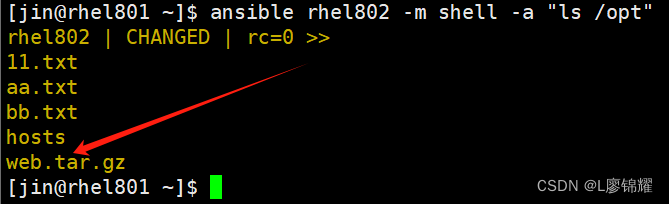
可以看到,已经把文件下载下来了
1.20 使用setup模块获取被管理主机的信息
如果想获取被管理主机的系统信息,可以使用setup模块。下面获取rhel802上的信息
[jin@rhel801 ~]$ ansible rhel802 -m setup
rhel802 | SUCCESS => {
    "ansible_facts": {
        "ansible_all_ipv4_addresses": [
            "192.168.161.17",
            "192.168.122.1"
        ],
setup中所获取的变量叫作fact变量,这里都是以key:value的格式输出,大致结构如下
1 键1:值
2 键2:{
3 子键a: 值a
4 子键b: 值b
5 ...
6 }
如果想获取“键1”的值,可以通过参数“filter=键”或“filter=键.子键”来过滤。例如,要获取rhel802上所在机器BIOS的版本,可以通过键值ansible_bios_version来获取,命令如下
[jin@rhel801 ~]$ ansible rhel802 -m setup -a "filter=ansible_bios_version"
rhel802 | SUCCESS => {
    "ansible_facts": {
        "ansible_bios_version": "6.00",
        "discovered_interpreter_python": "/usr/libexec/platform-python"
    },
    "changed": false
}
[jin@rhel801 ~]$
如果想获取ipv4的所有信息,可以通过键值ansible default ipv4来获取
[jin@rhel801 ~]$ ansible rhel802 -m setup -a "filter=ansible_default_ipv4"
rhel802 | SUCCESS => {
    "ansible_facts": {
        "ansible_default_ipv4": {
            "address": "192.168.161.17",
            "alias": "ens160",
            "broadcast": "192.168.161.255",
            "gateway": "192.168.161.2",
            "interface": "ens160",
            "macaddress": "00:0c:29:bd:32:8b",
            "mtu": 1500,
            "netmask": "255.255.255.0",
            "network": "192.168.161.0",
            "type": "ether"
        },
        "discovered_interpreter_python": "/usr/libexec/platform-python"
    },
    "changed": false
}
[jin@rhel801 ~]$
如果仅仅想获取IP地址信息,其他网络信息不需要,可以通过 ansible_default_ipv4的子键来获取
[jin@rhel801 ~]$ ansible rhel802 -m setup -a "filter=ansible_default_ipv4.address"
rhel802 | SUCCESS => {
    "ansible_facts": {
        "discovered_interpreter_python": "/usr/libexec/platform-python"
    },
    "changed": false
}
[jin@rhel801 ~]$
不过在命令行中如果filter含有子键,结果是不会显示的,所以上面的命令没有看到IP。不过如果把这个键写入playbook,是会显示值的,关于 playbook后面会讲


![[自动化运维工具]ansible简单介绍和常用模块](https://img-blog.csdnimg.cn/direct/a6256d5bae7e47b390d03ed6d3eb3ca3.png)