一、Mongodb
(1)简介
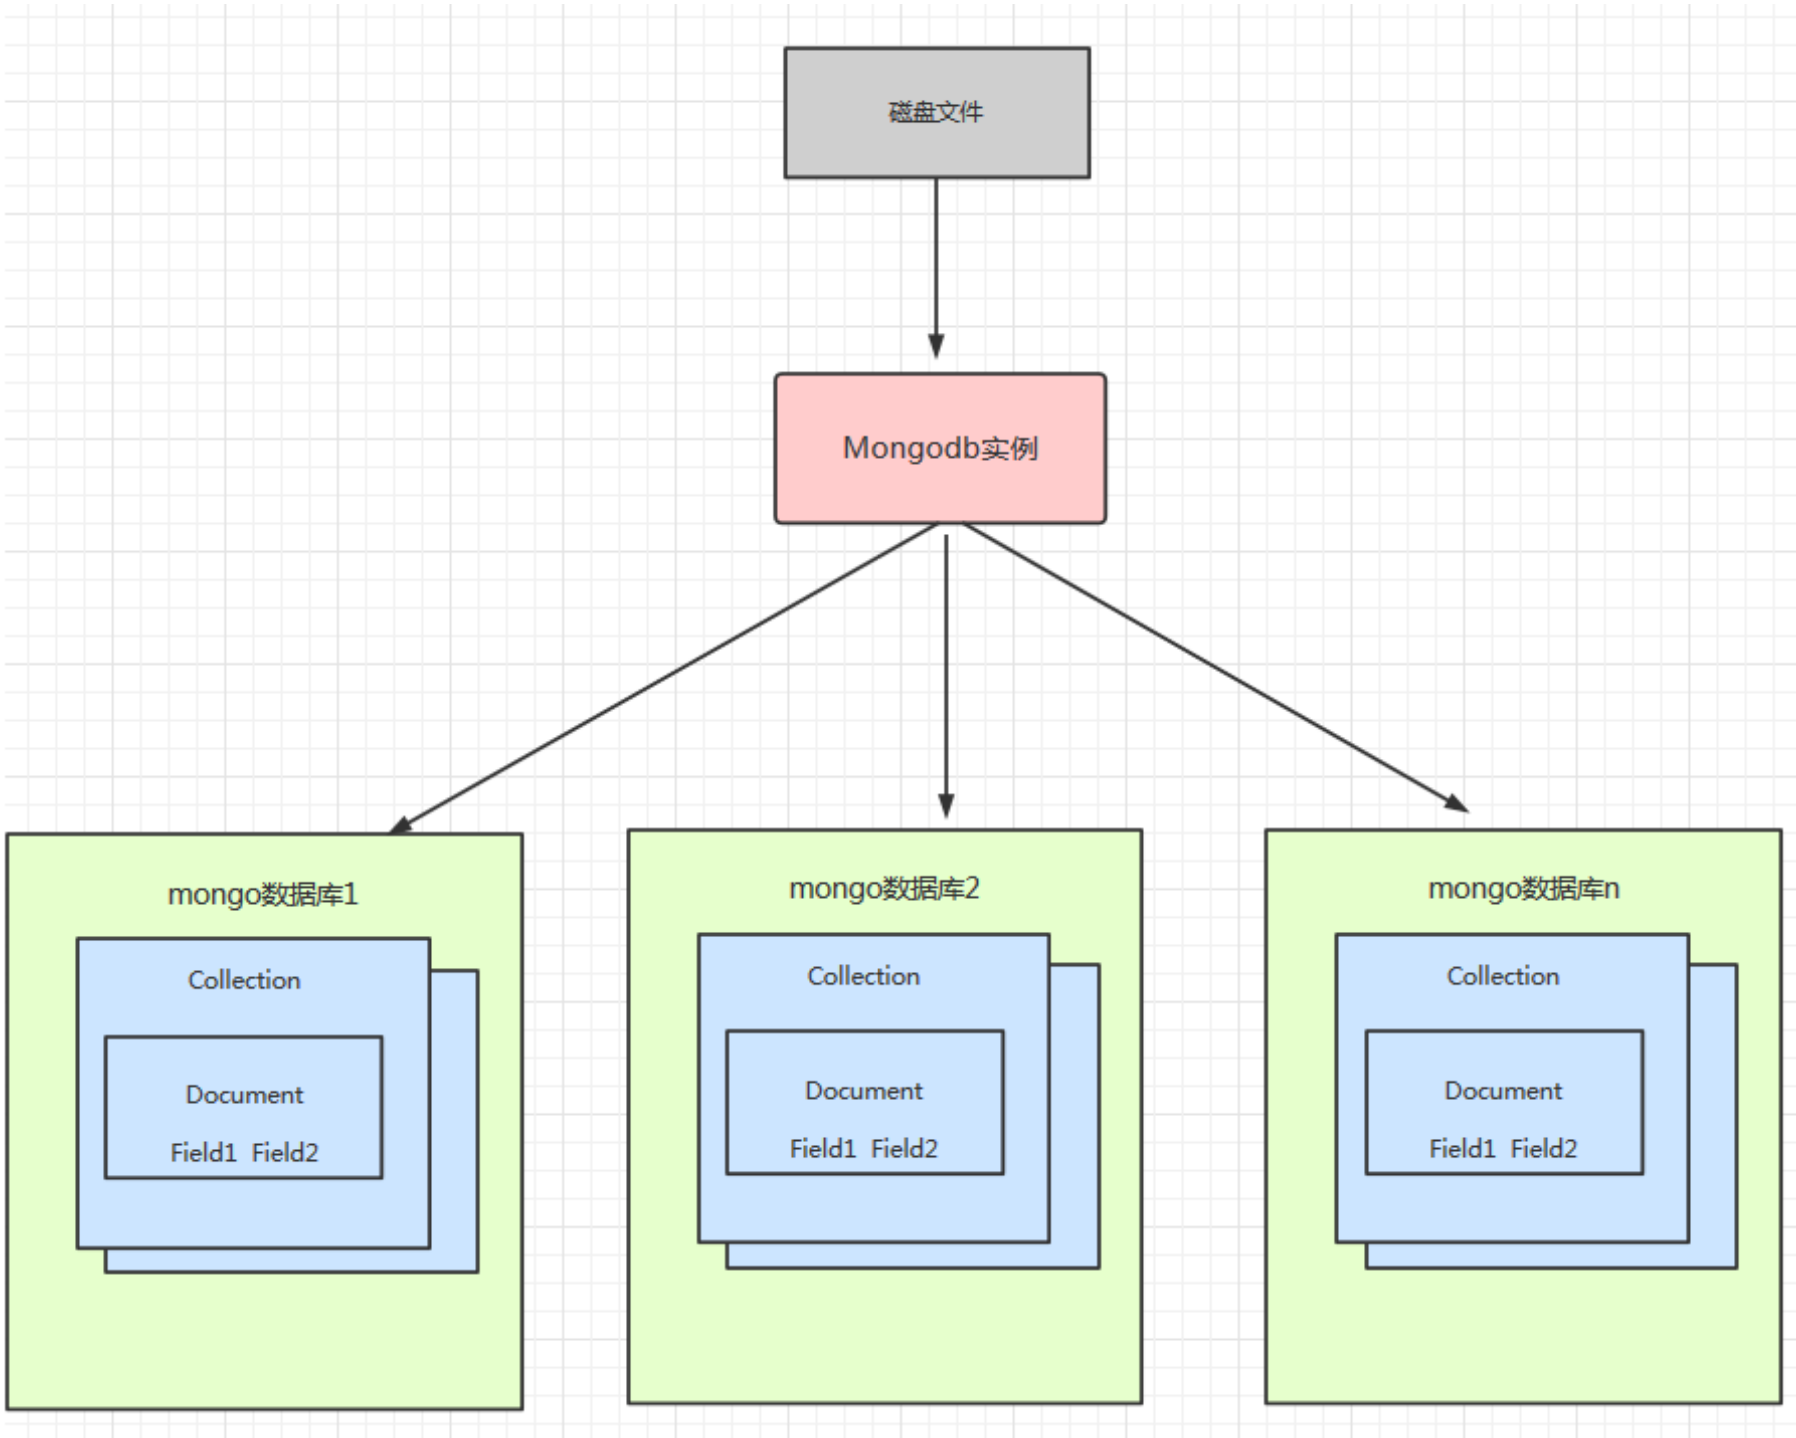
MongoDB是一个开源、高性能、无模式的文档型数据库。NoSQL数据库产品中的一种,是最像关系型数据库的非关系型数据库。
数据库:永久性存储,修改频率极低
Mongodb:永久性存储与临时存储相结合,临时存储,修改频率较高
(2)robo3t
添加:db.集合名称.insert/save/insertOne(文档)
修改:db.集合名称.remove(条件)
删除:db.集合名称.update(条件,{操作种类:{文档}})
(3)使用springboot整合Mongodb
导入Mongodb的驱动坐标,添加相关的配置,客户端读写Mongodb。
二、Elasticsearch(ES)
(1)简介
Elasticsearch是一个分布式全文搜索引擎。
ctrl+shift+f在命令行中搜索
(2)文档操作
POST http://localhost:9200/books/_doc #使用系统生成id POST http://localhost:9200/books/_create/1 #使用指定id, POST http://localhost:9200/books/_doc/1 #使用指定id,不存在创建,存在更新(版本递增)


(3)springboot整合ES
导入坐标,添加配置,测试
三、整合第三方技术
(1)缓存cache
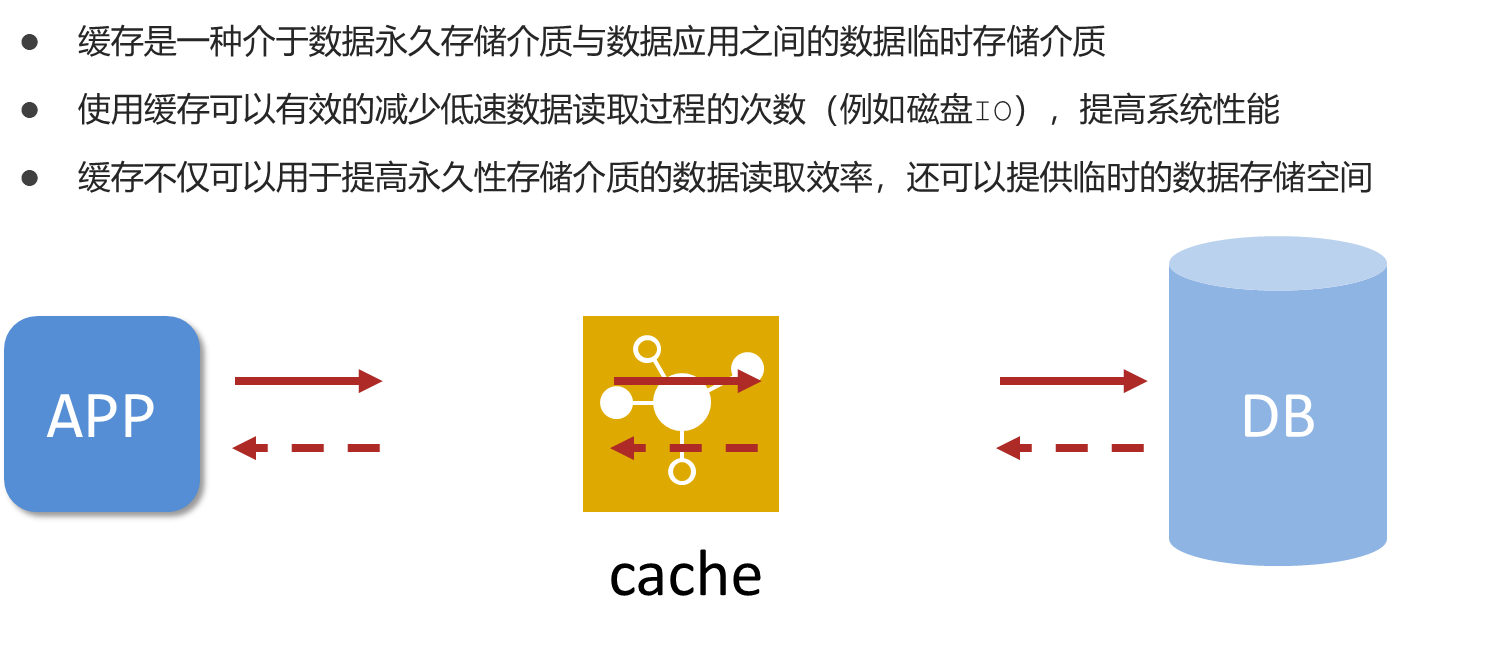
缓存是一种介于数据永久存储介质与数据应用之间的数据临时存储介质。
使用缓存可以有效地减少低速数据读取过程的次数,提高系统性能,
还可提供临时的数据存储空间。
(2)缓存使用
导入缓存技术相应的starter
<dependency>
    <groupId>org.springframework.boot</groupId>
   <artifactId>spring-boot-starter-cache</artifactId>
</dependency>
启用缓存
@SpringBootApplication
@EnableCaching
public class Springboot19CacheApplication {
   public static void main(String[] args) {
       SpringApplication.run(Springboot19CacheApplication.class, args);
    }
}
设置当前操作的结果数据进入缓存
@Cacheable(value="cacheSpace",key="#id")
public Book getById(Integer id) {
   return bookDao.selectById(id);
}
(3)缓存供应商变更:Ehcache
①加入缓存供应商的坐标Ehcache
    <dependency>
            <groupId>net.sf.ehcache</groupId>
            <artifactId>ehcache</artifactId>
    </dependency>
②缓存设定为使用Ehcache
spring:
  cache:
    type: ehcache
    ehcache:
     config: ehcache.xml
③提供ehcache配置文件ehcache.xml
(4)知识加油站(数据淘汰策略)
区分LRU和LFU
LRU:Least Recently Used(挑选最近最少使用的数据淘汰)
LFU:Least Frequently Used(挑选最近使用次数最少的数据淘汰)
(5)缓存供应商变更:Redis
①加入Redis坐标
<dependency>
    <groupId>org.springframework.boot</groupId>
    <artifactId>spring-boot-starter-data-redis</artifactId>
</dependency>
②配置Redis服务器,缓存设定为使用Redis
spring:
  redis:
    host: localhost
    port: 6379
  cache:
    type: redis
    redis:
      use-key-prefix: true      # 是否使用前缀名(系统定义前缀名)
      key-prefix: sms_          # 追加自定义前缀名
      time-to-live: 10s         # 有效时长
      cache-null-values: false  # 是否允许存储空值
(6)缓存供应商变更:memcached
①安装memcached,需要使用命令行窗口的管理员身份运行cmd指令。
安装:memcached.exe -d install
启动:memcached.exe -d start
停止:memcached.exe -d stop
②springboot整合memcached
由于springboot未整合过memcached,需要硬编码操作。
就变成将对应的东西交给spring容器管理。
第一步加坐标
 <dependency>
            <groupId>com.googlecode.xmemcached</groupId>
            <artifactId>xmemcached</artifactId>
            <version>2.4.7</version>
 </dependency>
第二步配置memcached服务器必要的属性
memcached:
    # memcached服务器地址
    servers: localhost:11211
    # 连接池的数量
    poolSize: 10
    # 设置默认操作超时
    opTimeout: 3000
第三步创建读取属性配置信息类,加载配置
@Component
@ConfigurationProperties(prefix = "memcached")
@Data
public class XMemcachedProperties {
    private String servers;
    private Integer poolSize;
    private Long opTimeout;
}
第四步创建客户端配置类
@Configuration
public class XMemcachedConfig {
    @Autowired
    private XMemcachedProperties xMemcachedProperties;
    @Bean
    public MemcachedClient getMemcachedClinet() throws IOException {
    MemcachedClientBuilder builder = new XMemcachedClientBuilder(xMemcachedProperties.getServers());
        MemcachedClient memcachedClient = builder.build();
       return memcachedClient;
    }
}
(7)使用jetCache
①如何整合远程的缓存
<dependency>
    <groupId>com.alicp.jetcache</groupId>
    <artifactId>jetcache-starter-redis</artifactId>
    <version>2.6.2</version>
</dependency>
jetcache:
  remote:
    default:
      type: redis
      host: localhost
      port: 6379
      poolConfig:
        maxTotal: 50
②整合本地缓存
jetcache:
  local:
    default:
      type: linkedhashmap
      keyConvertor: fastjson
(8)启用方法注解
要操作缓存要保证缓存的对象必须可序列化

 查看缓存统计报告:
jetcache:
  statIntervalMinutes: 1
(9)j2cache
jetCache对SpringCache进行了封装,在原有功能基础上实现了多级缓存、缓存统计、自动刷新、异步调用、数据报表等功能
j2cache是一个缓存整合框架,可以提供缓存的整合方案,使各种缓存搭配使用,
自身不提供缓存功能。
是基于ehcache+redis进行整合
四、任务
(1)springboot整合quartz
工作:用于定义具体执行的工作
工作明细:用于描述定时工作的信息
触发器:用于描述触发工作的规则
调度器:描述了工作明细与触发器的对应关系
①导入quartz的相关坐标
 <dependency>
            <groupId>org.springframework.boot</groupId>
            <artifactId>spring-boot-starter-quartz</artifactId>
 </dependency>
②定义具体要执行的任务,继承QuartzJobBean
public class MyQuartz extends QuartzJobBean {
    @Override
    protected void executeInternal(JobExecutionContext context) throws JobExecutionException {
        System.out.println("quartz task run...");
    }
}
③定义触发器与工作明细,并绑定对应关系
@Configuration
public class QuartzConfig {
    @Bean
    public JobDetail printJobDetail(){
//        绑定具体的工作
        return JobBuilder.newJob(MyQuartz.class).storeDurably().build();
    }
    @Bean
    public Trigger printJobTrigger(){
//        绑定对应的工作明细
        ScheduleBuilder schedBuilder=CronScheduleBuilder.cronSchedule("0/5 * * * * ?");
        return TriggerBuilder.newTrigger().forJob(printJobDetail()).withSchedule(schedBuilder).build();
    }
}
(2)spring task
①开启定时任务的开关
@EnableScheduling
public class Springboot22TaskApplication {
    public static void main(String[] args) {
        SpringApplication.run(Springboot22TaskApplication.class, args);
    }
}
②设置定时任务的执行,并设置执行周期
@Component
public class MyBean {
    @Scheduled(cron = "0/2 * * * * ?")
    public void print(){
        System.out.println("spring task run...");
    }
}
五、邮件
springboot整合JavaMail
SMTP(Simple Mail Transfer protocol):简单邮件传输协议,用于发送电子邮件的传输协议。
POP3(Post Office Protocol -Version3):用于接收电子邮件的标准协议
IMAP(Internet Mail Access Protocol):互联网消息协议,是POP3的替代协议
①导入springboot整合javaMail的坐标
<dependency>
            <groupId>org.springframework.boot</groupId>
            <artifactId>spring-boot-starter-mail</artifactId>
</dependency>
②配置JavaMail
spring:
  mail:
    username: ......@qq.com
    host: smtp.qq.com
    password: ......
③开启定时任务功能(发简单邮件)
@Service
public class SendServiceImpl implements SendMailService {
    @Autowired
    private JavaMailSender javaMailSender;
    //发送人
    private String from="。。。。。。@qq.com";
    //收件人
    private String to="。。。。。。@163.com";
    //标题
    private String subject="测试邮件";
    //正文
    private String context="测试邮件正文内容";
    @Override
    public void sendMail() {
        SimpleMailMessage message=new SimpleMailMessage();
        message.setFrom(from+"(。。。)");
        message.setTo(to);
        message.setSubject(subject);
        message.setText(context);
        javaMailSender.send(message);
    }
④发送多部件邮件
    try {
            MimeMessage message=javaMailSender.createMimeMessage();
            MimeMessageHelper helper=new MimeMessageHelper(message,true);//发送附件
            helper.setFrom(from+"(zzy)");
            helper.setTo(to);
            helper.setSubject(subject);
            helper.setText(context,true);//打开读取html
            //添加附件
            File f1=new File("D:\\code\\springboot_23_mail\\target\\springboot_23_mail-0.0.1-SNAPSHOT.jar");
            helper.addAttachment(f1.getName(),f1);

            javaMailSender.send(message);
        } catch (Exception e) {
            e.printStackTrace();
        }
六、消息
(1)概念:
生产者,消费者,同步消息,异步消息,消息队列
(2)企业级应用中广泛使用的三种异步消息传递技术
JMS ,AMQP ,MQTT
(3)JMS(java message service):一个规范,等同于jdbc规范,提供了与消息服务相关的API接口。
JMS消息模型:
peer-2-peer:点对点模型,消息发送到一个队列中,队列保存消息。队列的消息只能被一个消费者消费,或超时
publish-subscribe:发布订阅模型,消息可以被多个消费者消费,生产者和消费者完全独立,不需要感知对方的存在
JMS消息种类:
TextMessage MapMessage BytesMessage StreamMessage ObjectMessage Message (只有消息头和属性)
JMS实现:ActiveMQ、Redis、HornetMQ、RabbitMQ、RocketMQ(没有完全遵守JMS规范)
(4)AMQP
AMQP(advanced message queuing protocol):一种协议(高级消息队列协议,也是消息代理规范),规范了网络交换的数据格式,兼容JMS
优点:具有跨平台性,服务器供应商,生产者,消费者可以使用不同的语言来实现
AMQP消息模型:
direct exchange
fanout exchange
topic exchange
headers exchange
system exchange
AMQP消息种类:byte[]
AMQP实现:RabbitMQ、StormMQ、RocketMQ
(5)MQTT
MQTT(Message Queueing Telemetry Transport)消息队列遥测传输,专为小设备设计,是物联网(IOT)生态系统中主要成分之一
(6)
Kafka,一种高吞吐量的分布式发布订阅消息系统,提供实时消息功能。
消息队列产品:ActiveMQ ,RabbitMQ ,RocketMQ, Kafka
(7)ActiveMQ
①springboot整合ActiveMQ坐标
 <dependency>
            <groupId>org.springframework.boot</groupId>
            <artifactId>spring-boot-starter-activemq</artifactId>
 </dependency>
②配置ActiveMQ
spring:
  activemq:
    broker-url: tcp://localhost:61616
  jms:
    template:
      default-destination: zhou
    pub-sub-domain: true
③指定消息存储队列(生产与消费的关系)
@Service
public class MessageServiceActivemqImpl implements MessageService {
    @Autowired
    private JmsMessagingTemplate jmsMessagingTemplate;

    @Override
    public void sendMessage(String id) {
        System.out.println("待发送短信的订单已纳入处理队列111,id:"+id);
        jmsMessagingTemplate.convertAndSend("order.queue.id",id);
    }

    @Override
    public String doMessage() {
        String id =jmsMessagingTemplate.receiveAndConvert(String.class);
        System.out.println("已完成短信发送业务,id:"+id);
        return id;
    }
④使用消息监听器对消息队列监听
@Component
public class MessageListener {
    @JmsListener(destination = "order.queue.id")
    @SendTo("order.other.queue.id")
    public String receive(String id) {
        System.out.println("已完成短信发送业务,id:" + id);
        return "new:"+id;
    }
(8)RabbitMQ(direct)
①导入springboot整合RabbitMQ坐标
  <dependency>
            <groupId>org.springframework.boot</groupId>
            <artifactId>spring-boot-starter-amqp</artifactId>
  </dependency>
②配置RabbitMQ
spring:
    rabbitmq:
        host: localhost
        port: 5672
③定义消息队列
@Configuration
public class RabbitConfigDirect {
    @Bean
    public Queue directQueue(){
        return new Queue("direct_queue");
    }
    @Bean
    public DirectExchange directExchange(){
        return new DirectExchange("directExchange");

    }
    @Bean
    public Binding bindingDirect(){
        return BindingBuilder.bind(directQueue()).to(directExchange()).with("direct");
    }
durable:是否持久化,默认false
exclusive:是否当前连接专用,默认false,连接关闭后队列即被删除
autoDelete:是否自动删除,当生产者或消费者不再使用此队列,自动删除
④生产与消费消息
@Service
public class MessageServiceRabbitmqDirectImpl implements MessageService {
    @Autowired
    private AmqpTemplate amqpTemplate;


    @Override
    public void sendMessage(String id) {
        System.out.println("待发送短信的订单已纳入处理队列(rabbitmq direct),id:"+id);
        amqpTemplate.convertAndSend("directExchange","direct",id);
    }
⑤监听
@Component
public class MessageListener {
    @RabbitListener(queues = "direct_queue")
    public void receive(String id){
        System.out.println("已完成短信发送业务(rabbitmq direct),id:" + id);
    }
(9)topic
①定义消息队列
@Configuration
public class RabbitConfigTopic {
    @Bean
    public Queue topicQueue(){
        return new Queue("topic_queue");
    }
    @Bean
    public Queue topicQueue2(){
        return new Queue("topic_queue2");
    }
    @Bean
    public TopicExchange topicExchange(){
        return new TopicExchange("topicExchange");

    }
    @Bean
    public Binding bindingTopic(){
        return BindingBuilder.bind(topicQueue()).to(topicExchange()).with("topic.*.id");
    }
    @Bean
    public Binding bindingTopic2(){
        return BindingBuilder.bind(topicQueue2()).to(topicExchange()).with("topic.order.*");
    }
②绑定键匹配规则
* (星号): 用来表示一个单词 ,且该单词是必须出现的
# (井号): 用来表示任意数量
(10)RocketMQ
①导入springboot整合RocketMQ坐标
    <dependency>
            <groupId>org.apache.rocketmq</groupId>
            <artifactId>rocketmq-spring-boot-starter</artifactId>
            <version>2.2.1</version>
    </dependency>
②配置RocketMQ
rocketmq:
  name-server: localhost:9876
  producer:
    group: group_rocketmq
③生产消息
   @Autowired
    private RocketMQTemplate rocketMQTemplate;

    @Override
    public void sendMessage(String id) {
        System.out.println("待发送短信的订单已纳入处理队列(rocketmq),id:"+id);
//        rocketMQTemplate.convertAndSend("order_id",id);//同步
        SendCallback callback=new SendCallback() {
            @Override
            public void onSuccess(SendResult sendResult) {
                System.out.println("消息发送成功");
            }

            @Override
            public void onException(Throwable throwable) {
                System.out.println("消息发送失败!!!");
            }
        };
        rocketMQTemplate.asyncSend("order_id",id,callback);
}④消费消息用消息监听器(与前两个不同,监听器注解在类上)
@Component
@RocketMQMessageListener(topic = "order_id",consumerGroup = "group_rocketmq")
public class MessageListener implements RocketMQListener<String> {

    @Override
    public void onMessage(String id) {
        System.out.println("已完成短信发送业务(rocketmq),id:" + id);

    }
}
七、监听
(1)SpringBootAdmin(可视化监控平台)
①admin服务端(pom)
 <dependency>
            <groupId>de.codecentric</groupId>
            <artifactId>spring-boot-admin-starter-server</artifactId>
 </dependency>
 <dependency>
            <groupId>org.springframework.boot</groupId>
            <artifactId>spring-boot-starter-web</artifactId>
 </dependency>
②admin客户端(pom)
<dependency>
            <groupId>de.codecentric</groupId>
            <artifactId>spring-boot-admin-starter-client</artifactId>
</dependency>
<dependency>
            <groupId>org.springframework.boot</groupId>
            <artifactId>spring-boot-starter-web</artifactId>
</dependency>
③配置服务端

④配置客户端
 (2)监控原理
Actuator提供了Springboot生产就绪功能,通过断点的配置与访问,获取端点信息。
端点描述了一组监控信息,Springboot提供了多个内置端点,也可以根据需要自定义断点信息。
访问当前应用所有端点信息:/actuator
访问端点详细信息:/actuator/端点名称

(3)自定义监控指标(info端点)
①配置方式
info:
    appName: @project.artifactId@
    version: @project.version@
    author: zhou
②编程方式
@Component
public class AppInfoContributor implements InfoContributor {
   @Override
    public void contribute(Info.Builder builder) {
        Map<String,Object> infoMap = new HashMap<>();
        infoMap.put("buildTime","2006");
        builder.withDetail("runTime",System.currentTimeMillis())
                .withDetail("company","传智教育");
        builder.withDetails(infoMap);
    }
}
(4)为health端点添加自定义指标
@Component
public class AppHealthContributor extends AbstractHealthIndicator {
    @Override
    protected void doHealthCheck(Health.Builder builder) throws Exception {
        boolean condition = true;
        if(condition){
            Map<String,Object> infoMap = new HashMap<>();
            infoMap.put("buildTime","2006");
            builder.withDetail("runTime",System.currentTimeMillis())
                    .withDetail("company","传智教育");
            builder.withDetails(infoMap);
            builder.status(Status.UP);
        }else{
            builder.status(Status.DOWN);
        }
    }
}
(5)为Metrics端点添加自定义指标
@Service
public class BookServiceImpl extends ServiceImpl<BookDao, Book> implements IBookService {
    private Counter counter;
    public BookServiceImpl(MeterRegistry meterRegistry){
        counter = meterRegistry.counter("用户付费操作次数:");
    }
    @Override
    public boolean delete(Integer id) {
        counter.increment();
        return bookDao.deleteById(id) > 0;
    }
}
(6)自定义端点
@Component
@Endpoint(id="pay")
public class PayEndPoint {
    @ReadOperation
    public Object getPay(){
        //调用业务操作,获取支付相关信息结果,最终return出去
        Map payMap = new HashMap();
        payMap.put("level 1",103);
        payMap.put("level 2",315);
        payMap.put("level 3",666);
        return payMap;
    }
}