前言
在上一篇文章中,我们讨论了如何使用 Provider 在 Flutter 中进行状态管理。
本篇文章我们来讨论如何使用多个 Provider。
在 Flutter 中,使用 Provider 管理多个不同的状态时,你可以为每个状态创建一个单独的 ChangeNotifierProvider,并在需要的地方使用 Provider.of<T>(context) 或 Consumer<T>来访问这些状态。
接下来让我们正式开始使用:
为每个状态创建类
为每个需要管理的状态创建一个类,并确保这些类继承自 ChangeNotifier。
class Counter with ChangeNotifier {
  int _count = 0;

  int get count => _count;

  void increment() {
    _count++;
    notifyListeners();
  }
}

class ThemeSwitcher with ChangeNotifier {
  bool _isDarkTheme = false;

  bool get isDarkTheme => _isDarkTheme;

  void toggleTheme() {
    _isDarkTheme = !_isDarkTheme;
    notifyListeners();
  }
}
在应用的根或需要的地方提供状态
使用 ChangeNotifierProvider 来包裹你的应用或特定的 widget,并为每个状态提供一个 create 函数来创建其对应的实例。
import 'package:flutter/material.dart';
import 'package:provider/provider.dart';
void main() {
runApp(MyApp());
}
class MyApp extends StatelessWidget {
Widget build(BuildContext context) {
return MultiProvider(
providers: [
ChangeNotifierProvider(create: (context) => Counter()),
ChangeNotifierProvider(create: (context) => ThemeSwitcher()),
],
child: MaterialApp(
home: MyHomePage(),
),
);
}
}
在 widget 中访问状态
使用 Provider.of<T>(context) 或 Consumer<T> 在需要的地方访问状态。
class MyHomePage extends StatelessWidget {
Widget build(BuildContext context) {
final counter = Provider.of<Counter>(context);
final themeSwitcher = Provider.of<ThemeSwitcher>(context);
return Scaffold(
appBar: AppBar(
title: Text('Multiple Providers Example'),
),
body: Center(
child: Column(
mainAxisAlignment: MainAxisAlignment.center,
children: <Widget>[
Text(
'You have pushed the button this many times:',
),
Text(
'${counter.count}',
style: Theme.of(context).textTheme.headline4,
),
Switch(
value: themeSwitcher.isDarkTheme,
onChanged: (value) {
themeSwitcher.toggleTheme();
},
),
],
),
),
floatingActionButton: FloatingActionButton(
onPressed: () {
counter.increment();
},
tooltip: 'Increment',
child: Icon(Icons.add),
),
);
}
}
更新状态
在状态类中修改属性,并调用 notifyListeners() 来通知所有监听这个状态的 widget 进行更新。
class Counter with ChangeNotifier {
  int _count = 0;

  int get count => _count;

  void increment() {
    _count++;
    notifyListeners();  // 通知所有监听这个状态的widget进行更新
  }
}

class ThemeSwitcher with ChangeNotifier {
  bool _isDarkTheme = false;

  bool get isDarkTheme => _isDarkTheme;

  void toggleTheme() {
    _isDarkTheme = !_isDarkTheme;
    notifyListeners();  // 通知所有监听这个状态的widget进行更新
  }
}
完整示例
下面是一个例子,展示了如何使用 Provider 来管理两个不同的状态:
代码如下(示例):
import 'package:flutter/material.dart';
import 'package:provider/provider.dart';
void main() {
runApp(MyApp());
}
class MyApp extends StatelessWidget {
Widget build(BuildContext context) {
return MultiProvider(
providers: [
ChangeNotifierProvider(create: (context) => Counter()),
ChangeNotifierProvider(create: (context) => ThemeSwitcher()),
],
child: MaterialApp(
home: MyHomePage(),
),
);
}
}
class Counter with ChangeNotifier {
int _count = 0;
int get count => _count;
void increment() {
_count++;
notifyListeners();
}
}
class ThemeSwitcher with ChangeNotifier {
bool _isDarkTheme = false;
bool get isDarkTheme => _isDarkTheme;
void toggleTheme() {
_isDarkTheme = !_isDarkTheme;
notifyListeners();
}
}
class MyHomePage extends StatelessWidget {
Widget build(BuildContext context) {
final counter = Provider.of<Counter>(context);
final themeSwitcher = Provider.of<ThemeSwitcher>(context);
return Scaffold(
appBar: AppBar(
title: Text('Multiple Providers Example'),
),
body: Center(
child: Column(
mainAxisAlignment: MainAxisAlignment.center,
children: <Widget>[
Text(
'You have pushed the button this many times:',
),
Text(
'${counter.count}',
style: Theme.of(context).textTheme.headline4,
),
Switch(
value: themeSwitcher.isDarkTheme,
onChanged: (value) {
themeSwitcher.toggleTheme();
},
),
],
),
),
floatingActionButton: FloatingActionButton(
onPressed: () {
counter.increment();
},
tooltip: 'Increment',
child: Icon(Icons.add),
),
);
}
}
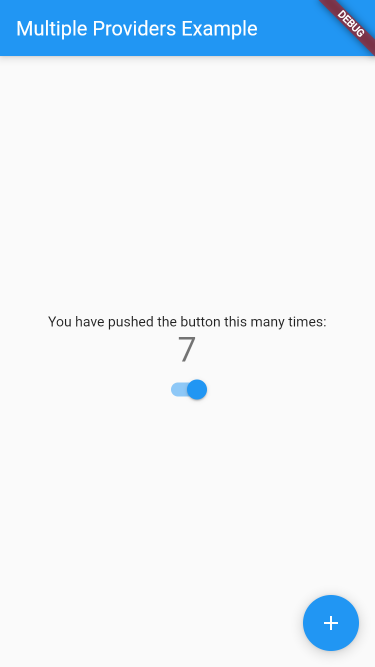
运行结果如下

总结
本文主要介绍了在 Flutter 中如何使用多个 Provider 进行状态管理。
类似的状态管理还有 Bloc 和 GetX 的使用,后续会继续分享它们的使用方式,欢迎关注。
– 欢迎点赞、关注、转发、收藏【我码玄黄】,gonghao同名


