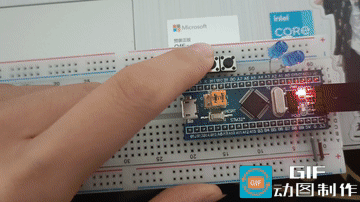
一、按键控制LED

LED.c
#include "stm32f10x.h" // Device header
/**
* 函 数:LED初始化
* 参 数:无
* 返 回 值:无
*/
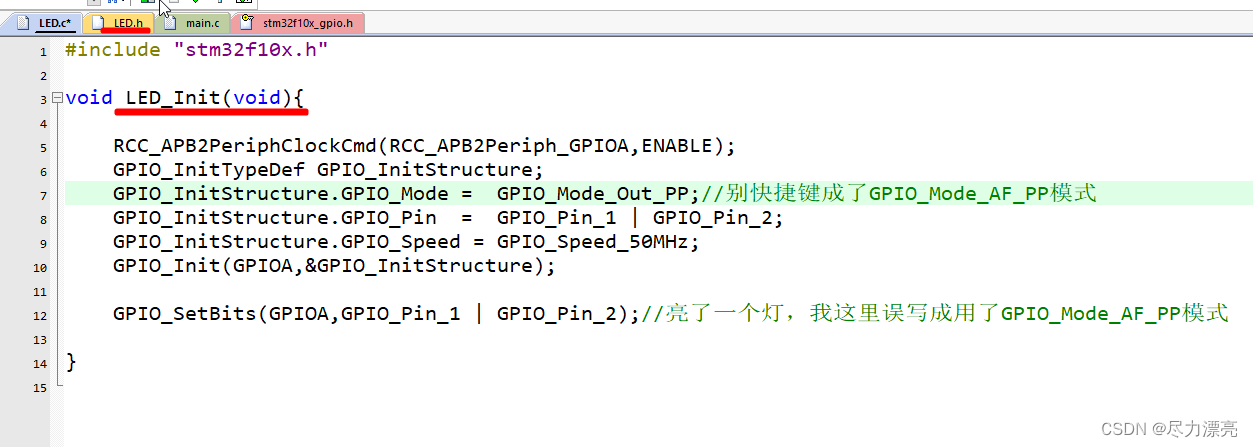
void LED_Init(void)
{
/*开启时钟*/
RCC_APB2PeriphClockCmd(RCC_APB2Periph_GPIOA, ENABLE); //开启GPIOA的时钟
/*GPIO初始化*/
GPIO_InitTypeDef GPIO_InitStructure;
GPIO_InitStructure.GPIO_Mode = GPIO_Mode_Out_PP;
GPIO_InitStructure.GPIO_Pin = GPIO_Pin_1 | GPIO_Pin_2;
GPIO_InitStructure.GPIO_Speed = GPIO_Speed_50MHz;
GPIO_Init(GPIOA, &GPIO_InitStructure); //将PA1和PA2引脚初始化为推挽输出
/*设置GPIO初始化后的默认电平*/
GPIO_SetBits(GPIOA, GPIO_Pin_1 | GPIO_Pin_2); //设置PA1和PA2引脚为高电平
}
/**
* 函 数:LED1开启
* 参 数:无
* 返 回 值:无
*/
void LED1_ON(void)
{
GPIO_ResetBits(GPIOA, GPIO_Pin_1); //设置PA1引脚为低电平
}
/**
* 函 数:LED1关闭
* 参 数:无
* 返 回 值:无
*/
void LED1_OFF(void)
{
GPIO_SetBits(GPIOA, GPIO_Pin_1); //设置PA1引脚为高电平
}
/**
* 函 数:LED1状态翻转
* 参 数:无
* 返 回 值:无
*/
void LED1_Turn(void)
{
if (GPIO_ReadOutputDataBit(GPIOA, GPIO_Pin_1) == 0) //获取输出寄存器的状态,如果当前引脚输出低电平
{
GPIO_SetBits(GPIOA, GPIO_Pin_1); //则设置PA1引脚为高电平
}
else //否则,即当前引脚输出高电平
{
GPIO_ResetBits(GPIOA, GPIO_Pin_1); //则设置PA1引脚为低电平
}
}
/**
* 函 数:LED2开启
* 参 数:无
* 返 回 值:无
*/
void LED2_ON(void)
{
GPIO_ResetBits(GPIOA, GPIO_Pin_2); //设置PA2引脚为低电平
}
/**
* 函 数:LED2关闭
* 参 数:无
* 返 回 值:无
*/
void LED2_OFF(void)
{
GPIO_SetBits(GPIOA, GPIO_Pin_2); //设置PA2引脚为高电平
}
/**
* 函 数:LED2状态翻转
* 参 数:无
* 返 回 值:无
*/
void LED2_Turn(void)
{
if (GPIO_ReadOutputDataBit(GPIOA, GPIO_Pin_2) == 0) //获取输出寄存器的状态,如果当前引脚输出低电平
{
GPIO_SetBits(GPIOA, GPIO_Pin_2); //则设置PA2引脚为高电平
}
else //否则,即当前引脚输出高电平
{
GPIO_ResetBits(GPIOA, GPIO_Pin_2); //则设置PA2引脚为低电平
}
}
LED.h
#ifndef __LED_H
#define __LED_H

void LED_Init(void);
void LED1_ON(void);
void LED1_OFF(void);
void LED1_Turn(void);
void LED2_ON(void);
void LED2_OFF(void);
void LED2_Turn(void);

#endif
Key.c
#include "stm32f10x.h" // Device header
#include "Delay.h"
/**
* 函 数:按键初始化
* 参 数:无
* 返 回 值:无
*/
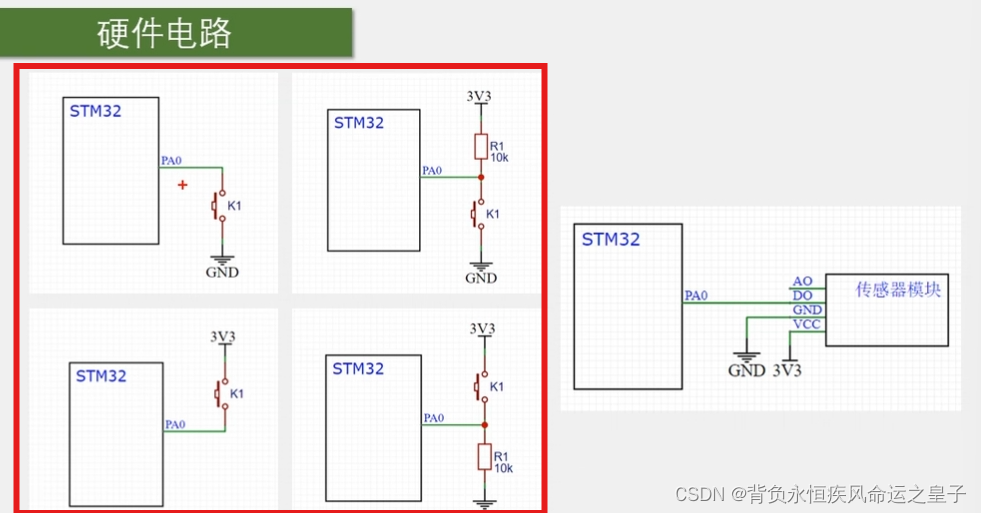
void Key_Init(void)
{
/*开启时钟*/
RCC_APB2PeriphClockCmd(RCC_APB2Periph_GPIOB, ENABLE); //开启GPIOB的时钟
/*GPIO初始化*/
GPIO_InitTypeDef GPIO_InitStructure;
GPIO_InitStructure.GPIO_Mode = GPIO_Mode_IPU;
GPIO_InitStructure.GPIO_Pin = GPIO_Pin_1 | GPIO_Pin_11;
GPIO_InitStructure.GPIO_Speed = GPIO_Speed_50MHz;
GPIO_Init(GPIOB, &GPIO_InitStructure); //将PB1和PB11引脚初始化为上拉输入
}
/**
* 函 数:按键获取键码
* 参 数:无
* 返 回 值:按下按键的键码值,范围:0~2,返回0代表没有按键按下
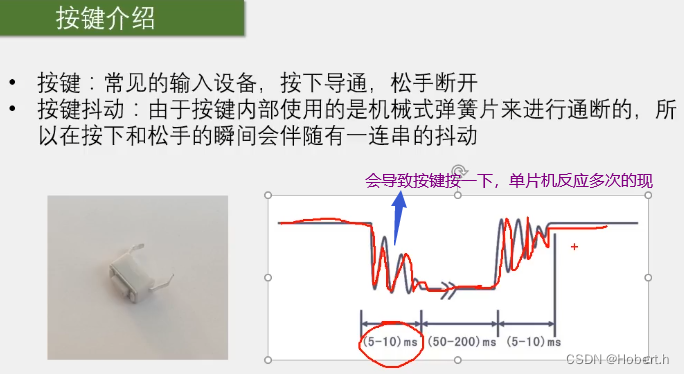
* 注意事项:此函数是阻塞式操作,当按键按住不放时,函数会卡住,直到按键松手
*/
uint8_t Key_GetNum(void)
{
uint8_t KeyNum = 0; //定义变量,默认键码值为0
if (GPIO_ReadInputDataBit(GPIOB, GPIO_Pin_1) == 0) //读PB1输入寄存器的状态,如果为0,则代表按键1按下
{
Delay_ms(20); //延时消抖
while (GPIO_ReadInputDataBit(GPIOB, GPIO_Pin_1) == 0); //等待按键松手
Delay_ms(20); //延时消抖
KeyNum = 1; //置键码为1
}
if (GPIO_ReadInputDataBit(GPIOB, GPIO_Pin_11) == 0) //读PB11输入寄存器的状态,如果为0,则代表按键2按下
{
Delay_ms(20); //延时消抖
while (GPIO_ReadInputDataBit(GPIOB, GPIO_Pin_11) == 0); //等待按键松手
Delay_ms(20); //延时消抖
KeyNum = 2; //置键码为2
}
return KeyNum; //返回键码值,如果没有按键按下,所有if都不成立,则键码为默认值0
}
Key.h
#ifndef __KEY_H
#define __KEY_H

void Key_Init(void);
uint8_t Key_GetNum(void);

#endif
main.c
#include "stm32f10x.h"                  // Device header
#include "Delay.h"
#include "LED.h"
#include "Key.h"

uint8_t KeyNum;		//定义用于接收按键键码的变量

int main(void)
{
	/*模块初始化*/
	LED_Init();		//LED初始化
	Key_Init();		//按键初始化

	while (1)
	{
		KeyNum = Key_GetNum();		//获取按键键码

		if (KeyNum == 1)			//按键1按下
		{
			LED1_Turn();			//LED1翻转
		}

		if (KeyNum == 2)			//按键2按下
		{
			LED2_Turn();			//LED2翻转
		}
	}
}
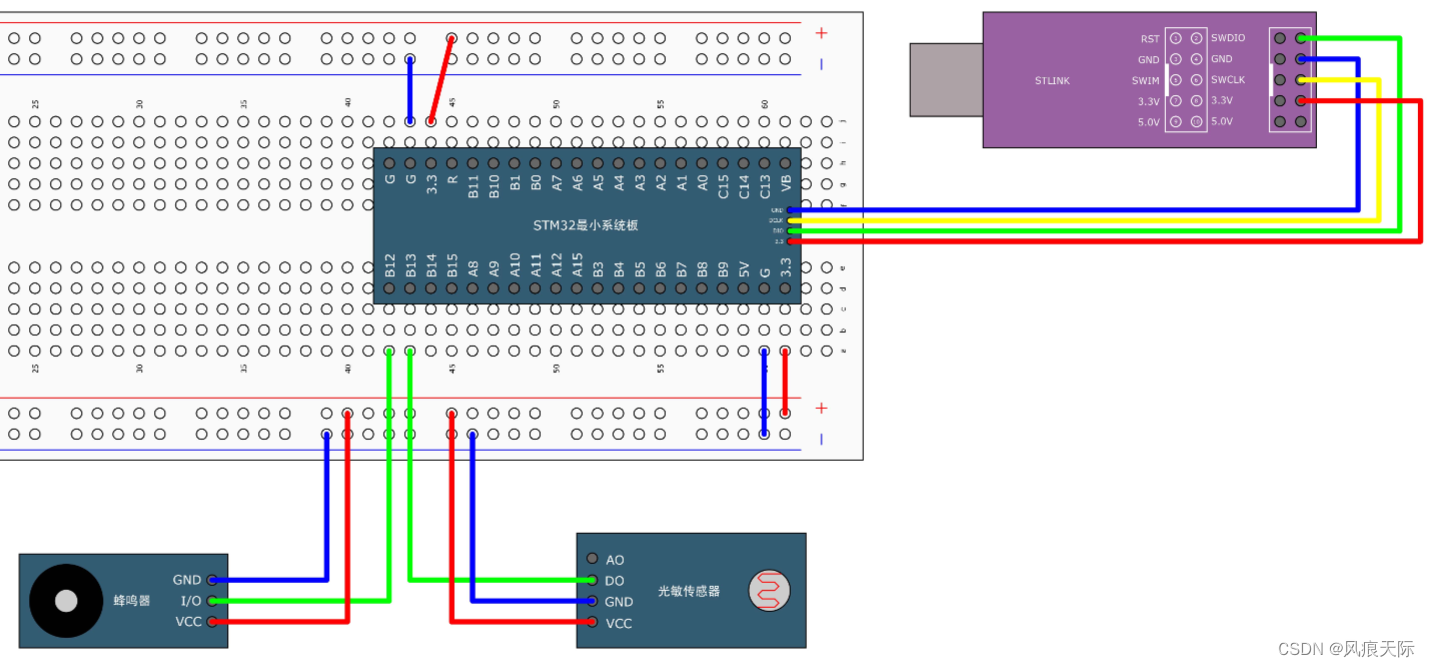
二、光敏传感器控制蜂鸣器

Buzzer.c
#include "stm32f10x.h"                  // Device header

/**
  * 函    数:蜂鸣器初始化
  * 参    数:无
  * 返 回 值:无
  */
void Buzzer_Init(void)
{
	/*开启时钟*/
	RCC_APB2PeriphClockCmd(RCC_APB2Periph_GPIOB, ENABLE);		//开启GPIOB的时钟

	/*GPIO初始化*/
	GPIO_InitTypeDef GPIO_InitStructure;
	GPIO_InitStructure.GPIO_Mode = GPIO_Mode_Out_PP;
	GPIO_InitStructure.GPIO_Pin = GPIO_Pin_12;
	GPIO_InitStructure.GPIO_Speed = GPIO_Speed_50MHz;
	GPIO_Init(GPIOB, &GPIO_InitStructure);						//将PB12引脚初始化为推挽输出

	/*设置GPIO初始化后的默认电平*/
	GPIO_SetBits(GPIOB, GPIO_Pin_12);							//设置PB12引脚为高电平
}

/**
  * 函    数:蜂鸣器开启
  * 参    数:无
  * 返 回 值:无
  */
void Buzzer_ON(void)
{
	GPIO_ResetBits(GPIOB, GPIO_Pin_12);		//设置PB12引脚为低电平
}

/**
  * 函    数:蜂鸣器关闭
  * 参    数:无
  * 返 回 值:无
  */
void Buzzer_OFF(void)
{
	GPIO_SetBits(GPIOB, GPIO_Pin_12);		//设置PB12引脚为高电平
}

/**
  * 函    数:蜂鸣器状态翻转
  * 参    数:无
  * 返 回 值:无
  */
void Buzzer_Turn(void)
{
	if (GPIO_ReadOutputDataBit(GPIOB, GPIO_Pin_12) == 0)		//获取输出寄存器的状态,如果当前引脚输出低电平
	{
		GPIO_SetBits(GPIOB, GPIO_Pin_12);						//则设置PB12引脚为高电平
	}
	else														//否则,即当前引脚输出高电平
	{
		GPIO_ResetBits(GPIOB, GPIO_Pin_12);						//则设置PB12引脚为低电平
	}
}
Buzzer.h
#ifndef __BUZZER_H
#define __BUZZER_H

void Buzzer_Init(void);
void Buzzer_ON(void);
void Buzzer_OFF(void);
void Buzzer_Turn(void);

#endif
LightSensor.c
#include "stm32f10x.h"                  // Device header

/**
  * 函    数:光敏传感器初始化
  * 参    数:无
  * 返 回 值:无
  */
void LightSensor_Init(void)
{
	/*开启时钟*/
	RCC_APB2PeriphClockCmd(RCC_APB2Periph_GPIOB, ENABLE);		//开启GPIOB的时钟

	/*GPIO初始化*/
	GPIO_InitTypeDef GPIO_InitStructure;
	GPIO_InitStructure.GPIO_Mode = GPIO_Mode_IPU;
	GPIO_InitStructure.GPIO_Pin = GPIO_Pin_13;
	GPIO_InitStructure.GPIO_Speed = GPIO_Speed_50MHz;
	GPIO_Init(GPIOB, &GPIO_InitStructure);						//将PB13引脚初始化为上拉输入
}

/**
  * 函    数:获取当前光敏传感器输出的高低电平
  * 参    数:无
  * 返 回 值:光敏传感器输出的高低电平,范围:0/1
  */
uint8_t LightSensor_Get(void)
{
	return GPIO_ReadInputDataBit(GPIOB, GPIO_Pin_13);			//返回PB13输入寄存器的状态
}
LightSensor.h
#ifndef __LIGHT_SENSOR_H
#define __LIGHT_SENSOR_H

void LightSensor_Init(void);
uint8_t LightSensor_Get(void);

#endif
main.c
#include "stm32f10x.h"                  // Device header
#include "Delay.h"
#include "Buzzer.h"
#include "LightSensor.h"

int main(void)
{
	/*模块初始化*/
	Buzzer_Init();			//蜂鸣器初始化
	LightSensor_Init();		//光敏传感器初始化

	while (1)
	{
		if (LightSensor_Get() == 1)		//如果当前光敏输出1
		{
			Buzzer_ON();				//蜂鸣器开启
		}
		else							//否则
		{
			Buzzer_OFF();				//蜂鸣器关闭
		}
	}
}


![[EtherCAT]Win10、Win11中SOEM1.4.0无法找到从站的解决方法——2024.07.16](https://i-blog.csdnimg.cn/direct/60e59f1fc212472c88e928d44ed7b095.png)