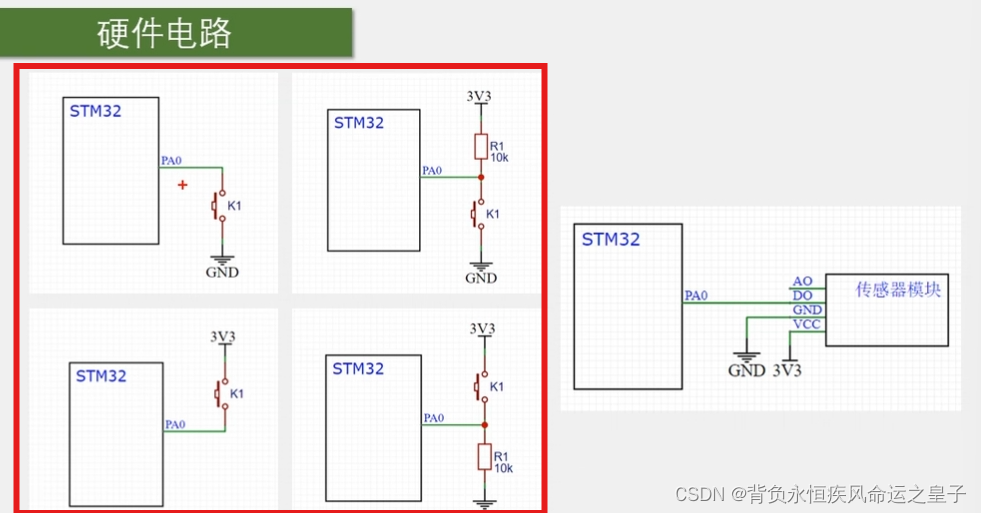
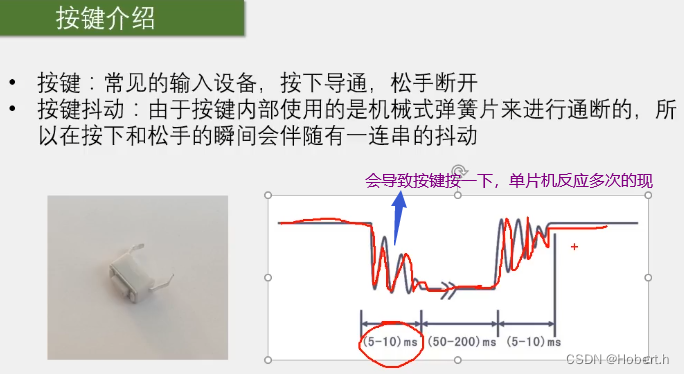
接线:
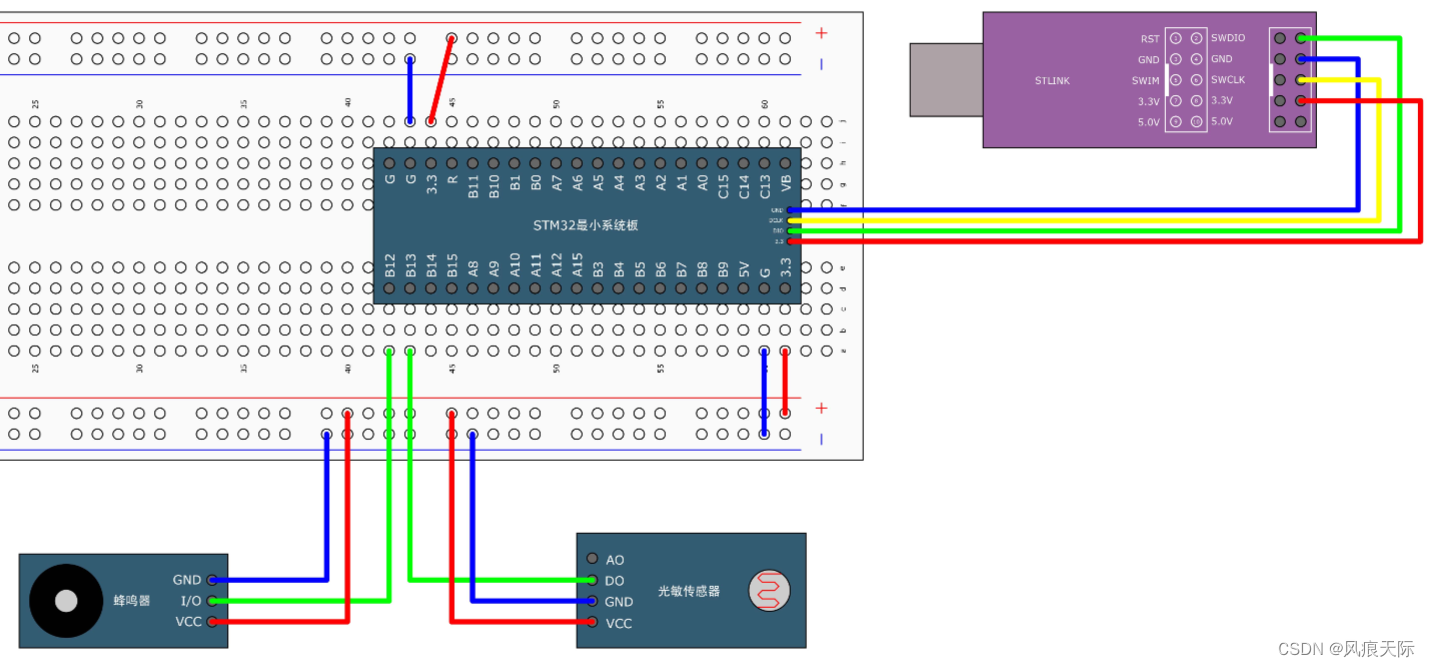
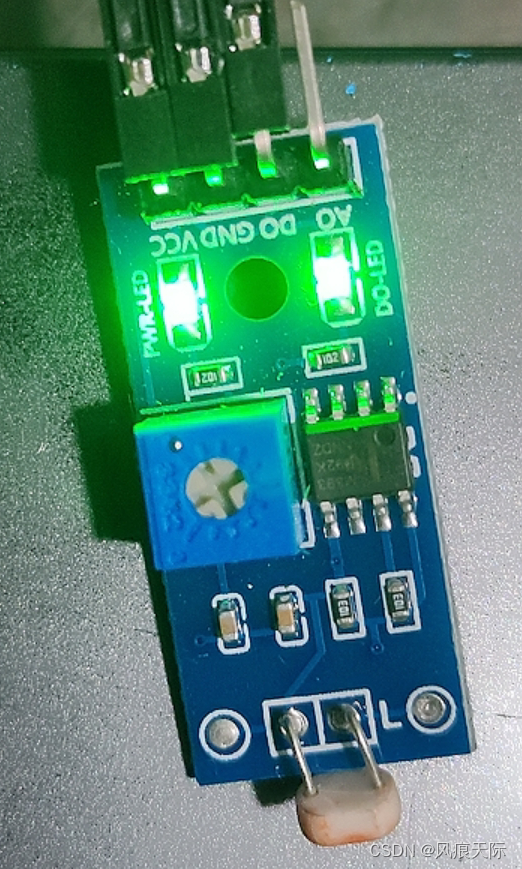
光敏传感器上的AO不接。
接好线后上电,可以看到光敏传感器上亮了两个灯,如果只亮一个,可以尝试加大环境光照或者拿螺丝刀拧上面的蓝色方块。用手遮住前面的电阻只亮一个灯。
代码:
复制粘贴3-4的工程文件,改名为“3-5 光敏传感器控制蜂鸣器”,打开keil,在“Hardware”文件夹里新建“Buzzer.c”、“Buzzer.h”、“LightSensor.c”、“LightSensor.h”四个文件,并输入如下代码:
Buzzer.c:
#include "stm32f10x.h"                  // Device header

void Buzzer_Init(void)
{
	RCC_APB2PeriphClockCmd(RCC_APB2Periph_GPIOB,ENABLE);

	GPIO_InitTypeDef GPIO_InitStructure;
	GPIO_InitStructure.GPIO_Mode = GPIO_Mode_Out_PP;
	GPIO_InitStructure.GPIO_Pin = GPIO_Pin_12;
	GPIO_InitStructure.GPIO_Speed = GPIO_Speed_50MHz;
	GPIO_Init(GPIOB,&GPIO_InitStructure);

	GPIO_ResetBits(GPIOB,GPIO_Pin_12);
}

void Buzzer_ON(void)
{
	GPIO_ResetBits(GPIOB,GPIO_Pin_12);
}

void Buzzer_OFF(void)
{
	GPIO_SetBits(GPIOB,GPIO_Pin_12);
}

void Buzzer_Turn(void)
{
	if(GPIO_ReadOutputDataBit(GPIOB,GPIO_Pin_12) == 0)
	{
		GPIO_SetBits(GPIOB,GPIO_Pin_12);
	}
	else
	{
		GPIO_ResetBits(GPIOB,GPIO_Pin_12);
	}
}
Buzzer.h:
#ifndef __BUZZER_H
#define __BUZZER_H

void Buzzer_Init(void);
void Buzzer_ON(void);
void Buzzer_OFF(void);
void Buzzer_Turn(void);

#endif
LightSensor.c:
#include "stm32f10x.h"                  // Device header

void LightSensor_Init(void)
{
	RCC_APB2PeriphClockCmd(RCC_APB2Periph_GPIOB,ENABLE);

	GPIO_InitTypeDef GPIO_InitStructure;
	GPIO_InitStructure.GPIO_Mode = GPIO_Mode_IPU;
	GPIO_InitStructure.GPIO_Pin = GPIO_Pin_13;
	GPIO_InitStructure.GPIO_Speed = GPIO_Speed_50MHz;
	GPIO_Init(GPIOB,&GPIO_InitStructure);
}

uint8_t LightSensor_Get(void)
{
	return GPIO_ReadInputDataBit(GPIOB,GPIO_Pin_13);
}
LightSensor.h:
#ifndef __LIGHTSENSOR_H
#define __LIGHTSENSOR_H

void LightSensor_Init(void);
uint8_t LightSensor_Get(void);

#endif
main.c:
#include "stm32f10x.h"                  // Device header
#include "Delay.h"
#include "Buzzer.h"
#include "LightSensor.h"

int main(void)
{
	Buzzer_Init();
	LightSensor_Init();

	while(1)
	{
		if (LightSensor_Get() == 1)
		{
			Buzzer_ON();
		}
		else
		{
			Buzzer_OFF();
		}
	}
}
编译运行成功后,即可通过遮住光敏电阻来控制蜂鸣器。