大家好,我是小森( ﹡ˆoˆ﹡ ) ! 易编橙·终身成长社群创始团队嘉宾,橙似锦计划领衔成员、阿里云专家博主、腾讯云内容共创官、CSDN人工智能领域优质创作者 。
卷积神经网络是深度学习在计算机视觉领域的突破性成果,在计算机视觉领域,往往我们输入的图像都很大,使用全连接网络的话,计算的代价较高;另外图像也很难保留原有的特征,导致图像处理的准确率不高。
卷积神经网络(CNN)是含有卷积层的神经网络,卷积层的作用就是用来自动学习、提取图像的特征。
CNN网络主要有三部分构成:卷积层、池化层和全连接层构成,其中卷积层负责提取图像中的局部特征;池化层用来大幅降低参数量级(降维);全连接层类似人工神经网络的部分,用来输出想要的结果。
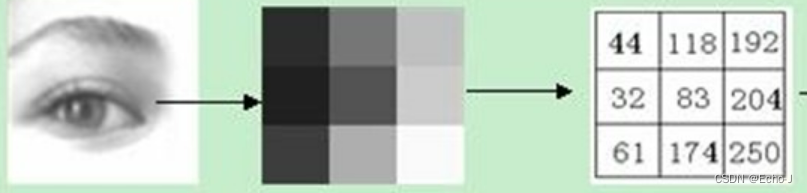
像素和通道的理解
我们使用 matplotlib 库来实际理解图像知识:
import numpy as np
import matplotlib.pyplot as plt


def func1():

    img = np.zeros([200, 200])
    print(img)
    plt.imshow(img, cmap='gray', vmin=0, vmax=255)   # imshow显示图像
    plt.show()

    img = np.full([255, 255], 255)
    print(img)
    plt.imshow(img, cmap='gray', vmin=0, vmax=255)
    plt.show()


#  图像的通道
def func2():

    img = plt.imread('QQ.png')
    # 修改数据的维度
    img = np.transpose(img, [2, 0, 1])

    # 打印所有通道
    for channel in img:
        print(channel)
        plt.imshow(channel)
        plt.show()


    # 修改透明度
    img[2] = 0.05
    img = np.transpose(img, [1, 2, 0])
    plt.imshow(img)
    plt.show()


if __name__ == '__main__':
    func1()
    func2()
💯输出:


- 图像是由像素点组成的,像素值的范围 [0, 255] 值越小表示亮度越小,值越大,表名亮度值越大。一个全0的图像就是一副全黑图像。 一个复杂的图像则是由多个通道组合在一起形成的。
卷积层
卷积包含一维卷积,二维卷积,三维卷积,在这里以二维卷积为主,如果明白了二维卷积,就知道其他维卷积是怎么回事了
二维卷积

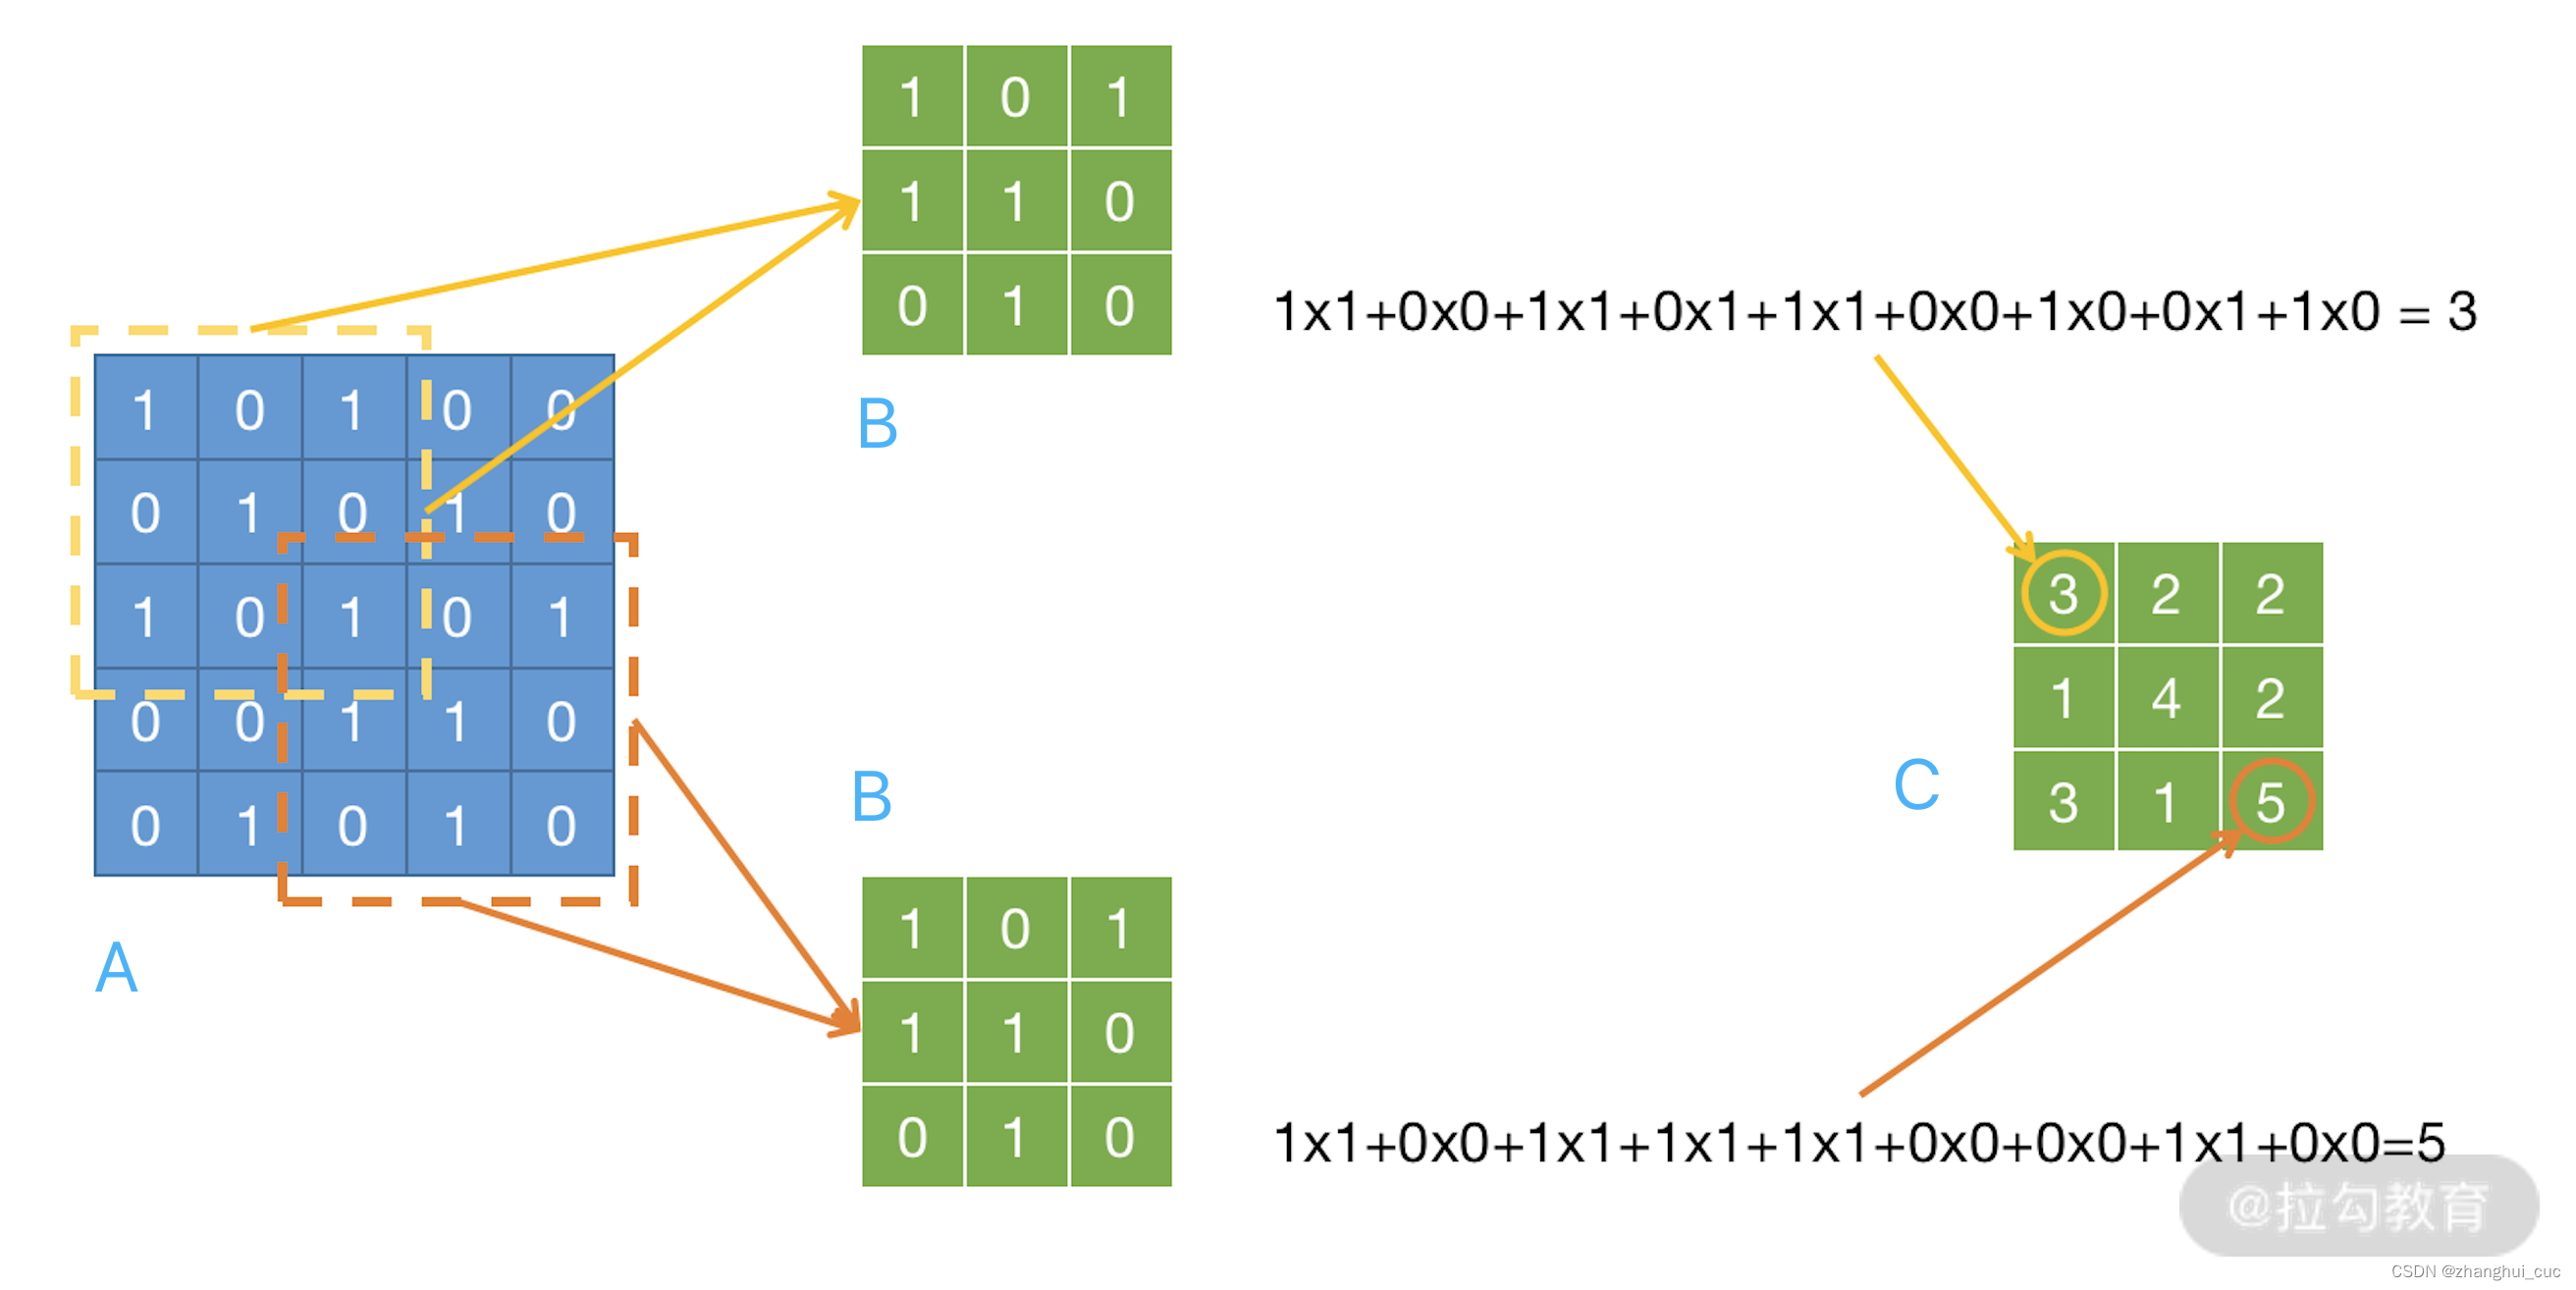
我们看一下卷积核的计算过程,也就是卷积核是如何提取特征的:

- input 表示输入的图像
- filter 表示卷积核, 也叫做滤波器
- input 经过 filter 的得到输出为最右侧的图像,该图叫做特征图
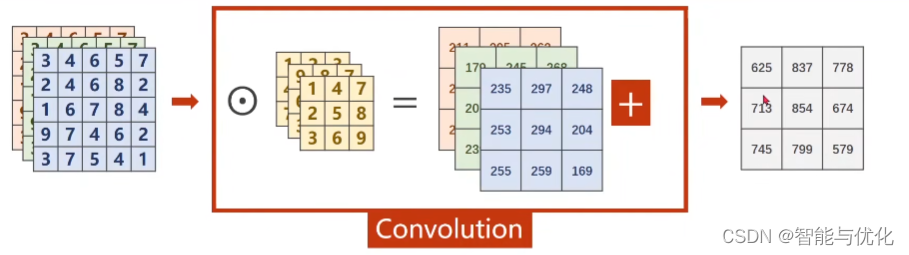
卷积运算本质上就是在滤波器和输入数据的局部区域间做点积。
按照上面的计算方法可以得到最终的特征图为:

Padding
通过上面的卷积计算过程,我们发现最终的特征图比原始图像小很多,如果想要保持经过卷积后的图像大小不变, 可以在原图周围添加 padding 来实现。
Stride
Stride指定了卷积核在遍历输入特征图时,每次移动的距离。
格式:
torch.nn.Conv2d(in_channels, out_channels, kernel_size, stride=1, padding=0, dilation=1, groups=1, bias=True, padding_mode=‘zeros’, device=None, dtype=None)其中
- in_channels: 输入通道数
- out_channels: 输出通道数(卷积核数量)
- kernel_size: 卷积核大小
- stride: 卷积步长
- padding: 边缘补零
- dilation: 扩散卷积
- group: 分组卷积
- bias: 是否带有偏置
import torch
import torch.nn as nn
#使用方形卷积核,以及相同的步长
m = nn.conv2d(16,33,3, stride=2)
#使用非方形的卷积核,以及非对称的步长和补零
m = nn. Conv2d(16,33,(3,5), stride=(2,1), padding=(4,2))
#使用非方形的卷积核,以及非对称的步长,补零和膨胀系数
m = nn.Conv2d(16,33,(3,5), stride=(2,1),padding=(4,2), dilation=(3,1))input = torch.randn(20,16,50,100)
output = m(input)
print(output.shape)
输出:
torch.Size([20,33,26,100])
卷积层提取案例
我们接下来对下面的图片进行特征提取:

import torch
import torch.nn as nn
import matplotlib.pyplot as plt


# 显示图像
def show(img):

    # 输入: (Height, Width, Channel)
    plt.imshow(img)
    plt.axis('off')
    plt.show()


# 单个多通道卷积核
def func1():

    img = plt.imread('QQ.png')
    show(img)

    conv = nn.Conv2d(in_channels=3, out_channels=1, kernel_size=3, stride=1, padding=1)
    img = torch.tensor(img).permute(2, 0, 1).float()  # 转换为float类型以匹配默认的tensor类型
    img = img.unsqueeze(0)
    new_img = conv(img)
    new_img = new_img.squeeze(0).permute(1, 2, 0)

    show(new_img.detach().numpy())


# 多个多通道卷积核
def func2():


    img = plt.imread('QQ.png')
    show(img)

    conv = nn.Conv2d(in_channels=3, out_channels=3, kernel_size=3, stride=1, padding=1)
    img = torch.tensor(img).permute(2, 0, 1).float()  # 转换为float类型
    img = img.unsqueeze(0)

    new_img = conv(img)
    new_img = new_img.squeeze(0).permute(1, 2, 0)

    # 打印三个特征图
    show(new_img[:, :, 0].unsqueeze(2).detach().numpy())
    show(new_img[:, :, 1].unsqueeze(2).detach().numpy())
    show(new_img[:, :, 2].unsqueeze(2).detach().numpy())


if __name__ == '__main__':
    func1()
    func2()
输出:

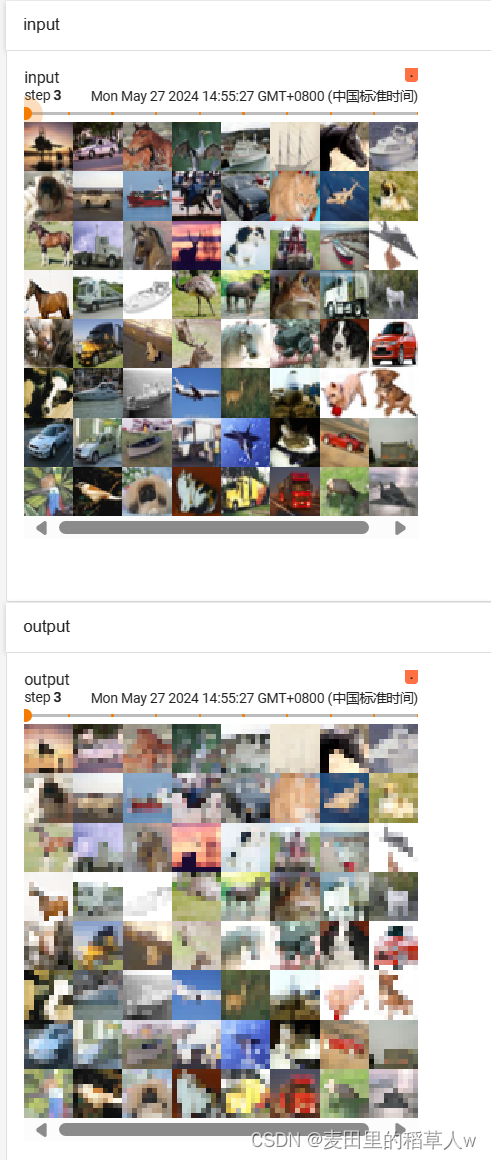
转置卷积 :就是卷积的逆操作,也称为逆卷积、反卷积。
torch.nn.ConvTranspose2d(in_channels, out_channels, kernel_size, stride=1, padding=0, output_padding=0, groups=1, bias=True, dilation=1, padding_mode=‘zeros’, device=None, dtype=None)- 输入:(𝑁,𝐶𝑖𝑛,𝐻𝑖𝑛,𝑊𝑖𝑛)或者(𝐶𝑖𝑛,𝐻𝑖𝑛,𝑊𝑖𝑛)
- 输出:(𝑁,𝐶𝑜𝑢𝑡,𝐻𝑜𝑢𝑡,𝑊𝑜𝑢𝑡)或者(𝐶𝑜𝑢𝑡,𝐻𝑜𝑢𝑡,𝑊𝑜𝑢𝑡)
import torch.nn as nnimport torch
#使用长宽一致的卷积核以及相同的步长
m = nn.ConvTranspose2d( 16,33,3, stride=2)#使用长宽不一致的卷积核,步长,以及补零
m = nn.ConvTranspose2d(16,33,(3,5), stride=(2,1), padding=(4,2))
input = torch.randn(20,16,50,100)
output = m( input)
#可以直接指明输出的尺寸大小
input = torch.randn(1,16,12,12)
downsample = nn.conv2d(16,16,3, stride=2, padding=1)
upsample = nn.ConvTranspose2d(16,16,3, stride=2, padding=1)
h = downsample( input)
print(h.size())
output = upsample(h,output_size=input.size( ))
print(output.size())
输出:
torch.Size([1,16,6,6])
torch.Size([1,16,12,12])
案例:搭建全卷积网络结构
import torch
import torch.nn as nn
import torch.nn.functional as F


class FCN(nn. Module) :
    def __init__(self, num_class):
        super(FCN, self).__init__()
        self.conv1 = nn.Conv2d(in_channels=3, out_channels=32, kernel_size=3)
        self.conv2 = nn.Conv2d(in_channels=32, out_channels=64, kernel_size=3)
        self.conv3 = nn.Conv2d(in_channels=64, out_channels=128, kernel_size=3)

        self.unsample1 = nn.ConvTranspose2d(in_channels=128, out_channels=64, kernel_size=3)
        self.unsample2 = nn.ConvTranspose2d(in_channels=64, out_channels=32, kernel_size=3)
        self.unsample3 = nn.ConvTranspose2d(in_channels=32, out_channels=num_class, kernel_size=3)

    def forward(self, x):
        x = F.relu(self.conv1(x))
        x = F.relu(self.conv2(x))
        x = F.relu(self.conv3(x))
        x = F.relu(self.unsample1(x))
        x = F.relu(self.unsample2(x))
        x = F.relu(self.unsample3(x))
        return x

num_class = 10
model = FCN(num_class)

print(model)
案例:搭建卷积+全连接的网络结构
import torch
import torch.nn as nn
import torch.nn.functional as F


class ConvNet(nn.Module):
    def __init__(self, num_classes=10):
        super(ConvNet, self).__init__()
        # 第一层卷积
        self.conv1 = nn.Conv2d(3, 32, kernel_size=3, padding=1)  # 添加padding以避免尺寸减小
        self.pool1 = nn.MaxPool2d(2, 2)  # 第一个池化层
        self.conv2 = nn.Conv2d(32, 64, kernel_size=3, padding=1)  # 添加padding
        self.pool2 = nn.MaxPool2d(2, 2)  # 第二个池化层

        self.flatten = nn.Flatten(start_dim=1)
        # 计算fc1的输入特征数:64 * (28/2/2) * (28/2/2) = 64 * 7 * 7
        self.fc1 = nn.Linear(64 * 7 * 7, 512)
        self.fc2 = nn.Linear(512, num_classes)

    def forward(self, x):
        x = self.conv1(x)
        x = self.pool1(x)  # 应用池化层
        x = self.conv2(x)
        x = self.pool2(x)  # 应用另一个池化层
        x = self.flatten(x)  # 展平
        x = self.fc1(x)
        x = self.fc2(x)
        return x


num_class = 10
model = ConvNet(num_class)

batch_size = 4
input_tensor = torch.randn(batch_size, 3, 28, 28)

output = model(input_tensor)
print(output)
输出:
tensor([[ 0.0986, -0.1008, -0.0225, -0.1896, -0.1659,  0.0817, -0.0684, -0.0195,
         -0.1648,  0.0578],
        [ 0.0241, -0.0391,  0.0014, -0.1261, -0.0593,  0.0679, -0.1342, -0.0396,
         -0.2054,  0.1309],
        [ 0.0549, -0.0116, -0.0471, -0.1747, -0.0148,  0.1378, -0.2085,  0.0004,
         -0.1579,  0.1637],
        [ 0.0553, -0.1103,  0.1054, -0.0782, -0.1624, -0.0047, -0.2090,  0.0089,
         -0.2294,  0.0865]], grad_fn=<AddmmBackward0>)


![[misc]-压缩包-zip](https://i-blog.csdnimg.cn/direct/73d8dc16a4d240998472d884e003945e.png)