目录
一、JWT介绍
1.1 什么是jwt
JWT(JSON Web Token)是一种开放标准(RFC 7519),用于在各方之间以安全的方式传输信息。JWT 是一种紧凑、自包含的信息载体,可以被解码和验证。它通常用于身份验证和授权服务,特别是在无状态的 Web 应用程序中,比如那些基于 REST 的 API。
1.2 jwt的结构
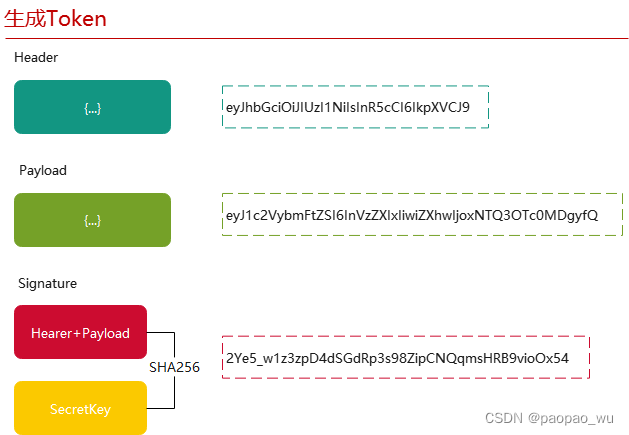
JWT 由三部分组成,每一部分都由点号(.)分隔开:
头部 (Header): 包含关于类型和签名算法的信息。例如:
{"alg":"HS256","typ":"JWT"}这个头部通常表明使用 HMAC SHA-256 算法签名。
负载 (Payload): 也称为“声明”(Claims),包含了要传输的信息。这些信息可以是任意的 JSON 数据,但通常包括一些标准的字段,例如:
{"sub":"1234567890","name":"John Doe","admin":true}这里 "sub" 是主题(Subject),"name" 是姓名,"admin" 是权限声明。
签名 (Signature): 用于验证数据的完整性和确认发送者的身份。签名是通过一个密钥对头部和负载进行加密得到的。
HMACSHA256(
    base64UrlEncode(header) + "." +
    base64UrlEncode(payload),
    secret
)
如果使用非对称加密,则密钥可以是公钥或私钥。
1.3 jwt工作流程
创建和签发: 服务器创建一个 JWT,其中包含用户的身份信息和/或其他数据,然后使用一个秘密密钥或私钥对其进行签名。
传输: JWT 通过网络发送给客户端,通常作为 HTTP Authorization header 的一部分。
验证和使用: 当客户端向服务器发送请求时,它将 JWT 作为身份验证的一部分。服务器验证 JWT 的签名,以确保它没有被篡改,并从中读取信息。
过期: JWT 可以设置一个过期时间,在此之后,它将不再有效。
下面将通过Vue + SpringBoot 实现一个jwt鉴权的项目
二、前端配置
2.1 引入axios
npm install axios通过添加前端拦截器配置axios
在src下创建一个utils包,再创建一个axios.js文件
import axios from 'axios';

// 创建axios实例
const instance = axios.create();

// 添加请求拦截器
instance.interceptors.request.use(
  function (config) {
    // 在这里添加token到请求头
    const token = localStorage.getItem('token') || ''; // 从本地存储获取token
    if (token) {
      config.headers.Authorization = `${token}`;
    }
    return config;
  },
  function (error) {
    // 请求错误时的处理
    return Promise.reject(error);
  }
);

export default instance;
在main.js中配置应用axios
import axios from './utils/axios';

Vue.prototype.$axios = axios;
2.3 使用axios
在配置全局后,使用axios就并不需要单独引入axios了,直接使用this.$axios即可调用
 this.$axios.get('/api/forum/getAllForumPost', {
                    params: {
                        pageSize: 1,
                        pageNumber: 10
                    }
                }).then((response) => {
                    console.log(response.data.data);

                    this.posts = response.data.data;
                });
创建一个TestView.vue测试发送请求时候是否会携带请求头
<template>
  <div>

    <!-- 测试是否会携带请求头 -->
    <button @click="Test"> 发送测试</button>

  </div>
</template>

<script>
export default {
  data() {
    return {
    };
  },
  methods: {
    Test(){
      // 假设有登录成功后的token
      localStorage.setItem('token', '1234567890');

      this.$axios.get('/api/Test').then((response) => {
                    console.log(response.data.data);
                });
    }
  },

};
</script>
在控制台的网络中查看是否有对应的请求头

已经成功携带,并且名称为Authorization

三、后端配置
3.1 引入依赖
<!--        JWT依赖-->
        <dependency>
            <groupId>io.jsonwebtoken</groupId>
            <artifactId>jjwt</artifactId>
            <version>0.9.1</version>
        </dependency>

        <dependency>
            <groupId>javax.xml.bind</groupId>
            <artifactId>jaxb-api</artifactId>
            <version>2.3.0</version>
        </dependency>
3.3 由于jwt需要三个属性 密钥 有效期 Token的名称
所以需要配置对应的资源类
@Component
@ConfigurationProperties(prefix = "paitool.jwt")
@Data
public class JwtProperties {

    private String SecretKey;
    private long Ttl;
    private String TokenName;


}
application.yml:
paitool:
  jwt:
    secret-key: Alphamilk
    ttl: 10800000
    token-name: Authorization
3.4 创建配置Jwt的工具类 实现快速创建Jwt与解密Jwt方法
public class JwtUtil {
    /**
     * 生成jwt
     * 使用Hs256算法, 私匙使用固定秘钥
     *
     * @param secretKey jwt秘钥
     * @param ttlMillis jwt过期时间(毫秒)
     * @param claims    设置的信息
     * @return
     */
    public static String createJWT(String secretKey, long ttlMillis, Map<String, Object> claims) {
        // 指定签名的时候使用的签名算法,也就是header那部分
        SignatureAlgorithm signatureAlgorithm = SignatureAlgorithm.HS256;

        // 生成JWT的时间
        long expMillis = System.currentTimeMillis() + ttlMillis;
        Date exp = new Date(expMillis);

        // 设置jwt的body
        JwtBuilder builder = Jwts.builder()
                // 如果有私有声明,一定要先设置这个自己创建的私有的声明,这个是给builder的claim赋值,一旦写在标准的声明赋值之后,就是覆盖了那些标准的声明的
                .setClaims(claims)
                // 设置签名使用的签名算法和签名使用的秘钥
                .signWith(signatureAlgorithm, secretKey.getBytes(StandardCharsets.UTF_8))
                // 设置过期时间
                .setExpiration(exp);

        return builder.compact();
    }

    /**
     * Token解密
     *
     * @param secretKey jwt秘钥 此秘钥一定要保留好在服务端, 不能暴露出去, 否则sign就可以被伪造, 如果对接多个客户端建议改造成多个
     * @param token     加密后的token
     * @return
     */
    public static Claims parseJWT(String secretKey, String token) {
        // 得到DefaultJwtParser
        Claims claims = Jwts.parser()
                // 设置签名的秘钥
                .setSigningKey(secretKey.getBytes(StandardCharsets.UTF_8))
                // 设置需要解析的jwt
                .parseClaimsJws(token).getBody();
        return claims;
    }

}
3.5 通过ThreadLocal实现后端存储用户信息
public class BaseContext {

    public static ThreadLocal<Long> threadLocal = new ThreadLocal<>();

    public static void setCurrentId(Long id) {
        threadLocal.set(id);
    }

    public static Long getCurrentId() {
        return threadLocal.get();
    }

    public static void removeCurrentId() {
        threadLocal.remove();
    }

}
3.6 配置jwt的拦截器
注意:这里的HandlerMehtod是org.springframework.web.method包下的
@Component
@Slf4j
public class JwtTokenInterceptor implements HandlerInterceptor {

    @Autowired
    private JwtProperties jwtProperties;

    /**
     * 校验jwt
     *
     * @param request
     * @param response
     * @param handler
     * @return
     * @throws Exception
     */
    public boolean preHandle(HttpServletRequest request, HttpServletResponse response, Object handler) throws Exception {


        //判断当前拦截到的是Controller的方法还是其他资源
        if (!(handler instanceof HandlerMethod)) {
            //当前拦截到的不是动态方法,直接放行
            return true;
        }

        //1、从请求头中获取令牌
        String token = request.getHeader(jwtProperties.getTokenName());

        //2、校验令牌
        try {
            log.info("jwt校验:{}", token);
            Claims claims = JwtUtil.parseJWT(jwtProperties.getSecretKey(), token);

            // 获取JWT的过期时间并转换为可读格式

            Date expirationDate = claims.getExpiration();

            SimpleDateFormat sdf = new SimpleDateFormat("yyyy-MM-dd HH:mm:ss");
            String formattedExpiration = sdf.format(expirationDate);
            log.info("JWT过期时间:{}", formattedExpiration);


            Long userId = Long.valueOf(claims.get("userId").toString());
            log.info("当前用户id:", userId);

            //通过ThreadLocal保存员工id
            BaseContext.setCurrentId(userId);
            //3、通过,放行

            return true;
        } catch (Exception ex) {
            //4、不通过,响应401状态码
            response.setStatus(401);
            return false;
        }
    }
}
3.7 将配置好的拦截器加入到webMvc配置中(由于本次实战通过用户登陆获取token,记得排除用户登陆时候进行校验的过程)
@Configuration
@Slf4j
public class WebMvcConfig extends WebMvcConfigurationSupport {


    @Autowired
    private JwtTokenInterceptor jwtTokenInterceptor;


    @Override
    protected void addInterceptors(InterceptorRegistry registry) {
        log.info("开始注册自定义拦截器...");
        registry.addInterceptor(jwtTokenInterceptor)
                .addPathPatterns("/**")
                .excludePathPatterns("/user/login")
                .excludePathPatterns("/user/GetCaptcha");


}
四、实战
1.创建User表单
create table paitool.user
(
    id                int auto_increment
        primary key,
    account           varchar(255)                                          not null,
    password          varchar(255)                                          not null,
    phone             varchar(20)                                           null,
    address           varchar(255)                                          null,
    isVip             tinyint(1)                  default 0                 null,
    email             varchar(255)                                          null,
    registration_date datetime                    default CURRENT_TIMESTAMP null,
    last_login        datetime                                              null,
    status            enum ('active', 'inactive') default 'active'          null,
    constraint account_UNIQUE
        unique (account),
    constraint email_UNIQUE
        unique (email),
    constraint phone_UNIQUE
        unique (phone)
);
通过MyBatisPlusX自动生成架构


2.创建返回结果实体类
//结果类
public class Result<T> {
    // 状态码常量
    public static final int SUCCESS = 200;
    public static final int ERROR = 500;

    private int code; // 状态码
    private String message; // 消息
    private T data; // 数据

    // 构造函数,用于创建成功的结果对象
    private Result(int code, String message, T data) {
        this.code = code;
        this.message = message;
        this.data = data;
    }

    // 成功结果的静态方法
    public static <T> Result<T> success(T data) {
        return new Result<>(SUCCESS, "Success", data);
    }


    // 错误结果的静态方法
    public static <T> Result<T> error(String message) {
        return new Result<>(ERROR, message, null);
    }

    // 错误结果的静态方法,可以传入自定义的状态码
    public static <T> Result<T> error(int code, String message) {
        return new Result<>(code, message, null);
    }

    // 获取状态码
    public int getCode() {
        return code;
    }

    // 设置状态码
    public void setCode(int code) {
        this.code = code;
    }

    // 获取消息
    public String getMessage() {
        return message;
    }

    // 设置消息
    public void setMessage(String message) {
        this.message = message;
    }

    // 获取数据
    public T getData() {
        return data;
    }

    // 设置数据
    public void setData(T data) {
        this.data = data;
    }

    // 用于转换为Map类型的方法,方便序列化为JSON
    public Map<String, Object> toMap() {
        Map<String, Object> map = new HashMap<>();
        map.put("code", code);
        map.put("message", message);
        map.put("data", data);
        return map;
    }
}
3.创建验证码(防止密码爆破)工具类 与 Md5加密与解密工具类(防止数据库密码信息泄露)
public class CaptchaUtil {

    private static final int WIDTH = 200;
    private static final int HEIGHT = 75;
    private static final int FONT_SIZE = 36;
    private static final String DEFAULT_FONT = "Arial";

    /**
     * 生成验证码图像.
     *
     * @param captchaText 验证码原始文本
     * @return Base64编码的图像字符串
     */
    public static String generateCaptchaImage(String captchaText) {
        if (captchaText == null || captchaText.isEmpty()) {
            throw new IllegalArgumentException("Captcha text cannot be null or empty.");
        }

        // 创建图像和图形上下文
        BufferedImage image = new BufferedImage(WIDTH, HEIGHT, BufferedImage.TYPE_INT_RGB);
        Graphics2D g = (Graphics2D) image.getGraphics();

        // 设置背景颜色
        g.setColor(Color.WHITE);
        g.fillRect(0, 0, WIDTH, HEIGHT);

        // 绘制验证码文本
        g.setFont(new Font(DEFAULT_FONT, Font.BOLD, FONT_SIZE));
        g.setColor(getRandomColor());
        g.drawString(captchaText, 45, 50);

        // 添加随机线条作为干扰
        addNoiseLines(g);

        // 关闭图形上下文
        g.dispose();

        // 将图像转换为Base64编码的字符串
        try (ByteArrayOutputStream baos = new ByteArrayOutputStream()) {
            ImageIO.write(image, "png", baos);
            return Base64.getEncoder().encodeToString(baos.toByteArray());
        } catch (Exception e) {
            throw new RuntimeException("Error generating captcha image", e);
        }
    }

    private static void addNoiseLines(Graphics2D g) {
        for (int i = 0; i < 5; i++) {
            g.setColor(getRandomColor());
            g.drawLine(
                    getRandomNumber(WIDTH),
                    getRandomNumber(HEIGHT),
                    getRandomNumber(WIDTH),
                    getRandomNumber(HEIGHT)
            );
        }
    }

    private static Color getRandomColor() {
        return new Color((int) (Math.random() * 255),
                         (int) (Math.random() * 255),
                         (int) (Math.random() * 255));
    }

    private static int getRandomNumber(int bound) {
        return (int) (Math.random() * bound);
    }
}
public final class MD5Util {
/**
* 使用MD5算法对字符串进行加密。
*
* @param input 待加密的字符串
* @return 加密后的MD5散列值字符串
*/
public static String encryptToMD5(String input) {
try {
MessageDigest md = MessageDigest.getInstance("MD5");
byte[] hashInBytes = md.digest(input.getBytes());
// 将字节数组转换成十六进制字符串
StringBuilder sb = new StringBuilder();
for (byte b : hashInBytes) {
sb.append(String.format("%02x", b));
}
return sb.toString();
} catch (NoSuchAlgorithmException e) {
throw new RuntimeException("MD5 algorithm not found", e);
}
}
public static void main(String[] args) {
String originalString = "Hello World";
String encryptedString = encryptToMD5(originalString);
System.out.println("Original: " + originalString);
System.out.println("Encrypted: " + encryptedString);
}
}
4.创建数据传输与视图的实体类
登陆时候,前端传入数据
@Data
public class LoginDTO {

    private String account;

    private String password;

//    验证码
    private String captcha;


}
验证通过后传给前端的数据
@Data
public class loginVo {

    private Integer id;

    private String account;

    private Integer isvip;

    private Object status;

    private String token;


}
4.UserController实现登陆功能
@RestController
@Slf4j
@RequestMapping("/user")
public class UserController {

    @Autowired
    UserService userService;


    @Autowired
    private JwtProperties jwtProperties;

    // 登陆时候获取验证码
    @ApiOperation("获取验证码功能")
    @GetMapping("/GetCaptcha")
    public String GetCaptcha(HttpSession session) {

//        随机生成四位验证码原始数据
        String allowedChars = "0123456789abcdefghijklmnopqrstuvwxyzABCDEFGHIJKLMNOPQRSTUVWXYZ";
        String randomString = generateRandomString(allowedChars, 4);
        System.out.println("captchaCode " + randomString);

        // 将验证码保存到session中
        session.setAttribute("captcha", randomString); // 使用方法参数session
        String ImageByBase64 = CaptchaUtil.generateCaptchaImage(randomString);
        return ImageByBase64;
    }


    // 实现登陆功能
    @ApiOperation("用户登陆功能")
    @PostMapping("/login")
    public Result<loginVo> Login(@RequestBody LoginDTO loginDTO, HttpSession session) { // 使用同一个HttpSession参数

        String captcha = (String) session.getAttribute("captcha");

        log.info("用户调用login方法");
        if (loginDTO.getCaptcha() == null || !loginDTO.getCaptcha().equalsIgnoreCase(captcha)) {
            session.removeAttribute("captcha");
            return Result.error("验证码出错了噢!");
        }

        // 对密码进行md5加密
        String encryptToMD5 = MD5Util.encryptToMD5(loginDTO.getPassword());

        LambdaQueryWrapper<User> lambdaQueryWrapper = new LambdaQueryWrapper<>();
        lambdaQueryWrapper.eq(User::getAccount, loginDTO.getAccount())
                .eq(User::getPassword, encryptToMD5);

        User user = userService.getOne(lambdaQueryWrapper);
        if (user == null) {
            return Result.error("很抱歉,查不到此用户");
        }
        loginVo loginVo = new loginVo();
        BeanUtils.copyProperties(user,loginVo);
        Map<String,Object> claims = new HashMap<>();
        claims.put("userId",user.getId());
        String token = JwtUtil.createJWT(jwtProperties.getSecretKey(), jwtProperties.getTtl(), claims);
        loginVo.setToken(token);

        return Result.success(loginVo);
    }
}
前端账户操作View.vue:
<template>
  <div id="Header">
    <h3>--PaiTool--</h3>

    <div class="header-avatar">
      <el-popover placement="bottom" :visible-arrow="false" :visible.sync="showUserInfo">
        <div class="userInfo">
          <p>用户名:{{ account }}</p>
          <p>邮箱:{{ email }}</p>
          <p>是否是vip: {{ isVip }}</p>
          <p>账号状态:{{ status }}</p>

          <!-- 登录按钮 -->
          <el-button type="primary" @click="showDialog">登录/注册</el-button>
          <!-- 退出按钮 -->
          <el-button type="text" @click="confirmQuit">退出</el-button>

          <!-- 登录对话框 -->
          <el-dialog title="登录与注册" :visible.sync="dialogLoginVisible" width="30%" @close="resetLoginForm" append-to-body
            :modal-append-to-body="false">

            <el-tabs v-model="activeName" @tab-click="handleClick">

              <el-tab-pane label="登陆" name="first">
                <el-form :model="loginForm" ref="loginFormRef" label-width="80px">
                  <el-form-item label="用户名:">
                    <el-input v-model="loginForm.account"></el-input>
                  </el-form-item>
                  <el-form-item label="密码:">
                    <el-input v-model="loginForm.password" show-password></el-input>
                  </el-form-item>
                  <el-form-item label="验证码">
                    <el-input v-model="loginForm.captcha" style="width: 20%;"></el-input>
                    <img :src="captchaImageUrl" alt="验证码" @click="refreshCaptcha" id="captchaImage">
                  </el-form-item>
                </el-form>
              </el-tab-pane>

              <el-tab-pane label="注册" name="second">
                <el-form :model="loginForm" ref="registerFormRef" label-width="80px">
                  <el-form-item label="注册用户:">
                    <el-input v-model="registerFormRef.account"></el-input>
                  </el-form-item>
                  <el-form-item label="注册密码:">
                    <el-input v-model="registerFormRef.password" show-password></el-input>
                  </el-form-item>
                  <el-form-item label="验证码">
                    <el-input v-model="registerFormRef.captcha" style="width: 20%;"></el-input>
                    <img :src="captchaImageUrl" alt="验证码" @click="refreshCaptcha" id="captchaImage">
                  </el-form-item>
                </el-form>


              </el-tab-pane>

            </el-tabs>
            <span slot="footer" class="dialog-footer">
              <el-button @click="dialogLoginVisible = false">取消</el-button>
              <el-button type="primary" @click="submitLogin">登录|注册</el-button>
            </span>


          </el-dialog>

          <!-- 退出确认对话框 -->
          <el-dialog title="确认退出" :visible.sync="dialogConfirmVisible" width="30%" @close="dialogConfirmVisible = false"
            append-to-body :modal-append-to-body="false">
            <span>您确定要退出吗?</span>
            <span slot="footer" class="dialog-footer">
              <el-button @click="dialogConfirmVisible = false">取消</el-button>
              <el-button type="primary" @click="quit">确定退出</el-button>
            </span>

          </el-dialog>
        </div>
        <el-avatar slot="reference" :src="circleUrl" :size="40" class="clickable-avatar"></el-avatar>
      </el-popover>
    </div>
  </div>
</template>

<script>
import axios from 'axios';
import Cookies from 'js-cookie';

export default {
  data() {
    return {
      showUserInfo: false, // 控制个人信息弹窗的显示状态
      circleUrl: "https://cube.elemecdn.com/3/7c/3ea6beec64369c2642b92c6726f1epng.png",
      isVip: '否',
      account: '未登录',
      status: '正常',
      email: 'none',
      activeName: 'first',
      loginOrRegistFlag: true,

      dialogLoginVisible: false,
      dialogConfirmVisible: false,
      loginForm: {
        username: '',
        password: '',
      },
      registerFormRef: {
        username: '',
        password: '',
      },
      captchaImageUrl: '', // 初始化为一个空字符串

    }
  },
  mounted() {
    this.loadUserDataFromCookie();
  },
  methods: {
    loadUserDataFromCookie() {
      // 从cookie中读取account
      const account = Cookies.get('account');
      if (account) {
        this.account = account;
      }


      // 从cookie中读取isVip
      const isVip = Cookies.get('isVip');
      if (isVip !== undefined) {
        // 注意:从cookie读取的数据是字符串类型,需要转换成布尔型
        this.isVip = isVip === 'true';
      }


      // 从cookie中读取status
      const status = Cookies.get('status');
      if (status) {
        this.status = status;
      }


      // 从cookie中读取email
      const email = Cookies.get('email');
      if (email) {
        this.email = email;
      }

    },
    // 打开登录对话框
    open() {
      this.dialogLoginVisible = true;
    },

    resetLoginForm() {
      this.$refs.loginFormRef.resetFields();
    },
    // 提交登录
    submitLogin() {

      // 判断是注册还是登录
      if (this.loginOrRegistFlag == true) {

        // 这里添加验证逻辑(如果需要)
        console.log('登录表单提交:', this.loginForm);

        this.dialogLoginVisible = false;

        // 将this.loginForm作为参数上传
        axios.post("/api/user/login", this.loginForm)
          .then(response => {
            console.log(response.data);
            if (response.data.code === 500) {
              // 重新获取验证码
              this.refreshCaptcha();

              this.$message.error(response.data.message);
            } else if (response.data.code === 200) {
              this.$message({
                showClose: true,
                message: '登陆成功!',
                type: 'success'
              });

              // 设置cookie,可以设置过期时间
              Cookies.set('account', response.data.data.account, { expires: 7 });
              Cookies.set('isVip', response.data.data.isVip, { expires: 7 });
              Cookies.set('status', response.data.data.status, { expires: 7 });
              Cookies.set('email', response.data.data.email, { expires: 7 });
              Cookies.set('userId', response.data.data.id, { expires: 7 })

              localStorage.setItem('token', response.data.data.token);


              this.account = response.data.data.account;
              this.isVip = response.data.data.isVip;
              this.status = response.data.data.status;
              this.email = response.data.data.email;
            }

          })
          .catch(error => {
            // 处理错误响应
            console.error('登录失败:', error);
            this.$message.error('登陆错了哦,这是一条错误消息')
          });


      } else {

        axios.post('/api/user/register', this.registerFormRef).then(response => {
          if (response.data.code === 200) {
            this.$message({
              showClose: true,
              message: '注册成功!',
              type: 'success'
            });

            this.dialogLoginVisible = false;
          } else {
            this.$message.error(response.data.message);
          }

        });

      }

    },
    // 打开退出确认对话框
    confirmQuit() {
      this.dialogConfirmVisible = true;
    },
    // 执行退出操作
    quit() {
      // 这里执行实际的退出逻辑
      console.log('执行退出操作');
      this.dialogConfirmVisible = false;

      // 将Cookie所有字段删除
      Cookies.remove('account');
      Cookies.remove('isVip');
      Cookies.remove('status');
      Cookies.remove('email');
      Cookies.remove('userId');
      this.account = '未登录';
      this.isVip = '否';
      this.status = '离线';
      this.email = 'none';

      this.$message({
        showClose: true,
        message: '退出成功!',
        type: 'success'
      });

    },


    // 刷新验证码的示例函数
    refreshCaptcha() {
      // 实现刷新验证码的逻辑
      console.log('刷新验证码');
      this.fetchCaptcha();
    },
    fetchCaptcha() {
      axios.get('/api/user/GetCaptcha')
        .then(response => {

          this.captchaImageUrl = 'data:image/png;base64,' + response.data;
        })
        .catch(error => {
          console.error('获取验证码失败:', error);
        });
    },
    showDialog() {
      this.fetchCaptcha(); // 先获取验证码
      this.dialogLoginVisible = true; // 然后显示登录对话框
    },
    handleClick(tab) {

      if (tab.name === 'first') {
        this.loginOrRegistFlag = true;
      } else {
        this.loginOrRegistFlag = false;
      }

    }

  }
}
</script>

<style scoped>
h3 {
  color: #E9EEF3;
  float: left;
  width: 1307px;
  height: 60px;
  margin-left: 15%;
}

.header-avatar {
  position: relative;
  /* 为绝对定位的子元素提供上下文 */
  float: right;
  z-index: 1000;
  /* 设置一个较高的 z-index 值以确保其位于其他元素之上 */
  margin-top: 10px;
}

.clickable-avatar {
  /* 添加点击手势效果 */
  cursor: pointer;
}

.userInfo {
  text-align: left;
  padding: 10px;
}

#captchaImage {
  cursor: pointer;
  width: 136px;
  height: 45px;
  border: 1px solid black;
  float: right;
  margin-right: 54%;
}
</style>
数据库创建用户与(123456)加密后的密码
account: admin
password: e10adc3949ba59abbe56e057f20f883e
进入前端并进行登陆

查看返回结果的token,前端的login函数已经自动存入了token中了

使用其它功能,查看是否有效

这里看到,后端正常识别到并解析出来了。


![uniapp编译成h5后接口请求参数变成[object object]](https://i-blog.csdnimg.cn/direct/4f8f3c7020644eb4a1cd846530529919.png)