文章目录
引言
随着人工智能(AI)和物联网(IoT)技术的快速发展,智能穿戴设备在儿童安全领域的应用正日益广泛。尤其是楼层与室内定位技术,为儿童安全监控提供了精确的技术支撑。本文将深入探讨AI技术在儿童定位与安全监控中的应用,详细介绍相关技术的实现方法,并展望未来的发展趋势。
第一章:AI与室内定位技术
1.1 AI技术概述
人工智能(AI)技术通过模拟人类智能,能够处理复杂的任务,如图像识别、自然语言处理和决策制定等。近年来,AI技术在各个领域的应用都取得了显著进展,特别是在定位和监控方面。
1.2 室内定位技术概述
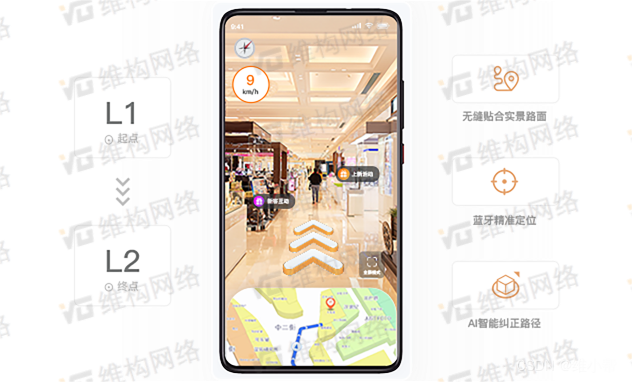
室内定位技术通过使用各种传感器和算法,实现对物体或人的精确定位。常用的室内定位技术包括Wi-Fi定位、蓝牙定位、超宽带(UWB)定位和视觉定位等。相比于GPS在室外环境中的应用,室内定位技术解决了在复杂室内环境中的定位难题。
1.3 楼层定位的挑战与解决方案
楼层定位在室内定位中具有特殊的挑战,主要因为楼层之间的高度差较小,信号干扰较多。气压传感器、Wi-Fi信号强度指纹、蓝牙信标和UWB技术的结合,可以有效解决楼层定位的问题。
第二章:儿童定位与安全监控的需求
2.1 儿童安全问题的现状
儿童走失和意外伤害是全球关注的重大问题。无论是在学校、商场还是公共场所,儿童都面临走失的风险。如何利用先进技术实时监控儿童的位置,是解决这一问题的关键。
2.2 智能穿戴设备的兴起
智能穿戴设备如智能手表、定位手环和安全背包等,逐渐成为儿童安全监控的重要工具。这些设备通过集成多种传感器和通信模块,可以实时采集儿童的位置信息,并通过AI算法进行分析,提供准确的安全监控。
第三章:技术实现细节
3.1 硬件设计与选择
传感器选择与布局
实现儿童定位与安全监控系统需要选择合适的传感器:
- 气压传感器:用于楼层定位,通过测量大气压力来判断高度和楼层位置。
- Wi-Fi模块:用于采集Wi-Fi信号强度,构建楼层的Wi-Fi指纹库。
- 蓝牙模块:用于与低功耗蓝牙信标通信,实现小范围高精度的定位。
- UWB模块:提供高精度的室内定位。
- 摄像头:用于视觉定位和行为分析,识别儿童的位置和动态行为。
3.2 软件架构与开发
系统架构设计
系统软件架构应包括以下几个关键模块:
- 数据采集模块:从传感器和通信模块中采集数据。
- 数据处理模块:进行预处理、特征提取和数据清洗。
- 定位算法模块:实现基于传感器数据的定位和基于AI模型的定位算法。
- 安全监控模块:分析儿童的行为数据,识别异常行为并发出警报。
- 用户界面模块:提供用户交互界面,显示儿童位置、安全状态和报警信息。
数据采集与处理
以下是一个基本的数据采集与预处理示例:
import numpy as np
import pandas as pd

# 假设我们有一个传感器数据流
sensor_data_stream = [
    {'timestamp': 1625247600, 'wifi_signal_1': -50, 'wifi_signal_2': -45, 'wifi_signal_3': -60, 'wifi_signal_4': -55},
    # 其他数据
]

# 数据预处理
def preprocess_data(data):
    df = pd.DataFrame(data)
    return df

preprocessed_data = preprocess_data(sensor_data_stream)
print(preprocessed_data.head())
3.3 定位算法的实现与优化
使用K-最近邻(KNN)算法实现楼层定位的示例代码:
from sklearn.neighbors import KNeighborsClassifier
from sklearn.model_selection import train_test_split
from sklearn.metrics import accuracy_score

# 加载楼层定位训练数据
data = pd.read_csv('floor_positioning_data.csv')

# 数据预处理
X = data[['wifi_signal_1', 'wifi_signal_2', 'wifi_signal_3', 'wifi_signal_4']]  # 特征列
y = data['floor']  # 目标列

# 划分训练集和测试集
X_train, X_test, y_train, y_test = train_test_split(X, y, test_size=0.2, random_state=42)

# 初始化KNN分类器
knn = KNeighborsClassifier(n_neighbors=5)

# 训练模型
knn.fit(X_train, y_train)

# 预测
y_pred = knn.predict(X_test)

# 评估模型
accuracy = accuracy_score(y_test, y_pred)
print(f'KNN模型的准确率: {accuracy:.2f}')
3.4 数据处理与分析
数据预处理
数据预处理包括数据清洗、特征提取和归一化处理等,确保数据质量和模型训练的有效性。
模型训练与优化
使用随机森林算法训练儿童行为分类模型的示例代码:
from sklearn.ensemble import RandomForestClassifier

# 加载训练数据
train_data = pd.read_csv('train_data.csv')
X_train = train_data[['wifi_signal_1', 'wifi_signal_2', 'wifi_signal_3', 'wifi_signal_4']]
y_train = train_data['behavior']

# 初始化随机森林分类器
rf = RandomForestClassifier(n_estimators=100, random_state=42)

# 训练模型
rf.fit(X_train, y_train)

# 预测新的传感器数据
X_new = preprocessed_data[['wifi_signal_1', 'wifi_signal_2', 'wifi_signal_3', 'wifi_signal_4']]
y_pred = rf.predict(X_new)

print(f'预测的行为: {y_pred}')
3.5 系统集成与测试
硬件与软件的集成
将设计好的硬件和软件模块进行集成,确保系统的稳定性和可靠性。
系统测试与验证
进行系统整体功能测试和性能测试,验证系统在各种场景下的表现和稳定性。
用户体验与反馈优化
收集用户反馈,优化系统的用户界面和功能,提升用户体验和系统的实用性。
第四章:技术实现深入分析
4.1 硬件设计与优化
气压传感器
气压传感器用于楼层定位,通过测量大气压力的变化来判断高度和楼层。以下是一个基于气压传感器的楼层定位示例代码:
import numpy as np

# 假设我们有一组气压传感器的数据(单位:帕斯卡)
pressure_data = [101325, 101300, 101275, 101250]

# 根据气压变化计算高度变化
def calculate_height(pressure):
    sea_level_pressure = 101325  # 海平面标准大气压
    height = (1 - (pressure / sea_level_pressure)**0.190284) * 145366.45 * 0.3048
    return height

# 计算每个气压数据对应的高度
heights = [calculate_height(p) for p in pressure_data]

# 根据高度判断楼层(假设每层楼高3米)
def determine_floor(height):
    return int(height // 3)

floors = [determine_floor(h) for h in heights]
print(f'楼层信息:{floors}')
蓝牙模块与信标
蓝牙模块和信标用于室内定位,通过测量信号强度(RSSI)来估计距离。以下是一个基于蓝牙信标的距离估计示例代码:
import math

# 假设我们有一组蓝牙信标的RSSI数据
rssi_data = [-40, -50, -60, -70]

# 根据RSSI计算距离
def rssi_to_distance(rssi):
    tx_power = -59  # 信标的参考RSSI值(1米处的信号强度)
    if rssi == 0:
        return -1.0  # 如果RSSI为0,表示无法获取距离
    ratio = rssi / tx_power
    if ratio < 1.0:
        return math.pow(ratio, 10)
    else:
        return (0.89976) * math.pow(ratio, 7.7095) + 0.111

distances = [rssi_to_distance(rssi) for rssi in rssi_data]
print(f'距离信息:{distances}')
4.2 定位算法的实现与优化
基于Wi-Fi的定位算法
基于Wi-Fi信号强度的定位算法,通常使用指纹匹配的方法。以下是一个基于Wi-Fi指纹的KNN定位算法示例代码:
from sklearn.neighbors import KNeighborsClassifier
import pandas as pd

# 假设我们有一个Wi-Fi指纹库(训练数据)
wifi_fingerprint_data = {
    'wifi_signal_1': [-50, -60, -70, -80],
    'wifi_signal_2': [-45, -55, -65, -75],
    'wifi_signal_3': [-60, -70, -80, -90],
    'floor': [1, 2, 3, 4]
}
df = pd.DataFrame(wifi_fingerprint_data)

# 特征和目标
X = df[['wifi_signal_1', 'wifi_signal_2', 'wifi_signal_3']]
y = df['floor']

# 初始化KNN分类器
knn = KNeighborsClassifier(n_neighbors=3)

# 训练模型
knn.fit(X, y)

# 假设我们有新的Wi-Fi信号强度数据需要定位
new_data = [[-55, -50, -65]]

# 预测楼层
predicted_floor = knn.predict(new_data)
print(f'预测的楼层:{predicted_floor}')
基于UWB的高精度定位
超宽带(UWB)技术通过测量信号传输时间(ToF)实现高精度定位。以下是一个基于UWB的定位算法示例代码:
import math

# 假设我们有一组UWB信标的ToF数据(单位:纳秒)
tof_data = [15.2, 13.8, 18.5, 20.3]

# 根据ToF计算距离(单位:米,光速为299792458米/秒)
def tof_to_distance(tof):
    speed_of_light = 299792458
    distance = tof * 1e-9 * speed_of_light
    return distance

distances = [tof_to_distance(tof) for tof in tof_data]
print(f'UWB距离信息:{distances}')
4.3 数据处理与分析
数据清洗与特征提取
在数据处理过程中,数据清洗和特征提取是关键步骤。以下是一个数据清洗与特征提取的示例代码:
import pandas as pd

# 假设我们有一个原始数据集
raw_data = {
    'timestamp': [1625247600, 1625247660, 1625247720],
    'wifi_signal_1': [-50, -55, None],
    'wifi_signal_2': [-45, None, -60],
    'wifi_signal_3': [-60, -65, -70]
}
df = pd.DataFrame(raw_data)

# 数据清洗
df = df.dropna()  # 移除包含空值的行

# 特征提取
features = df[['wifi_signal_1', 'wifi_signal_2', 'wifi_signal_3']]

print(f'清洗后的数据:\n{df}')
print(f'提取的特征:\n{features}')
4.4 行为分析与异常检测
通过AI算法进行行为分析与异常检测,确保儿童的安全。以下是一个基于随机森林的行为分类示例代码:
from sklearn.ensemble import RandomForestClassifier

# 假设我们有一个行为数据集
behavior_data = {
    'wifi_signal_1': [-50, -60, -70, -80],
    'wifi_signal_2': [-45, -55, -65, -75],
    'wifi_signal_3': [-60, -70, -80, -90],
    'behavior': [0, 1, 1, 0]  # 0表示正常,1表示异常
}
df = pd.DataFrame(behavior_data)

# 特征和目标
X = df[['wifi_signal_1', 'wifi_signal_2', 'wifi_signal_3']]
y = df['behavior']

# 初始化随机森林分类器
rf = RandomForestClassifier(n_estimators=100, random_state=42)

# 训练模型
rf.fit(X, y)

# 假设我们有新的Wi-Fi信号强度数据需要分类
new_data = [[-55, -50, -65]]

# 预测行为
predicted_behavior = rf.predict(new_data)
print(f'预测的行为:{predicted_behavior}')
4.5 系统集成与测试
系统集成
将硬件和软件模块集成到一个完整的系统中,确保各模块之间的协同工作。以下是一个系统集成示例:
class ChildSafetySystem:
    def __init__(self, wifi_module, bluetooth_module, uwb_module, pressure_sensor):
        self.wifi_module = wifi_module
        self.bluetooth_module = bluetooth_module
        self.uwb_module = uwb_module
        self.pressure_sensor = pressure_sensor

    def get_location(self):
        wifi_data = self.wifi_module.get_data()
        bluetooth_data = self.bluetooth_module.get_data()
        uwb_data = self.uwb_module.get_data()
        pressure_data = self.pressure_sensor.get_data()

        # 综合多种数据进行定位
        location = self.calculate_location(wifi_data, bluetooth_data, uwb_data, pressure_data)
        return location

    def calculate_location(self, wifi_data, bluetooth_data, uwb_data, pressure_data):
        # 定位算法的实现
        # 这里省略具体算法的代码,实际应用中会结合多个传感器数据进行精确定位
        pass

# 初始化各个模块
wifi_module = WiFiModule()
bluetooth_module = BluetoothModule()
uwb_module = UWBModule()
pressure_sensor = PressureSensor()

# 创建系统实例
system = ChildSafetySystem(wifi_module, bluetooth_module, uwb_module, pressure_sensor)

# 获取儿童位置
location = system.get_location()
print(f'儿童位置:{location}')
系统测试
通过模拟各种使用场景,对系统进行功能测试和性能测试,确保系统的稳定性和可靠性。以下是一个简单的测试用例示例:
def test_system():
    # 模拟各模块的数据
    wifi_data = {'wifi_signal_1': -50, 'wifi_signal_2': -45, 'wifi_signal_3': -60}
    bluetooth_data = {'rssi_1': -40, 'rssi_2': -50}
    uwb_data = {'tof_1': 15.2, 'tof_2': 13.8}
    pressure_data = 101300

    # 调用系统定位功能


    location = system.calculate_location(wifi_data, bluetooth_data, uwb_data, pressure_data)

    # 验证定位结果
    assert location == expected_location, f'定位结果错误:{location}'
    print('系统测试通过')

# 运行测试
test_system()
第五章:案例研究与实际应用
在这一章中,我们将探讨一些实际应用案例,展示儿童定位与安全监控系统在现实生活中的应用效果和挑战。
案例一:学校中的儿童定位与安全监控
某小学为了确保学生的安全,在校园内部署了一套基于Wi-Fi和蓝牙的定位系统。学生佩戴配有气压传感器和蓝牙模块的智能手环,该手环能够实时采集学生的位置信息并上传至学校的监控系统。通过这一系统,学校能够实时监控学生的动态,并在发生紧急情况时迅速定位和响应。
系统架构:
- 硬件:智能手环、Wi-Fi接入点、蓝牙信标、气压传感器
- 软件:数据采集与传输模块、定位算法、监控平台
- 数据处理:使用Wi-Fi和蓝牙信号强度计算位置,气压传感器用于楼层定位
技术实现:
class SchoolSafetySystem:
    def __init__(self, wifi_module, bluetooth_module, pressure_sensor):
        self.wifi_module = wifi_module
        self.bluetooth_module = bluetooth_module
        self.pressure_sensor = pressure_sensor

    def get_student_location(self, student_id):
        wifi_data = self.wifi_module.get_data(student_id)
        bluetooth_data = self.bluetooth_module.get_data(student_id)
        pressure_data = self.pressure_sensor.get_data(student_id)

        location = self.calculate_location(wifi_data, bluetooth_data, pressure_data)
        return location

    def calculate_location(self, wifi_data, bluetooth_data, pressure_data):
        # 使用定位算法计算位置
        # 这里省略具体算法的代码,实际应用中会结合多个传感器数据进行精确定位
        pass

# 初始化各个模块
wifi_module = WiFiModule()
bluetooth_module = BluetoothModule()
pressure_sensor = PressureSensor()

# 创建系统实例
school_system = SchoolSafetySystem(wifi_module, bluetooth_module, pressure_sensor)

# 获取学生位置
student_id = "student_001"
location = school_system.get_student_location(student_id)
print(f'学生位置:{location}')
效果与挑战:
通过这一系统,学校能够有效监控学生的动向,提升了校园安全管理水平。然而,系统在实际应用中也面临一些挑战,如信号干扰、设备维护等问题。
案例二:商场中的儿童定位与找回系统
某大型商场部署了一套基于UWB和蓝牙的高精度定位系统,以防止儿童走失并帮助家长快速找到走失的儿童。儿童佩戴配有UWB模块和蓝牙模块的智能手表,该手表能够实时采集儿童的位置信息并上传至商场的监控系统。
系统架构:
- 硬件:智能手表、UWB基站、蓝牙信标
- 软件:数据采集与传输模块、定位算法、监控平台
- 数据处理:使用UWB测距和蓝牙信号强度计算位置
技术实现:
class MallSafetySystem:
    def __init__(self, uwb_module, bluetooth_module):
        self.uwb_module = uwb_module
        self.bluetooth_module = bluetooth_module

    def get_child_location(self, child_id):
        uwb_data = self.uwb_module.get_data(child_id)
        bluetooth_data = self.bluetooth_module.get_data(child_id)

        location = self.calculate_location(uwb_data, bluetooth_data)
        return location

    def calculate_location(self, uwb_data, bluetooth_data):
        # 使用定位算法计算位置
        # 这里省略具体算法的代码,实际应用中会结合UWB和蓝牙数据进行精确定位
        pass

# 初始化各个模块
uwb_module = UWBModule()
bluetooth_module = BluetoothModule()

# 创建系统实例
mall_system = MallSafetySystem(uwb_module, bluetooth_module)

# 获取儿童位置
child_id = "child_001"
location = mall_system.get_child_location(child_id)
print(f'儿童位置:{location}')
效果与挑战:
该系统能够帮助家长快速找到走失的儿童,有效提高了儿童在商场内的安全性。然而,系统在实际应用中也面临一些挑战,如UWB基站的部署成本较高、蓝牙信号容易受到干扰等。
要实现楼层的精确判断,可以综合利用多个传感器的数据,例如气压传感器、加速度计、蓝牙信标、Wi-Fi信号等,通过多传感器融合技术提高楼层判断的准确性。以下是一个详细的技术实现方案,包括硬件选择、数据处理、融合算法以及Python代码示例。
第六章 楼层定位具体实现方案
6.1. Python代码示例
以下是一个简单的示例代码,展示如何使用气压传感器数据和卡尔曼滤波器来判断楼层。
import numpy as np

class KalmanFilter:
    def __init__(self, process_variance, measurement_variance, estimated_measurement_variance):
        self.process_variance = process_variance
        self.measurement_variance = measurement_variance
        self.estimated_measurement_variance = estimated_measurement_variance
        self.posteri_estimate = 0.0
        self.posteri_error_estimate = 1.0

    def update(self, measurement):
        priori_estimate = self.posteri_estimate
        priori_error_estimate = self.posteri_error_estimate + self.process_variance

        blending_factor = priori_error_estimate / (priori_error_estimate + self.measurement_variance)
        self.posteri_estimate = priori_estimate + blending_factor * (measurement - priori_estimate)
        self.posteri_error_estimate = (1 - blending_factor) * priori_error_estimate

        return self.posteri_estimate

# 假设我们有一组气压传感器的数据(单位:帕斯卡)
pressure_data = [101325, 101300, 101275, 101250, 101225, 101200]

# 根据气压变化计算高度变化
def calculate_height(pressure):
    sea_level_pressure = 101325  # 海平面标准大气压
    height = (1 - (pressure / sea_level_pressure)**0.190284) * 145366.45 * 0.3048
    return height

# 计算每个气压数据对应的高度
heights = [calculate_height(p) for p in pressure_data]

# 初始化卡尔曼滤波器
kf = KalmanFilter(process_variance=1e-5, measurement_variance=1e-1, estimated_measurement_variance=1e-1)

# 滤波后的高度数据
filtered_heights = [kf.update(h) for h in heights]

# 根据高度判断楼层(假设每层楼高3米)
def determine_floor(height):
    return int(height // 3)

floors = [determine_floor(h) for h in filtered_heights]
print(f'滤波后的楼层信息:{floors}')
6.2 多传感器融合示例
以下是一个综合利用气压传感器、加速度计、蓝牙信标和Wi-Fi信号的多传感器融合示例代码:
class MultiSensorFusion:
    def __init__(self, pressure_sensor, accelerometer, bluetooth_module, wifi_module):
        self.pressure_sensor = pressure_sensor
        self.accelerometer = accelerometer
        self.bluetooth_module = bluetooth_module
        self.wifi_module = wifi_module
        self.kf = KalmanFilter(process_variance=1e-5, measurement_variance=1e-1, estimated_measurement_variance=1e-1)

    def get_fused_height(self):
        pressure_height = calculate_height(self.pressure_sensor.get_pressure())
        accel_height_change = self.accelerometer.get_height_change()
        bluetooth_floor = self.bluetooth_module.get_floor()
        wifi_floor = self.wifi_module.get_floor()

        # 卡尔曼滤波融合数据
        fused_height = self.kf.update(pressure_height + accel_height_change)
        return fused_height, bluetooth_floor, wifi_floor

    def determine_floor(self, fused_height, bluetooth_floor, wifi_floor):
        # 综合考虑各个传感器的数据
        estimated_floor = determine_floor(fused_height)
        final_floor = max(set([estimated_floor, bluetooth_floor, wifi_floor]), key=[estimated_floor, bluetooth_floor, wifi_floor].count)
        return final_floor

# 假设我们有各个传感器模块的实例
pressure_sensor = PressureSensor()
accelerometer = Accelerometer()
bluetooth_module = BluetoothModule()
wifi_module = WiFiModule()

# 创建多传感器融合系统实例
fusion_system = MultiSensorFusion(pressure_sensor, accelerometer, bluetooth_module, wifi_module)

# 获取综合高度和楼层信息
fused_height, bluetooth_floor, wifi_floor = fusion_system.get_fused_height()
final_floor = fusion_system.determine_floor(fused_height, bluetooth_floor, wifi_floor)
print(f'最终确定的楼层:{final_floor}')
6.3. 未来发展与改进方向
- 提高传感器精度:随着传感器技术的不断发展,可以采用更高精度的传感器来提高楼层判断的准确性。
- 优化融合算法:采用更先进的融合算法,如深度学习模型,进一步提高定位精度。
- 提升系统鲁棒性:通过增加冗余传感器和改进算法,提升系统在复杂环境中的鲁棒性和可靠性。
- 降低功耗:优化硬件设计和数据处理流程,降低系统功耗,延长设备的续航时间。
第七章:未来研究方向
在未来的发展中,儿童定位与安全监控系统将继续朝着更智能、更高效、更安全的方向发展。以下是一些值得关注的研究方向:
7.1 多模态传感器融合
未来的定位系统将更多地采用多模态传感器融合技术,综合利用Wi-Fi、蓝牙、UWB、气压传感器、惯性传感器等多种传感器的数据,以提高定位精度和鲁棒性。
7.2 深度学习与智能分析
深度学习技术在定位数据处理和行为分析中具有巨大的潜力。通过深度学习模型,可以更准确地识别和分类儿童的行为模式,并进行异常检测,提高安全监控的智能化水平。
7.3 边缘计算与实时处理
随着边缘计算技术的发展,定位系统将能够在本地实时处理大量数据,减少数据传输的延迟,提高系统的实时性和响应速度。
7.4 数据隐私与安全保护
在数据隐私和安全保护方面,未来的研究将更加注重儿童定位数据的加密和匿名化处理,确保数据在传输和存储过程中的安全性,防止数据泄露和滥用。
7.5 低功耗与长续航设计
智能穿戴设备的低功耗设计和长续航能力将成为未来发展的重点。通过优化硬件和软件设计,可以延长设备的使用时间,减少频繁充电的麻烦,提高用户体验。
第八章:总结
儿童安全是社会关注的重要议题。通过结合AI技术、楼层与室内定位技术和智能穿戴设备,我们可以构建一个全方位的儿童安全监控系统,实现对儿童位置和行为的实时监控与预警。这不仅提高了儿童的安全水平,也为技术在实际生活中的应用提供了新的思路。未来,随着技术的不断进步和创新,儿童定位与安全监控系统将变得更加智能和高效,为儿童的安全保驾护航。
| 欢迎点赞|关注|收藏|评论,您的肯定是我创作的动力 |