引言
在TinUIXml简易编辑器中,我们通过TinUI搭建了一个简易的针对TinUIXml布局的编辑器,基本掌握了TinUIXml布局和TinUIXml的导入与导出。现在,就在此基础上,对编辑器进行升级。
本次升级的功能:
- 更合理的xml编辑与UI展示布局,python代码导出放到另一个子窗口
- python代码使用语法高亮显示
- 在UI展示中,允许打开鼠标十字线坐标定位
- 允许右键单击创建标记坐标点,并能够通过坐标点管理窗口来操作坐标点
新版TinUIXml简易编辑器内置到了TinUI包中,
/test/tuxmltest.py,xml资源文件在/test/xmltestpage目录下。
重新布局
新的主界面main.xml:
<tinui>
<line anchor='w' y='20'>
    <button2 text='导入xml' command='self.funcs["inxml"]'></button2>
    <button2 text='python代码' command='self.funcs["pycode"]'></button2>
    <checkbutton text='启用十字线定位' command='self.funcs["if_location"]'></checkbutton>
    <paragraph text='x: y:'>loctext</paragraph>
</line>
<line>
    <ui width='870' height='630' scrollbar='True'>xmlui</ui>
</line>
<line x='710' y='20' anchor='w'>
    <button2 text='打开标记点管理窗口' command='self.funcs["open_markw"]'></button2>
</line>
</tinui>
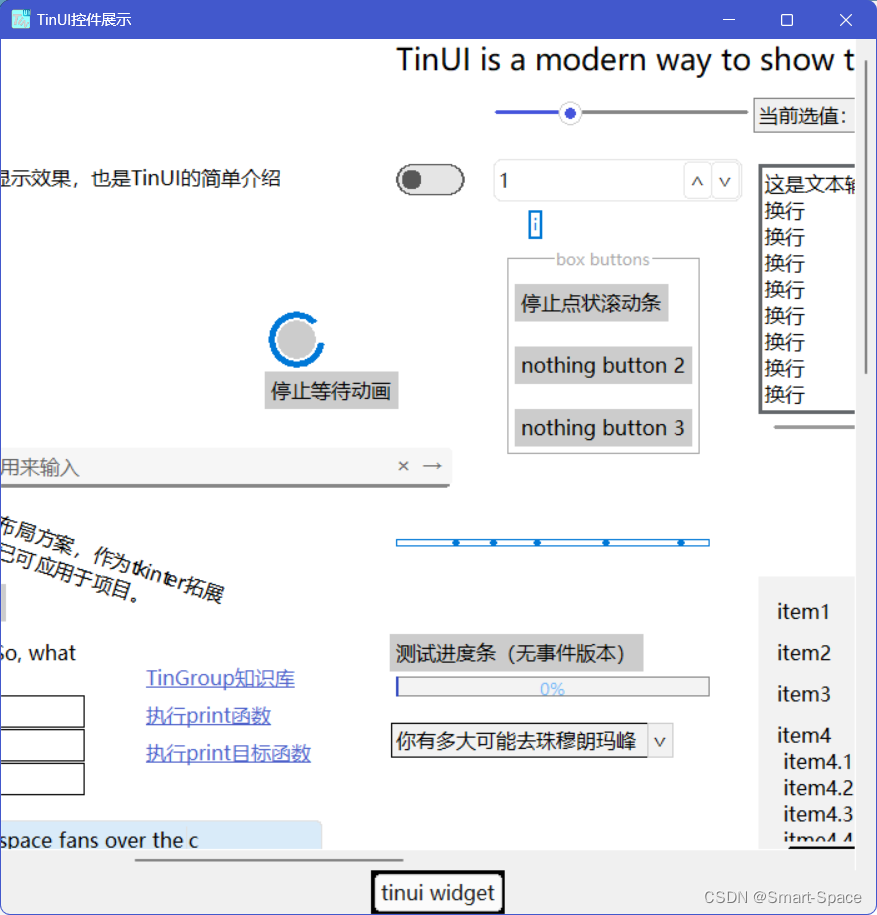
生成界面:

在新版TinUIXml编辑器中,默认添加了一段来自于TinUI.test.maintest里的
back介绍界面xml,这样就可以一目了然明确文本框的交互意义,点击“导入xml”后如图:

新python代码窗口
在新版TinUIXml简易编辑器中,python代码部分被划归到了新的子窗口,名为pycodew,资源文件为pytest.xml:
<!--弹窗显示python代码(IDO)部分-->
<tinui>
<line>
    <textbox width='500' height='500' scrollbar='True'>textbox</textbox>
</line>
<line anchor='w' y='530'>
    <button text='复制' command='self.funcs["copy_pycode"]'></button>
    <button text='标注重点' command='self.funcs["highlight"]'></button>
    <label text='※该内容不可更改'></label>
</line>
</tinui>
在tuxmltest.py中,创建新的窗口:
import idlelib.colorizer as idc
import idlelib.percolator as idp

#...

#弹窗窗口
pycodew=Toplevel()
pycodew.title("Python代码")
# 设置窗口大小
window_width = 520
window_height = 550
# 获取屏幕大小
screen_width = pycodew.winfo_screenwidth()
screen_height = pycodew.winfo_screenheight()
# 计算窗口居中的x和y坐标
x_coordinate = int((screen_width/2) - (window_width/2))
y_coordinate = int((screen_height/2) - (window_height/2))
# 设置窗口的位置和大小,并禁止改变尺寸
pycodew.geometry("{}x{}+{}+{}".format(window_width, window_height,
                                      x_coordinate, y_coordinate))
pycodew.resizable(width=False, height=False)  # 禁止改变窗口大小
pctinui=BasicTinUI(pycodew)
pctinui.pack(fill='both',expand=True)
pycodew.protocol("WM_DELETE_WINDOW", lambda: pycodew.withdraw())  # 忽略关闭窗口的协议
pycodew.withdraw()
pctinuix=TinUIXml(pctinui)

xmlf=open(os.path.dirname(__file__)+r'\xmltestpage\pytest.xml','r',encoding='utf-8')
xml=xmlf.read()
xmlf.close()
pctinuix.environment(globals())
pctinuix.loadxml(xml)
textbox=pctinuix.tags['textbox'][0]
idc.color_config(textbox)
p = idp.Percolator(textbox)
d = idc.ColorDelegator()
p.insertfilter(d)
注意到其中的idc, idp等,都是从idlelib中导入的,用来对文本框进行python语法高亮处理。
新xml编辑器对于python代码的处理,与上一版一样,都是重新生成一遍TinUI界面,在此过程中生成对应IDO片段部分python代码,这里不做赘述。新的变化是能够直接复制python代码,同时可以通过注释生成重点内容。
功能代码如下:
def copy_pycode(e):#复制
    textbox.clipboard_clear()
    copyText = textbox.get(1.0,'end')
    textbox.clipboard_append(copyText)
def highlight(e):#标注funcs,datas等重点
    havefunc,havedata=False,False
    textbox.configure(state='normal')
    write('\n#TinUIXml导入重点:\n')
    for i in textbox.result:
        if i[0]=='funcs':
            if havefunc==False:
                havefunc=True
                write('#函数/方法(funcs):\n')
            write(f'#  {i[1]}(...)\n')
        elif i[0]=='datas':
            if havedata==False:
                havedata=True
                write('#数据(datas):\n')
            write(f'#  {i[1]}=...\n')
    havetag=False
    for tag in duixml.tags.keys():
        if havetag==False:
            havetag=True
            write('\n#TinUIXml导出重点:\n')
        write(f'#  {tag}\n')
    textbox.configure(state='disabled')
十字线定位
TinUIXml只是解决了每块包含若干控件元素的行元素默认布局问题,但是行元素<line>的起始位置是可以自定义的,同时,行元素内部也可以嵌套新的行元素,起始位置也可以自定义。如果我们要在TinUIXml布局时也保持绝对坐标布局的灵活性,就需要知道在当前xml布局(新xml布局编写之前)下,界面元素所占的空间位置状态。
在新TinUIXml编辑器中,直接使用了BasicTinUI自带的设计模式,通过display.show_location控制开启和关闭。
TinUI(BasicTinUI)设计模式在5.1版本中加入。
loclines=False#坐标十字线是否存在
def if_location(e):#是否显示坐标十字线
    global loclines
    loclines=e
    if loclines:
        tinui.itemconfig(loctext,state='normal')
        displayui.show_location(command=getloc)
    else:
        tinui.itemconfig(loctext,text='x:? y:?',state='hidden')
        displayui.show_location(False)

def getloc(x,y):
    tinui.itemconfig(loctext,text=f'x:{x} y:{y}')
标记点绘制
在新TinUIXml编辑器中,我们设计右键单击绘制标记点,这个功能非常简单,就先不在这里给出详细代码,稍后会随标记点的管理给出。不过需要注意的是,当ui界面重绘,也就是inxml()方法执行后,我们也需要重绘这些点,因此,我们使用mark_points:list=[]来记录这些点的位置信息和画布对象id。
只需要在inxml()后加入reset_marks()即可。
def inxml(e):#注入xml界面
    xml=text.get(1.0,'end')
    duixml.funcs=dict()
    duixml.datas=dict()
    duixml.tags=dict()
    result=re.findall("self\.(.*?)\[.(.*?).\]'",xml,re.M|re.S)
    for i in result:
        if i[0]=='funcs':
            duixml.funcs[i[1]]=None
        elif i[0]=='datas':
            duixml.datas[i[1]]=(None,None)
    duixml.yendy=5
    duixml.clean()
    duixml.loadxml(xml)
    rescroll()
    reset_marks()#!!!

def reset_marks():#重新绘制标记点
    if len(mark_points)==0:
        return
    index=1
    for i in mark_points[1:]:
        mark=displayui.create_oval((i[0][0],i[0][1],i[0][0]+3,i[0][1]+3),outline='red',fill="red")
        mark_points[index]=(i[0],mark)
        index+=1
标记点管理
仅仅有十字线坐标定位是不够的,有时候,我们需要记录几个关键标记点,比如窗口大小对角点、预留控件位置等等。在新TinUIXml编辑器中,我们可以通过另一个窗口,来管理这些标记点。
窗口布局marks.xml:
<!--标记点控制窗口-->
<tinui>
<line y='14' anchor='w'>
    <paragraph text='鼠标右键单击确立标记点'></paragraph>
    <button2 text='删除标记点' command='self.funcs["del_mark"]'></button2>
</line>
<line>
    <listbox data='("TinUIXml编辑器标记点",)' width="365" height="535" command='self.funcs["sel_mark"]'>listbox</listbox>
</line>
</tinui>
这个窗口中的listbox列表框,就是我们的主要交互方式,我们也需要保持mark_points列表与列表框的同步更新。
now_mark=None#mark_index
def open_markw(e):
    markw.deiconify()
def del_mark(e):#删除选定标记点
    global now_mark
    if now_mark==None:
        return
    listbox.delete(now_mark)
    displayui.delete(mark_points[now_mark][1])
    del mark_points[now_mark]
    now_mark=None
def sel_mark(name):#选定标记点
    global now_mark
    if name.index==0:
        now_mark=None
    else:
        if now_mark!=None:
            displayui.itemconfigure(mark_points[now_mark][1],outline='red',fill="red")
        now_mark=name.index
        displayui.itemconfigure(mark_points[now_mark][1],outline='blue',fill='blue')
def __set_mark(x,y):
    mark=displayui.create_oval((x,y,x+3,y+3),outline='red',fill="red")
    mark_points.append(((x,y),mark))
    listbox.add(f'({x} , {y})')
def set_mark(e):#绘制标记点
    __set_mark(e.x,e.y)
注意其中每次
listbox的变动,都要伴随mark_points的变动,UI展示区域则视情况而定。
至此,完成一个新的TinUIXml简易编辑器。