目标:向 ROS 2 包添加一个启动文件
教程级别:中级
时间:10 分钟
目录
先决条件
背景
任务
1. 创建一个包
2. 创建用于存放启动文件的结构
3. 编写启动文件
4. 建立和运行启动文件
文档
先决条件
您应该已经学习了如何创建 ROS 2 包的教程。
始终不要忘记在您打开的每个新终端中获取 ROS 2 的源。
背景
在上一教程中,我们看到了如何编写一个独立的启动文件。本教程将展示如何将一个启动文件添加到现有的包中,以及通常使用的约定。
任务
1. 创建一个包
创建一个包可以存放的工作空间:
mkdir -p launch_ws/src
cd launch_ws/src
Python 包
ros2 pkg create --build-type ament_python --license Apache-2.0 py_launch_examplecxy@ubuntu2404-cxy:~$ mkdir -p launch_ws/src
cxy@ubuntu2404-cxy:~$ cd launch_ws/src
cxy@ubuntu2404-cxy:~/launch_ws/src$ ros2 pkg create --build-type ament_python --license Apache-2.0 py_launch_example
going to create a new package
package name: py_launch_example
destination directory: /home/cxy/launch_ws/src
package format: 3
version: 0.0.0
description: TODO: Package description
maintainer: ['cxy <cxy@todo.todo>']
licenses: ['Apache-2.0']
build type: ament_python
dependencies: []
creating folder ./py_launch_example
creating ./py_launch_example/package.xml
creating source folder
creating folder ./py_launch_example/py_launch_example
creating ./py_launch_example/setup.py
creating ./py_launch_example/setup.cfg
creating folder ./py_launch_example/resource
creating ./py_launch_example/resource/py_launch_example
creating ./py_launch_example/py_launch_example/__init__.py
creating folder ./py_launch_example/test
creating ./py_launch_example/test/test_copyright.py
creating ./py_launch_example/test/test_flake8.py
creating ./py_launch_example/test/test_pep257.pyC++包
ros2 pkg create --build-type ament_cmake --license Apache-2.0 cpp_launch_examplecxy@ubuntu2404-cxy:~/launch_ws/src$ ros2 pkg create --build-type ament_cmake --license Apache-2.0 cpp_launch_example
going to create a new package
package name: cpp_launch_example
destination directory: /home/cxy/launch_ws/src
package format: 3
version: 0.0.0
description: TODO: Package description
maintainer: ['cxy <cxy@todo.todo>']
licenses: ['Apache-2.0']
build type: ament_cmake
dependencies: []
creating folder ./cpp_launch_example
creating ./cpp_launch_example/package.xml
creating source and include folder
creating folder ./cpp_launch_example/src
creating folder ./cpp_launch_example/include/cpp_launch_example
creating ./cpp_launch_example/CMakeLists.txt2. 创建用于保存启动文件的结构
按照惯例,包的所有启动文件都存储在包内的 launch 目录中。确保在您上面创建的包的顶层创建一个 launch 目录。
Python包:
cxy@ubuntu2404-cxy:~/launch_ws/src$ cd py_launch_example
cxy@ubuntu2404-cxy:~/launch_ws/src/py_launch_example$ mkdir launch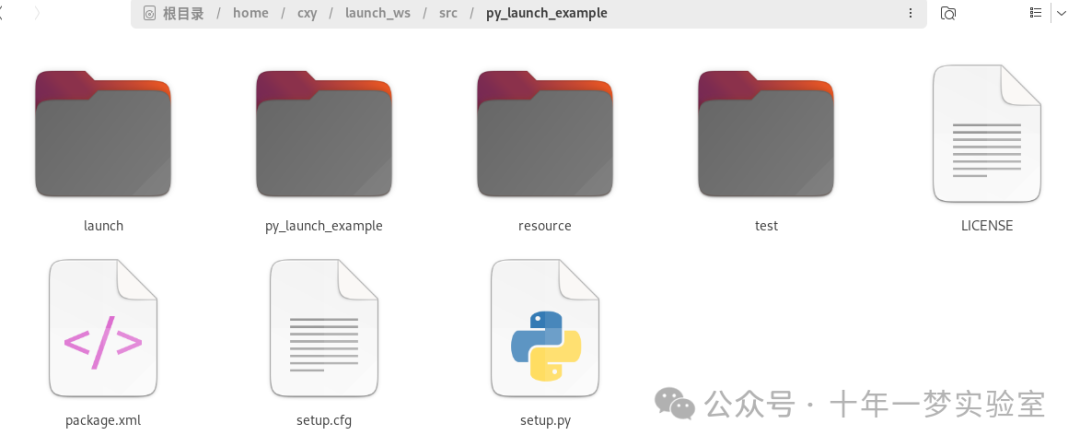
对于 Python 包,包含您包的目录应该如下所示:
src/
  py_launch_example/
    launch/
    package.xml
    py_launch_example/
    resource/
    setup.cfg
    setup.py
    test/
为了使 colcon 能够定位和使用我们的启动文件,我们需要通知 Python 的设置工具它们的存在。为此,打开 setup.py 文件,在顶部添加必要的 import 语句,并将启动文件包含到 setup 的 data_files 参数中:
import os
from glob import glob
# Other imports ...


package_name = 'py_launch_example'


setup(
    # Other parameters ...
    data_files=[
        # ... Other data files
        # Include all launch files.
        (os.path.join('share', package_name, 'launch'), glob(os.path.join('launch', '*launch.[pxy][yma]*')))
    ]
)
# 导入os模块,该模块提供了一种方便的使用操作系统依赖功能的方式
import os
# 导入glob模块,该模块提供了一个在目录中使用通配符搜索创建文件列表的函数
from glob import glob
# 导入setuptools模块的find_packages和setup函数
from setuptools import find_packages, setup
# 定义包名
package_name = 'py_launch_example'
# 调用setup函数来配置包
setup(
# 包名
name=package_name,
# 版本号
version='0.0.0',
# 使用find_packages函数查找包,排除名为'test'的包
packages=find_packages(exclude=['test']),
# 数据文件,将会被安装到指定的位置
data_files=[
('share/ament_index/resource_index/packages',
['resource/' + package_name]),
('share/' + package_name, ['package.xml']),
(os.path.join('share', package_name, 'launch'), glob(os.path.join('launch', '*launch.[pxy][yma]*')))
],
# 安装依赖,这个包需要setuptools
install_requires=['setuptools'],
# zip_safe参数,如果为True,表示此包可以作为.zip文件进行安全的分发和运行
zip_safe=True,
# 维护者的名字
maintainer='cxy',
# 维护者的邮箱
maintainer_email='cxy@126.com',
# 包的描述
description='py_launch_example',
# 许可证
license='Apache-2.0',
# 测试需要的包
tests_require=['pytest'],
# 入口点,定义了哪些包可以生成可执行文件
entry_points={
'console_scripts': [
],
},
)C++包:
对于 C++ 包,我们将仅通过添加调整 CMakeLists.txt 文件:
# Install launch files.
install(DIRECTORY
  launch
  DESTINATION share/${PROJECT_NAME}/
)
文件结束前(但在 ament_package() 之前)。
3. 编写启动文件(Python / C++)
cxy@ubuntu2404-cxy:~/launch_ws/src/py_launch_example$ mkdir launch
cxy@ubuntu2404-cxy:~/launch_ws/src/py_launch_example$ cd launch
cxy@ubuntu2404-cxy:~/launch_ws/src/py_launch_example/launch$ gedit my_script_launch.py
cxy@ubuntu2404-cxy:~/launch_ws/src/py_launch_example/launch$ gedit my_script_launch.yaml
cxy@ubuntu2404-cxy:~/launch_ws/src/py_launch_example/launch$ gedit my_script_launch.xml
Python 启动文件 :
在您的 launch 目录中,创建一个名为 my_script_launch.py 的新启动文件。虽然 _launch.py 作为 Python 启动文件的文件后缀是推荐的,但不是必须的。然而,启动文件名需要以 launch.py 结尾,才能被 ros2 launch 识别和自动完成。
您的启动文件应定义 generate_launch_description() 函数,该函数返回一个 launch.LaunchDescription() ,供 ros2 launch 动词使用。
# 导入launch模块,该模块提供了ROS2的启动功能
import launch
# 导入launch_ros.actions模块,该模块提供了ROS2的节点启动功能
import launch_ros.actions


# 定义一个函数generate_launch_description,该函数用于生成启动描述
def generate_launch_description():
    # 返回一个启动描述,该描述包含一个ROS2节点的启动信息
    return launch.LaunchDescription([
        # 使用launch_ros.actions.Node创建一个节点的启动信息
        launch_ros.actions.Node(
            # package参数指定了节点所在的包的名称
            package='demo_nodes_cpp',
            # executable参数指定了节点的可执行文件的名称
            executable='talker',
            # name参数指定了节点的名称
            name='talker'),
  ])
XML 启动文件
在您的 launch 目录中,创建一个名为 my_script_launch.xml 的新启动文件。建议使用 _launch.xml 作为 XML 启动文件的文件后缀,但这不是必需的。
<launch>
  <node pkg="demo_nodes_cpp" exec="talker" name="talker"/>
</launch>
YAML 启动文件
在您的 launch 目录中,创建一个名为 my_script_launch.yaml 的新启动文件。 _launch.yaml 作为 YAML 启动文件的文件后缀是推荐的,但不是必须的。
launch:


- node:
    pkg: "demo_nodes_cpp"
    exec: "talker"
    name: "talker"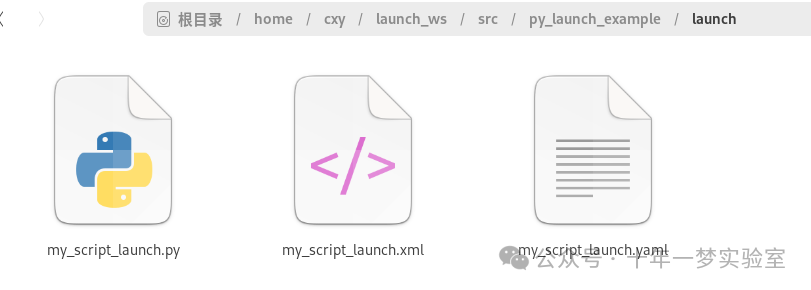
4. 构建和运行启动文件
转到工作区的顶层,并构建它:
cxy@ubuntu2404-cxy:~$ cd ~/launch_ws
cxy@ubuntu2404-cxy:~/launch_ws$ colcon build
Starting >>> cpp_launch_example
Starting >>> py_launch_example
Finished <<< cpp_launch_example [2.19s]
Finished <<< py_launch_example [2.44s]


Summary: 2 packages finished [2.65s]
在 colcon build 成功后,您已经配置了工作空间,您应该能够按照以下方式运行启动文件:
Python包:
Python launch文件:
ros2 launch py_launch_example my_script_launch.pyXML launch文件:
ros2 launch py_launch_example my_script_launch.xmlYAML launch 文件:
ros2 launch py_launch_example my_script_launch.yamlcxy@ubuntu2404-cxy:~/launch_ws$ ros2 launch py_launch_example my_script_launch.xml
[INFO] [launch]: All log files can be found below /home/cxy/.ros/log/2024-07-09-21-52-01-201445-ubuntu2404-cxy-22041
[INFO] [launch]: Default logging verbosity is set to INFO
[INFO] [talker-1]: process started with pid [22044]
[talker-1] [INFO] [1720533122.376809549] [talker]: Publishing: 'Hello World: 1'
[talker-1] [INFO] [1720533123.376706560] [talker]: Publishing: 'Hello World: 2'
[talker-1] [INFO] [1720533124.376704004] [talker]: Publishing: 'Hello World: 3'
[talker-1] [INFO] [1720533125.376706763] [talker]: Publishing: 'Hello World: 4'
^C[WARNING] [launch]: user interrupted with ctrl-c (SIGINT)
[talker-1] [INFO] [1720533125.700402229] [rclcpp]: signal_handler(signum=2)
[INFO] [talker-1]: process has finished cleanly [pid 22044]C++ 包:
ros2 launch cpp_launch_example my_script_launch.py
ros2 launch cpp_launch_example my_script_launch.xml
ros2 launch cpp_launch_example my_script_launch.yaml
cxy@ubuntu2404-cxy:~/launch_ws$ . install/setup.bash
cxy@ubuntu2404-cxy:~/launch_ws$ ros2 launch cpp_launch_example my_script_launch.yaml
[INFO] [launch]: All log files can be found below /home/cxy/.ros/log/2024-07-09-21-51-33-440231-ubuntu2404-cxy-21986
[INFO] [launch]: Default logging verbosity is set to INFO
[INFO] [talker-1]: process started with pid [21989]
[talker-1] [INFO] [1720533095.014554528] [talker]: Publishing: 'Hello World: 1'
[talker-1] [INFO] [1720533096.014375189] [talker]: Publishing: 'Hello World: 2'
[talker-1] [INFO] [1720533097.014263021] [talker]: Publishing: 'Hello World: 3'
[talker-1] [INFO] [1720533098.014382181] [talker]: Publishing: 'Hello World: 4'
[talker-1] [INFO] [1720533099.014358704] [talker]: Publishing: 'Hello World: 5'
^C[WARNING] [launch]: user interrupted with ctrl-c (SIGINT)
[talker-1] [INFO] [1720533099.908663176] [rclcpp]: signal_handler(signum=2)
[INFO] [talker-1]: process has finished cleanly [pid 21989]文档
launch 文档 https://docs.ros.org/en/jazzy/p/launch/architecture.html 提供了更多关于也用于 launch_ros 的概念的详细信息。
即将提供更多关于启动功能的文档/示例。同时,请查看源代码(https://github.com/ros2/launch 和 https://github.com/ros2/launch_ros)。