在本文介绍 PyTorch 中一些最常用的命令和设置。
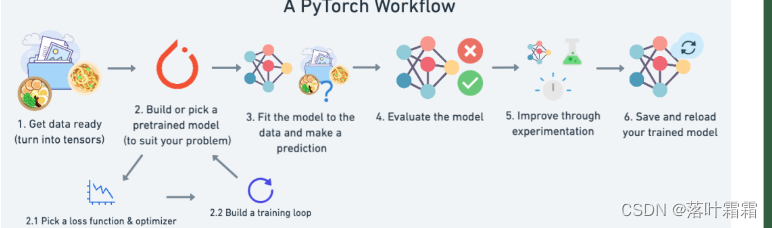
一个完成的 PyTorch 工作流程。
安装和引入 PyTorch 包
最好的安装教程就是去官方网站:https://pytorch.org/get-started/locally/
安装结束之后,直接引入整个 torch 包:
import torch
或者是按需引入:
from torch import nn
由于大多数机器学习都是在数据中寻找模式,因此了解如何在 PyTorch 中处理数据集是很有必要的。
from torch.utils.data import Dataset, DataLoader
创建张量
PyTorch 的主要用例之一是加速深度学习计算。深度学习通常涉及操纵大型张量(大型、多维数字集合)。
PyTorch 有许多创建张量的方法。
# Create a single number tensor (scalar)
scalar = torch.tensor(7)

# Create a random tensor
random_tensor = torch.rand(size=(3, 4)) # this will create a tensor of size 3x4 but you can manipulate the shape how you want

# Multiply two random tensors
random_tensor_1 = torch.rand(size=(3, 4))
random_tensor_2 = torch.rand(size=(3, 4))
random_tensor_3 = random_tensor_1 * random_tensor_2 # PyTorch has support for most math operators in Python (+, *, -, /)
特定领域相关的库
根据我们正在处理的具体问题,PyTorch 有多个与具体领域相关的库:
TorchVision — PyTorch 的内置计算机视觉库。
TorchText — PyTorch 的内置文本库。
TorchAudio — PyTorch 的音频库。
TorchRec — PyTorch 最新的用于通过深度学习为推荐引擎提供支持的库。
计算机视觉
https://pytorch.org/vision/stable/index.html
# Base computer vision library
import torchvision

# Other components of TorchVision (premade datasets, pretrained models and image transforms)
from torchvision import datasets, models, transforms
自然语言处理
https://pytorch.org/text/stable/index.html
# Base text and natural language processing library
import torchtext

# Other components of TorchText (premade datasets, pretrained models and text transforms)
from torchtext import datasets, models, transforms
语音
https://pytorch.org/audio/stable/index.html
# Base audio and speech processing library
import torchaudio

# Other components of TorchAudio (premade datasets, pretrained models and text transforms)
from torchaudio import datasets, models, transforms
推荐系统
# # Base recommendation system library
# import torchrec

# # Other components of TorchRec
# from torchrec import datasets, models
在不同设备上使用 PyTorch
深度学习的大部分内容都涉及张量计算。
张量计算在 GPU(通常来自 NVIDIA)上通常比在 CPU 上运行得更快。通常是:NVIDIA GPU(cuda)> MPS 设备(mps)> CPU(cpu)。
MPS 代表 Metal Performance Shader ,即 Apple 的 GPU(M1、M1 Pro、M2 等)。关于mps更多详细的教程可以去官方网站:
https://pytorch.org/docs/stable/notes/mps.html
编写自动检测设备的代码:
# Setup device-agnostic code
if torch.cuda.is_available():
    device = "cuda" # NVIDIA GPU
elif torch.backends.mps.is_available():
    device = "mps" # Apple GPU
else:
    device = "cpu" # Defaults to CPU if NVIDIA GPU/Apple GPU aren't available

print(f"Using device: {device}")
然后我们可以通过 .to(“device_name”) 方法将 PyTorch 中的对象(模型和张量)移动到不同的设备。
# Create a tensor
x = torch.tensor([1, 2, 3])
print(x.device) # defaults to CPU

# Send tensor to target device
x = x.to(device)
print(x.device)
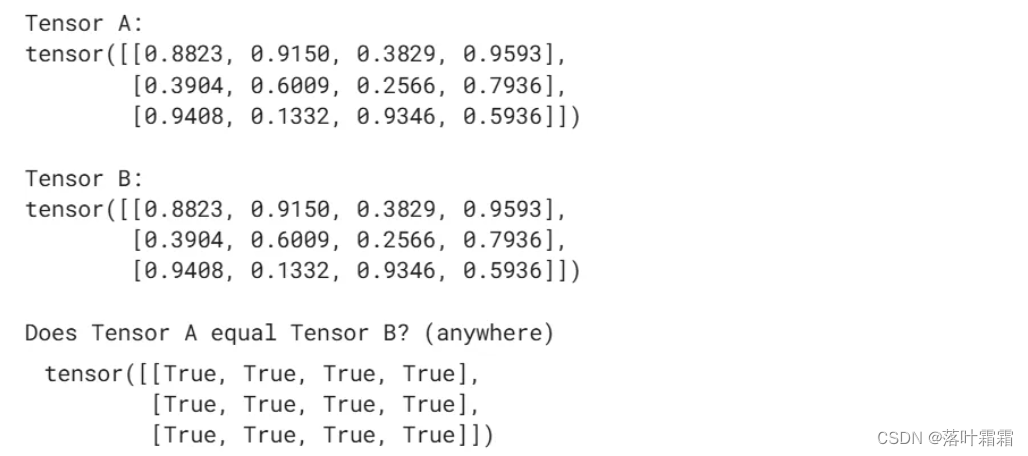
设置随机数种子
许多机器学习和深度学习涉及在张量中获取随机数,然后对这些随机数进行整形以查找/表示真实数据中的模式。
但是,有时我们需要“可重现”的随机性。为此,我们可以设置随机种子。
import torch

# Set the random seed (you can set this to any number you like, it will "flavour"
# the randomness with that number.
torch.manual_seed(42)

# Create two random tensors
random_tensor_A = torch.rand(3, 4)

torch.manual_seed(42) # set the seed again (try commenting this out and see what happens)
random_tensor_B = torch.rand(3, 4)

print(f"Tensor A:\n{random_tensor_A}\n")
print(f"Tensor B:\n{random_tensor_B}\n")
print(f"Does Tensor A equal Tensor B? (anywhere)")
random_tensor_A == random_tensor_B
还可以在 GPU(CUDA 设备)上设置随机种子。
# Set random seed on GPU
torch.cuda.manual_seed(42)
神经网络
PyTorch 拥有一个非常全面的预构建神经网络组件库(其中许多在 PyTorch 生态系统中被称为“模块”)。
从根本上讲,神经网络是层的堆叠。这些层中的每一层都对输入执行某种操作并产生输出。这些层如何堆叠在一起将取决于你正在处理的问题。机器学习中最活跃的研究领域之一是如何将神经网络层堆叠在一起。
PyTorch 中的绝大多数神经网络组件都包含在 torch.nn 包中(nn 是神经网络 neural network 的缩写)。
https://pytorch.org/docs/stable/nn.html
from torch import nn
线性层
PyTorch 有很多内置的线性层。
https://pytorch.org/docs/stable/nn.html#linear-layers
# Create a linear layer with 10 in features and out features
linear_layer = nn.Linear(in_features=10,
                         out_features=10)

# Create an Identity layer
identity_layer = nn.Identity()
卷积层
PyTorch 有几个内置的卷积层。
https://pytorch.org/docs/stable/nn.html#convolution-layers
卷积层的命名通常遵循 torch.nn.ConvXd,其中 X 可以是1、2或3。X 值表示卷积将在其上运行的维度数,例如,1表示单维文本,2表示二维图像(高度 x 宽度),3表示视频等3D对象(视频被视为具有时间维度的一系列图像,高度 x 宽度 x 时间)。
# Create a Conv1d layer (often used for text with a singular dimension)
conv1d = nn.Conv1d(in_channels=1,
                   out_channels=10,
                   kernel_size=3)

# Create a Conv2d layer (often used for images with Height x Width dimensions)
conv2d = nn.Conv2d(in_channels=3, # 3 channels for color images (red, green, blue)
                   out_channels=10,
                   kernel_size=3)

# Create a Conv3d layer (often used for video with Height x Width x Time dimensions)
conv3d = nn.Conv3d(in_channels=3,
                   out_channels=10,
                   kernel_size=3)
Transformer 层
PyTorch 具有内置的,如论文《Attention Is All You Need》中所描述的 Transformer 层。
(https://arxiv.org/abs/1706.03762)
得益于 PyTorch 的 BetterTransformer,使用内置的 PyTorch Transformer 层可以带来潜在的加速优势。
https://pytorch.org/blog/a-better-transformer-for-fast-transformer-encoder-inference/
# Create a Transformer model (model based on the paper "Attention Is All You Need" - https://arxiv.org/abs/1706.03762)
transformer_model = nn.Transformer()

# Create a single Transformer encoder cell
transformer_encoder = nn.TransformerEncoderLayer(d_model=768, # embedding dimension
                                                 nhead=12) # number of attention heads

# Create a single Transformer decoder cell
transformer_decoder = nn.TransformerDecoderLayer(d_model=768,
                                                 nhead=12)

# Stack together Transformer decoder cells
transformer_decoder_stack = nn.TransformerDecoder(decoder_layer=transformer_decoder, # from above
                                                  num_layers=6) # 6 Transformer decoders stacked on top of each other
循环层
PyTorch 内置了对循环神经网络(RNN)层的支持,例如 LSTM 和 GRU。
# Create a single LSTM cell
lstm_cell = nn.LSTMCell(input_size=10, # can adjust as necessary
                        hidden_size=10) # can adjust as necessary

# Stack together LSTM cells
lstm_stack = nn.LSTM(input_size=10,
                     hidden_size=10,
                     num_layers=3) # 3 single LSTM cells stacked on top of each other

# Create a single GRU cell
gru_cell = nn.GRUCell(input_size=10, # can adjust as necessary
                      hidden_size=10) # can adjust as necessary

# Stack together GRU cells
gru_stack = nn.GRU(input_size=10,
                   hidden_size=10,
                   num_layers=3) # 3 single GRU cells stacked on top of each other
激活函数
激活函数通常位于神经网络的各层之间,为线性(直线)函数添加非线性(非直线)功能。本质上,神经网络通常由大量线性和非线性函数组成。
PyTorch 在 torch.nn 中内置了几个非线性激活函数。其中一些最常见的是:
nn.ReLU
nn.Sigmoid
nn.Softmax
# ReLU
relu = nn.ReLU()

# Sigmoid
sigmoid = nn.Sigmoid()

# Softmax
softmax = nn.Softmax()
损失函数
损失函数衡量模型的错误程度。也就是说,它衡量了模型的预测值与真实值的偏差有多大。
PyTorch(以及一般的深度学习)中的损失函数也经常被称为:标准(criterion)、成本函数。PyTorch 在 torch.nn 中内置了几个损失函数。其中一些最常见的是:
nn.L1Loss - 也称为 MAE 或平均绝对误差(此损失通常用于回归问题或预测数字,例如房价)。
nn.MSELoss - 也称为 L2Loss 或均方误差(此损失通常用于回归问题或预测数字,例如房价)。
nn.BCEWithLogitsLoss - 也称为二元交叉熵,此损失函数通常用于二元分类问题。
nn.CrossEntropyLoss——此损失函数通常用于多类分类问题。
# L1Loss
loss_fn = nn.L1Loss() # also known as MAE or mean absolute error

# MSELoss
loss_fn = nn.MSELoss() # also known as MSE or mean squared error

# Binary cross entropy (for binary classification problems)
loss_fn = nn.BCEWithLogitsLoss()

# Cross entropy (for multi-class classification problems)
loss_fn = nn.CrossEntropyLoss()
优化器
优化器的作用是改变神经网络权重,从而降低损失函数值。
PyTorch 在 torch.optim 模块中内置了几个优化函数。两个主要的优化器函数包括:
torch.optim.SGD(lr=0.1, params=model.parameters()) - SGD 也称为随机梯度下降(stochastic gradient descent)。
torch.optim.Adam(lr=0.001, params=model.parameters()) - Adam 优化器。
lr 代表学习率(learning rate),即每一步修改神经网络权重的乘数,小值 = 小调整,大值 = 大调整)。
params 代表“模型参数”,换句话说,就是您希望优化函数在训练期间优化的模型参数/权重。
# Create a baseline model
model = nn.Transformer()

# SGD (stochastic gradient descent)
optimizer = torch.optim.SGD(lr=0.1, # set the learning rate (required)
                            params=model.parameters()) # tell the optimizer what parameters to optimize

# Create a baseline model
model = nn.Transformer()

# Adam optimizer
optimizer = torch.optim.Adam(lr=0.001, # set the learning rate (required)
                             params=model.parameters()) # tell the optimizer what para


![[C][数据结构][排序][下][快速排序][归并排序]详细讲解](https://img-blog.csdnimg.cn/direct/3b49e49fcf1c4a0393d247d78efa696b.gif)