import cv2
from matplotlib import pyplot as plt
import os
import numpy as np
from paddleocr import PaddleOCR, draw_ocr
from PIL import Image, ImageDraw, ImageFont
# 利用paddelOCR进行文字扫描,并输出结果
def text_scan(img_path):
ocr = PaddleOCR(use_angle_cls=True, use_gpu=False)
# img_path = r'test image/license_plate1.jpg'
result = ocr.ocr(img_path, cls=True)
for line in result:
# print(line)
return result
# 在图片中写入将车牌信息
def infor_write(img, rect, result):
text = result[0][0][1][0]
cv2img = cv2.cvtColor(img, cv2.COLOR_BGR2RGB) # cv2和PIL中颜色的hex码的储存顺序不同
pilimg = Image.fromarray(cv2img)
# PIL图片上打印汉字
draw = ImageDraw.Draw(pilimg) # 图片上打印
font = ImageFont.truetype("simhei.ttf", 20, encoding="utf-8") # 参数1:字体文件路径,参数2:字体大小
draw.text((rect[2], rect[1]), str(text), (0, 255, 0), font=font) # 参数1:打印坐标,参数2:文本,参数3:字体颜色,参数4:字体
# PIL图片转cv2 图片
cv2charimg = cv2.cvtColor(np.array(pilimg), cv2.COLOR_RGB2BGR)
return cv2charimg
def plt_show0(img):
#cv2与plt的图像通道不同:cv2为[b,g,r];plt为[r,g,b]
b,g,r=cv2.split(img)
img=cv2.merge([r,g,b])
plt.imshow(img)
plt.show()
#plt显示灰度图片
def plt_show(img):
plt.imshow(img,camp='gray')
plt.show()
# 图像去噪灰度处理
def gray_guss(img):
img = cv2.GaussianBlur(img, (1, 1), 0)
gray = cv2.cvtColor(img, cv2.COLOR_BGR2GRAY)
return gray
# 图像尺寸变换
def img_resize(img):
a = 400 * img.shape[0] / img.shape[1]
a = int(a)
img = cv2.resize(img, (400, a))
return img
# Sobel检测,x方向上的边缘检测(增强边缘信息)
def Sobel_detec(img):
Sobel_x = cv2.Sobel(img, cv2.CV_16S, 1, 0)
absX = cv2.convertScaleAbs(Sobel_x)
return absX
# 寻找某区域最大外接矩形框4点坐标
def find_retangle(contour):
y, x = [], []
for p in contour:
y.append(p[0][0])
x.append(p[0][1])
return [min(y), min(x), max(y), max(x)]
# 寻找并定位车牌轮廓位置
def locate_license(img):
blocks = []
contours, hierarchy = cv2.findContours(img, cv2.RETR_EXTERNAL, cv2.CHAIN_APPROX_SIMPLE)
for c in contours:
x, y, w, h = cv2.boundingRect(c)
r = find_retangle(c)
a = (r[2] - r[0]) * (r[3] - r[1])
s = (r[2] - r[0]) / (r[3] - r[1])
print(w)
if (w > (h * 3)) and (w < (h * 5)):
blocks.append([r, a, s])
# blocks.append([r, a, s])
blocks = sorted(blocks, key=lambda b: b[1])[-3:]
maxweight, maxindex = 0, -1
for i in range(len(blocks)):
b = oriimg[blocks[i][0][1]:blocks[i][0][3], blocks[i][0][0]:blocks[i][0][2]]
hsv = cv2.cvtColor(b, cv2.COLOR_BGR2HSV)
lower = np.array([70, 150, 50])
upper = np.array([120, 255, 255])
mask = cv2.inRange(hsv, lower, upper)
w1 = 0
for m in mask:
w1 += m / 255
w2 = 0
for w in w1:
w2 += w
if w2 > maxweight:
maxindex = i
maxweight = w2
print('blocks是', blocks[maxindex])
print('blocks0是',blocks[maxindex][0])
return blocks[maxindex][0]
# 图像预处理+车牌轮廓位置检测
def fine_lisecenpts(img):
# 图像去噪灰度处理
guss = gray_guss(img)
# Sobel检测,增强边缘信息
sobel = Sobel_detec(guss)
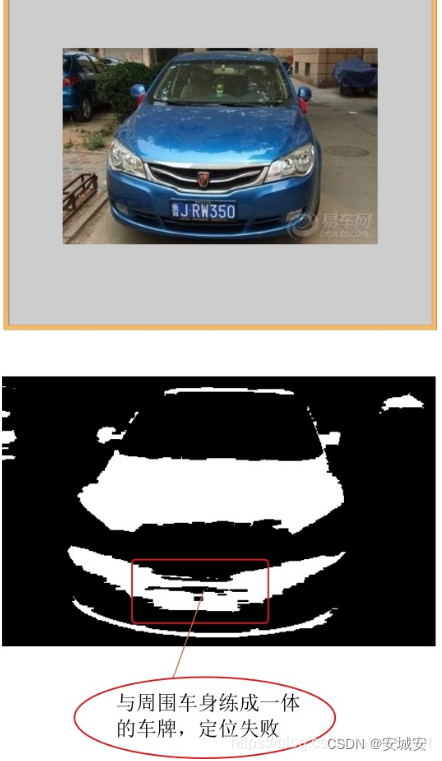
# 图像阈值化操作——获得二值化图
ret, threshold = cv2.threshold(sobel, 0, 255, cv2.THRESH_OTSU)
# # 对二值化图像进行边缘检测(可选,通过边缘检测后,最终进行形态学运算得到的轮廓面积更大)
# threshold=cv2.Canny(threshold,threshold.shape[0],threshold.shape[1])
# 形态学运算(从图像中提取对表达和描绘区域形状有意义的图像分量)——闭操作
kernelX = cv2.getStructuringElement(cv2.MORPH_RECT, (30, 10))
closing = cv2.morphologyEx(threshold, cv2.MORPH_CLOSE, kernelX, iterations=1)
# 腐蚀(erode)和膨胀(dilate)
kernelX = cv2.getStructuringElement(cv2.MORPH_RECT, (50, 1))
kernelY = cv2.getStructuringElement(cv2.MORPH_RECT, (1, 20))
# x方向上进行闭操作(抑制暗细节)
img = cv2.dilate(closing, kernelX)
img = cv2.erode(img, kernelX)
# y方向上进行开操作
img = cv2.erode(img, kernelY)
img = cv2.dilate(img, kernelY)
# 进行中值滤波去噪
Blur = cv2.medianBlur(img, 15)
# 寻找轮廓
rect = locate_license(Blur)
print('rect是',rect)
return rect, Blur
# 车牌字符识别
def seg_char(rect_list, img):
img = oriimg[rect_list[1]:rect_list[3], rect_list[0]:rect_list[2]]
# 图像去噪灰度处理
gray = gray_guss(img)
# 图像阈值化操作-获得二值化图(可选)
# ret,charimage=cv2.threshold(gray,0,255,cv2.THRESH_BINARY_INV+cv2.THRESH_OTSU)
# 图像进行闭运算
k1 = np.ones((1, 1), np.uint8)
close = cv2.morphologyEx(gray, cv2.MORPH_CLOSE, k1)
cv2.imshow('close', close)
cv2.imwrite(r"E:\ultralytics-20240216\21\img2\6.jpg", close)
cv2.waitKey()
res = text_scan(r"E:\ultralytics-20240216\21\img2\6.jpg")
return res
def put_chinese_text(img, text, left_top):
# 转换 cv2 img 为 PIL Image
img_PIL = Image.fromarray(cv2.cvtColor(img, cv2.COLOR_BGR2RGB))
draw = ImageDraw.Draw(img_PIL)
font = ImageFont.truetype('simhei.ttf', 30, encoding="utf-8")
# 黄色文字
fillColor = (255,255,0)
position = left_top
draw.text(position, text, font=font, fill=fillColor)
# 转换回 OpenCV 格式
img_out = cv2.cvtColor(np.asarray(img_PIL),cv2.COLOR_RGB2BGR)
return img_out
# 主函数区
if __name__ == '__main__':
img = cv2.imread(r"E:\ultralytics-20240216\21\img2\5.jpg")
# 改变图像尺寸
img = img_resize(img)
oriimg = img.copy()
# 寻找到车牌外轮廓矩形坐标
print(1)
rect, img = fine_lisecenpts(img)
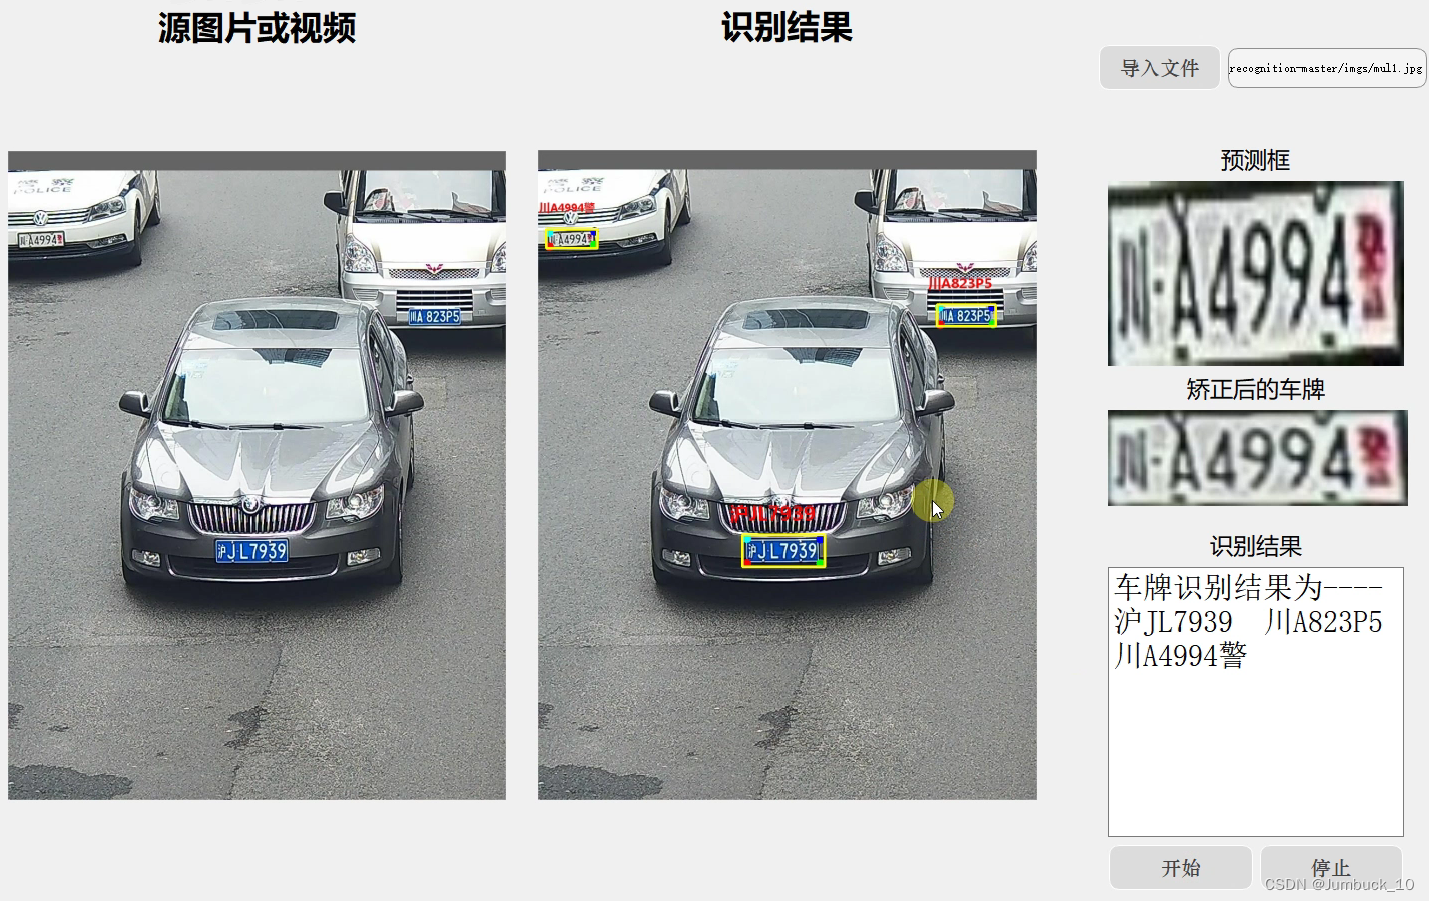
# 利用车牌轮廓坐标划分ROI区域用于字符识别,利用OCR识别车牌字符并返回字符串内容
result = seg_char(rect, oriimg)
print(result)
print(rect)
# 循环读取车牌字符串并写入到图片中
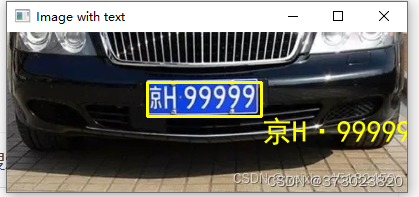
text = result[0][0][1][0]
# 获取文本所在的矩形位置
left_top = tuple(rect[0:2])
right_bottom = tuple(rect[2:4])
# 在原始图像上绘制矩形(黄色框)
cv2.rectangle(oriimg, left_top, right_bottom, (0, 255, 255), 2)
# 在矩形旁边写入文本
# 注意你可能需要根据实际情况调整文本的位置
text_position = (right_bottom[0] + 1, right_bottom[1])
oriimg = put_chinese_text(oriimg, text, text_position)
# cv2.putText(oriimg, text, text_position, cv2.FONT_HERSHEY_SIMPLEX, 1, (0, 255, 255), 2)
cv2.imshow("Image with text", oriimg)
cv2.waitKey(0)
cv2.destroyAllWindows()
![[C#]winform部署yolov7+CRNN实现<span style='color:red;'>车牌</span>颜色<span style='color:red;'>识别</span><span style='color:red;'>车牌</span><span style='color:red;'>号</span>检测<span style='color:red;'>识别</span>](https://img-blog.csdnimg.cn/direct/c12aefab36e342e7a127f6e953ac3905.jpeg)


![[数据集][实例分割]减速带分割数据集json+yolo格式5400张1类别](https://img-blog.csdnimg.cn/direct/a03b857250a6475893c3bd11c9464a38.png)