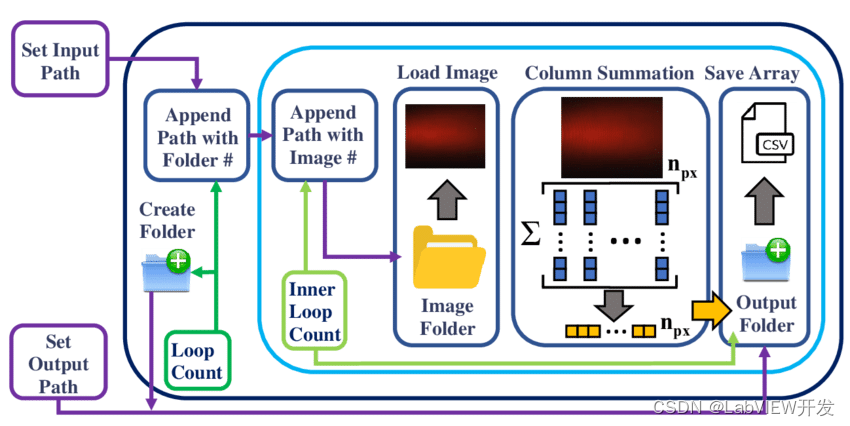
大家好,今天制作制作一个粒子漩涡特效的页面!
先看具体效果:
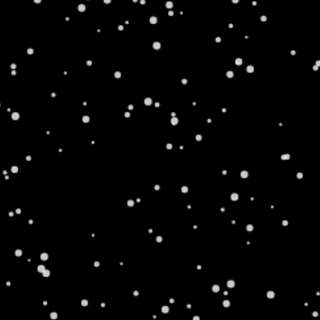
要在一个单一的 index.html 页面中实现粒子漩涡特效,我们可以使用HTML、CSS和JavaScript(不需要外部库)。下面是一个简单的例子,展示了如何使用纯HTML和JavaScript来创建一个基本的粒子漩涡效果:
<!DOCTYPE html>
<html lang="en">
<head>
<meta charset="UTF-8">
<meta name="viewport" content="width=device-width, initial-scale=1.0">
<title>粒子漩涡特效</title>
<style>
  body {
    margin: 0;
    overflow: hidden;
    background-color: #000;
  }
  canvas {
    display: block;
    position: absolute;
    top: 0;
    left: 0;
  }
</style>
</head>
<body>
<canvas id="particles"></canvas>

<script>
  const canvas = document.getElementById('particles');
  const ctx = canvas.getContext('2d');
  const particles = [];
  const particleCount = 200;
  const speed = 2;
  let centerX, centerY;

  // 初始化画布大小
  function resizeCanvas() {
    canvas.width = window.innerWidth;
    canvas.height = window.innerHeight;
    centerX = canvas.width / 2;
    centerY = canvas.height / 2;
  }

  // 初始化粒子
  function initParticles() {
    for (let i = 0; i < particleCount; i++) {
      particles.push({
        x: Math.random() * canvas.width,
        y: Math.random() * canvas.height,
        size: Math.random() * 2 + 1,
        speedX: (Math.random() - 0.5) * 2,
        speedY: (Math.random() - 0.5) * 2,
        targetX: centerX,
        targetY: centerY,
      });
    }
  }

  // 更新粒子位置
  function updateParticles() {
    for (let i = 0; i < particles.length; i++) {
      const particle = particles[i];

      // 靠近漩涡中心
      particle.targetX = centerX + (Math.sin(i / 5 + Date.now() * 0.001) * 100);
      particle.targetY = centerY + (Math.cos(i / 7 - Date.now() * 0.001) * 100);

      // 吸引粒子到漩涡中心
      const angle = Math.atan2(particle.y - centerY, particle.x - centerX);
      const distance = Math.sqrt(Math.pow(particle.x - centerX, 2) + Math.pow(particle.y - centerY, 2));

      particle.speedX += (Math.cos(angle) / distance * 0.01) * (speed - particle.size);
      particle.speedY += (Math.sin(angle) / distance * 0.01) * (speed - particle.size);

      // 更新位置
      particle.x += particle.speedX;
      particle.y += particle.speedY;

      // 边界检测
      if (particle.x < 0) particle.x = canvas.width;
      if (particle.y < 0) particle.y = canvas.height;
      if (particle.x > canvas.width) particle.x = 0;
      if (particle.y > canvas.height) particle.y = 0;
    }
  }

  // 绘制粒子
  function drawParticles() {
    ctx.clearRect(0, 0, canvas.width, canvas.height);

    ctx.fillStyle = 'rgba(255, 255, 255, 0.8)';
    for (let i = 0; i < particles.length; i++) {
      const particle = particles[i];
      ctx.beginPath();
      ctx.arc(particle.x, particle.y, particle.size, 0, Math.PI * 2);
      ctx.fill();
    }
  }

  // 动画循环
  function animate() {
    requestAnimationFrame(animate);
    updateParticles();
    drawParticles();
  }

  // 初始化
  resizeCanvas();
  initParticles();
  animate();

  // 监听窗口大小变化
  window.addEventListener('resize', resizeCanvas);
</script>
</body>
</html>
这段代码定义了一个粒子系统,每个粒子都有位置、大小、速度和目标位置。在updateParticles函数中,我们根据粒子与漩涡中心的角度和距离来计算吸引力,并更新粒子的速度和位置。drawParticles函数负责在画布上绘制粒子。animate函数是动画循环,它会在每个帧中更新和绘制粒子。
注意:这个简单的例子没有实现复杂的漩涡效果和高级图形渲染,但它提供了一个基础的粒子系统,可以根据需要进行扩展和优化。


![C# Maui 报错:程序“[15748] MauiApp1.exe”已退出,返回值为 2147942405 (0x80070005)](https://img-blog.csdnimg.cn/direct/5573d8f739f841228a106edc62295e2c.png)


![[qt] qt程序打包以及docker镜像打包](https://img-blog.csdnimg.cn/direct/bb25a594317a4c37a1832b819fecd574.png)