当涉及到比较复杂的设置背景色时,需要根据一些结果去对另一些单元格进行设置时,在行列上只能设置一种颜色,否则会被覆盖;
比如对 F列的 1,3,5设置红色,对F列的2,4,7设置绿色;
对G列的1,4,6设置红色,对G列的2,3,5设置黄色;
则只能先对表格,F、G列的红色背景单元格,设置公共的红色,然后保存到本地文件,用openpyxl读取在对其余的单元格分别设置颜色;
df_c = df_b.style.map(
        lambda x: 'background-color: red;', subset=pd.IndexSlice[[1, 3, 5], ['F']])
df_d = df_c.map(
        lambda x: 'background-color: red;', subset=pd.IndexSlice[[1, 4, 6], ['G']])

# openpyxl 遍历单元格对F列的2,4,7设置绿色;对G列的2,3,5设置黄色;
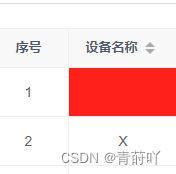
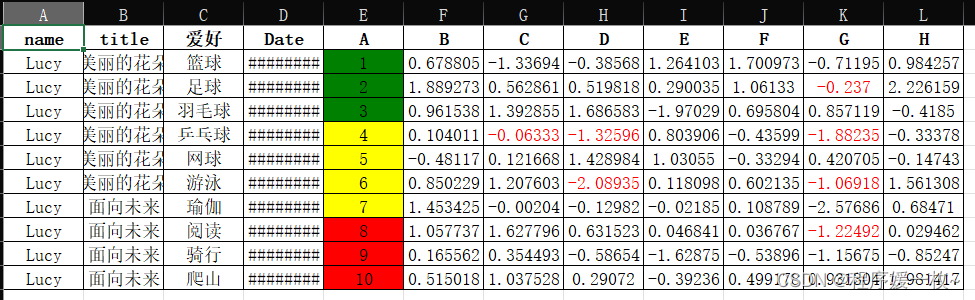
1. 效果图
pandas设置单元格背景色,字体颜色,边框
openpyxl合并单元格,设置丰富的字体
2. 源码
# excel数字与列名互转
import os

import numpy as np
import openpyxl
import pandas as pd
from openpyxl.styles import Side, Border, Font


# 列名转数字
def column_to_num(s: str) -> int:
    assert (isinstance(s, str))
    for i in s:
        if not 64 < ord(i) < 91:
            raise ValueError('Excel Column ValueError')
    return sum([(ord(n) - 64) * 26 ** i for i, n in enumerate(list(s)[::-1])])


# 数字转列名
def num_to_column(n: int) -> str:
    assert (isinstance(n, int) and n > 0)
    num = [chr(i) for i in range(65, 91)]
    ret = []
    while n > 0:
        n, m = divmod(n - 1, len(num))
        ret.append(num[m])
    return ''.join(ret[::-1])


def read_and_merge(file=None):
    np.random.seed(24)
    print([x[0] for x in np.random.randn(10, 1).tolist()])
    data = {'name': ['Lucy'] * 10,
            'title': ['美丽的花朵'] * 6 + ['面向未来'] * 4,
            '爱好': ['篮球', '足球', '羽毛球', '乒乓球', '网球', '游泳', '瑜伽', '阅读', '骑行', '爬山'],
            'Date': pd.to_datetime(['2017-05-31 20:53:00', '2017-05-11 20:53:00', '2017-05-08 20:53:00',
                                    '2017-06-06 20:53:00', '2017-06-06 20:53:00'] * 2),
            'A': np.linspace(1, 10, 10).tolist(),
            'B': [x[0] for x in np.random.randn(10, 1).tolist()],
            'C': [x[0] for x in np.random.randn(10, 1).tolist()],
            'D': [x[0] for x in np.random.randn(10, 1).tolist()],
            'E': [x[0] for x in np.random.randn(10, 1).tolist()],
            'F': [x[0] for x in np.random.randn(10, 1).tolist()],
            'G': [x[0] for x in np.random.randn(10, 1).tolist()],
            'H': [x[0] for x in np.random.randn(10, 1).tolist()]
            }
    df_b = pd.DataFrame(data)
    print(df_b)

    # 定义一个函数来设置样式,将文本居中对齐和上下居中对齐
    def set_cell_style(value):
        style = 'text-align: center; vertical-align: middle; border: solid 1px black; '
        return style

    def set_cell_color(val):
        if val < 4:
            color = 'green'
        elif val < 8:
            color = 'yellow'
        else:
            color = 'red'
        return 'background-color: %s' % color

    def color_negative_red(val):
        """
        Takes a scalar and returns a string with
        the css property `'color: red'` for negative
        strings, black otherwise.
        """
        # print('---val:', val)
        # color_list = []
        # for val in vals:
        #     color = 'color: %s' % ('red' if val < 0 else 'black')
        #     color_list.append(color)
        # return color_list
        return 'color: %s' % ('red' if val < 0 else 'black')

    # 使用Styler对象来应用样式,同时设置文本的居中对齐和上下居中对齐
    df_c = df_b.style.map(lambda x: set_cell_style(x)).map(lambda x: set_cell_color(x), subset=['A']).map(
        lambda x: color_negative_red(x), subset=pd.IndexSlice[[1, 3, 5, 7, 9], ['B', 'C', 'D', 'G']])

    # 保存到新文件
    df_c.to_excel('temp.xlsx', index=False, engine='openpyxl')

    # 合并单元格
    wb = openpyxl.load_workbook('temp.xlsx')
    ws = wb.active
    # 第一列连续相同值的合并单元格
    # 获取第一列数据
    type_list = []
    i = 2
    while True:
        r = ws.cell(i, 1).value
        if r:
            type_list.append(r)
        else:
            break
        i += 1

    # 判断合并单元格的始末位置
    s = 0
    e = 0
    flag = type_list[0]
    for i in range(len(type_list)):
        if type_list[i] != flag:
            flag = type_list[i]
            e = i - 1
            if e >= s:
                ws.merge_cells("A" + str(s + 2) + ":A" + str(e + 2))
                s = e + 1
        if i == len(type_list) - 1:
            e = i
            ws.merge_cells("A" + str(s + 2) + ":A" + str(e + 2))

    ### 合并列
    num_rows = ws.max_row

    combine_columns = {
        ('F', 'G')
    }

    for i in range(num_rows):
        for columns in combine_columns:
            start, end = columns
            ws.merge_cells(start + str(i + 1) + ":" + end + str(i + 1))

    # 定义不同列的字体配置
    font_columns = [
        (['A', 'B', 'C'], Font(name='Times New Roman', size=9, bold=True)),
        (['D', 'E'], Font(name='Times New Roman', size=12)),
        (['F', 'G'], Font(name='宋体', size=12)),
    ]

    # 设置列的字体样式
    for labels, font in font_columns:
        for label in labels:
            for cell in ws[label]:
                cell.font = font
                # XX结尾的数据改成红色
                if cell.value and str(cell.value).endswith("XX"):
                    cell.value = cell.value[:-2]
                    cell.font = Font(name='Times New Roman', size=12, bold=True, color="FF0000", )
    # 创建一个边框样式
    border_style = Border(
        left=Side(border_style='thin', color='000000'),
        right=Side(border_style='thin', color='000000'),
        top=Side(border_style='thin', color='000000'),
        bottom=Side(border_style='thin', color='000000')
    )

    # 遍历工作表中的所有单元格并应用边框样式
    for row in ws.iter_rows():
        for cell in row:
            cell.border = border_style
    wb.save('output_excel_file.xlsx')

    try:
        os.remove('temp.xlsx')
    except FileNotFoundError:
        pass
    except Exception as e:
        pass
    return 'output_excel_file.xlsx'


if __name__ == '__main__':
    for i in range(1, 100):
        column_name = num_to_column(i)
        print(i, column_name, column_to_num(column_name))

    read_and_merge()
参考
- https://blog.csdn.net/boysoft2002/article/details/119794260
- https://blog.csdn.net/flysnownet/article/details/134049045
- https://blog.csdn.net/shenqigongshi/article/details/131438042
- https://blog.csdn.net/shenghaomail/article/details/125754836
- https://blog.csdn.net/Xw_Classmate/article/details/109006600