目录
8.2.实例方式1(使用成员函数, 不推荐,该方式没有实际意义)
2.5.1.所有的类模板函数写在类的内部---上面已讲解--
2.5.3.所有的类模板函数写在类的外部,在不同的.h和.cpp中
一、面向对象的思想

面向对象是一种开发思想,一种全新的开发方式。
面向对象思想的重要性:
开发大型项目必备,是高级程序员的必备技能!

二、类的使用
面向对象编程,最重要的第一个概念:类
“人类”是一个抽象的概念,不是具体的某个人。
“类”,是看不见,摸不着的,是一个纯粹的概念.
“类”,是一种特殊的“数据类型”,不是一个具体的数据。
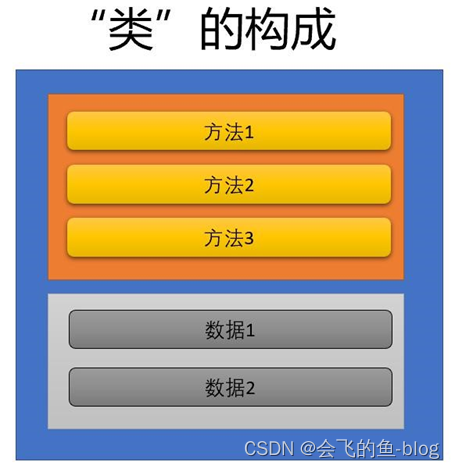
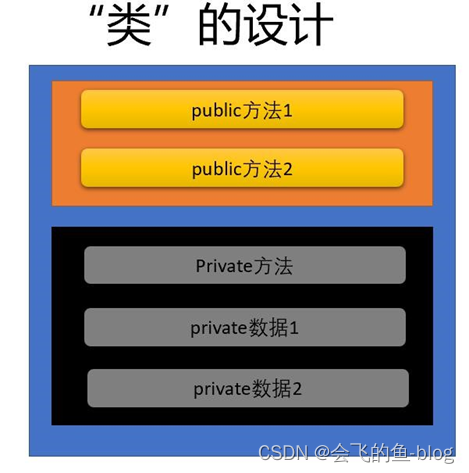
注意:类, 和基本数据类型(char/int/short/long/long long/float/double)不同类的构成:方法和数据
1.类的构成
2.类的设计
定义一个“人类”:
Demo
#include <iostream>
#include <Windows.h>
#include <string>

using namespace std;

// 定义一个“人类”

class Human {
    public:	//公有的,对外的
    void eat(); //方法, “成员函数”
    void sleep();
    void play();
    void work();

    string getName();
    int getAge();
    int getSalary();

private:
    string name; int age; int salary;
};

void Human::eat() {
    cout << "吃炸鸡,喝啤酒!" << endl;
}

void Human::sleep() {
    cout << "我正在睡觉!" << endl;
}

void Human::play() {
    cout << "我在唱歌! " << endl;
}

void Human::work() {
    cout << "我在工作..." << endl;
}

string Human::getName() {
    return name;
}

int Human::getAge() {
    return age;
}

int Human::getSalary() {
    return salary;
}


int main(void) {

	Human	zhangshan;
    system("pause");
}
三、对象的基本使用
什么是对象?
对象,是一个特定“类”的具体实例。
对象和普通变量有什么区别?
一般地,一个对象,就是一个特殊的变量,但是有跟丰富的功能和用法。
什么时候使用对象?
对象的具体使用方法方式
Demo1
int main(void) {
Human h1; // 通过自定义的特殊数据类型“Human”类, 来创建一个“对象”
// 合法使用
h1.eat();
h1.play();
h1.sleep();
// 非法使用
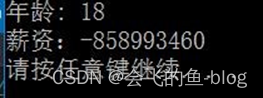
//cout << "年龄" << h1.age << endl; //直接访问私有成员,将无法通过编译
//正确使用 cout << "年龄" << h1.getAge() << endl; //暴露问题,年龄值是一个很大的负数
system("pause");
}
总结:
- “.”的使用
- 调用方法时,方法名后需要带一对圆括号()
- 通过对象,只能调用这个对象的 public 方法
分析:多个不同的对象都有自己的数据,彼此无关。
Demo2
int main(void) {
    Human	h1; // 通过自定义的特殊数据类型“Human”类, 来创建一个“对象”
    Human *p; p = &h1;

    // 合法使用
    p->eat();
    p->play();
    p->sleep();

    // 非法使用
    //cout << "年龄" << p->age << endl;	//直接访问私有成员,将无法通过编译

    //正确使用 cout << "年龄" << p->getAge() << endl; //暴露问题,年龄值是一个很大的负数
    system("pause");
}
小结:
1. -> 的使用(类似 C 语言的结构体用法)
四、类的构造函数
千人千面的“兵马俑”

在构造(制造)每个兵马俑的时候,使用了不同的“参数”。
1.构造函数的作用
在创建一个新的对象时,自动调用的函数,用来进行“初始化”工作:对这个对象内部的数据成员进行初始化。
2.构造函数的特点
- 自动调用(在创建新对象时,自动调用)
- 构造函数的函数名,和类名相同
- 构造函数没有返回类型
- 可以有多个构造函数(即函数重载形式)
3.默认构造函数
没有参数的构造函数,称为默认构造函数。
3.1.合成的默认构造函数
但没有手动定义默认构造函数时,编译器自动为这个类定义一个构造函数。
- 如果数据成员使用了“类内初始值”,就使用这个值来初始化数据成员。【C++11】
- 否则,就使用默认初始化(实际上,不做任何初始化)
Demo3
#include <iostream>
#include <Windows.h>
#include <string>

using namespace std;

// 定义一个“人类”
class Human {

public: //公有的,对外的
    void eat(); //方法, “成员函数”
    void sleep();
    void play();
    void work();

    string getName();
    int getAge();
    int getSalary();

private:
    string name;
    int age = 18;
    int salary;
};

void Human::eat() {
    cout << "吃炸鸡,喝啤酒!" << endl;
}

void Human::sleep() {
    cout << "我正在睡觉!" << endl;
}

void Human::play() {
    cout << "我在唱歌! " << endl;
}

void Human::work() {
    cout << "我在工作..." << endl;
}

string Human::getName() {
    return name;
}

int Human::getAge() {
    return age;
}

int Human::getSalary() {
    return salary;
}

int main(void) {
	Human	h1;	// 使用合成的默认初始化构造函数

    cout << "年龄: " << h1.getAge() << endl;	//使用了类内初始值
    cout << "薪资:" << h1.getSalary() << endl;

    system("pause");
    return 0;
}	//没有类内初始值
注意:只要手动定义了任何一个构造函数,编译器就不会生成“合成的默认构造函数” 一般情况下,都应该定义自己的构造函数,不要使用“合成的默认构造函数”【仅当数据成员全部使用了“类内初始值”,才宜使用“合成的默认构造函数”】
3.2.手动定义的默认构造函数
常称为“默认构造函数” 实例:
#include <iostream>
#include <Windows.h>
#include <string>

using namespace std;

// 定义一个“人类”
class Human {
public: //公有的,对外的
    Human(); //手动定义的“默认构造函数”

    void eat(); //方法, “成员函数”
    void sleep();
    void play();
    void work();

    string getName();
    int getAge();
    int getSalary();
private:
    string name = "Unknown";
    int age = 28;
    int salary;
};

Human::Human() {
    name = "无名氏";
    age = 18;
    salary = 30000;
}

void Human::eat() {
    cout << "吃炸鸡,喝啤酒!" << endl;
}

void Human::sleep() {
    cout << "我正在睡觉!" << endl;
}

void Human::play() {
    cout << "我在唱歌! " << endl; }

void Human::work() {
    cout << "我在工作..." << endl;
}

string Human::getName() {
    return name;
}

int Human::getAge() {
    return age;
}

int Human::getSalary() {
    return salary;
}

int main(void) {
    Human	h1;	// 使用自定义的默认构造函数
    cout << "姓名:" << h1.getName() << endl;
    cout << "年龄: " << h1.getAge() << endl;
    cout << "薪资:" << h1.getSalary() << endl;

    system("pause");
    return 0;
}
说明:如果某数据成员使用类内初始值,同时又在构造函数中进行了初始化,那么以构造函数中的初始化为准。相当于构造函数中的初始化,会覆盖对应的类内初始值。
四、自定义的重载构造函数
#include <iostream>
#include <Windows.h>
#include <string>

using namespace std;

// 定义一个“人类”
class Human {
public:
    Human();
    Human(int age, int salary);

    void eat();
    void sleep();
    void play();
    void work();
    string getName();
    int getAge();
    int getSalary();

private:
    string name = "Unknown";
    int age = 28;
    int salary;
};

Human::Human() {
    name = "无名氏";
    age = 18;
    salary = 30000;
}

Human::Human(int age, int salary) {
    cout << "调用自定义的构造函数" << endl;
    this->age = age;	//this 是一个特殊的指针,指向这个对象本身
    this->salary = salary;
    name = "无名";
}

void Human::eat() {
    cout << "吃炸鸡,喝啤酒!" << endl;
}

void Human::sleep() {
    cout << "我正在睡觉!" << endl;
}

void Human::play() {
    cout << "我在唱歌! " << endl;
}

void Human::work() {
    cout << "我在工作..." << endl;
}

string Human::getName() {
    return name;
}

int Human::getAge() {
    return age;
}

int Human::getSalary() {
    return salary;
}

int main(void) {
	Human	h1(25, 35000);	// 使用自定义的默认构造函数

    cout << "姓名:" << h1.getName() << endl;
    cout << "年龄: " << h1.getAge() << endl;
    cout << "薪资:" << h1.getSalary() << endl;

    system("pause");
return 0;
}
五、拷贝构造函数
1.手动定义的拷贝构造函数
Demo
#include <iostream>
#include <Windows.h>
#include <string>

using namespace std;

// 定义一个“人类”
class Human {
public:
    Human();
    Human(int age, int salary);
    Human(const Human&);

    void eat();
    void sleep();
    void play();
    void work();

    string getName();
    int getAge();
    int getSalary();
private:
    string name = "Unknown";
    int age = 28;
    int salary;
};

Human::Human() {
    name = "无名氏";
    age = 18;
    salary = 30000;
}

Human::Human(int age, int salary) {
    cout << "调用自定义的构造函数" << endl;
    this->age = age;	//this 是一个特殊的指针,指向这个对象本身
    this->salary = salary;
    name = "无名";
}

Human::Human(const Human& man) {
    cout << "调用自定义的拷贝构造函数" << endl;
    name = man.name; age = man.age;
    salary = man.salary;
}

void Human::eat() {
    cout << "吃炸鸡,喝啤酒!" << endl;
}

void Human::sleep() {
    cout << "我正在睡觉!" << endl;
}

void Human::play() {
    cout << "我在唱歌! " << endl;
}

void Human::work() {
    cout << "我在工作..." << endl;
}

string Human::getName() {
    return name;
}

int Human::getAge() {
    return age;
}

int Human::getSalary() {
    return salary;
}

int main(void) {
    Human	h1(25, 35000);	// 使用自定义的默认构造函数
    Human	h2(h1);	// 使用自定义的拷贝构造函数

    cout << "姓名:" << h2.getName() << endl;
    cout << "年龄: " << h2.getAge() << endl;
    cout << "薪资:" << h2.getSalary() << endl;

    system("pause");
    return 0;
}
2.合成的拷贝构造函数
Demo
#include <iostream>
#include <Windows.h>
#include <string>
#include <string.h>

using namespace std;

// 定义一个“人类”
class Human {
public:
    Human();
    Human(int age, int salary);
	//Human(const Human&);	//不定义拷贝构造函数,编译器会生成“合成的拷贝构造函数”

    void eat();
    void sleep();
    void play();
    void work();

    string getName();
    int getAge();
    int getSalary();

    void setAddr(const char *newAddr);
    const char* getAddr();

private:
    string name = "Unknown";
    int age = 28;
    int salary;
    char *addr;
};

Human::Human() {
    name = "无名氏";
    age = 18;
    salary = 30000;
}

Human::Human(int age, int salary) {
    cout << "调用自定义的构造函数" << endl;
    this->age = age;	//this 是一个特殊的指针,指向这个对象本身
    this->salary = salary;
    name = "无名";
    addr = new char[64]; strcpy_s(addr, 64, "China");
}

void Human::eat() {
    cout << "吃炸鸡,喝啤酒!" << endl;
}

void Human::sleep() {
    cout << "我正在睡觉!" << endl;
}

void Human::play() {
    cout << "我在唱歌! " << endl;
}

void Human::work() {
    cout << "我在工作..." << endl;
}

string Human::getName() {
    return name;
}

int Human::getAge() {
    return age;
}

int Human::getSalary() {
    return salary;
}

void Human::setAddr(const char *newAddr) {
    if (!newAddr) {
        return;
}
	strcpy_s(addr, 64,	newAddr);
}

const char* Human::getAddr() {
    return addr;
}

int main(void) {
    Human	h1(25, 35000);	// 使用自定义的默认构造函数
    Human	h2(h1);	// 使用自定义的拷贝构造函数

    cout << "h1 addr:" << h1.getAddr() << endl;
    cout << "h2 addr:" << h2.getAddr() << endl;
    h1.setAddr("长沙");
    cout << "h1 addr:" << h1.getAddr() << endl;
    cout << "h2 addr:" << h2.getAddr() << endl;

    system("pause");
    return 0;
}
说明:合成的拷贝构造函数的缺点: 使用“浅拷贝”
解决方案:在自定义的拷贝构造函数中,使用‘深拷贝'
#include <iostream>
#include <Windows.h>
#include <string>
#include <string.h>

using namespace std;

// 定义一个“人类”
class Human {
public:
    Human();
    Human(int age, int salary);
	Human(const Human&);	//不定义拷贝构造函数,编译器会生成“合成的拷贝构造函数”

    void eat();
    void sleep();
    void play();
    void work();

    string getName();
    int getAge();
    int getSalary();

    void setAddr(const char *newAddr);
    const char* getAddr();
private:
    string name = "Unknown";
    int age = 28;
    int salary;
    char *addr;
};

Human::Human() {
    name = "无名氏";
    age = 18;
    salary = 30000;
}

Human::Human(int age, int salary) {
    cout << "调用自定义的构造函数" << endl;
    this->age = age;	//this 是一个特殊的指针,指向这个对象本身
    this->salary = salary;
    name = "无名";
    addr = new char[64]; strcpy_s(addr, 64, "China");
}

Human::Human(const Human &man) {
    cout << "调用自定义的拷贝构造函数" << endl;
    age = man.age;	//this 是一个特殊的指针,指向这个对象本身
    salary = man.salary;
    name = man.name;

    // 深度拷贝
    addr = new char[64];
    strcpy_s(addr, 64, man.addr);
}

void Human::eat() {
    cout << "吃炸鸡,喝啤酒!" << endl;
}

void Human::sleep() {
    cout << "我正在睡觉!" << endl;
}

void Human::play() {
    cout << "我在唱歌! " << endl;
}

void Human::work() {
    cout << "我在工作..." << endl;
}

string Human::getName() {
    return name;
}
int Human::getAge() {
    return age;
}
int Human::getSalary() {
    return salary;
}
void Human::setAddr(const char *newAddr) {
    if (!newAddr) {
        return;
}

    strcpy_s(addr, 64, newAddr);
}

const char* Human::getAddr() {
    return addr;
}

int main(void) {
    Human	h1(25, 35000);	// 使用自定义的默认构造函数
    Human	h2(h1);	// 使用自定义的拷贝构造函数

    cout << "h1 addr:" << h1.getAddr() << endl;
    cout << "h2 addr:" << h2.getAddr() << endl;

    h1.setAddr("长沙");
    cout << "h1 addr:" << h1.getAddr() << endl;
    cout << "h2 addr:" << h2.getAddr() << endl;

    system("pause");
    return 0;
}
3.什么时候调用拷贝构造函数
- 调用函数时,实参是对象,形参不是引用类型如果函数的形参是引用类型,就不会调用拷贝构造函数
- 函数的返回类型是类,而且不是引用类型
- 对象数组的初始化列表中,使用对象。
Demo
#include <iostream>
#include <Windows.h>
#include <string>
#include <string.h>

using namespace std;

// 定义一个“人类”
class Human {
public:
    Human();
    Human(int age, int salary);
    Human(const Human&); //不定义拷贝构造函数,编译器会生成“合成的拷贝构造函数”

    void eat();
    void sleep();
    void play();
    void work();

    string getName();
    int getAge();
    int getSalary();

    void setAddr(const char *newAddr);
    const char* getAddr();
private:
    string name = "Unknown";
    int age = 28;
    int salary;
    char *addr;
};

Human::Human() {
    name = "无名氏";
    age = 18;
    salary = 30000;
}

Human::Human(int age, int salary) {
    cout << "调用自定义的构造函数" << endl;
    this->age = age;	//this是一个特殊的指针,指向这个对象本身
    this->salary = salary;
    name = "无名";
    addr = new char[64];
    strcpy_s(addr, 64, "China");
}

Human::Human(const Human &man) {
    cout << "调用自定义的拷贝构造函数" << "参数:" << &man << " 本对象:" << this << endl;

    age = man.age;	//this是一个特殊的指针,指向这个对象本身
    salary = man.salary;
    name = man.name;

    // 深度拷贝
    addr = new char[64];
    strcpy_s(addr, 64, man.addr);
}

void Human::eat() {
    cout << "吃炸鸡,喝啤酒!" << endl;
}

void Human::sleep() {
    cout << "我正在睡觉!" << endl;
}

void Human::play() {
    cout << "我在唱歌! " << endl;
}

void Human::work() {
    cout << "我在工作..." << endl;
}

string Human::getName() {
    return name;
}

int Human::getAge() {
    return age;
}

int Human::getSalary() {
    return salary;
}

void Human::setAddr(const char *newAddr) {
    if (!newAddr) {
        return;
}

    strcpy_s(addr, 64, newAddr);
}

const char* Human::getAddr() {
    return addr;
}

void test(Human man) {
    cout << man.getSalary() << endl;
}

void test2(Human &man) { //不会调用拷贝构造函数,此时没有没有构造新的对象
    cout << man.getSalary() << endl;
}

Human test3(Human &man) {
    return man;
}

Human& test4(Human &man) {
    return man;
}

int main(void) {
    Human h1(25, 35000); // 调用默认构造函数
    Human h2(h1);	// 调用拷贝构造函数
    Human h3 = h1;	// 调用拷贝构造函数

    test(h1); // 调用拷贝构造函数
    test2(h1); // 不会调用拷贝构造函数
    test3(h1);	// 创建一个临时对象,接收test3函数的返回值,调用1次拷贝构造函数

    Human h4 = test3(h1); // 仅调用1次拷贝构造函数,返回的值直接作为h4的拷贝构造函数的参数
    test4(h1);	// 因为返回的是引用类型,所以不会创建临时对象,不会调用拷贝构造函数
    Human men[] = { h1, h2, h3 }; //调用3次拷贝构造函数
    system("pause"); return 0;
}
六、赋值构造函数
Demo
#include <iostream>
#include <Windows.h>
#include <string>
#include <string.h>

using namespace std;

// 定义一个“人类”
class Human {
public:
    Human();
    Human(int age, int salary);
    Human(const Human&);	//不定义拷贝构造函数,编译器会生成“合成的拷贝构造函数”
    Human& operator=(const Human &);

    void eat();
    void sleep();
    void play();
    void work();

    string getName();
    int getAge();
    int getSalary();
    void setAddr(const char *newAddr);
    const char* getAddr();

private:
    string name = "Unknown";
    int age = 28;
    int salary;
    char *addr;
};

Human::Human() {
    name = "无名氏";
    age = 18;
    salary = 30000;
}

Human::Human(int age, int salary) {
    cout << "调用自定义的构造函数" << endl;
    this->age = age;	//this 是一个特殊的指针,指向这个对象本身 this->salary = salary;
    name = "无名";
    addr = new char[64];
    strcpy_s(addr, 64, "China");
}

Human::Human(const Human &man) {
    cout << "调用自定义的拷贝构造函数" << "参数:" << &man << " 本对象:" << this << endl;
    age = man.age;	//this 是一个特殊的指针,指向这个对象本身
    salary = man.salary;
    name = man.name;

    // 深度拷贝
    addr = new char[64];
    strcpy_s(addr, 64, man.addr);
}

Human& Human::operator=(const Human &man) {
    cout << "调用" << __FUNCTION__ << endl;

    if (this == &man) {
    return *this; //检测是不是对自己赋值:比如 h1 = h1;
}

    // 如果有必要,需要先释放自己的资源(动态内存)
    //delete addr;
    //addr = new char[ADDR_LEN];

    // 深拷贝
    strcpy_s(addr, ADDR_LEN, other.addr);

    // 处理其他数据成员
    name = man.name;
    age = man.age;
    salary = man.salary;

    // 返回该对象本身的引用, 以便做链式连续处理,比如 a = b = c;
    return *this;
}


void Human::eat() {
    cout << "吃炸鸡,喝啤酒!" << endl;
}

void Human::sleep() {
    cout << "我正在睡觉!" << endl;
}

void Human::play() {
    cout << "我在唱歌! " << endl;
}

void Human::work() {
    cout << "我在工作..." << endl;
}

string Human::getName() {
    return name;
}

int Human::getAge() {
    return age;
}

int Human::getSalary() {
    return salary;
}

void Human::setAddr(const char *newAddr) {
    if (!newAddr) {
        return;
}

strcpy_s(addr, 64, newAddr);

}

const char* Human::getAddr() {
    return addr;
}

void test(Human man) {
    cout << man.getSalary() << endl;
}

void test2(Human &man) { //不会调用拷贝构造函数,此时没有没有构造新的对象
    cout << man.getSalary() << endl;
}

Human test3(Human &man) {
    return man;
}

Human& test4(Human &man) {
    return man;
}

int main(void) {
	Human h1(25, 35000);	// 调用默认构造函数
    // 特别注意,此时是创建对象 h2 并进行初始化,调用的是拷贝构造函数,
    // 不会调用赋值构造函数
    Human h2 = h1;
    h2 = h1; //调用赋值构造函数
    h2 = test3(h1); //调用赋值构造函数
    Human h3 = test3(h1); //调用拷贝构造函数

    system("pause");
    return 0;
}
如果没有定义赋值构造函数,编译器会自动定义“合成的赋值构造函数”,与其他合成的构造函数,是“浅拷贝”(又称为“位拷贝”)。
七、析构函数
作用:对象销毁前,做清理工作。
具体的清理工作,一般和构造函数对应
比如:如果在构造函数中,使用 new 分配了内存,就需在析构函数中用 delete 释放。
如果构造函数中没有申请资源(主要是内存资源),那么很少使用析构函数。
函数名:
~类型
没有返回值,没有参数,最多只能有一个析构函数
访问权限:
一般都使用 public
使用方法:不能主动调用。
对象销毁时,自动调用。
如果不定义,编译器会自动生成一个析构函数(什么也不做)
Demo
#include <iostream>
#include <Windows.h>

#include <string>
#include <string.h>

using namespace std;

// 定义一个“人类”
class Human {
public:
    Human();
    Human(int age, int salary);
	Human(const Human&);	//不定义拷贝构造函数,编译器会生成“合成的拷贝构造函数”
    Human& operator=(const Human &);
    ~Human(); //析构函数
......
private:
    string name = "Unknown";
    int age = 28;
    int salary;
    char *addr;
};

Human::Human() {
    name = "无名氏";
    age = 18;
    salary = 30000;
    addr = new char[64];
    strcpy_s(addr, 64, "China");
    cout << "调用默认构造函数-" << this << endl;
}
......
Human::~Human() {
    cout << "调用析构函数-" << this	<< endl;	//用于打印测试信息 delete addr;
}

void test() {
    Human h1;
    {
        Human h2;
    }
    cout << "test()结束" << endl;
}

int main(void) {
    test();

    system("pause");
    return 0;
}
八、this指针
Demo1
Human::Human(int age, int salary) {
    cout << "调用自定义的构造函数" << endl;
    this->age = age;	//this是一个特殊的指针,指向这个对象本身
    this->salary = salary;
    name = "无名";

    addr = new char[64];
    strcpy_s(addr, 64, "China");
}
注意:在类的静态成员函数中,不能使用this指针!
Demo2
#include <iostream>
#include <Windows.h>
#include <string>
#include <string.h>

using namespace std;

// 定义一个“人类”
class Human {
public:
    Human();
    Human(int age, int salary);
    ......
    int getAge() const;
    const Human* compare1(const Human *);
private:
    string name = "Unknown";
    int age = 28;
    int salary;
    char *addr;
};

int Human::getAge() const {
    return age;
}
const Human*  Human::compare1(const Human * other) {
    if (age > other->age) {
        return	this; //没有创建新的对象
    }else{
        return other;
    }
}

int main(void) {
    Human h1(25, 30000);
    Human h2(18, 8000);

    cout << h1.compare1(&h2)->getAge() << endl;

    system("pause");
    return 0;
}
Demo3
......
class Human {
public:
    Human();
    Human(int age, int salary);

    int getAge() const;
    const Human* compare1(const Human *);
    const Human& compare2(const Human&);
private:
    string name = "Unknown";
    int age = 28;
    int salary;
    char *addr;
};

......
const Human& Human::compare2(const Human& other) {
    if (age > other.age) {
	    return *this;	//访问该对象本身的引用,而不是创建一个新的对象
    }else{
        return other;
    }
}

int main(void) {
    Human h1(25, 30000);
    Human h2(18, 8000);

    cout << h1.compare2(h2).getAge() << endl;

    system("pause");
    return 0;
}
this 不能指向其他对象,堪称“永不迷失的真爱”
class Human {
public:
    Human();
    Human(int age, int salary);
    ......
    void thisTestError(Human *other) {
        this = other; // 将报错!
    }
......
};
九、类文件的分离
实际开发中,类的定义保存在头文件中,比如 Human.h【类的声明文件】(C++PrimerPlus)类的成员函数的具体实现,保存在.cpp 文件中,比如 Human.cpp【类的方法文件】
(C++PrimerPlus)
其他文件,如果需要使用这个类,就包含这个类的头文件。
十、静态数据
1.静态数据成员
需求分析:需要获取总的人数,如何实现?
只能使用一个全局变量,然后在构造函数中对这个全局变量进行修改(加 1)缺点:使用全局变量不方便,破坏程序的封装性。
解决方案:
使用类的静态成员。
定义:
Human.h
class Human {
public:
    ......
    int getCount();
private:
    string name = "Unknown";
    int age = 28;
    ......
    // 类的静态成员
    static int count;
};
初始化:
Human.cpp
#include "Human.h"

// 初始化类的静态成员
int Human::count = 0;
......

Human::Human() {
    cout << "调用构造函数:" << this << endl;
    name = "无名氏";
    age = 18;
    salary = 30000;
    addr = new char[ADDR_LEN];
    strcpy_s(addr, ADDR_LEN, "China");
    count++;
}

// 类的普通成员函数,可以直接访问静态成员(可读可写)
int Human::getCount() {
    return count;
}
main.cpp
#include "Human.h"

int main(void) {
Human h1;

cout << h1.getCount() << endl;

Human h2;
cout << h1.getCount() << endl;

system("pause");
return 0;
}
对于非 const 的类静态成员,只能在类的实现文件中初始化。
const 类静态成员,可以在类内设置初始值,也可以在类的实现文件中设置初始值。(但是不要同时在这两个地方初始化,只能初始化 1 次)
2.静态成员函数
上一节 getCount 的讨论:
当需要获取总的人数时,还必须通过一个对象来访问,比如 h1.getCount().
如果当前没有可用的对象时,就非常尴尬,不能访问 getCount()!
void test() {
    cout << "总人数: ";
    //没有可用的对象来访问getCount()
}
如果为了访问总的人数,而特意去创建一个对象,就很不方便,而且得到的总人数还不真实(包含了一个没有实际用处的人)
解决方案:
把 getCount()方法定义为类的静态方法!
类的静态方法:
- 可以直接通过类来访问【更常用】,也可以通过对象(实例)来访问。
- 在类的静态方法中,不能访问普通数据成员和普通成员函数(对象的数据成员和成员函数)
Human.h
#pragma once ......

class Human {
public:
    static int getCount();
};
Human.cpp
//静态方法的实现,不能加static
int Human::getCount() {
// 静态方法中,不能访问实例成员(普通的数据成员)
// cout << age;
// 静态方法中,不能访问this指针
// 因为this指针是属于实例对象的
// cout << this;
//静态方法中,只能访问静态数据成员
return count;
}
main.cpp
void test() {
    cout << "总人数: ";
    // ??? 没有可用的对象来访问getCount()
    // 直接通过类名来访问静态方法!
    // 用法:类名::静态方法
    cout << Human::getCount();
}

int main(void) {
    Human h1, h2;

    test();
    system("pause");
    return 0;
}
说明:
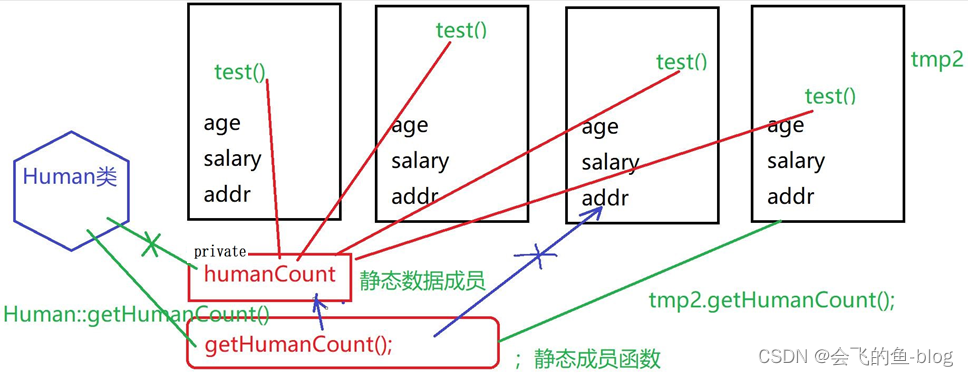
1.静态数据成员对象的成员函数(没有 static 的成员函数)内部,可以直接访问“静态数据成员” 类的静态成员函数(有 static 的成员函数)内部,可以直接访问“静态数据成员” 即:所有的成员函数,都可以访问静态数据成员。
类可以直接访问public静态数据成员(Human::humanCount 非法)
2.静态成员函数
对象可以直接访问静态成员函数
类可以直接访问静态成员函数(Human::getHumanCount())在类的静态成员函数(类的静态方法)内部,不能直接访问 this 指针和对象的数据成员!在类的静态成员函数(类的静态方法)内部,只能访问类的数据成员
十一、常成员
1.const数据成员
需求分析:
怎样表示人的“血型”?血型可以修改吗?
解决方案:
把血型定义为 const 数据类型(常量数据成员)
const 数据成员的初始化方式:
- 使用类内值(C++11 支持)
- 使用构造函数的初始化列表
(如果同时使用这两种方式,以初始化列表中的值为最终初始化结果)注意: 不能在构造函数或其他成员函数内,对 const 成员赋值!
Demo
Human.h
#pragma once
class Human {
public:
    ......
private:
    ......
    const string bloodType;
};
Human.cpp
// 使用初始化列表,对const数据成员初始化
Human::Human():bloodType("未知") { ......
    //在成员函数内,不能对const数据成员赋值
    //bloodType = "未知血型";
    count++;
}
void Human::description() const {
    cout << "age:" << age
         << " name:" << name
         << " salary:" << salary
         << " addr:" << addr
         << " bloodType:" << bloodType << endl; //其他成员函数可以“读”const变量
}
Main.cpp
int main(void) {
    Human h1;

    h1.description();

    system("pause");
     return 0;
}
2.const成员函数
需求分析:
const 的 Human 对象,不能调用普通的成员函数。
分析:
C++认为,const(常量)对象,如果允许去调用普通的成员函数,而这个成员函数内部可能会修改这个对象的数据成员!而这讲导致 const 对象不再是 const 对象!
【类比】:专一男就是 const 对象,撩妹方法,就是普通的成员函数,如果允许专一男调去撩妹,那么专一男,也就不专一了!
解决方案:
如果一个成员函数内部,不会修改任何数据成员,就把它定义为 const 成员函数。
Human 的 description 方法
//Human.h class Human {
public:
    ......
    void description() const; //注意,const的位置
    ......
};

//Human.cpp
void Human::description ()const {
     cout << "age:" << age
     << " name:" << name
     << " salary:" << salary
     << " addr:" << addr
     << " bloodType:" << bloodType << endl;
}

//main.cpp
int main(void) {
    const Human h1;
    h1.description();

    system("pause");
    return 0;
}
const 成员函数内,不能修改任何数据成员!
C++的成员函数设置建议:如果一个对象的成员函数,不会修改任何数据成员,那么就强烈:把这个成员函数,定义为 const 成员函数!
十二、组合和聚合
聚合
说明:组合和聚合,不是 C++的语法要求,是应用中的常用手段。
组合
需求:
构建一个计算机类,一台计算机,由 CPU 芯片,硬盘,内存等组成。
CPU 芯片也使用类来表示。
组合
#pragma once
#include <string>

class CPU
{
public:
    CPU(const char *brand = "intel", const char *version="i5");
    ~CPU();

private:
    std::string brand; //品牌
    std::string version; //型号
};
CPU.cpp
#include "CPU.h"
#include <iostream>

CPU::CPU(const char *brand, const char *version)
{
    this->brand = brand;
    this->version = version;
    std::cout << __FUNCTION__ << std::endl;
}

CPU::~CPU()
{
    std::cout << __FUNCTION__ << std::endl;
}
Computer.h
#pragma once
#include "CPU.h"
class Computer
{
 public:
    Computer(const char *cpuBrand, const char *cpuVersion, int hardDisk, int memory);
    ~Computer(); private:

    CPU cpu;	// Computer和CPU是“组合”关系
    int hardDisk; //硬盘, 单位:G
    int memory; //内存, 单位:G
};
Computer.cpp
#include "Computer.h"
#include <iostream>

Computer::Computer(const char *cpuBrand, const char *cpuVersion, int hardDisk, int memory):cpu(cpuBrand, cpuVersion)
{
    this->hardDisk = hardDisk;
    this->memory = memory;
    std::cout << __FUNCTION__ << std::endl;
}

Computer::~Computer()
{
    std::cout << __FUNCTION__ << std::endl;
}
Main.cpp
#include <iostream>
#include <Windows.h>
#include <string>
#include <string.h>
#include "Computer.h"

using namespace std;

void test() {
    Computer a("intel", "i9", 1000, 8);
}
int main(void) {
    test();

    system("pause");
    return 0;
}
小结:被拥有的对象(芯片)的生命周期与其拥有者(计算机)的生命周期是一致的。计算机被创建时,芯片也随之创建。计算机被销毁时,芯片也随之销毁。
拥有者需要对被拥有者负责,是一种比较强的关系,是整体与部分的关系。
具体组合方式:
1、被组合的对象直接使用成员对象。(常用)
2、使用指针表示被组合的对象,在构造函数中,创建被组合的对象;在析构函数中,释放被组合的对象。
UML 中的组合表示:
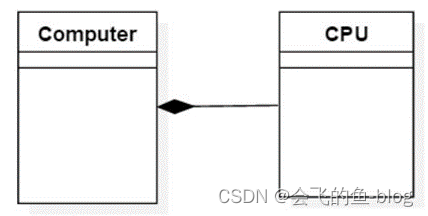
注意包含者使用实心菱形
【补充】UML 画图工具:starUML
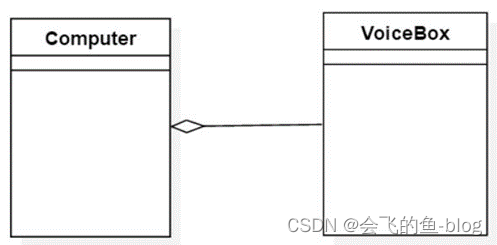
聚合
需求:
给计算机配一台音响。
Computer.h
#pragma once
#include "CPU.h"

class VoiceBox;
class Computer
{
public:
    Computer(const char *cpuBrand, const char *cpuVersion, int hardDisk, int memory);
    ~Computer();

    void addVoiceBox(VoiceBox *box);
private:
    CPU cpu; // Computer和CPU是“组合”关系
    int hardDisk; //硬盘, 单位:G
    int memory; //内存, 单位:G
    VoiceBox *box; //音箱
};
Computer.cpp
#include "Computer.h"
#include <iostream>
#include "VoiceBox.h"

Computer::Computer(const char *cpuBrand, const char *cpuVersion, int hardDisk, int memory):cpu(cpuBrand, cpuVersion)
{
    this->hardDisk = hardDisk;
    this->memory = memory;
    std::cout << __FUNCTION__ << std::endl;
}

void Computer::addVoiceBox(VoiceBox *box) {
    this->box = box;
}

Computer::~Computer()
{
    std::cout << __FUNCTION__ << std::endl;
}
Main.cpp
#include <iostream>
#include <Windows.h>
#include <string>
#include <string.h>
#include "Computer.h"
#include "VoiceBox.h"

using namespace std;

void test(VoiceBox *box) {
    Computer a("intel", "i9", 1000, 8);
    a.addVoiceBox(box);
}

int main(void) {
    VoiceBox box;
    test(&box);

    system("pause");
    return 0;
}
聚合不是组成关系,被包含的对象,也可能被其他对象包含。
拥有者,不需要对被拥有的对象的生命周期负责。
UML 中的组合表示:
十三、常见错误总结
const 的错误用法
#include <iostream>
#include <windows.h>

using namespace std;

class Man{
public:
    Man(){}
    void play() {
    cout << "I am playing ...." << std::endl;
    }
};

int main(void) {
    const Man man;
    man.play();
}
报错:
error C2662: “void Man::play(void)”: 不能将“this”指针从“const Man”转换为“Man &”
原因: man 是 const 对象, 但是却调用了非 const 方法. 类比: 专一男, 不能去夜店玩耍[因为这样很危险, 可能导致专一男变心]
解决方案: 方案 1:
把 const Man man; 修改为: Man man;
方案 2: 把 play 方法, 修改为 const 方法.
Error2-vector
vector 加入的成员是拷贝新成员
Demo
#include <iostream>
#include <windows.h>
#include <vector>

using namespace std;

class Man {
public:
Man() {}
void play() {
    count += 10; cout << "I am playing ...." << std::endl;
}
int getDrinkCount() const {
    return count;
}

private:
    int count = 0; //一共喝了多少杯酒
};

int main(void) {
    Man zhangFei, guanYu, liuBei;
    vector<Man> men;
    // push_back是把参数的值,拷贝给vector
    // men[0]的值和liubBei是相同的,但是,是两个不同的对象

    men.push_back(liuBei);
    men.push_back(guanYu);
    men.push_back(zhangFei);
    men[0].play();

    cout << men[0].getDrinkCount() << endl; //10
    cout << liuBei.getDrinkCount() << endl; //0

    system("pause");
    return 0;
}
Error2-const
#include <iostream>
#include <windows.h>

using namespace std;

class Man{
public:
    Man(){}
    void play()
    const { cout << "I am playing ...." << std::endl; }
};

void play(Man &man) {
     man.play();
}

int main(void) {
    const Man man;
    play(man);
}
原因: 非 const 引用, 不能对 const 变量进行引用注意: const 引用, 可以对非 const 变量进行引用
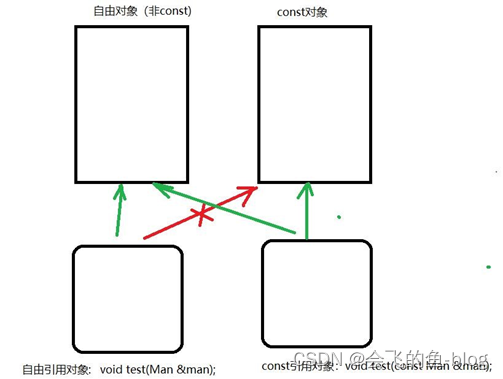
解决方案:
修改引用变量, 或者被引用的变量
Error3-static
#include <iostream>
#include <windows.h>

using namespace std;

class Man{
public:
    Man() { count++; }

    void play() const {
        cout << "I am playing ...." << std::endl;
    }

    int getAge() {
        return age;
    }

    static int getCount() {
        getAge(); //error!
        return count;
    }

private:
    static int count;
    int age;
};

int Man::count = 0;

int main(void) {
    Man man1;
    Man man2;

    cout << Man::getCount() << endl;

    system("pause");
    return 0;
}
十四、继承与派生
引用功能目的:有大量重复的代码和实现。
1.什么是继承和派生?
现实写照:

父亲“派生”出儿子儿子“继承”自父亲派生和派生,本质是相同的,只是从不同的角度来描述。
2.继承和派生在 UML 中的表示
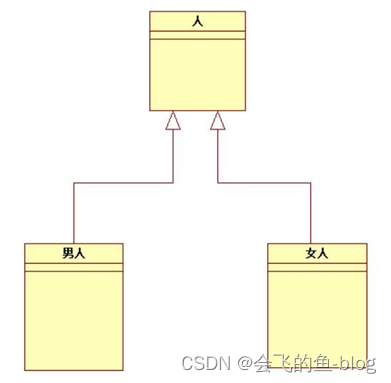
注意是“空心三角箭头”,从子类【派生的类】指向父类【被继承的类】父类,也称为“基类”
除了“构造函数”和“析构函数”,
父类的所有成员函数,以及数据成员,都会被子类继承!
3.派生和基继承的实现
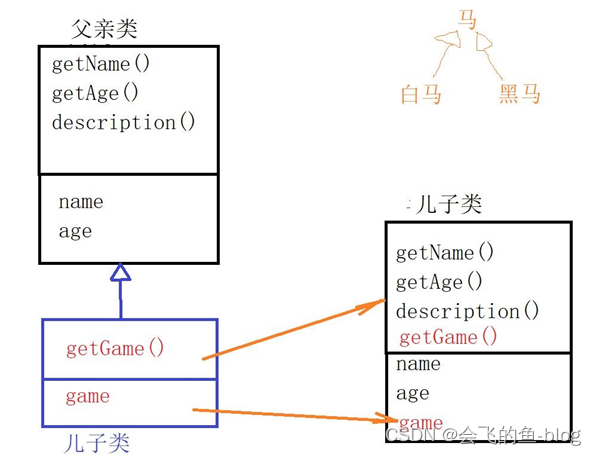
Father.h
#pragma once
#include <string>

using namespace std;

class Father
{
public:
    Father(const char*name, int age);
    ~Father();

    string getName();
    int getAge();
    string description();
private:
    int age;
    string name;
};
Father.cpp
#include "Father.h"
#include <sstream>
#include <iostream>

Father::Father(const char*name, int age)
{
    cout << __FUNCTION__ << endl;
    this->name = name;
    this->age = age;
}

Father::~Father()
{

}

string Father::getName() {
    return name;
}

int Father::getAge() {
    return age;
}

string Father::description() {
    stringstream ret; ret << "name:" << name << " age:" << age;

    return ret.str();
}
Son.h
#pragma once
#include "Father.h"

class Son : public Father {
public:
    Son(const char *name, int age, const char *game);
    ~Son();

    string getGame();
    string description();
private:
    string game;
};
Son.cpp
#include "Son.h"
#include <iostream>
#include <sstream>

// 创建Son对象时, 会调用构造函数!
// 会先调用父类的构造函数, 用来初始化从父类继承的数据
// 再调用自己的构造函数, 用来初始化自己定义的数据
Son::Son(const char *name, int age, const char *game) : Father(name, age) {
    cout << __FUNCTION__ << endl;
// 没有体现父类的构造函数, 那就会自动调用父类的默认构造函数!!! this->game = game;
}

Son::~Son() {

}

string Son::getGame() {
    return game;
}

string Son::description() {
    stringstream ret;
    // 子类的成员函数中, 不能访问从父类继承的private成员

    ret << "name:" << getName() << " age:" << getAge()
        << " game:" << game; return ret.str();
}
main.cpp
#include <iostream>
#include "Father.h"
#include "Son.h"

int main(void) {
    Father wjl("王健林", 68);
    Son wsc("王思聪", 32, "电竞");

    cout << wjl.description() << endl;
    // 子类对象调用方法时, 先在自己定义的方法中去寻找, 如果有, 就调用自己定义的方法
    // 如果找不到, 就到父类的方法中去找, 如果有, 就调用父类的这个同名方法 // 如果还是找不到, 就是发生错误!
    cout << wsc.description() << endl;

    system("pause");
    return 0;
}
4.派生类(子类)对象的内存分布
设置 vs 编译器:
在命令行中添加选项:(打印指定类的内存分布)
/d1 reportSingleClassLayoutFather	/d1 reportSingleClassLayoutSon

重新生成:
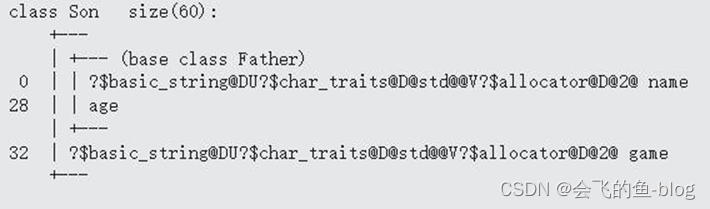
测试:
cout << sizeof(wlj) << endl; // 32 cout << sizeof(yangGuo) << endl; // 60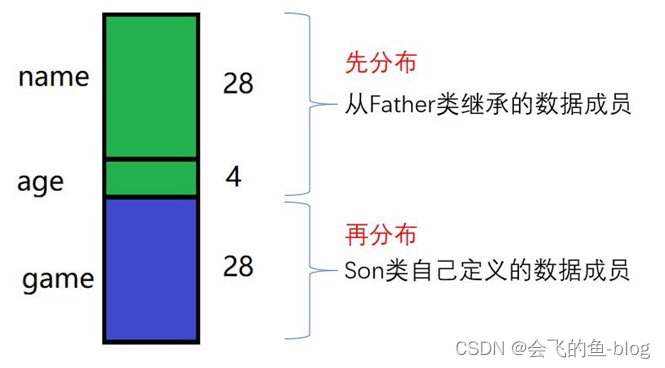
说明:成员函数,不占用对象的内存空间,但是也被子类继承了!!!
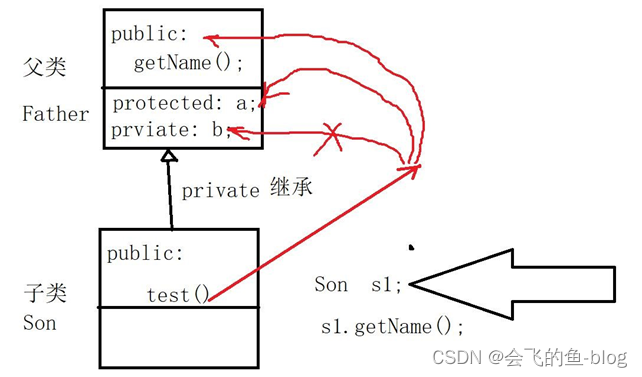
5.protected(保护)访问权限
为什么要使用 protected 访问权限?
子类的成员函数中,不能直接访问父类的 private 成员,已经这些成员已经被继承下来了,但是却不能访问。
只有通过父类的 public 函数来间接访问,不是很方便。比如,刚才 Demo 中 Father 类中的 name 和 age 成员。
解决方案:
把 name 和 age 定义为 protected 访问访问权限。
效果:
Son 类的成员函数中,可以直接访问它的父类的 protected 成员。
但是在外部,别人又不能直接通过 Son 对象来访问这些成员。
一个类, 如果希望, 它的成员, 可以被自己的子类(派生类)直接访问,
但是, 又不想被外部访问那么就可以把这些成员, 定义为 protected访问权限!!!
访问权限总结:
public
外部可以直接访问.
可以通过对象来访问这个成员 Fahter wjl("王健林", 65); wjl.getName(); private
外部不可以访问自己的成员函数内, 可以访问 Fahter wjl("王健林", 65);
wjl.name; // 错误!!!
Father内的所有成员函数内, 可以直接访问name protected
protected和private非常相似和private的唯一区别:
protecte: 子类的成员函数中可以直接访问 private: 子类的成员函数中不可以访问
十五、派生和继承的各种方式
public(公有)继承 [使用最频繁]
父类中定义的成员(数据成员和函数成员)被继承后,访问权限不变! public --> public
protected --> protected private --> private
private(私有)继承
父类中定义的成员(数据成员和函数成员)被继承后,访问权限都变成 private public --> private protected --> private private --> private
protected(保护)继承
public --> protected protected --> protected private --> private
小结:
public 继承全不变 private 继承全变私
protected 继承只把 public 降级为 protected
1.什么时候使用继承和派生
1)准备实现多个类,但是这些类在现实世界中有某种特殊关系(比如:类别与子类别的关系)
例如:人 女人 男人
如果完全独立的实现这 3 个类,将有很多重复代码,而且不利于以后的维护。
2)准备构建一个类,但是这个类与已经开发好的某个类非常相似,而且在现实世界中具有某种特殊关系(比如:类别与子类别的关系)。
如果全部重新写这个新类,效率较低,因为有很多东西已经在这个已有的类中实现了。
实例:某卫星监控平台的 ODU 和 ODU232
ODU
class ODU232 : public ODU
2)对多个已经实现的类(这些类有某种特殊关系),进行重构。
一般在前两种情况使用,第 3 种(重构)是不得而为之。
十六、子类对父类成员的访问权限
无论通过什么方式(public、protected、private)继承,在子类内部均可访问父类中的 public、protected 成员,
private 成员不可访问(如果想要子类能够访问,就定义为 protected)
继承方式只影响外界通过子类对父类成员的访问权限。
public 继承,父类成员的访问权限全部保留至子类;
protected 继承,父类 public 成员的访问权限在子类中降至 protected;
private 继承,父类 public、protected 成员的访问权限在子类中均降至 private。
实例测试:
通过修改 Son 类的继承方式,观察变化。
十七、子类的构造函数
1.调用父类的哪个构造函数
Demo
class Son : public Father {
public:
    // 在子类的构造函数中,显式调用父类的构造函数
    Son(const char *name, int age, const char *game):Father(name, age) {
        this->game = game;
}

// 没有显式的调用父类的构造函数,那么会自动调用父类的默认构造函数
Son(const char *name, const char *game){
    this->game = game;
}
......
};
2.子类和父类的构造函数的调用顺序
当创建子类对象时, 构造函数的调用顺序:
静态数据成员的构造函数 -> 父类的构造函数 -> 非静态的数据成员的构造函数 -> 自己的构造函数
注意:
无论创建几个对象, 该类的静态成员只构建一次, 所以静态成员的构造函数只调用 1 次!!!
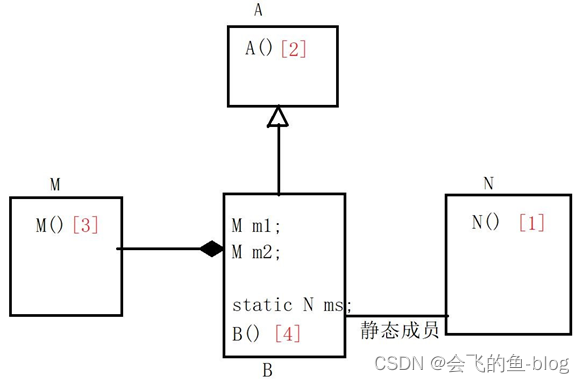
Demo
#include <iostream>
#include <Windows.h>

using namespace std;

class M {
public:
    M() { cout << __FUNCTION__ << endl; }
};

class N {
public:
    N() { cout << __FUNCTION__ << endl; }
};

class A {
public:
    A() { cout << __FUNCTION__ << endl; }
};

class B : public A {
public:
    B() { cout << __FUNCTION__ << endl;
}
private:
    M	m1;
    M m2;
    static N ms;
};

N	B::ms; //静态成员

int main(void) {
    B b;

    system("pause");
}
执行:
N::N |
静态数据成员的构造函数 |
A::A |
父类的构造函数 |
M::M |
非静态数据成员的构造函数 |
M::M |
非静态数据成员的构造函数 |
B::B |
自己的构造函数 |
十八、子类的析构函数
子类的析构函数的调用顺序,和子类的构造函数的调用顺序相反!!!记住,相反即可。
Demo
#include <iostream>
#include <Windows.h>

using namespace std;

class M {
public:
    M() {
        cout << __FUNCTION__ << endl;
    }
    ~M() {
        cout << __FUNCTION__ << endl;
    }
};

class N {
public:
    N() {
        cout << __FUNCTION__ << endl;
    }
    ~N() {
        cout << __FUNCTION__ << endl; }
    };

class A {
public:
    A() {
        cout << __FUNCTION__ << endl;
    }
    ~A() {
        cout << __FUNCTION__ << endl;
    }
};

class B : public A {
public:
    B() {
        cout << __FUNCTION__ << endl;
    }
    ~B() {
        cout << __FUNCTION__ << endl;
    }
private:
    M	m1;
    M m2;
    static N ms;
};

N	B::ms; //静态成员

int main(void) {
{
    B b;
    cout << endl;
}
    system("pause");

}
执行:
N::N A::A
M::M M::M
B::B
B::~B
M::~M M::~M
A::~A
静态对象在程序终止时被销毁,所以:
静态成员的析构函数,在程序结束前,是不会被调用的!
十九、子类型关系
1.什么是子类型
花木兰替父从军

公有继承时,派生类的对象可以作为基类的对象处理,派生类是基类的子类型。
B类就是 A 类的子类型.
Demo.
#include <iostream>

using namespace std;

class A {
public:
    A() {}
    ~A() {}

    void kill() {
        cout << "A kill." << endl;
    }
};

class B : public A {
public:
    B(){}
    ~B(){}

    void kill() {
        cout << "B kill." << endl;
    }
};

void test(A a) {
    a.kill(); //调用的是A类对象的kill方法
}

int main(void) {
    A	a;
    B	b;

    test(a);
    test(b);

    system("pause");
    return 0;
}
子类型关系具有单向传递性。
C类是 B 类的子类型
B 类是 A 类的子类型
2.子类型的作用:
在需要父类对象的任何地方, 可以使用”公有派生”的子类的对象来替代,从而可以使用相同的函数统一处理基类对象和公有派生类对象即:形参为基类对象时,实参可以是派生类对象
demo
#include <iostream>
#include <sstream>

using namespace std;

class Father {
public:
    void play() {
         cout << "KTV唱歌!" << endl;
    }
};

class Son : public Father {
public:
    void play() {
        cout << "今晚吃鸡!" << endl;
    }
};

void party(Father *f1, Father *f2) {
    f1->play();
    f2->play();
}

int main(void) {
    Father yangKang;
    Son yangGuo;

    party(&yangKang, &yangGuo);
    system("pause");
    return 0;
}
执行:
KTV 唱歌!
KTV 唱歌!
注意:如果把 Son 改为 protected 继承,或 private 继承,就会导致编译失败!
3.子类型的应用
1)基类(父类)的指针,可以指向这个类的公有派生类(子类型)对象。
Son yangGuo;
Father * f = &yangGuo;
2)公有派生类(子类型)的对象可以初始化基类的引用
Son yangGuo;
Father &f2 = yangGuo;
3)公有派生类的对象可以赋值给基类的对象
Son yangGuo;
Father f1 = yangGuo;
注意:以上的应用,反过来就会编译失败!
二十、多重继承
1.为什么要使用多重继承?
陈赫的显赫世家
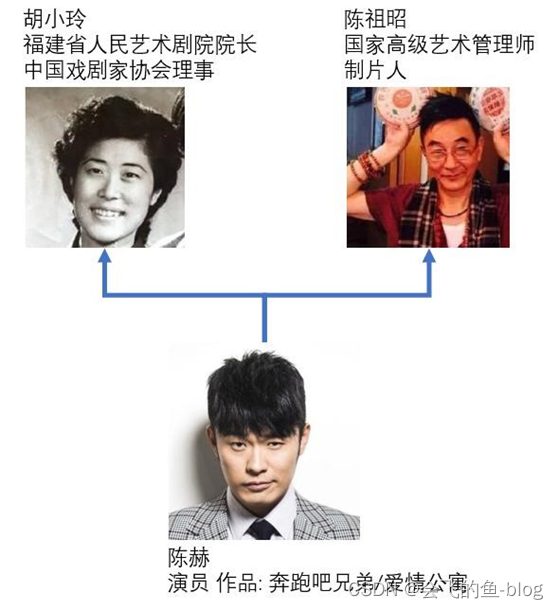
门阀世族的婚姻, 为什么要”门当户对”?
就是为了实现”多重继承”
蒋介石与宋美龄
2.什么是多重继承
多继承/多重继承:
一个派生类可以有两个或多个基类(父类)。
多重继承在中小型项目中较少使用,在 Java、C#等语言中直接取消多继承, 以避免复杂性.
3.多重继承的用法
将多个基类用逗号隔开.
实例:
例如已声明了类 A、类 B 和类 C,那么可以这样来声明派生类 D:
class D: public A, private B, protected C{
//类 D 自己新增加的成员
};
D 是多继承形式的派生类,
D 有 3 个父类(基类)
它以公有的方式继承 A 类,以私有的方式继承 B 类,以保护的方式继承 C 类。
D 根据不同的继承方式获取 A、B、C 中的成员.
4.多继承的构造函数
多继承形式下的构造函数和单继承形式基本相同.
以上面的 A、B、C、D 类为例,D 类构造函数的写法为:
D(形参列表): A(实参列表) |
, B(实参列表) |
, C(实参列表){ |
//其他操作 } |
||
Father.h
#pragma once
#include <string>
class Father
{
public:
    Father(const char *lastName="无姓", const char *firstName="无名");
    ~Father();

    void playBasketball(); //打篮球
protected:
    std::string lastName; //姓
    std::string firstName; //名
};
Father.cpp
#include "Father.h"
#include <iostream>

Father::Father(const char *lastName, const char *firstName)
{
    this->lastName = lastName;
    this->firstName = firstName;
}

Father::~Father()
{

}
void Father::playBasketball() {
    std::cout << "呦呦, 我要三步上篮了!" << std::endl;
}
Mother.h
#pragma once
#include <string>

class Mother
{
public:
    Mother(const char * food, const char *lastName = "无姓", const char *firstName = "无名");
    ~Mother();

    void dance();
private:
    std::string lastName; //姓
    std::string firstName; //名
    std::string food; //喜欢的食物
};
Mother.cpp
#include "Mother.h"
#include <iostream>

Mother::Mother(const char *food, const char *lastName, const char *firstName)
{
    this->food = food;
    this->lastName = lastName;
    this->firstName = firstName;
}

Mother::~Mother()
{

}

void Mother::dance()
{
    std::cout << "一起跳舞吧, 一二三四, 二二三四..." << std::endl;
}
Son.h
#pragma once
#include "Father.h"
#include "Mother.h"

class Son : public Father, public Mother {
public:
    Son(const char *lastName, const char *firstName, const char *food, const char *game);
    ~Son();

    void playGame();
private:
    std::string game;
};
Son.cpp
#include "Son.h"
#include <iostream>

Son::Son( const char *lastName, const char *firstName, const char *food, const char *game)
:Father(lastName, firstName), Mother(food)
{
    this->game = game;
}

Son::~Son()
{

}
void Son::playGame()
{
    std::cout << "一起玩" << game << "吧..." << std::endl;
}
main.cpp
#include <Windows.h>
#include "Son.h"

int main(void) {
    Son wsc("川菜", "王", "思聪", "电竞");

    wsc.playBasketball();
    wsc.dance();
    wsc.playGame();

    system("pause");
    return 0;
}
5.多继承的构造函数的调用顺序
基类构造函数的调用顺序和和它们在派生类构造函数中出现的顺序无关,而是和声明派生类时基类出现的顺序相同。
二十一、多重继承的二义性
Demo.
Father.h
#pragma once
#include <string>
class Father
{
public:
    Father(const char *lastName="无姓", const char *firstName="无名");
    ~Father();

    void playBasketball(); //打篮球
    void dance(); //跳舞

protected:
    std::string lastName; //姓
    std::string firstName; //名
};
Father.cpp
#include "Father.h"
#include <iostream>
Father::Father(const char *lastName, const char *firstName)
{
    this->lastName = lastName;
    this->firstName = firstName;
}

Father::~Father()
{

}

void Father::playBasketball() {
    std::cout << "呦呦, 我要三步上篮了!" << std::endl;
}

void Father::dance() {
    std::cout << "嘿嘿, 我要跳霹雳舞!" << std::endl;
}
Mother.h和Mother.cpp不变
Son.h
#pragma once
#include "Father.h"
#include "Mother.h"

class Son : public Father, public Mother {
public:
    Son(const char *lastName, const char *firstName, const char *food, const char *game);
    ~Son();

    void playGame();
    void dance();

private:
    std::string game;
};
Son.cpp
#include "Son.h"
#include <iostream>

Son::Son( const char *lastName, const char *firstName, const char *food, const char *game)
:Father(lastName, firstName), Mother(food)
{
    this->game = game;
}

Son::~Son()
{

}

void Son::playGame()
{
    std::cout << "一起玩" << game << "吧..." << std::endl;
}

void Son::dance() {
    Father::dance();
    Mother::dance();

    std::cout << "霍霍, 我们来跳街舞吧! " << std::endl;
}
main.cpp
#include <Windows.h>
#include "Son.h"

int main(void) {
    Son wsc("川菜", "王", "思聪", "电竞");

    wsc.playBasketball();

    // 解决多重继承的二义性的方法1:
    // 使用 "类名::" 进行指定, 指定调用从哪个基类继承的方法!
    wsc.Father::dance();
    wsc.Mother::dance();

    // 解决多重继承的二义性的方法2:
    // 在子类中重新实现这个同名方法, 并在这个方法内部, 使用基类名进行限定,
    // 来调用对应的基类方法
    wsc.dance();
    wsc.playGame();

    system("pause");
    return 0;
}
二十二、虚基类
1.多重继承在”菱形继承”中的重大缺点
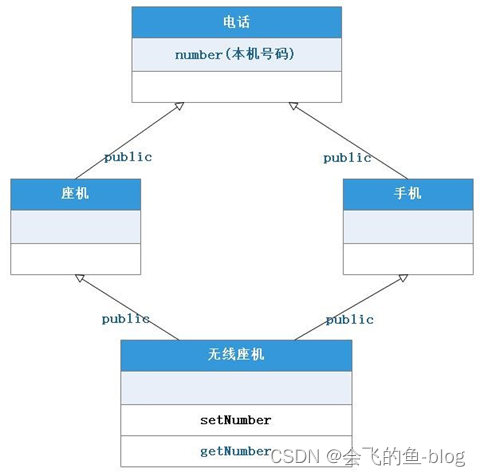
Demo
#include <iostream>
#include <string>
#include <Windows.h>

using namespace std;

// 电话类
class Tel {
public:
    Tel() {
        this->number = "未知";
    }

protected:
    string number; //电话号码;
};

// 座机类
class FixedLine : public Tel {
};

// 手机类
class MobilePhone :public Tel {
};

// 无线座机
class WirelessTel :public FixedLine, public MobilePhone {
public:
    void setNumber(const char *number) {
        //this->number = number; //错误, 指定不明确
        this->FixedLine::number = number; //this可以省略
}

string getNumber() {
    //return MobilePhone::number;
    return MobilePhone::number; }
};

int main(void) {
    WirelessTel phone;
    phone.setNumber("13243879166");
    cout << phone.getNumber() << endl; //打印未知

    system("pause");
    return 0;
}
检查: 添加命令行选项:
/d1 reportSingleClassLayoutWirelessTel

2.解决方案
使用虚基类和虚继承.
Demo.
#include <iostream>
#include <string>
#include <Windows.h>

using namespace std;

// 电话类
class Tel { //虚基类
public:
    Tel() {
        this->number = "未知";
    }
protected:
    string number; //电话号码;
};

// 座机类
class FixedLine : virtual public Tel { //虚继承
};


// 手机类 class MobilePhone :virtual public Tel { //虚继承
};

// 无线座机
class WirelessTel :public FixedLine, public MobilePhone {
public:
    void setNumber(const char *number) {
        this->number = number; //直接访问number
    }

    string getNumber() {
        return this->number; //直接访问number
    }
};

int main(void) {
    WirelessTel phone;

    phone.setNumber("13243879166");
    cout << phone.getNumber() << endl;

    system("pause");
    return 0;
}
这个被共享的基类(Tel)就称为虚基类(Virtual Base Class)

小结: 尽量不要使用多重继承(多继承)
二十三、常见错误总结
1.默认访问权限和语法要求
默认访问权限是 private
访问权限之后一定要加冒号:
指定为某种访问权限之后, 就一直是这种权限, 除非再次指定为其他权限.
2.类的成员的访问权限, 与继承方式的区别
相同点:
都有 public, private, protected 不同点:意义完全不同。
小结:
成员的访问权限:
public, 可以通过外部来访问(通过对象直接访问), 类似于 C 语言结构体中的成员 private, 只能在内部访问(在这个类的成员函数内访问),但是在子类的内部不能直接访问。
protected, 只能在内部访问,而且可以在子类的内部直接访问。
继承方式:
public, 父类成员, 被继承到子类后,访问权限都不变。
private, 父类成员, 被继承到子类后,访问权限都变为 private
protected, 父类成员, 被继承到子类后,public 权限的成员,降级为 protected, 其他不变。
二十四、C++流
用户数据不能永久保存, 程序关闭后, 数据消失.
解决方案:
把数据保存在文件中.
IO: 向设备输入数据和输出数据
C++的 IO 流

设备:
- 文件
- 控制台
- 特定的数据类型(stringstream)
c++中,必须通过特定的已经定义好的类, 来处理 IO(输入输出)

1.文件流
文件流: 对文件进行读写操作头文件: <fstream> 类库:
ifstream |
对文件输入(读文件) |
ofstream |
对文件输出(写文件) |
fstream |
对文件输入或输出 |
2.对文本文件流读写
文件打开方式:
模式标志 |
描述 |
ios::in |
读方式打开文件 |
ios:out |
写方式打开文件 |
ios::trunc |
如果此文件已经存在, 就会打开文件之前把文件长度截断为 0 |
ios::app |
尾部最加方式(在尾部写入) |
ios::ate |
文件打开后, 定位到文件尾 |
ios::binary |
二进制方式(默认是文本方式) |
以上打开方式, 可以使用位操作 | 组合起来
写文本文件
#include <fstream>
#include <iostream>
#include <string>

using namespace std;

int main()
{
    string name;
    int age;
    ofstream outfile; //也可以使用fstream, 但是fstream的默认打开方式不截断文件长度

    // ofstream的默认打开方式是, 截断式写入 ios::out | ios::trunc
    // fstream的默认打开方式是, 截断式写入 ios::out
    // 建议指定打开方式
    outfile.open("user.txt", ios::out | ios::trunc);
    while (1) {
        cout << "请输入姓名: [ctrl+z退出] ";
        cin >> name; if (cin.eof()) { //判断文件是否    结束
        break;
}
    outfile << name << "\t";

    cout << "请输入年龄: ";
    cin >> age;
    outfile << age << endl; //文本文件写入
}

    // 关闭打开的文件
    outfile.close();

    system("pause");
    return 0;
}
读文本文件
#include <fstream>
#include <iostream>
#include <string>

using namespace std;

int main()
{
    string name;
    int age;
    ifstream infile;
    infile.open("user.txt");

    while (1) {
        infile >> name;
        if (infile.eof()) { //判断文件是否结束
            break;
    }

    cout << name << "\t";
    infile >> age;
    cout << age << endl;
}

    // 关闭打开的文件
    infile.close();

    system("pause");
    return 0;
}
3.对二进制文件流读写
思考:文本文件和二进制文件的区别?
文本文件: 写数字 1, 实际写入的是 ‘1’
二进制文件:写数字 1, 实际写入的是 整数 1(4 个字节,最低字节是 1, 高 3 个字节都是 0)写字符‘R’实际输入的还是‘R’
写二进制文件
使用文件流对象的 write 方法写入二进制数据.
Demo
#include <fstream>
#include <iostream>
#include <string>

using namespace std;

int main()
{
    string name;
    int age;
    ofstream outfile;

    outfile.open("user.dat", ios::out | ios::trunc | ios::binary);

    while (1) {
        cout << "请输入姓名: [ctrl+z退出] ";
        cin >> name;
        if (cin.eof()) { //判断文件是否结束
            break;
        }
    outfile << name << "\t";
    cout << "请输入年龄: ";
    cin >> age;
    //outfile	<<	age	<<	endl;	//会自动转成文本方式写入
    outfile.write((char*)&age, sizeof(age));
}

    // 关闭打开的文件
    outfile.close();

    system("pause");
    return 0;
}
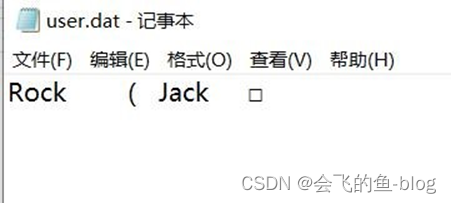
输入数据:
Rock
40
Jack
1
记事本打开 user.dat
使用 notepad++二进制方式查看:
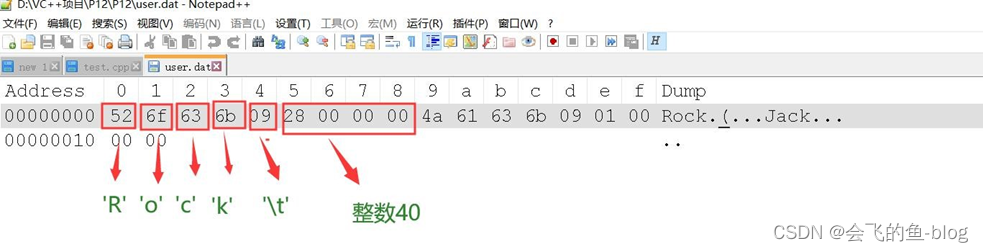
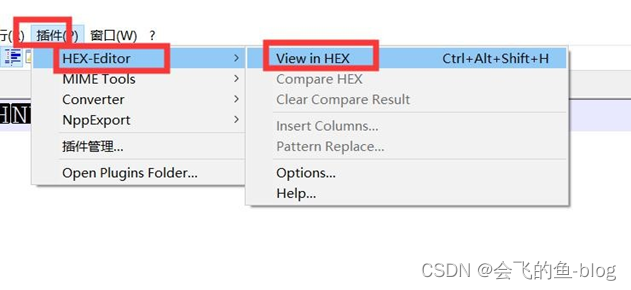
notepad++查看二进制文件
- 安装 notepad++ (群文件中可直接下载)
- 配置二进制编辑插件

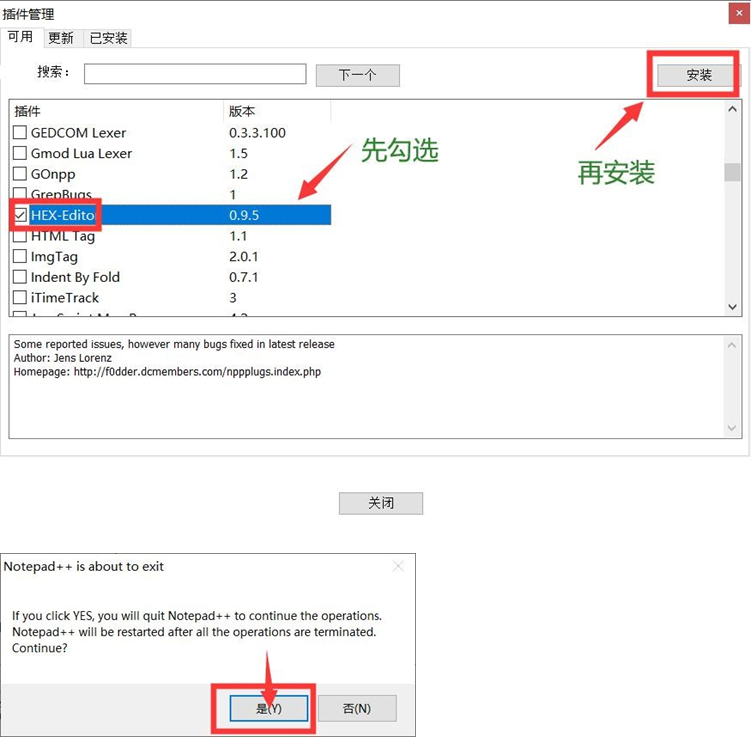
关闭 notepad++, 再重新打开.
使用二进制方式查看:
读二进制文件
使用文件流对象的 read 方法.
#include <fstream>
#include <iostream>
#include <string>

using namespace std;

int main()
{
    string name;
    int age;
    ifstream infile;

    infile.open("user.dat", ios::in | ios::binary);
    while (1) {
        infile >> name;
        if (infile.eof()) { //判断文件是否结束
            break;
        }

    cout << name << "\t";

    // 跳过中间的制表符
    char tmp;
    infile.read(&tmp, sizeof(tmp));

    //infile >> age; //从文本文件中读取整数, 使用这个方式
    infile.read((char*)&age, sizeof(age));
    cout << age << endl; //文本文件写入
}

    // 关闭打开的文件
    infile.close();

    system("pause");
    return 0;
}
4.对文件流按格式读写取数据
使用 stringstream
按指定格式写文件
Demo
#include <fstream>
#include <iostream>
#include <string>
#include <sstream

using namespace std;

int main()
{
    string name;
    int age;
    ofstream outfile;

    outfile.open("user.txt", ios::out | ios::trunc);
    while (1) {
        cout << "请输入姓名: [ctrl+z退出] ";
        cin >> name;
        if (cin.eof()) { //判断文件是否结束
            break;
    }

    cout << "请输入年龄: ";
    cin >> age;

    stringstream s;
    s << "name:" << name << "\t\tage:" << age << endl;
    outfile << s.str();
}

    // 关闭打开的文件
    outfile.close();

    system("pause");
    return 0;
}
按指定格式读文件
没有优雅的 C++解决方案, 使用 C 语言的 sscanf
demo
#include <fstream>
#include <iostream>
#include <string>
#include <sstream>
#include <Windows.h>

using namespace std;

int main(void)
{
    char name[32];
    int age;
    string line;
    ifstream infile;

    infile.open("user.txt");
    while (1) {
        getline(infile, line);
        if (infile.eof()) { //判断文件是否结束
        break;
    }

    sscanf_s(line.c_str(), "姓名:%s 年龄:%d", name, sizeof(name),&age);
    cout << "姓名:" << name << "\t\t年龄:" << age << endl;
}
    infile.close();

    system("pause");
    return 0;
}
5.文件流的状态检查
s.is_open( )
文件流是否打开成功,
s.eof( ) 流 s 是否结束
s.fail( )
流 s 的 failbit 或者 badbit 被置位时, 返回 true failbit: 出现非致命错误,可挽回, 一般是软件错误 badbit 置位, 出现致命错误, 一般是硬件错误或系统底层错误, 不可挽回
s.bad( )
流 s 的 badbit 置位时, 返回 true
s.good( )
流 s 处于有效状态时, 返回 true
s.clear( )
流 s 的所有状态都被复位
6.文件流的定位
seekg
seekg( off_type offset, //偏移量
ios::seekdir origin ); //起始位置作用:设置输入流的位置参数 1: 偏移量参数 2: 相对位置
beg 相对于开始位置 cur 相对于当前位置 end 相对于结束位置
demo
读取当前程序的最后 50 个字符
#include <iostream>
#include <fstream>
#include <string>

using namespace std;

int main(void) {
    ifstream infile;

    infile.open("定位.cpp");

    if (!infile.is_open()) {
        return 1;
    }

    infile.seekg(-50, infile.end);
    while (!infile.eof()) {
        string line;
        getline(infile, line);
        cout << line << endl;
}

    infile.close();

    system("pause");
    return 0;
}
tellg
返回该输入流的当前位置(距离文件的起始位置的偏移量)
Demo
获取当前文件的长度
#include <iostream>
#include <fstream>
#include <string>

using namespace std;

int main(void) {
    ifstream infile;

    infile.open("定位.cpp");
    if (!infile.is_open()) {
        return 1;
    }
    // 先把文件指针移动到文件尾
    infile.seekg(0, infile.end);

    int len = infile.tellg();
    cout << "len:" << len;

    infile.close();

    system("pause");
    return 0;
}
seekp
设置该输出流的位置
demo
先向新文件写入:“123456789”
然后再在第 4 个字符位置写入“ABC”
#include <iostream>
#include <fstream>
#include <string>

using namespace std;

int main(void) {
    ofstream outfile;

    outfile.open("test.txt");

    if (!outfile.is_open()) {
        return 1;
    }

    outfile << "123456789";

    outfile.seekp(4, outfile.beg);
    outfile << "ABC";
    outfile.close();

    system("pause");

    return 0;
}
二十五、常见错误总结
1、文件没有关闭
文件没有关闭, close(),可能导致写文件失败
2、文件打开方式不合适
2、在 VS2015 的部分版本中,当 sscanf 和 sscanf_s 的格式字符串中含有中文时,可能会读取失败。在 vs2019 中未发现该类问题。
二十六、友元
1.为什么要使用友元
自动配对的结果太多,不便于会员做选择。
C++是面向对象的,目的之一:封装
封装:优点之一,就是安全。
缺点:在某些特殊的场合,不是很方便。
华为与 IBM 40 亿的咨询故事

IBM 需要对华为各级部门做深度咨询分析,为了提高咨询效率,由任正非直接授权,直接获取各部门的所有权限。
使用前提:某个类需要实现某种功能,但是这个类自身,因为各种原因,无法自己实现。
需要借助于“外力”才能实现。
2.友元的两种使用形式
友元函数、友元类。
3.友元函数
3.1.使用全局函数作为友元函数
需求:
计算机和计算机的升级
Computer.h
#pragma once
#include <string>
class Computer
{
public:
    Computer();
    // 使用全局函数作为友元函数
    friend void upgrade(Computer* computer);
    std::string description();
private:
    std::string cpu; //CPU芯片
};
Computer.cpp
#include "Computer.h"
#include <sstream>

Computer::Computer()
{
    cpu = "i7";
}

std::string Computer::description()
{
    std::stringstream ret;
    ret << "CPU:" << cpu;

    return ret.str();
}
main.cpp
#include <stdio.h>
#include <iostream>
#include <Windows.h>
#include "Computer.h"

void upgrade(Computer* computer) {
    computer->cpu = "i9"; //直接访问对象的私有数据成员!!!
}
int main(void) {
    Computer shanxing;
    std::cout << shanxing.description() << std::endl;

    upgrade(&shanxing);
    std::cout << shanxing.description() << std::endl;

    system("pause");
    return 0;
}
3.2.使用类的成员函数作为友元函数
Computer.h
#pragma once
#include <string>

// class ComputerService;
// 仅仅声明ComputerService不够,需要包含头文件

#include "ComputerService.h"
class Computer
{
public:
    Computer();

    // 使用全局函数作为友元函数
    friend void upgrade(Computer* computer);

    // 使用类的成员函数,作为友元函数
    friend void ComputerService::upgrade(Computer* comptuer);

    std::string description();

private:
    std::string cpu; //CPU芯片
};
Computer.cpp 不变
#include "Computer.h"
#include <sstream>

Computer::Computer()
{
    cpu = "i7";
}

std::string Computer::description()
{
    std::stringstream ret;
    ret << "CPU:" << cpu;

    return ret.str();
}
ComputerService.h
#pragma once

class Computer;
class ComputerService {
public:
    void upgrade(Computer* computer);
};

#include "ComputerService.h"
#include "Computer.h"

void ComputerService::upgrade(Computer* computer) {
    computer->cpu = "i9";
}
main.cpp
#include <stdio.h>
#include <iostream>
#include <Windows.h>
#include "Computer.h"
#include "ComputerService.h"

int main(void) {
    Computer shanxing;
    ComputerService service;
    std::cout << shanxing.description() << std::endl;
    service.upgrade(&shanxing);
    std::cout << shanxing.description() << std::endl;

    system("pause");
    return 0;
}
功能上,这两种形式,都是相同,应用场合不同。
一个是,使用普通的全局函数,作为自己的朋友,实现特殊功能。
一个是,使用其他类的成员函数,作为自己的朋友,实现特殊功能。
4.友元类
4.1.为什么要使用友元类
一个独立的咨询师, 给其他企业做服务时,这个咨询师作为企业的“友元函数”即可。
一个大型的咨询服务公司,比如 IBM(IT 事务), 普华永道(会计事务),给其他企业做服务时,使用友元函数就不是很方便了,因为需要设计很多友元函数,不方便。
解决方案:使用“友元类”
4.2.友元类的作用
如果把 A 类作为 B 类的友元类,那么 A 类的所有成员函数【在 A 类的成员函数内】,就可以直接访问【使用】B 类的私有成员。
即,友元类可以直接访问对应类的所有成员!!!
实例:
Computer.h
#pragma once
#include <string>
class ComputerService;

class Computer
{
public:
    Computer();
    std::string description();
private:
    std::string cpu; //CPU芯片
    // 友元类
    friend class ComputerService;
};
Computer.cpp
#include "Computer.h"
#include <sstream>

Computer::Computer()
{
    cpu = "i7";
}

std::string Computer::description()
{
    std::stringstream ret;
    ret << "CPU:" << cpu;

    return ret.str();
}
ComputerService.h
#pragma once
class Computer;
class ComputerService
{
public:
    void upgrade(Computer* computer);
    void clean(Computer* computer); //计算机清理
    void kill(Computer* computer); //杀毒
};
ComputerService.cpp
#include "ComputerService.h"
#include "Computer.h"
#include <iostream>

void ComputerService::upgrade(Computer* computer) {
    computer->cpu = "i9";
}

void ComputerService::clean(Computer* computer)
{
    std::cout << "正在对电脑执行清理[CPU:"
              << computer->cpu << "]..."
              << std::endl;
}

void ComputerService::kill(Computer* computer)
{
    std::cout << "正在对电脑执行杀毒[CPU:"
              << computer->cpu << "]..."
              << std::endl;
}
main.cpp
#include <stdio.h>
#include <iostream>
#include <Windows.h>
#include "Computer.h"

#include "ComputerService.h"
int main(void) {
    Computer shanxing;
    ComputerService service;

    std::cout << shanxing.description() << std::endl;
    service.upgrade(&shanxing);
    service.clean(&shanxing);
    service.kill(&shanxing);
    std::cout << shanxing.description() << std::endl;

    system("pause");
    return 0;
}
5.使用注意
友元类,和友元函数,使用 friend 关键字进行声明即可,与访问权限无关,所以,可以放在 private/pulic/protected 任意区域内
二十七、运算符重载
1.为什么要使用运算符重载
C/C++的运算符,支持的数据类型,仅限于基本数据类型。
问题:一头牛+一头马 = ?(牛马神兽?)一个圆 +一个圆 = ? (想要变成一个更大的圆)
一头牛 – 一只羊 = ? (想要变成 4 只羊,原始的以物易物:1 头牛价值 5 只羊)
解决方案:使用运算符重载
2.运算符重载的基本用法
2.1.使用成员函数重载运算符
需求:
// 规则:
// 一斤牛肉:2斤猪肉
// 一斤羊肉:3斤猪肉
Cow.h
#pragma once
class Pork;
class Goat;
class Cow
{
public:
    Cow(int weight);
    // 参数此时定义为引用类型,更合适,避免拷贝
    Pork operator+(const Cow& cow); //同类型进行运算,很频繁
    Pork operator+(const Goat& goat); //不同类型进行运算,比较少见
private:
    int weight = 0;
};
Cow.cpp
#include "Cow.h"
#include "Pork.h"
#include "Goat.h"
Cow::Cow(int weight)
{
    this->weight = weight;
}

// 规则:
// 一斤牛肉:2斤猪肉
// 一斤羊肉:3斤猪肉
Pork Cow::operator+(const Cow &cow)
{
    int tmp = (this->weight + cow.weight) * 2;

    return Pork(tmp);
}

Pork Cow::operator+(const Goat& goat) {
    // 不能直接访问goat.weight
    //int tmp = this->weight * 2 + goat.weight * 3;
    int tmp = this->weight * 2 + goat.getWeight() * 3;

    return Pork(tmp);
}
Goat.h
#pragma once class Goat
{
public:
    Goat(int weight);
    int getWeight(void) const;
private:
    int weight = 0;
};
Goat.cpp
#include "Goat.h"
Goat::Goat(int weight) {
    this->weight = weight;
}

int Goat::getWeight(void) const
{
    return weight;
}
Pork.h
#pragma once
#include <iostream>
class Pork
{
public:
    Pork(int weight);
    std::string description(void);

private:
    int weight = 0;
};
Pork.cpp
#include "Pork.h"
#include <sstream>

Pork::Pork(int weight)
{
    this->weight = weight;
}
std::string Pork::description(void)
{
    std::stringstream ret;
    ret << weight << "斤猪肉";

    return ret.str();
}
main.cpp
#include <iostream>
#include "Pork.h"
#include "Cow.h"
#include "Goat.h"

int main(void) {
    Cow c1(100);
    Cow c2(200);
    // 调用c1.operator+(c2);
    //相当于:Pork p = c1.operator+(c2);
    Pork p = c1 + c2;
    std::cout << p.description() << std::endl;

    Goat g1(100);
    p = c1 + g1;
    std::cout << p.description() << std::endl;

    system("pause");
    return 0;
}
2.2.使用非成员函数【友元函数】重载运算符
Cow.h
#pragma once
class Pork;
class Goat;

class Cow
{
public:
    Cow(int weight);
// 有友元函数实现运算符重载
    friend Pork operator+(const Cow& cow1, const Cow& cow2);
    friend Pork operator+(const Cow& cow1, const Goat& goat);
private:
    int weight = 0;
};
main.cpp
#include <iostream>
#include "Pork.h"
#include "Cow.h"
#include "Goat.h"

Pork operator+(const Cow &cow1, const Cow &cow2)
{
    int tmp = (cow1.weight + cow2.weight) * 2;

    return Pork(tmp);
}

Pork operator+(const Cow& cow1, const Goat& goat)
{
    int tmp = cow1.weight * 2 + goat.getWeight() * 3;

    return Pork(tmp);
}

int main(void) {
    Cow c1(100);
    Cow c2(200);
    Goat g1(100);
    Pork p = c1 + c2;4

    std::cout << p.description() << std::endl;
    p = c1 + g1; // 思考:如何实现:
    p = g1 + c1;

    std::cout << p.description() << std::endl;

    system("pause");
    return 0;
}
其他文件不变。
2.3.两种方式的区别
区别:
1)、使用成员函数来实现运算符重载时,少写一个参数,因为第一个参数就是 this 指针。
两种方式的选择:
- 1一般情况下,单目运算符重载,使用成员函数进行重载更方便(不用写参数)
- 1一般情况下,双目运算符重载,使用友元函数更直观
方便实现 a+b 和 b+a 相同的效果,成员函数方式无法实现。
例如: 100 + cow; 只能通过友元函数来实现
cow +100; 友元函数和成员函数都可以实现特殊情况:
- 1= () [ ] -> 不能重载为类的友元函数!!!(否则可能和 C++的其他规则矛盾),只能使用成员函数形式进行重载。
- 1如果运算符的第一个操作数要求使用隐式类型转换,则必须为友元函数(成员函数方式的第一个参数是 this 指针)
注意:
同一个运算符重载, 不能同时使用两种方式来重载,会导致编译器不知道选择哪一个(二义性)
3.运算符重载的禁区和规则
1. 为了防止对标准类型进行运算符重载,
C++规定重载运算符的操作对象至少有一个不是标准类型,而是用户自定义的类型比如不能重载 1+2
但是可以重载 cow + 2 和 2 + cow // cow 是自定义的对象
2.不能改变原运算符的语法规则, 比如不能把双目运算符重载为单目运算
3.不能改变原运算符的优先级
4.不能创建新的运算符,比如 operator**就是非法的, operator*是可以的
5.不能对以下这四种运算符,使用友元函数进行重载= 赋值运算符,()函数调用运算符,[ ]下标运算符,->通过指针访问类成员
6.不能对禁止重载的运算符进行重载
3.1.不能被重载的运算符
成员访问 |
. |
域运算 |
:: |
内存长度运算 |
sizeof |
三目运算 |
? : : |
预处理 |
# |
3.2.可以被重载的运算符
双目运算符 |
+ - |
* / % |
|
关系运算符 |
== != |
< <= > >= |
|
逻辑运算符 |
&& || |
! |
|
单目运算符 |
+(正号) |
-(负号) *(指针) &(取地址) ++ |
-- |
位运算 |
& | |
~ ^ <<(左移) >>(右移) |
|
赋值运算符 |
= += -= *= /= %= &= |= ^= <<= |
>>= |
|
内存分配 |
new delete new[ ] delete[ ] |
||
其他 |
( ) 函数调用 -> 成员访问 [ ] 下标 , 逗号 |
||
4.重载加减运算符+、-
略,参考《运算符重载的基本用法》其他双目运算符,用法类似。
5.重载复制运算符=
Boy.h
#pragma once
#include <string>
class Boy
{
public:
    Boy(const char* name=NULL, int age=0, int salary=0, int darkHorse=0);
    ~Boy();
    Boy& operator=(const Boy& boy);

    std::string description(void);
private:
     char* name;
    int age;
    int salary;
    int darkHorse; //黑马值,潜力系数
    unsigned int id; // 编号
    static int LAST_ID;
};
Boy.cpp
#include "boy.h"
#include <string.h>
#include <sstream>

int Boy::LAST_ID = 0; //初始值是0

Boy::Boy(const char* name, int age, int salary, int darkHorse)
{
    if (!name) {
        name = "未命名";
    }
    this->name = new char[strlen(name) + 1];
    strcpy_s(this->name, strlen(name)+1, name);
    this->age = age;
    this->salary = salary;
    this->darkHorse = darkHorse;
    this->id = ++LAST_ID;
}

Boy::~Boy()
{
    if (name) {
        delete name;
    }
}

// 注意返回类型 和参数类型
Boy& Boy::operator=(const Boy& boy)
{
    if (name) {
        delete name; //释放原来的内存
    }

    name = new char[strlen(boy.name) + 1]; //分配新的内存
    strcpy_s(name,strlen(boy.name)+1, boy.name);
    this->age = boy.age;
    this->salary = boy.salary;
    this->darkHorse = boy.darkHorse;
    //this->id = boy.id; //根据需求来确定是否要拷贝id

    return *this;
}
main.cpp
#include <iostream>
#include "boy.h"

int main(void) {
    Boy boy1("Rock", 38, 58000, 10);
    Boy boy2, boy3;

    std::cout << boy1.description() << std::endl;
    std::cout << boy2.description() << std::endl;
    std::cout << boy3.description() << std::endl;

    boy3 = boy2 = boy1;

    std::cout << boy2.description() << std::endl;
    std::cout << boy3.description() << std::endl;

    system("pause");
    return 0;
}
注意:
注意赋值运算符重载的返回类型 和参数类型。
返回引用类型,便于连续赋值
参数使用应用类型, 可以省去一次拷贝
参数使用const, 便于保护实参不被破坏。
6.重载关系运算>、<、==
Boy.h
#pragma once
#include <string>

class Boy
{
public:
    Boy(const char* name=NULL, int age=0, int salary=0, int darkHorse=0);
    ~Boy();
    Boy& operator=(const Boy& boy);
    bool operator>(const Boy& boy);
    bool operator<(const Boy& boy);
    bool operator==(const Boy& boy);

    std::string description(void);
private:
    char* name;
    int age;
    int salary;
    int darkHorse; //黑马值,潜力系数
    unsigned int id; // 编号
    static int LAST_ID;
    int power() const; //综合能力值
};
Boy.cpp
#include "boy.h"
#include <string.h>
#include <sstream>

int Boy::LAST_ID = 0; //初始值是0

Boy::Boy(const char* name, int age, int salary, int darkHorse)
{
    if (!name) {
        name = "未命名";
    }

    this->name = new char[strlen(name) + 1];
    strcpy_s(this->name, strlen(name)+1, name);
    this->age = age;
    this->salary = salary;
    this->darkHorse = darkHorse;

    this->id = ++LAST_ID;
}

Boy::~Boy()
{
    if (name) {
        delete name;
    }
}

Boy& Boy::operator=(const Boy& boy)
{
    if (name) {
        delete name; //释放原来的内存
    }

    name = new char[strlen(boy.name) + 1]; //分配新的内存
    strcpy_s(name, strlen(boy.name)+1, boy.name);
    this->age = boy.age;
    this->salary = boy.salary;
    this->darkHorse = boy.darkHorse;
    //this->id = boy.id; //根据需求来确定是否要拷贝id

    return *this;
}

bool Boy::operator>(const Boy& boy) {
    // 设置比较规则:
    // 薪资 * 黑马系数 + (100-年龄)*100
    if (power() > boy.power()) {
        return true;
    }else{
        return false;
    }
}

bool Boy::operator<(const Boy& boy)
{
    if (power() < boy.power()) {
        return true;
    }else{
        return false;
    }
}

bool Boy::operator==(const Boy& boy)
{
    if (power() == boy.power()) {
        return true;
    }else{
        return false;
    }
}

std::string Boy::description(void)
{
    std::stringstream ret;

    ret << "ID:" << id << "\t姓名:" << name << "\t年龄:" << age << "\t薪资:"
        << salary << "\t黑马系数:" << darkHorse;

    return ret.str();
}

int Boy::power() const {
    // 薪资* 黑马系数 + (100 - 年龄) * 1000
    int value = salary * darkHorse + (100 - age) * 100;

    return value;
}
main.cpp
#include <iostream>
#include "boy.h"

int main(void) {
    Boy boy1("Rock", 38, 58000, 5);
    Boy boy2("Jack", 25, 50000, 10);
    if (boy1 > boy2) {
        std::cout << "选择boy1" << std::endl;
    }
    else if (boy1 == boy2) {
        std::cout << "难以选择" << std::endl;
    }else{
        std::cout << "选择boy2" << std::endl;
    }

    system("pause");
    return 0;
}
7.重载运算符[ ]
Boy.h
#pragma once
#include <string>

class Boy
{
public:
    Boy(const char* name=NULL, int age=0, int salary=0, int darkHorse=0);
    ~Boy();
    Boy& operator=(const Boy& boy);
    bool operator>(const Boy& boy);
    bool operator<(const Boy& boy);
    bool operator==(const Boy& boy);

    int operator[](std::string index);
    int operator[](int index);

    std::string description(void);
private:
    char* name;
    int age;
    int salary;
    int darkHorse; //黑马值,潜力系数
    unsigned int id; // 编号
    static int LAST_ID;
    int power() const; //综合能力值
};
Boy.cpp
#include "boy.h"
#include <string.h>
#include <sstream>

int Boy::LAST_ID = 0; //初始值是0

Boy::Boy(const char* name, int age, int salary, int darkHorse)
{
    if (!name) { name = "未命名";
}

    this->name = new char[strlen(name) + 1];
    strcpy_s(this->name, strlen(name)+1, name);
    this->age = age;
    this->salary = salary;
    this->darkHorse = darkHorse;
    this->id = ++LAST_ID;
}

Boy::~Boy()
{
    if (name) {
        delete name;
    }
}

Boy& Boy::operator=(const Boy& boy)
{
    if (name) {
        delete name; //释放原来的内存
    }
    name = new char[strlen(boy.name) + 1]; //分配新的内存
    strcpy_s(name, strlen(boy.name)+1, boy.name);
    this->age = boy.age;
    this->salary = boy.salary;
    this->darkHorse = boy.darkHorse;
    //this->id = boy.id; //根据需求来确定是否要拷贝id

    return *this;
}

bool Boy::operator>(const Boy& boy) {
    // 设置比较规则:
    // 薪资 * 黑马系数 + (100-年龄)*100
    if (power() > boy.power()) {
        return true;
    }else{
        return false;
    }
}

bool Boy::operator<(const Boy& boy)
{
    if (power() < boy.power()) {
        return true;
    }else{
        return false;
    }
}

bool Boy::operator==(const Boy& boy)
{
    if (power() == boy.power()) {
        return true;
    }else{
        return false;
    }
}

int Boy::operator[](std::string index)
{
    if (index == "age") {
        return age;
    }else if(index == "salary") {
        return salary;
    }else if(index == "darkHorse") {
        return darkHorse;
    }
    else if(index == "power") {
        return power();
    }else{
        return -1;
    }
}

int Boy::operator[](int index)
{
    if (index == 0) {
        return age;
    }else if(index == 1) {
        return salary;
    }else if(index == 2) {
        return darkHorse;
    }else if(index == 3) {
        return power();
    } else {
        return -1;
    }
}

std::string Boy::description(void)
{
    std::stringstream ret;

    ret << "ID:" << id << "\t姓名:" << name << "\t年龄:" << age << "\t薪资:"
        << salary << "\t黑马系数:" << darkHorse;

    return ret.str();
}

int Boy::power() const {
// 薪资* 黑马系数 + (100 - 年龄) * 1000
    int value = salary * darkHorse + (100 - age) * 100;
    return value;
}
main.cpp
#include <iostream>
#include "boy.h"

int main(void) {
    Boy boy1("Rock", 38, 58000, 5);
    Boy boy2("Jack", 25, 50000, 10);
    std::cout << "age:" << boy1["age"] << std::endl;
    std::cout << "salary:" << boy1["salary"] << std::endl;
    std::cout << "darkHorse:" << boy1["darkHorse"] << std::endl;
    std::cout << "power:" << boy1["power"] << std::endl;
    std::cout << "[0]:" << boy1[0] << std::endl;
    std::cout << "[1]:" << boy1[1] << std::endl; std::cout << "[2]:" << boy1[2] <<     std::endl;
    std::cout << "[3]:" << boy1[3] << std::endl;

    system("pause");
    return 0;
}
8.重载<<和>>
8.1.为什么要重载<<和>>
为了更方便的实现复杂对象的输入和输出。
8.2.实例方式1(使用成员函数, 不推荐,该方式没有实际意义)
Boy.h
ostream& operator<<(ostream& os) const;ostream& Boy::operator<<(ostream& os) const
{
os << "ID:" << id << "\t姓名:" << name << "\t年龄:" << age << "\t薪资:"
<< salary << "\t黑马系数:" << darkHorse;
return os;
}// 调用: boy1.operator<<(cout);
boy1 << cout;8.2.使用友元函数
// 该方式不适合
//ostream& operator<<(ostream& os) const;
friend ostream& operator<<(ostream& os, const Boy& boy);
friend istream& operator>>(istream& is, Boy& boy);ostream& operator<<(ostream& os, const Boy& boy) {
os << "ID:" << boy.id << "\t姓名:" << boy.name << "\t年龄:" << boy.age << "\t薪资:"
<< boy.salary << "\t黑马系数:" << boy.darkHorse;
return os;
}
istream& operator>>(istream& is, Boy& boy)
{
string name2;
is >> name2 >> boy.age >> boy.salary >> boy.darkHorse;
boy.name = (char*)malloc((name2.length()+1) * sizeof(char));
strcpy_s(boy.name, name2.length() + 1, name2.c_str());
return is;
}9.普通类型 => 类类型
//Boy(const char* name = NULL, int age = 0, int salary = 0, int darkHorse = 0);
Boy(const char* name, int age, int salary, int darkHorse);
~Boy();
Boy(int salary);
Boy(const char* name);
Boy.cpp
Boy::Boy(int salary)
{
    const char *defaultName = "未命名";
    name = new char[strlen(defaultName) + 1];
    strcpy_s(name, strlen(defaultName) + 1, defaultName);
    age = 0;
    this->salary = salary;
    darkHorse = 0;
    this->id = ++LAST_ID;
}

Boy::Boy(const char* name) {
    this->name = new char[strlen(name) + 1];
    strcpy_s(this->name, strlen(name) + 1, name);
    age = 0;
    this->salary = 0;
    darkHorse = 0;
    this->id = ++LAST_ID;
}
main.cpp
Boy boy1 = 10000;
Boy boy2 = "Rock";
cout << boy1 << endl;
cout << boy2 << endl;
boy1 = 20000; //boy1 = Boy(20000);
cout << boy1 << endl;10.类类型 => 普通类型
// 特殊的运算符重载:类型转换函数,不需要写返回类型
operator int() const;
operator char* () const;
Boy.cpp
Boy::operator int() const
{
    return power();
}

Boy::operator char* () const
{
    return name;
}Boy boy1("Rock", 28, 10000, 5);
Boy boy2("Rock");
int power = boy1;
char* name = boy2;
cout << power << endl;
cout << name << endl;11.类类型 A => 类类型 B
二十八、常见错误总结
1.const 导致的异常 BUG
2.operator=的参数问题
二十八、多态
1.为什么要使用多态特性
#include <iostream>

using namespace std;
class Father {
public:
    void play() {
        cout << "到 KTV 唱歌..." << endl;
    }
};

class Son :public Father {
public:
    void play() {
    cout << "一起打王者吧!" << endl;
    }
};

void party(Father **men, int n) {
    for (int i = 0; i<n; i++) {
        men[i]->play();
    }
}

int main(void) {
    Father father;
    Son son1, son2;
    Father* men[] = { &father, &son1, &son2 };
    party(men, sizeof(men) / sizeof(men[0]));

    system("pause");
    return 0;
}#include <iostream>
using namespace std;
class Father {
public:
virtual void play() {
cout << "到 KTV 唱歌..." << endl;
}
};
class Son :public Father {
public:
virtual void play() {
cout << "一起打王者吧!" << endl;
}
};
void party(Father **men, int n) {
for (int i = 0; i<n; i++) {
men[i]->play();
}
}
int main(void) {
Father father;
Son son1, son2;
Father* men[] = { &father, &son1, &son2 };
party(men, sizeof(men) / sizeof(men[0]));
system("pause");
return 0;
}2.实现多态:虚函数
2.1.虚函数的使用
2.2.虚函数的原理-虚函数表
#include <iostream>
using namespace std;
class Father {
public:
    virtual void func1() { cout << "Father::func1" << endl; }
    virtual void func2() { cout << "Father::func2" << endl; }
    virtual void func3() { cout << "Father::func3" << endl; }
    void func4() { cout << "非虚函数:Father::func4" << endl; }
public: //为了便于测试,特别该用 public
    int x = 100;
    int y = 200;
    static int z;
};

typedef void (*func_t)(void);
int Father::z = 1;
int main(void) {
    Father father;
    // 含有虚函数的对象的内存中,最先存储的就是“虚函数表”
    cout << "对象地址:" << (int*)&father << endl;
    int* vptr = (int*)*(int*)&father;
    cout << "虚函数表指针 vptr:" << vptr << endl;
    cout << "调用第 1 个虚函数: ";
    ((func_t) * (vptr + 0))();
    cout << "调用第 2 个虚函数:";
    ((func_t) * (vptr + 1))();
    cout << "调用第 3 个虚函数: ";
    ((func_t) * (vptr + 2))();
    cout << "第 1 个数据成员的地址: " << endl;
    cout << &father.x << endl;
    cout << std::hex << (int)&father + 4 << endl;
    cout << "第 1 个数据成员的值:" << endl;
    cout << std::dec << father.x << endl;
    cout << *(int*)((int)&father + 4) << endl;
    cout << "第 2 个数据成员的地址: " << endl;
    cout << &father.y << endl;
    cout << std::hex << (int)&father + 8 << endl;
    cout << "第 2 个数据成员的值:" << endl;
    cout << std::dec << father.y << endl;
    cout << *(int*)((int)&father + 8) << endl;
    cout << "sizeof(father)==" << sizeof(father) << endl;

    Father father2;
    cout << "father 的虚函数表:";
    cout << *(int*)(*(int*)&father) << endl;
    cout << "father2 的虚函数表:";
    cout << *(int*)(*(int*)&father2) << endl;

    system("pause");
    return 0;
}
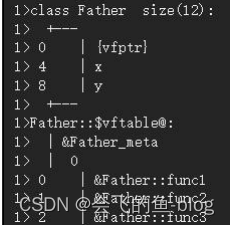
手绘内存分布:
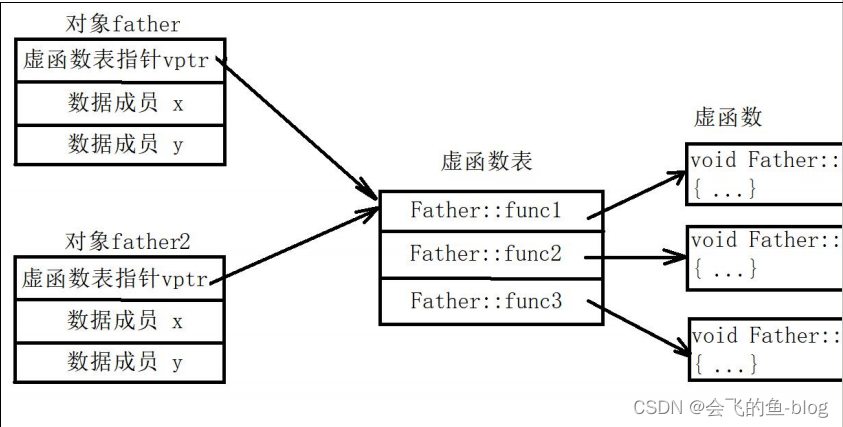
#include <iostream>
using namespace std;
class Father {
public:
    virtual void func1() { cout << "Father::func1" << endl; }
    virtual void func2() { cout << "Father::func2" << endl; }
    virtual void func3() { cout << "Father::func3" << endl; }
    void func4() { cout << "非虚函数:Father::func4" << endl; }
public: //为了便于测试,特别该用 public
    int x = 100;
    int y = 200;
};

class Son : public Father {
public:
    void func1() { cout << "Son::func1" << endl; }
    virtual void func5() { cout << "Son::func5" << endl; }
};

typedef void (*func_t)(void);

int main(void) {
    Father father;
    Son son;
    // 含有虚函数的对象的内存中,最先存储的就是“虚函数表”
    cout << "son 对象地址:" << (int*)&son << endl;
    int* vptr = (int*)*(int*)&son;

    cout << "虚函数表指针 vptr:" << vptr << endl;
    for (int i = 0; i < 4; i++) {
        cout << "调用第" << i + 1 << "个虚函数:";
        ((func_t) * (vptr + i))();
    }
    for (int i = 0; i < 2; i++) {
        // +4 是因为先存储了虚表指针
        cout << *(int*)((int)&son + 4 + i * 4) << endl;
}

system("pause");
return 0;

}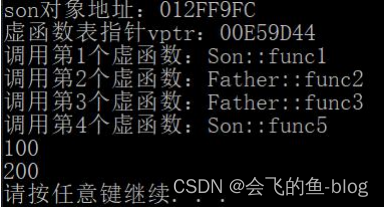
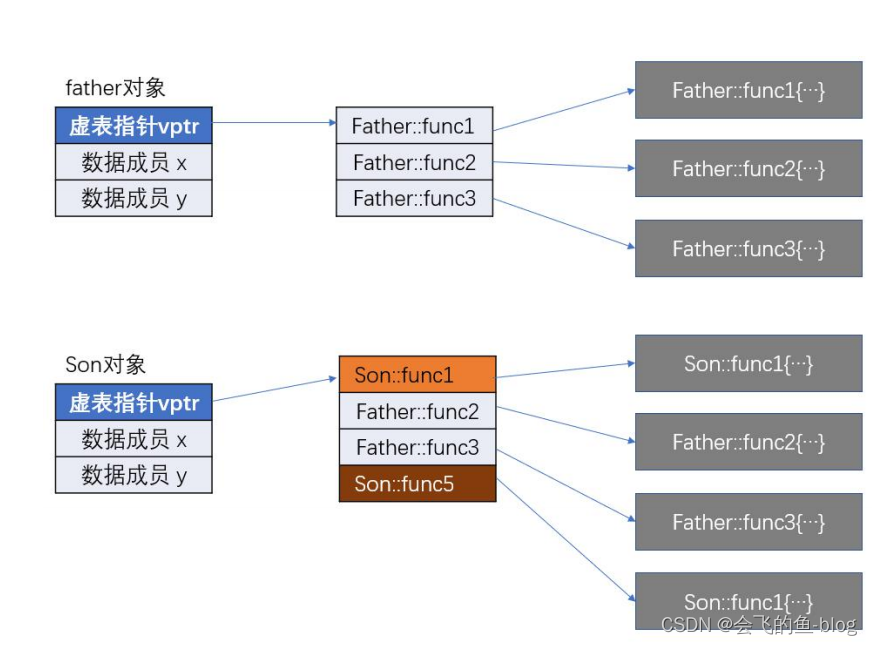
补充:
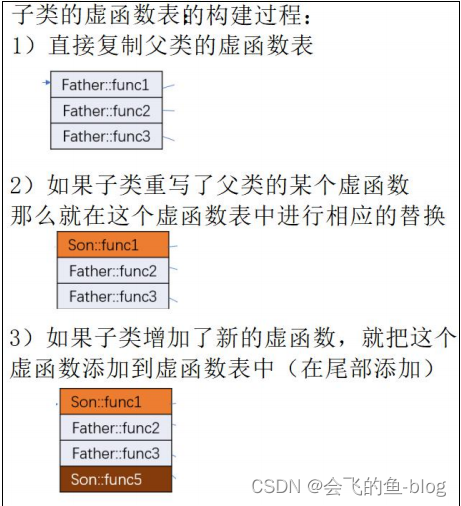
#include <iostream>
using namespace std;
class Father {
public:
virtual void func1() { cout << "Father::func1" << endl; }
virtual void func2() { cout << "Father::func2" << endl; }
virtual void func3() { cout << "Father::func3" << endl; }
void func4() { cout << "非虚函数:Father::func4" << endl; }
public:
int x = 200;
int y = 300;
static int z;
};
class Mother {
public:
virtual void handle1() { cout << "Mother::handle1" << endl; }
virtual void handle2() { cout << "Mother::handle2" << endl; }
virtual void handle3() { cout << "Mother::handle3" << endl; }
public: //为了便于测试,使用 public 权限
int m = 400;
int n = 500;
};
class Son : public Father, public Mother {
public:
    void func1() { cout << "Son::func1" << endl; }
    virtual void handle1() { cout << "Son::handle1" << endl; }
    virtual void func5() { cout << "Son::func5" << endl; }
};

int Father::z = 0;
typedef void(*func_t)(void);

int main(void) {
    Son son;
    int* vptr = (int*) * (int*)&son;
    cout << "第一个虚函数表指针:" << vptr << endl;

    for (int i = 0; i < 4; i++) {
        cout << "调用第" << i + 1 << "个虚函数:";
        ((func_t) * (vptr + i))();
    }

    for (int i = 0; i < 2; i++) {
        cout << *(int*)((int)&son + 4 + i * 4) << endl;
    }

    int* vptr2 = (int*) * ((int*)&son + 3);
    for (int i = 0; i < 3; i++) {
        cout << "调用第" << i + 1 << "个虚函数:";
        ((func_t) * (vptr2 + i))();
    }

    for (int i = 0; i < 2; i++) {
        cout << *(int*)((int)&son + 16 + i * 4) << endl;
    }

    system("pause");
    return 0;
}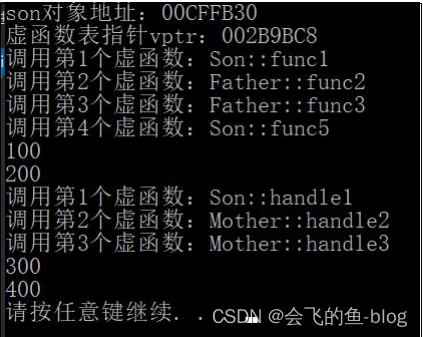
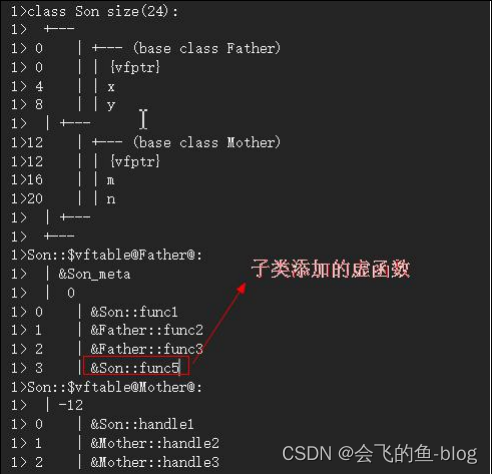
内存分布
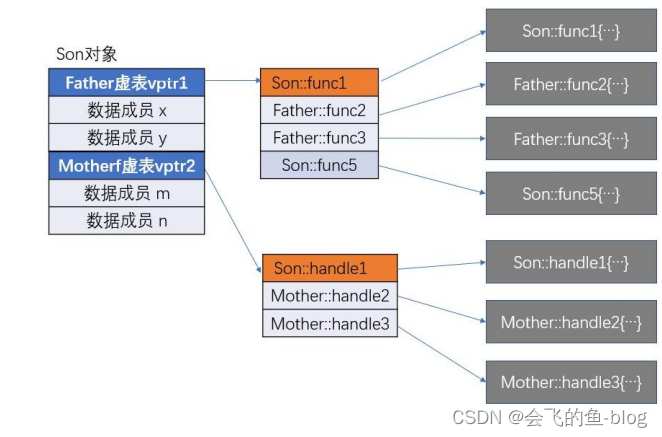
2.3.final
class XiaoMi {
public:
    XiaoMi(){}
};

class XiaoMi2 final : public XiaoMi {
    XiaoMi2(){}
};

class XiaoMi3 : public XiaoMi2 { //不能把 XiaoMi2 作为基类
};class XiaoMi {
public:
virtual void func() final;
};
void XiaoMi::func() { //不需要再写 final
cout << "XiaoMi::func" << endl;
}
class XiaoMi2 : public XiaoMi {
public:
void func() {}; // 错误!不能重写 func 函数
};2.4.override
#include <iostream>

using namespace std;

class XiaoMi {
public:
virtual void func() {
    cout << "XiaoMi::func" << endl; };
};

class XiaoMi2 : public XiaoMi {
public:
    void func() override {}
    //void func() override; 告诉程序员 func 是重写父类的虚函数
    //void func1() override{} 错误!因为父类没有 func1 这个虚函数
};

int main(void) {
    XiaoMi2 xiaomi;

    return 0;
}3.遗失的子类析构函数
#include <iostream>
#include <Windows.h>
#include <string.h>
using namespace std;
class Father {
public:
Father(const char* addr ="中国"){
cout << "执行了 Father 的构造函数" << endl;
int len = strlen(addr) + 1;
this->addr = new char[len];
strcpy_s(this->addr, len, addr);
}
// 把 Father 类的析构函数定义为 virtual 函数时,
// 如果对 Father 类的指针使用 delete 操作时,
// 就会对该指针使用“动态析构”:
// 如果这个指针,指向的是子类对象,
// 那么会先调用该子类的析构函数,再调用自己类的析构函数
virtual ~Father(){
cout << "执行了 Father 的析构函数" << endl;
if (addr) {
delete addr;
addr = NULL;
-490-
}
}
private:
char* addr;
};
class Son :public Father {
public:
    Son(const char *game="吃鸡", const char *addr="中国")
    :Father(addr){
    cout << "执行了 Son 的构造函数" << endl;
    int len = strlen(game) + 1;
    this->game = new char[len];
    strcpy_s(this->game, len, game);
}

~Son(){
    cout << "执行了 Son 的析构函数" << endl;
    if (game) {
        delete game;
        game = NULL;
    }
}

private:
    char* game;
};

int main(void) {
    cout << "----- case 1 -----" << endl;
    Father* father = new Father();
    delete father;
    cout << "----- case 2 -----" << endl;
    Son* son = new Son();
    delete son;
    cout << "----- case 3 -----" << endl;
    father = new Son();
    delete father;

    system("pause");
    return 0;
}4.纯虚函数与抽象类
4.1.什么时候使用纯虚函数
4.2.纯虚函数的使用方法
#include <iostream>
#include <string>

using namespace std;

class Shape {
public:
    Shape(const string& color = "white") { this->color = color; }
    virtual float area() = 0; //不用做具体的实现
    string getColor() { return color; }
private:
    string color;
};

class Circle : public Shape {
public:
    Circle(float radius = 0, const string& color="White"):Shape(color), r(radius){}
    float area();
private:
    float r; //半径
};

float Circle::area() {
    return 3.14 * r * r;
}

int main() {
//使用抽象类创建对象非法!
//Shape s;
    Circle c1(10);
    cout << c1.area() << endl;
    Shape* p = &c1;
    cout << p->area() << endl;

    system("pause");
    return 0;
}4.3.纯虚函数的注意事项:
二十九、常见错误总结
三十、模版和容器
// demo 15-1.c
#include <vector>
#include <iostream>

using namespace std;

class demo{
public:
    demo(int _k=0){k=_k;}
    ~demo(){}
    int value(){return k;}
private:
    int k;
};

int main(void){
    vector<int> v1;
    int i1 = 1;
    int i2 = 2;
    v1.push_back(i1);
    v1.push_back(i2);
    demo d1(10);
    vector<demo> v2;
    v2.push_back(d1);
    for(unsigned int i=0; i<v1.size(); i++){
        printf("vector v1 中的元素%d : %d\n",i ,v1[i]);
    }
    cout<<v2[0].value()<<endl;

    system("pause");
    return 0;
}
前言
1.C++函数模板的使用
1.1为什么要有函数模板
// demo 15-2.c
#include <iostream>

using namespace std;

int Max(int a, int b)
{
    return a>b ? a:b;
}

char Max(char a, char b)
{
    return a>b ? a:b;
}

float Max(float a, float b)
{
    return a>b ? a:b;
}

void main()
{
    //char a = 'c';
    int x = 1;
    int y = 2;

    cout<<"max(1, 2) = "<<Max(x, y)<<endl;897943840118979438401111
    float a = 2.0;
    float b = 3.0;
    cout<<"max(2.0, 3.0) = "<<Max(a, b)<<endl;

    system("pause");
    return ;
}// demo 15-3.c
#include <iostream>
using namespace std;
/*
int Max(int a, int b)
{
return a>b ? a:b;
}
char Max(char a, char b)
{
return a>b ? a:b;
}
float Max(float a, float b)
{
return a>b ? a:b;
}
*/
//template 关键字告诉 C++编译器 我要开始泛型编程了,请你不要随意报错
//T - 参数化数据类型
template <typename T>
T Max(T a, T b){
return a>b ? a:b;
}
/*如果 T 使用 int 类型调用,相当于调用下面这个函数
int Max(int a, int b)
{
return a>b ? a:b;
}
void main()
{
//char a = 'c';
int x = 1;
int y = 2;
cout<<"max(1, 2) = "<<Max(x, y)<<endl; //实现参数类型的自动推导
cout<<"max(1, 2) = "<<Max<int>(x,y)<<endl;//显示类型调用
float a = 2.0;
float b = 3.0;
cout<<"max(2.0, 3.0) = "<<Max(a, b)<<endl;
system("pause");
return ;
}1.2.函数模板语法
1.3.函数模板定义形式
1.4.模板说明
1.5.函数定义
1.6.函数模板调用
1.7.模板函数
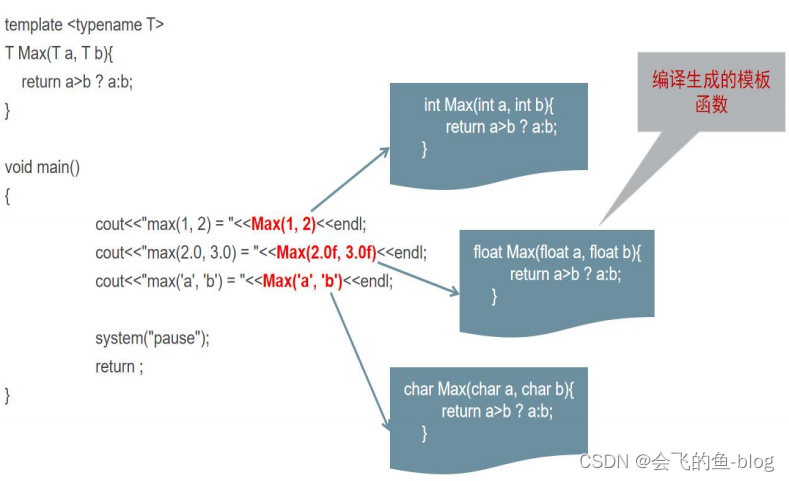
// demo 15-4.c
#include <iostream>

using namespace std;

template <typename T>

void Swap(T &a, T &b){
    T t;
    t = a;
    a = b;
    b = t;
    cout<<"Swap 模板函数被调用了"<<endl;
}

/*
void Swap(char &a, int &b){
    int t;
    t = a;
    a = b;
    b = t;
    cout<<"Swap 普通函数被调用了"<<endl;
}
*/

void main(void){
    char cNum = 'c';
    int iNum = 65;
    //第一种情况,模板函数和普通函数并存,参数类型和普通重载函数更匹配
    //调用普通函数
    //Swap(cNum, iNum);
    //第二种情况 不存在普通函数,函数模板会隐式数据类型转换嘛?
    //结论:不提供隐式的数据类型转换,必须是严格的匹配
    //Swap(cNum, iNum);

    system("pause");
    return ;
}// demo 15-5.c
#include <iostream>
using namespace std;
//第一版
int Max(int a, int b)
{
cout<<"调用 int Max(int a, int b)"<<endl;
return a>b ? a:b;
}
template<typename T>
T Max(T a, T b)
{
cout<<"调用 T Max(T a, T b)"<<endl;
return a>b ? a:b;
}
template <typename T>
T Max(T a, T b, T c){
cout<<"调用 T Max(T a, T b, T c)"<<endl;
return Max(Max(a, b), c);
}
//第二版
int Max1(int a, int b)
{
cout<<"调用 int Max(int a, int b)"<<endl;
return a>b ? a:b;
}
template<typename T1, typename T2>
T1 Max1(T1 a, T2 b)
{
cout<<"调用 T Max1(T1 a, T2 b)"<<endl;
return a>b ? a:b;
}
void main(void){
int a = 1;
int b = 2;
//当函数模板和普通函数都符合调用时,优先选择普通函数
//cout<<"Max(a, b)"<<Max(a, b)<<endl;
//如果显式的使用函数模板,则使用<> 类型列表
//Max<>(a, b);
char c = 'a';
//如果函数模板会产生更好的匹配,使用函数模板
//Max1(c, a);
//Max(1.0, 2.0);
Max(3.0, 4.0, 5.0);
system("pause");
return ;
}// demo 15-6.c
#include <iostream>
using namespace std;
template <typename T>
T Max(T a, T b){
return a>b ? a:b;
}
int main()
{
int x = 1;
int y = 2;
Max(x, y);
float a = 2.0;
float b = 3.0;
Max(a, b);
return 0;
}// demo.c
#include <iostream>
using namespace std;
int Max(int a, int b){
return a>b ? a:b;
}
int main()
{
int x = 1;
int y = 2;
Max(x, y);
return 0;
}// demo.S
.file "demo.cpp"
.local _ZStL8__ioinit
.comm _ZStL8__ioinit,1,1
.text
.globl _Z3Maxii
.type _Z3Maxii, @function
_Z3Maxii:
.LFB1021:
.cfi_startproc
pushq %rbp
.cfi_def_cfa_offset 16
.cfi_offset 6, -16
movq %rsp, %rbp
.cfi_def_cfa_register 6
movl %edi, -4(%rbp)
movl %esi, -8(%rbp)
movl -4(%rbp), %eax
cmpl -8(%rbp), %eax
jle .L2
movl -4(%rbp), %eax
jmp .L4
.L2:
movl -8(%rbp), %eax
.L4:
popq %rbp
.cfi_def_cfa 7, 8
ret
.cfi_endproc
.LFE1021:
.size _Z3Maxii, .-_Z3Maxii
.globl main
.type main, @function
main:
.LFB1022:
.cfi_startproc
pushq %rbp
.cfi_def_cfa_offset 16
.cfi_offset 6, -16
movq %rsp, %rbp
.cfi_def_cfa_register 6
subq $16, %rsp
movl $1, -8(%rbp)
movl $2, -4(%rbp)
movl -4(%rbp), %edx
movl -8(%rbp), %eax
movl %edx, %esi
movl %eax, %edi
call _Z3Maxii
movl $0, %eax
leave
.cfi_def_cfa 7, 8
ret
.cfi_endproc
.LFE1022:
.size main, .-main
.type _Z41__static_initialization_and_destruction_0ii, @function
_Z41__static_initialization_and_destruction_0ii:
.LFB1023:
.cfi_startproc
pushq %rbp
.cfi_def_cfa_offset 16
.cfi_offset 6, -16
movq %rsp, %rbp
.cfi_def_cfa_register 6
subq $16, %rsp
movl %edi, -4(%rbp)
movl %esi, -8(%rbp)
cmpl $1, -4(%rbp)
jne .L9
cmpl $65535, -8(%rbp)
jne .L9
movl $_ZStL8__ioinit, %edi
call _ZNSt8ios_base4InitC1Ev
movl $__dso_handle, %edx
movl $_ZStL8__ioinit, %esi
movl $_ZNSt8ios_base4InitD1Ev, %edi
call __cxa_atexit
.L9:
nop
leave
.cfi_def_cfa 7, 8
ret
.cfi_endproc
.LFE1023:
.size _Z41__static_initialization_and_destruction_0ii, .-_Z41__static_initialization_and
_destruction_0ii
.type _GLOBAL__sub_I__Z3Maxii, @function
_GLOBAL__sub_I__Z3Maxii:
.LFB1024:
.cfi_startproc
pushq %rbp
.cfi_def_cfa_offset 16
.cfi_offset 6, -16
movq %rsp, %rbp
.cfi_def_cfa_register 6
movl $65535, %esi
movl $1, %edi
call _Z41__static_initialization_and_destruction_0ii
popq %rbp
.cfi_def_cfa 7, 8
ret
.cfi_endproc
.LFE1024:
.size _GLOBAL__sub_I__Z3Maxii, .-_GLOBAL__sub_I__Z3Maxii
.section .init_array,"aw"
.align 8
.quad _GLOBAL__sub_I__Z3Maxii
.hidden __dso_handle
.ident "GCC: (Ubuntu 5.4.0-6ubuntu1~16.04.5) 5.4.0 20160609"
.section .note.GNU-stack,"",@progbits// demo_06.cpp
#include <iostream>
using namespace std;
template <typename T>
T Max(T a, T b){
return a>b ? a:b;
}
int main()
{
int x = 1;
int y = 2;
Max(x, y);
float a = 2.0;
float b = 3.0;
Max(a, b);
return 0;
}// demo_06.S
.file "demo_06.cpp"
.local _ZStL8__ioinit
.comm _ZStL8__ioinit,1,1
.text
.globl main
.type main, @function
main:
.LFB1022:
.cfi_startproc
pushq %rbp
.cfi_def_cfa_offset 16
.cfi_offset 6, -16
movq %rsp, %rbp
.cfi_def_cfa_register 6
subq $32, %rsp
movl $1, -16(%rbp)
movl $2, -12(%rbp)
movl -12(%rbp), %edx
movl -16(%rbp), %eax
movl %edx, %esi
movl %eax, %edi
call _Z3MaxIiET_S0_S0_ movss .LC0(%rip), %xmm0
movss %xmm0, -8(%rbp)
movss .LC1(%rip), %xmm0
movss %xmm0, -4(%rbp)
movss -4(%rbp), %xmm0
movl -8(%rbp), %eax
movaps %xmm0, %xmm1
movl %eax, -20(%rbp)
movss -20(%rbp), %xmm0
call _Z3MaxIfET_S0_S0_ movl $0, %eax
leave
.cfi_def_cfa 7, 8
ret
.cfi_endproc
.LFE1022:
.size main, .-main
.section .text._Z3MaxIiET_S0_S0_,"axG",@progbits,_Z3MaxIi
ET_S0_S0_,comdat
.weak _Z3MaxIiET_S0_S0_
.type _Z3MaxIiET_S0_S0_, @function
_Z3MaxIiET_S0_S0_:
.LFB1023:
.cfi_startproc
pushq %rbp
.cfi_def_cfa_offset 16
.cfi_offset 6, -16
movq %rsp, %rbp
.cfi_def_cfa_register 6
movl %edi, -4(%rbp)
movl %esi, -8(%rbp)
movl -4(%rbp), %eax
cmpl -8(%rbp), %eax
jle .L4
movl -4(%rbp), %eax
jmp .L6
.L4:
movl -8(%rbp), %eax
.L6:
popq %rbp
.cfi_def_cfa 7, 8
ret
.cfi_endproc
.LFE1023:
.size _Z3MaxIiET_S0_S0_, .-_Z3MaxIiET_S0_S0_
.section .text._Z3MaxIfET_S0_S0_,"axG",@progbits,_Z3MaxI
fET_S0_S0_,comdat
.weak _Z3MaxIfET_S0_S0_
.type _Z3MaxIfET_S0_S0_, @function
_Z3MaxIfET_S0_S0_:
.LFB1024:
.cfi_startproc
pushq %rbp
.cfi_def_cfa_offset 16
.cfi_offset 6, -16
movq %rsp, %rbp
.cfi_def_cfa_register 6
movss %xmm0, -4(%rbp)
movss %xmm1, -8(%rbp)
movss -4(%rbp), %xmm0
ucomiss -8(%rbp), %xmm0
jbe .L13
movss -4(%rbp), %xmm0
jmp .L11
.L13:
movss -8(%rbp), %xmm0
.L11:
popq %rbp
.cfi_def_cfa 7, 8
ret
.cfi_endproc
.LFE1024:
.size _Z3MaxIfET_S0_S0_, .-_Z3MaxIfET_S0_S0_
.text
.type _Z41__static_initialization_and_destruction_0ii, @function
_Z41__static_initialization_and_destruction_0ii:
.LFB1025:
.cfi_startproc
pushq %rbp
.cfi_def_cfa_offset 16
.cfi_offset 6, -16
movq %rsp, %rbp
.cfi_def_cfa_register 6
subq $16, %rsp
movl %edi, -4(%rbp)
movl %esi, -8(%rbp)
cmpl $1, -4(%rbp)
jne .L16
cmpl $65535, -8(%rbp)
jne .L16
movl $_ZStL8__ioinit, %edi
call _ZNSt8ios_base4InitC1Ev
movl $__dso_handle, %edx
movl $_ZStL8__ioinit, %esi
movl $_ZNSt8ios_base4InitD1Ev, %edi
call __cxa_atexit
.L16:
nop
leave
.cfi_def_cfa 7, 8
ret
.cfi_endproc
.LFE1025:
.size _Z41__static_initialization_and_destruction_0ii, .-_Z41__static_initialization_and
_destruction_0ii
.type _GLOBAL__sub_I_main, @function
_GLOBAL__sub_I_main:
.LFB1026:
.cfi_startproc
pushq %rbp
.cfi_def_cfa_offset 16
.cfi_offset 6, -16
movq %rsp, %rbp
.cfi_def_cfa_register 6
movl $65535, %esi
movl $1, %edi
call _Z41__static_initialization_and_destruction_0ii
popq %rbp
.cfi_def_cfa 7, 8
ret
.cfi_endproc
.LFE1026:
.size _GLOBAL__sub_I_main, .-_GLOBAL__sub_I_main
.section .init_array,"aw"
.align 8
.quad _GLOBAL__sub_I_main
.section .rodata
.align 4
.LC0:
.long 1073741824
.align 4
.LC1:
.long 1077936128
.hidden __dso_handle
.ident "GCC: (Ubuntu 5.4.0-6ubuntu1~16.04.5) 5.4.0 20160609"
.section .note.GNU-stack,"",@progbits2.类模板的使用
2.1.为什么需要类模板
类模板与函数模板的定义和使用类似,有时,有两个或多个类,其功能是相同的,仅仅是 数据类型不同,我们可以通过如下面语句声明了一个类模板:
//demo15-7.c
 template<typenameT>
 classA
 {
 public:
     A(Tt)
     {
         this->t=t;
     }

     T&getT()
     {
         returnt;
     }
 public:
     Tt;
 };
通过上述代码可知:
类模板用于实现类所需数据的类型参数化
类模板在表示支持多种数据结构显得特别重要,这些数据结构的表示和算法不受所 包含的元素类型的影响
2.2.类模板定义
template <typenameType>
classClassName
{
 //ClassName的成员函数
 private:
     TypeDataMember;
}
2.3.单个类模板的使用
//demo15-8.c
 #include<iostream>

 usingnamespacestd;

 template<typenameT>
 classA
 {
 public:
 //函数的参数列表使用虚拟类型
    A(Tt=0)
    {
        this->t=t;
    }
 //成员函数返回值使用虚拟类型
    T&getT()
    {
         returnt;
    }
 private:
 //成员变量使用虚拟类型
    Tt;
  };

 voidprintA(A<int> &a)
 {
     cout<<a.getT()<<endl;
 }
 intmain(void)
 {
     //1.模板类定义类对象,必须显示指定类型
     //2.模板种如果使用了构造函数,则遵守以前的类的构造函数的调用规则
     A<int> a(666);

     cout<<a.getT()<<endl;
     //模板类做为函数参数
     printA(a);

     system("pause");
     return0;
 }
2.4.继承中类模板的使用
//demo15-9.c
 #include<iostream>

 using namespace std;
 //继承中父子类和模板类的结合情况
//1.父类一般类,子类是模板类,和普通继承的玩法类似
//2.子类是一般类,父类是模板类,继承时必须在子类里实例化父类的类型参数
//3.父类和子类都时模板类时,子类的虚拟的类型可以传递到父类中
/*classB
 {
     public:
     B(intb)
     {
         this->b=b;
     }
 private:
     int b;
 };
 */

 template<typenameT>
 classA
 {
  public:
  //函数的参数列表使用虚拟类型
    A(Tt)
     {
         this->t=t;
     }

  //成员函数返回值使用虚拟类型
    T&getT()
     {
         returnt;
     }
  private:
  //成员变量使用虚拟类型
    Tt;
 };

 template<typenameTb>
 classB:publicA<int>
 {
 public:
     B(Tbb):A<Tb>(b)
     {
         this->b=b;
     }
 private:
     Tbb;
 };

 voidprintA(A<int>&a)
 {
     cout<<a.getT()<<endl;
 }

 intmain(void)
 {
 //1.模板类定义类对象,必须显示指定类型
 //2.模板种如果使用了构造函数,则遵守以前的类的构造函数的调用规则
    A<int> a(666);

    cout<<a.getT()<<endl;

    B<int>b(888);

    cout<<"b(888):"<<b.getT()<<endl;

 //模板类做为函数参数
     printA(a);

     system("pause");
     return0;
 }
结论:子类从模板类继承的时候,需要让编译器知道父类的数据类型具体是什么
1.父类一般类,子类是模板类,和普通继承的玩法类似
2.子类是一般类,父类是模板类,继承时必须在子类里实例化父类的类型参数
3.父类和子类都时模板类时,子类的虚拟的类型可以传递到父类中
2.5.类模板函数的三种表达描述方式
2.5.1.所有的类模板函数写在类的内部---上面已讲解--
2.5.2.所有的类模板函数写在类的外部,在一个cpp中
//demo15-9.c
 #include<iostream>

 using namespace std;
 template<typenameT>
 classA
 {
 public:
     A(Tt=0);
     T&getT();
     Aoperator+(constA&other);
     voidprint();
 private:
     Tt;
 };

 /*
 classA
 {
 public:
 A(intt=0);
 int&getT();
 Aoperator+(constA&other);
 voidprint();
 private:
 intt;
 };
 */

 template<typenameT>
 A<T>::A(Tt)
 {
     this->t=t;
 }

 template<typenameT>
 T&A<T>::getT()
 {
     return t;
 }

 template<typenameT>
 A<T>A<T>::operator+(constA<T>&other)
 {
     A<T>tmp;//类的内部类型可以显示声明也可以不显示
     tmp.t=this->t+other.t;
     return tmp;
 }

 template<typenameT>
 void A<T>::print()
 {
     cout<<this->t<<endl;
 }

 intmain(void)
 {
     A<int> a(666),b(888);

     //cout<<a.getT()<<endl;

     A<int>tmp=a+b;
     tmp.print();

     system("pause");
     return0;
 }
总结: 在同一个cpp文件中把模板类的成员函数放到类的外部,需要注意以下几点
1.函数前声明template
2.类的成员函数前的类限定域说明必须要带上虚拟参数列表
3.返回的变量是模板类的对象时必须带上虚拟参数列表
4.成员函数参数中出现模板类的对象时必须带上虚拟参数列表
5.成员函数内部没有限定
2.5.3.所有的类模板函数写在类的外部,在不同的.h和.cpp中
//demo.h
 #pragma once
 template<typenameT>
 classA
 {
 public:
     A(Tt=0);
     T& getT();
     Aoperator+(constA&other);
     void print();
 private:
     Tt;
 };

 //demo15-10.c
 #include "demo.h"
 #include <iostream>
 using namespace std;
 template<typenameT>
 A<T>::A(Tt)
 {
     this->t=t;
 }

 template<typenameT>
 T& A<T>::getT()
 {
     return t;
 }

 template<typenameT>
 A<T>A<T>::operator+(constA<T>&other)
 {
     A<T> tmp;//类的内部类型可以显示声明也可以不显示
    tmp.t=this->t + other.t;
     return tmp;
 }

 template<typenameT>
 voidA<T>::print()
 {
     cout<<this->t<<endl;
 }

 int main(void)
 {
     A<int> a(666),b(888);
     //cout<<a.getT()<<endl;
     A<int> tmp=a+b;
     tmp.print();

     system("pause");
     return0;
 }
注意:当类模板的声明(.h文件)和实现(.cpp或.hpp文件)完全分离,因为类模板的特殊实现, 我们应在使用类模板时使用#include包含实现部分的.cpp或.hpp文件。
2.5.4.特殊情况友元函数
//demo15-11.c
 #include <iostream>

 using namespace std;

 template<typenameT>
 classA
 {
 public:
     A(Tt=0);
     //声明一个友元函数,实现对两个A类对象进行加法操作
    template<typenameT>
     friendA<T> addA(const A<T> &a,const A<T> &b);
     T& getT();
     A operator+(const A &other);
     void print();
 private:
     T t;
 };

 template<typenameT>
 A<T>::A(T t)
 {
     this->t=t;
 }

 template<typenameT>
 T& A<T>::getT()
 {
     return t;
 }

 template<typenameT>
 A<T>A<T>::operator+(const A<T> &other)
 {
     A tmp;//类的内部类型可以显示声明也可以不显示
     tmp.t=this->t + other.t;
     return tmp;
 }

 template<typenameT>
 void A<T>::print()
 {
     cout<<this->t<<endl;
 }

 //A类的友元函数,就是它的好朋友
 template<typenameT>
 A<T> addA(const A<T> &a,const A<T> &b)
 {
     A<T> tmp;
     cout<<"calladdA()..."<<endl;
     tmp.t=a.t+b.t;
     return tmp;
 }

 int main(void)
 {
     A<int> a(666),b(888);
     //cout<<a.getT()<<endl;
     A<int> tmp=a+b;
     A<int> tmp1=addA<int>(a,b);
     tmp.print();
     tmp1.print();

     system("pause");
     return0;
 }
结论:
(1)类内部声明友元函数,必须写成一下形式 template friendAaddA(A&a,A&b);
(2)友元函数实现必须写成 template A add(A&a,A&b) { //...... }
(3)友元函数调用必须写成 A c4=addA(c1,c2);
2.5.5.模板类和静态成员
// demo 15-12.c
#include <iostream>

using namespace std;

template <typename T>
class A
{
public:
	A(T t=0);

	T &getT();

	A operator +(const A &other);

	void print();

public:
	static int count;
private:
	T t;
};

template <typename T> int A<T>::count = 666;

template <typename T>
A<T>::A(T t)
{
	this->t = t;
}

template <typename T>
T &A<T>::getT()
{
	return t;
}

template <typename T>
A<T> A<T>::operator+(const A<T> &other){
	A tmp; //类的内部类型可以显示声明也可以不显示
	tmp.t =this->t + other.t;
	return tmp;
}
template <typename T>
void A<T>::print(){
	cout<<this->t<<endl;
}

/*
//当我们的虚拟的类型T被 int 实例化以后,模板类如下:
class A
{
public:
A(int t=0);

int &getT();

A operator +(const A &other);

void print();

public:
static int count;
private:
int t;
};

int A::count = 666;


A::A(int t)
{
this->t = t;
}


int &A::getT()
{
return t;
}

A A::operator+(const A &other){
A tmp; //类的内部类型可以显示声明也可以不显示
tmp.t =this->t + other.t;
return tmp;
}


void A::print(){
cout<<this->t<<endl;
}
*/

/*
//当我们的虚拟的类型T被 float 实例化以后,模板类如下:
class A
{
public:
A(float t=0);

float &getT();

A operator +(const A &other);

void print();

public:
static int count;
private:
float t;
};

int A::count = 666;


A::A(float t)
{
this->t = t;
}


float &A::getT()
{
return t;
}

A A::operator+(const A &other){
A tmp; //类的内部类型可以显示声明也可以不显示
tmp.t =this->t + other.t;
return tmp;
}

void A::print(){
cout<<this->t<<endl;
}
*/
int main(void){

	A<int>  a(666), b(888);
	A<int> tmp = a + b;
	//A  a(666), b(888);
	//A tmp = a + b;

	A<float> c(777), d(999);

	a.count = 888;

	cout<<"b.count:"<<b.count<<endl;

	cout<<"c.count:"<<c.count<<endl;
	cout<<"d.count:"<<d.count<<endl;
	c.count = 1000;
	cout<<"修改后, d.count:"<<d.count<<endl;

	//tmp.print();

	system("pause");
	return 0;
}
总结:
- 从类模板实例化的每个模板类有自己的类模板数据成员,该模板类的所有对象共享一个static数据成员
- 和非模板类的static数据成员一样,模板类的static数据成员也应该在文件范围定义和初始化
- static 数据成员也可以使用虚拟类型参数T
2.6.类模板使用总结
归纳以上的介绍,可以这样声明和使用类模板:
1) 先写出一个实际的类。
2) 将此类中准备改变的类型名(如int要改变为float或char)改用一个自己指定的虚拟类型名(如上例中的T)。
3) 在类声明前面加入一行,格式为:
template <typename 虚拟类型参数>如:
    template <typename numtype>

    class A

    {…}; //类体
4) 用类模板定义对象时用以下形式:
类模板名<实际类型名> 对象名;
或 类模板名<实际类型名> 对象名(实参表列);
如:
    A<int> cmp;

    A<int> cmp(3,7);
5) 如果在类模板外定义成员函数,应写成类模板形式:
template <typename 虚拟类型参数>函数类型 类模板名<虚拟类型参数>::成员函数名(函数形参表列) {…}
关于类模板的几点补充:
1) 类模板的类型参数可以有一个或多个,每个类型前面都必须加typename 或class,如:
    template <typename T1,typename T2>

    class someclass

    {…};
在定义对象时分别代入实际的类型名,如:
someclass<int, char> object;2) 和使用类一样,使用类模板时要注意其作用域,只有在它的有效作用域内用使用它定义对象。
3) 模板类也可以有支持继承,有层次关系,一个类模板可以作为基类,派生出派生模板类。
2.7.类模板实战
- 请设计一个数组模板类( Vector ),完成对int、char、float、double 以及任意的自定义类等类型元素进行管理。需求:实现构造函数、实现拷贝构造函数、实现cout << 操作实现下标访问符[] 的重载操作、实现 = 号操作符重载
源码实现:
// demo 15-13  Vector.h
#include <iostream>

using namespace std;

template <typename  T>
class Vector
{
	//Vector<int> a(10); cout<<a;
	friend ostream &operator<< <T> (ostream &out, const Vector &object);
public:
	Vector(int size = 128); //构造函数
	Vector(const Vector &object); //拷贝构造函数
	//Vector<int> a(10); a
	//operator<<()

	int getLength();//获取内部储存的元素个数

	//Vector<int> a1, a2;  a1[0]
	 T& operator[](int index);

	 //实现=操作符重载
	 //a1 = a2 = a3;
	 Vector &operator=(const Vector &object);
	~Vector(); //析构函数

private:
	T *m_base;
	int m_len;
};
// demo 15-13  Vector.cpp
#include <iostream>
using namespace std;
#include "Vector.h"

//cout<<a<<b<<c;
template<typename T>
ostream &operator<<(ostream &out, const Vector<T> &object){
	for(int i=0; i<object.m_len; i++){
		out << object.m_base[i] << " ";//Student a("18","李小花"); cout<< a<<endl;
	}
	out<<endl;

	return out;
}

template <typename T>
Vector<T>::Vector(int size){ //构造函数
	if(size > 0){
		m_len = size;
		m_base = new T[m_len];
	}
}

template <typename T>
Vector<T>::Vector(const Vector<T> &object){ //拷贝构造函数

	//根据传入的对象元素个数分配空间
	m_len = object.m_len;
	m_base = new T[m_len];

	//数据的拷贝
	for(int i=0; i<m_len; i++){
		m_base[i] = object.m_base[i];
	}
}

template <typename T>
int Vector<T>::getLength(){
	return m_len;
}

	//Vector<int> a1, a2;  a1[0]
template <typename T>
T& Vector<T>::operator[](int index){
	return m_base[index];// return *(m_base+index);
}

	 //实现=操作符重载
	 //a1 = a2 = a3;
template <typename T>
Vector<T> &Vector<T>::operator=(const Vector<T> &object){
	if(m_base != NULL){
		delete[] m_base;
		m_base = NULL;
		m_len = 0;
	}

	//根据传入的对象元素个数分配空间
	m_len = object.m_len;
	m_base = new T[m_len];

	//数据的拷贝
	for(int i=0; i<m_len; i++){
		m_base[i] = object.m_base[i];
	}

	return *this; // a3 = a2 = a1;
}

template <typename T>
Vector<T>::~Vector(){ //析构函数
	if(m_base != NULL){
		delete[] m_base;
		m_base = NULL;
		m_len = 0;
	}
}
// demo 15-13  13_类模板实战.cpp
#include <iostream>
using namespace std;

#include "Vector.cpp"

class Student{
	friend ostream &operator<<(ostream &out, const Student &object);
public:
	Student(){
		age = 0;
		name[0] = '\0';
	}

	Student(int _age, char *_name){
		age = _age;
		strcpy_s(name, 64, _name);
	}

	void print(){
		cout<<name<<", "<<age<<endl;
	}

	~Student(){

	}

private:
	int age;
	char name[64];
};

ostream &operator<<(ostream &out, const Student &object){
	out<<"("<<object.name<<" , "<<object.age<<")";
	return out;
}

int main(){
	Student s1(18, "李小花");
	Student s2(19, "王大炮");

	Vector<Student *> studentVector(2);

	studentVector[0] = &s1;
	studentVector[1] = &s2;

	/*for(int i=0; i<studentVector.getLength(); i++){
		studentVector[i].print();
	}*/

	cout<<studentVector<<endl;
	system("pause");

	//ostream cout;
	Vector<int> myVector(10);
	//int a[10]; len: sizeof(a)/sizeof(a[0])
	for(int i=0; i<myVector.getLength(); i++){
		myVector[i] = i;
	}

	cout<<myVector<<endl;
	system("pause");

	for(int i=0; i<myVector.getLength(); i++){
		cout<<myVector[i]<<endl;
	}

	//测试拷贝构造函数
	Vector<int> myIntVector1(myVector);
	cout<<"myIntVector1 中的元素如下:"<<endl;
	for(int i=0; i<myIntVector1.getLength(); i++){
		cout<<myIntVector1[i]<<endl;
	}
	cout<<"---end---"<<endl;

	//测试赋值运算符重载
	Vector<int> myIntVector2(1);
	myIntVector2 = myIntVector1;

	cout<<"myIntVector2 中的元素如下:"<<endl;
	for(int i=0; i<myIntVector1.getLength(); i++){
		cout<<myIntVector1[i]<<endl;
	}
	cout<<"---end---"<<endl;


	Vector<float> myVector1(10);
	//int a[10]; len: sizeof(a)/sizeof(a[0])
	for(int i=0; i<myVector1.getLength(); i++){
		myVector1[i] = i*0.1f;
	}

	for(int i=0; i<myVector1.getLength(); i++){
		cout<<myVector1[i]<<endl;
	}

	system("pause");
	return 0;
}
三十一、异常处理机制
唐僧一行西天取经队伍到达贫困山区,几天要不到吃的,悟空因为要保护师父,只好让沙僧和八戒去远处城里找吃的.
第一天去,空手回来,因为没有钱.第二天去,还是空手,因为没有钱.
悟空大怒:"再找不回吃的,就别回来!"
第三天傍晚,沙僧高高兴兴地背着一大袋子米,还剩了好多钱.
悟空大喜,又问:"八戒呢?"
沙僧顿时伤心地哭道:"大师兄,原谅我吧!咱们这么多人,就二师兄能卖到25块钱一斤.......
异常无处不在,程序随时可能误入歧途!C++ 提出了新的异常处理机制!
异常是一种程序控制机制,与函数机制互补
函数是一种以栈结构展开的上下函数衔接的程序控制系统,异常是另一种控制结构,它可以在出现“意外”时中断当前函数,并以某种机制(类型匹配)回馈给隔代的调用者相关的信息.
1.传统错误处理机制
通过函数返回值来处理错误。
// demo 15-14
#include <stdio.h>
#include <stdlib.h>

#define BUFSIZE 1024

//实现文件的二进制拷贝
int copyfile(const char *dest,const char *src){
	FILE *fp1 = NULL, *fp2 = NULL;

	//rb 只读方式打开一个二进制文件,只允许读取数据
	fopen_s(&fp1, src, "rb");

	if(fp1 == NULL){
		return -1;
	}

	//wb 以只写的方式打开或新建一个二进制文件,只允许写数据。
	fopen_s(&fp2, dest, "wb");
	if(fp2 == NULL){
		return -2;
	}

	char buffer[BUFSIZE];
	int readlen, writelen;

	//如果读到数据,则大于0
	while( (readlen = fread(buffer, 1, BUFSIZE, fp1)) > 0 ){
		writelen = fwrite(buffer, 1, readlen, fp2);
		if(readlen != writelen){
			return -3 ;
		}
	}

	fclose(fp1);
	fclose(fp2);
	return 0;
}

void main(){
	int ret = 0;
	ret = copyfile("c:/test/dest.txt", "c:/test/src.txt");

	if(ret != 0){
		switch(ret){
		case -1:
			printf("打开源文件失败!\n");
			break;
		case -2:
			printf("打开目标文件失败!\n");
			break;
		case -3:
			printf("拷贝文件时失败!\n");
			break;
		default:
			printf("出现未知的情况!\n");
			break;
		}
	}
	system("pause");
}
C++ 异常处理机制
// demo 15-15
#include <stdio.h>
#include <stdlib.h>
#include <string>

using namespace std;

#define BUFSIZE 1024

//实现文件的二进制拷贝
int copyfile2(char *dest, char *src){
	FILE *fp1 = NULL, *fp2 = NULL;

	//rb 只读方式打开一个二进制文件,只允许读取数据
	fopen_s(&fp1, src, "rb");

	if(fp1 == NULL){
		throw new string("文件不存在");
	}

	//wb 以只写的方式打开或新建一个二进制文件,只允许写数据。
	fopen_s(&fp2, dest, "wb");
	if(fp2 == NULL){
		throw -2;
	}

	char buffer[BUFSIZE];
	int readlen, writelen;

	//如果读到数据,则大于0
	while( (readlen = fread(buffer, 1, BUFSIZE, fp1)) > 0 ){
		writelen = fwrite(buffer, 1, readlen, fp2);
		if(readlen != writelen){
			throw -3 ;
		}
	}

	fclose(fp1);
	fclose(fp2);
	return 0;
}

int copyfile1(char *dest, char *src){
	return copyfile2(dest, src);
}

void main(){
	int ret = 0;

	try{
		ret = copyfile1("c:/test/dest.txt", "c:/test/src.txt");

	}catch(int error){
		printf("出现异常啦!%d\n", error);
	}catch(string *error){
		printf("捕捉到字符串异常:%s\n", error->c_str());
		delete error;
	}

	system("pause");
}
2.异常处理基本语法
异常发生第一现场,抛出异常
void  function( ){
//... ...
  throw 表达式;
//... ...
}
在需要关注异常的地方,捕捉异常
try{
//程序
function();
//程序

}catch(异常类型声明){
//... 异常处理代码 ...
}catch(异常类型 形参){
//... 异常处理代码 ...
}catch(...){ //其它异常类型
//
}
注意事项:
- 通过throw操作创建一个异常对象并抛掷
- 在需要捕捉异常的地方,将可能抛出异常的程序段嵌在try块之中
- 按正常的程序顺序执行到达try语句,然后执行try块{}内的保护段
- 如果在保护段执行期间没有引起异常,那么跟在try块后的catch子句就不执行,程序从try块后跟随的最后一个catch子句后面的语句继续执行下去
- catch子句按其在try块后出现的顺序被检查,匹配的catch子句将捕获并按catch子句中的代码处理异常(或继续抛掷异常)
- 如果没有找到匹配,则缺省功能是调用abort终止程序。
提示:处理不了的异常,我们可以在catch的最后一个分支,使用throw语法,继续向调用者throw。
源码:
// demo 15-16
#include <stdio.h>
#include <stdlib.h>
#include <string>

using namespace std;

#define BUFSIZE 1024

//实现文件的二进制拷贝
int copyfile2(char *dest, char *src){
	FILE *fp1 = NULL, *fp2 = NULL;

	//通过throw操作创建一个异常对象并抛掷
	throw 0.01f;
	//rb 只读方式打开一个二进制文件,只允许读取数据
	fopen_s(&fp1, src, "rb");

	if(fp1 == NULL){
		throw new string("文件不存在");
	}

	//wb 以只写的方式打开或新建一个二进制文件,只允许写数据。
	fopen_s(&fp2, dest, "wb");
	if(fp2 == NULL){
		throw -2;
	}

	char buffer[BUFSIZE];
	int readlen, writelen;

	//如果读到数据,则大于0
	while( (readlen = fread(buffer, 1, BUFSIZE, fp1)) > 0 ){
		writelen = fwrite(buffer, 1, readlen, fp2);
		if(readlen != writelen){
			throw -3 ;
		}
	}

	fclose(fp1);
	fclose(fp2);
	return 0;
}

int copyfile1(char *dest, char *src){
	try{
		copyfile2(dest, src);
	}catch(float e){
		//throw ;
		printf("copyfile1 - catch ...\n");

		//提示:处理不了的异常,我们可以在catch的最后一个分支,使用throw语法,继续向调用者throw。
		throw ;
	}

	return 0;
}

void main(){
	int ret = 0;

	//在需要捕捉异常的地方,将可能抛出异常的程序段嵌在try块之中
	//按正常的程序顺序执行到达try语句,然后执行try块{}内的保护段
	//如果在保护段执行期间没有引起异常,那么跟在try块后的catch子句就不执行,程序从try块后跟随的最后一个catch子句后面的语句继续执行下去
	try{//保护段
		printf("开始执行 copyfile1...\n");
		ret = copyfile1("c:/test/dest.txt", "c:/test/src.txt");
		printf("执行 copyfile1 完毕\n");

		//catch子句按其在try块后出现的顺序被检查,匹配的catch子句将捕获并按catch子句中的代码处理异常(或继续抛掷异常)
	}catch(int error){
		printf("出现异常啦!%d\n", error);
	}catch(string *error){
		printf("捕捉到字符串异常:%s\n", error->c_str());
		delete error;
	}catch(float error){
		printf("出现异常啦!%f\n", error);
	}catch(...){
		printf("catch ...\n");
	}


	//如果没有找到匹配,则缺省功能是调用abort终止程序。

	system("pause");
}
3.异常接口声明
可以在函数声明中列出可能抛出的所有异常类型,加强程序的可读性。
如:
int copyfile2(char *dest, char *src) throw (float, string *, int)1.对于异常接口的声明,在函数声明中列出可能抛出的所有异常类型
2.如果没有包含异常接口声明,此函数可以抛出任何类型的异常
3.如果函数声明中有列出可能抛出的所有异常类型,那么抛出其它类型的异常讲可能导致程序终止
4.如果一个函数不想抛出任何异常,可以使用 throw () 声明
4.异常类型和生命周期

4.1.throw基本类型
// demo 15-17
#include <stdio.h>
#include <stdlib.h>
#include <string>

using namespace std;

#define BUFSIZE 1024


//实现文件的二进制拷贝

//第一种情况,throw 普通类型,和函数返回传值是一样的
int copyfile2(char *dest, char *src){
	FILE *fp1 = NULL, *fp2 = NULL;

	//rb 只读方式打开一个二进制文件,只允许读取数据
	fopen_s(&fp1, src, "rb");

	if(fp1 == NULL){
		//int ret = -1;
		char ret = 'a';
		throw ret;
	}

	//wb 以只写的方式打开或新建一个二进制文件,只允许写数据。
	fopen_s(&fp2, dest, "wb");
	if(fp2 == NULL){
		throw -2;
	}

	char buffer[BUFSIZE];
	int readlen, writelen;

	//如果读到数据,则大于0
	while( (readlen = fread(buffer, 1, BUFSIZE, fp1)) > 0 ){
		writelen = fwrite(buffer, 1, readlen, fp2);
		if(readlen != writelen){
			throw -3 ;
		}
	}

	fclose(fp1);
	fclose(fp2);
	return 0;
}

int copyfile1(char *dest, char *src){
	return copyfile2(dest, src);
}

void main(){
	int ret = 0;


	try{//保护段
		//printf("开始执行 copyfile1...\n");
		ret = copyfile1("c:/test/dest.txt", "c:/test/src.txt");
		//printf("执行 copyfile1 完毕\n");

	}catch(int error){
		printf("出现异常啦!%d\n", error);
	}catch(char error){
		printf("出现异常啦!%c\n", error);
	}

	system("pause");
}
4.2.throw字符串类型
// demo 15-18
#include <stdio.h>
#include <stdlib.h>
#include <string>

using namespace std;

#define BUFSIZE 1024

//第二种情况,throw 字符串类型,实际抛出的指针,而且,修饰指针的const 也要严格进行类型匹配
int copyfile3(char *dest, char *src){
	FILE *fp1 = NULL, *fp2 = NULL;

	//rb 只读方式打开一个二进制文件,只允许读取数据
	fopen_s(&fp1, src, "rb");

	if(fp1 == NULL){
		const char * error = "大佬,你的源文件打开有问题";
		printf("throw 前,error 的地址:%p\n", error);
		throw error;
	}

	//wb 以只写的方式打开或新建一个二进制文件,只允许写数据。
	fopen_s(&fp2, dest, "wb");
	if(fp2 == NULL){
		throw -2;
	}

	char buffer[BUFSIZE];
	int readlen, writelen;

	//如果读到数据,则大于0
	while( (readlen = fread(buffer, 1, BUFSIZE, fp1)) > 0 ){
		writelen = fwrite(buffer, 1, readlen, fp2);
		if(readlen != writelen){
			throw -3 ;
		}
	}

	fclose(fp1);
	fclose(fp2);
	return 0;
}

int copyfile1(char *dest, char *src){
	return copyfile3(dest, src);
}

void main(){
	int ret = 0;

	try{//保护段
		//printf("开始执行 copyfile1...\n");
		ret = copyfile1("c:/test/dest.txt", "c:/test/src.txt");
		//printf("执行 copyfile1 完毕\n");

	}catch(int error){
		printf("出现异常啦!%d\n", error);
	}catch(char error){
		printf("出现异常啦!%c\n", error);
	}catch(string error){
		printf("出现异常啦!%s\n", error.c_str());
	}catch(const char *error){
		printf("出现异常啦(char *)!%s(地址:%p)\n", error, error);
	}catch(...){
		printf("没捉到具体的异常类型\n");
	}

	system("pause");
}
4.3.throw类对象类型异常
// demo 15-19
#include <stdio.h>
#include <stdlib.h>
#include <string>

using namespace std;

#define BUFSIZE 1024

class ErrorException{
public:
	ErrorException(){
		id = 0;
		printf("ErrorException  构造!\n");
	}

	~ErrorException(){
		printf("ErrorException  ~析构!(id: %d)\n", id);
	}

	ErrorException(const ErrorException &e){
		id = 1;
		printf("ErrorException  拷贝构造函数!\n");
	}

	int  id;
};

//第三种情况,throw 类类型,最佳的方式是使用引用类型捕捉,抛出匿名对象
//当然,如果是动态分配的对象,直接抛出其指针
//注意:引用和普通的形参传值不能共存
int copyfile4(char *dest, char *src){
	FILE *fp1 = NULL, *fp2 = NULL;

	//rb 只读方式打开一个二进制文件,只允许读取数据
	fopen_s(&fp1, src, "rb");

	if(fp1 == NULL){
		//ErrorException error1;
		throw ErrorException(); //throw ErrorException();
	}

	//wb 以只写的方式打开或新建一个二进制文件,只允许写数据。
	fopen_s(&fp2, dest, "wb");
	if(fp2 == NULL){
		throw -2;
	}

	char buffer[BUFSIZE];
	int readlen, writelen;

	//如果读到数据,则大于0
	while( (readlen = fread(buffer, 1, BUFSIZE, fp1)) > 0 ){
		writelen = fwrite(buffer, 1, readlen, fp2);
		if(readlen != writelen){
			throw -3 ;
		}
	}

	fclose(fp1);
	fclose(fp2);
	return 0;
}

int copyfile1(char *dest, char *src){
	return copyfile4(dest, src);
}

void main(){
	int ret = 0;
	try{//保护段
		//printf("开始执行 copyfile1...\n");
		ret = copyfile1("c:/test/dest.txt", "c:/test/src.txt");
		//printf("执行 copyfile1 完毕\n");

	}catch(ErrorException error){
		printf("出现异常啦!捕捉到 ErrorException 类型 id: %d\n", error.id);
	}catch(ErrorException &error){
		//error.id = 2;
		printf("出现异常啦!捕捉到 ErrorException &类型 id: %d\n", error.id);
	}catch(ErrorException *error){
		printf("出现异常啦!捕捉到 ErrorException *类型 id: %d\n", error->id);
		delete error;
	}catch(...){
		printf("没捉到具体的异常类型\n");
	}
	system("pause");
}
5.继承与异常
异常也是类,我们可以创建自己的异常类,在异常中可以使用(虚函数,派生,引用传递和数据成员等)
案例:设计一个数组类容器 Vector,重载[]操作,数组初始化时,对数组的个数进行有效检查
index<0 抛出异常errNegativeException
index = 0 抛出异常 errZeroException
index>1000抛出异常errTooBigException
index<10 抛出异常errTooSmallException
errSizeException类是以上类的父类,实现有参数构造、并定义virtual void printError()输出错误。
// demo 15-20
#include <iostream>

using namespace std;

/*
设计一个数组类容器 Vector,重载[]操作,数组初始化时,对数组的个数进行有效检查
1)index<0 抛出异常errNegativeException
2)index = 0 抛出异常 errZeroException
3)index>1000抛出异常errTooBigException
4)index<10 抛出异常errTooSmallException
5)errSizeException类是以上类的父类,实现有参数构造、并定义virtual void printError()输出错误。

*/
class errSizeException{
public:
	errSizeException(int size){
		m_size = size;
	}

	virtual void printError(){
		cout<<"size: "<<m_size<<endl;
	}

protected:
	int m_size;
};

class errNegativeException : public errSizeException{
public:
	errNegativeException(int size):errSizeException(size){

	}

	virtual void printError(){
		cout<<"errNegativeException size: "<<m_size<<endl;
	}
};

class errZeroException : public errSizeException{
	public:
	errZeroException(int size):errSizeException(size){

	}

	virtual void printError(){
		cout<<"errZeroException size: "<<m_size<<endl;
	}
};

class errTooBigException : public errSizeException{
	public:
	errTooBigException(int size):errSizeException(size){

	}

	virtual void printError(){
		cout<<"errTooBigException size: "<<m_size<<endl;
	}
};

class errTooSmallException : public errSizeException{
	public:
	errTooSmallException(int size):errSizeException(size){

	}

	virtual void printError(){
		cout<<"errTooSmallException size: "<<m_size<<endl;
	}
};


class Vector{
public:
	Vector(int  size = 128); //构造函数

	int getLength();//获取内部储存的元素个数

	int& operator[](int index);

	~Vector();

private:
	int *m_base;
	int m_len;
};

Vector::Vector(int len){
	if(len < 0){
		throw errNegativeException(len);
	}else if(len == 0){
		throw errZeroException(len);
	}else if(len > 1000){
		throw errTooBigException(len);
	}else if(len < 10){
		throw errTooSmallException(len);
	}

	m_len = len;
	m_base = new int[len];
}

Vector::~Vector(){
	if(m_base) delete[] m_base;
	m_len = 0;
}

int Vector::getLength(){
	return m_len;
}

int &Vector::operator[](int index){
	return m_base[index];
}

void main(){

	try{
		Vector v(10000);
		for(int i=0; i<v.getLength(); i++){
			v[i] = i+10;
			printf("v[i]: %d\n", v[i]);
		}
	}catch(errSizeException &err){
		err.printError();
	}

	/*catch(errNegativeException &err){
		cout<<"errNegativeException..."<<endl;
	}catch(errZeroException &err){
		cout<<"errZeroException..."<<endl;
	}catch(errTooBigException &err){
		cout<<"errTooBigException..."<<endl;
	}catch(errTooSmallException &err){
		cout<<"errTooSmallException..."<<endl;
	}*/

	system("pause");
	return ;
}
6.异常处理的基本思想
C++的异常处理机制使得异常的引发和异常的处理不必在同一个函数中,这样底层的函数可以着重解决具体问题,而不必过多的考虑异常的处理。上层调用者可以再适当的位置设计对不同类型异常的处理。
异常是专门针对抽象编程中的一系列错误进行处理的,C++中不能借助函数机制实现异常,因为栈结构的本质是先进后出,依次访问,无法进行跳跃,但错误处理的特征却是遇到错误信息就想要转到若干级之上进行重新尝试, 如图:

7.标准程序库异常

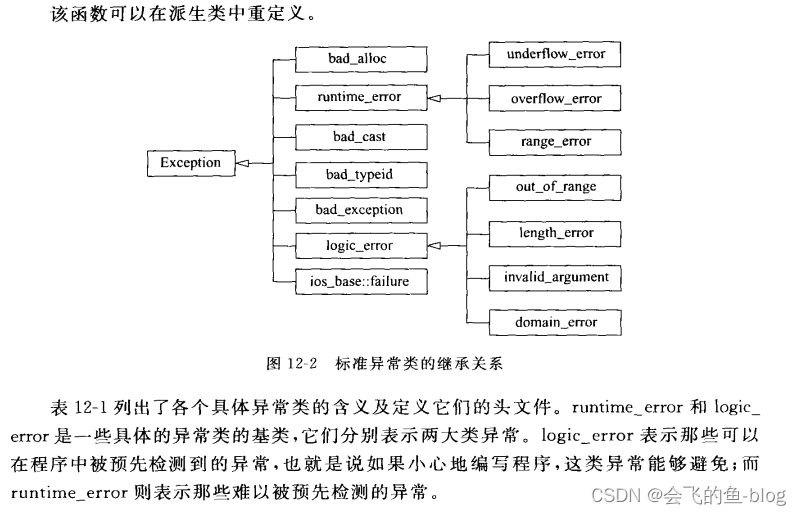
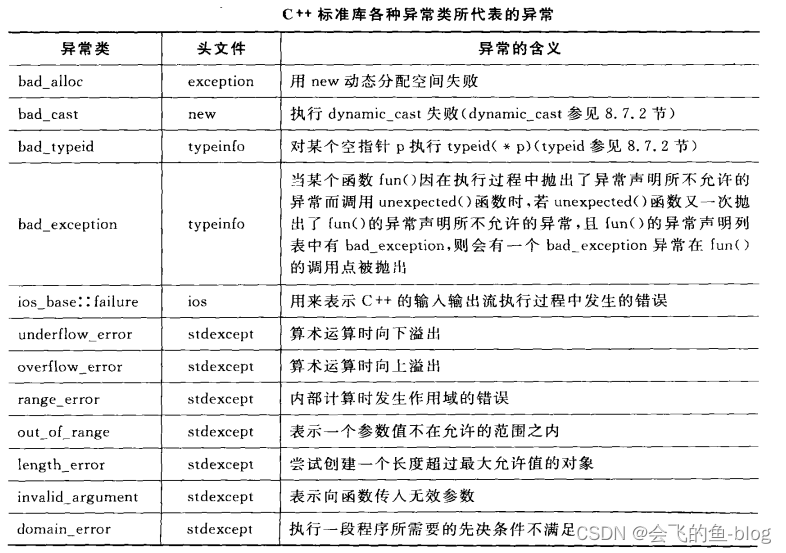

// demo 15-21
#include <iostream>
#include <exception>
#include <stdexcept>

using namespace std;

class Student{
public:
	Student(int age){
		if(age > 249){
			throw out_of_range("年龄太大,你是外星人嘛?");
		}
		m_age = age;
		m_space = new int[1024*1024*100];
	}

private :
	int m_age;
	int *m_space;
};


void main(){

	try{
		for(int i=1; i<1024; i++){
			Student * xiao6lang = new Student(18);
		}
	}catch(out_of_range &e){
		cout<<"捕捉到一只异常:"<<e.what()<<endl;
	}catch(bad_alloc &e){
		cout<<"捕捉到动态内存分配的异常:"<<e.what()<<endl;
	}

	system("pause");
}
三十二、STL标准模板库
STL主要分为分为三类:
algorithm(算法) - 对数据进行处理(解决问题) 步骤的有限集合
container(容器) - 用来管理一组数据元素
Iterator (迭代器) - 可遍历STL容器内全部或部分元素”的对象
容器和算法通过迭代器可以进行无缝地连接。在STL中几乎所有的代码都采用了模板类和模板函数的方式,这相比于传统的由函数和类组成的库来说提供了更好的代码重用机会。
STL 最早源于惠普实验室,早于C++存在,但是C++引入STL概念后,STL就成为C++的一部分,因为它被内建在你的编译器之内,不需要另行安装。
STL被组织为下面的13个头文 件:<algorithm>、<deque>、<functional>、<iterator>、<vector>、<list>、<map>、<memory>、<numeric>、<queue>、<set>、<stack> 和<utility>。
// demo 15-22
#include <iostream>
using namespace std;

#include <vector>
#include <algorithm>


class student{
public:
	student(int age, const char *name){
		this->age = age;
		strncpy(this->name, name, 64);
	}

	student(const student &s){
		this->age = s.age;
		strncpy(this->name, s.name, 64);
		cout<<"拷贝构造函数被调用!"<<endl;
	}
public:
	int age;
	char name[64];
};

//容器中直接存放对象,会发生拷贝构造
void demo2(){
	vector<student> v1;

	student s1(18, "李小美");
	student s2(19, "王大帅");

	v1.push_back(s1);
	v1.push_back(s2);

	cout<<"v1 的学生的个数:"<<v1.size()<<endl;

	//方式1,下标访问
	//for(unsigned int i=0; i<v1.size(); i++){
	//	cout<<v1[i].name<<": "<<v1[i].age<<endl;
	//}

	vector<student>::iterator it = v1.begin();
	for( ; it != v1.end(); it++){
		cout<< (*it).name<<": "<<(*it).age <<endl;
	}

}

//容器中存放指针
void demo3(){
	vector<student *> v1;

	student s1(18, "李小美");
	student s2(19, "王大帅");

	v1.push_back(&s1);
	v1.push_back(&s2);

	cout<<"v1 的学生的个数:"<<v1.size()<<endl;

	//方式1,下标访问
	//for(unsigned int i=0; i<v1.size(); i++){
	//	cout<<v1[i].name<<": "<<v1[i].age<<endl;
	//}

	vector<student *>::iterator it = v1.begin();
	for( ; it != v1.end(); it++){
		cout<< (**it).name<<": "<<(**it).age <<endl;
	}

}


void demo1(){
	//第一部分 容器
	vector<int> v1;

	v1.push_back(1);
	v1.push_back(2);
	v1.push_back(3);
	v1.push_back(4);
	v1.push_back(3);

	cout<<"v1 的元素个数:"<<v1.size()<<endl;

	cout<<"v1中保存的元素:"<<endl;
	//方式1,下标访问
	//for(unsigned int i=0; i<v1.size(); i++){
	//	cout<<v1[i]<<endl;
	//}

	//方式2,迭代器访问
	//第二部分 迭代器
	//1  2  3  4
	//it
	vector<int>::iterator it = v1.begin();
	for( ; it != v1.end(); it++){
		cout<< *it <<endl;
	}


	//第三部分  算法
	int ncount = count(v1.begin(), v1.end(), 90);
	cout<<"v1 中数值为 90 的元素个数:"<< ncount<< endl;
}

void main(){

	demo3();

	system("pause");
	return ;
}
1.容器
在实际的开发过程中,数据结构本身的重要性完全不逊于算法的重要性,当程序中存在着对时间要求很高的部分时,数据结构的选择就显得更加重要。
试想: 一条死胡同里面停车,这样的效率会很高嘛?

经典的数据结构数量有限,但是在项目实战中,我们常常重复着一些为了存放不同数据类型而实现顺序表、链表等结构而重复编写的代码,这些代码都十分相似,只是为了适应不同数据类型的变化而在细节上有所出入。STL容器就为我们提供了这样的方便,它允许我们重复利用已有的实现构造自己的特定类型下的数据结构,通过设置一些模板,STL容器对最常用的数据结构提供了支持,这些模板的参数允许我们指定容器中元素的数据类型,避免重复编码。
容器部分主要有由<vector>,<list>,<deque>,<set>,<map>,<stack> 和<queue>组成。
下面是常用的一些容器,可以通过下表总结一下它们和相应头文件的对应关系。
数据结构 |
描述 |
实现头文件 |
向量(vector) |
连续存储的元素 |
<vector> |
列表(list) |
由节点组成的双向链表,每个结点包含着一个元素 |
<list> |
双向队列(deque) |
连续存储的指向不同元素的指针所组成的数组 |
<deque> |
集合(set) |
由节点组成的红黑树,每个节点都包含着一个元素,节点之间以某种作用于元素对的谓词排列,没有两个不同的元素能够拥有相同的次序 |
<set> |
多重集合(multiset) |
允许存在两个次序相等的元素的集合 |
<set> |
栈(stack) |
后进先出的元素的排列 |
<stack> |
队列(queue) |
先进先出的元素的排列 |
<queue> |
优先队列(priority_queue) |
元素的次序是由作用于所存储的值对上的某种优先级决定的的一种队列 |
<queue> |
映射(map) |
由{键,值}对组成的集合,以某种作用于键对上的谓词排列 |
<map> |
多重映射(multimap) |
允许键对有相等的次序的映射 |
<map> |
1.1.Vector容器
Vector容器概念
vector是将元素置于一个动态数组中加以管理的容器。
vector可以随机存取元素,支持索引值直接存取, 用[]操作符或at()方法对元素进行操作
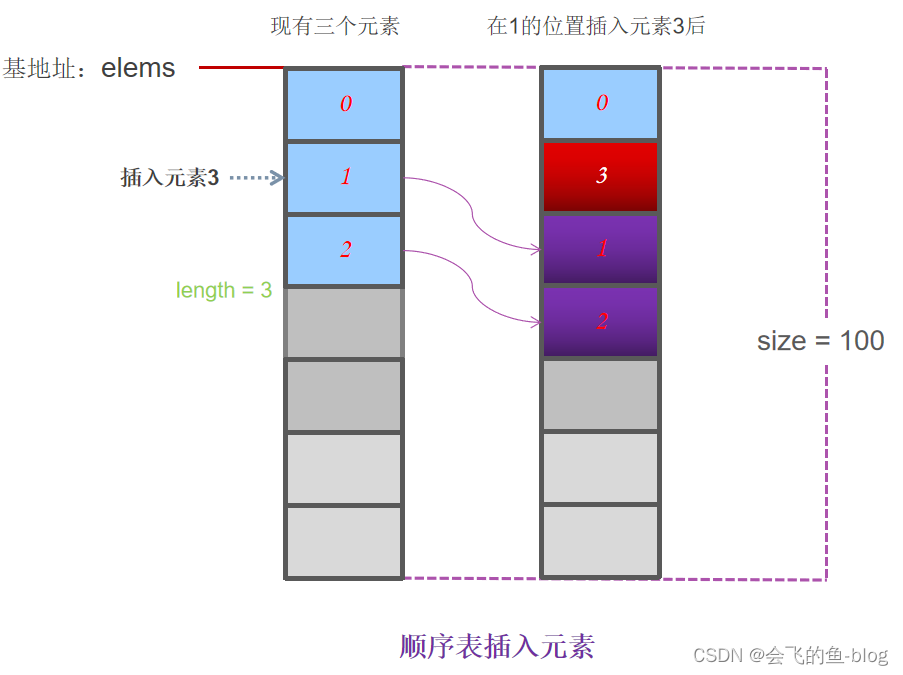
vector尾部添加或移除元素非常快速。但是在中部或头部插入元素或移除元素比较费时
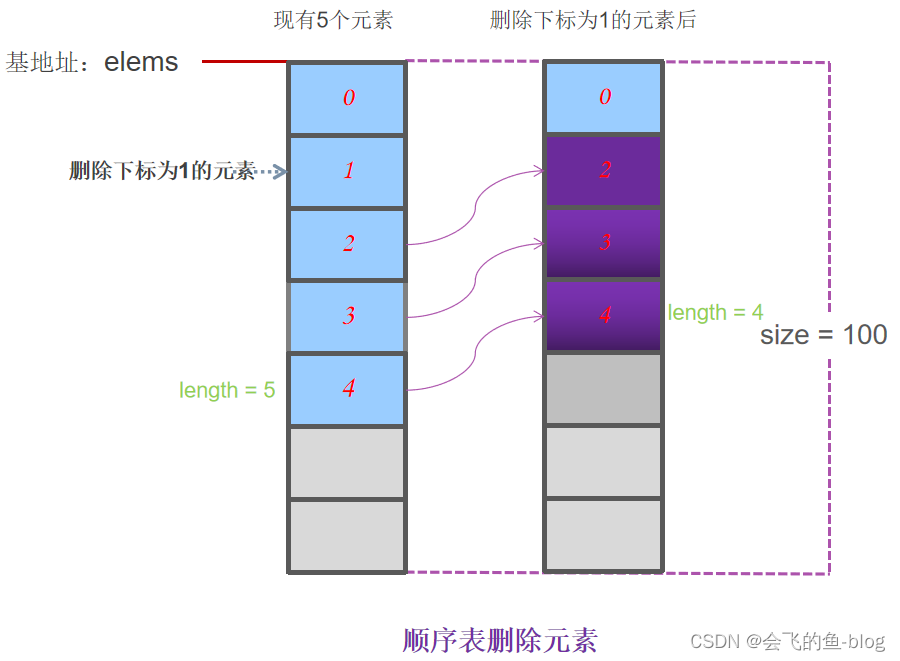
vector对象的构造
vector采用模板类实现,vector对象的默认构造形式
vector<T> vecT;//默认构造函数
//带参构造函数
vector(beg,end);    //构造函数将[beg, end)区间中的元素拷贝给本身。注意该区间是左闭右开的区间
vector(n,elem);   //构造函数将n个elem拷贝给本身
vector(const vector &v1);  //拷贝构造函数
// demo 15-23
#include <iostream>
using namespace std;
#include <vector>
#include <algorithm>
void demo1(){
//vector 对象的默认构造
//默认构造函数 元素个数为0, 所占内存空间为0
/*vector<int> v1;
//vector<float> v2;
cout<<"v1 的元素个数: "<<v1.size()<<endl;
cout<<"v1 容器的大小:"<<v1.capacity()<<endl;
//当我们使用vector 的默认构造函数时,切记,不能直接通过下标去访问
//v1[0]=1;
v1.push_back(1);
cout<<"尾部插入1个元素后:"<<endl;
cout<<"v1 的元素个数:"<<v1.size()<<endl;
cout<<"v1 容器的大小:"<<v1.capacity()<<endl;
v1.push_back(2);
v1.push_back(3);
v1.push_back(4);
v1.push_back(5);
cout<<"尾部插入5个元素后:"<<endl;
cout<<"v1 的元素个数:"<<v1.size()<<endl;
cout<<"v1 容器的大小:"<<v1.capacity()<<endl;
*/
//vector 带参构造函数
//vector<int> v2(10); //构造时就分配空间,同时插入10个元素,元素大小为0
vector<int> v2(10, 666);
//vector<int> v3(v2);
//vector<int> v3(v2.begin()+3, v2.end());
int test[]={1, 2, 3, 4, 5};
vector<int> v3(test, test+2);
cout<<"v2 的元素个数:"<<v2.size()<<endl;
cout<<"v2 容器的大小:"<<v2.capacity()<<endl;
cout<<"v2调用 assign 后:"<<endl;
cout<<"v2 的元素个数:"<<v2.size()<<endl;
cout<<"v2 中存储的元素是: "<<endl;
for(int i=0; i<v2.size(); i++){
cout<<v2[i]<<endl;
}
cout<<"v3 中存储的元素是: "<<endl;
for(int i=0; i<v3.size(); i++){
cout<<v3[i]<<endl;
}
}
void main(){
demo1();
system("pause");
return ;
}
vector的赋值
vector 的赋值
v2.assign(2, 888);//第一种玩法  改变原来vector 中的元素个数和值
v2.assign(v3.begin(), v3.end());//第二种玩法,使用迭代器重新赋值
int test1[]={1, 2, 3, 4, 5};
v2.assign(test1, test1+3);//第三种玩法,使用指针赋值
v2 = v3;//第四种玩法,赋值运算vector的大小
vector.size(); //返回容器中元素的个数
vector.empty(); //判断容器是否为空vector.resize(num); //重新指定容器的长度为num,若容器变长,则以默认值填充新位置。如果容器变短,则末尾超出容器长度的元素被删除。
vector.resize(num, elem); //重新指定容器的长度为num,若容器变长,则以elem值填充新位置。如果容器变短,则末尾超出容器长度的元素被删除
vector末尾的添加移除操作
v2.push_back(1);  //在容器尾部加入一个元素
v2.pop_back();    //移除容器中最后一个元素
vector的数据存取
第一 使用下标操作 v2[0] = 100;
第二 使用at 方法 如: v2.at(2) = 100;
第三 接口返回的引用 v2.front() 和 v2.back()
注意: 第一和第二种方式必须注意越界
vector的插入
vector.insert(pos,elem);   //在pos位置插入一个elem元素的拷贝,返回新数据的位置。
vector.insert(pos,n,elem);   //在pos位置插入n个elem数据,无返回值。
vector.insert(pos,beg,end);   //在pos位置插入[beg,end)区间的数据,无返回值
vector的删除
1. 把整个vector 都干掉
    v2.clear();
    cout<<"调用 v2.clear() 后"<<endl;
2.干掉单个元素
v2[1] = 888;
v2.erase(v2.begin()+1);
3. 干掉多个元素
v2.erase(v2.begin(), v2.begin()+3);1.2.deuqe容器
deque容器概念
deque是“double-ended queue”的缩写,和vector一样都是STL的容器,唯一不同的是:
deque是双端数组,而vector是单端的。
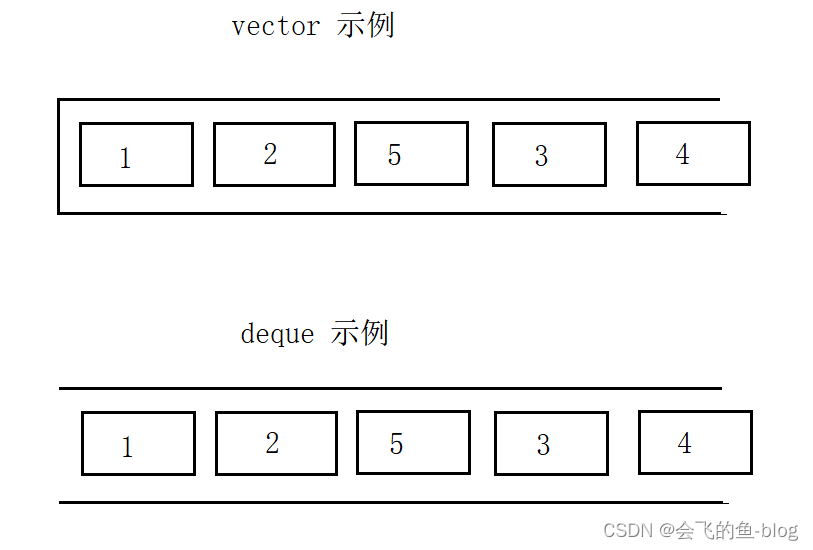
Deque 特点:
- deque在接口上和vector非常相似,在许多操作的地方可以直接替换。
- deque可以随机存取元素(支持索引值直接存取,用[]操作符或at()方法)
- deque头部和尾部添加或移除元素都非常快速, 但是在中部安插元素或移除元素比较费时。
使用时,包含头文件:#include <deque>
deque对象的默认构造
deque也是采用模板类实现。
deque对象的默认构造形式:deque<T> deqT
例如:
deque <int> deqInt; //存放int的deque容器。
deque <float> deqFloat; //存放float的deque容器。
deque <student> deqStu; //存放student的deque容器。
...
注意:尖括号内还可以设置指针类型或自定义类型。
deque对象的带参数构造
方式1:deque(beg,end); //构造函数将[beg, end)区间中的元素拷贝给本身。
方式2:deque(n,elem); //构造函数将n个elem拷贝给本身。
方式3:deque(const deque &deq); //拷贝构造函数。
deque<int> deqIntA;
deqIntA.push_back(1);
deqIntA.push_back(2);
deqIntA.push_back(3);
deqIntA.push_back(4);
deque<int> deqIntB(deqIntA.begin(),deqIntA.end());            //1 2 3 4
deque<int> deqIntC(8, 666);                                   //8 8 8 8 8
deque<int> deqIntD(deqIntA);                                  //1 2 3 4
deque头部和末尾的添加移除操作
- deque.push_back(element); //容器尾部添加一个数据
- deque.push_front(element); //容器头部插入一个数据
- deque.pop_back(); //删除容器最后一个数据
- deque.pop_front(); //删除容器第一个数据
deque<int> deqIntA;
deqIntA.push_back(1);
deqIntA.push_back(2);
deqIntA.push_back(3);
deqIntA.push_back(4);
deqIntA.push_back(5);
deqIntA.push_back(6);
deqIntA.pop_front();
deqIntA.pop_front();
deqIntA.push_front(7);
deqIntA.push_front(8);
deqIntA.pop_back();
deqIntA.pop_back();
deqIntA 中剩余元素: 8 7 3 4
deque的数据存取
第一 使用下标操作 deqIntA[0] = 100;
第二 使用at 方法 如: deqIntA.at(2) = 100;
第三 接口返回的引用 deqIntA.front() 和 deqIntA.back()
注意: 第一和第二种方式必须注意越界
例如:
deque<int> deqIntA;
deqIntA.push_back(1);
deqIntA.push_back(2);
deqIntA.push_back(3);
deqIntA.push_back(4);
deqIntA.push_back(5);
int i1 = deqIntA.at(0);              //i1 = 1
int i2 = deqIntA[1];                 //i2 = 2
deqIntA.at(0) = 666;                 //第一个元素改成666
deqIntA[1] = 888;                    //第二个元素改成888
int iFront = deqInt.front();         //666
int iBack = deqInt.back(); //5
deqInt.front() = 888;                //第一个元素改成  888
deqInt.back() = 666;                 //最后一个元素改成 666
deque与迭代器
- deque.begin(); //返回容器中第一个元素的迭代器。
- deque.end(); //返回容器中最后一个元素之后的迭代器。
- deque.rbegin(); //返回容器中倒数第一个元素的迭代器。
- deque.rend(); //返回容器中倒数最后一个元素之后的迭代器。
- deque.cbegin(); //返回容器中第一个元素的常量迭代器。
- deque.cend(); //返回容器中最后一个元素之后的常量迭代器。
deque<int> deqIntA;
deqIntA.push_back(1);
deqIntA.push_back(2);
deqIntA.push_back(3);
deqIntA.push_back(4);
deqIntA.push_back(5);

//普通迭代器
for(deque<int>::iterator it = deqIntA.begin(); it!=deqIntA.end(); ++it)
{

       (*it)++;  //*it++  (*it)++
       cout<<*it;
       cout<<" ";
}


//常量迭代器

deque<int>::const_iterator cit = deqIntA.cbegin();

for( ; cit!=deqIntA.cend(); cit++)
{
       cout<<*cit;
       cout<<" ";
}


//逆转的迭代器
for(deque<int>::reverse_iterator rit=deqIntA.rbegin(); rit!=deqIntA.rend(); ++rit)
{
       cout<<*rit;
       cout<<" ";
}
deque的赋值
- deque.assign(beg,end); //将[beg, end)区间中的数据拷贝赋值给本身。注意该区间是左闭右开的区间。
- deque.assign(n,elem); //将n个elem拷贝赋值给本身。
- deque& operator=(const deque &deq); //重载等号操作符
- deque.swap(deq); // 将deque与本身的元素互换
例如:
deque<int> deqIntA,deqIntB,deqIntC,deqIntD;
deque<int> deqIntA;
deqIntA.push_back(1);
deqIntA.push_back(2);
deqIntA.push_back(3);
deqIntA.push_back(4);
deqIntA.push_back(5);

deqIntB.assign(deqIntA.begin(),deqIntA.end()); // 1 2 3 4 5
deqIntC.assign(4,888);                                      //888 888 888 888
deqIntD = deqIntA;                                          //1 2 3 4 5
deqIntC.swap(deqIntD);                                      //互换
deque的大小
deque.size(); //返回容器中元素的个数
deque.empty(); //判断容器是否为空
deque.resize(num); //重新指定容器的长度为num,若容器变长,则以默认值0填充新位置。如果容器变短,则末尾超出容器长度的元素被删除。
deque.resize(num, elem); //重新指定容器的长度为num,若容器变长,则以elem值填充新位置。如果容器变短,则末尾超出容器长度的元素被删除。
deque<int> deqIntA;
deqIntA.push_back(1);
deqIntA.push_back(2);
deqIntA.push_back(3);
deqIntA.push_back(4);
deqIntA.push_back(5);
int iSize = deqIntA.size(); //5
deqIntA.resize(7); //1 2 3 4 5 0 0
deqIntA.resize(8,1); //1 2 3 4 5 0 0 1
deqIntA.resize(2); //1 2
deque的插入
deque.insert(pos,elem);   //在pos位置插入一个elem元素的拷贝,返回新数据                                                 的位置。
deque.insert(pos,n,elem);   //在pos位置插入n个elem数据,无返回值。
deque.insert(pos,beg,end);   //在pos位置插入[beg,end)区间的数据,无返回值
// demo 15-30
#include <deque>
#include <iostream>
using namespace std;
int main(void){
deque<int> deqIntA;
deque<int> deqIntB;
deqIntA.push_back(1);
deqIntA.push_back(2);
deqIntA.push_back(3);
deqIntA.push_back(4);
deqIntB.push_back(11);
deqIntB.push_back(12);
deqIntB.push_back(13);
deqIntB.push_back(14);
deqIntA.insert(deqIntA.begin(), 0); // {0,1,2,3,4}
deqIntA.insert(deqIntA.begin()+1, 2, 88); //{0,88,88,1,2,3,4}
deqIntA.insert(deqIntA.begin(), deqIntB.rbegin(), deqIntB.rend());{11,12,13,14,0,88,88,1,2,3,4}
for(deque<int>::iterator it = deqIntA.begin(); it!=deqIntA.end(); ++it){
cout<<*it;
cout<<" ";
}
system("pause");
}
deque的删除
- deque.clear(); //移除容器的所有数据
- deque.erase(beg,end); //删除[beg,end)区间的数据,返回下一个数据的位置。
- deque.erase(pos); //删除pos位置的数据,返回下一个数据的位置。
// demo 15-30-2
#include <deque>
#include <iostream>

using namespace std;

int main(void){
	deque<int> deqIntA;

	deqIntA.push_back(1);
	deqIntA.push_back(2);
	deqIntA.push_back(3);
	deqIntA.push_back(4);
	deqIntA.push_back(5);

	//方式一 单独使用擦除的接口
	//deqIntA.erase(deqIntA.begin()+1); //干掉第二个元素 {1,3,4,5}

	//deqIntA.erase(deqIntA.begin()+1, deqIntA.begin()+3);// 干掉3 和4, 剩下{1, 5}

	//deqIntA.clear(); //干掉所有的元素

	//方式二 使用迭代器遍历删除
	for(deque<int>::iterator it = deqIntA.begin(); it!=deqIntA.end();){
		if(*it == 4){
			it = deqIntA.erase(it);
		}else {
			cout<<*it;
			cout<<" ";
			it++;
		}
	}

	system("pause");
}
1.3.List容器
List 容器概念
list是一个双向链表容器,可高效地进行插入删除元素。
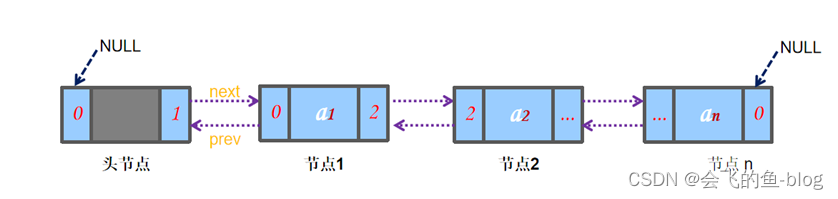
List 特点:
- list不可以随机存取元素,所以不支持at.(position)函数与[]操作符。可以对其迭代器执行++,但是不能这样操作迭代器:it+3
- 使用时包含 #include <list>
list对象的默认构造
list同样采用模板类实现,对象的默认构造形式:list<T> listT; 如:
list对象的默认构造
list同样采用模板类实现,对象的默认构造形式:list<T> listT;  如:
list<int> lstInt;            //定义一个存放int的list容器。
list<float> lstFloat;        //定义一个存放float的list容器。
list<string> lstString;       //定义一个存放string的list容器。
...
注意:尖括号内还可以设置指针类型或自定义类型。
list对象的带参数构造
方式一:list(beg,end); //将[beg, end)区间中的元素拷贝给本身。
方式二:list(n,elem); //构造函数将n个elem拷贝给本身。
方式三:list(const list &lst); //拷贝构造函数。
list<int> lstInt1;
lstInt1.push_back(1);
lstInt1.push_back(2);
lstInt1.push_back(3);
list<int> lstInt2(lstInt1.begin(),lstInt1.end());             //1 2 3
list<int> lstInt3(5,8);                                               //8 8 8 8 8
list<int> lstInt4(lstIntA); //1 2 3list头尾的添加移除操作
- list.push_back(elem); //在容器尾部加入一个元素
- list.pop_back(); //删除容器中最后一个元素
- list.push_front(elem); //在容器开头插入一个元素
- list.pop_front(); //从容器开头移除第一个元素
list<int> lstInt;
lstInt.push_back(1);
lstInt.push_back(2);
lstInt.push_back(3);
lstInt.push_back(4);
lstInt.push_back(5);
lstInt.pop_front();
lstInt.pop_front();
lstInt.push_front(11);
lstInt.push_front(12);
lstInt.pop_back();
lstInt.pop_back();

// lstInt {12, 11, 3}list的数据存取
- list.front(); //返回第一个元素。
- list.back(); //返回最后一个元素。
list<int> lstInt;
lstInt.push_back(1);
lstInt.push_back(2);
lstInt.push_back(3);
lstInt.push_back(4);
lstInt.push_back(5);
int iFront = lstInt.front();	//1
int iBack = lstInt.back();		//5
lstInt.front() = 11;			//11
lstInt.back() = 19;			//19
list与迭代器
- list.begin(); //返回容器中第一个元素的迭代器。
- list.end(); //返回容器中最后一个元素之后的迭代器。
- list.rbegin(); //返回容器中倒数第一个元素的迭代器。
- list.rend(); //返回容器中倒数最后一个元素的后面的迭代器。
- list.cbegin(); //返回容器中第一个元素的常量迭代器。
- list.cend(); //返回容器中最后一个元素之后的常量迭代器。
list<int> lstInt;
lstInt.push_back(1);
lstInt.push_back(3);
lstInt.push_back(5);
lstInt.push_back(7);
lstInt.push_back(9);
for (list<int>::iterator it=lstInt.begin(); it!=lstInt.end(); ++it)
{
	cout << *it;
	cout << " ";
}

for (list<int>::reverse_iterator rit=lstInt.rbegin(); rit!=lstInt.rend(); ++rit)
{
	cout << *rit;
	cout << " ";
}
list的赋值
- list.assign(beg,end); //将[beg, end)区间中的数据拷贝赋值给本身。
- list.assign(n,elem); //将n个elem拷贝赋值给本身。
- list& operator=(const list &lst); //重载等号操作符。
- list.swap(lst); // 将lst与本身的元素互换。
list<int> lstIntA,lstIntB,lstIntC,lstIntD;
lstIntA.push_back(1);
lstIntA.push_back(3);
lstIntA.push_back(5);
lstIntA.push_back(7);
lstIntA.push_back(9);

lstIntB.assign(lstIntA.begin(),lstIntA.end());		//1 3 5 7 9
lstIntB.assign(++lstIntA.begin(),--lstIntA.end());		//3 5 7

lstIntC.assign(5,8);							//8 8 8 8 8
lstIntD = lstIntA;							//1 3 5 7 9
lstIntC.swap(lstIntD);						//互换
list的大小
- ist.size(); //返回容器中元素的个数
- list.empty(); //判断容器是否为空
- list.resize(num); //重新指定容器的长度为num,若容器变长,则以默认值0填充新位置。如果容器变短,则末尾超出容器长度的元素被删除。
- list.resize(num, elem); //重新指定容器的长度为num,若容器变长,则以elem值填充新位置。如果容器变短,则末尾超出容器长度的元素被删除。
list<int> lstIntA;
lstIntA.push_back(1);
lstIntA.push_back(2);
lstIntA.push_back(3);
if (!lstIntA.empty())
{

    int iSize = lstIntA.size();       //3
    lstIntA.resize(5);                  //1 2 3 0 0
    lstIntA.resize(7,1);               //1 2 3 0 0 1 1
    lstIntA.resize(5);                  //1 2 3 0 0
}list的插入
- list.insert(pos,elem); //在pos位置插入一个elem元素的拷贝,返回新数据的位置。
- list.insert(pos,n,elem); //在pos位置插入n个elem数据,无返回值。
- list.insert(pos,beg,end); //在pos位置插入[beg,end)区间的数据,无返回值。
list<int> listA;
list<int> listB;
listA.push_back(1);
listA.push_back(2);
listA.push_back(3);
listA.push_back(4);
listA.push_back(5);
listB.push_back(11);
listB.push_back(12);
listB.push_back(13);
listB.push_back(14);

listA.insert(listA.begin(), -1);		//{-1, 1, 2, 3, 4, 5}
listA.insert( ++listA.begin(), 2, -2);	//{-1, -2, -2, 1, 2, 3, 4, 5}
listA.insert(listA.begin() , listB.begin() , listB.end());	//{11, 12, 13, 14, -1, -2, -2, 1, 2, 3, 4, 5}

for(list<int>::iterator it = listA.begin(); it!=listA.end(); it++)
{
	cout<< *it<<endl;
}
list的删除
- list.clear(); //移除容器的所有数据
- list.erase(beg,end); //删除[beg,end)区间的数据,返回下一个数据的位置。
- list.erase(pos); //删除pos位置的数据,返回下一个数据的位置。
- lst.remove(elem); //删除容器中所有与elem值匹配的元素。
// demo 15-32
#include <list>
#include <vector>
#include <iostream>

using namespace std;

int main(void){


	//list 删除元素
	list<int> listA;

	listA.push_back(1);
	listA.push_back(2);
	listA.push_back(3);
	listA.push_back(4);
	listA.push_back(5);

	//erase 的用法
	list<int>::iterator itBegin=listA.begin();
	++ itBegin;
	list<int>::iterator itEnd=listA.begin();
	++ itEnd;
	++ itEnd;
	++ itEnd;
	listA.erase(itBegin,itEnd);//此时容器lstInt包含按顺序的1, 4, 5三个元素。

	listA.erase(listA.begin());//此时容器lstInt包含按顺序的4, 5三个元素。
	listA.push_back(4); // 4, 5, 4
	listA.insert(listA.end(), 5, 4);  //4, 5, 4, 4, 4, 4, 4, 4
	/*remove 删除元素*/
	//方式一  直接调用remove 方法
	//listA.remove(4);

	//方式二   遍历然后逐个删除
	for(list<int>::iterator it=listA.begin(); it!=listA.end(); ){
		if(*it == 4){
			it =listA.erase(it); //相当于执行了++
		}else {
			it++;
		}
	}

	for (list<int>::iterator it=listA.begin(); it!=listA.end(); ++it)
	{
		cout << *it;
		cout << " ";
	}


	system("pause");
	return 0;
}
list的反序排列
list.reverse(); //反转链表,比如list包含1, 2, 3, 4, 5五个元素,运行此方
法后,list就包含5, 4, 3, 2, 1元素。
list<int> listA;
listA.push_back(1);
listA.push_back(2);
listA.push_back(3);
listA.push_back(4);
listA.push_back(5);
listA.reverse(); //5, 4, 3, 2, 1C++11新特性 变参模板、完美转发和emplace
变参模板 - 使得 emplace 可以接受任意参数,这样就可以适用于任意对象的构建
完美转发 - 使得接收下来的参数 能够原样的传递给对象的构造函数,这带来另一个方便性
// demo 15-33
#include <iostream>
using namespace std;

#include <vector>
#include <list>
#include <deque>
#include <algorithm>


class student {
public:
	student() {
		cout << "无参构造函数被调用!" << endl;
	}

	student(int age, string name, int test) {
		this->age = age;
		//strncpy_s(this->name, name, 64);
		cout << "有参构造函数被调用!" << endl;
		cout << "姓名:" << name.c_str() << " 年龄:" << age << endl;
	}

	student(const student &s) {
		this->age = s.age;
		//strncpy_s(this->name, s.name, 64);

		cout << "拷贝构造函数被调用!" << endl;
	}

	~student() {
		cout << "析构函数被调用" << endl;
	}
public:
	int age;
	string name;
};


int main(void) {
	//vector<int>   vectInt(10);
	deque<int>   dqInt;
	list<int>    lstInt;
	vector<student>   vectStu(10);

	cout << "vectStu size:" << vectStu.size() << endl;
	cout << "vectStu capacity:" << vectStu.capacity() << endl;
	//插入学生

	//方法一  先定义对象,再插入
	//student  xiaoHua(18, "李校花");
	//vectStu.push_back(xiaoHua);

	//方法二  直接插入临时对象
	//vectStu.push_back(student(19, "王大锤"));

	//c++11 新特性: 变参模板和完美转发的表演啦

	vectStu.emplace_back(19, "王大锤", 11);   //push_back
	cout << "vectStu size (1):" << vectStu.size() << endl;
	cout << "vectStu capacity(1):" << vectStu.capacity() << endl;

	vectStu.emplace(vectStu.end(), 18, "lixiaohua", 12);   //相当于 insert.
	cout << "vectStu size (2):" << vectStu.size() << endl;
	cout << "vectStu capacity (2):" << vectStu.capacity() << endl;

	system("pause");
	return 0;
}
1.4.Set和multiset容器
set/multiset容器概念
set和multiset是一个集合容器,其中set所包含的元素是唯一的,集合中的元素按一定的顺序排列。set采用红黑树变体的数据结构实现,红黑树属于平衡二叉树。在插入操作和删除操作上比vector快。在n个数中查找目标数的效率是 log2 n
红黑树定义 — 是每个节点都带有颜色属性(颜色为红色或黑色)的自平衡二叉查找树,满足下列性质:
1)节点是红色或黑色;
2)根节点是黑色;
3)所有叶子节点都是黑色节点(NULL);
4)每个红色节点必须有两个黑色的子节点。(从每个叶子到根的所有路径上不能有两个连续的红色节点。)
5)从任一节点到其每个叶子的所有简单路径都包含相同数目的黑色节点。

Set 和 multiset 特点
- set中元素插入过程是按排序规则插入,所以不能指定插入位置。
- set不可以直接存取元素。(不可以使用at.(pos)与[]操作符)。
- multiset与set的区别:set支持唯一键值,每个元素值只能出现一次;而multiset中同一值可以出现多次。
- 不可以直接修改set或multiset容器中的元素值,因为该类容器是自动排序的。如果希望修改一个元素值,必须先删除原有的元素,再插入新的元素
- 头文件 #include <set>
// demo 15-34
#include <set>
#include <iostream>
#include <functional>
#include <algorithm>
using namespace std;

int main(void) {

	set<int>  setInt;

	multiset<int>  msetInt;
	multiset<int>  msetInt1(msetInt.begin(), msetInt.end());

	for(int i=0; i<10; i++){
		msetInt.insert(100-i);
	}
	//set 不允许插入相同的元素,而multiset 是支持插入多个相同元素的.
	msetInt.insert(99);
	multiset<int>::iterator it = msetInt.begin();

	for( ; it!=msetInt.end(); it++){
		cout<<*it;
		cout<<" ";
	}
	cout<<endl;
	system("pause");
	return 0;
}
set/multiset对象的默认构造
set<int> setInt; //一个存放int的set容器。
set<float> setFloat; //一个存放float的set容器。
set<string> setString; //一个存放string的set容器。
multiset<int> mulsetInt; //一个存放int的multi set容器。
multiset<float> multisetFloat; //一个存放float的multi set容器。
multiset<string> multisetString; //一个存放string的multi set容器。
Set/multiset 对象的带参构造函数
set(beg,end); //将[beg, end)区间中的元素拷贝给本身。
set(const set &s); //拷贝构造函数。
multiset(beg,end); //将[beg, end)区间中的元素拷贝给本身。
multiset(const multiset &s); //拷贝构造函数。
set对象的拷贝构造与赋值
set(const set &st); //拷贝构造函数
set& operator=(const set &st); //重载等号操作符
set.swap(st); //交换两个集合容器
setIntA.insert(5);
set<int> setIntA;
setIntA.insert(1);
setIntA.insert(2);
setIntA.insert(3);
setIntA.insert(4);
set<int> setIntB(setIntA);  //1 2 3 4 5
set<int> setIntC;
setIntC = setIntA;		//1 2 3 4 5
setIntC.insert(6);      //1 2 3 4 5 6
setIntC.swap(setIntA);	  //交换
仿函数(函数对象)functor的用法
Set/multiset 排序刨根究底
// demo 15-35
#include <set>
#include <iostream>
#include <functional>
#include <algorithm>

using namespace std;

class student {
public:
	student(int age) {
		this->age = age;
	}

	bool operator < (const student &right) const{
		return this->age < right.age;
	}

bool operator > (const student &right) const{
		return this->age > right.age;
	}


	int getAge() const { return age; }

private:
	int age;
	string name;

};

int main(void) {

	//less 函数对象实现比较,为排序提供依据
	//set<int,less<int>> set1;

	set<int,greater<int>> set1;

	for(int i=5; i>0; i--){
		set1.insert(i);
	}

	set<student>   setStu;  //等同于 set<student,less<student>>
	setStu.insert(student(18));
	setStu.insert(student(19));


	/*for (set<int,greater<int>>::iterator it = set1.begin(); it != set1.end(); it++) {
		cout << *it << endl;
	}*/

	for (set<student>::iterator it = setStu.begin(); it != setStu.end(); it++) {
		cout << it->getAge() ;
		cout << " ";
	}

	system("pause");
	return 0;
}
仿函数概念
- 尽管函数指针被广泛用于实现函数回调,但C++还提供了一个重要的实现回调函数的方法,那就是函数对象。
- functor,翻译成函数对象,伪函数,它是是重载了“()”操作符的普通类对象。从语法上讲,它与普通函数行为类似。
- functional头文件中包含的 greater<>与less<>就是函数对象。
下面举出greater<int> 和 less<int>的简易实现原理。
struct greater
{
bool operator() (const int& iLeft, const int& iRight)
{
       return (iLeft>iRight);
}
}

struct less
{
bool operator() (const int& iLeft, const int& iRight)
{
       return (iLeft<iRight);
}
}
set/setmulti容器就是调用函数对象的operator()方法去比较两个值的大小。
// demo 15-36

#include <set>
#include <iostream>
#include <functional>
#include <algorithm>

using namespace std;

class student {
public:
	student(int age) {
		this->age = age;
	}

	bool operator < (const student &right) const{
		return this->age > right.age;
	}

	int getAge() const { return age; }

private:
	int age;
	string name;

};

class FunStudent{
public:
	bool operator () (const student &left, const student &right){
		cout<<"调用了 FunStudent ."<<endl;
		ret  = left.getAge() < right.getAge();
		return ret;
	}

public:
	int ret;
};

int main(void) {

	//less 函数对象实现比较,为排序提供依据
	//less 和greater 都是函数对象,有叫仿函数
	//set<int,less<int>> set1;

	set<int,greater<int>> set1;

	for(int i=5; i>0; i--){
		set1.insert(i);
	}
	//less<student>
	set<student, FunStudent>   setStu;  //等同于 set<student,less<student>>
	student  lixiaohua(18);
	student  wangdachui(19);

	//函数对象(仿函数)可以像函数一样直接调用
	FunStudent   funStu;
	 funStu(lixiaohua, wangdachui);
	cout<<"比较结果:"<<funStu.ret<<endl;

	setStu.insert(lixiaohua);
	setStu.insert(wangdachui);

	for (set<student, FunStudent>::iterator it = setStu.begin(); it != setStu.end(); it++) {
		cout << it->getAge() ;
		cout << " ";
	}

	system("pause");
	return 0;
}
set的插入和pair的用法
pair表示一个对组,它将两个值视为一个单元,把两个值捆绑在一起。
pair<T1,T2>用来存放的两个值的类型,可以不一样,也可以一样,如T1为int,T2为float。T1,T2也可以是自定义类。
- pair.first是pair里面的第一个值,是T1类型。
- pair.second是pair里面的第二个值,是T2类型。
set<int>  setInt;
	for(int i=5; i>0; i--){
		pair<set<int>::iterator, bool> ret = setInt.insert(i);
		if(ret.second){
			cout<<"插入 "<<i<<" 成功!"<<endl;
		}else {
			cout<<"插入 "<<i<<" 失败!"<<endl;
		}
	}
set与迭代器
set.insert(elem); //在容器中插入元素。
set.begin(); //返回容器中第一个数据的迭代器。
set.end(); //返回容器中最后一个数据之后的迭代器。
set.rbegin(); //返回容器中倒数第一个元素的迭代器。
set.rend(); //返回容器中倒数最后一个元素的后面的迭代器。
set<int> setInt;
setInt.insert(3);
setInt.insert(4);
setInt.insert(1);
setInt.insert(5);
setInt.insert(2);

//顺序输出  1 2 3 4 5
for(set<int>::iterator it=setInt.begin(); it!=setInt.end(); ++it)
{
      int elem = *it;
      cout << elem;    //或直接使用cout << *it
}
set/multiset的大小
- set.size(); //返回容器中元素的数目
- set.empty();//判断容器是否为空
注意事项: 它们没有resize 方法
set<int> setIntA;
setIntA.insert(3);
setIntA.insert(1);
setIntA.insert(7);
setIntA.insert(5);
setIntA.insert(9);

if (!setIntA.empty())
{
	int iSize = setIntA.size();		//5
}
set/multiset的删除
set.clear(); //清除所有元素
set.erase(pos); //删除pos迭代器所指的元素,返回下一个元素的迭代器。
set.erase(beg,end); //删除区间[beg,end)的所有元素,返回下一个元素的迭代器。
set.erase(elem); //删除容器中值为elem的元素。
删除区间内的某个或某些元素
setInt是用set<int>声明的容器,假设它内部现已包含按顺序的1, 2, 3, 4, 5, 6元素。
set<int>::iterator itBegin=setInt.begin();
++ itBegin;
set<int>::iterator itEnd=setInt.begin();
++ itEnd;
++ itEnd;
++ itEnd;
setInt.erase(itBegin,itEnd);
//此时容器setInt包含按顺序的1, 4, 5, 6四个元素。
删除容器中第一个元素
setInt.erase(setInt.begin()); //4, 5, 6
删除容器中值为5的元素
setInt.erase(5); //4, 6
删除setInt的所有元素
setInt.clear(); //容器为空
set/multiset的查找
- set.find(elem); //查找elem元素,返回指向elem元素的迭代器。
- set.count(elem); //返回容器中值为elem的元素个数。对set来说,要么是0,要么是1。对multiset来说,值可能大于1。
- set.lower_bound(elem); //返回第一个>=elem元素的迭代器。
- set.upper_bound(elem); // 返回第一个>elem元素的迭代器。
- set.equal_range(elem); //返回容器中与elem相等的上下限的两个迭代器。上限是闭区间,下限是开区间,如[beg,end)。以上函数返回两个迭代器,而这两个迭代器被封装在pair中。
set<int> setInt;
setInt.insert(1);
setInt.insert(2);
setInt.insert(3);
setInt.insert(4);
setInt.insert(5);

set<int>::iterator it1 = setInt.find(4);
int elem1 = *it1;		//elem1 == 4
int iCount = setInt.count(3);	//iCount == 1

set<int>::iterator it2 = setInt.lower_bound(3);
set<int>::iterator it3 = setInt.upper_bound(3);
int elem2 = *it2;	//i2 == 3
int elem3 = *it3;   //i3 == 4

pair< set<int>::iterator, set<int>::iterator > pairIt = setInt.equal_range(5);
1.5.Map和multimap容器
map/multimap的简介
map是标准的关联式容器,一个map里存储的元素是一个键值对序列,叫做(key,value)键值对。它提供基于key快速检索数据的能力。
- map中key值是唯一的。集合中的元素按一定的顺序排列。元素插入过程是按排序规则插入,所以不能指定插入位置。
- map底层的具体实现是采用红黑树变体的平衡二叉树的数据结构。在插入操作、删除和检索操作上比vector快很多。
- map可以直接存取key所对应的value,支持[]操作符,如map[key]=value。
- #include <map>
multimap与map的区别:
map支持唯一键值,每个键只能出现一次;而multimap中相同键可以出现多次。multimap不支持[]操作符。
//demo15_37
#include  <map>
#include <iostream>
#include <functional>
#include <algorithm>
#include <string>

using namespace std;

int main(void) {
	multimap<int, string>  mapStu;

	mapStu.insert(pair<int, string>(1, "张三"));
	mapStu.insert(pair<int, string>(2, "李四"));
	mapStu.insert(pair<int, string>(3, "王五"));

	//multimap 不支持[]操作,map 支持
	//mapStu[4] = "赵六";

	//multimap 支持相同的key 插入
	mapStu.insert(pair<int, string>(3, "小王五"));

	for(multimap<int, string>::iterator it=mapStu.begin(); it!=mapStu.end(); it++){
		cout<<"key: "<<(*it).first << " value: "<<(*it).second <<endl;
	}

	system("pause");
	return 0;
}
map/multimap对象的默认构造
map/multimap采用模板类实现,对象的默认构造形式:
map<T1,T2> mapTT;
multimap<T1,T2>  multimapTT;

如:
map<int, char> mapA;
map<string,float> mapB;
//其中T1,T2还可以用各种指针类型或自定义类型
map和multimap对象的带参数构造
方式一:map(beg,end); //将[beg, end)区间中的元素拷贝给本身。
方式二:map(const map &mapObject); //拷贝构造函数。
map的插入与迭代器
map.insert(...); //往容器插入元素,返回pair<iterator,bool>
map中插入元素的四种方式:
假设 map<int, string> mapStu;
方式一、通过pair的方式插入对象
mapStu.insert( pair<int,string>(1,"张三") );
方式二、通过pair的方式插入对象
mapStu.inset(make_pair(2, “李四”));
方式三、通过value_type的方式插入对象
mapStu.insert( map<int,string>::value_type(3,"王五") );
方式四、通过数组的方式插入值
mapStu[4] = "赵六";
mapStu[5] = “小七";
注意:
- 前三种方法,采用的是insert()方法,该方法返回值为pair<iterator,bool>
- 第四种方法非常直观,但碰到相同的键时会进行覆盖操作。比如插入key 为4的键值时,先在mapStu中查找主键为4的项,若不存在,则将一个键为4,值为默认初始化值的对组插入到mapStu中,然后再将值修改成“赵六”。若发现已存在4这个键,则修改这个键对应的value。
- string strName = mapStu[8]; //取值操作或插入操作
- 只有当mapStu存在8这个键时才是正确的取操作,否则会自动插入一个实例,键为8,值为默认构造时的初始化值。
迭代器
- map.begin(); //返回容器中第一个数据的迭代器。
- map.end(); //返回容器中最后一个数据之后的迭代器。
- map.rbegin(); //返回容器中倒数第一个元素的迭代器。
- map.rend(); //返回容器中倒数最后一个元素的后面的迭代器。
//demo15-39
#include  <map>
#include <iostream>
#include <functional>
#include <algorithm>
#include <string>

using namespace std;

int main(void) {
	map<int, string>  mapStu;

	//方式一  构造一个pair ,然后插入
	pair<map<int, string>::iterator,bool> ret = mapStu.insert(pair<int, string>(1, "张三"));
	if(ret.second==true){
		cout<<"插入成功! value: "<<(*(ret.first)).second<<endl;
	}else {
		cout<<"插入失败!"<<endl;
	}

	//如果键存在,则插入会失败
	ret = mapStu.insert(pair<int, string>(1, "小张三"));
	if(ret.second==true){
		cout<<"插入成功! value: "<<(*(ret.first)).second<<endl;
	}else {
		cout<<"插入小张三失败! "<<endl;
	}


	//方式二  使用make_pair
	mapStu.insert(make_pair(2, "李四"));

	//方式三  使用value_type, 相当于pair<int, sting>
	mapStu.insert(map<int, string>::value_type(3, "王五"));

	//方式四 直接使用[]重载,如果键值对已经存在,则覆盖原值
	mapStu[4]="赵六";
	mapStu[4] = "小赵六";
	mapStu[5] = mapStu[6];
	mapStu[7] = mapStu[4];

	for(map<int, string>::iterator it=mapStu.begin(); it!=mapStu.end(); it++){
		cout<<"key: "<<(*it).first << " value: "<<(*it).second <<endl;
	}

	system("pause");
	return 0;
}
map/multimap 排序
- map<T1,T2,less<T1> > mapA; //该容器是按键的升序方式排列元素。未指定函数对象,默认采用less<T1>函数对象。
- map<T1,T2,greater<T1>> mapB; //该容器是按键的降序方式排列元素。
- less<T1>与greater<T1> 可以替换成其它的函数对象functor。
- 可编写自定义函数对象以进行自定义类型的比较,使用方法与set构造时所用的函数对
map对象的拷贝构造与赋值
- map(const map &mp); //拷贝构造函数
- map& operator=(const map &mp); //重载等号操作符
- map.swap(mp); //交换两个集合容器
例如:
map<int, string> mapA;
mapA.insert(pair<int,string>(2, "李四"));
mapA.insert(pair<int,string>(1, "张三"));
mapA.insert(pair<int,string>(3, "王五"));
mapA.insert(pair<int,string>(4, "赵六"));
map<int ,string> mapB(mapA);    //拷贝构造,此时mapB 和mapA中元素一致
map<int, string> mapC;
mapC = mapA;                        //赋值,此时mapC 和mapA中元素一致
mapC[3] = "老张";            //mapC中,此时包含 张三, 李四, 老张, 赵六
mapC.swap(mapA);                 //mapA 和mapC交换
map的大小
- map.size(); //返回容器中元素的数目
- map.empty();//判断容器是否为空
map<int, string> mapA;
mapA.insert(pair<int,string>(2, "李四"));
mapA.insert(pair<int,string>(1, "张三"));
mapA.insert(pair<int,string>(3, "王五"));
mapA.insert(pair<int,string>(4, "赵六"));
if (!mapA.empty())
{
int size = mapA.size(); //size 为 4
}
map的删除
- map.clear(); //删除所有元素
- map.erase(pos); //删除pos迭代器所指的元素,返回下一个元素的迭代器。
- map.erase(beg,end);//删除区间[beg,end)的所有元素 ,返回下一个元素的迭代器。
- map.erase(key); //删除容器中key为key的对组,返回删除的对组个数
- Map.erase(key_type *first, key_type *last) //删除数组指定的半闭半开的区间中特定的key对应的所有队组
map<int, string> mapA;
mapA.insert(pair<int,string>(2, "李四"));
mapA.insert(pair<int,string>(1, "张三"));
mapA.insert(pair<int,string>(3, "王五"));
mapA.insert(pair<int,string>(4, "赵六"));
//删除区间内的元素,迭代器指示区间(半闭半开)
map<int,string>::iterator itBegin=mapA.begin();
++itBegin;
map<int,string>::iterator itEnd=mapA.end();
mapA.erase(itBegin,itEnd); //此时容器mapA仅仅包含{1,"张三"}一个元素。
mapA.insert(pair<int,string>(2, "李四"));
mapA.insert(pair<int,string>(3, "王五"));
mapA.insert(pair<int,string>(4, "赵六"));
//删除容器中的第一个元素,使用迭代器指示位置
mapA.erase(mapA.begin()); //mapA包含{2,"李四"}{3,"王五"}{4,"赵六"}三个元素
//删除容器中key为4的元素
mapA.erase(4);
//删除mapA的所有元素
mapA.clear(); //容器为空
map/multimap的查找
- map.find(key); 查找键key是否存在,若存在,返回该键的元素的迭代器;若不存在,返回map.end();
- map.count(key); //返回容器中键值为key的对组个数。对map来说,要么是0,要么是1;对multimap来说,值>=0。
- map.lower_bound(keyElem); //返回第一个key>=keyElem元素的迭代器。
- map.upper_bound(keyElem); // 返回第一个key>keyElem元素的迭代器。
- map.equal_range(keyElem); //返回容器中key与keyElem相等的上下限的两个迭代器。上限是闭区间,下限是开区间,如[beg,end)。
//demo15-40
#include <map>
#include <iostream>
#include <functional>
#include <algorithm>
#include <string>
using namespace std;
int main(void) {
map<int, string> mapStu;
mapStu.insert(pair<int,string>(2, "李四"));
mapStu.insert(pair<int,string>(1, "张三"));
mapStu.insert(pair<int,string>(3, "王五"));
mapStu.insert(pair<int,string>(4, "赵六"));
multimap<int, string> mmapTeacher; //<班级,老师姓名>
mmapTeacher.insert(pair<int,string>(101, "李老师"));
mmapTeacher.insert(pair<int,string>(101, "张老师"));
mmapTeacher.insert(pair<int,string>(102, "王老师"));
mmapTeacher.insert(pair<int,string>(102, "赵老师"));
//map 的查找
map<int, string>::iterator it = mapStu.find(3);
if(it !=mapStu.end()){//找到了
cout<<"mapStu.find(3) = "<<(*it).second<<endl;
}else {//没找到
cout<<"找不到键值为3的键值对!"<<endl;
}
//multimap 的查找
int count = mmapTeacher.count(101);
multimap<int, string>::iterator mit = mmapTeacher.find(101);
if(mit !=mmapTeacher.end()){//找到了
//输出multimap 中的同一键的多个值
//方法一 通过比较key ,循环判断 推荐使用
/*for(; mit!=mmapTeacher.end(); mit++){
if((*mit).first == 101){
cout<<"mmapTeacher.find(101) = "<<(*mit).second<<endl;
}else{
break;
}
}*/
//方法二 通过count计数来控制
for(int i=0; i<count; i++, mit++){
cout<<"mmapTeacher.find(101) = "<<(*mit).second<<endl;
}
}else {//没找到
cout<<"找不到键值为101的键值对!"<<endl;
}
//equal_range 用法
pair<multimap<int, string>::iterator, multimap<int, string>::iterator> mmiit = mmapTeacher.equal_range(101);
//第一个迭代器, 对应begin
if(mmiit.first != mmapTeacher.end()){
cout<<"mmapTeacher.equal_range(101).begin ="<<(*mmiit.first).second<<endl;
}
//第二个迭代器,对应end
if(mmiit.second != mmapTeacher.end()){
cout<<"mmapTeacher.equal_range(101).end ="<<(*mmiit.second).second<<endl;
}
for(map<int, string>::iterator it=mapStu.begin(); it!=mapStu.end(); it++){
cout<<"key: "<<(*it).first << " value: "<<(*it).second <<endl;
}
system("pause");
return 0;
}
1.6.Queue容器
Queue简介
queue是队列容器,是一种“先进先出”的容器。
- 默认情况下queue是利用deque容器实现的一种容器。
- 它只允许在队列的前端(front)进行删除操作,而在队列的后端(back)进行插入操作
- #include <queue>
queue对象的默认构造
queue采用模板类实现,queue对象的默认构造形式:queue<T> queT; 如:
queue<int> queueInt; //一个存放int的queue容器。
queue<float> queueFloat; //一个存放float的queue容器。
queue<string> queueString; //一个存放string的queue容器。注意: 尖括号内还可以设置指针类型或自定义类型。
queue 对象的带参构造
queue<int, list<int>> queueList; //内部使用list 来存储队列元素的queue 容器.
错误: queue<int, vector<int>> queueList; //内部不能使用vector来存储队列元素
queue的push()与pop()方法
- queue.push(elem); //往队尾添加元素
- queue.pop(); //从队头处移除队首元素
queue<int> queueInt;
queueInt.push(1);
queueInt.push(2);
queueInt.push(3);
queueInt.push(4);
queueInt.pop();
queueInt.pop();
此时queueInt存放的元素是3, 4queue对象的拷贝构造与赋值
- queue(const queue &que); //拷贝构造函数
- queue& operator=(const queue &que); //重载等号操作符
queue<int> queIntA;
queIntA.push(1);
queIntA.push(2);
queIntA.push(3);
queIntA.push(4);
queIntA.push(5);
queue<int> queIntB(queIntA); //拷贝构造
queue<int> queIntC;
queIntC = queIntA; //赋值queue的数据存取
- queue.back(); //返回最后一个元素
- queue.front(); //返回第一个元素
queue<int> queIntA;
queIntA.push(1);
queIntA.push(2);
queIntA.push(3);
queIntA.push(4);
queIntA.push(5);
int iFront = queIntA.front(); //1
int iBack = queIntA.back(); //5
queIntA.front() = 66; //66
queIntA.back() = 88; //88queue的大小
- queue.empty(); //判断队列是否为空
- queue.size(); //返回队列的大小
queue<int> queIntA;
queIntA.push(1);
queIntA.push(2);
queIntA.push(3);
queIntA.push(4);
queIntA.push(5);
if (!queIntA.empty())
{
int iSize = queIntA.size(); //iSize = 5
}1.7.优先级队列priority_queue
英雄联盟游戏里面防御塔都有一个自动攻击功能,小兵排着队进入防御塔的攻击范围,防御塔先攻击靠得最近的小兵,这时候大炮车的优先级更高(因为系统判定大炮车对于防御塔的威胁更大),所以防御塔会优先攻击大炮车。而当大炮车阵亡,剩下的全部都是普通小兵,这时候离得近的优先级越高,防御塔优先攻击距离更近的小兵。
优先队列: 它的入队顺序没有变化,但是出队的顺序是根据优先级的高低来决定的。优先级高的优先出队。
- 最大值优先级队列、最小值优先级队列
- 用来开发一些特殊的应用
- #include <queue>
//demo15_41
#include <queue>
#include <iostream>
#include <list>
#include <vector>
#include <deque>
#include <set>
using namespace std;
int main(void) {
//priority_queue<int> pqA;//默认情况下是值越大,优先级越大
//priority_queue<int, vector<int>, greater<int>> pqA; //使用 vector 值越小,优先级越大
priority_queue<int, deque<int>, greater<int>> pqA; //使用deque 值越小,优先级越大
//priority_queue<int, list<int>, greater<int>> pqA; //不可以使用list,不兼容
pqA.push(1);
pqA.push(2);
pqA.push(3);
pqA.push(3);
pqA.push(4);
pqA.push(5);
pqA.push(3);
while(!pqA.empty()){
cout<<pqA.top()<<" ";//读取队首的元素,但元素不出列
pqA.pop(); //出队列
}
cout<<endl;
system("pause");
return 0;
}
1.8.stack容器
stack是堆栈容器,是一种“先进后出”的容器。
- stack是基于deque容器而实现的容器。
- #include <stack>
stack对象的默认构造
stack采用模板类实现, stack对象的默认构造形式: stack <T> stkT;
stack <int> stkInt; //一个存放int的stack容器。
stack <float> stkFloat; //一个存放float的stack容器。
stack <string> stkString; //一个存放string的stack容器。
//尖括号内还可以设置指针类型或自定义类型。
stack的push()与pop()方法
stack.push(elem); //往栈头添加元素
stack.pop(); //从栈头移除第一个元素
stack<int> stkInt;
stkInt.push(1);
stkInt.push(2);
stkInt.pop();
stkInt.push(3);
此时stkInt存放的元素是1, 3
stack对象的拷贝构造与赋值
stack(const stack &stk); //拷贝构造函数
stack& operator=(const stack &stk); //重载等号操作符
stack<int> stkIntA;
stkIntA.push(1);
stkIntA.push(2);
stkIntA.push(3);
stack<int> stkIntB(stkIntA); //拷贝构造
stack<int> stkIntC;
stkIntC = stkIntA; //赋值
stack的数据存取
stack.top(); //返回最后一个压入栈元素
stack<int> stkIntA;
stkIntA.push(1);
stkIntA.push(2);
stkIntA.push(3);
int iTop = stkIntA.top(); //3
stkIntA.top() = 88; //88
stack的大小
stack.empty(); //判断堆栈是否为空
stack.size(); //返回堆栈的大小
stack<int> stkInt;
stkInt.push(1);
stkInt.push(2);
stkInt.push(3);
int iSize = stkInt.size(); //31.9.STL常见疑难杂症
// demo 15_42_疑难杂症
#include <iostream>
#include <deque>
#include <string>
#include <vector>
#include <list>
#include <Windows.h>
using namespace std;
template <typename T>
void printInf(const list<T>& object) throw()
{
string line(50, '-');
typename list<T>::const_iterator citor;
for (citor = object.begin(); citor != object.end(); citor++) {
cout << *citor << endl;
}
cout << endl;
cout << "size:" << object.size() << endl;
cout << line << endl;
return;
}
class Student
{
public:
Student() {
cout << "默认构造函数" << endl;
this->m_nAge = 0;
this->m_sName = "未知";
}
Student(int _age, const char* _name) {
cout << "带参数的构造函数" << endl;
this->m_nAge = _age;
this->m_sName = _name;
}
Student(const Student& object) {
cout << "拷贝构造函数" << endl;
this->m_nAge = object.m_nAge;
this->m_sName = object.m_sName;
}
~Student() {
cout << "析构函数 " << endl;
}
friend ostream& operator<<(ostream& out, const Student& stu);
public:
string m_sName;
int m_nAge;
};
ostream& operator<<(ostream& out, const Student& stu) {
out << "年龄:" << stu.m_nAge << "\t" << "姓名:" << stu.m_sName;
return out;
}
int main(int agrc, char** argv)
{
Student s1(21, "张大帅");
Student s2(21, "李小美");
Student s3(51, "张三");
Student s4(50, "罗二");
list<Student> stuList;
printInf<Student>(stuList);
system("pause");
return 0;
}
注意:任何时候在模板(template)中使用一个嵌套从属类型名称, 需要在前一个位置, 添加关键字typename;
比如上例中使用迭代器类型时,就要使用typename.虽然在vs2010 和vs2015中没有错误,但在VC++2019和gcc编译器中,都会报错。
1.10.Array容器
array容器概念
- array是将元素置于一个固定数组中加以管理的容器。
- array可以随机存取元素,支持索引值直接存取, 用[]操作符或at()方法对元素进行操作,也可以使用迭代器访问
- 不支持动态的新增删除操作
- array可以完全替代C语言中的数组,使操作数组元素更加安全!
array对象的构造
- array采用模板类实现,array对象的默认构造形式(涉及非类型参数-数值类模板)
- array<T,10> arrT; //10 为数值型模板参数
array<int, 6> a1; //一个存放int的array容器
array<float, 6> a2; //一个存放float的array容器
array<student, 6> a3; //一个存放student的array容器
array<int, 6> a1={1,2,3,4,5,6}; //定义时同时初始化
arra的赋值
array 的赋值
a2.assign(0);//第一种玩法 改变原来array中的所有元素的值
array<int, 6> a1 = {1, 2, 3};
array<int, 6> a2 ;
a2 = a1; //第二种玩法 赋值运算,将a1 赋值给a2array的大小
- array.size(); //返回容器中元素的个数
- array.max_size(); //返回容器中最大的元素个数,与size 等同
- array.empty(); //判断容器是否为空
array的数据存取
- 第一 使用下标操作 a1[0] = 100;
- 第二 使用at 方法 如: a1.at(2) = 100;
- 第三 接口返回的引用 a2.front() 和 a2.back()
- 第四 返回内建数组的指针 a1.data()
注意: 第一和第二种方式必须注意越界
自此,全文剧中!