Nginx发展

Nginx
nginx http server
Nginx是俄罗斯人 Igor Sysoev(伊戈尔.塞索耶夫)开发的一款高性能的HTTP和反向代理服务器。
Nginx以高效的epoll.kqueue,eventport作为网络IO模型,在高并发场景下,Nginx能够轻松支持5w并发连接数的响应,并且消耗的服务器内存,CPU等系统资源消耗很低,运行非常稳定。
国内著名站点,新浪博客,网易,豆瓣,迅雷等大型网站都在使用Nginx作为web服务器 或是 反向代理服务器。

是俄罗斯人开发的一款高性能 HTTP Web server ,支持反向代理,负载均衡,资源压缩,URL重写,网站跳转等等功能,

nginx以高效的 linux 网络模型,epoll,event,作为网络IO模型,kqueue在高并发网站情况下,nginx 能够轻松支持5w+的并发流量,并且消耗的服务器内存,CPU等资源也是很低的。运行起来非常稳定。

在互联网的快速普及,全球化,物联网的迅速发展,世界排名前3的分别是Apache,ISS,Nginx,而Nginx一直在呈现增长趋势。
Nginx资源消耗低/性能强
官方提供的测试数据,Nginx能支持5w的并发连接,在实际生产环境下可支撑2-4w的并发连接数。
Apache使用的网络I/O模型是传统的select模型,以Prefork多进程模式运转,需要经常派生子进程,消耗系统资源要比Nginx高得多。且一个进程在同一时间只会处理一个请求。
如 Apache Web Server支撑这日均千万PV的网站,服务器平均负载在50-60,CPU消耗在70%-90%,而整体迁移到Nginx后,系统平均负载降低1~4,CPU使用率在20%~40%,效果可见。
常见LNMP (linux,nginx,mysql,php) 服务器在3万并发连接下,开启10个Nginx进程消耗不过 (15MB10=150MB) 内存。就算开启64个 php-cgi进程,也就消耗 20MB64=1280MB,总共后台进程使用不到2GB内存,且服务器如果内存较小,开启 php-cgi进程数量可以再少点。
在压力测试,3w的并发连接下,Nginx+PHP的程序任然能够飞速运转,从Nginx的日志统计下(每分钟的第15秒有多少条日志),单机处理请求能力在700次/秒,那么日承受访问量在 7006060*24=60480000,且服务器的负载不会太高。
Nginx成本低
Nginx强大功能其一在于反向代理,负载均衡,属于是软件负载均衡,企业您购买硬件的 F5,NetScaler等硬件负载均衡设备价格昂贵,而Nginx属于开源软件,遵循BSD协议,可以免费试用,甚至二次开发用于商业用途。
BSD协议指的是给与用户更自由的协议,可以自由试用,修改源代码
Nginx优势
配置文件简单易读
支持 Rewrite重写,根据域名,URL的不同,转发HTTP请求到不同的后端服务器组
高可用性,稳定性,宕机几率很低
节省资源,支持GZIP压缩静态资源
支持热部署,可以7*24小时不间断运行,数月时间可不重启,在kill进程的情况下对软件修改。
技术架构
闭源技术栈:	收费技术栈
这一套东西都是花钱买的,
操作系统: redhat + Jquery + js + svn(代码管理) + oracle + tomcat + java + apache

开源技术栈
centos + jquery + js + git + mysql + java +tomcat + python + perl + nginx
操作系统  centos
前端    jquery + js
代码管理   git
后端	java + tomcat
运维自动化	python + perl
web 服务器		nginx
现实情况
美企 比较有钱

有钱的大公司,自己造机房,买服务器,数据都由自己管控,自己招聘IDC机房运维,linux 系统运维,头条,,美团,苹果。

中等公司,外企,自己购买服务器,服务器放在专业的机房托管。(内部的内网业务,也有在自己公司搭建小型的服务器机房)

小型公司,选择云服务器,是最经济实惠的。
Nginx特点
成本低
nginx的强大在于其反向代理的功能,软件负载均衡,还存在硬件负载均衡(F5,netscaler),但是由于价格昂贵,小型公司不会使用,利用nginx搭建高可用性的负载均衡的站点。

由于 nginx 支持 BSD 开源许可协议,BSD就是可以给用户更自由的使用权限,可以自由试用,修改源码,如果你修改后发布,还得遵循 BSD 协议

利用软件技术,可以实现硬件负载均衡一样的效果,经济实惠。
几大优势
1.nginx 配置文件更加易懂
2.nginx 支持网站 url地址重写 (网站需要域名更换,当用户访问老的域名的时候,会自动跳转到新的域名上来,这就是支持 URL 重写),还能够根据URL的特点,进行一个请求转发,判断(nginx 7层负载均衡的特点,比如判断来自于移动端的请求,就发给移动端服务器,判断是来自PC端的流量,用户请求就发给运行着PC端代码的服务器)
3. nginx 支持高可用性配置(防止单点故障,服务器崩溃),nginx 非常稳定,宕机异常退出的几率很小。
4.nginx 能够节省网络带宽,支持静态文件压缩后传输,支持 gzip 压缩功能。
5.nginx 还支持热部署,可以在不停止nginx情况下,更新代码,并且 nginx 支持 7*24h运转,可以数年数月都不重启。
Nginx 网络模型基础
学习 nginx 的网络模型
网络IO模型概念
1. 内核空间
内核:一个操作系统的核心组件,称之为内核,独立于普通的应用程序,可以直接操作底层硬件。
我们在硬件计算机上安装 linux 操作系统,在操作系统之间,又分为操作系统内核空间和用户空间,内核空间与用户空间是有本质区别的,你能允许让一个用户通过一些应用程序简简单单操作修改你的硬件信息吗?硬件信息是一个计算机的灵魂,操作系统为了保护内核,就分为内核空间和用户空间。内核是可以直接操作底层硬件的,处理系统受保护的区域。
操作系统为了保护系统的核心区域,也就是内核,使得用户无法直接修改系统底层,因此操作系统就开辟了两块虚拟内存空间。
一是内核空间,二是用户空间
2. 用户空间
Linux进程管理
linux下存在进程(process)和线程(thread)两种操作系统的基本概念。
1. 计算机核心是CPU,承担机器的计算任务,好比一座工厂,时刻在运行着。
2. 假设工厂电力有限,一次只能供电一个车间,一个车间在工作,其他车间都停下来(理解为CPU一次只能处理一个任务)。
3. 进程的概念,好比是一个工厂的车间,每一个车间代表CPU正在处理的任务,任一时刻,CPU总是在进行一个进程,其他进程处于非运行的状态。
4. 在一个车间里,想要完成工作,肯定会有很多工人,协同完成一个任务,每一个工人可以理解操作系统的线程。因此,工厂里有很多干活的工人,进程里有很多工作的线程。 工厂=线程 工人=线程
5. 工厂内的空间很大,工人们共享这个空间,理解为进程内的内存空间是共享的,每个线程共享内存。 工厂内=进程内
6. 问题是工厂内的小房间,容量大小个不同,有的可以容纳多个人,有的只能进去一个,好比为卫生间,里面有人了,你就等等吧。
理解为,进程内用一个线程正在使用一块内存,其他线程必须等待它结束了,才能使用这块内存。
进程切换
为了控制进程的执行,操作系统的内核需要有能力挂起CPU上运行的程序 (暂停一个CPU正在处理的进程)他还能恢复之前已经挂起的进程。这种行为称之为进程切换。
进程阻塞
正在执行中的进程,由于某些事件的等待,比如资源加载中,资源加载失败,操作系统自动的就会阻塞该进程,调用内核的 block 语句,让该进程处于阻塞状态。因此阻塞的进程是一种主动的行为。
文件描述符
这是计算机科学里的一个术语,表示指向文件引用的一个抽象的概念,文件描述符是一个索引值,指向 linux 内核为每一个进程打开的文件做记录的一个表。
程序每打开一个文件,系统内核就向该进程发送一个文件描述符。
系统默认的打开一个文件描述符有多大
# 显示文件描述符大小
root@ubuntu-master:~# ulimit -n
1024
root@ubuntu-master:~#

# 显示内核版本
root@ubuntu-master:~# uname -r
5.15.0-106-generic
root@ubuntu-master:~#
Linux IO 模型
input 输入
output 输出
对于 linux 的文件读写操作
数据的 IO 操作,比如文件的读取,数据优先会被拷贝到操作系统的内核缓冲区,然后再从缓冲区拷贝到应用程序的内存空间
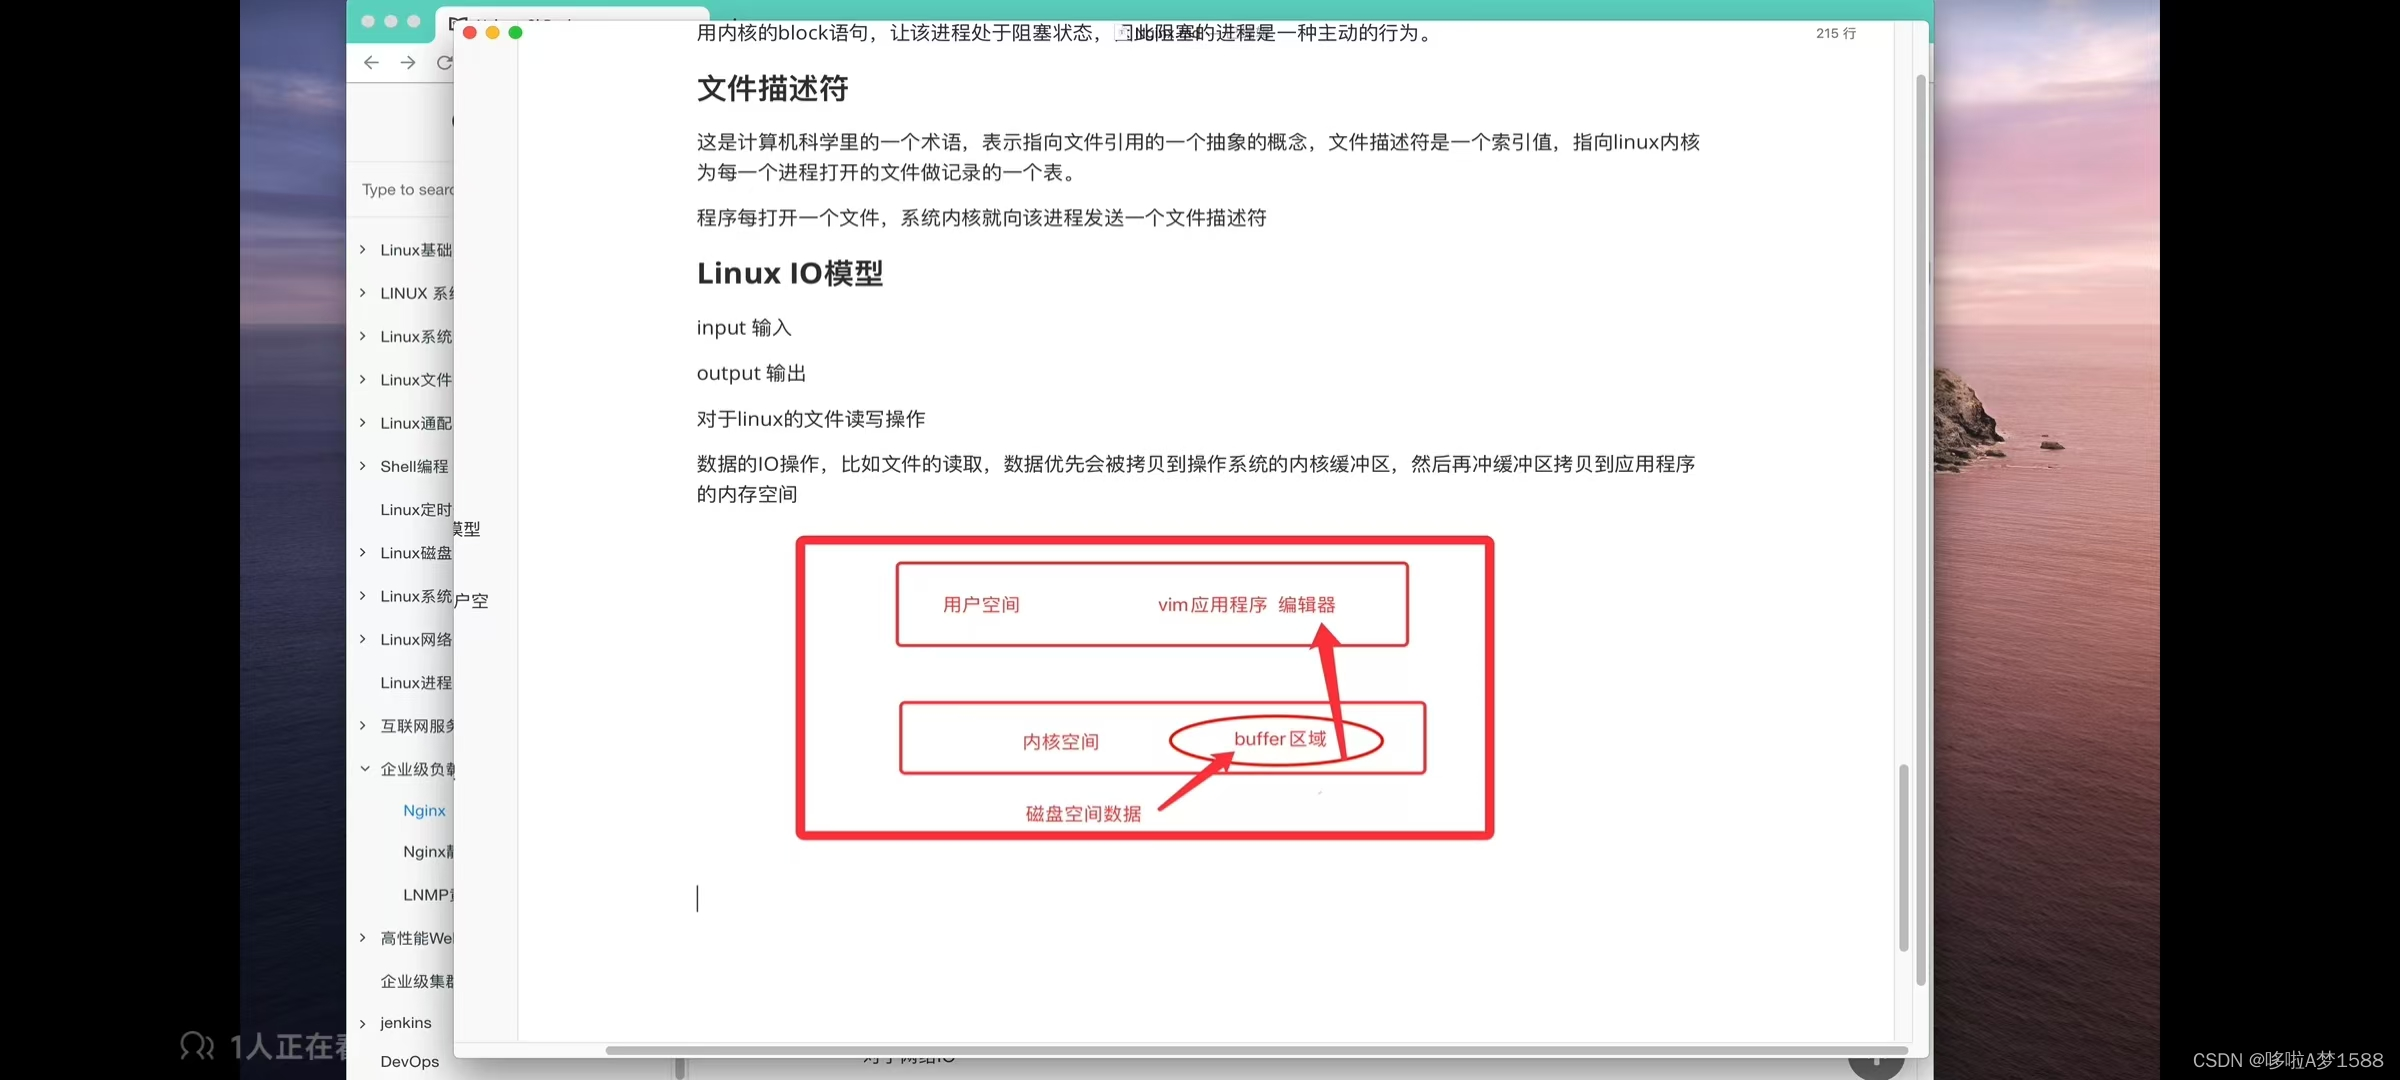
一个读取操作,经历了两个阶段:
1.等待数据准备 等待操作系统在磁盘上找到数据,并且从磁盘是读取数据
2.数据从内核空间拷贝到用户进程空间
以上这是属于本地文件的 IO 过程
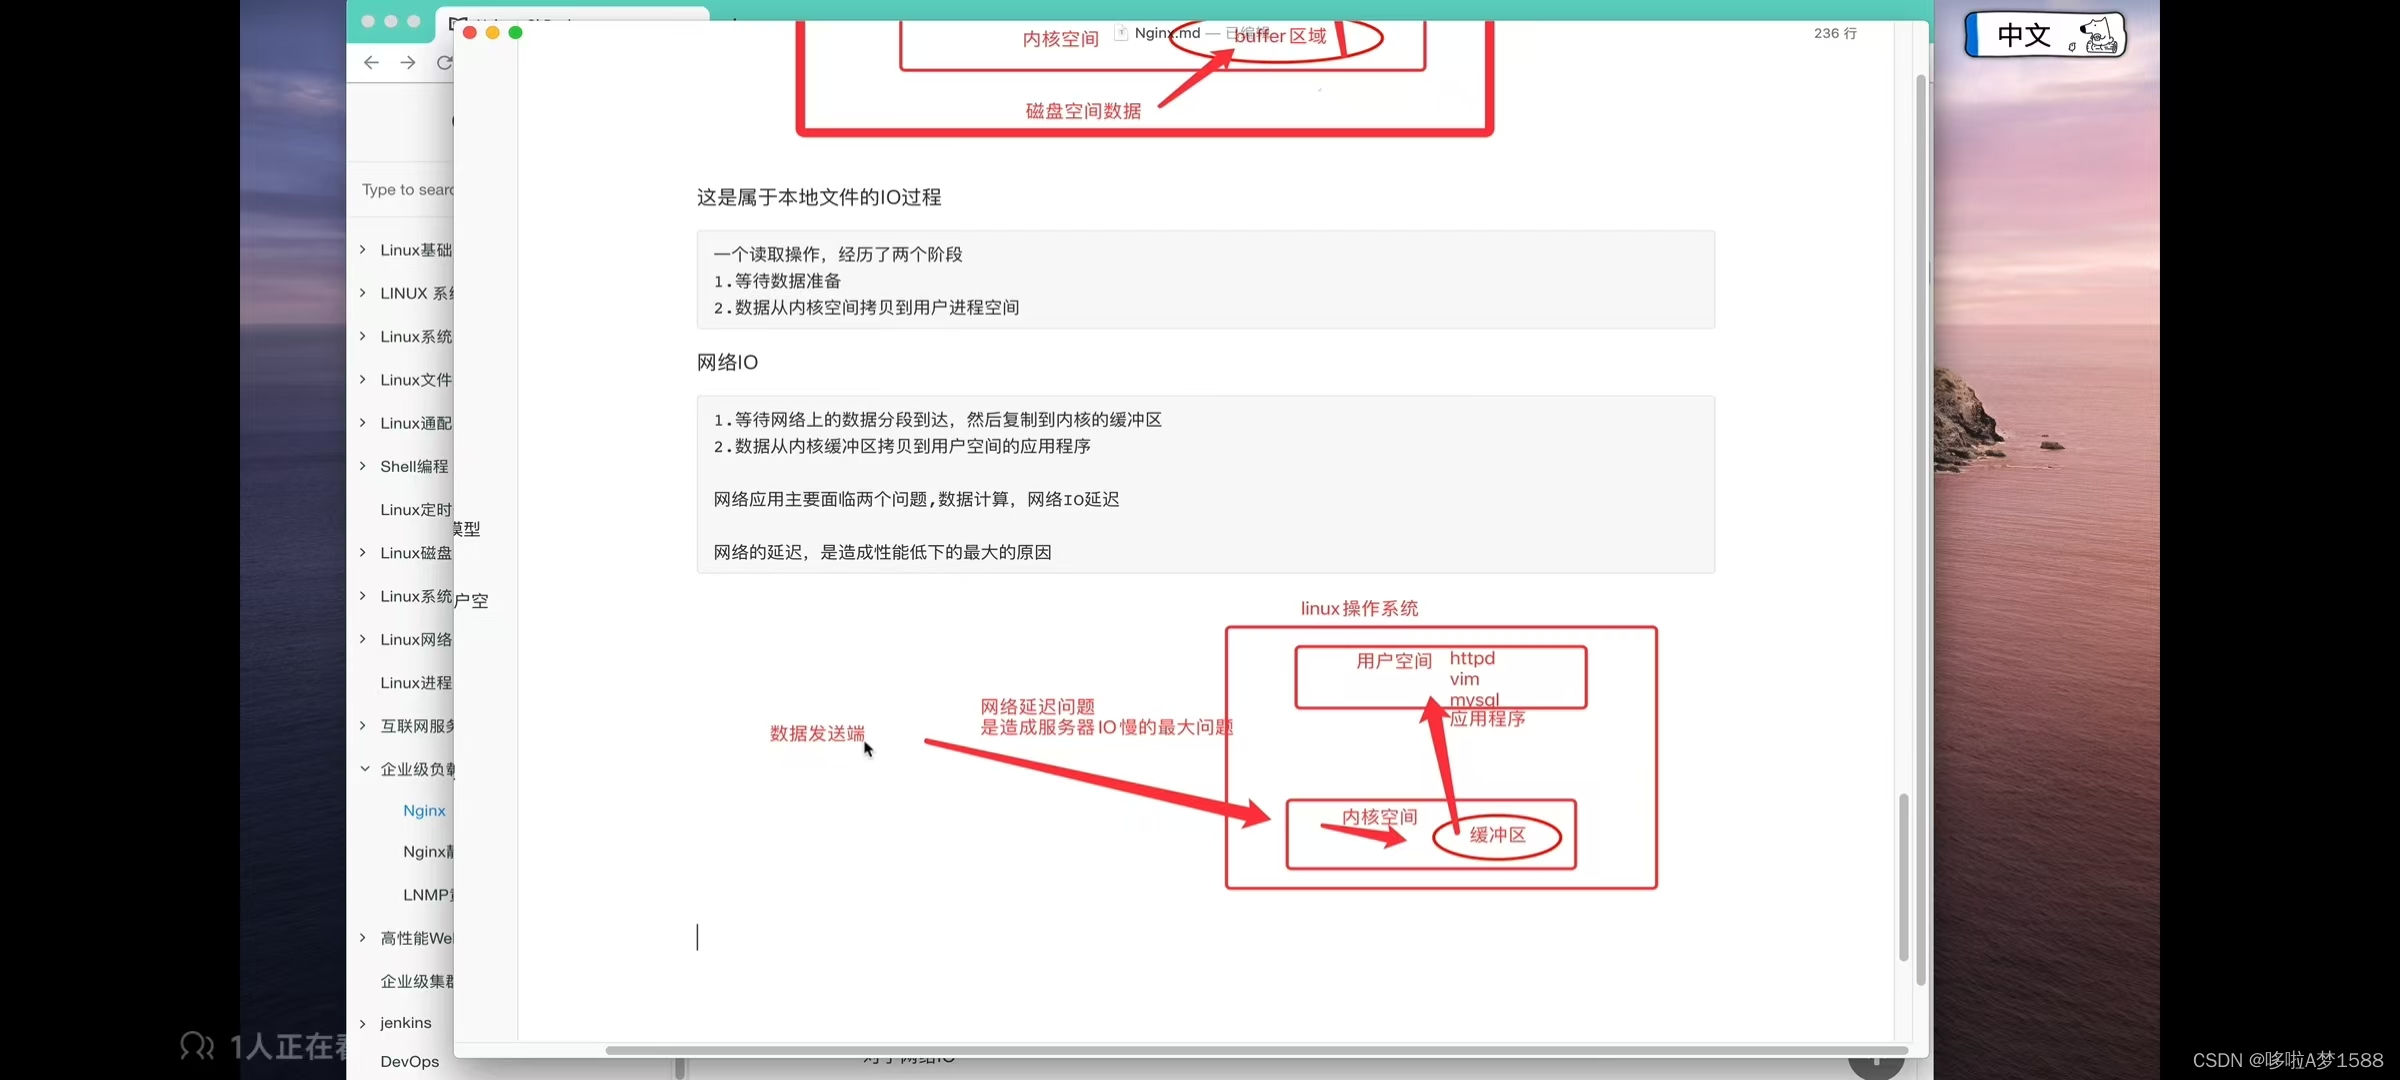
1.等待网络上的数据分段到达,就好比我们下载东西,不是一子把文件全读过来,你是挨段去读取。比如,下载4G 文件,数据读取,他一般都是分段读取 多少兆文件复制到内核的缓冲区(先是从网络上读取数据,然后再把数据拷贝到内核的buffer缓冲区)
2.数据从内核缓冲区拷贝到用户空间的应用程序
网络应用主要面临两个问题, 数据计算 和 网络 IO 延迟
网络的延迟,是造成性能低下的最大的原因。
以上是网络 IO
为何选择 Nginx
nginx 就是在于优秀的网络 IO 处理模型
常见的 IO 模型
阻塞模型
非阻塞模型
IO 多路复用
异步 IO (golang 是一个天生的异步 IO, 用golang编写的代码应用程序运行很快的原由在此)
网络 IO 指的就是在网络中进行数据的读写操作,本质上就是一个 socket 套接字读取,socket 套接字在 linux 系统中被抽象为 流的概念。网络 IO 就是对数据流的处理。说白了,实际就是对你磁盘上的数据在网络中进行读写操作。
趣谈阻塞模型之(同步阻塞 IO block IO)
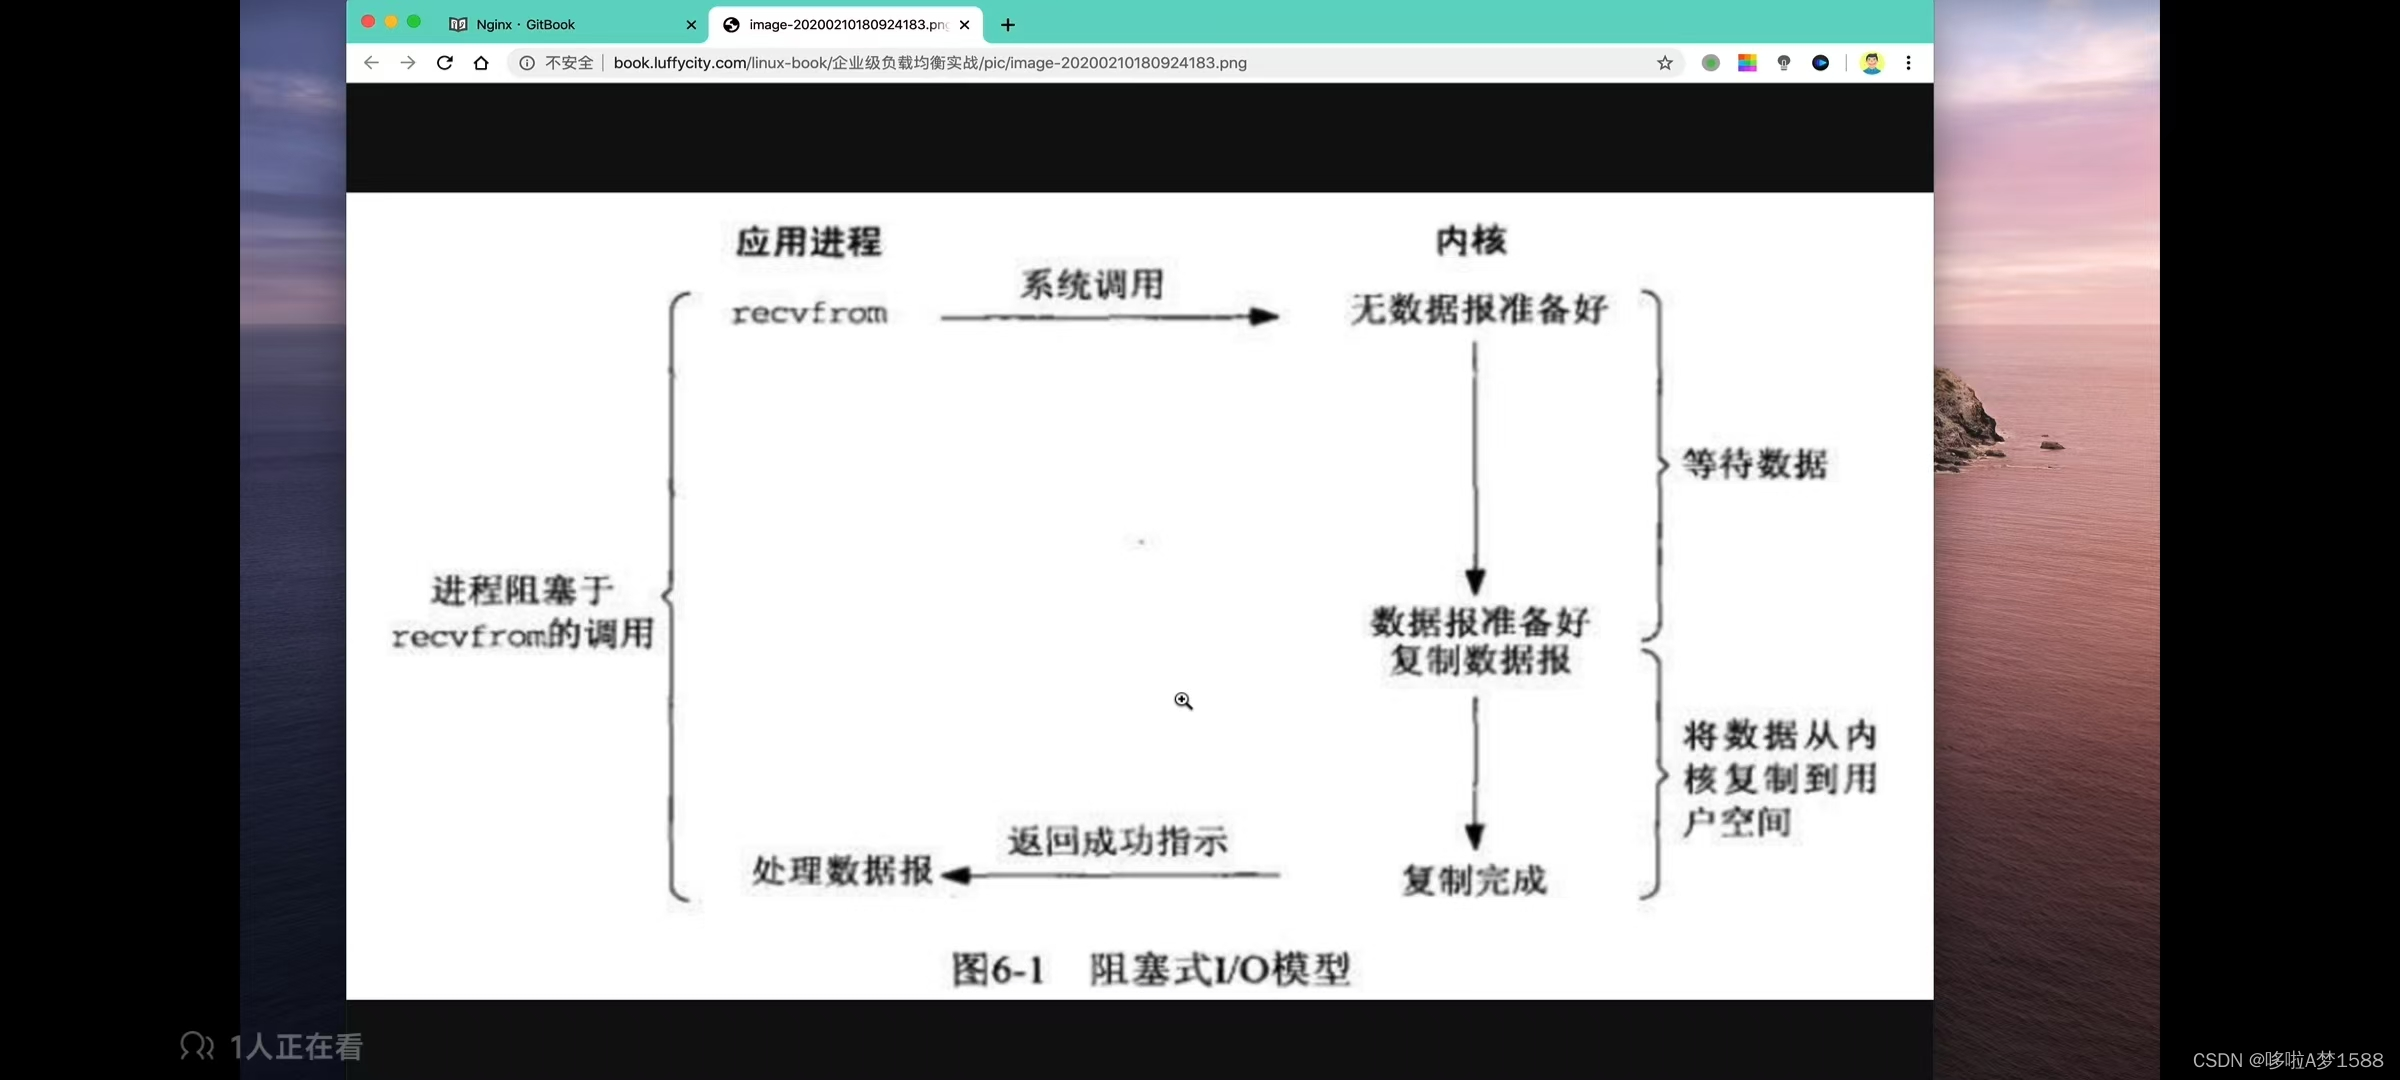
同步阻塞 IO 的特点是:
1. IO 执行的两个阶段都是阻塞的,用户空间发起调用,内核准备数据时阻塞;
2. 内核拷贝数据到用户空间,此时阻塞
直到最终内核返回结果,数据拷贝完毕,用户进程解除 block 阻塞状态,重新运行
这就是阻塞 IO 的原理和特点
用户进程发起了一个 recvfrom 系统调用,内核开始 IO 操作,
第一阶段会准备数据,在网络 IO 情况下,内核要等待,网络中的数据全部接收完毕,数据从磁盘上拷贝到操作系统的内核空间的缓冲区,他是需要一定的时间的,因此在第一个阶段是阻塞的 IO
第二阶段,当内核把数据准备好了,再从内核空间把数据拷贝到用户空间,拷贝过程中,也是需要等待的,IO 也是阻塞的,直到拷贝结束,用户整个的进程才会解除 block 阻塞的状态。重新运行起来,因此
在 linux 默认的情况下,所有的 socket 套接字都是阻塞的,阻塞指的就是进程在等待中,cpu此时去做别的事了
同步阻塞模型,主要优缺点如下:
1. 阻塞 IO 能够及时返回数据,无延迟
2. 对于开发人员负担较低,开发负担较低
3. 但是对于用户是很不友好的,性能较弱
趣谈 IO 模型之非阻塞 IO(同步非阻塞模型)
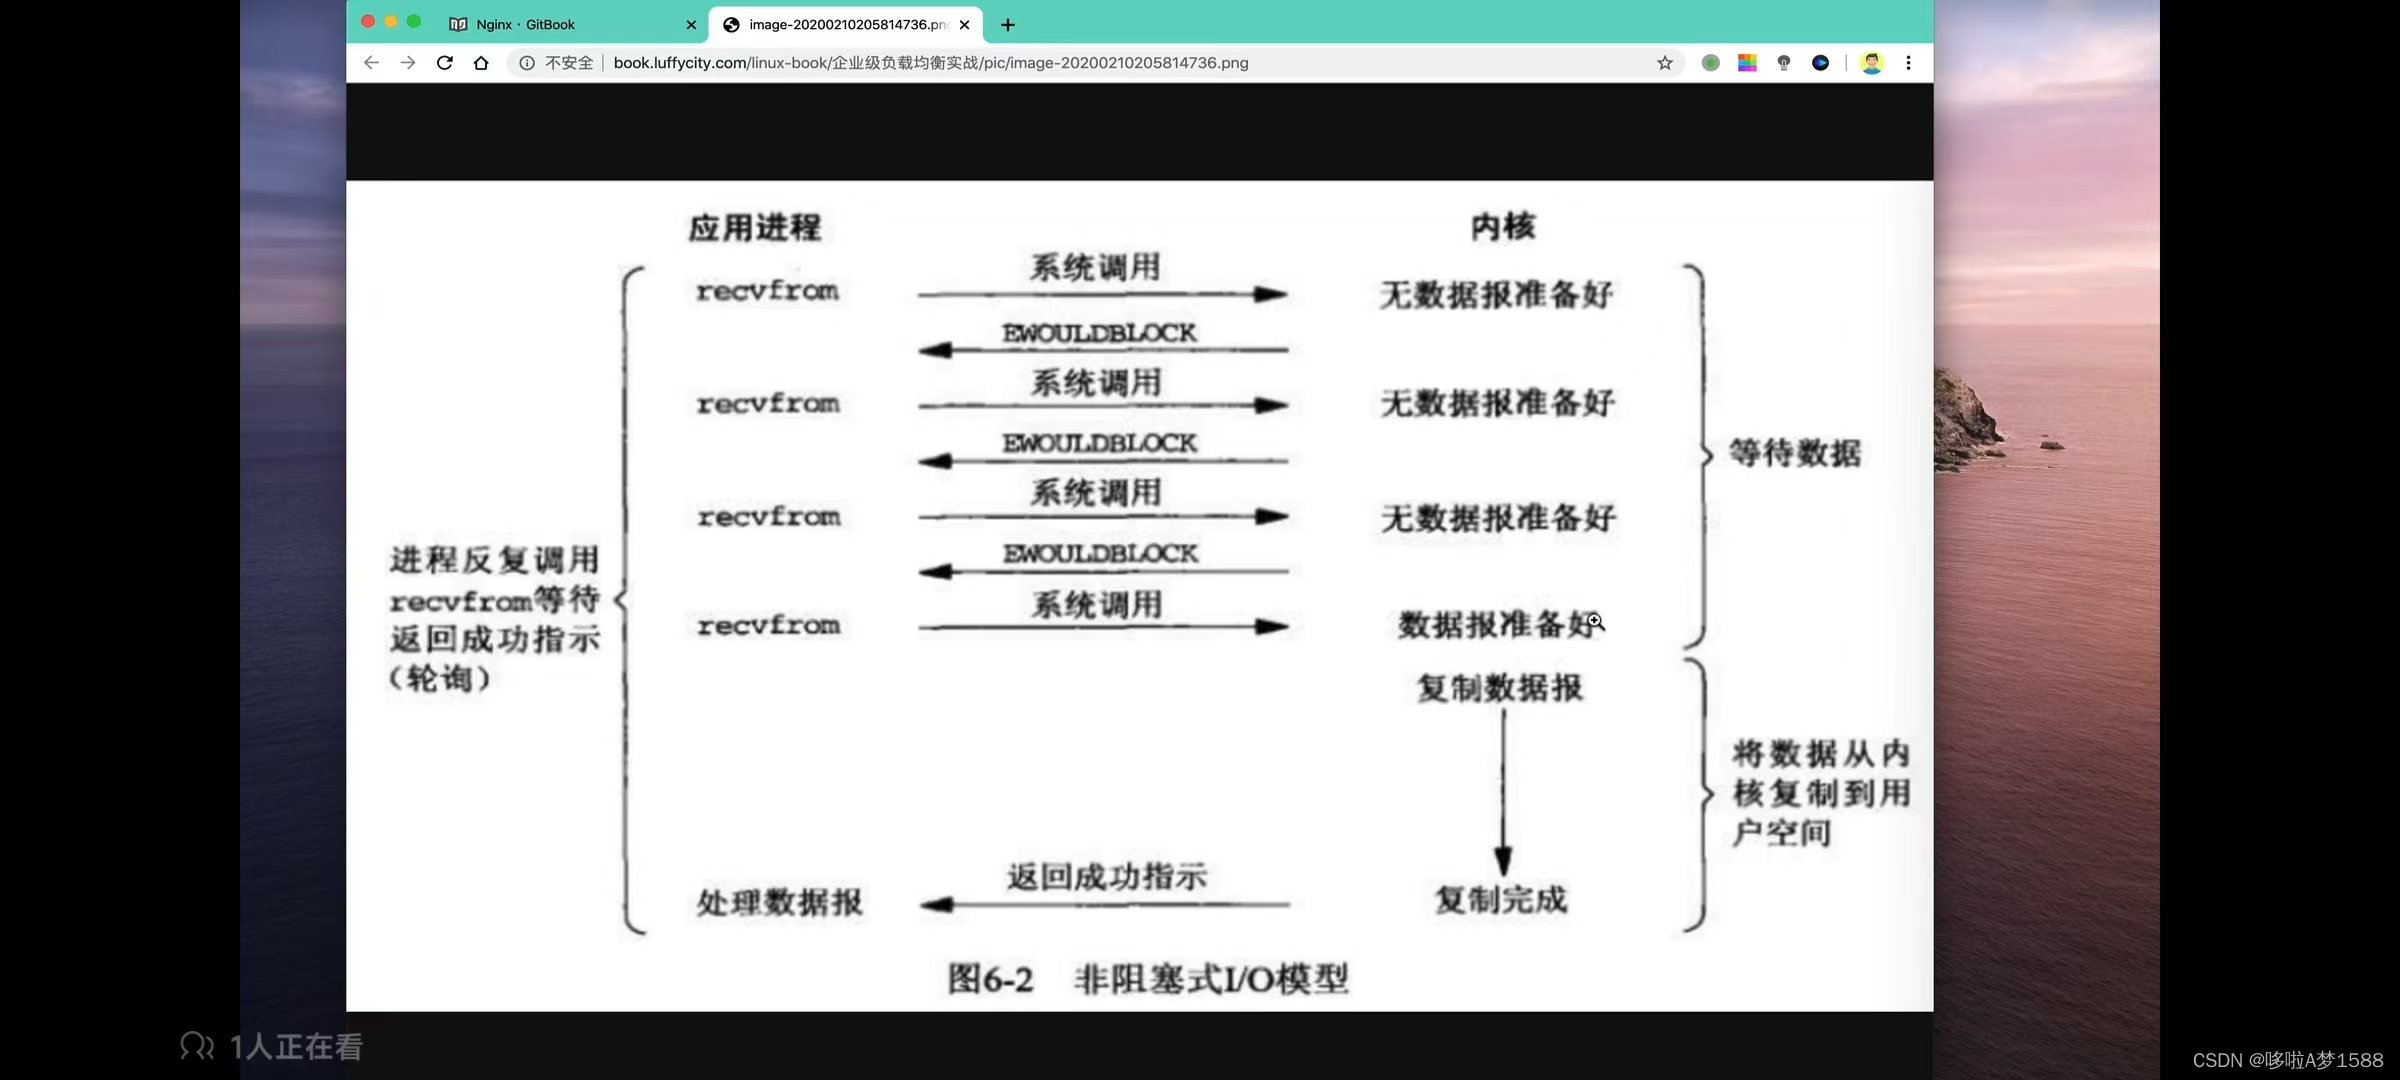
同步非阻塞
同步非阻塞就是没隔一会儿检索一次,进行轮询调用的方式。(你们夫妻去吃肯德基,在你们点好餐,发起调用之后,餐厅开始准备食物,但是此时你们又不愿意干等着,又去跟你媳妇逛街,但是在逛街过程中,又害怕食材准备好了,来迟了,因此你们逛一会回来餐厅询问一下,好没好,如果没好,待会再来)
以上是同步非阻塞一个非常形象的比喻,我们再来看原理图,在IO的时候,非阻塞IO,他同样是用户进程发起一个 recvfrom 调用,但是区别在哪里呢?他在发起系统调用之后,来检查内核数据是否准备好了,不一样在哪里呢?非阻塞模式,他把阻塞时间片撤分很多个小的阻塞,在撤分过程中,CPU任然有机会不断操作用户进程,因为你用户进程整个阻塞中,CPU就不再对你进行操作了,去其他人了,当用户发起一个 recvfrom 调用操作,如果内核数据还没有准备好,他会立即返回一个 error 报错,告诉用户进程数据还没有准备好,这时候用户进程就不再等待,他就不是一个阻塞等待的状态,而是立即得到了一个结果。如果没有好,可以去做别的事,然后再询问一下,好了吗?一旦内核把数据准备好了之后,内核立即会把数据拷贝到用户空间,然后返回给用户进程。这时候你就明白阻塞IO和非阻塞IO主要的区别在哪里,就是用户进程发起调用的时候,被做了一个撤分,然后用户进程会不断的向用户空间进行询问,


当用户进程发起 read 操作,内核若是没有数据,不会立即阻塞用户进程,而是立即返回了 error 报错
对于用户进程而言,这就不再是等待了,而是立即有了一个结果,已知是 error 的时候,知道了数据还未准备好,于是再次发起,一旦内核准备好了数据,且在此收到用户的系统调用,内核立即将数据拷贝到用户内存,然后返回给用户进程。


区别就在于发起 recvfrom时候的阻塞撤分了,用户进程需要不断的主动询问内核数据是否准备好。
同步阻塞和非同步阻塞的区别
1. 非阻塞的优点,不用完全等待,可以去做其他事情
在等待的时间内,可以继续处理其他的任务,当然也包括继续提交新的任务
2. 非阻塞的缺点是
任务完成的延迟比较大,因为需要多次的发起系统轮询调用操作。并且很有可能在任务轮询过程中,数据早已准备完毕了,造成延迟,对整体系统吞吐性能有了降低。
趣谈IO多路之select
IO 多路复用
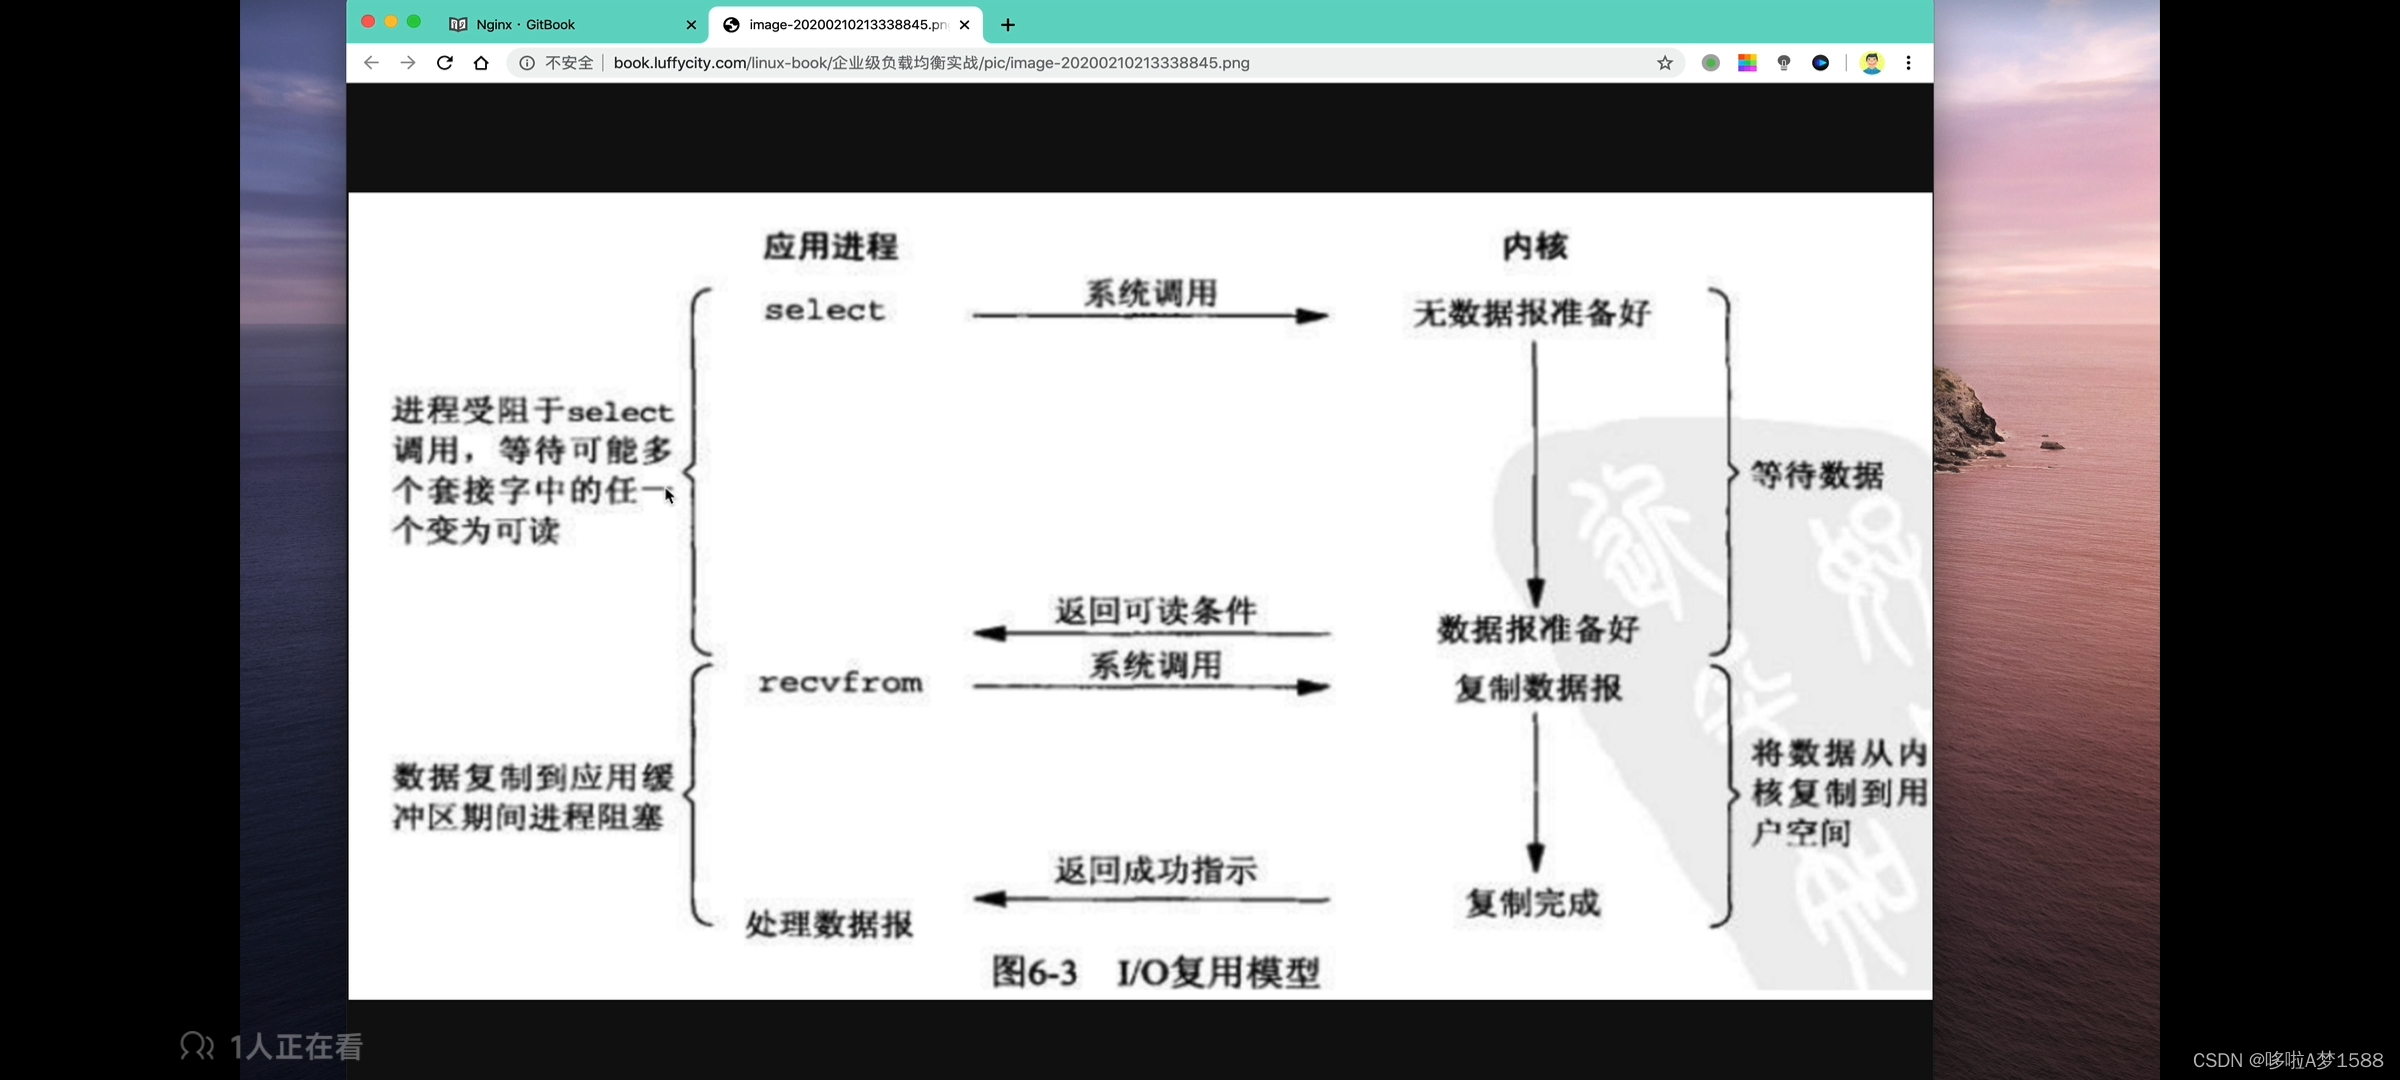
此时餐厅安装了一个单子屏,此时你逛好回来就不需要去询问服务员了,你只需要看单子屏就可以知道,你的食物是否准备好了,餐厅现在都使用单子屏,我们可以更方便的知道我们的需求准备好了吗?


计算机系统后台可能存在N多个进程任务,如果能自动的循环的查询,多个任务的进度,而不需要用户进程主动发起轮询调用,而是有人来帮忙盯着这些进度,那就很方便了。

因此,linux系统下 select,poll,spoll这样的函数,就是来帮你做盯着进程进度的一个软件并且 epoll 效率是最高的。且 nginx 就是使用的 epoll这个IO网络模型。
select 模型
select 就是做自动轮询这件事,他和非阻塞轮询的区别原理
select 他可以同时监听多个 socket ,socket 套接字,我们要知道,nginx 主要是一个web服务器,主要是对网络IO进行操作,socket 是指用户发来一个请求,他就在你的服务器上建立了一个套接字,建立了一个socket连接,select他可以同时监听多个用户的请求,监听多个 socket,当你一个socket数据准备好了,因为数据通过网络发送到服务器上,他有一个等待时间,有一个socket数据准备好了,立即进行IO操作,然后用户进程发起一个系统调用,然后将数据由内核直接拷贝到用户进程,

其实IO多路复用和阻塞IO形式区别不大,并且有可能性能还更差一点。他能够监听多个socket,能够监听多个连接。是因为IO多路还额外的调用了select事件,还有了额外的系统开销。

IO多路复用,好处就是select事件可以同时处理多个连接。

如果你的服务器连接数不是很高的话,使用IO多路复用还不如用(多线程 + 同步阻塞IO)来的效率更高。

IO多路复用优势就在于可以同时处理更多的连接,而不是处理速度的优势。
网络IO模型对比
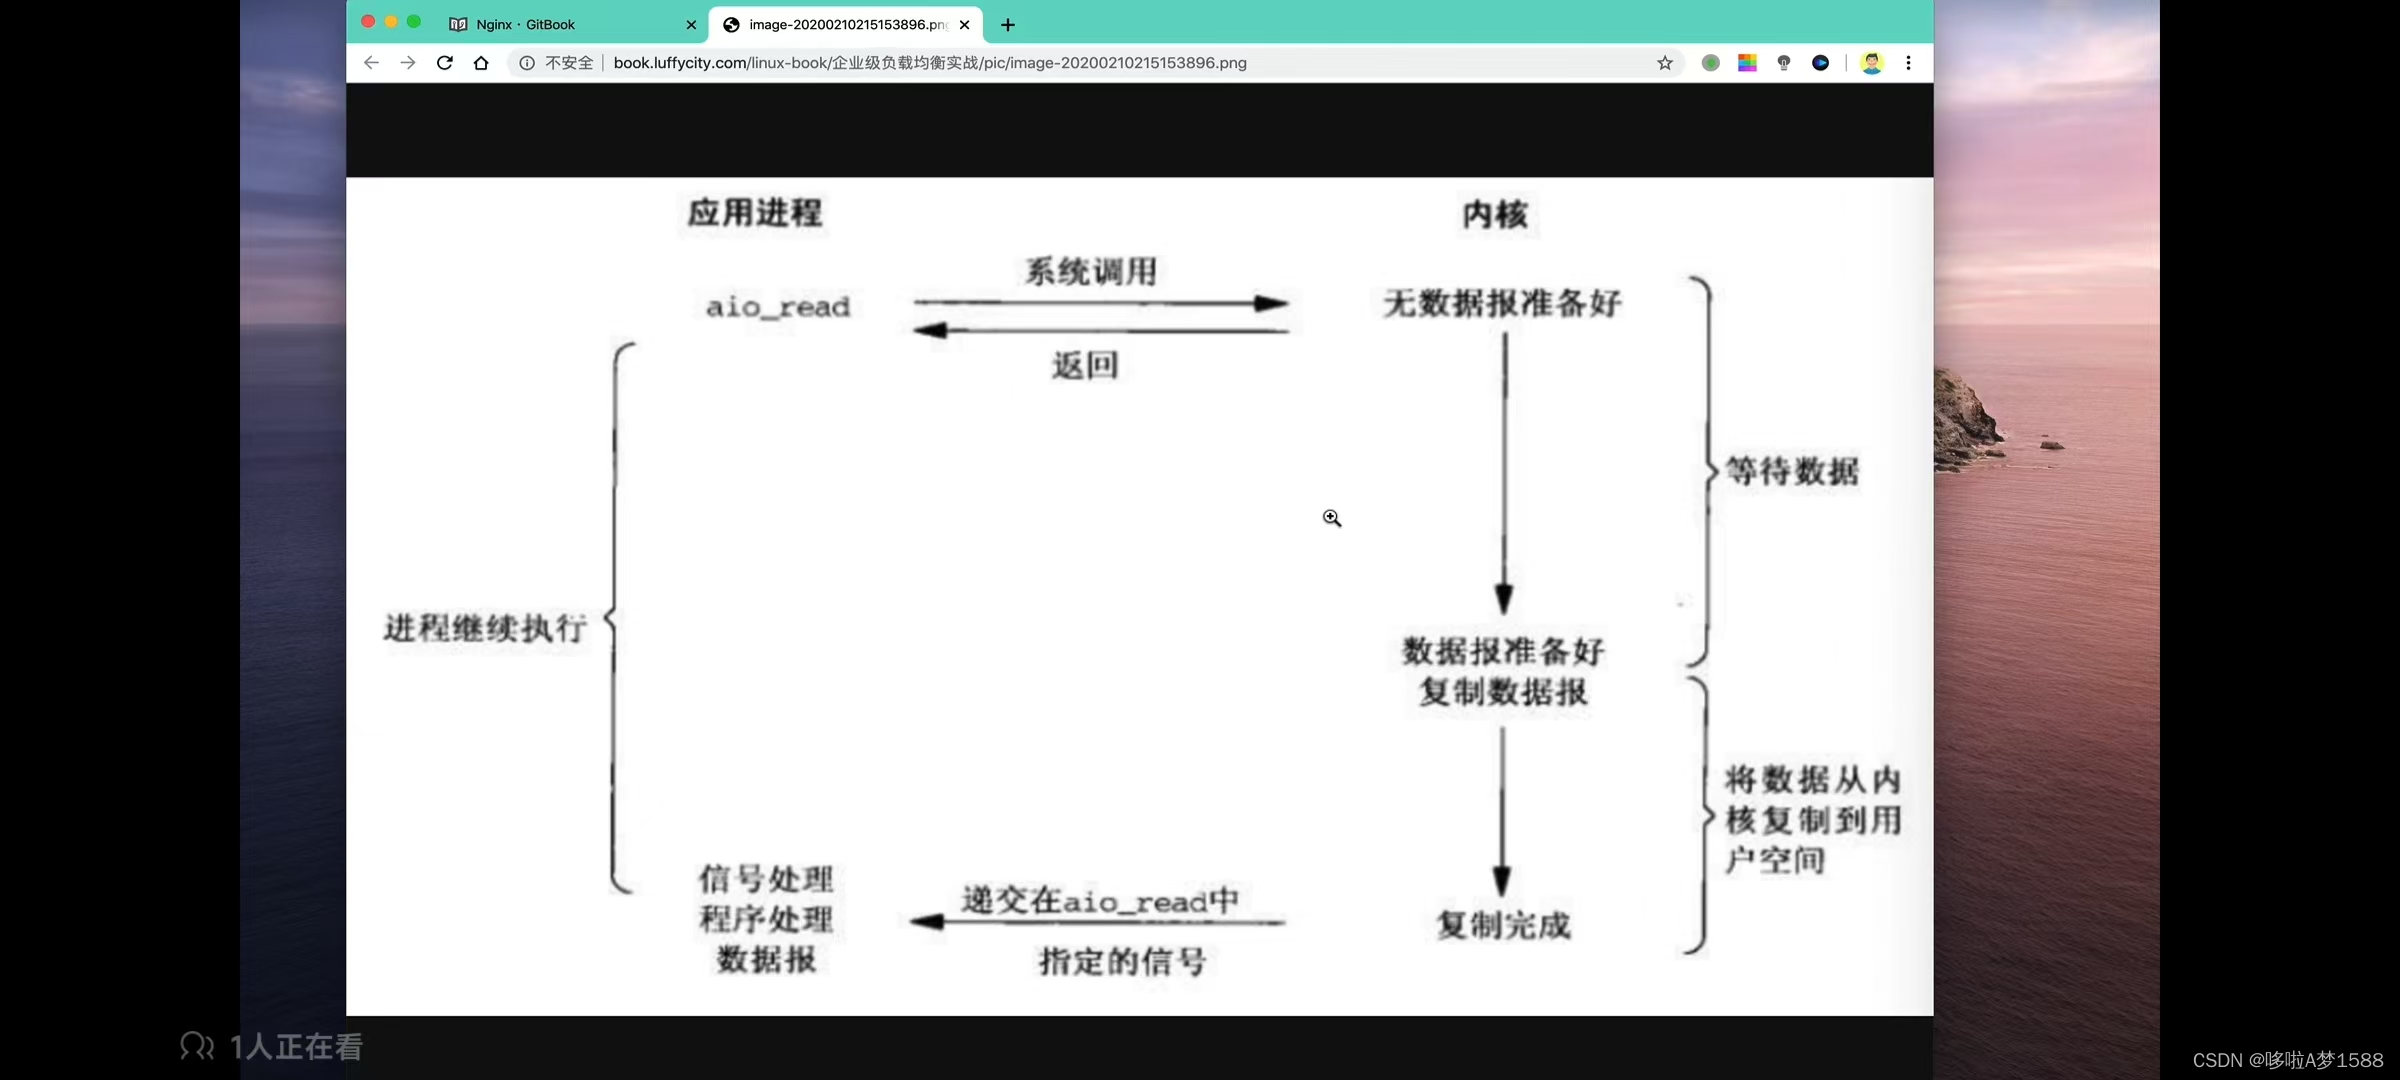
异步非阻塞IO模型
用户发起一个 aio_read 异步调用,发给内核空间,内核空间即使他数据还没有准备好,他立即给用户返回了,中间没有任何阻塞的状态,然后内核空间,开始准备数据,准备好数据之后,复制到用户空间,复制完成之后,他会直接给用户进程发一个信号。告诉他你的数据已经准备好了。这个时候,用户进程再来处理这个数据。

异步非阻塞IO模型的原理
你们夫妻不想逛街,想吃饭,但是不想在餐厅等着,你们会怎么做呢?你们可以回家,拿手机点外卖。

用户进程发起 aio_read 异步系统调用,无论你的内核数据是否准备好,他都会直接返回给用户进程,用户进程可以去做其他的事情,直到内核空间把数据准好之后,内核空间再把数据复制给用户空间,最终把信号通过用户进程。整个过程都是非阻塞的。
前几个IO网络模型总结
1.阻塞与非阻塞的区别
其实就是一个等待和不等待
阻塞IO会一直阻塞对应的进程,直到数据操作完毕
非阻塞IO是在内核空间准备数据的阶段会立即返回。

2.同步IO和异步IO的区别
同步IO在进行IO操作的时候,进程会被阻塞,
异步IO,是在进程发起IO操作之后,内核直接返回。编程当中 '直接返回'是指 'return',直到内核发送一个信号,告诉该进程IO操作完成了。整个进程完全是没有阻塞的,因此,异步IO他是性能非常高的
但是要考虑的事情也是很多的 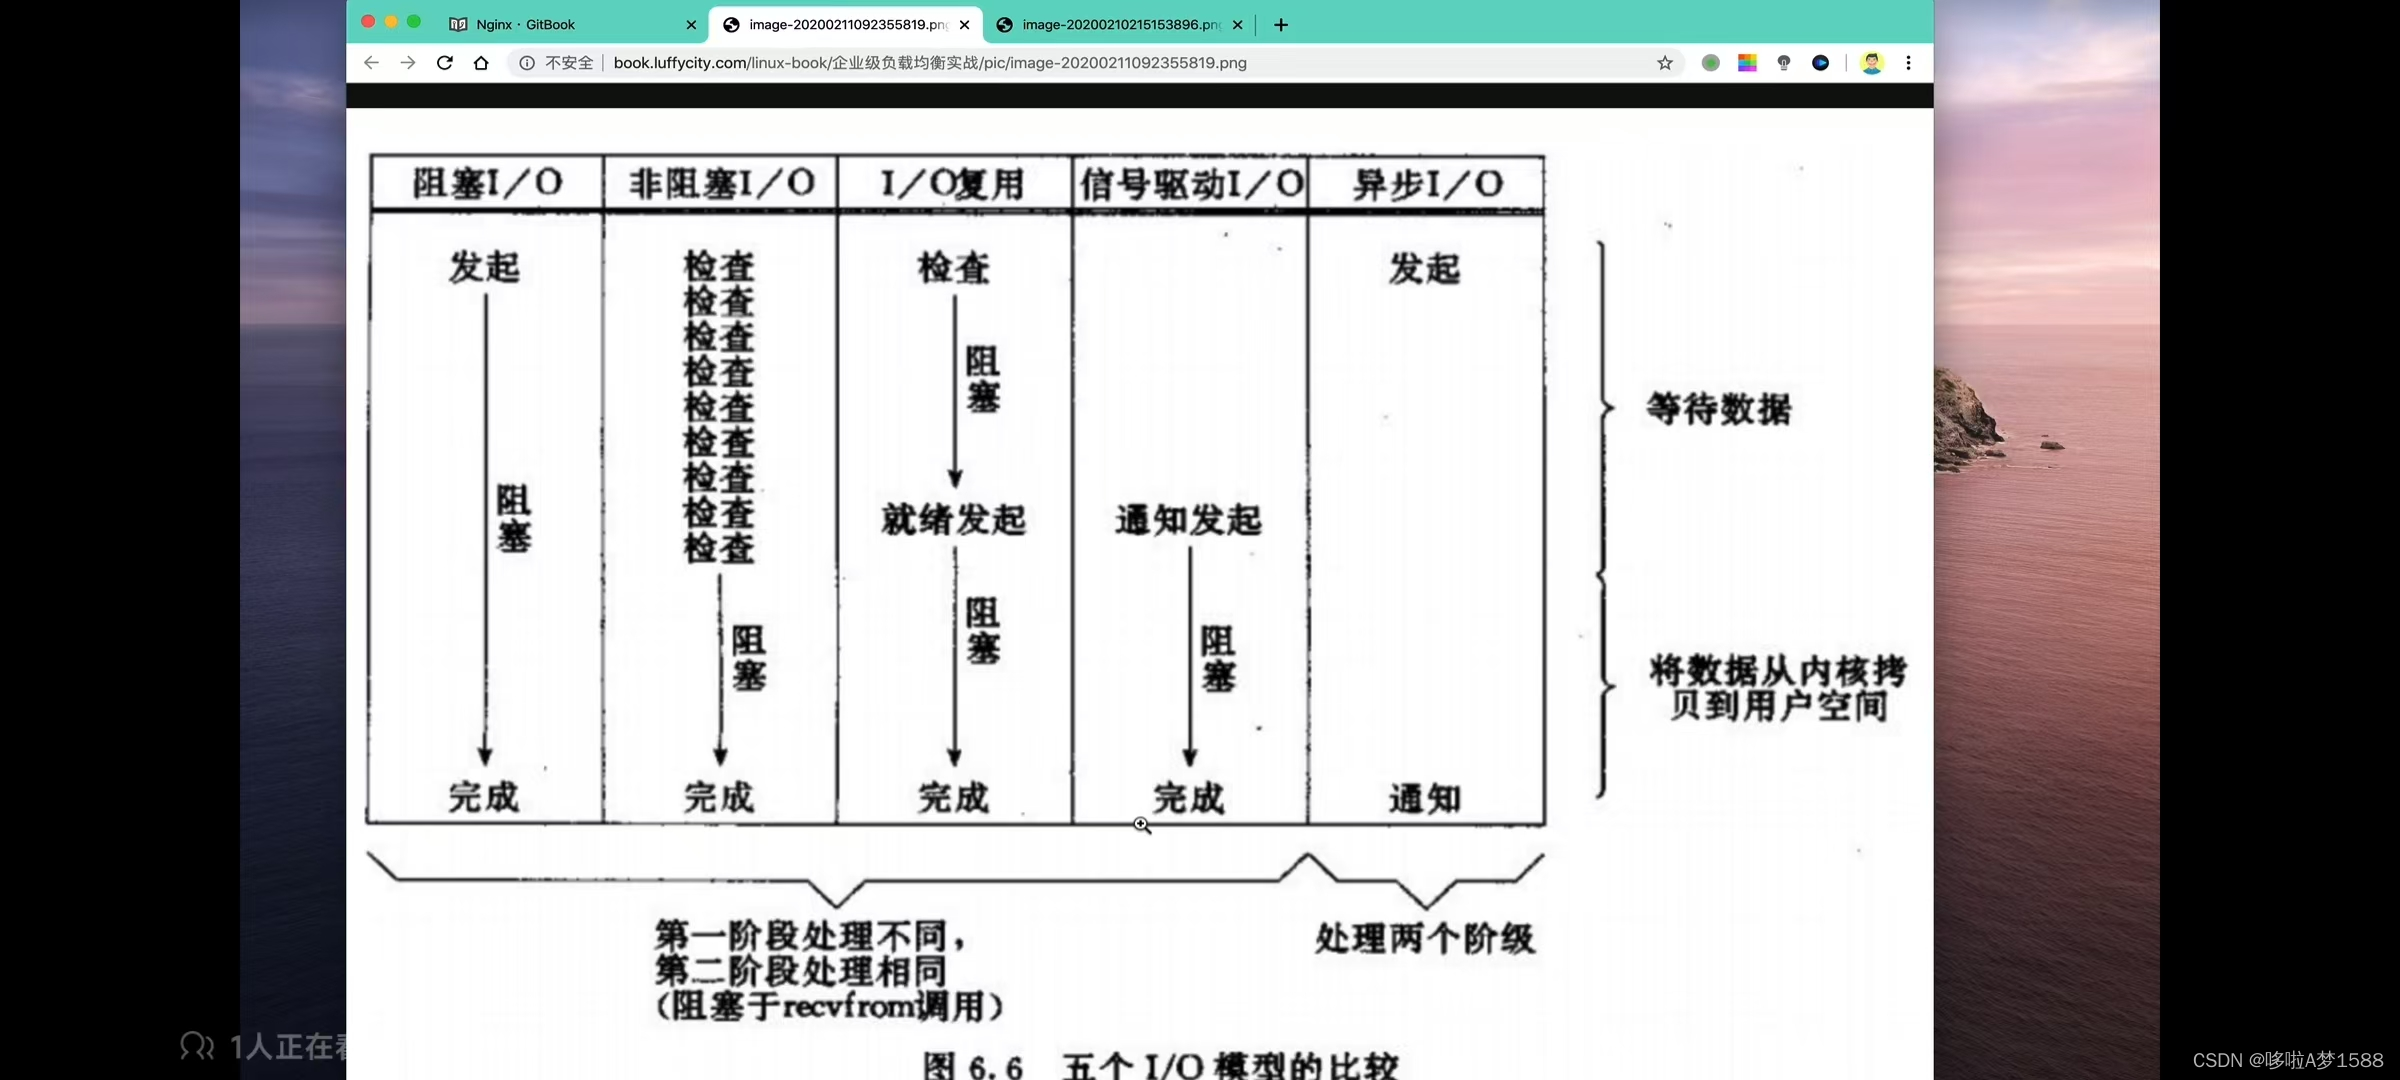
我们目前在使用的是阻塞IO,多路复用IO,异步IO
五大IO的比较如下:
1. 阻塞IO,从发起进程到结束,整个过程一一直阻塞,直到数据拷贝完成
2. 非阻塞IO,是用户进程能够发起多次调用,如果数据没有准备好,他会一直一直检查检查,直到数据最终拷贝完毕。
3. I/O多路复用,我们可以使用select  epoll进行监听多个连接,他其实和阻塞IO区别不大,阻塞IO他只处理一个连接,而多路复用IO,能够同时处理多个连接
4. 异步IO,异步IO他只有发起和通过阶段,中间没有任何阻塞,但是其实你在做异步IO操作的时候,中间你管控的问题还是很多的。
Nginx架构组成
Nginx基本语法
1.下载安装
2.配置语法
3.功能模块
4.日志功能
5.访问限制
Nginx功能实践
1.静态站点
2.反向代理
3.负载均衡
4.缓存服务
5.URL重写
6.动静态请求分离
7.HTTPS
8.LUA开发
9.Nginx安全
10.Nginx 调优
Nginx安装配置
Nginx如今分为商业版,开源版,支持 linux与windows平台下载使用
nginx.com 商业版本 nginx.org 开源版本 https://tengine.taobao.org/
[环境准备]
操作系统:Centos Linux release 7.3.1611 (Core)
GCC编译环境:yum install -y gcc gcc-c++ autoconf automake make
模块依赖性:Nginx 支持的功能模块需要有第三方的库支持,例如 gzip 的 zlib 库,rewrite重写需要的pcre库,HTTPS需要的
yum install zlib zlib-devel openssl openssl-devel pcre pcre-devel wget httpd-tools vim

系统基础开发环境:
yum groupinstall "Development Tools" "Basic Web Server"

确保防火墙关闭  iptables -F
关闭 selinux	getenforce
yum源配置正确
网络连接状态正常

root@nginx:~# iptables -L
Chain INPUT (policy ACCEPT)
target     prot opt source               destination

Chain FORWARD (policy ACCEPT)
target     prot opt source               destination

Chain OUTPUT (policy ACCEPT)
target     prot opt source               destination
root@nginx:~#
[Nginx 下载]
yum 自动安装,不支持自由扩展第三方功能
源码编译安装
1. 下载nginx 源代码,nginx.org官网


2. 解压缩Nginx源代码


3.复制Nginx默认提供的vim 语法插件

# 安装 pcre
PCRE官网 https://sourceforge.net/projects/pcre/files/pcre/
https://sourceforge.net/projects/pcre/files/pcre/8.40/
wget https://nchc.dl.sourceforge.net/projects/pcre/pcre/8.40/pcre-8.40.tar.gz
tar -zxvf pcre-8.40.tar.gz
cd pcre-8.40/
# 配置安装文件
./configure --prefix=/usr/local/pcre
make
sudo make install


# 安装 zlib
zlib官网 http://zlib.net/
可在官网或者去 https://sourceforge.net/projects/libpng/files/zlib/下载
wget http://zlib.net/zlib-1.2.11.tar.gz
tar -zxvf zlib-1.2.11.tar.gz
cd zlib-1.2.11/
./configure --prefix=/usr/local/zlib1.2


# 安装 openssl 官网 https://www.openssl.org/
下载页面 https://www.openssl.org/source/
wget https://www.openssl.org/source/openssl-1.1.0e.tar.gz
tar -zxvf openssl-1.1.0e.tar.gz
cd openssl-1.1.0e/
./config --prefix=/usr/local/openssl1.1

# 开始安装nginx
tar -zxvf nginx-1.11.11.tar.gz
cd nginx-1.11.11/
ls
auto CHANGE CHANGE.ru conf configure contrib html license man readme src
./configure --prefix=/usr/local/nginx1.11 --with-pcre=/usr/local/pcre --with-zlib=/usr/local/zlib1.2

make & make install

# 指定 PCRE 和 zlib 源代码位置,复制文件时请执行 make distclean
sudo mkdir /usr/local/pcre/src
sudo mkdir /usr/local/zlib1.2/src
sudo cp -r zlib-1.2.11/* /usr/local/zlib1.2/src/
sudo cp -r pcre-8.40/* /usr/local/pcre/src/
make clean

whereis pcre
which psre
./configure --prefix=usr/local/nginx1.11 --with-pcre=/home/dell/pcre-8.40 --with-h-zlib=/home/dell/zlib-1.2.11

# 开始安装 sudo make install
nginx安装配置笔记
1. 操作系统的选择 centos7

2. 下载安装nginx的方式
1)rpm包安装
2)yum 工具自动化安装
3)获取源代码安装,手动编译安装 nginx(指定安装路径,额外的开启nginx第三方功能)

3.选择了 nginx 编译安装,那么就得解决好 linux 的编译开发环境  gcc make 编译工具

---------配置yum源	start--------------
使用 yum 工具之前,必须配置好阿里云的 yum 源
步骤一:确保有wget 工具
yum install -y wget
步骤二,备份旧的repo文件
cd /etc/yum.repos.d/
ls
CentOS-Base.repo		CentOS-fasttrack.repo	CentOS-Vault.repo
CentOS-CRrepo	CentOS-Media.repo		epel.repo
CentOS-Debuginfo.repo	CentOS-Sources.repo		epel-testing.repo

备份
mkdir repobak
mv /etc/yum.repos.d/*.repo /etc/repo.d/repobak/
# 如上的操作,就是使得在yum仓库的一层目录,没有任何repo文件,因此就实现了 linux 此时就没有yum源了
# 此时没有yum源,需要你再配置一个新的repo仓库文件
访问阿里云镜像站点	https://developer.aliyun.com/
步骤三:
# 用如下命令生成新的yum  其实就是下载了一个新的repo文件
cd /etc/yum.repos.d/
wget -O /etc/yum.repos.d/CentOS-Base.repo https://mirrors.aliyun.com/repo/Centos-7.repo

# 用如下命令生成新的epel  其实就是下载了一个新的repo文件
wget -O /etc/yum.repos.d/epel.repo https://mirrors.aliyun.com/repo/epel-7.repo

# 清空旧的yum源缓存
yum clean all

# 生成新的阿里云缓存  加速下载
yum makecache

---------配置yum源 end--------------

# 在配置了阿里云的yum源之后,安装如下编译工具
yum install -y gcc gcc-c++ autoconf automake make

'autoconf' 自定义配置文件
'automake' 自定义make工具
'gcc gcc-c++' 工具


# 安装使用 nginx 还得安装 nginx 所需的一些第三方系统库的支持,比如 nginx的静态资源压缩功能所需的 gzip,lib库,nginx 需要支持URL重写,所需要的 pcre 库,用perl语言开发的依赖库,以及nginx搭建加密站点,HTTPS,所需的 openssl依赖库等
'httpd-tools'apache测试命令,我们可以利用他进行对该网站压力测试等等
# 安装基础环境依赖
yum install -y zlib zlib-devel openssl openssl-devel pcre pcre-devel wget httpd-tools vim


# 安装完毕 nginx 所需要的基础依赖库,还得检查系统的防火墙是否关闭,还用 selinux ,yum源配置,网络情况等等,因为你要搭建一个web服务,这些都会影响到他。
比如防火墙是否关闭 执行如下命令
iptables -L (列出当前防火墙规则)
,selinux 关闭
getenforce
返回 Disabled 表示已经关闭

ping baidu.com  能拼通,说明本机可以正常上网
编译安装 nginx
编译安装淘宝Nginx三步曲
1.下载程序源代码  opt目录一般存放第三方软件包
wget http://nginx.org/download/nginx-1.25.5.tar.gz

wget https://tengine.taobao.org/download/tengine-3.1.0.tar.gz
https://github.com/alibaba/tengine-ingress/releases/tag/Tengine-Ingress-v1.1.0

2. 解压缩淘宝nginx或者官方nginx 源代码都一样

2.1  拷贝nginx 的配置文件语法高亮,发给vim 的插件目录
mkdir ~/.vim
cp -r /opt/tengine-3.1.0/contrib/vim/* ~/.vim
root@nginx:~# cp -r /opt/tengine-3.1.0/contrib/vim/* ~/.vim/
root@nginx:~#


root@nginx:/opt# ls
tengine-3.1.0.tar.gz
'gz' 说明他用gz压缩过了
'tar' 说明用tar命令打包过了。相当于有两把锁,就好比快递先装盒子,再压缩一下,就更节省空间
tar -zxvf tengine-3.1.0.tar.gz
'-z' 解压缩
'-x' 撤包解包的意思
'-v' 看一看解压过程出现了哪些文件
'-f' 指定解压文件 f必须写在结尾,即解压缩文件开头

root@nginx:/opt# ls
tengine-3.1.0  tengine-3.1.0.tar.gz
root@nginx:/opt#
# 进入源代码目录 解压缩nginx源代码,进入源代码目录,准备开始编译安装
# 进入源代码后查看目录下有哪些内容。
root@nginx:/opt# cd tengine-3.1.0
root@nginx:/opt/tengine-3.1.0# ll
total 468
drwxrwxr-x 13 root root   4096 Oct 27  2023 ./
drwxr-xr-x  3 root root   4096 May 20 05:47 ../
-rw-rw-r--  1 root root    931 Oct 27  2023 AUTHORS.te
drwxrwxr-x  6 root root   4096 Oct 27  2023 auto/	# 检测系统模块依赖信息的
-rw-rw-r--  1 root root 323310 Oct 27  2023 CHANGES	# 存放nginx的变化记录日志
-rw-rw-r--  1 root root  31076 Oct 27  2023 CHANGES.cn
-rw-rw-r--  1 root root  39892 Oct 27  2023 CHANGES.te
drwxrwxr-x  2 root root   4096 Oct 27  2023 conf/	# 存放nginx主配置文件的目录
-rwxrwxr-x  1 root root   2502 Oct 27  2023 configure*	#可执行的脚本用于释放编译文件的定制脚本
drwxrwxr-x  4 root root   4096 Oct 27  2023 contrib/ # 提供了vim插件,让配置文件颜色区分更友好
drwxrwxr-x  4 root root   4096 Oct 27  2023 docs/
drwxrwxr-x  4 root root   4096 Oct 27  2023 .github/
-rw-rw-r--  1 root root     20 Oct 27  2023 .gitignore
drwxrwxr-x  2 root root   4096 Oct 27  2023 html/ # 存放了标准的html页面文件
-rw-rw-r--  1 root root   1715 Oct 27  2023 LICENSE
drwxrwxr-x  2 root root   4096 Oct 27  2023 man/
drwxrwxr-x 33 root root   4096 Oct 27  2023 modules/
drwxrwxr-x  3 root root   4096 Oct 27  2023 packages/
-rw-rw-r--  1 root root   5729 Oct 27  2023 README.markdown
drwxrwxr-x 10 root root   4096 Oct 27  2023 src/	# 存放了nginx 源代码的目录
drwxrwxr-x  4 root root   4096 Oct 27  2023 tests/
-rw-rw-r--  1 root root     43 Oct 27  2023 THANKS.te
root@nginx:/opt/tengine-3.1.0#


4.开始准备编译三不曲
第一曲:
进入软件源代码目录,执行编译脚本文件,如制定安装路径,以及开启额外功能等。
首先查看编译脚本信息  ./configure --help  # 查看编译帮助信息
执行编译脚本文件,释放 makefile 等信息
./configure --prefix=/home/Learn_Nginx/nginx/ --with-http_ssl_module --with-http_flv_module --with-http_gzip_static_module --with-http_stub_status_module --with-threads --with-file-aio


./configure --prefix=/opt/tngx310 --with-http_ssl_module --with-http_flv_module --with-http_gzip_static_module --with-http_stub_status_module --with-threads --with-file-aio

'with-http_stub_status_module' 开启nginx状态连接功能
'with-threads' 支持线程
'with-file-aio' 支持异步文件操作


root@nginx:/opt/tengine-3.1.0# ./configure --prefix=/opt/tngx310 --with-http_ssl_module --with-http_flv_module --with-http_gzip_static_module --with-http_st_status_module --with-threads --with-file-aio
checking for OS
 + Linux 5.15.0-107-generic x86_64
checking for C compiler ... found
 + using GNU C compiler
 + gcc version: 11.4.0 (Ubuntu 11.4.0-1ubuntu1~22.04)

creating objs/Makefile

Configuration summary
  + using threads
  + using system PCRE library
  + using system OpenSSL library
  + using system zlib library
  + jemalloc library is disabled

  nginx path prefix: "/opt/tngx310"
  nginx binary file: "/opt/tngx310/sbin/nginx"
  nginx modules path: "/opt/tngx310/modules"
  nginx configuration prefix: "/opt/tngx310/conf"
  nginx configuration file: "/opt/tngx310/conf/nginx.conf"
  nginx pid file: "/opt/tngx310/logs/nginx.pid"
  nginx error log file: "/opt/tngx310/logs/error.log"
  nginx http access log file: "/opt/tngx310/logs/access.log"
  nginx http client request body temporary files: "client_body_temp"
  nginx http proxy temporary files: "proxy_temp"
  nginx http fastcgi temporary files: "fastcgi_temp"
  nginx http uwsgi temporary files: "uwsgi_temp"
  nginx http scgi temporary files: "scgi_temp"

root@nginx:/opt/tengine-3.1.0#


root@nginx:/opt/tengine-3.1.0# ls
AUTHORS.te  CHANGES     CHANGES.te  configure  docs  LICENSE  modules   README.markdown  tests
auto        CHANGES.cn  conf        contrib    html  man      packages  src              THANKS.te


root@nginx:/opt/tengine-3.1.0# ls
AUTHORS.te  CHANGES     CHANGES.te  configure  docs  LICENSE   man      objs      README.markdown  tests
auto        CHANGES.cn  conf        contrib    html  Makefile  modules  packages  src              THANKS.te
root@nginx:/opt/tengine-3.1.0#


第二曲
直接开始下一步安装
make
root@nginx:/opt/tengine-3.1.0# make
make -f objs/Makefile
make[1]: Entering directory '/opt/tengine-3.1.0'

objs/ngx_modules.o \
-lpthread -lcrypt -lpcre -lssl -lcrypto -lpthread -lz \
-Wl,-E
sed -e "s|%%PREFIX%%|/opt/tngx310|" \
        -e "s|%%PID_PATH%%|/opt/tngx310/logs/nginx.pid|" \
        -e "s|%%CONF_PATH%%|/opt/tngx310/conf/nginx.conf|" \
        -e "s|%%ERROR_LOG_PATH%%|/opt/tngx310/logs/error.log|" \
        < man/nginx.8 > objs/nginx.8
make[1]: Leaving directory '/opt/tengine-3.1.0'
root@nginx:/opt/tengine-3.1.0#


第三曲
开始安装	make install
root@nginx:/opt/tengine-3.1.0# make install
make -f objs/Makefile install
make[1]: Entering directory '/opt/tengine-3.1.0'
test -d '/opt/tngx310' || mkdir -p '/opt/tngx310'
test -d '/opt/tngx310/sbin' \
        || mkdir -p '/opt/tngx310/sbin'
test ! -f '/opt/tngx310/sbin/nginx' \
        || mv '/opt/tngx310/sbin/nginx' \
                '/opt/tngx310/sbin/nginx.old'
cp objs/nginx '/opt/tngx310/sbin/nginx'
test -d '/opt/tngx310/conf' \
        || mkdir -p '/opt/tngx310/conf'
cp conf/koi-win '/opt/tngx310/conf'
cp conf/koi-utf '/opt/tngx310/conf'
cp conf/win-utf '/opt/tngx310/conf'
test -f '/opt/tngx310/conf/mime.types' \
        || cp conf/mime.types '/opt/tngx310/conf'
cp conf/mime.types '/opt/tngx310/conf/mime.types.default'
test -f '/opt/tngx310/conf/fastcgi_params' \
        || cp conf/fastcgi_params '/opt/tngx310/conf'
cp conf/fastcgi_params \
        '/opt/tngx310/conf/fastcgi_params.default'
test -f '/opt/tngx310/conf/fastcgi.conf' \
        || cp conf/fastcgi.conf '/opt/tngx310/conf'
cp conf/fastcgi.conf '/opt/tngx310/conf/fastcgi.conf.default'
test -f '/opt/tngx310/conf/uwsgi_params' \
        || cp conf/uwsgi_params '/opt/tngx310/conf'
cp conf/uwsgi_params \
        '/opt/tngx310/conf/uwsgi_params.default'
test -f '/opt/tngx310/conf/scgi_params' \
        || cp conf/scgi_params '/opt/tngx310/conf'
cp conf/scgi_params \
        '/opt/tngx310/conf/scgi_params.default'
test -f '/opt/tngx310/conf/nginx.conf' \
        || cp conf/nginx.conf '/opt/tngx310/conf/nginx.conf'
cp conf/nginx.conf '/opt/tngx310/conf/nginx.conf.default'
test -d '/opt/tngx310/logs' \
        || mkdir -p '/opt/tngx310/logs'
test -d '/opt/tngx310/logs' \
        || mkdir -p '/opt/tngx310/logs'
test -d '/opt/tngx310/html' \
        || cp -R html '/opt/tngx310'
test -d '/opt/tngx310/logs' \
        || mkdir -p '/opt/tngx310/logs'
make[1]: Leaving directory '/opt/tengine-3.1.0'
root@nginx:/opt/tengine-3.1.0#


root@nginx:/opt/tengine-3.1.0# cd ../
root@nginx:/opt# ls
tengine-3.1.0  tengine-3.1.0.tar.gz  tngx310
root@nginx:/opt#
root@nginx:/opt# ll
total 3204
drwxr-xr-x  4 root root    4096 May 20 12:24 ./
drwxr-xr-x 20 root root    4096 May 20 02:13 ../
drwxrwxr-x 14 root root    4096 May 20 12:12 tengine-3.1.0/
-rw-r--r--  1 root root 3261347 Nov  6  2023 tengine-3.1.0.tar.gz
drwxr-xr-x  6 root root    4096 May 20 12:24 tngx310/	# 编译后生成的文件夹
root@nginx:/opt#


5.  进入编译生成的文件夹  查看安装后的 nginx 目录
root@nginx:/opt# cd tngx310/
root@nginx:/opt/tngx310# ll
total 24
drwxr-xr-x 6 root root 4096 May 20 12:24 ./
drwxr-xr-x 4 root root 4096 May 20 12:24 ../
drwxr-xr-x 2 root root 4096 May 20 12:24 conf/	# 存放nginx的配置文件
drwxr-xr-x 2 root root 4096 May 20 12:24 html/	# 存放nginx网页根目录文件,存放站点的静态资源
drwxr-xr-x 2 root root 4096 May 20 12:24 logs/	# 存放nginx的各种日志目录
drwxr-xr-x 2 root root 4096 May 20 12:24 sbin/	# 存放nginx该软件的可执行命令
root@nginx:/opt/tngx310#

root@nginx:/opt/tngx310# cd html/
root@nginx:/opt/tngx310/html# ls
50x.html  index.html
root@nginx:/opt/tngx310/html# cd ../
root@nginx:/opt/tngx310# cd conf/
root@nginx:/opt/tngx310/conf# ls
fastcgi.conf          fastcgi_params          koi-utf  mime.types          nginx.conf          scgi_params          uwsgi_params          win-utf
fastcgi.conf.default  fastcgi_params.default  koi-win  mime.types.default  nginx.conf.default  scgi_params.default  uwsgi_params.default
root@nginx:/opt/tngx310/conf# cd ../
root@nginx:/opt/tngx310# cd logs/
root@nginx:/opt/tngx310/logs# ls
root@nginx:/opt/tngx310/logs# cd ../
root@nginx:/opt/tngx310# cd sbin/
root@nginx:/opt/tngx310/sbin# ls
nginx
root@nginx:/opt/tngx310/sbin#

6. 若是直接 执行nginx命令,默认是代表启动nginx进程
root@nginx:~# echo $PATH
/usr/local/sbin:/usr/local/bin:/usr/sbin:/usr/bin:/sbin:/bin:/usr/games:/usr/local/games:/snap/bin
root@nginx:~#
/opt/tngx310/sbin/nginx (用绝对路径去启动,这是可以的)
netstat -tunlp 	# 查看当前机器所有端口

root@nginx:~# /opt/tngx310/sbin/nginx
root@nginx:~# netstat -tunlp
Active Internet connections (only servers)
Proto Recv-Q Send-Q Local Address           Foreign Address         State       PID/Program name
tcp        0      0 0.0.0.0:80              0.0.0.0:*               LISTEN      4510/nginx: master
tcp        0      0 0.0.0.0:22              0.0.0.0:*               LISTEN      920/sshd: /usr/sbin
tcp        0      0 127.0.0.53:53           0.0.0.0:*               LISTEN      853/systemd-resolve
tcp        0      0 127.0.0.1:6010          0.0.0.0:*               LISTEN      1104/sshd: root@pts
tcp6       0      0 :::22                   :::*                    LISTEN      920/sshd: /usr/sbin
tcp6       0      0 ::1:6010                :::*                    LISTEN      1104/sshd: root@pts
udp        0      0 127.0.0.53:53           0.0.0.0:*                           853/systemd-resolve
udp        0      0 192.168.222.133:68      0.0.0.0:*                           851/systemd-network


root@nginx:~#
root@nginx:~# netstat -tunlp | grep nginx
tcp        0      0 0.0.0.0:80              0.0.0.0:*               LISTEN      4510/nginx: master
root@nginx:~#

# 停止nginx
nginx -s stop

# 配置PATH变量 把 nginx 的 sbin 目录加入到 PATH 中

6.1 编写一个 nginx 的专属环境变量,创建一个脚本文件 nginx.sh
vim /etc/profile.d/nginx.sh
root@nginx:~# vim /etc/profile.d/nginx.sh
root@nginx:~# cat /etc/profile.d/nginx.sh
export PATH="$PATH:/opt/tngx310/sbin"
root@nginx:~#

参数解释
'export' 定义一个变量,让他生效
'PATH' 我们修改'PATH'的值
' PATH=' 赋值覆盖就可以了
'$PATH' 变量替换的作用  即取出PATH默认的值
':' 把原有的环境变量再拼接一下 nginx 的 '/opt/tngx310/sbin' 环境变量
'/opt/tngx310/sbin' nginx的环境变量

最终把值赋予给 PATH 变量,最终的 PATH 变量多了一个 nginx 的可执行目录


7. 退出当前会话,重新登录,系统默认加载 /etc/profile.d/ 下所有的环境变量文件
# 退出会话后,重新登录,查看 nginx 的环境变量是否被添加了
root@nginx:~# echo $PATH
/usr/local/sbin:/usr/local/bin:/usr/sbin:/usr/bin:/sbin:/bin:/usr/games:/usr/local/games:/snap/bin:/opt/tngx310/sbin/
root@nginx:~#


8.此时可以快捷的使用 nginx 各种指令
nginx # 首次输入表示启动该进程如果你再次启动则报错,端口被占用,注意这个坑
root@nginx:~# netstat -tunlp | grep 80
tcp  0      0 0.0.0.0:80   0.0.0.0:*               LISTEN      4510/nginx: master
root@nginx:~#
nginx -s stop # 停止nginx
nginx 再次启动nginx服务,用于重新加载nginx配置

# 如果不想重启 nginx ,直接加载配置文件即可 ,nginx 提供了一个 reload 功能,能够在不重启nginx服务的情况下,直接重新读取配置文件功能
nginx -s reload		# 平滑重启

9. 此时检查 nginx 的编译安装信息  V是大写字母
nginx -V	# 查看nginx 安装版本信息和编译安装信息   V是大写字母
nginx -v   # 查看nginx安装版本信息		v是小写字母

root@nginx:~# nginx -s reload
root@nginx:~# nginx -v		# v小写
Tengine version: Tengine/3.1.0
nginx version: nginx/1.24.0
root@nginx:~#


root@nginx:~# nginx -V	# V是大写
Tengine version: Tengine/3.1.0
nginx version: nginx/1.24.0
built by gcc 11.4.0 (Ubuntu 11.4.0-1ubuntu1~22.04)
built with OpenSSL 3.0.2 15 Mar 2022
TLS SNI support enabled
configure arguments: --prefix=/opt/tngx310 --with-http_ssl_module --with-http_flv_module --with-http_gzip_static_module --with-http_stub_status_module --with-threads --with-file-aio
root@nginx:~#
ubuntu源代码安装 tengine nginx
环境准备

root@nginx:~# iptables -L
Chain INPUT (policy ACCEPT)
target     prot opt source               destination

Chain FORWARD (policy ACCEPT)
target     prot opt source               destination

Chain OUTPUT (policy ACCEPT)
target     prot opt source               destination


root@nginx:~# getenforce
Command 'getenforce' not found, but can be installed with:
apt install selinux-utils
root@nginx:~# apt install selinux-utils -y
Reading package lists... Done
Building dependency tree... Done
Reading state information... Done
The following NEW packages will be installed:
  selinux-utils
0 upgraded, 1 newly installed, 0 to remove and 2 not upgraded.
Need to get 107 kB of archives.
After this operation, 596 kB of additional disk space will be used.
Get:1 http://mirrors.tuna.tsinghua.edu.cn/ubuntu jammy/universe amd64 selinux-utils amd64 3.3-1build2 [107 kB]
Fetched 107 kB in 1s (169 kB/s)
Selecting previously unselected package selinux-utils.
(Reading database ... 98539 files and directories currently installed.)
Preparing to unpack .../selinux-utils_3.3-1build2_amd64.deb ...
Unpacking selinux-utils (3.3-1build2) ...
Setting up selinux-utils (3.3-1build2) ...
Processing triggers for man-db (2.10.2-1) ...
Scanning processes...
Scanning linux images...

Running kernel seems to be up-to-date.

No services need to be restarted.

No containers need to be restarted.

No user sessions are running outdated binaries.

No VM guests are running outdated hypervisor (qemu) binaries on this host.
root@nginx:~# getenforce
Disabled
root@nginx:~#


1. 建立用户和用户组
sudo groupadd nginx
sudo useradd nginx -g nginx -s /sbin/nologin -M

sudo groupadd tengine
sudo useradd tengine -g tengine -s /sbin/nologin -M
sudo passwd tengine

sudo useradd www
sudo passwd www

sudo apt update
sudo apt upgrade


root@nginx:/opt/tngx310/conf# sudo groupadd tengine
sudo useradd tengine -g tengine -s /sbin/nologin -M
groupadd: group 'tengine' already exists
useradd: user 'tengine' already exists
root@nginx:/opt/tngx310/conf# passwd tengine
New password:
Retype new password:
passwd: password updated successfully
root@nginx:/opt/tngx310/conf#
root@nginx:/opt/tngx310/conf# id tengine
uid=1001(tengine) gid=1001(tengine) groups=1001(tengine)
root@nginx:/opt/tngx310/conf#
root@nginx:/opt/tngx310/conf# nginx -s reload  # 平滑重启
root@nginx:/opt/tngx310/conf# ps -ef | grep nginx
root        1563       1  0 06:11 ?        00:00:00 nginx: master process ./nginx
tengine     1673    1563  0 06:25 ?        00:00:00 nginx: worker process
root        1675    1307  0 06:26 pts/0    00:00:00 grep --color=auto nginx


2. 在线安装依赖
sudo apt -y install gcc make openssl libssl-dev libpcre3 libpcre3-dev libgd-dev vim wget net-tools build-essential libtool zlib1g-dev

3.下载并解压 tengine 源代码
wget https://tengine.taobao.org/download/tengine-3.1.0.tar.gz
tar -zxvf tengine-3.1.0.tar.gz
root@nginx:/opt# cd tengine-3.1.0
root@nginx:/opt/tengine-3.1.0# ls
AUTHORS.te  CHANGES     CHANGES.te  configure  docs  LICENSE  modules   README.markdown  tests
auto        CHANGES.cn  conf        contrib    html  man      packages  src              THANKS.te
root@nginx:/opt/tengine-3.1.0#

# 预编译源代码
sudo ./configure --prefix=/usr/local/nginx \
--user=nginx --group=nginx \
--with-http_stub_status_module --with-http_ssl_module \
--with-http_realip_module --with-http_gzip_static_module \
--with-file-aio --with-http_realip_module


./configure --prefix=/usr/local/nginx \
--user=nginx --group=nginx \
--with-http_gzip_static_module \
--with-http_flv_module \
--with-http_ssl_module \
--with-http_realip_module \
--with-http_v2_module \
--with-http_sub_module \
--with-http_mp4_module \
--with-http_stub_status_module \
--with-http_gzip_static_module \
--with-pcre --with-stream \
--with-stream_ssl_module \
--with-stream_realip_module


./configure \
--prefix=/usr/local/nginx-1.17.8 \
--sbin-path=/usr/sbin/nginx \
--conf-path=/etc/nginx/nginx.conf \
--error-log-path=/var/log/nginx/error.log \
--http-log-path=/var/log/nginx/access.log \
--pid-path=/var/run/nginx.pid \
--lock-path=/var/run/nginx.lock \
--http-client-body-temp-path=/var/tmp/nginx/client \
--http-proxy-temp-path=/var/tmp/nginx/proxy \
--http-fastcgi-temp-path=/var/tmp/nginx/fcgi \
--http-uwsgi-temp-path=/var/tmp/nginx/uwsgi \
--http-scgi-temp-path=/var/tmp/nginx/scgi \
--user=nginx \
--group=nginx \
--with-pcre \
--with-http_v2_module \
--with-http_ssl_module \
--with-http_realip_module \
--with-http_addition_module \
--with-http_sub_module \
--with-http_dav_module \
--with-http_flv_module \
--with-http_mp4_module \
--with-http_gunzip_module \
--with-http_gzip_static_module \
--with-http_random_index_module \
--with-http_secure_link_module \
--with-http_stub_status_module \
--with-http_auth_request_module \
--with-mail \
--with-mail_ssl_module \
--with-file-aio \
--with-ipv6 \
--with-http_v2_module \
--with-threads \
--with-stream \
--with-stream_ssl_module


./configure \
--prefix=/usr/local/nginx-1.17.8 \
--sbin-path=/usr/sbin/nginx \
--conf-path=/etc/nginx/nginx.conf \
--error-log-path=/var/log/nginx/error.log \
--http-log-path=/var/log/nginx/access.log \
--pid-path=/var/run/nginx.pid \
--lock-path=/var/run/nginx.lock \
--http-client-body-temp-path=/var/tmp/nginx/client \
--http-proxy-temp-path=/var/tmp/nginx/proxy \
--http-fastcgi-temp-path=/var/tmp/nginx/fcgi \
--http-uwsgi-temp-path=/var/tmp/nginx/uwsgi \
--http-scgi-temp-path=/var/tmp/nginx/scgi \
--user=nginx \
--group=nginx \
--with-pcre=../pcre-8.35 \
--with-http_v2_module \
--with-http_ssl_module \
--with-http_realip_module \
--with-http_addition_module \
--with-http_sub_module \
--with-http_dav_module \
--with-http_flv_module \
--with-http_mp4_module \
--with-http_gunzip_module \
--with-http_gzip_static_module \
--with-http_random_index_module \
--with-http_secure_link_module \
--with-http_stub_status_module \
--with-http_auth_request_module \
--with-mail \
--with-mail_ssl_module \
--with-file-aio \
--with-ipv6 \
--with-http_v2_module \
--with-threads \
--with-stream \
--with-stream_ssl_module

# 编译源代码
sudo make -j4

# 安装 nginx
sudo make -j4 install

# 查看nginx 版本号
sudo /usr/local/nginx/sbin/nginx -v

# 检查 nginx 配置文件是否正确
sudo /usr/local/nginx/sbin/nginx -t

# 启动nginx
sudo /usr/local/nginx/sbin/nginx

# 重新载入配置文件
sudo /usr/local/nginx/sbin/nginx -s reload

# 快速关闭nginx
sudo /usr/local/nginx/sbin/nginx -s stop

# 关闭Nginx
sudo /usr/local/nginx/sbin/nginx -s quit

# 编写启动脚本
cd /usr/lib/systemd/system/
sudo vim nginx.service
[Unit]
Description=nginx
After=network.target remote-fs.target nss-lookup.target

[Service]
Type=forking
PIDFile=/usr/local/nginx/logs/nginx.pid
ExecStartPost=/bin/sleep 0.1
ExecStartPre=/usr/local/nginx/sbin/nginx -t -c /usr/local/nginx/conf/nginx.conf
ExecStart=/usr/local/nginx/sbin/nginx -c /usr/local/nginx/conf/nginx.conf
ExecReload=/bin/kill -s HUP $MAINPID
ExecStop= /bin/kill -s QUIT $MAINPID
PrivateTmp=true

[Install]
WantedBy=multi-user.target


# 重新加载服务文件
sudo systemctl daemon-reload

sudo systemctl start|stop|reload|restart|status nginx.service

# 开机子启
sudo systemctl enable nginx.service

# 关闭开机子启
sudo systemtl disable nginx.service
Nginx配置文件语法
nginx.conf 由指令与指令块构成
每行语句由分号结束,指令和参数之间由空格分隔
指令块可以大括号{}组织多条指令块
nginx配置文件中#号添加注释信息
nginx支持 $变量 使用变量
nginx支持include,组合多个配置文件
nginx部分指令支持正则表达式,如 rewrite重写指令
root@nginx:/opt/tngx310/conf# ls
fastcgi.conf          fastcgi_params          koi-utf  mime.types          nginx.conf          scgi_params          uwsgi_params          win-utf
fastcgi.conf.default  fastcgi_params.default  koi-win  mime.types.default  nginx.conf.default  scgi_params.default  uwsgi_params.default


root@nginx:/opt/tngx310/conf# pwd
/opt/tngx310/conf


root@nginx:/opt/tngx310/conf# cp nginx.conf nginx.conf.bak

root@nginx:/opt/tngx310/conf# ls
fastcgi.conf          fastcgi_params          koi-utf  mime.types          nginx.conf      nginx.conf.default  scgi_params.default  uwsgi_params.default
fastcgi.conf.default  fastcgi_params.default  koi-win  mime.types.default  nginx.conf.bak  scgi_params         uwsgi_params         win-utf
root@nginx:/opt/tngx310/conf#


root@nginx:/opt/tngx310/conf# vim nginx.conf
root@nginx:/opt/tngx310/conf# nginx -s reload
root@nginx:/opt/tngx310/conf# ls ../logs/
access.log  error.log  nginx.pid
root@nginx:/opt/tngx310/conf# cat ../logs/nginx.pid
1563
主配置文件代码解释 vim /opt/tngx310/conf/nginx.conf
=================全局配置参数  start================
# user nobody;
worker_processes 1;
# error_log logs/error.log;
# error_log logs/error.log notice;
# error_log logs/error.log info;
# error_log "pipe:rollback logs/error_log interval=1d baknum=7 maxsize=2G";

# pid		logs/nginx.pid

=================全局配置参数  end================

--------------局部配置参数	start---------------------
events {
	worker_connections	1024;	# 定义 nginx 的链接数限制  属于局部配置
}

--------------局部配置参数	end---------------------


~~~~~~~~~~~nginx 最核心的配置参数	start~~~~~~~~~~~~~~
# 都是通过 http{} 标签来定义
# include,default_type,server 这三个变量参数就是由http{}标签所定义和控制
http {
	include		mime.types;
	default_type	application/octet-stream;

	# server 是有关nginx的虚拟主机配置  属于局部配置
	# listen,server_name,location 这三个变量参数就是server{}标签所定义和控制
	server {
		listen		80;
		server_name		localhost;

		# location 是有关 nginx 网页根目录配置 属于局部配置
		# root,index 这两个变量参数就仅仅针对location{}标签所定义和控制
		location / {
			root	html;
			index	index.html	index.htm;
		}
	}
}
~~~~~~~~~~~nginx 最核心的配置参数	end~~~~~~~~~~~~~~
nginx.conf指令注释
Nginx配置文件 nginx.conf 中文详解
# 定义Nginx运行的用户和用户组
user www  www;		# nginx 运行时用户和用户组信息

# nginx 进程数,建议设置为等于 CPU 总核心数
worker_processes 8;

# 全局错误日志定义类型,[ debug | info | notice | warn | error | crit ]
error_log /usr/local/nginx/logs/error.log info;

# 进程 pid 文件
pid /usr/local/nginx/logs/nginx.pid;


# 指定进程可以打开的最大描述符:数目
# 工作模式与连接数上限
# 这个指令是指当一个 nginx 进程打开的最多文件描述符数目,理论值应该是最多打开文件数 (ulimit -n) 与 nginx 进程数相当...
# 现在在 linux 2.6 内核下开启文件打开数为65535,worker_rlimit_nofile就相应应该填写65535.
# 这是因为nginx调度时分配请求到进程并不是那么的均衡,所以假如填写 10240,总并发量达到3-4万时就有进程可能超过10;
worker_rlimit_nofile 65535;


events
{
	# 参考事件模型,use [ kqueue | rtsig | epoll | /dev/poll | select | poll ]; epoll模型
	# 是 linux 2.6 以上版本内核中的高性能网络 I/O 模型,linux 建议 epoll,如果跑在 FreeBSD 上面,就用 kqueue 模型。
	# 与 apache 相类,nginx 针对不同的操作系统,有不同的事件模型
	# A) 标准事件模型
	# Select,poll 属于标准事件模型,如果当前系统不存在更有效的方法,nginx 会选择 select 或 poll
	# B) 高效事件模型
	# Kqueue: 使用于 FreeBSD 4.1+,OpenBSD 2.9+,NetBSD 2.0 和 MacOS X.使用双处理器的MasOS X系统使用...
	# Epoll: 使用于 Linux 内核2.6版本及以后的系统
	# /dev/poll: 使用于 Solaris 7 11/99+.HP/UX 11.22+ (eventport),IRIX 6.5.15+ 和 Tru64 UNIX 5...
	# Eventport: 使用于 Solaris10. 为了防止出现内核崩溃的问题,有必要安装安全补丁。
	use epoll;

	# 单个进程最大连接数 (最大连接数=连接数+进程数)
	# 根据硬件调整,和前面工作进程配合起来用,尽量大,但是别把CPU跑到100%就行。每个进程允许的最多连接数,理论上...
	worker_connections 65535;


	# keepalive超时时间。
	keepalive_timeout 60;

	# 客户端请求头部的缓冲区大小。这个可以根据你的系统分页大小来设置。一般一个请求头的大小不会超过1k,不过由于一...
	# 分页大小可以用命令 getconf PAGESIZE 取得。
	# getconf PAGESIZE
	root@nginx:/opt/tngx310/conf# getconf PAGESIZE
	4096
	# 但也有 client_header_buffer_size 超过4k的情况,但是 client_header_buffer_size 该值必须设置为 "系统分..."
	client_header_buffer_size 4k;

	# 这个是指多长时间检查一次缓存的有效信息。
	# 语法:open_file_cache_valid time 默认值:open_file_cache_valid 60 使用字段:http,server.location...
	open_file_cache_valid 80s;

	# open_file_cache 指令中的 inactive参数时间内文件的最少使用次数,如果超过这个数字,文件描述符一直是在缓存...
	# 语法:open_file_cache_min_uses number 默认值:open_file_cache_min_uses 1 使用字段:http,server,location...
	open_file_cache_min_uses 1;

	# 语法:open_file_cache_errors on | off 默认值:open_file_cache_errors off 使用字段:http,server,location...
	open_file_cache_errors on;
}


# 设定 http 服务器,利用它的反向代理功能提供负载均衡支持
http
{
	# 文件扩展与文件类型映射表
	include mime.types;

	# 默认文件类型
	default_type application/octet-stream;

	# 默认编码
	# charset utf-8;

	# 服务器名字的hash表大小
	# 保存服务器名字的 hash 表是由指令 server_names_hash_max_size 和 server_names_hash_bucket_size 所控制...
	server_names_hash_bucket_size 128;


	# 客户端请求头部的缓冲区大小,这个可以根据你的系统分页大小来设置,一般一个请求的头部大小不会超过1k,不过由于...
	client_header_buffer_size 32k;


	# 客户端请求头缓冲大小,nginx默认会用 client_header_buffer_size 这个 buffer来读取 header 值,如果 header 过...
	large_client_header_buffers 4 64k;


	# 设定通过 nginx 上传文件的大小
	client_max_body_size 8m;

	#开启高效文件传输模式,sendfile 指令指定 nginx 是否调用 sendfile 函数来输出文件,对于普通应用设为 on,如果...
	# sendfile 指令指定 nginx 是否调用 sendfile 函数 (zero copy 方式) 来输出文件,对于普通应用,必须设为 on ...
	sendfile on;


	# 开启目录列表访问,合适下载服务器,默认关闭。
	autoinde* on;


	# 此选项允许或禁止使用 socket 的 TCP_CORK的选项,此选项仅在使用 sendfile 的时候使用
	tcp_nopush on;

	tcp_nodelay on;


	# 长连接超时时间,单位是秒
	keepalive_timeout 120;


	# FastCGI 相关参数是为了改善网站的性能:减少资源占用,提高访问速度。下面参数看字面意思都能理解。
	fastcgi_connect_timeout 300;
	fastcgi_send_timeout 300;
	fastcgi_read_timeout 300;
	fastcgi_buffer_size 64k;
	fastcgi_buffers 4 64k;
	fastcgi_busy_buffers_size 128k;
	fastcgi_temp_file_write_size 128k;

	# gzip 模块设置
	gzip on;	# 开启gzip压缩输出
	gzip_min_length 1k;		# 最小压缩文件大小
	gzip_buffers 4 16k;		# 压缩缓冲区
	gzip_http_version 1.0;	# 压缩版本 (默认 1.1,前端如果是 squid2.5请使用1.0)
	gzip_comp_level 2;		# 压缩等级
	gzip_types text/plain application/x-javascript text/css application/xml;#压缩类型,默认.
	gzip_vary on;

	# 开启限制 IP 连接数的时候需要使用
	# limit_zone crawler $binary_remote_addr 10m;

	# 负载均衡配置
	upstream jh.w3cschool.cn {

		# upstream的负载均衡,weight是权重,可以根据机器配置定义权重,weight参数表示权值,权值越高被分配到的几率就越高...
		server 192.168.80.121:80 weight=3;
		server 192.168.80.122:80 weight=2;
		server 192.168.80.123:80 weight=3;

	# nginx 的 upstream 目前支持4种方式的分配
	# 1. 轮询 (默认)
	# 每个请求按时间顺序逐一分配到不同的后端服务器,如果后端服务器down掉,能自动剔除。

	# 2. weight
	# 指定轮询几率,weight 和访问比率成正比,用于后端服务器性能不均的情况。
	# 例如:
	# upstream bakend {
	# 		server 192.168.0.14 weight=10;
	# 		server 192.168.0.15 weight=10;
	#}
	# 2).ip_hash
	# 每个请求按访问ip的hash结果分配,这样每个访客固定访问一个后端服务器,可以解决 session的问题。
	# 例如:
	# upstream bakend {
	# 		ip_hash;
	# 		server 192.168.0.14:88;
	# 		server 192.168.0.15:80;
	#}
	#3.fair (第三方)
	# 按后端服务器的响应时间来分配请求,响应时间短的优先分配
	# upstream bakend {
	# 		server server1;
    # 		server server2;
    #		fair;
	#}
	# 4. url_hash (第三方)
	# 按访问 url 的 hash 结果来分配请求,使每个 url 定向到同一个后端服务器,后端服务器未缓存时比较有效
	# 例如:在 upstream 中加入 hash 语句,server 语句中不能写入 weight 等其他的参数,hash_method是使用的hash...
	# upstream backend {
	# 		server squid1:3128;
	# 		server squid2:3128;
	# 		hash $request_uri;
	# 		hash_method crc32;
	#}

	# tips:
	# upsteam backend {# 定义负载均衡设备的IP及设备状态}{
	# 		ip_hash;
	# 		server 127.0.0.1:9090 down;
	# 		server 127.0.0.1:8080 weight=2;
	#		server 127.0.0.1:6060;
	# 		server 127.0.0.1:7070 backup;
	#}
	# 在需要使用负载均衡的 server 中增加 proxy_pass http://backend;

	# 每个设备的状态设置为:
	# 1. down 表示单前的server暂时不参与负载
	# 2. weight 为weight 越大,负载权重就越大
	# 3. max_fails: 允许请求失败的次数默认为1,当超过最大次数时,返回 proxy_next_upstream 模块定义的错误...
	# 4. fail_timeout:max_fails 次失败后,暂停的时间。
	# 5.backup:其它所有的非backup或者忙的时候,请求backup机器。所以这台机器压力会最轻。

	# nginx 支持同时设置多组的负载均衡,用来给不用的 server 使用。
	# client_body_in_file_only 设置为 on 可以讲 client post 过来的数据记录到文件中用来做 debug
	# client_body_temp_path 设置记录文件的目录,可以设置最多3层
	# location 对 URL 进行匹配,可以进行重定向或者进行新的代理 负载均衡
  }


  # 虚拟主机的配置
  server
  {
  	# 监听端口
  	listen	80;

  	# 域名可以用多个,用空格隔开
  	server_name www.w3cschool.cn w3cschool.cn;
  	index index.html index.htm index.php;
  	root /data/www/w3cschool;


  	# 对*****进行负载均衡
  	location ~ .*.(php|php5) ?$
  	{
  		fastcgi_pass 127.0.0.1:9000;
  		fastcgi_index index.php;
  		include fastcgi.conf;
  	}


  	# 图片缓存时间设置
  	location ~ .*. (gif|jpg|jpeg|png|bmp|swf)$
  	{
  		expires 10d;
  	}


  	# JS 和 CSS 缓存时间设置
  	location ~ .*. (js|css) ?$
  	{
  		expires 1h;
  	}


  	# 日志格式设定
  	# $remote_addr与$http_x_forwarded_for 用以记录客户端的 IP 地址;
  	# $remote_user: 用来记录客户端用户名称;
  	# $time_local: 用来记录访问时间与时区;
  	# $request: 用来记录请求的url与http协议;
  	# $status: 用来记录请求状态,成功是200;
  	# $body_bytes_sent: 记录发送给客户端文件主体内容大小;
  	# $http_referer: 用来记录从那个页面链接访问过来的;
  	# $http_user_agent: 记录客户浏览器的相关信息;
  	# 通常web服务器放在反向代理的后面,这样就不能获取到客户的IP地址了,通过$remote_addr拿到的IP地址是反向代理...
  	log_format acces '$remote_addr - $remote_user [$time_local] "$request"'
  	'$status $body_bytes_sent "$http_referer"'
  	'"$http_user_agent" $http_x_forwarded_for';


  	# 定义本虚拟主机的访问日志
  	access_log /usr/local/nginx/logs/host.access.log main;
  	access_log /usr/local/nginx/logs/host.access.404.log log404;


  	# 对 "/" 启用反向代理
  	location / {
  		proxy_pass http://127.0.0.1:88;
  		proxy_redirect off;
  		proxy_set_header X-Real-IP $remote_addr;

  		# 后端的 web 服务器可以通过 X-Forwarded-For 获取用户真实 IP
  		proxy_set_header X-Forwarded-For $proxy_addr_x_forwarded_for;

  		# 以下是一些反向代理的配置,可选。
  		proxy_set_header Host $host;

  		# 允许客户端请求的最大单文件字节数
  		client_max_body_size 10m;

  		# 缓存区代理缓存用户端请求的最大字节数
  		# 如果把它设置为比较大的数值,例如256k,那么,无论使用 firefox还是IE浏览器,来提交任意小于256k的。。。
  		# 无论使用 firefox4.0还是IE8.0,提交一个比较大,200k左右的图片,都返回500 Internal Server
  		client_body_buffer_size 128k;

  		# 表示使 nginx 阻止HTTP应答代码为400或者更高的应答。
  		proxy_intercept_errors on;

  		# 后端服务器连接的超时时间—发起握手等候响应超时时间
  		# nginx 跟后端服务器连接超时时间(代理连接超时)
  		proxy_connect_timeout 90;


  		# 后端服务器数据回传时间(代理发送超时)
  		# 后端服务器数据回传时间就是在规定时间之内后端服务器必须传完所有的数据
  		proxy_send_timeout 90;


  		# 连接成功后,后端服务器响应时间(代理接收超时)
  		# 连接成功后——等候后端服务器响应时间—其实已经进入后端的排队之中等候处理(也可以说是后端服务器处理请求...)
  		proxy_read_timeout 90;


  		# 设置代理服务器 (nginx) 保存用户头信息的缓冲区大小
  		# 设置从被代理服务器读取的第一部分应答的缓冲区大小,通常情况下这部分应答中包含一个小的应答头,默认
  		proxy_buffer_size 4k;


  		# proxy_buffers缓冲区,网页平均在32k以下的设置
  		# 设置用于读取应答(来自被代理服务器) 的缓冲区数目和大小,默认情况下也为分页大小,根据操作系统的不同...
  		proxy_buffers 4 32k;


  		# 高负荷下缓存大小(proxy_buffers*2)
  		proxy_busy_buffers_size 64k;


  		# 设置在写入 proxy_temp_path时数据的大小,预防一个工作进程在传递文件时阻塞太长
  		# 设定缓存文件夹大小,大于这个值,将从 upstream 服务器传
  		proxy_temp_file_write_size 64k;
  	}

  	# 设定查看 Nginx 状态的地址
    location /NginxStatus {
    	stub_status on;
    	access_log on;
    	auth_basic "NginxStatus";
    	auth_basic_user_file confpasswd;
    	# htpasswd文件的内容可以用apache 提供的 htpasswd工具来产生。
    }

  	# 本地动静分离反向代理配置
  	# 所有 jsp 的页面均交由tomcat 或 resin 处理
  	location ~ . (jsp|jspx|do) ?$ {
  		proxy_set_header Host $host;
  		proxy_set_header X-Real-IP $remote_addr;
  		proxy_
  		proxy_pass http://127.0.0.1:8080;
  	}


  	# 所有静态文件由 nginx 直接读取不经过 tomcat 或 resin
  	location ~ .*. (htm|html|gif|jpg|jpeg|png|bmp|swf|ioc|rar|zip|txt|flv|mid|doc|ppt|pdf|xls|mp3|wma)$
  	{
  		expires 15d;
  	}
  	location ~ .*. (js|css) ?$
  	{
  		expires 1h;
  	}
  }
}

######Nginx配置文件 nginx.conf中文详解####
nginx.conf详解
nginx.conf重要指令块
核心功能都在于http{}指令块里,http{}块包含了以下指令
server{}指令块,对应一个站点配置,反向代理,静态资源站点
location{},对应一个url
upstream{},定义上游服务,负载均衡池
Nginx 命令行
1.nginx 启停的指令  '-s' 参数,指的是给 nginx 进程发送某种信号。
nginx # 初次启动,它会绑定80端口,首次启动它会注册nginx,直接输入 nginx,如启动后再执行该命令,80端口已经被别人占用了,所以就会提示端口冲突(停止nginx,释放80端口,再启动nginx,就不会报错了)
 nginx -s stop # 停止nginx进程
 nginx -s reload # 热加载,平滑重启,利用 reload 可以在不重启 nginx 进程的情况下,重新读取配置文件。


 # 查看 nginx 的path变量   which nginx
root@nginx:~# which nginx
/opt/tngx310/sbin//nginx
root@nginx:~#

检查nginx配置文件语法是否正确
root@nginx:~# nginx -t
nginx: the configuration file /opt/tngx310/conf/nginx.conf syntax is ok
nginx: configuration file /opt/tngx310/conf/nginx.conf test is successful
root@nginx:~#


# 列出nginx版本信息,且列出所有编译配置参数信息选项然后退出
root@nginx:~# nginx -V
Tengine version: Tengine/3.1.0
nginx version: nginx/1.24.0
built by gcc 11.4.0 (Ubuntu 11.4.0-1ubuntu1~22.04)
built with OpenSSL 3.0.2 15 Mar 2022
TLS SNI support enabled
configure arguments: --prefix=/opt/tngx310 --with-http_ssl_module --with-http_flv_module --with-http_gzip_static_module --with-http_stub_status_module --with-threads --with-file-aio
启停指令
nginx -s stop
nginx -s start
nginx 首次输入表示启动
nginx -s reload
nginx 帮助指令
2.查看 nginx 命令的帮助信息

root@nginx:/opt/tngx310/conf# nginx -h
Tengine version: Tengine/3.1.0
nginx version: nginx/1.24.0
Usage: nginx [-?hvVtTq] [-s signal] [-p prefix]
             [-e filename] [-c filename] [-g directives]

Options:
  -?,-h         : this help	# 输出 nginx 的帮助信息
  -v            : show version and exit	# 列出 nginx 的版本号
  -V            : show version and configure options then exit
  					# 列出nginx版本信息,且列出所有编译配置参数信息选项然后退出
  -t            : test configuration and exit
  					# 测试nginx配置是否正确 检查nginx配置文件语法是否正确
  -T            : test configuration, dump it and exit
  					# 检查配置并且把配置列出来 同时检查配置然后输出配置信息
  -q            : suppress non-error messages during configuration testing
  					# 在检测配置文件期间屏蔽非错误信息
  -s signal     : send signal to a master process: stop, quit, reopen, reload
  					# 给 nginx 主进程发送一个主信号,分别有stop停止运行,quit优雅停止,reopen重新记						# 录nginx 日志,reload重读配置文件等
   -p prefix     : set prefix path (default: /opt/tngx310/)
					# 设置 nginx 目录前缀
  -e filename   : set error log file (default: logs/error.log)
  					#
  -c filename   : set configuration file (default: conf/nginx.conf)
  					# nginx -c /opt/tngx310/conf/nginx.conf 指定配置文件去启动
  -g directives : set global directives out of configuration file
					# 覆盖设置一些默认参数
  -m            : show all modules and exit		# 列出nginx所有支持的模块
  -l            : show all directives and exit	# 列出所有nginx 目录相关的信息
root@nginx:/opt/tngx310/conf#


root@nginx:~# nginx -?
Tengine version: Tengine/3.1.0
nginx version: nginx/1.24.0
Usage: nginx [-?hvVtTq] [-s signal] [-p prefix]
             [-e filename] [-c filename] [-g directives]

Options:
  -?,-h         : this help	#帮助信息
  -v            : show version and exit	# 显示版本
  -V            : show version and configure options then exit	#显示编译信息与版本
  -t            : test configuration and exit	#测试配置文件语法
  -T            : test configuration, dump it and exit	# 测试语法且输出内容
  -q            : suppress non-error messages during configuration testing
  -s signal     : send signal to a master process: stop, quit, reopen, reload	# 发送信号
  -p prefix     : set prefix path (default: /opt/tngx310/)
  -e filename   : set error log file (default: logs/error.log)
  -c filename   : set configuration file (default: conf/nginx.conf)	# 使用指定配置文件
  -g directives : set global directives out of configuration file	#覆盖默认参数

  -m            : show all modules and exit
  -l            : show all directives and exit
root@nginx:~#
Nginx 命令行案例
配置文件重读
在 nginx 正在运行时,如实修改了 nginx.conf 或是新增了一些功能配置,让其生效,可能需要重启整个 nginx 进程,但是你不能保证某个时间段没有用户在访问 nginx,重启会断开用户的连接,造成莫名的故障,因此 nginx 提供了 reload 重载功能,不停止服务,更新配置文件
1.检查当前的 nginx 进程
ps -ef | grep nginx | grep -v grep
root@nginx:~# ps -ef | grep nginx | grep -v grep
root        1331       1  0 10:50 ?        00:00:00 nginx: master process nginx -q
tengine     1332    1331  0 10:50 ?        00:00:00 nginx: worker process
root@nginx:~#

2.修改 nginx.conf 修改配置参数
worker_process 3; # 定义 nginx 工作进程数
root@nginx:~# vim /opt/tngx310/conf/nginx.conf

3. 重新加载 nginx 配置
nginx -s reload


# 重载配置文件实践
root@nginx:~# nginx -s reload
root@nginx:~# nginx -t		检测配置文件是否正确
nginx: the configuration file /opt/tngx310/conf/nginx.conf syntax is ok
nginx: configuration file /opt/tngx310/conf/nginx.conf test is successful
root@nginx:~# ps -ef | grep nginx | grep -v grep
root        1331       1  0 10:50 ?        00:00:00 nginx: master process nginx -q
tengine     1388    1331  0 11:47 ?        00:00:00 nginx: worker process
tengine     1389    1331  0 11:47 ?        00:00:00 nginx: worker process
tengine     1390    1331  0 11:47 ?        00:00:00 nginx: worker process
root@nginx:~#
热加载 nginx -s reload 具体描述如下:
如果你重启,会造成数据丢失
假如是淘宝网运维人员:
他们会选择夜里凌晨3点或者4点去重启服务器,假如淘宝网要做代码更新,他们都不会重启的,只会进行热加载(nginx -s reload),在不停机的情况下更新代码,为什么呢?因为你没发保证在哪一个时间点,没有人在用服务器,你没发保证夜里3点4点5点没有人用淘宝,如果有人在用,你又把进程断了,那么客户端和服务器保持的TCP连接它就会立即断开,可能会导致异常的数据丢失,造成服务损坏,那么nginx提供了一个(nginx -s reload)重载功能,再不停止服务的情况下,更新数据
nginx-master 信号传递
1.master主进程是不处理请求的,而是分配请求,发给 worker 进程,主进程负责重启,热加载,热部署等等
2.master 是根据 nginx.conf 中定义 worker_process 启动时创建的工作进程数
3.当 worker 运行后,master就处于一个等待的状态,等待用户的请求来临,或者系统信号
4.系统管理员可以发送kill指令,或者 nginx -s 信号,这样的形式操控 nginx

由 nginx 模块 ngx_signal_handler 函数来处理传递。
nginx信号集
nginx -s 对应的信号功能如下:
参数		信号		含义
stop	TERM      强制关闭 nginx 服务
null	INT		  强制关闭整个 nginx 服务
quit	QUIT	  优雅的关闭整个 nginx 服务
reopen  USR1	  重新打开日志记录  主要用在nginx热部署和日志切割中会用到
reload	HUB		  重新读取配置文件,并且优雅的退出旧的 worker
nginx热部署功能
nginx作为一个优秀的 web 服务器,优秀的反向代理服务器,并且 nginx 也支持高可用的特性,nginx 还支持热部署的特点。
热部署:服务器规模比较大,服务器禁止宕机的等特性,才会使用热部署功能


热部署的特点:
在不重启或者不关闭进程的情况下,新的应用直接替换就的应用,
比如更换 nginx 的二进制版本,


热部署大致流程
1.备份旧的程序,二进制文件  备份 nginx 命令  默认的路径 /opt/tngx310/sbin/nginx
2. 编译安装新的二进制文件,覆盖旧的二进制文件(再安装一个版本的nginx,且替换旧的 nginx 命令)
3.发送 USR2 信号发给旧的 master 进程
4.发送 WINCH 信号给旧的 master 进程
5.发送 QUIT信号给旧的 master 进程
nginx热部署环境准备
1.准备旧的 nginx 程序版本
root@nginx:~# nginx -v
Tengine version: Tengine/3.1.0
nginx version: nginx/1.24.0


2.准备一个新的 nginx 程序版本
wget https://tengine.taobao.org/download/tengine-3.0.0.tar.gz
nginx热部署实践
nginx工作模式是 master--worker(包工头----干活工人)
我们所说的 nginx 支持 reload 重载,仅仅是 nginx 的 master 进程,在检查配置文件正确之后,正确则更新,错误则返回异常,正确的情况下也不会更改已经建立的worker.只会等待 worker 处理完毕请求之后,杀死旧的worker,然后再从新的配置文件中,运行处新的worker(一旦更换了配置文件,reload master主进程,那么手底下的工人也就会被替换一批了)
nginx 还提供了热部署功能,特点是:在不影响用户体验下,进行软件版本升级或降级,也就是不主动杀死 worker,就能够更换软件的二进制命令。
1. 检查当前机器环境的 nginx 版本
root@nginx:~# nginx -v
Tengine version: Tengine/3.1.0
nginx version: nginx/1.24.0
root@nginx:~# ps -ef | grep nginx
root        1348    1331  0 20:51 pts/0    00:00:00 grep --color=auto nginx
root@nginx:~# /opt/tngx310/sbin/nginx
root@nginx:~# ps -ef | grep nginx
root        1350       1  0 20:52 ?        00:00:00 nginx: master process /opt/tngx310/sbin/nginx
tengine     1351    1350  0 20:52 ?        00:00:00 nginx: worker process
tengine     1352    1350  0 20:52 ?        00:00:00 nginx: worker process
tengine     1353    1350  0 20:52 ?        00:00:00 nginx: worker process
root        1355    1331  0 20:52 pts/0    00:00:00 grep --color=auto nginx
root@nginx:~#

root@nginx:~# curl 127.0.0.1
<!DOCTYPE html>
<html>
<head>
<title>Welcome to tengine!</title>
<style>
    body {
        width: 35em;
        margin: 0 auto;
        font-family: Tahoma, Verdana, Arial, sans-serif;
    }
</style>
</head>
<body>
<h1>Welcome to tengine!</h1>
<p>If you see this page, the tengine web server is successfully installed and
working. Further configuration is required.</p>

<p>For online documentation and support please refer to
<a href="http://tengine.taobao.org/">tengine.taobao.org</a>.</p>

<p><em>Thank you for using tengine.</em></p>
</body>
</html>
root@nginx:~#


2.备份旧的二进制命令
mv /opt/tngx310/sbin/nginx /opt/tngx310/sbin/nginx.310
root@nginx:~# mv /opt/tngx310/sbin/nginx /opt/tngx310/sbin/nginx.310
root@nginx:~# cd /opt/tngx310/sbin/
root@nginx:/opt/tngx310/sbin# ls
nginx.310
root@nginx:/opt/tngx310/sbin#


3.检查旧的二进制命令的编译参数,
root@nginx:/opt/tngx310/sbin# nginx.310 -V
Tengine version: Tengine/3.1.0
nginx version: nginx/1.24.0
built by gcc 11.4.0 (Ubuntu 11.4.0-1ubuntu1~22.04)
built with OpenSSL 3.0.2 15 Mar 2022
TLS SNI support enabled
configure arguments: --prefix=/opt/tngx310 --with-http_ssl_module --with-http_flv_module --with-http_gzip_static_module --with-http_stub_status_module --with-threads --with-file-aio
root@nginx:/opt/tngx310/sbin#


4.下载编译安装新版本的nginx
wget https://tengine.taobao.org/download/tengine-3.0.0.tar.gz
root@nginx:/opt/tngx310/sbin# cd /opt/
root@nginx:/opt# ls
tengine-3.1.0  tengine-3.1.0.tar.gz  tngx310

# 下载
root@nginx:/opt# wget https://tengine.taobao.org/download/tengine-3.0.0.tar.gz
--2024-05-21 22:59:51--  https://tengine.taobao.org/download/tengine-3.0.0.tar.gz
Resolving tengine.taobao.org (tengine.taobao.org)... 59.82.60.20, 2408:4001:f00::3f5
Connecting to tengine.taobao.org (tengine.taobao.org)|59.82.60.20|:443... connected.
HTTP request sent, awaiting response... 200 OK
Length: 3243580 (3.1M) [application/octet-stream]
Saving to: ‘tengine-3.0.0.tar.gz’

tengine-3.0.0.tar.gz                   100%[============================================================================>]   3.09M  9.59MB/s    in 0.3s

2024-05-21 22:59:52 (9.59 MB/s) - ‘tengine-3.0.0.tar.gz’ saved [3243580/3243580]

root@nginx:/opt# ls
tengine-3.0.0.tar.gz  tengine-3.1.0  tengine-3.1.0.tar.gz  tngx310


# 解压缩
root@nginx:/opt# tar -zxvf tengine-3.0.0.tar.gz
tengine-3.0.0/
tengine-3.0.0/.github/


# 进入到源代码目录并查看目录文件
root@nginx:/opt# ls
tengine-3.0.0  tengine-3.0.0.tar.gz  tengine-3.1.0  tengine-3.1.0.tar.gz  tngx310
root@nginx:/opt# cd tengine-3.0.0
root@nginx:/opt/tengine-3.0.0# ls
AUTHORS.te  CHANGES     CHANGES.te  configure  docs  LICENSE  modules   README.markdown  tests
auto        CHANGES.cn  conf        contrib    html  man      packages  src              THANKS.te
root@nginx:/opt/tengine-3.0.0#


# 编译安装源代码   编译三步曲
# 新版本的 nginx 编译参数和旧的保持一致
./configure --prefix=/opt/tngx310 --with-http_ssl_module --with-http_flv_module --with-http_gzip_static_module --with-http_stub_status_module --with-threads --with-file-aio


root@nginx:/opt/tengine-3.0.0# ./configure --prefix=/opt/tngx310 --with-http_ssl_module --with-http_flv_module --with-http_gzip_static_module --with-http_stub_status_module --with-threads --with-file-aio
checking for OS
 + Linux 5.15.0-107-generic x86_64
checking for C compiler ... found
 + using GNU C compiler
 + gcc version: 11.4.0 (Ubuntu 11.4.0-1ubuntu1~22.04)
checking for gcc -pipe switch ... found
checking for -Wl,-E switch ... found
checking for gcc builtin atomic operations ... found
creating objs/Makefile

Configuration summary
  + using threads
  + using system PCRE library
  + using system OpenSSL library
  + using system zlib library
  + jemalloc library is disabled

  nginx path prefix: "/opt/tngx310"
  nginx binary file: "/opt/tngx310/sbin/nginx"
  nginx modules path: "/opt/tngx310/modules"
  nginx configuration prefix: "/opt/tngx310/conf"
  nginx configuration file: "/opt/tngx310/conf/nginx.conf"
  nginx pid file: "/opt/tngx310/logs/nginx.pid"
  nginx error log file: "/opt/tngx310/logs/error.log"
  nginx http access log file: "/opt/tngx310/logs/access.log"
  nginx http client request body temporary files: "client_body_temp"
  nginx http proxy temporary files: "proxy_temp"
  nginx http fastcgi temporary files: "fastcgi_temp"
  nginx http uwsgi temporary files: "uwsgi_temp"
  nginx http scgi temporary files: "scgi_temp"


#  编译三步曲后两步  make && make install
make
make install


root@nginx:/opt/tengine-3.0.0# make && make install
make -f objs/Makefile
make[1]: Entering directory '/opt/tengine-3.0.0'
cc -c -pipe  -O -W -Wall -Wpointer-arith -Wno-unused-parameter -Werror -g  -I src/core -I src/event -I src/event/modules -I src/os/unix -I src/proc -I objs \
        -o objs/src/core/nginx.o \
        src/core/nginx.c
cp conf/uwsgi_params \
        '/opt/tngx310/conf/uwsgi_params.default'
test -f '/opt/tngx310/conf/scgi_params' \
        || cp conf/scgi_params '/opt/tngx310/conf'
cp conf/scgi_params \
        '/opt/tngx310/conf/scgi_params.default'
test -f '/opt/tngx310/conf/nginx.conf' \
        || cp conf/nginx.conf '/opt/tngx310/conf/nginx.conf'
cp conf/nginx.conf '/opt/tngx310/conf/nginx.conf.default'
test -d '/opt/tngx310/logs' \
        || mkdir -p '/opt/tngx310/logs'
test -d '/opt/tngx310/logs' \
        || mkdir -p '/opt/tngx310/logs'
test -d '/opt/tngx310/html' \
        || cp -R html '/opt/tngx310'
test -d '/opt/tngx310/logs' \
        || mkdir -p '/opt/tngx310/logs'
make[1]: Leaving directory '/opt/tengine-3.0.0'
root@nginx:/opt/tengine-3.0.0#


5.检查一下新版的 nginx信息,发现此时已经有2个版本的 nginx 命令
cd /opt/tngx310/sbin
root@nginx:/opt/tengine-3.0.0# cd /opt/tngx310/sbin
root@nginx:/opt/tngx310/sbin# ls
nginx  nginx.310
root@nginx:/opt/tngx310/sbin# nginx -v
Tengine version: Tengine/3.0.0
nginx version: nginx/1.24.0
root@nginx:/opt/tngx310/sbin# ./nginx.310 -v
Tengine version: Tengine/3.1.0
nginx version: nginx/1.24.0
root@nginx:/opt/tngx310/sbin#


6.再次检查当前系统的 nginx 状态 等会进行进程迁移的时候,我们会发现旧的进程会能生成新的进程
# 通过 pid ppid 可以验证 worker process是由 master process 创建的
root@nginx:/opt/tngx310/sbin# ps -ef | grep nginx
root        1346    1  0 22:24 ?  00:00:00 nginx: master process /opt/tngx310/sbin/nginx
tengine     1347    1346  0 22:24 ?        00:00:00 nginx: worker process
tengine     1348    1346  0 22:24 ?        00:00:00 nginx: worker process
tengine     1349    1346  0 22:24 ?        00:00:00 nginx: worker process
root        4354    1301  0 23:26 pts/0    00:00:00 grep --color=auto nginx
root@nginx:/opt/tngx310/sbin#


7.此时发送一个 USR2 信号给 旧的 master process,作用是使得 nginx 旧的版本停止接收用户请求,并且切换为新的 nginx 版本	命令 kill -USR2 `cat /opt/tngx310/logs/nginx.pid` 反引号表示取值
# 查找 master process 进程好  nginx.pid 里面存储的就是 master process 的主进程号
root@nginx:/opt/tngx310/sbin# ls /opt/tngx310/logs/
access.log  error.log  nginx.pid
root@nginx:/opt/tngx310/sbin# cat /opt/tngx310/logs/nginx.pid
1346


# 执行如下命令,给旧的 nginx 发送信号

kill -USR2 `cat /opt/tngx310/logs/nginx.pid`
root@nginx:/opt/tngx310/sbin# kill -USR2 `cat /opt/tngx310/logs/nginx.pid`
root@nginx:/opt/tngx310/sbin#

# 当执行完毕上述命令,nginx-master旧的,首先会重命名它的 pid 文件,然后添加上.oldbin后缀,然后会再启动一个新的 nginx-master 主进程,以及 worker,使用的是新版本的 nginx 二进制命令,此时新的 nginx 就能够自动的接收用户发来的请求,过度到新的 nginx-worker 工作进程上,因此实现了一个平滑过度。
root@nginx:/opt/tngx310/sbin# ls /opt/tngx310/logs/
access.log  error.log  nginx.pid  nginx.pid.oldbin
root@nginx:/opt/tngx310/sbin#


8.此时再次检查新的 nginx 进程状态 发现新的master process 由旧的 master process 生成的
新的 worker process 由 新的 master process 生成的。
root@nginx:/opt/tngx310/sbin# ps -ef | grep nginx
root        1346  1  0 22:24 ?  00:00:00 nginx: master process /opt/tngx310/sbin/nginx
tengine     1347    1346  0 22:24 ?        00:00:00 nginx: worker process
tengine     1348    1346  0 22:24 ?        00:00:00 nginx: worker process
tengine     1349    1346  0 22:24 ?        00:00:00 nginx: worker process
root        4401 1346  0 23:44 ?   00:00:00 nginx: master process /opt/tngx310/sbin/nginx
tengine     4402    4401  0 23:44 ?        00:00:00 nginx: worker process
tengine     4403    4401  0 23:44 ?        00:00:00 nginx: worker process
tengine     4404    4401  0 23:44 ?        00:00:00 nginx: worker process
root        4407    1301  0 23:45 pts/0    00:00:00 grep --color=auto nginx
root@nginx:/opt/tngx310/sbin# ls
nginx  nginx.310
root@nginx:/opt/tngx310/sbin# ./nginx -v
Tengine version: Tengine/3.0.0
nginx version: nginx/1.24.0
root@nginx:/opt/tngx310/sbin# ./nginx.310 -v
Tengine version: Tengine/3.1.0
nginx version: nginx/1.24.0
root@nginx:/opt/tngx310/sbin#


# 再检查一下新的 pid 文件信息
cat /opt/tngx310/logs/nginx.pid
root@nginx:/opt/tngx310/sbin# ls /opt/tngx310/logs/
access.log  error.log  nginx.pid  nginx.pid.oldbin
root@nginx:/opt/tngx310/sbin# cat /opt/tngx310/logs/nginx.pid
4401
root@nginx:/opt/tngx310/sbin# cat /opt/tngx310/logs/nginx.pid.oldbin
1346
root@nginx:/opt/tngx310/sbin#


9.此时发送 WINCH 信号,给旧的 master 进程,让旧的 master process 进程优雅的退出
kill -WINCH `cat /opt/tngx310/logs/nginx.pid.oldbin`

root@nginx:/opt/tngx310/sbin# kill -WINCH `cat /opt/tngx310/logs/nginx.pid.oldbin`
root        1346    1  0 May21 ?  00:00:00 nginx: master process /opt/tngx310/sbin/nginx
root        4401  1346  0 May21 ?  00:00:00 nginx: master process /opt/tngx310/sbin/nginx
tengine     4402    4401  0 May21 ?        00:00:00 nginx: worker process
tengine     4403    4401  0 May21 ?        00:00:00 nginx: worker process
tengine     4404    4401  0 May21 ?        00:00:00 nginx: worker process
root        4436    1301  0 00:17 pts/0    00:00:00 grep --color=auto nginx
root@nginx:/opt/tngx310/sbin#


10.此时如果你觉得 nginx 服务一切正常,就可以干掉旧的 master 主进程,也可以放在哪里做版本回滚。
root@nginx:/opt/tngx310/sbin# kill `cat /opt/tngx310/logs/nginx.pid.oldbin`
root@nginx:/opt/tngx310/sbin# ps -ef | grep nginx | grep -v grep

root@nginx:/opt/tngx310/sbin# ps -ef | grep nginx
root        1346       1  0 May21 ?        00:00:00 nginx: master process /opt/tngx310/sbin/nginx
root        4401    1346  0 May21 ?        00:00:00 nginx: master process /opt/tngx310/sbin/nginx
tengine     4402    4401  0 May21 ?        00:00:00 nginx: worker process
tengine     4403    4401  0 May21 ?        00:00:00 nginx: worker process
tengine     4404    4401  0 May21 ?        00:00:00 nginx: worker process
root        4436    1301  0 00:17 pts/0    00:00:00 grep --color=auto nginx
root@nginx:/opt/tngx310/sbin# ps -ef | grep nginx | grep -v grep
root        1346       1  0 May21 00:00:00 nginx: master process /opt/tngx310/sbin/nginx
root        4401    1346  0 May21 00:00:00 nginx: master process /opt/tngx310/sbin/nginx
tengine     4402    4401  0 May21 ?        00:00:00 nginx: worker process
tengine     4403    4401  0 May21 ?        00:00:00 nginx: worker process
tengine     4404    4401  0 May21 ?        00:00:00 nginx: worker process
root@nginx:/opt/tngx310/sbin# kill `cat /opt/tngx310/logs/nginx.pid.oldbin`
root@nginx:/opt/tngx310/sbin# ps -ef | grep nginx | grep -v grep
root        4401  1  0 May21 ?     00:00:00 nginx: master process /opt/tngx310/sbin/nginx
tengine     4402    4401  0 May21 ?        00:00:00 nginx: worker process
tengine     4403    4401  0 May21 ?        00:00:00 nginx: worker process
tengine     4404    4401  0 May21 ?        00:00:00 nginx: worker process
root@nginx:/opt/tngx310/sbin#


11.此时 nginx 版本热部署,热更换实验就结束了
nginx 日志概念描述
[网络设备](https://baike.baidu.com/item/网络设备/7667828?fromModule=lemma_inlink)、系统及[服务程序](https://baike.baidu.com/item/服务程序/16915606?fromModule=lemma_inlink)等,在运作时都会产生一个叫log的[事件记录](https://baike.baidu.com/item/事件记录/2193356?fromModule=lemma_inlink);每一行日志都记载着日期、时间、使用者及动作等相关操作的描述

Windows[网络操作系统](https://baike.baidu.com/item/网络操作系统/3997?fromModule=lemma_inlink)都设计有各种各样的[日志文件](https://baike.baidu.com/item/日志文件/1505348?fromModule=lemma_inlink),如[应用程序](https://baike.baidu.com/item/应用程序/5985445?fromModule=lemma_inlink)日志,[安全日志](https://baike.baidu.com/item/安全日志/761771?fromModule=lemma_inlink)、[系统日志](https://baike.baidu.com/item/系统日志/9389581?fromModule=lemma_inlink)、Scheduler服务日志、[FTP](https://baike.baidu.com/item/FTP/13839?fromModule=lemma_inlink)日志、WWW日志、DNS服务器日志等等,这些根据你的系统开启的服务的不同而有所不同。我们在系统上进行一些操作时,这些日志文件通常会记录下我们操作的一些相关内容,这些内容对[系统安全](https://baike.baidu.com/item/系统安全/400721?fromModule=lemma_inlink)工作人员相当有用。比如说有人对系统进行了IPC探测,系统就会在安全日志里迅速地记下探测者探测时所用的IP、时间、[用户名](https://baike.baidu.com/item/用户名/7241132?fromModule=lemma_inlink)等,用FTP探测后,就会在FTP日志中记下[IP](https://baike.baidu.com/item/IP/0?fromModule=lemma_inlink)、时间、探测所用的用户名等。

当然,日志数据对于实现网络安全的价值有多大取决于两个因素:第一,你的系统和设备必须进行合适的设置以便记录你需要的数据。第二,你必须有合适的工具、培训和可用的资源来分析收集到的数据。

当前的[计算机病毒](https://baike.baidu.com/item/计算机病毒/174112?fromModule=lemma_inlink)越来越复杂,对于网上求助这种远程的判断和分析来说,必须借助第三方的[软件分析](https://baike.baidu.com/item/软件分析/4734414?fromModule=lemma_inlink)。流行的辅助分析工具有sawmill、Hijackthis 及SREng。

通过专业的日志分析工具的[完整性](https://baike.baidu.com/item/完整性/949221?fromModule=lemma_inlink)分析,让你从数据的海洋中摆脱出来,并可以直接的以WEB界面的形式查看所需信息,解除专业性烦恼
nginx 日志切割
日志切割是线上很常见的操作,控制单个文件大小,便于管理日志
针对 nginx 的访客日志进行切割  tail more 等读取大文件内容
1. 查看当前 nginx 日志
root@nginx:/opt/tngx310/logs# ll -h
total 27M
drwxr-xr-x  2 root root 4.0K May 22 00:26 ./
drwxr-xr-x 11 root root 4.0K May 20 12:48 ../
-rw-r--r--  1 root root  27M May 22 02:17 access.log
-rw-r--r--  1 root root 107K May 22 02:03 error.log
-rw-r--r--  1 root root    5 May 21 23:44 nginx.pid
root@nginx:/opt/tngx310/logs#


# 大致看下日志内容  tail -50 access.log
root@nginx:/opt/tngx310/logs# tail -5 access.log
127.0.0.1 - - [22/May/2024:02:17:54 +0000] "GET / HTTP/1.0" 200 555 "-" "ApacheBench/2.3"
127.0.0.1 - - [22/May/2024:02:17:54 +0000] "GET / HTTP/1.0" 200 555 "-" "ApacheBench/2.3"
127.0.0.1 - - [22/May/2024:02:17:54 +0000] "GET / HTTP/1.0" 200 555 "-" "ApacheBench/2.3"
127.0.0.1 - - [22/May/2024:02:17:54 +0000] "GET / HTTP/1.0" 200 555 "-" "ApacheBench/2.3"
127.0.0.1 - - [22/May/2024:02:17:54 +0000] "GET / HTTP/1.0" 200 555 "-" "ApacheBench/2.3"
root@nginx:/opt/tngx310/logs#


2.给当前日志文件重命名,注意用 mv 而不是 cp (涉及到文件 inode知识)
mv access.log access.log$(date +"%Y-%m-%d--%H:%M:%S")
mv access.log "access.log_$(date +"%Y-%m-%d--%H:%M:%S")"
mv access.log "access.log_$(date +"%Y-%m-%d")"
mv 'access.log_$(date +"%Y-%m-%d")' "access.log_$(date +"%Y-%m-%d")"

root@nginx:/opt/tngx310/logs# mv access.log 'access.log_$(date +"%Y-%m-%d")'
root@nginx:/opt/tngx310/logs# ls
'access.log_$(date +"%Y-%m-%d")'   error.log   nginx.pid
root@nginx:/opt/tngx310/logs# mv 'access.log_$(date +"%Y-%m-%d")' "access.log_$(date +"%Y-%m-%d")"
root@nginx:/opt/tngx310/logs# ls
access.log_2024-05-22  error.log  nginx.pid
root@nginx:/opt/tngx310/logs#


3.发送 USR1 信号给 nginx-master,重新打开日志记录,生成新的日志文件
# 日志切割  (就是把当前日志重命名,然后执行 nginx -s reopen  生成新的日志文件access.log, 此时access.log 大小为0,这就是新的日志,旧的日志就分割出来了)
# 发送信号给 nginx 主进程,给他发送一个重新打开的信号,让 nginx 生成新的日志文件
nginx -s reopen  # 这个命令等同于 kill -USR1 `cat nginx.pid`
root@nginx:/opt/tngx310/logs# ll -h
total 27M
drwxr-xr-x  2 root    root 4.0K May 22 04:01 ./
drwxr-xr-x 11 root    root 4.0K May 20 12:48 ../
-rw-r--r--  1 tengine root    0 May 22 04:01 access.log
-rw-r--r--  1 root    root  27M May 22 02:17 access.log_2024-05-22
-rw-r--r--  1 tengine root 107K May 22 04:01 error.log
-rw-r--r--  1 root    root    5 May 22 04:01 nginx.pid
root@nginx:/opt/tngx310/logs#


4.注意,在以上的 nginx 重命名日志切割,不要着急立即对文件修改,且要 sleep 等待 1 秒
由于 nginx 的工作模式,master 下发指令给 worker 只是做了标记,当业务量大的时候,这个修改操作可能会慢一点,不会立即生效,定期做日志切割。


5.在生成环境下,日志切割主要是以定时任务来材质,以 crontab 显示,执行cut_nginx_log.sh脚本的
编写一个定时日志切割的脚本
vim cut_nginx_log.sh	# 写入如下内容:
root@nginx:~# mkdir myscripts
root@nginx:~# ls
myscripts  snap
root@nginx:~# cd myscript
-bash: cd: myscript: No such file or directory
root@nginx:~# cd myscripts/
root@nginx:~/myscripts# vim cut_nginx_log.sh
root@nginx:~/myscripts# cat cut_nginx_log.sh
#!/bin/bash
# 脚本写入 crontab, 每天0点执行,这是一个 nginx 日志切割脚本

# nginx 日志存放点
logs_path="/opt/tngx310/logs/"
mkdir -p ${logs_path}$(date -d "yesterday" +"%Y")/$(date -d "yesterday" +"%m")
mv ${logs_path}access.log ${logs_path}$(date -d "yesterday" +"%Y")/$(date -d "yesterday" +"%m")/access_$(date -d "yesterday" +"%Y-%m-%d").log

kill -USR1 `cat /opt/tngx310/logs/nginx.pid


root@nginx:/opt/tngx310/logs# tree
.
├── 2024
│   └── 05
│       └── access_2024-05-21.log
├── access.log
├── access.log_2024-05-22
├── cut_nginx_log.sh
├── error.log
└── nginx.pid

2 directories, 6 files
root@nginx:/opt/tngx310/logs# cat cut_nginx_log.sh
#!/bin/bash
# 脚本写入 crontab, 每天0点执行,这是一个 nginx 日志切割脚本

# nginx 日志存放点
logs_path="/opt/tngx310/logs/"
mkdir -p ${logs_path}$(date -d "yesterday" +"%Y")/$(date -d "yesterday" +"%m")
mv ${logs_path}access.log ${logs_path}$(date -d "yesterday" +"%Y")/$(date -d "yesterday" +"%m")/access_$(date -d "yesterday" +"%Y-%m-%d").log

kill -USR1 `cat /opt/tngx310/logs/nginx.pid`

root@nginx:/opt/tngx310/logs#


cut_nginx_log.sh 脚本解释:
`
root@nginx:~/myscripts# cat cut_nginx_log.sh
#!/bin/bash		定义用什么解释器去执行命令,我们这里用的是 '/bin/bash'解释器
# 脚本写入 crontab 定时任务, 每天0点执行,这是一个 nginx 日志切割脚本

# nginx 日志存放点
logs_path="/opt/tngx310/logs/"	# 定义变量 nginx 日志存放路径
mkdir -p ${logs_path}$(date -d "yesterday" +"%Y")/$(date -d "yesterday" +"%m")
# 创建文件夹
mv ${logs_path}access.log ${logs_path}$(date -d "yesterday" +"%Y")/$(date -d "yesterday" +"%m")/access_$(date -d "yesterday" +"%Y-%m-%d").log
# 给文件重新命名

kill -USR1 `cat /opt/tngx310/logs/nginx.pid`
# 生成新的access.log文件  也可以用 nginx -s reopen
`
'${}'	表示取出变量的值
'$(date -d "yesterday" +"%Y")'  创建昨天的年份
'$(date -d "yesterday" +"%m")'	创建昨天的月份
'${logs_path}$(date -d "yesterday" +"%Y")/$(date -d "yesterday" +"%m")' # 创建的文件夹
'access_$(date -d "yesterday" +"%Y-%m-%d").log' 重新命名的日志


root@nginx:/opt/tngx310/logs# ls
2024  access.log_2024-05-22  error.log  nginx.pid
root@nginx:/opt/tngx310/logs# pwd
/opt/tngx310/logs
root@nginx:/opt/tngx310/logs# cd /root/myscripts/
root@nginx:~/myscripts# ls
cut_nginx_log.sh
root@nginx:~/myscripts# cp cut_nginx_log.sh /opt/tngx310/logs/
root@nginx:~/myscripts#


6.把该脚本的执行,加入crontab 每天0点执行
crontab -e		# 打开定时任务
分	时	日	月	周
*	*	*	*	*	命令
0	0	*	*	*	/bin/bash /root/myscripts/cut_nginx_log.sh

root@nginx:~/myscripts# crontab -e
crontab: installing new crontab		# 安装了一个新的定时任务
root@nginx:~/myscripts#

# 查看定时任务	crontab -l
root@nginx:~/myscripts# crontab -l
# Edit this file to introduce tasks to be run by cron.
#
# Each task to run has to be defined through a single line
# indicating with different fields when the task will be run
# and what command to run for the task
#
# To define the time you can provide concrete values for
# minute (m), hour (h), day of month (dom), month (mon),
# and day of week (dow) or use '*' in these fields (for 'any').
#
# Notice that tasks will be started based on the cron's system
# daemon's notion of time and timezones.
#
# Output of the crontab jobs (including errors) is sent through
# email to the user the crontab file belongs to (unless redirected).
#
# For example, you can run a backup of all your user accounts
# at 5 a.m every week with:
# 0 5 * * 1 tar -zcf /var/backups/home.tgz /home/
#
# For more information see the manual pages of crontab(5) and cron(8)
#
# m h  dom mon dow   command


0       0       *       *       *       /bin/bash /root/myscripts/cut_nginx_log.sh
root@nginx:~/myscripts#


root@nginx:~/myscripts# vim /etc/crontab
root@nginx:~/myscripts# cat /etc/crontab
# /etc/crontab: system-wide crontab
# Unlike any other crontab you don't have to run the `crontab'
# command to install the new version when you edit this file
# and files in /etc/cron.d. These files also have username fields,
# that none of the other crontabs do.

SHELL=/bin/sh
# You can also override PATH, but by default, newer versions inherit it from the environment
#PATH=/usr/local/sbin:/usr/local/bin:/sbin:/bin:/usr/sbin:/usr/bin

# Example of job definition:
# .---------------- minute (0 - 59)
# |  .------------- hour (0 - 23)
# |  |  .---------- day of month (1 - 31)
# |  |  |  .------- month (1 - 12) OR jan,feb,mar,apr ...
# |  |  |  |  .---- day of week (0 - 6) (Sunday=0 or 7) OR sun,mon,tue,wed,thu,fri,sat
# |  |  |  |  |
# *  *  *  *  * user-name command to be executed
17 *    * * *   root    cd / && run-parts --report /etc/cron.hourly
25 6    * * *   root    test -x /usr/sbin/anacron || ( cd / && run-parts --report /etc/cron.daily )
47 6    * * 7   root    test -x /usr/sbin/anacron || ( cd / && run-parts --report /etc/cron.weekly )
52 6    1 * *   root    test -x /usr/sbin/anacron || ( cd / && run-parts --report /etc/cron.monthly )
#
root@nginx:~/myscripts#

0	0	*	*	*	/bin/bash /root/myscripts/cut_nginx_log.s


# 查看文件大小
root@nginx:/opt/tngx310/logs# du -h ./*
4.0K    ./access.log
4.0K    ./error.log
4.0K    ./nginx.pid
root@nginx:/opt/tngx310/logs# cat access.log
192.168.222.1 - - [20/May/2024:12:59:10 +0000] "GET / HTTP/1.1" 200 555 "-" "Mozilla/5.0 (Windows NT 10.0; Win64; x64) AppleWebKit/537.36 (KHTML, like Gecko) Chrome/126.0.0.0 Safari/537.36"
192.168.222.1 - - [20/May/2024:12:59:10 +0000] "GET /favicon.ico HTTP/1.1" 404 567 "http://192.168.222.133/" "Mozilla/5.0 (Windows NT 10.0; Win64; x64) AppleWebKit/537.36 (KHTML, like Gecko) Chrome/126.0.0.0 Safari/537.36"
127.0.0.1 - - [21/May/2024:22:25:04 +0000] "GET / HTTP/1.1" 200 555 "-" "curl/7.81.0"
192.168.222.1 - - [22/May/2024:00:22:58 +0000] "GET / HTTP/1.1" 304 0 "-" "Mozilla/5.0 (Windows NT 10.0; Win64; x64) AppleWebKit/537.36 (KHTML, like Gecko) Chrome/127.0.0.0 Safari/537.36"
192.168.222.1 - - [22/May/2024:00:22:58 +0000] "GET /favicon.ico HTTP/1.1" 404 567 "http://192.168.222.133/" "Mozilla/5.0 (Windows NT 10.0; Win64; x64) AppleWebKit/537.36 (KHTML, like Gecko) Chrome/127.0.0.0 Safari/537.36"


root@nginx:/opt/tngx310/logs# cat access.log -n
1  192.168.222.1 - - [20/May/2024:12:59:10 +0000] "GET / HTTP/1.1" 200 555 "-" "Mozilla/5.0 (Windows NT 10.0; Win64; x64) AppleWebKit/537.36 (KHTML, like Gecko) Chrome/126.0.0.0 Safari/537.36"
2  192.168.222.1 - - [20/May/2024:12:59:10 +0000] "GET /favicon.ico HTTP/1.1" 404 567 "http://192.168.222.133/" "Mozilla/5.0 (Windows NT 10.0; Win64; x64) AppleWebKit/537.36 (KHTML, like Gecko) Chrome/126.0.0.0 Safari/537.36"
3  127.0.0.1 - - [21/May/2024:22:25:04 +0000] "GET / HTTP/1.1" 200 555 "-" "curl/7.81.0"
4  192.168.222.1 - - [22/May/2024:00:22:58 +0000] "GET / HTTP/1.1" 304 0 "-" "Mozilla/5.0 (Windows NT 10.0; Win64; x64) AppleWebKit/537.36 (KHTML, like Gecko) Chrome/127.0.0.0 Safari/537.36"
5  192.168.222.1 - - [22/May/2024:00:22:58 +0000] "GET /favicon.ico HTTP/1.1" 404 567 "http://192.168.222.133/" "Mozilla/5.0 (Windows NT 10.0; Win64; x64) AppleWebKit/537.36 (KHTML, like Gecko) Chrome/127.0.0.0 Safari/537.36"
root@nginx:/opt/tngx310/logs#

# 实时刷新日志内容
root@nginx:/opt/tngx310/logs# tail -f access.log
192.168.222.1 - - [20/May/2024:12:59:10 +0000] "GET / HTTP/1.1" 200 555 "-" "Mozilla/5.0 (Windows NT 10.0; Win64; x64) AppleWebKit/537.36 (KHTML, like Gecko) Chrome/126.0.0.0 Safari/537.36"
192.168.222.1 - - [20/May/2024:12:59:10 +0000] "GET /favicon.ico HTTP/1.1" 404 567 "http://192.168.222.133/" "Mozilla/5.0 (Windows NT 10.0; Win64; x64) AppleWebKit/537.36 (KHTML, like Gecko) Chrome/126.0.0.0 Safari/537.36"
127.0.0.1 - - [21/May/2024:22:25:04 +0000] "GET / HTTP/1.1" 200 555 "-" "curl/7.81.0"
192.168.222.1 - - [22/May/2024:00:22:58 +0000] "GET / HTTP/1.1" 304 0 "-" "Mozilla/5.0 (Windows NT 10.0; Win64; x64) AppleWebKit/537.36 (KHTML, like Gecko) Chrome/127.0.0.0 Safari/537.36"
192.168.222.1 - - [22/May/2024:00:22:58 +0000] "GET /favicon.ico HTTP/1.1" 404 567 "http://192.168.222.133/" "Mozilla/5.0 (Windows NT 10.0; Win64; x64) AppleWebKit/537.36 (KHTML, like Gecko) Chrome/127.0.0.0 Safari/537.36"


# 管道符查看有几条信息
root@nginx:/opt/tngx310/logs# cat -n access.log | wc -l
11
root@nginx:/opt/tngx310/logs#


# 查看文件大小
root@nginx:/opt/tngx310/logs# ll -h access.log
-rw-r--r-- 1 root root 2.0K May 22 01:44 access.log
root@nginx:/opt/tngx310/logs#


# 如何使用 ab 命令
ab -kc 100 -n 500 http://127.0.0.1/

参数解释
'-kc' 发送长连接
'100' 100个并发
'-n' 表示多少个连接
'500' 表示500个连接
'http://127.0.0.1/'  发送给谁 给本地80端口发送请求

root@nginx:~# ab -kc 100 -n 500 http://127.0.0.1/
This is ApacheBench, Version 2.3 <$Revision: 1879490 $>
Copyright 1996 Adam Twiss, Zeus Technology Ltd, http://www.zeustech.net/
Licensed to The Apache Software Foundation, http://www.apache.org/

Benchmarking 127.0.0.1 (be patient)
Completed 100 requests
Completed 200 requests
Completed 300 requests
Completed 400 requests
Completed 500 requests
Finished 500 requests


Server Software:        Tengine/3.0.0
Server Hostname:        127.0.0.1
Server Port:            80

Document Path:          /
Document Length:        555 bytes

Concurrency Level:      100
Time taken for tests:   0.032 seconds
Complete requests:      500
Failed requests:        0
Keep-Alive requests:    500
Total transferred:      397000 bytes
HTML transferred:       277500 bytes
Requests per second:    15511.57 [#/sec] (mean)
Time per request:       6.447 [ms] (mean)
Time per request:       0.064 [ms] (mean, across all concurrent requests)
Transfer rate:          12027.53 [Kbytes/sec] received

Connection Times (ms)
min  mean[+/-sd] median   max
Connect:        0    1   2.0      0       5
Processing:     0    4   1.7      4       9
Waiting:        0    4   1.7      4       9
Total:          0    5   3.0      4      14

Percentage of the requests served within a certain time (ms)
50%      4
66%      5
75%      6
80%      8
90%      9
95%     10
98%     14
99%     14
100%     14 (longest request)
root@nginx:~#
root@nginx:~# ab -kc 100 -n 500 http://127.0.0.1/index.html
root@nginx:~# ab -kc 100 -n 500 http://127.0.0.1/index.php
root@nginx:~# ab -kc 1000 -n 100000 http://127.0.0.1/


root@nginx:/opt/tngx310/logs# cat -n access.log | wc -l
1511
root@nginx:/opt/tngx310/logs# cat -n access.log | wc -l
11511
root@nginx:/opt/tngx310/logs# cat -n access.log | wc -l
111511
root@nginx:/opt/tngx310/logs# cat -n access.log | wc -l
211511
root@nginx:/opt/tngx310/logs# cat -n access.log | wc -l
311511
root@nginx:/opt/tngx310/logs#


# 统计日志条数
root@nginx:/opt/tngx310/logs# cat -n access.log | wc -l
1511
root@nginx:/opt/tngx310/logs#

# 查看文件大小
root@nginx:/opt/tngx310/logs# ll -h
total 27M
drwxr-xr-x  2 root root 4.0K May 22 00:26 ./
drwxr-xr-x 11 root root 4.0K May 20 12:48 ../
-rw-r--r--  1 root root  27M May 22 02:17 access.log
-rw-r--r--  1 root root 107K May 22 02:03 error.log
-rw-r--r--  1 root root    5 May 21 23:44 nginx.pid
root@nginx:/opt/tngx310/logs#
安装ab命令
root@nginx:~# ab --help
Command 'ab' not found, but can be installed with:
apt install apache2-utils
root@nginx:~# apt install apache2-utils
Reading package lists... Done
Building dependency tree... Done
Reading state information... Done
The following additional packages will be installed:
  libapr1 libaprutil1
The following NEW packages will be installed:
  apache2-utils libapr1 libaprutil1
0 upgraded, 3 newly installed, 0 to remove and 2 not upgraded.
Need to get 290 kB of archives.
After this operation, 993 kB of additional disk space will be used.
Do you want to continue? [Y/n] y
Get:1 http://mirrors.tuna.tsinghua.edu.cn/ubuntu jammy-updates/main amd64 libapr1 amd64 1.7.0-8ubuntu0.22.04.1 [108 kB]
Get:2 http://mirrors.tuna.tsinghua.edu.cn/ubuntu jammy-updates/main amd64 libaprutil1 amd64 1.6.1-5ubuntu4.22.04.2 [92.8 kB]
Get:3 http://mirrors.tuna.tsinghua.edu.cn/ubuntu jammy-updates/main amd64 apache2-utils amd64 2.4.52-1ubuntu4.9 [88.7 kB]
Fetched 290 kB in 3s (115 kB/s)
Selecting previously unselected package libapr1:amd64.
(Reading database ... 98640 files and directories currently installed.)
Preparing to unpack .../libapr1_1.7.0-8ubuntu0.22.04.1_amd64.deb ...
Unpacking libapr1:amd64 (1.7.0-8ubuntu0.22.04.1) ...
Selecting previously unselected package libaprutil1:amd64.
Preparing to unpack .../libaprutil1_1.6.1-5ubuntu4.22.04.2_amd64.deb ...
Unpacking libaprutil1:amd64 (1.6.1-5ubuntu4.22.04.2) ...
Selecting previously unselected package apache2-utils.
Preparing to unpack .../apache2-utils_2.4.52-1ubuntu4.9_amd64.deb ...
Unpacking apache2-utils (2.4.52-1ubuntu4.9) ...
Setting up libapr1:amd64 (1.7.0-8ubuntu0.22.04.1) ...
Setting up libaprutil1:amd64 (1.6.1-5ubuntu4.22.04.2) ...
Setting up apache2-utils (2.4.52-1ubuntu4.9) ...
Processing triggers for man-db (2.10.2-1) ...
Processing triggers for libc-bin (2.35-0ubuntu3.7) ...
Scanning processes...
Scanning linux images...

Running kernel seems to be up-to-date.

No services need to be restarted.

No containers need to be restarted.

No user sessions are running outdated binaries.

No VM guests are running outdated hypervisor (qemu) binaries on this host.
root@nginx:~#


安装 ab 命令
root@nginx:~# apt install apache2-utils
root@nginx:~# ab -kc 100 -n 500 http://127.0.0.1/
参数解释
'-kc' 发送长连接
'100' 100个并发
'-n' 表示多少个连接
'500' 表示500个连接
'http://127.0.0.1/'  发送给谁 给本地80端口发送请求

root@nginx:~# ab --help
ab: wrong number of arguments	# 调用函数的参数数目错
Usage: ab [options] [http[s]://]hostname[:port]/path
# 举例:ab -kc 100 -n 500 http://127.0.0.1/index.html
Options are:
    -n requests     Number of requests to perform
    -c concurrency  Number of multiple requests to make at a time
    -t timelimit    Seconds to max. to spend on benchmarking
                    This implies -n 50000
    -s timeout      Seconds to max. wait for each response
                    Default is 30 seconds
    -b windowsize   Size of TCP send/receive buffer, in bytes
    -B address      Address to bind to when making outgoing connections
    -p postfile     File containing data to POST. Remember also to set -T
    -u putfile      File containing data to PUT. Remember also to set -T
    -T content-type Content-type header to use for POST/PUT data, eg.
                    'application/x-www-form-urlencoded'
                    Default is 'text/plain'
    -v verbosity    How much troubleshooting info to print
    -w              Print out results in HTML tables
    -i              Use HEAD instead of GET
    -x attributes   String to insert as table attributes
    -y attributes   String to insert as tr attributes
    -z attributes   String to insert as td or th attributes
    -C attribute    Add cookie, eg. 'Apache=1234'. (repeatable)
    -H attribute    Add Arbitrary header line, eg. 'Accept-Encoding: gzip'
                    Inserted after all normal header lines. (repeatable)
    -A attribute    Add Basic WWW Authentication, the attributes
                    are a colon separated username and password.
    -P attribute    Add Basic Proxy Authentication, the attributes
                    are a colon separated username and password.
    -X proxy:port   Proxyserver and port number to use
    -V              Print version number and exit
    -k              Use HTTP KeepAlive feature
    -d              Do not show percentiles served table.
    -S              Do not show confidence estimators and warnings.
    -q              Do not show progress when doing more than 150 requests
    -l              Accept variable document length (use this for dynamic pages)
    -g filename     Output collected data to gnuplot format file.
    -e filename     Output CSV file with percentages served
    -r              Don't exit on socket receive errors.
    -m method       Method name
    -h              Display usage information (this message)
    -I              Disable TLS Server Name Indication (SNI) extension
    -Z ciphersuite  Specify SSL/TLS cipher suite (See openssl ciphers)
    -f protocol     Specify SSL/TLS protocol
                    (SSL2, TLS1, TLS1.1, TLS1.2 or ALL)
    -E certfile     Specify optional client certificate chain and private key
root@nginx:~#
Nginx.conf重要配置参数讲解
root@nginx:~# cat /opt/tngx310/conf/nginx.conf

#user  nobody;
worker_processes  1;

#error_log  logs/error.log;
#error_log  logs/error.log  notice;
#error_log  logs/error.log  info;
#error_log  "pipe:rollback logs/error_log interval=1d baknum=7 maxsize=2G";

#pid        logs/nginx.pid;


events {
    worker_connections  1024;
}


http {
    include       mime.types;
    default_type  application/octet-stream;

    #log_format  main  '$remote_addr - $remote_user [$time_local] "$request" '
    #                  '$status $body_bytes_sent "$http_referer" '
    #                  '"$http_user_agent" "$http_x_forwarded_for"';

    #access_log  logs/access.log  main;
    #access_log  "pipe:rollback logs/access_log interval=1d baknum=7 maxsize=2G"  main;

    sendfile        on;
    #tcp_nopush     on;

    #keepalive_timeout  0;
    keepalive_timeout  65;

    #gzip  on;

    server {
        listen       80;
        server_name  localhost;

        #charset koi8-r;

        #access_log  logs/host.access.log  main;
        #access_log  "pipe:rollback logs/host.access_log interval=1d baknum=7 maxsize=2G"  main;

        location / {
            root   html;
            index  index.html index.htm;
        }

        #error_page  404              /404.html;

        # redirect server error pages to the static page /50x.html
        #
        error_page   500 502 503 504  /50x.html;
        location = /50x.html {
            root   html;
        }

        # proxy the PHP scripts to Apache listening on 127.0.0.1:80
        #
        #location ~ \.php$ {
        #    proxy_pass   http://127.0.0.1;
        #}

        # pass the PHP scripts to FastCGI server listening on 127.0.0.1:9000
        #
        #location ~ \.php$ {
        #    root           html;
        #    fastcgi_pass   127.0.0.1:9000;
        #    fastcgi_index  index.php;
        #    fastcgi_param  SCRIPT_FILENAME  /scripts$fastcgi_script_name;
        #    include        fastcgi_params;
        #}

        # pass the Dubbo rpc to Dubbo provider server listening on 127.0.0.1:20880
        #
        #location /dubbo {
        #    dubbo_pass_all_headers on;
        #    dubbo_pass_set args $args;
        #    dubbo_pass_set uri $uri;
        #    dubbo_pass_set method $request_method;
        #
        #    dubbo_pass org.apache.dubbo.samples.tengine.DemoService 0.0.0 tengineDubbo dubbo_backend;
        #}

        # deny access to .htaccess files, if Apache's document root
        # concurs with nginx's one
        #
        #location ~ /\.ht {
        #    deny  all;
        #}
    }

    # upstream for Dubbo rpc to Dubbo provider server listening on 127.0.0.1:20880
    #
    #upstream dubbo_backend {
    #    multi 1;
    #    server 127.0.0.1:20880;
    #}

    # another virtual host using mix of IP-, name-, and port-based configuration
    #
    #server {
    #    listen       8000;
    #    listen       somename:8080;
    #    server_name  somename  alias  another.alias;

    #    location / {
    #        root   html;
    #        index  index.html index.htm;
    #    }
    #}


    # HTTPS server
    #
    #server {
    #    listen       443 ssl;
    #    server_name  localhost;

    #    ssl_certificate      cert.pem;
    #    ssl_certificate_key  cert.key;

    #    ssl_session_cache    shared:SSL:1m;
    #    ssl_session_timeout  5m;

    #    ssl_ciphers  HIGH:!aNULL:!MD5;
    #    ssl_prefer_server_ciphers  on;

    #    location / {
    #        root   html;
    #        index  index.html index.htm;
    #    }
    #}

}
mime.type 表示文件类型
root@nginx:~# cd /opt/tngx310/conf/
root@nginx:/opt/tngx310/conf# ls
fastcgi.conf          fastcgi_params          koi-utf  mime.types          nginx.conf      nginx.conf.default  scgi_params.default  uwsgi_params.default
fastcgi.conf.default  fastcgi_params.default  koi-win  mime.types.default  nginx.conf.bak  scgi_params         uwsgi_params         win-utf
root@nginx:/opt/tngx310/conf# vim mime.types
root@nginx:/opt/tngx310/conf# pwd
/opt/tngx310/conf
root@nginx:/opt/tngx310/conf# cat mime.types

types {
    text/html                                        html htm shtml;
    text/css                                         css;
    text/xml                                         xml;
    image/gif                                        gif;
    image/jpeg                                       jpeg jpg;
    application/javascript                           js;
    application/atom+xml                             atom;
    application/rss+xml                              rss;

    text/mathml                                      mml;
    text/plain                                       txt;
    text/vnd.sun.j2me.app-descriptor                 jad;
    text/vnd.wap.wml                                 wml;
    text/x-component                                 htc;

    image/avif                                       avif;
    image/png                                        png;
    image/svg+xml                                    svg svgz;
    image/tiff                                       tif tiff;
    image/vnd.wap.wbmp                               wbmp;
    image/webp                                       webp;
    image/x-icon                                     ico;
    image/x-jng                                      jng;
    image/x-ms-bmp                                   bmp;

    font/woff                                        woff;
    font/woff2                                       woff2;

    application/java-archive                         jar war ear;
    application/json                                 json;
    application/mac-binhex40                         hqx;
    application/msword                               doc;
    application/pdf                                  pdf;
    application/postscript                           ps eps ai;
    application/rtf                                  rtf;
    application/vnd.apple.mpegurl                    m3u8;
    application/vnd.google-earth.kml+xml             kml;
    application/vnd.google-earth.kmz                 kmz;
    application/vnd.ms-excel                         xls;
    application/vnd.ms-fontobject                    eot;
    application/vnd.ms-powerpoint                    ppt;
    application/vnd.oasis.opendocument.graphics      odg;
    application/vnd.oasis.opendocument.presentation  odp;
    application/vnd.oasis.opendocument.spreadsheet   ods;
    application/vnd.oasis.opendocument.text          odt;
    application/vnd.openxmlformats-officedocument.presentationml.presentation
                                                     pptx;
    application/vnd.openxmlformats-officedocument.spreadsheetml.sheet
                                                     xlsx;
    application/vnd.openxmlformats-officedocument.wordprocessingml.document
                                                     docx;
    application/vnd.wap.wmlc                         wmlc;
    application/wasm                                 wasm;
    application/x-7z-compressed                      7z;
    application/x-cocoa                              cco;
    application/x-java-archive-diff                  jardiff;
    application/x-java-jnlp-file                     jnlp;
    application/x-makeself                           run;
    application/x-perl                               pl pm;
    application/x-pilot                              prc pdb;
    application/x-rar-compressed                     rar;
    application/x-redhat-package-manager             rpm;
    application/x-sea                                sea;
    application/x-shockwave-flash                    swf;
    application/x-stuffit                            sit;
    application/x-tcl                                tcl tk;
    application/x-x509-ca-cert                       der pem crt;
    application/x-xpinstall                          xpi;
    application/xhtml+xml                            xhtml;
    application/xspf+xml                             xspf;
    application/zip                                  zip;

    application/octet-stream                         bin exe dll;
    application/octet-stream                         deb;
    application/octet-stream                         dmg;
    application/octet-stream                         iso img;
    application/octet-stream                         msi msp msm;

    audio/midi                                       mid midi kar;
    audio/mpeg                                       mp3;
    audio/ogg                                        ogg;
    audio/x-m4a                                      m4a;
    audio/x-realaudio                                ra;

    video/3gpp                                       3gpp 3gp;
    video/mp2t                                       ts;
    video/mp4                                        mp4;
    video/mpeg                                       mpeg mpg;
    video/quicktime                                  mov;
    video/webm                                       webm;
    video/x-flv                                      flv;
    video/x-m4v                                      m4v;
    video/x-mng                                      mng;
    video/x-ms-asf                                   asx asf;
    video/x-ms-wmv                                   wmv;
    video/x-msvideo                                  avi;
}
root@nginx:/opt/tngx310/conf#

# 创建额外配置文件夹
# 相对路径 额外增加其他配置文件
root@nginx:/opt/tngx310/conf# mkdir extra
root@nginx:/opt/tngx310/conf# ls
extra                 fastcgi_params          koi-win             nginx.conf          scgi_params          uwsgi_params.default
fastcgi.conf          fastcgi_params.default  mime.types          nginx.conf.bak      scgi_params.default  win-utf
fastcgi.conf.default  koi-utf                 mime.types.default  nginx.conf.default  uwsgi_params
root@nginx:/opt/tngx310/conf# cd extra
root@nginx:/opt/tngx310/conf/extra# touch longchi.conf
root@nginx:/opt/tngx310/conf/extra# pwd
/opt/tngx310/conf/extra
root@nginx:/opt/tngx310/conf/extra# ls
longchi.conf
root@nginx:/opt/tngx310/conf/extra#


root@nginx:/opt/tngx310/conf# vim nginx.conf
root@nginx:/opt/tngx310/conf# tail -10 nginx.conf
    #    ssl_ciphers  HIGH:!aNULL:!MD5;
    #    ssl_prefer_server_ciphers  on;

    #    location / {
    #        root   html;
    #        index  index.html index.htm;
    #    }
    #}
include extra/*.conf	# 相对路径 额外增加其他配置文件
}
创建额外配置文件夹
相对路径 额外增加其他配置文件
root@nginx:/opt/tngx310/conf# mkdir extra
root@nginx:/opt/tngx310/conf# ls
extra                 fastcgi_params          koi-win             nginx.conf          scgi_params          uwsgi_params.default
fastcgi.conf          fastcgi_params.default  mime.types          nginx.conf.bak      scgi_params.default  win-utf
fastcgi.conf.default  koi-utf                 mime.types.default  nginx.conf.default  uwsgi_params
root@nginx:/opt/tngx310/conf# cd extra
root@nginx:/opt/tngx310/conf/extra# touch longchi.conf
root@nginx:/opt/tngx310/conf/extra# pwd
/opt/tngx310/conf/extra
root@nginx:/opt/tngx310/conf/extra# ls
longchi.conf
root@nginx:/opt/tngx310/conf/extra#


root@nginx:/opt/tngx310/conf# vim nginx.conf
root@nginx:/opt/tngx310/conf# cat nginx.conf

#user  nobody;
worker_processes  1;

#error_log  logs/error.log;
#error_log  logs/error.log  notice;
#error_log  logs/error.log  info;
#error_log  "pipe:rollback logs/error_log interval=1d baknum=7 maxsize=2G";

#pid        logs/nginx.pid;


events {
    worker_connections  1024;
}


http {
    include       mime.types;
    default_type  application/octet-stream;

    #log_format  main  '$remote_addr - $remote_user [$time_local] "$request" '
    #                  '$status $body_bytes_sent "$http_referer" '
    #                  '"$http_user_agent" "$http_x_forwarded_for"';

    #access_log  logs/access.log  main;
    #access_log  "pipe:rollback logs/access_log interval=1d baknum=7 maxsize=2G"  main;

    sendfile        on;
    #tcp_nopush     on;

    #keepalive_timeout  0;
    keepalive_timeout  65;

    #gzip  on;

    server {
        listen       80;
        server_name  localhost;

        #charset koi8-r;

        #access_log  logs/host.access.log  main;
        #access_log  "pipe:rollback logs/host.access_log interval=1d baknum=7 maxsize=2G"  main;

        location / {
            root   html;
            index  index.html index.htm;
        }

        #error_page  404              /404.html;

        # redirect server error pages to the static page /50x.html
        #
        error_page   500 502 503 504  /50x.html;
        location = /50x.html {
            root   html;
        }

        # proxy the PHP scripts to Apache listening on 127.0.0.1:80
        #
        #location ~ \.php$ {
        #    proxy_pass   http://127.0.0.1;
        #}

        # pass the PHP scripts to FastCGI server listening on 127.0.0.1:9000
        #
        #location ~ \.php$ {
        #    root           html;
        #    fastcgi_pass   127.0.0.1:9000;
        #    fastcgi_index  index.php;
        #    fastcgi_param  SCRIPT_FILENAME  /scripts$fastcgi_script_name;
        #    include        fastcgi_params;
        #}

        # pass the Dubbo rpc to Dubbo provider server listening on 127.0.0.1:20880
        #
        #location /dubbo {
        #    dubbo_pass_all_headers on;
        #    dubbo_pass_set args $args;
        #    dubbo_pass_set uri $uri;
        #    dubbo_pass_set method $request_method;
        #
        #    dubbo_pass org.apache.dubbo.samples.tengine.DemoService 0.0.0 tengineDubbo dubbo_backend;
        #}

        # deny access to .htaccess files, if Apache's document root
        # concurs with nginx's one
        #
        #location ~ /\.ht {
        #    deny  all;
        #}
    }

    # upstream for Dubbo rpc to Dubbo provider server listening on 127.0.0.1:20880
    #
    #upstream dubbo_backend {
    #    multi 1;
    #    server 127.0.0.1:20880;
    #}

    # another virtual host using mix of IP-, name-, and port-based configuration
    #
    #server {
    #    listen       8000;
    #    listen       somename:8080;
    #    server_name  somename  alias  another.alias;

    #    location / {
    #        root   html;
    #        index  index.html index.htm;
    #    }
    #}


    # HTTPS server
    #
    #server {
    #    listen       443 ssl;
    #    server_name  localhost;

    #    ssl_certificate      cert.pem;
    #    ssl_certificate_key  cert.key;

    #    ssl_session_cache    shared:SSL:1m;
    #    ssl_session_timeout  5m;

    #    ssl_ciphers  HIGH:!aNULL:!MD5;
    #    ssl_prefer_server_ciphers  on;

    #    location / {
    #        root   html;
    #        index  index.html index.htm;
    #    }
    #}
include extra/*.conf	# 相对路径 额外增加其他配置文件
}
root@nginx:/opt/tngx310/conf#
趣学 nginx 虚拟主机配置
虚拟主机指的就是一个独立站点配置,是 nginx 默认支持的一个功能它能够有自己独立的域名,独立的IP,独立的端口配置,能够配置完整的 www 服务,例如:网站搭建,ftp服务搭建,邮件服务器代理等等。
并且 nginx 支持多虚拟主机,可以在一台机器上,同时运行多个网站的功能。不同的域名都解析到同一个IP地址,也就是解析到这台服务器,我们只需要通过多虚拟主机这个功能,让A.COM去服务器的一个文件夹找资料,B.COM也可以去这个服务器另一个文件夹找资料,其他也一样。我们可以基于域名的区分,实现多虚拟主机。当然还有其他的方式。
nginx的多虚拟主机,可以基于
多域名的形式
多 IP 的形式
多端口的形式
利用虚拟主机的功能,就不用为了运行一个网站,而单独的配置一个 nginx服务器,或者单独的再运行一组进程。
利用 nginx 的多虚拟主机配置,我们就可以基于一台服务器,一个NGINX进程,实现多个站点的配置。

虚拟主机功能:
web server 提供了一个虚拟主机功能,能够很方便的让草根站长,去搭建多个站点以及现在主流的互联网公司,都在使用 nginx 的虚拟主机功能,完成各种各样的反向代理,负载均衡,和静态站点等等功能。

文生视频项目主页: https://jjihwan.github.io/projects/FIFO-Diffusion
文生视频代码:https://github.com/jjihwan/FIFO-Diffusion_public
文生视频论文链接:https://arxiv.org/pdf/240511473


https://www.apple.com/es/siri/
https://assistant.google.com/
https://www.amazon.com/
nginx 单虚拟主机的配置
nginx 静态网站的搭建
基本的匹配规则
nginx.conf

user www;

# nginx 核心功能块
http {

	# 在http{}标签里面就可以定义虚拟主机
	# nginx.conf 中 server{} 虚拟主机标签的定义,默认加载顺序是自上而下的匹配规则(如果没有其他规则定义的情况下,如:基于域名的匹配,基于端口的匹配,)
	# 第一个虚拟主机站点
	server {
		#
	}
	# 在平级关系内,编写第二个,第三个...第N个 server{} 就是代表配置多个虚拟主机
	# 一个 server{} 标签就可以理解为是一个网站
	server {
		#
	}
	# 编写第三个网站的配置
	server {
		#
	}

}
配置文件,虚拟主机站点介绍如下:
贴出来的只是一部分的修改 ,请理解后进行配置
我们可以修改默认的网页根目录,并且可以自定义一些静态资源,好比我们自己搭建了一个网站
root@nginx:/opt/tngx310/html# cat ../conf/nginx.conf

user  tengine;
worker_processes  3;

#error_log  logs/error.log;
#error_log  logs/error.log  notice;
#error_log  logs/error.log  info;
#error_log  "pipe:rollback logs/error_log interval=1d baknum=7 maxsize=2G";

pid        logs/nginx.pid;


events {
    worker_connections  1024;
}

# nginx web 功能的核心配置点
http {
    include       mime.types;
    default_type  application/octet-stream;

    #log_format  main  '$remote_addr - $remote_user [$time_local] "$request" '
    #                  '$status $body_bytes_sent "$http_referer" '
    #                  '"$http_user_agent" "$http_x_forwarded_for"';

    #access_log  logs/access.log  main;
    #access_log  "pipe:rollback logs/access_log interval=1d baknum=7 maxsize=2G"  main;

    sendfile        on;
    #tcp_nopush     on;

    #keepalive_timeout  0;
    keepalive_timeout  65;

    #gzip  on;


    # nginx.conf 通过 server 关键字来定义虚拟主机
    # nginx.conf 支持编写多个 server{} 标签,可以平级写多个 server{} 标签
    # nginx.conf 第一个虚拟主机站点配置如下
    server {
        # 定义虚拟主机站点的端口号,也是用户访问网站的入口
        listen       80;
        # 填写虚拟主机的域名配置,没有域名就可以写 localhost 或者 _ 也可以
        server_name  localhost;
        # server_name www.chaoge.cc;

        # 给 nginx 定义网站的编码
        charset         utf-8;
        #charset koi8-r;

        # nginx 访问日志功能,我们只需要去掉注释,就可以使用日志功能
        #access_log  logs/host.access.log  main;
        #access_log  "pipe:rollback logs/host.access_log interval=1d baknum=7 maxsize=2G"  main;

        # 看到 location 就是 nginx 的核心配置
        # nginx 的路径匹配规则 通过 location 后面的参数就可以对路径进行匹配
        # 如下的规则是最低级匹配,任何的 nginx 请求,都会进入如下 location 的配置,去它所定义的目录中寻找资料
        # 最最基本的默认规则 location 后面跟 '/' 代表根目录 表示的是 nginx(http://192.168.22.18:80/index.html) 80端口后面的 '/' 斜杠
        # 可以去 location / 后面的 root 去寻找资料
        location / {
            # root 关键词 是定义网页根目录的,这个 html 是以 nginx 安装的路径为相对路径
            root   html;
            # index 关键词,定义 nginx 的首页文件名字,默认找那个文件
            index  index.html index.htm;
        }

        #error_page  404              /404.html;

        # redirect server error pages to the static page /50x.html
        #
        error_page   500 502 503 504  /50x.html;
        location = /50x.html {
            root   html;
        }
    }
        include extra/*.conf;
}
修改 nginx 虚拟主机站点目录
1.修改 nginx 默认站点配置,nginx.conf 修改 server{} 标签内容
 location / {
            # root 关键词 是定义网页根目录的,这个 html 是以 nginx 安装的路径为相对路径
            # root  	 html;
            root 	/www/html;
            # index 关键词,定义 nginx 的首页文件名字,默认找那个文件
            index  index.html index.htm;
        }

2.创建新的网页站点资料
mkdir -p /www/html/


3. 修改了配置文件,一定要重新加载 nginx ,读取配置
nginx -s reload

root@nginx:/opt/tngx310/html# nginx -s reload
root@nginx:/opt/tngx310/html# mkdir -p /www/html/
root@nginx:/opt/tngx310/html#

状态码400系列表示客户端访问出错了
Nginx静态资源压缩配置
静态资源压缩
nginx 支持 gzip 对资源压缩传输,经过 gzip 压缩后的页面大小,图片,动态提这类的静态文件,可以为原本的30%甚至更小,用户浏览体验会好很多。
1.首先准备 nginx 服务器,以及配置好虚拟主机站点,再准备好 nginx 静态资源数据
搜索 nginx 已经安装了吗?  which nginx

root@nginx:~# which nginx
/opt/tngx310/sbin/nginx
root@nginx:~# echo $PATH
/usr/local/sbin:/usr/local/bin:/usr/sbin:/usr/bin:/sbin:/bin:/usr/games:/usr/local/games:/snap/bin:/opt/tngx310/sbin
root@nginx:~# cd /opt/tngx310/
root@nginx:/opt/tngx310# ls
client_body_temp  conf  fastcgi_temp  html  logs  logs2024  proxy_temp  sbin  scgi_temp  uwsgi_temp
root@nginx:/opt/tngx310# cd conf
root@nginx:/opt/tngx310/conf# ls
extra                 fastcgi_params          koi-win             nginx.conf          scgi_params          uwsgi_params.default
fastcgi.conf          fastcgi_params.default  mime.types          nginx.conf.bak      scgi_params.default  win-utf
fastcgi.conf.default  koi-utf                 mime.types.default  nginx.conf.default  uwsgi_params
root@nginx:/opt/tngx310/conf# vim nginx.conf
root@nginx:/opt/tngx310/conf# netstat -tunlp | grep nginx
root@nginx:/opt/tngx310/conf# /opt/tngx310/sbin/nginx
root@nginx:/opt/tngx310/conf# netstat -tunlp | grep nginx
tcp        0      0 0.0.0.0:80     0.0.0.0:*               LISTEN      1265/nginx: master
root@nginx:/opt/tngx310/conf# iptables -L
Chain INPUT (policy ACCEPT)
target     prot opt source               destination

Chain FORWARD (policy ACCEPT)
target     prot opt source               destination

Chain OUTPUT (policy ACCEPT)
target     prot opt source               destination
root@nginx:/opt/tngx310/conf# getenforce
Disabled
root@nginx:/opt/tngx310/conf#
Nginx 开启gzip压缩
1.首先准备好 nginx 服器,以及配置好虚拟主机站点,再准备好一些静态数据
root@nginx:/www/html# echo chao{1..999999} > cc.txt
root@nginx:/www/html# ll -h
total 52M
drwxr-xr-x 2 root root 4.0K May 24 04:04 ./
drwxr-xr-x 3 root root 4.0K May 23 06:15 ../
-rw-r--r-- 1 root root  11M May 24 04:04 cc.txt
-rw-r--r-- 1 root root 593K May 24 00:01 index.html
-rw-r--r-- 1 root root  25M Apr 10 01:04 istio-1.21.1-linux-amd64.tar.gz
-rw-r--r-- 1 root root  16M May 23 23:26 WeChat.mp4
root@nginx:/www/html# echo chao{1..999999} >> cc.txt
root@nginx:/www/html# ll -h
total 62M
drwxr-xr-x 2 root root 4.0K May 24 04:04 ./
drwxr-xr-x 3 root root 4.0K May 23 06:15 ../
-rw-r--r-- 1 root root  21M May 24 04:05 cc.txt
-rw-r--r-- 1 root root 593K May 24 00:01 index.html
-rw-r--r-- 1 root root  25M Apr 10 01:04 istio-1.21.1-linux-amd64.tar.gz
-rw-r--r-- 1 root root  16M May 23 23:26 WeChat.mp4
root@nginx:/www/html# echo chao{1..999999} >> cc.txt
root@nginx:/www/html# ll -h
total 73M
drwxr-xr-x 2 root root 4.0K May 24 04:04 ./
drwxr-xr-x 3 root root 4.0K May 23 06:15 ../
-rw-r--r-- 1 root root  32M May 24 04:06 cc.txt
-rw-r--r-- 1 root root 593K May 24 00:01 index.html
-rw-r--r-- 1 root root  25M Apr 10 01:04 istio-1.21.1-linux-amd64.tar.gz
-rw-r--r-- 1 root root  16M May 23 23:26 WeChat.mp4
root@nginx:/www/html#


2. 此时在没有开启 gzip 压缩的情况下,访问该 .txt 文本 发现访问速度很慢 22.91秒
root@nginx:/www/html# vim /opt/tngx310/conf/nginx.conf
root@nginx:/www/html# /opt/tngx310/sbin/nginx -s reload
root@nginx:/www/html#


3. 开启 nginx 的 gzip 压缩功能,只需要在 http{} 配置中,打开如下参数即可。都是key/value形式,gzip官方提供好的关键字,我们填写值就可以了,
	gzip	on;
	gzip_http_version	1.1;
	gzip_comp_level	4;
	gzip_type	text/plain	application/javascript	application/x-javascript text/css	application/xml	text/javascript	application/x-httpd-php	image/jpeg	image/gif image/png;


# 代码解释
	gzip	on;	# 开启gzip
	gzip_http_version	1.1;	# gzip_http_version 遵循1.1版本协议就可以
	gzip_comp_level	4;	# gzip 压缩的等级,等级越低,压缩效率越高,对CPU的损耗也是更高,
	# 'gzip_types' 能够支持压缩的文件类型  指定能够支持哪些文本进行压缩
	gzip_types	text/plain	application/javascript	application/x-javascript text/css	application/xml	text/javascript	application/x-httpd-php	image/jpeg	image/gif image/png;
	'text/plain'  表示支持 text 文本类型
	'application/javascript' js文件
	'text/css'  css文件
	'application/xml'  xml 文件
	'image/jpeg'	jpeg图片类型


# 修改完配置文件,记得一定要加载
root@nginx:/www/html# vim /opt/tngx310/conf/nginx.conf
root@nginx:/www/html# /opt/tngx310/sbin/nginx -s reload
root@nginx:/www/html#


# 此时的配置文件如下
root@nginx:/www/html# cat /opt/tngx310/conf/nginx.conf

user  tengine;
worker_processes  3;

#error_log  logs/error.log;
#error_log  logs/error.log  notice;
#error_log  logs/error.log  info;
#error_log  "pipe:rollback logs/error_log interval=1d baknum=7 maxsize=2G";

pid        logs/nginx.pid;


events {
    worker_connections  1024;
}

# nginx web 功能的核心配置点
http {
    include       mime.types;
    default_type  application/octet-stream;

    #log_format  main  '$remote_addr - $remote_user [$time_local] "$request" '
    #                  '$status $body_bytes_sent "$http_referer" '
    #                  '"$http_user_agent" "$http_x_forwarded_for"';

    #access_log  logs/access.log  main;
    #access_log  "pipe:rollback logs/access_log interval=1d baknum=7 maxsize=2G"  main;

    sendfile        on;
    #tcp_nopush     on;

    #keepalive_timeout  0;
    keepalive_timeout  65;

    #gzip  on;
        gzip    on;
        gzip_http_version       1.1;
        gzip_comp_level 4;
        gzip_types      text/plain      application/javascript  application/x-javascript text/css       application/xml text/javascript application/x-httpd-php     image/jpeg      image/gif image/png;


    # nginx.conf 通过 server 关键字来定义虚拟主机
    # nginx.conf 支持编写多个 server{} 标签,可以平级写多个 server{} 标签
    # nginx.conf 第一个虚拟主机站点配置如下
    server {
        # 定义虚拟主机站点的端口号,也是用户访问网站的入口
        listen       80;
        # 填写虚拟主机的域名配置,没有域名就可以写 localhost 或者 _ 也可以
        server_name  localhost;
        # server_name www.chaoge.cc;

        # 给 nginx 定义网站的编码
        charset         utf-8;
        #charset koi8-r;

        # nginx 访问日志功能,我们只需要去掉注释,就可以使用日志功能
        #access_log  logs/host.access.log  main;
        #access_log  "pipe:rollback logs/host.access_log interval=1d baknum=7 maxsize=2G"  main;

        # 看到 location 就是 nginx 的核心配置
        # nginx 的路径匹配规则 通过 location 后面的参数就可以对路径进行匹配
        # 如下的规则是最低级匹配,任何的 nginx 请求,都会进入如下 location 的配置,去它所定义的目录中寻找资料
        # 最最基本的默认规则 location 后面跟 '/' 代表根目录 表示的是 nginx(http://192.168.22.18:80/index.html) 80端口后面的 '/' 斜杠
        # 可以去 location / 后面的 root 去寻找资料
        # location 是针对用户请求做匹配的 '/' 会去'root /www/html'文件夹下找用户请求的资源 如果存在就返回请求的资源,如果没有,则返回 404 页面
        location / {
            # root 关键词 是定义网页根目录的,这个 html 是以 nginx 安装的路径为相对路径
            # root   html;
            root /www/html;
            # index 关键词,定义 nginx 的首页文件名字,默认找那个文件
            index  index.html index.htm;
        }

        #error_page  404              /404.html;

        # redirect server error pages to the static page /50x.html
        #
        error_page   500 502 503 504  /50x.html;
        location = /50x.html {
            root   html;
        }
    }
        include extra/*.conf;
}
root@nginx:/www/html#
Nginx 基于 IP 的多虚拟主机
virtual server 多虚拟主机就是让一台服务器上运行很多个站点
172.18.22.133
172.18.22.195
172.18.22.196

多个 ip 都解析到同一台 server
然后 nginx 多虚拟主机  多虚拟主机其实就是定义都个 server{} 关键词即可  然后分别指向本地的三个目录
基于 ip 进行匹配
不同的 IP 在经过解析后,就可以访问这个服务器的不同目录的资料,我们就实现了一台服务器,基于 IP 的不同,访问不同的站点,以下是操作步骤
环境准备
1. 准备好 linux 机器,以及配置好3个 ip 地址
root@nginx:~# ifconfig | grep "inet 172"
        inet 172.18.22.133  netmask 255.255.255.0  broadcast 1172.18.22.255
        inet 172.18.22.195  netmask 255.255.255.0  broadcast 172.18.22.255
        inet 172.18.22.196  netmask 255.255.255.0  broadcast 172.18.22.255


# 以下是具体配置多个 IP 的操作步骤:
root@nginx:~# ifconfig
ens33: flags=4163<UP,BROADCAST,RUNNING,MULTICAST>  mtu 1500
        inet 172.18.22.133  netmask 255.255.255.0  broadcast 172.18.22.255
        inet6 fe80::20c:29ff:feda:3b7c  prefixlen 64  scopeid 0x20<link>
        ether 00:0c:29:da:3b:7c  txqueuelen 1000  (Ethernet)
        RX packets 1415  bytes 496839 (496.8 KB)
        RX errors 0  dropped 0  overruns 0  frame 0
        TX packets 401  bytes 49403 (49.4 KB)
        TX errors 0  dropped 0 overruns 0  carrier 0  collisions 0

lo: flags=73<UP,LOOPBACK,RUNNING>  mtu 65536
        inet 127.0.0.1  netmask 255.0.0.0
        inet6 ::1  prefixlen 128  scopeid 0x10<host>
        loop  txqueuelen 1000  (Local Loopback)
        RX packets 108  bytes 8792 (8.7 KB)
        RX errors 0  dropped 0  overruns 0  frame 0
        TX packets 108  bytes 8792 (8.7 KB)
        TX errors 0  dropped 0 overruns 0  carrier 0  collisions 0

root@nginx:~#


2. 给网络设备添加别名,绑定多个 IP
# 创建 网卡和 IP 用如下命令
ifconfig ens33:1 172.18.22.195 netmask 255.255.255.0 broadcast 172.18.22.255 up
ifconfig ens33:2 172.18.22.196 netmask 255.255.255.0 broadcast 172.18.22.255 up
参数解释
'ens33:1'  表示给 ens33 绑定别名
'netmask'  子网掩码
'broadcast'  广播地址
'255.255.255.0' 代表24位子网掩码
'172.18.22.255' 广播地址
'up' 代表启动他

root@nginx:~# ifconfig ens33:1 172.18.22.195 netmask 255.255.255.0 broadcast 172.18.22.255 up
root@nginx:~# ifconfig
ens33: flags=4163<UP,BROADCAST,RUNNING,MULTICAST>  mtu 1500
        inet 172.18.22.133  netmask 255.255.255.0  broadcast 172.18.22.255
        inet6 fe80::20c:29ff:feda:3b7c  prefixlen 64  scopeid 0x20<link>
        ether 00:0c:29:da:3b:7c  txqueuelen 1000  (Ethernet)
        RX packets 1824  bytes 540668 (540.6 KB)
        RX errors 0  dropped 0  overruns 0  frame 0
        TX packets 587  bytes 66247 (66.2 KB)
        TX errors 0  dropped 0 overruns 0  carrier 0  collisions 0

ens33:1: flags=4163<UP,BROADCAST,RUNNING,MULTICAST>  mtu 1500
        inet172.18.22.195  netmask 255.255.255.0  broadcast 172.18.22.255
        ether 00:0c:29:da:3b:7c  txqueuelen 1000  (Ethernet)

lo: flags=73<UP,LOOPBACK,RUNNING>  mtu 65536
        inet 127.0.0.1  netmask 255.0.0.0
        inet6 ::1  prefixlen 128  scopeid 0x10<host>
        loop  txqueuelen 1000  (Local Loopback)
        RX packets 114  bytes 9212 (9.2 KB)
        RX errors 0  dropped 0  overruns 0  frame 0
        TX packets 114  bytes 9212 (9.2 KB)
        TX errors 0  dropped 0 overruns 0  carrier 0  collisions 0


 root@nginx:~# ifconfig ens33:2 172.18.22.196 netmask 255.255.255.0 broadcast 172.18.22.255 up
root@nginx:~# ifconfig
ens33: flags=4163<UP,BROADCAST,RUNNING,MULTICAST>  mtu 1500
        inet 172.18.22.133  netmask 255.255.255.0  broadcast 172.18.22.255
        inet6 fe80::20c:29ff:feda:3b7c  prefixlen 64  scopeid 0x20<link>
        ether 00:0c:29:da:3b:7c  txqueuelen 1000  (Ethernet)
        RX packets 1987  bytes 560126 (560.1 KB)
        RX errors 0  dropped 0  overruns 0  frame 0
        TX packets 649  bytes 71284 (71.2 KB)
        TX errors 0  dropped 0 overruns 0  carrier 0  collisions 0

ens33:1: flags=4163<UP,BROADCAST,RUNNING,MULTICAST>  mtu 1500
        inet 172.18.22.195  netmask 255.255.255.0  broadcast 172.18.22.255
        ether 00:0c:29:da:3b:7c  txqueuelen 1000  (Ethernet)

ens33:2: flags=4163<UP,BROADCAST,RUNNING,MULTICAST>  mtu 1500
        inet 172.18.22.196  netmask 255.255.255.0  broadcast 172.18.22.255
        ether 00:0c:29:da:3b:7c  txqueuelen 1000  (Ethernet)

lo: flags=73<UP,LOOPBACK,RUNNING>  mtu 65536
        inet 127.0.0.1  netmask 255.0.0.0
        inet6 ::1  prefixlen 128  scopeid 0x10<host>
        loop  txqueuelen 1000  (Local Loopback)
        RX packets 114  bytes 9212 (9.2 KB)
        RX errors 0  dropped 0  overruns 0  frame 0
        TX packets 114  bytes 9212 (9.2 KB)
        TX errors 0  dropped 0 overruns 0  carrier 0  collisions 0


root@nginx:~# apt install ipmiutil


# 查看 IP 地址  通过管道符进行 grep 查看
# 准备好的IP地址如下:
root@nginx:~# ifconfig | grep "inet 172"
        inet 172.18.22.133  netmask 255.255.255.0  broadcast 172.18.22.255
        inet 172.18.22.195  netmask 255.255.255.0  broadcast 172.18.22.255
        inet 172.18.22.196  netmask 255.255.255.0  broadcast 172.18.22.255


root@nginx:~# ifconfig | grep inet
        inet 172.18.22.133  netmask 255.255.255.0  broadcast 172.18.22.255
        inet6 fe80::20c:29ff:feda:3b7c  prefixlen 64  scopeid 0x20<link>
        inet 172.18.22.195  netmask 255.255.255.0  broadcast 172.18.22.255
        inet 172.18.22.196  netmask 255.255.255.0  broadcast 172.18.22.255
        inet 127.0.0.1  netmask 255.0.0.0
        inet6 ::1  prefixlen 128  scopeid 0x10<host>


C:\Users\Administrator>ping 172.18.22.195

正在 Ping 172.18.22.195 具有 32 字节的数据:
来自 172.18.22.195 的回复: 字节=32 时间<1ms TTL=64
来自 172.18.22.195 的回复: 字节=32 时间<1ms TTL=64
来自 172.18.22.195 的回复: 字节=32 时间<1ms TTL=64
来自 172.18.22.195 的回复: 字节=32 时间<1ms TTL=64

172.18.22..195 的 Ping 统计信息:
    数据包: 已发送 = 4,已接收 = 4,丢失 = 0 (0% 丢失),
往返行程的估计时间(以毫秒为单位):
    最短 = 0ms,最长 = 0ms,平均 = 0ms
添加 nginx 的配置,添加多个 server{} 标签,让 nginx 支持基于 ip 的多虚拟主机,返回多个站点内容
1. 给 nginx 添加 include 包含语法,让其他目录下的配置文件参数导入到 nginx.conf 中,这样的写法能够让 nginx 每一个配置文件,看起来更简洁,更清晰
# 修改 nginx.conf, 在 http{} 大括号标签中,的最后一行,添加如下参数:
include extra/*.conf;

参数解释
'include' 表示导入一个相对目录.相对目录下的 *.conf的配置文件,extra 文件夹 和 nginx.conf 文件 相对。
'*.conf' 表示所有以 .conf 结尾的文件。


2. 在 extra 目录下,添加多个基于 IP 的虚拟主机配置

可以像如下规划的形式,来编写 nginx.conf 配置文件
	第一个基于 ip 的虚拟主机,写在 conf/nginx.conf 中,部分代码如下,当172.18.22.133 请求到来,让 nginx 去 /www/133文件夹下寻找资料:

vim nginx.conf
server {
    listen       172.18.22.133:80;
    server_name  localhost;
    charset         utf-8;

    location / {
        root    /www/133;
        index  index.html index.htm;
    }
}
3. 在添加 172.18.22.195 虚拟主机的配置
vim extra/195.conf
root@nginx:/opt/tngx310/conf/extra# vim 195.conf
root@nginx:/opt/tngx310/conf/extra# cat 195.conf
server {
        listen  172.18.22.195:80;
        server_name     _;
        location / {
                root    /www/195;
                index   index.html      index.htm;
        }
}


4. 编辑 196.conf 添加如下代码
root@nginx:/opt/tngx310/conf/extra# vim 196.conf
root@nginx:/opt/tngx310/conf/extra# cat 196.conf
server {
        listen  172.18.22.196:80;
        server_name     _;
        location / {
                root    /www/196;
                index   index.html      index.htm;
        }
}

5.检查 nnginx 语法是否正确  nginx -t
root@nginx:/www# nginx -t
nginx: the configuration file /opt/tngx310/conf/nginx.conf syntax is ok
nginx: configuration file /opt/tngx310/conf/nginx.conf test is successful
root@nginx:/www#


6. 1)重新加载 nginx 配置,
nginx -s reload
   2)改了较多的 nginx 配置,在允许重启 nginx 的情况下
   nginx -s stop
   nginx(启动)
   # 防止出现 nginx 有缓存的情况,发现页面无变化

root@nginx:/www# nginx
root@nginx:/www# netstat -tunlp | grep nginx
tcp        0      0 172.18.22.133:80      0.0.0.0:*      LISTEN      3042/nginx: master
tcp        0      0 172.18.22.196:80      0.0.0.0:*      LISTEN      3042/nginx: master
tcp        0      0 172.18.22.195:80      0.0.0.0:*      LISTEN      3042/nginx: master
root@nginx:/www# nginx -s reload
root@nginx:/www#


7. 准备3个基于 IP 的站点内容
mkdir -p /www/{133,195,196}  生成三个文件夹
echo "I'm 133,hello man." > /www/133/index.html
echo "I'm 195,hello man." > /www/195/index.html
echo "I'm 196,hello man." > /www/196/index.html

root@nginx:/opt/tngx310/conf/extra# mkdir -p /www/133
root@nginx:/opt/tngx310/conf/extra# mkdir -p /www/195
root@nginx:/opt/tngx310/conf/extra# mkdir -p /www/196
root@nginx:/opt/tngx310/conf/extra# cd /www/
root@nginx:/www# echo "I'm 133,hello man." > /www/133/index.html
echo "I'm 195,hello man." > /www/195/index.html
echo "I'm 196,hello man." > /www/196/index.html
root@nginx:/www# tree
.
├── 133
│   └── index.html
├── 195
│   └── index.html
├── 196
│   └── index.html
└── html
    ├── cc.txt
    ├── index.html
    ├── istio-1.21.1-linux-amd64.tar.gz
    └── WeChat.mp4

4 directories, 7 files


8.先在 liunx 本地测试
root@nginx:/www# nginx -t
nginx: the configuration file /opt/tngx310/conf/nginx.conf syntax is ok
nginx: configuration file /opt/tngx310/conf/nginx.conf test is successful
root@nginx:/www# nginx -s reload
root@nginx:/www# curl 172.18.22.195
I'm 195,hello man.
root@nginx:/www# curl 172.18.22.196
I'm 196,hello man.
root@nginx:/www# curl 172.18.22.133
I'm 133,hello man.
root@nginx:/www#


9.使用客户端浏览器来访问

172.18.22.133

172.18.22.195

172.18.22.196


# 查看主配置文件
root@nginx:/www# cat /opt/tngx310/conf/nginx.conf

user  tengine;
worker_processes  3;

#error_log  logs/error.log;
#error_log  logs/error.log  notice;
#error_log  logs/error.log  info;
#error_log  "pipe:rollback logs/error_log interval=1d baknum=7 maxsize=2G";

pid        logs/nginx.pid;


events {
    worker_connections  1024;
}

# nginx web 功能的核心配置点
http {
    include       mime.types;
    default_type  application/octet-stream;

    #log_format  main  '$remote_addr - $remote_user [$time_local] "$request" '
    #                  '$status $body_bytes_sent "$http_referer" '
    #                  '"$http_user_agent" "$http_x_forwarded_for"';

    #access_log  logs/access.log  main;
    #access_log  "pipe:rollback logs/access_log interval=1d baknum=7 maxsize=2G"  main;

    sendfile        on;
    #tcp_nopush     on;

    #keepalive_timeout  0;
    keepalive_timeout  65;

    #gzip  on;
        gzip    on;
        gzip_http_version       1.1;
        gzip_comp_level 4;
        gzip_types      text/plain      application/javascript  application/x-javascript text/css       application/xml text/javascript application/x-httpd-php     image/jpeg      image/gif image/png;


        # nginx.conf 通过 server 关键字来定义虚拟主机
        # nginx.conf 支持编写多个 server{} 标签,可以平级写多个 server{} 标签
        # nginx.conf 第一个虚拟主机站点配置如下
    server {
        # 定义虚拟主机站点的端口号,也是用户访问网站的入口
        listen       172.18.22.133:80;
        # 填写虚拟主机的域名配置,没有域名就可以写 localhost 或者 _ 也可以
        server_name  localhost;
        # server_name www.chaoge.cc;

        # 给 nginx 定义网站的编码
        charset         utf-8;
        #charset koi8-r;

        # nginx 访问日志功能,我们只需要去掉注释,就可以使用日志功能
        #access_log  logs/host.access.log  main;
        #access_log  "pipe:rollback logs/host.access_log interval=1d baknum=7 maxsize=2G"  main;

        # 看到 location 就是 nginx 的核心配置
        # nginx 的路径匹配规则 通过 location 后面的参数就可以对路径进行匹配
        # 如下的规则是最低级匹配,任何的 nginx 请求,都会进入如下 location 的配置,去它所定义的目录中寻找资料
        # 最最基本的默认规则 location 后面跟 '/' 代表根目录 表示的是 nginx(http://172.18.22.18:80/index.html) 80端口后面的 '/' 斜杠
        # 可以去 location / 后面的 root 去寻找资料
        # location 是针对用户请求做匹配的 '/' 会去'root /www/html'文件夹下找用户请求的资源 如果存在就返回请求的资源,如果没有,则返回 404 页面
        location / {
            # root 关键词 是定义网页根目录的,这个 html 是以 nginx 安装的路径为相对路径
            # root   html;
            # root /www/html;
            root    /www/133;
            # index 关键词,定义 nginx 的首页文件名字,默认找那个文件
            index  index.html index.htm;
        }

        #error_page  404              /404.html;

        # redirect server error pages to the static page /50x.html
        #
        error_page   500 502 503 504  /50x.html;
        location = /50x.html {
            root   html;
        }
    }
   include extra/*.conf;
}


nginx 最主要的功能,就是由 server{} 标签来定义,server{} 即可以返回一个本地的资源,当做静态站点目录,这个 server{} 标签也可以定义不返回本地资料,可以让他成为一个反向代理,负载均衡的相关的 web 服务器配置,因此 server{} 他是非常重要的功能。
我们想使用不同的 server 虚拟主机,如果说在一台机器上频繁使用,或者说有各种功能都需要使用到 server虚拟主机,我们如何区分它们?他支持基于IP ,域名,端口等的不同,他可以实现各种各样的配置。
Nginx基于多域名的虚拟主机配置
nginx 最主要的功能,就是由 server{} 标签来定义,server{} 即可以返回一个本地的资源,当做静态站点目录,这个 server{} 标签也可以定义不返回本地资料,可以让他成为一个反向代理,负载均衡的相关的 web 服务器配置,因此 server{} 他是非常重要的功能。
我们想使用不同的 server 虚拟主机,如果说在一台机器上频繁使用,或者说有各种功能都需要使用到 server 虚拟主机,我们如何区分它们?他支持基于IP ,域名,端口等的不同,他可以实现各种各样的配置。
基于多 IP 的虚拟主机,用的还是不多的,因为服务器都是有负载均衡的 IP 入口的,不会说给他绑定各种 IP,让用户去使用,并且也可能因为,一台服务器,简单的一个 nginx 服务就使用多个 ip 地址。可能会造成 IP 地址不足等各种各样的问题。一般如果没有特殊需求,用的更多的是基于多域名的虚拟主机
使用多域名的虚拟主机使用的前提条件是:
要么配置DNS服务器,将你想用的域名解析到对应的 IP,
使用本地的 hosts 文件,进行本地测试访问
多域名的配置结合 nginx ,就是实现了多虚拟主机的访问,解决了可能 IP 不足的问题。
1.环境准备		牢记修改客户端的 host 文件
我们想要基于不同的域名多虚你主机。
先在你的客户端本地,修改hosts文件信息
macos	/etc/hosts 文件修改
windown	 c 盘里面的 hosts 文件,搜索引擎搜一下即可知道

2.修改 hosts 文件,添加如下信息
C:\windows\System32\drivers\etc\hosts

172.18.22.133	learn_nginx.com
172.18.22.133	learn_nginx_cc.com
172.18.22.133	learn_nginx_yy.com


3.修改服务端的 nginx 的配置
第一个域名的虚拟主机
server {
    listen          80;
    server_name		learn_nginx.com;
    charset         utf-8;
    location / {
        root    /www/learn_nginx;
        index  index.html index.htm;
    }
}


第二个域名的虚拟主机
root@nginx:/opt/tngx310/conf/extra# cat learn_nginx_cc.conf
server {
    listen          80;
    server_name         learn_nginx_cc.com;
    charset         utf-8;
    location / {
        root    /www/learn_nginx_cc;
        index  index.html index.htm;
    }
}


第三个域名的虚拟主机
server {
    listen          80;
    server_name		learn_nginx_yy.com;
    charset         utf-8;
    location / {
        root    /www/learn_nginx_yy;
        index  index.html index.htm;
    }
}


4.进行 nginx 重启
nginx -t
nginx -s reload
nginx


5. 分别准备3个域名的虚拟主机站点资料
mkdir -p /www/{learn_nginx,learn_nginx_cc,learn_nginx_yy}


6. 生成三个虚拟主机站点的首页内容
echo "I'm website learn_nginx, welcome......" > /www/learn_nginx/index.html
echo "I'm website learn_nginx_cc, welcome......" > /www/learn_nginx_cc/index.html
echo "I'm website learn_nginx_yy, welcome......" > /www/learn_nginx_yy/index.html


7. 通过客户端浏览器。分别访问3个域名,查看站点内容
1) 服务器查看站点内容
root@nginx:/www# curl learn_nginx.com
I'm website learn_nginx, welcome......
root@nginx:/www# curl learn_nginx_cc.com
I'm website learn_nginx_cc, welcome......
root@nginx:/www# curl learn_nginx_yy.com
I'm website learn_nginx_yy, welcome......
root@nginx:/www#
2)浏览器查看站点内容
http://learn_nginx.com/
http://learn_nginx_cc.com/
http://learn_nginx_yy.com/

默认都看到 index.html 内容,表示访问成功


root@nginx:/www# tree
.
├── 133
│   └── index.html
├── 195
│   └── index.html
├── 196
│   └── index.html
├── html
│   ├── cc.txt
│   ├── index.html
│   ├── istio-1.21.1-linux-amd64.tar.gz
│   └── WeChat.mp4
├── learn_nginx
├── learn_nginx_cc
└── learn_nginx_yy

7 directories, 7 files

---------------------------
root@nginx:/opt/tngx310/conf# cat nginx.conf

user  tengine;
worker_processes  3;

#error_log  logs/error.log;
#error_log  logs/error.log  notice;
#error_log  logs/error.log  info;
#error_log  "pipe:rollback logs/error_log interval=1d baknum=7 maxsize=2G";

pid        logs/nginx.pid;


events {
    worker_connections  1024;
}

# nginx web 功能的核心配置点
http {
    include       mime.types;
    default_type  application/octet-stream;

    #log_format  main  '$remote_addr - $remote_user [$time_local] "$request" '
    #                  '$status $body_bytes_sent "$http_referer" '
    #                  '"$http_user_agent" "$http_x_forwarded_for"';

    #access_log  logs/access.log  main;
    #access_log  "pipe:rollback logs/access_log interval=1d baknum=7 maxsize=2G"  main;

    sendfile        on;
    #tcp_nopush     on;

    #keepalive_timeout  0;
    keepalive_timeout  65;

    #gzip  on;
    gzip    on;
    gzip_http_version       1.1;
    gzip_comp_level 4;
    gzip_types      text/plain      application/javascript  application/x-javascript text/css       application/xml text/javascript application/x-httpd-php     image/jpeg      image/gif image/png;


    # nginx.conf 通过 server 关键字来定义虚拟主机
    # nginx.conf 支持编写多个 server{} 标签,可以平级写多个 server{} 标签
    # nginx.conf 第一个虚拟主机站点配置如下
    server {
        # 定义虚拟主机站点的端口号,也是用户访问网站的入口
        # listen       172.18.22.133:80;
        listen          80;
        # 填写虚拟主机的域名配置,没有域名就可以写 localhost 或者 _ 也可以
        server_name             learn_nginx.com;
        # server_name  localhost;
        # server_name www.chaoge.cc;

        # 给 nginx 定义网站的编码
        charset         utf-8;
        #charset koi8-r;

        # nginx 访问日志功能,我们只需要去掉注释,就可以使用日志功能
        #access_log  logs/host.access.log  main;
        #access_log  "pipe:rollback logs/host.access_log interval=1d baknum=7 maxsize=2G"  main;

        # 看到 location 就是 nginx 的核心配置
        # nginx 的路径匹配规则 通过 location 后面的参数就可以对路径进行匹配
        # 如下的规则是最低级匹配,任何的 nginx 请求,都会进入如下 location 的配置,去它所定义的目录中寻找资料
        # 最最基本的默认规则 location 后面跟 '/' 代表根目录 表示的是 nginx(http://172.18.22.18:80/index.html) 80端口后面的 '/' 斜杠
        # 可以去 location / 后面的 root 去寻找资料
        # location 是针对用户请求做匹配的 '/' 会去'root /www/html'文件夹下找用户请求的资源 如果存在就返回请求的资源,如果没有,则返回 404 页面
        location / {
            # root 关键词 是定义网页根目录的,这个 html 是以 nginx 安装的路径为相对路径
            # root   html;
            # root /www/html;
            root    /www/learn_nginx;
            # root  /www/133;
            # index 关键词,定义 nginx 的首页文件名字,默认找那个文件
            index  index.html index.htm;
        }

        #error_page  404              /404.html;

        # redirect server error pages to the static page /50x.html
        #
        error_page   500 502 503 504  /50x.html;
        location = /50x.html {
            root   html;
        }
    }
include extra/*.conf;
}
root@nginx:/opt/tngx310/conf#
Nginx支持基于多端口的虚拟主机配置
只需要修改 nginx.conf 中
server {} 标签里面定义的
listen 端口 参数即可 ,进行实现不同的端口,进行虚拟主机匹配

172.18.22.133:80
172.18.22.133:85
172.18.22.133:90

基于不同的端口,来定义为到不同的 server 虚拟主机的配置---

1.修改服务端的 nginx 的配置
第一个端口的虚拟主机
vim /opt/tngx310/conf/nginx
server {
        listen  80;
        server_name     _;
        charset utf-8;
        location / {
                root    /www/80;
                index   index.html      index.htm;
        }
}


第二个端口虚拟主机配置
vim /opt/tngx310/conf/extra/85.conf
root@nginx:/opt/tngx310/conf# vim extra/85.conf
root@nginx:/opt/tngx310/conf# cat extra/85.conf
server {
        listen  85;
        server_name     _;
        charset utf-8;
        location / {
                root    /www/85;
                index   index.html      index.htm;
        }
}


第三个端口虚拟主机配置
vim /opt/tngx310/conf/extra/90.conf
server {
    listen  90;
    server_name     _;
    charset utf-8;
    location / {
            root    /www/90;
            index   index.html      index.htm;
    }
}


2.进行 nginx 重启
nginx -t
nginx -s reload
nginx


3. 分别准备3个端口的虚拟主机站点资料
mkdir -p /www/{80,85,90}


4. 生成三个虚拟主机站点的首页内容
echo "I'm 80 port,welcome...." > /www/80/index.html
echo "I'm 85 port,welcome...." > /www/85/index.html
echo "I'm 90 port,welcome...." > /www/90/index.html


5. 通过客户端浏览器。分别访问3个端口,查看站点内容
1} 在浏览器访问
http://172.18.22.133:80/
http://172.18.22.133:85/
http://172.18.22.133:90/
2)在服务器终端访问
curl 172.18.22.133:80
curl 172.18.22.133:85
curl 172.18.22.133:90

以上访问能够看到站点内容,表示服务器部署成功


-------------实战--------------
root@nginx:/opt/tngx310/conf# vim nginx.conf
root@nginx:/opt/tngx310/conf# vim extra/85.conf
root@nginx:/opt/tngx310/conf# cat extra/85.conf
server {
        listen  85;
        server_name     _;
        charset utf-8;
        location / {
                root    /www/85;
                index   index.html      index.htm;
        }
}
root@nginx:/opt/tngx310/conf# vim extra/90.conf
root@nginx:/opt/tngx310/conf# vim extra/90.conf
root@nginx:/opt/tngx310/conf# mkdir -p /www/{80,85,90}
root@nginx:/opt/tngx310/conf# cd /www/
root@nginx:/www# tree
.
├── 133
│   └── index.html
├── 195
│   └── index.html
├── 196
│   └── index.html
├── 80
├── 85
├── 90
├── html
│   ├── cc.txt
│   ├── index.html
│   ├── istio-1.21.1-linux-amd64.tar.gz
│   └── WeChat.mp4
├── learn_nginx
│   └── index.html
├── learn_nginx_cc
│   └── index.html
└── learn_nginx_yy
    └── index.html

10 directories, 10 files
root@nginx:/www# echo "I'm 80 port,welcome...." > /www/80/index.html
echo "I'm 85 port,welcome...." > /www/85/index.html
echo "I'm 90 port,welcome...." > /www/90/index.html
root@nginx:/www# tree
.
├── 133
│   └── index.html
├── 195
│   └── index.html
├── 196
│   └── index.html
├── 80
│   └── index.html
├── 85
│   └── index.html
├── 90
│   └── index.html
├── html
│   ├── cc.txt
│   ├── index.html
│   ├── istio-1.21.1-linux-amd64.tar.gz
│   └── WeChat.mp4
├── learn_nginx
│   └── index.html
├── learn_nginx_cc
│   └── index.html
└── learn_nginx_yy
    └── index.html

10 directories, 13 files
root@nginx:/www# nginx -t
nginx: the configuration file /opt/tngx310/conf/nginx.conf syntax is ok
nginx: configuration file /opt/tngx310/conf/nginx.conf test is successful
root@nginx:/www# nginx -s reload
root@nginx:/www# curl 172.18.22.133:80
I'm 80 port,welcome....
root@nginx:/www# curl 172.18.22.133:85
I'm 85 port,welcome....
root@nginx:/www# curl 172.18.22.133:90
I'm 90 port,welcome....
root@nginx:/www#
Nginx多虚拟主机日志配置
不同的 IP
不同的端口
不同的域名
都能够访问到一台计算机的配置,nginx 的多虚拟主机配置利用虚拟主机可以在一台服务器上,运行多个站点配置。
这个功能非常好用,不仅仅是做静态服务器展示,还能够支持反向代理,负载均衡,都是基于虚拟主机去做的配置
Nginx访问日志
日志对于程序员是很重要的,可以用于问题排错,记录程序运行时的状态,一个好的日志配置,能够给与运维人员,开发人员精准的问题定位功能。
Nginx 开启日志功能只需要在 nginx.conf里面找到 log_format 参数,定义日志的格式,以及日志的存储位置,以及日志的格式,路径,缓存大小等等。
针对每一个站点,都有他的日志功能,打开主配置文件,日志是写在全局里面的,对所有的虚拟主机都生效,
针对每一个虚拟主机配置好 access.log 更方便更清晰的对每一个虚拟主机进行访客信息管理
nginx.conf 配置日志功能的代码如下,修改为如下即可

# nginx web 功能的核心配置点
http {
	include		mime.types;
	default_type	application/octet-stream;
	# 定义日志的内容格式 (记录内容的详细程度)
	log_format main '$remote_addr - $remote_user [$time_local] "$request"'
					'$status $body_bytes_sent "$http_referer"'
					'"$http_user_agent" "$http_x_forwarded_for"';
	access_log	logs/cc_access.log main;
	# access_log "pipe:rollback logs/access_log interval=1d baknum=7 maxsize=2G" main;

	server {
		...
	}

	server {
		...
	}
}


配置第二个虚拟主机日志
root@nginx:~# cd /opt/tngx310/conf/extra/
root@nginx:/opt/tngx310/conf/extra# ls
195.conf  196.conf  85.conf  90.conf  bbs.conf  blog.conf  learn_nginx_cc.conf  learn_nginx_yy.conf  longchi.conf  www.conf
root@nginx:/opt/tngx310/conf/extra# vim 85.conf
root@nginx:/opt/tngx310/conf/extra# cat 85.conf
# 针对虚拟主机,添加日志的路径
server {
        listen  85;
        server_name     _;
        charset utf-8;

        access_log      logs/85.log;

        location / {
                root    /www/85;
                index   index.html      index.htm;
        }
}


第三个虚拟主机的配置
root@nginx:/opt/tngx310/conf/extra# cat 90.conf
server {
    listen  90;
    server_name     _;
    charset utf-8;

	# 定义日志路径
    access_log      logs/90.log;

    location / {
            root    /www/90;
            index   index.html      index.htm;
    }
}


# 检测 nginx 语法
root@nginx:/opt/tngx310/logs# nginx -t
nginx: the configuration file /opt/tngx310/conf/nginx.conf syntax is ok
nginx: configuration file /opt/tngx310/conf/nginx.conf test is successful

# 重新读取配置文件
root@nginx:/opt/tngx310/logs# nginx -s reload


# 此时就生成了 '85.log' '90.log' 针对不同的虚拟主机站点的日志文件
root@nginx:/opt/tngx310/logs# ll
total 8964
drwxr-xr-x  3 root    root    4096 May 26 23:58 ./
drwxr-xr-x 12 root    root    4096 May 22 04:58 ../
drwxr-xr-x  3 root    root    4096 May 22 05:24 2024/
-rw-r--r--  1 tengine root       0 May 26 23:58 85.log
-rw-r--r--  1 tengine root       0 May 26 23:58 90.log
-rw-r--r--  1 tengine root   20643 May 26 23:21 access.log
-rw-r--r--  1 tengine root 9000000 May 22 04:07 access.log_2024-05-22
-rw-r--r--  1 root    root     417 May 22 05:26 cut_nginx_log.sh
-rw-r--r--  1 tengine root  125771 May 26 23:59 error.log
-rw-r--r--  1 root    root       5 May 26 07:45 nginx.pid
root@nginx:/opt/tngx310/logs#


# 实时刷新 '85.log' 日志文件
tail -f /opt/tngx310/logs/85.log


root@nginx:~# tail -f /opt/tngx310/logs/access.log
root@nginx:~# tail -f /opt/tngx310/logs/90.log
root@nginx:~# tail -f /opt/tngx310/logs/85.log


基于不同虚拟主机日志配置


-----------------------------

# nginx 服务文件
[root@mail ~]# vim /usr/lib/systemd/system/nginx.service
[root@mail ~]# cat /usr/lib/systemd/system/nginx.service
[Unit]
Description=The nginx HTTP and reverse proxy server
After=network.target remote-fs.target nss-lookup.target

[Service]
Type=forking
PIDFile=/run/nginx.pid
# Nginx will fail to start if /run/nginx.pid already exists but has the wrong
# SELinux context. This might happen when running `nginx -t` from the cmdline.
# https://bugzilla.redhat.com/show_bug.cgi?id=1268621
ExecStartPre=/usr/bin/rm -f /run/nginx.pid
ExecStartPre=/usr/sbin/nginx -t
ExecStart=/usr/sbin/nginx
ExecReload=/bin/kill -s HUP $MAINPID
KillSignal=SIGQUIT
TimeoutStopSec=5
KillMode=mixed
PrivateTmp=true

[Install]
WantedBy=multi-user.target
[root@mail ~]#


[Unit]
Description=The nginx HTTP and reverse proxy server
After=network.target remote-fs.target nss-lookup.target

[Service]
Type=forking
PIDFile=/run/nginx.pid
# Nginx will fail to start if /run/nginx.pid already exists but has the wrong
# SELinux context. This might happen when running `nginx -t` from the cmdline.
# https://bugzilla.redhat.com/show_bug.cgi?id=1268621
ExecStartPre=/usr/bin/rm -f /run/nginx.pid
ExecStartPre=/usr/sbin/nginx -t
ExecStart=/usr/sbin/nginx
ExecReload=/bin/kill -s HUP $MAINPID
KillSignal=SIGQUIT
TimeoutStopSec=5
KillMode=mixed
PrivateTmp=true

[Install]
WantedBy=multi-user.target
Nginx 之 Access 日志功能
nginx 的访客日志内容如下
日志对于程序员是很重要的,可以用于问题排错,记录程序运行时的状态,一个好的日志配置,能够给与运维人员和开发人员精准的问题定位功能。
Nginx 开启日志功能只需要在主配置文件 nginx.conf 里面找到 log_format 这个参数,我们就可以定义日志的格式。各种字段,比如来访问人员的名单,电话,家庭地址,身份证号等各种各样的信息,可以自由定义字段数量,以及记录日志的详细信息;以及定义日志的存储位置(相对路径和绝对路径都可以,只要能找到他就可以了)。以及日志的格式,路径,缓存大小等
可以定义在全局配置中
1. 开启日志的功能  ssh root@172.18.178.110  配置了免密登录
rpm -qi nginx  查看该机器是否安装 nginx


2. nginx.conf 配置日志功能的代码如下,修改为如下即可
http {
    include       mime.types;
    default_type  application/octet-stream;

	# 定义日志的内容格式(记录内容的详细程度)
    log_format  main  '$remote_addr - $remote_user [$time_local] "$request" '
                      '$status $body_bytes_sent "$http_referer" '
                      '"$http_user_agent" "$http_x_forwarded_for"';

    # 定义日志存储的路径(以 conf 文件夹为相对路径  在 nginx 的安装目录[tngx310]下有一个 logs 文件夹,在 logs 目录生成 access.log 文件)
    access_log  logs/access.log  main;
    # 默认是不定义下面这些功能参数,然后对 nginx 做日志切割这样的操作
    #access_log  "pipe:rollback logs/access_log interval=1d baknum=7 maxsize=2G"  main;

    ...
}

代码解释
'' 通过单引号表示他是一个普通的字符串
'$remote_addr - $remote_user' 然后通过 $ 加 变量的名字, Linux通过 $+变量  是能够把它的值取出来的
'maxsize=2G'  定义日志文件单个存储最大是2G


root@nginx:~# nginx -s reload
nginx: [alert] kill(2332, 1) failed (3: No such process)
root@nginx:~# cat /opt/tngx310/logs/nginx.pid
2332
root@nginx:~# nginx
root@nginx:~# cat /opt/tngx310/logs/nginx.pid
1419
root@nginx:~# netstat -tunlp | grep nginx
tcp        0      0 0.0.0.0:90              0.0.0.0:*               LISTEN      1419/nginx: master
tcp        0      0 0.0.0.0:80              0.0.0.0:*               LISTEN      1419/nginx: master
tcp        0      0 0.0.0.0:85              0.0.0.0:*               LISTEN      1419/nginx: master
root@nginx:~# ps -ef | grep nginx
root        1419       1  0 20:30 ?        00:00:00 nginx: master process nginx
tengine     1420    1419  0 20:30 ?        00:00:00 nginx: worker process
tengine     1421    1419  0 20:30 ?        00:00:00 nginx: worker process
tengine     1422    1419  0 20:30 ?        00:00:00 nginx: worker process
root        1428    1385  0 20:31 pts/0    00:00:00 grep --color=auto nginx
root@nginx:~#


root@nginx:~# cd /opt/tngx310/logs/
root@nginx:/opt/tngx310/logs# ls
2024  85.log  90.log  access.log  access.log_2024-05-22  cut_nginx_log.sh  error.log  nginx.pid
root@nginx:/opt/tngx310/logs# vim access.log_2024-05-22
root@nginx:/opt/tngx310/logs# vim cut_nginx_log.sh

-------------------------------------------
实时检测日志命令 tail -f access.log
root@nginx:/opt/tngx310/logs# tail -f access.log

172.18.22.1 - - [27/May/2024:20:43:01 +0000] "GET / HTTP/1.1" 304 0 "-" "Mozilla/5.0 (Windows NT 10.0; Win64; x64) AppleWebKit/537.36 (KHTML, like Gecko) Chrome/127.0.0.0 Safari/537.36" "-"
172.18.22.1 - - [27/May/2024:20:43:25 +0000] "GET /index.html HTTP/1.1" 200 53 "-" "Mozilla/5.0 (Windows NT 10.0; Win64; x64) AppleWebKit/537.36 (KHTML, like Gecko) Chrome/127.0.0.0 Safari/537.36" "-"
172.18.22.1 - - [27/May/2024:20:43:26 +0000] "GET /favicon.ico HTTP/1.1" 404 368 "http://172.18.22.133/index.html" "Mozilla/5.0 (Windows NT 10.0; Win64; x64) AppleWebKit/537.36 (KHTML, like Gecko) Chrome/127.0.0.0 Safari/537.36" "-"

172.18.22..1 - - [27/May/2024:20:43:50 +0000] "GET /index.html HTTP/1.1" 304 0 "-" "Mozilla/5.0 (Windows NT 10.0; Win64; x64) AppleWebKit/537.36 (KHTML, like Gecko) Chrome/127.0.0.0 Safari/537.36" "-"

实时检测日志返回参数解释
'172.18.22.1' 客户端的 IP 地址
'[27/May/2024:20:43:50 +0000]' 什么时间访问的
'GET ' 通过什么样的请求方式
'/index.html ' 请求的资源
'HTTP/1.1'  协议版本
'304'  状态码	表示重定向
'Chrome'  客户端信息


在 liunx 终端访问 curl 172.18.22.133   日志返回结果如下
root@nginx:~# curl 172.18.22.133
I'm 80 port,welcome....
root@nginx:~# curl 172.18.22.133/hehe.txt
<!DOCTYPE HTML PUBLIC "-//IETF//DTD HTML 2.0//EN">
<html>
<head><title>404 Not Found</title></head>
<body>
<center><h1>404 Not Found</h1></center>
 Sorry for the inconvenience.<br/>
Please report this message and include the following information to us.<br/>
Thank you very much!</p>
<table>
<tr>
<td>URL:</td>
<td>http://172.18.22.133/hehe.txt</td>
</tr>
<tr>
<td>Server:</td>
<td>nginx</td>
</tr>
<tr>
<td>Date:</td>
<td>2024/05/27 21:09:05</td>
</tr>
</table>
<hr/>Powered by Tengine/3.0.0<hr><center>tengine</center>
</body>
</html>
root@nginx:~#

实时检测日志返回参数解释
root@nginx:/opt/tngx310/logs# tail -f access.log


172.18.22.133 - - [27/May/2024:20:58:37 +0000] "GET / HTTP/1.1" 200 24 "-" "curl/7.81.0" "-"
'172.18.22.133' 检测到客户端的 ip 地址
'[27/May/2024:20:58:37 +0000]' 访问时间
'GET' 请求方式
'/'	我们访问这台机器结尾加了一个斜杠
'HTTP/1.1'  协议版本
'200' 返回的状态码	表示访问成功
'curl/7.81.0' 客户端 curl 命令版本号


172.18.22.133 - - [27/May/2024:21:09:05 +0000] "GET /hehe.txt HTTP/1.1" 404 564 "-" "curl/7.81.0" "-"

'172.18.22.133' 检测到客户端的 ip 地址
'[27/May/2024:20:58:37 +0000]' 访问时间
'GET' 请求方式
'/hehe.txt'	我们访问这台机器结尾加了一个斜杠,再加访问资源的文件名
'HTTP/1.1'  协议版本
'404' 返回的状态码   表示访问的资源不存在
'curl/7.81.0' 客户端 curl 命令版本号
nginx 的访客日志内容如下:
# 定义日志的内容格式(记录内容的详细程度)  vim /opt/tngx310/conf/nginx.conf  定义 'log_format'内容
log_format  main  '$remote_addr - $remote_user [$time_local] "$request" '
                      '$status $body_bytes_sent "$http_referer" '
                      '"$http_user_agent" "$http_x_forwarded_for"';
参数解释
'$remote_addr' 表示远程客户端地址	记录访客的客户端 IP 地址
'_'  远程没有特殊的用户,他显示的就是 '_'
'$remote_user' 表示远程的用户是什么	记录远程客户端的访客用户名
'[$time_local]' 表示本地时间	记录访问的时间和地区信息
"$request"   记录用户的 http 请求的首行信息  他请求的资源是什么 表示是"GET /hehe.txt HTTP/1.1"信息
'$status'  记录用户的 http 请求状态,也就是请求发出之后,响应的状态 如200 OK 301 重定向 404 不存在 502 服务器崩溃 等等
'$body_bytes_sent' 记录服务器发给客户端的响应数据字节大小
'$http_referer'  记录本次请求是从哪个链接过来的,可以根据 referer 信息来进行防盗链信息
'"$http_user_agent"'  记录客户端的访问信息,如浏览器信息,手机浏览器信息
'"$http_x_forwarded_for"'  捉到藏在代理服务器后面的真实客户端 IP 信息


# 老师的参数解释
$remote_addr	记录访客的客户端 IP 地址
$remote_user	记录远程客户端的访客用户名
$time_local		记录访问的时间和地区信息
$request		记录用户的 http 请求的首行信息
$status			记录用户的 http 请求状态,也就是请求发出之后,响应的状态,如200 301 404 502
$body_bytes_sent	记录服务器发给客户端的响应体数据字节大小
$http_referer	记录本次请求是从哪个链接过来的,可以根据 referer 信息来进行防盗链信息
$http_user_agent	记录客户端的访问信息,如浏览器信息,手机浏览器信息
"$http_x_forwarded_for"		捉到藏在代理服务器后面的真实客户端 ip 信息


# 以下返回内容由 'log_format' 他所定义的 'tail -f /opt/tngx310/logs/access.log'实时检测日志命令
172.18.22.133 - - [27/May/2024:21:09:05 +0000] "GET /hehe.txt HTTP/1.1" 404 564 "-" "curl/7.81.0" "-"
Nginx 目录浏览功能 这个很重要,一定要搞清楚
如何做文件下载功能
能够将你的机器上的目录资料,提供一个展示,无论是谁都可以快速的访问
修改 nginx.conf 配置,这个功能是在虚拟主机里定义的
浏览器不认识中文的解决方案
文本文件的解决方案,是打开该虚拟机的配置文件 vim /opt/tngx310/conf/extra/learn_nginx_cc.conf


1.在该虚拟主机服务器配置文件 server{} 代码块内容里面增加如下一行
charset		utf-8;		# 代表让 learn_nginx_cc.com 服务器虚拟主机支持中文解析


# 想快速知道 'learn_nginx_cc.com' 这个目录下有哪些文件是提供访问的,怎么做呢?我们就可以再次编辑 'vim /opt/tngx310/conf/extra/learn_nginx_cc.conf'	这个配置文件,我们在该虚拟主机服务器配置文件 location / {} 代码块内容里面增加如下一行且把首要功能关闭
# index		index.html	index.htm;
autoindex	on;		# 自动索引排列功能打开 自动的展示 root 所定义的目录下所有文件内容


root@nginx:/www/learn_nginx_cc# vim /opt/tngx310/conf/extra/learn_nginx_cc.conf
root@nginx:/www/learn_nginx_cc# cat /opt/tngx310/conf/extra/learn_nginx_cc.conf
server {
    listen          80;
    server_name         learn_nginx_cc.com;
    charset         utf-8;

        #access_log             logs/learn_nginx_cc.logs;

	# 域名匹配,所有的请求都会进入如下的目录解析
    location / {
        root    /www/learn_nginx_cc;
        # 关闭虚拟主机的默认首要功能
        #index  index.html index.htm;
        # 自动的展示 root 所定义的目录下所有文件内容
        autoindex       on;
    }
}

# 只要我们访问 'learn_nginx_cc.com' 虚拟主机,他就一定会进入到 '/www/learn_nginx_cc' 目录下去找资料。你想使用 nginx 目录浏览功能,只需要在该虚拟主机配置文件加上如下一行且关闭 index 的首要文件功能,代码如下所示
# 关闭虚拟主机的默认首要功能
# index		index.html	index.htm;
# 自动索引排列功能打开 自动的展示 root 所定义的目录下所有文件内容
autoindex	on;


2.还得检查虚拟主机目录下,不要存在 index.html 文件,如果该目录下存在 index.html 文件,浏览器默认访问就直接去找 index.html 文件去了,你就无法展示该虚拟主机目录下的所有文件了,注意这里的坑  且访问的时候不能在域名后面加任何的后缀  注意 坑坑
root@nginx:/www/learn_nginx_cc# ls
didi.sh  hehe.txt  index.html  xixi.py
root@nginx:/www/learn_nginx_cc# mv index.html index.html.bak
root@nginx:/www/learn_nginx_cc# ls
didi.sh  hehe.txt  index.html.bak  xixi.py
root@nginx:/www/learn_nginx_cc# pwd
/www/learn_nginx_cc
root@nginx:/www/learn_nginx_cc#
root@nginx:/www/learn_nginx_cc# nginx -t
nginx: the configuration file /opt/tngx310/conf/nginx.conf syntax is ok
nginx: configuration file /opt/tngx310/conf/nginx.conf test is successful
root@nginx:/www/learn_nginx_cc# nginx -s reload

上图展示了 Nginx 目录浏览功能 ,可以将 ‘http://learn_nginx_cc.com/’ 该目录下所有内容给我们做一个展示,如果我们想下载这些内容,只需要点击一下对应的目录资源文件名,该文件就可以下载了,这样就可以下载我们需要的资料,这是各大公司存放本公司公用资源的一种方法。!!!
点击 .py  是可以下载这个文件内容的
点击 .txt 是可以展示该文件内容的
Nginx 状态页
Nginx 状态信息功能
Nginx 状态信息 (status) 配置及信息详解 nginx与php-fpm 一样内建了一个状态页,对于想了解 nginx 的状态以及监控 nginx 非常有帮助。为了后续的 zabbix 监控,我们需要先了解一下 nginx 的状态页。
Nginx状态信息 (status) 介绍 Nginx 软件在编译时又一个 with-http_stub_status_module 模块,在编译时必须增加 --with-http_stub_status_module 参数。
nginx 提供了 status 模块,用于检测 nginx 的请求连接信息,这个功能需要在编译安装 nginx 的时候,添加--with-http_stub_status_module参数,才能使用
# 检查 Nginx 是否开启此功能	nginx -V
# nginx -V  # 检查当前 nginx 是否支持 status 功能

root@nginx:~# nginx -V
Tengine version: Tengine/3.0.0
nginx version: nginx/1.24.0
built by gcc 11.4.0 (Ubuntu 11.4.0-1ubuntu1~22.04)
built with OpenSSL 3.0.2 15 Mar 2022
TLS SNI support enabled
configure arguments: --prefix=/opt/tngx310 --with-http_ssl_module --with-http_flv_module --with-http_gzip_static_module --with-http_stub_status_module --with-threads --with-file-aio
root@nginx:~#
当你支持 status 功能,我们可以添加一个 conf 配置文件,用于检查状态页的功能
有的,那么修改 nginx.conf,支持此功能
创建一个 status.conf,然后放入 extra 目录下
1. 确保你的 nginx.conf 主配置文件,支持 include 语法
vim /opt/tngx310/conf/nginx.conf  打开主配置文件,添加如下一行
include extra/*.conf;
# 将当前的 extra 目录下所有的 *.conf 文件,都识别为 nginx 的配置文件


2.创建一个 status.conf 如下文件:
touch /opt/tngx310/conf/extra/status.conf


3.修改 status.conf 开启状态页面功能,添加如下内容
vim /opt/tngx310/conf/extra/status.conf
server {
	listen		85;
	location / {
		stub_status on;
		access_log	off;
	}
}


4.检查 nginx 配置,重启 nginx
nginx -t
nginx -s reload

5. 访问 nginx 状态页面 192.168.222.133:86  查看到如下内容
前面是关键词,后面跟的事值  key/value
Active connections: 2 	# 激活中的链接有两个
# 显示正在处理的活动的连接数
server accepts handled requests request_time
 2 2 2 0
Reading: 0 Writing: 1 Waiting: 1

'server' 对应2	nginx 启动后一共处理的请求数量	保持长链接  返回数最大是7
'accepts handled' 对应2  nginx 启动后创建的握手数量
'requests' 对应 2		表示 nginx 一共处理了多少次请求
'request_time' 对应 0		表示处理的时间

'Reading'	nginx 读取到客户端的 headers 数量
'Writing'	nginx 响应给客户端的 headers 数量
'Waiting'	nginx 处理完毕请求之后,等待下一次的请求驻留的连接数
	waiting值=active-(reading+writing) 计算公式


root@nginx:~# touch /opt/tngx310/conf/extra/status.conf
root@nginx:~# vim /opt/tngx310/conf/extra/status.conf
root@nginx:~# cat /opt/tngx310/conf/extra/status.conf
server {
    listen          86;
    location / {
        stub_status on;		# 开启状态页功能
        access_log  off;	# 关闭日志功能
    }
}
root@nginx:~# nginx -t
nginx: the configuration file /opt/tngx310/conf/nginx.conf syntax is ok
nginx: configuration file /opt/tngx310/conf/nginx.conf test is successful
root@nginx:~# nginx -s reload	# 注意 nginx
nginx: [alert] kill(1461, 1) failed (3: No such process)
root@nginx:~# nginx
root@nginx:~# nginx -s reload
root@nginx:~#
访问状态页 172.18.22.133:86
使用 ab 命令,进行 nginx 压力测试 测试api 接口
1. 安装 ab 命令
yum -y install httpd-tools (centos)
apt install apache2-utils -y	(ubuntu)
apt install tcllib
ab -kc 1000 -n 1000000 http://127.0.0.1/
# 开启会话保持,1000个并发,发送十万个请求


2. 使用 ab 命令对 nginx 发送大量的连接
-n	请求数量	# 一共发出多少个请求  比如 -n 100 表示给网站发送100个请求
-c  请求并发数	# 比如 -c 20 表示发送20个并发数
-k  # 表示启用 keepalived 保持连接功能
ab -kc 20 -n 100 http://172.18.22.133/
ab -kc 1000 -n 100000 http://127.0.0.1/  # 给服务器的根路径发送 10 万个请求

# 访问 http://172.18.22.133:86/  返回如下内容
Active connections: 2
server accepts handled requests request_time
 1009 1009 100036 0
Reading: 0 Writing: 1 Waiting: 1
Nginx 错误日志
nginx能够把自身运行时故障的信息,也写入到对应的日志文件中,称之为 error_log
对于错误信息的调试,也是运维人员维护 nginx 的一个重要的手段
nginx想要使用 error_log 就得打开 nginx.conf ,找到关键字参数 'error_log' ,它是放在 http{} 花括号,称之为全局的变量参数,针对所有的server{} 虚拟主机生效。
也可以单独的写在虚拟主机中,单独记录某一个虚拟主机的错误日志
vim /opt/tngx310/conf/nginx.conf

user www;	# 全局变量参数
http {
	# 全局变量参数
	# 局部变量参数
	error_log	logs/cc_error.log;  # 表示虚拟主机1,虚拟主机2 如果出错了,都写入 cc_error.log文件中。
	# 也可以单独的写在虚拟主机中,单独记录某一个虚拟主机的错误日志,便于服务的区分,更容易把控
	server {
		error_log	logs/s1_error.log;
	}
	server {
		error_log	logs/s2_error.log;
	}
}


# 错误日志的语法
error_log file level;

参数解释
'error_log' 关键词
'file'   文件路径以及文件名
'level'	 指定日志错误的级别


日志级别有如下几种:
debug	#
info	#
notice	#
warn	#
error	#
crit	#
alert	#
emerg	#
这个级别是越来越严重的,级别写的越低,记录的日志越详细。没有必要...
级别越高,日志记录的内容就越少生成环境下常用的是 warn,error,crit模式
日志的级别,可能会给服务器增加额外的大量 IO 消耗,因此,根据你实际的工作环境去修改
针对虚拟主机添加错误日志的部分代码
在 server{} 里面增加一行  表示本虚拟主机的错误日志记录到如下路径的 'learn_nginx_error.log' 文件中
 error_log logs/learn_nginx_error.log;
Nginx location 匹配
location 是写在 server{} 虚拟主机里面的
nginx 的 location 的作用,是根据用户访问的 URL,进行不同的处理方式
针对用户请求的网站 URL 进行匹配处理,然后进行对应的处理
1. location 在 nginx.conf 中的写法
location / {
              # root 关键词 是定义网页根目录的,这个 html 是以 nginx 安装的路径为相对路径
              # root   html;
              # root /www/html;
              root    /www/learn_nginx;
              # root  /www/133;
              # root  /www/80;
              # index 关键词,定义 nginx 的首页文件名字,默认找那个文件
              index  index.html index.htm;
          }


# 添加 location 路径匹配,判断当请求后缀是
location ~ .*\.(gif|jpg|jpeg|png|bmp|swf)$ {
	root 	/www/learn_nginx;
	expires 		30d;		# 设置过期时间 30 天
}


# 判断当请求 url 后缀是 js,css 文件类型的时候,就进行浏览器缓存
location ~ .*\.(js|css)?$ {
	root		/www/learn_nginx;
	expires		1h;		# 设置过期时间
}


代码解释
location 相关语法
location [ = | ~ | ~* | ^~ ] url {
	# 做出的相应的处理动作
}

'[ | ]' 中括号里面的管道符 '|' 表示或的意思
# nginx 有关 location 的匹配 符号如下
匹配符号			匹配规则												优先级
'='  		精确匹配 你定义了 location 的路径,等于你后面的 url 					1 表示优先级最高
'^~'		以某个字符开头的意思	不做正则处理 									 2
'~*'		支持正则的匹配模式												  3
'/string 比如/blog/'   表示某某字符串   当你访问 192.168.222.133/blog/xxx/		4
'/'  		通用匹配不符合其他的 location 的匹配规则,就走到这里					   5


表示 nginx.conf 支持在虚拟主机中定义多个 location ,进行用户的请求 url 解析


# 我们在虚拟主机里面可以定义多个 location ,他能够根据用户的请求 url 不同,去做相应的事

server {
	# 比如说用户想找到一个图片
	location = {

	}
	# 用户想访问 nginx 的动态信息,我们需要用 '/' 反向代理功能去后台服务器转发
	location / {

	}
	#用户访问的是一个通用请求,他访问了一个错误的地址,我们让他去什么地址匹配
	location ~* {

	}
}
nginx 的 location 实战演练如下 重点掌握
准备一个 nginx 的配置文件,来练习 location 语法
1. 打开主配置 vim /opt/tngx310/conf/nginx.conf 要确保该配置文件添加如下一行
include extra/*.conf;
2. 在 extra 目录下创建 my_location.conf 配置文件如下
root@nginx:~# netstat -tunlp | grep nginx
tcp 0 0 0.0.0.0:80 0.0.0.0:* LISTEN 1448/nginx: master
tcp 0 0 0.0.0.0:85 0.0.0.0:* LISTEN 1448/nginx: master
tcp 0 0 0.0.0.0:86 0.0.0.0:* LISTEN 1448/nginx: master
tcp 0 0 0.0.0.0:90 0.0.0.0:* LISTEN 1448/nginx: master
root@nginx:~# cd /opt/tngx310/conf/extra/
root@nginx:/opt/tngx310/conf/extra# ls
195.conf 196.conf 85.conf 90.conf bbs.conf blog.conf learn_nginx_cc.conf learn_nginx_yy.conf longchi.conf status.conf www.conf
root@nginx:/opt/tngx310/conf/extra# vim my_location.conf
root@nginx:/opt/tngx310/conf/extra# cat my_location.conf
# 我们可以访问 IP:83 进入如下的虚拟主机
# 这是基于端口的多虚拟主机的多个 location 配置如下
server {
listen 83;
server_name _;
charset utf-8;
# 最低级匹配,不符合其他 location 就来这
# 比如当用户访问 172.18.22.133:83/qwuwe nginx 直接返回 401 状态码给用户
location / {
return 401; #Authorization Required 授权要求
}
# 优先级最高,精确匹配,当用户访问 172.18.22.133:83/
location = / {
return 402; #Payment Required 付款要求
}
# 当用户访问 172.18.22.133:83/blog/hehe.txt
# 以 /blog/ 开头的 url,来这里,如符合其他 location,则以其他优先
location /blog/ {
return 403; #Forbidden 被禁止的
}
# 当用户访问 172.18.22.133:83/img/xxxx
# 匹配任何以 /img/ 开头的请求,不匹配正则
location ^~ /img/ {
return 404; #Not Found 找不到用户访问的页面
}
# '*'代表支持正则的匹配 url,通过一个转义符 '\' '.' 代表普通的小数点 ,普通的小数点后面写 '()',括号里面分别 'gif|jpg|jpeg' ,中间的 '|' 代表或的意思,结尾加上 '$' 终止符,表示当用户访问任意 url,结尾是以 '.gif' '.jpg' '.jpeg' 的时候,就进入如下 location 中。给用户返回一个 500.
# 当用户访问 http://172.18.22.133:83/zs.jpg 的时候,则返回 500 Internal Server Error
# 当用户访问任意 url,结尾是 .gif .jpg .jpeg 的时候,就进入如下 location
# 匹配任何以 .gif 结尾的请求,支持正则
location ~* \.(gif|jpg|jpeg)$ {
return 500; # Internal Server Error 服务器内部错误
}
}
参数解释
'\' 代表转义
'.' 普通的小数点
'|' 代表或的意思
'$' 获取
root@nginx:/opt/tngx310/conf/extra# ls
195.conf 196.conf 85.conf 90.conf bbs.conf blog.conf learn_nginx_cc.conf learn_nginx_yy.conf longchi.conf my_location.conf status.conf www.conf
root@nginx:/opt/tngx310/conf/extra#
[点击并拖拽以移动]
Nginx之URL地址重写功能
这个功能在工作中用得还是很多的,因为有些业务他的网站域名会经常发生变化,或者说公司网站做了一个升级,域名也做了一个升级,做了一个迁移,那么对于大部分老的用户来说,可能不知道你们公司的域名做了更新,我访问的还是就的域名,这时候你要是不做地址重写,我们有可能会访问你旧的域名,网站就打不开了。因为域名不用了,或者说,这种情况就很有可能给你造成大量的用户流失,企业肯定不允许这样的事情发生
Nginx 的 URL 地址重写功能,主要是使用 nginx 提供的 rewrite功能,且支持正则表达式
rewrite 能够实现 url 的跳转,实现 url 规范化,根据请求的变量实现 url 跳转等等,基于 url 重写功能,常见的效果如下
对于爬虫程序的封禁,让其跳转到一个错误的页面 ,使用 user_agent 进行检测,检测到爬虫之后,我们就给他重定向到不存在的网站,让这个爬虫去访问不存在的网页,对于我们自己的网站,压力是不是就转移了。
动态的 url ,伪装成静态的 html 页面,便于搜索引擎的抓取,百度,谷歌等搜索引擎,其实这些搜索引擎他们就是一个超大的爬虫,他们会不停的爬取互联网中资料。能够去检测互联网中信息的变化,这种爬虫程序他们最爱收录什么呢?去这种爬虫网站最愿意去收集一个不怎么变化的页面还是去收集一个反反复复变化的页面呢?答案肯定是更愿意去收集一个静态网站,因为动态的网站,数据要从数据库中去读取,你的网站一直在变化,我的爬虫一直在爬行你变化的内容,给我的爬虫也造成了压力。因此搜索引擎更愿意录取像 png html 等静态页面,而不愿意去爬取非这样的动态页面。因此对于网站架构优化,
新旧域名,目录的更新,替换,需要跳转到新的URL地址
比如 www.oldboyedu.com > www.oldboyedu.com.cn
rewrite 语法
rewrite	^/(.*) http://172.18.22.133/$1 parmanent;

参数解释
rewrite	是 nginx 地址重写的关键词指令,开启跳转功能
^/(.*)	正则表达式匹配,^/(.*) 表示匹配所有的请求,匹配成功后,跳转到后面指定的 url 地址
'$1' 只是用户访问的路径变量	是取出前面正则表达式分组括号里的内容  $1=^/(.*)
parmanent	表示 301 重定向的标记
rewrite 结尾的参数 flag 标记
Last 表示规则匹配完成后,继续向下匹配新的 location
break 本条规则匹配完成后,立即停止匹配动作
Redirct 返回302临时重定向状态码,浏览器地址栏显示跳转后的 url ,爬虫不会更新该 url
Permanent 返回 301 永久重定向,浏览器地址也显示跳转后的 url ,爬虫就会更新该网站 url
last 和 break 用于实现 url 重写,浏览器的地址栏不会发生变化
redirct 和 permanent 也是用于 url 跳转,浏览器 url 地址栏发生变化,跳转到新的 url 地址栏
rewrite 实践
实现一个 301 URL 跳转
# 准备一个虚拟主机的配置文件,实现,当用户访问该虚拟主机,直接跳转到百度页面
vim /opt/tngx310/conf/extra/learn_rewrite.conf
server {
	listen		84;
	server_name	_;
	charset		utf-8;

	# 最低级请求匹配,所有请求都走到这里.然后我们在 location {} 里面做什么动作呢,rewrite 地址重写关键词,'^/(.*)' 匹配任意一个请求,让他转发给 'http://www.baidu.com/$1'  $1是用户请求的路径也把他保存下来,然后 premanent ,具体代码如下:
	location / {
		rewrite	^/(.*)	http://www.baidu.com/$1	permanent;
	}
}

匹配 location 描述如下
最低级请求匹配,所有请求都走到这里.然后我们在 location {} 里面做什么动作呢,rewrite 地址重写关键词,'^/(.*)' 匹配任意一个请求,让他转发给 'http://www.baidu.com/$1'  $1是用户请求的路径也把他保存下来,然后 premanent ,具体代码如下:

root@nginx:~# cat /opt/tngx310/conf/extra/learn_rewrite.conf
server {
        listen          84;
        server_name     _;
        charset         utf-8;

        # 最低级请求匹配,所有请求都走到这里.然后我们在 location {} 里面做什么动作呢,rewrite 地址重写关键词,'^/(.*)' 匹配任意一个请求,让他转发给 'http://www.baidu.com/$1'  $1是用户请求的路径也把他保存下来,然后 premanent ,具体代码如下:
        location / {
                rewrite ^/(.*)  http://www.baidu.com/$1 permanent;
        }
}

# 生成 htpasswd -bc ./htpasswd change 666
Adding password for user chaoge
访问 IP:84 访问 IP:84/index.html 跳转的页面如下
Nginx 访问认证
他的应用场景线上资源需要输入账号密码才可以看,如果你直接取消,他们就会给你一个 401 提示验证失败,你必须输入账号密码通过验证以后才可以查看资源,有时候,我们有一些个人站点,或者说企业网站,有一些后台管理,平台,入口不想让人看见,我们就针对入口加把锁,加一堵墙,你必须输入账号密码才可以进入,才能观看。比如一些重要的内网平台,客户管理系统,企业内网的 CRM 平台了,或者服务器资产管理平台,或者我们自己网站的书籍,不想让人家在公网中随便访问,只能让我们的学生可以访问,我们是不是要给他设置一个账号密码。nginx 就提供了这么一个功能,且看下面步骤:
nginx 提供子认证模块,语法是
location / {
	auth_basic	'string';		# 开启认证功能,然后给他取名
    auth_basic_user_file	conf/htpasswd;(相对路径)	指定密码文件
}


"auth_basic" 是验证模块的关键词 ,只要在 location {} 里面写上 auth_basic 关键词就可以验证了
'string'  你给你的验证取一个名字
'autn_basic_user_file' 密码验证文件,你的告诉 nginx 你的密码文件在哪里
linux 提供了密码生成命令
htpasswd 是 apache 提供的密码生成工具,nginx 也支持 auth_basic 模块,因此我们可以利用 htpasswd 命令生成账号密码文件,提供给 nginx 去使用。安装账号密码生成工具 http-tools,apache2-utils
# 安装账号密码生成工具 http-tools,apache2-utils
htpasswd 是 apache 提供的密码生成工具,nginx 也支持 auth_basic 模块,因此我们可以利用 htpasswd 命令生成账号密码文件,提供给 nginx 去使用。
yum install httpd-tools -y   (centos)
apt install apache2-utils -y 	(ubuntu)
'http-tools,apache2-utils'  他里面不但有密码生成工具,还有压测命令,ab 命令都在这工具包里面


root@nginx:~# apt install apache2-utils -y
Reading package lists... Done
Building dependency tree... Done
Reading state information... Done
apache2-utils is already the newest version (2.4.52-1ubuntu4.9).
0 upgraded, 0 newly installed, 0 to remove and 5 not upgraded.
root@nginx:~#
htpasswd 命令如何使用
语法: htpasswd -b[cmBdpsDv] [-C cost] passwordfile username password
htpasswd -bc .access username password
htpasswd -bc ./htpasswd	longchi 123456


命令参数解释
'htpasswd'  密码生成命令
'-b' 	在命令行中输入 账号密码
'-c'	创建密码文件
'.access' 文件名  以 . 开头的文件是隐藏文件,能够相对的保护这个文件,不被别人随意看见
'username' 账号
'password' 密码

默认 .access 文件采用加密方式 md5 来验证。


比如实例	htpasswd -bc ./htpasswd longchi 123456
root@nginx:/opt/tngx310/conf/extra# htpasswd -bc ./htpasswd longchi 123456
Adding password for user longchi
htpasswd 使用方法
root@nginx:/opt/tngx310/html/www# htpasswd
Usage:
        htpasswd [-cimBdpsDv] [-C cost] passwordfile username
        htpasswd -b[cmBdpsDv] [-C cost] passwordfile username password

        htpasswd -n[imBdps] [-C cost] username
        htpasswd -nb[mBdps] [-C cost] username password
 -c  Create a new file.
 -n  Don't update file; display results on stdout.
 -b  Use the password from the command line rather than prompting for it.
 -i  Read password from stdin without verification (for script usage).
 -m  Force MD5 encryption of the password (default).
 -B  Force bcrypt encryption of the password (very secure).
 -C  Set the computing time used for the bcrypt algorithm
     (higher is more secure but slower, default: 5, valid: 4 to 17).
 -d  Force CRYPT encryption of the password (8 chars max, insecure).
 -s  Force SHA encryption of the password (insecure).
 -p  Do not encrypt the password (plaintext, insecure).
 -D  Delete the specified user.
 -v  Verify password for the specified user.
On other systems than Windows and NetWare the '-p' flag will probably not work.
The SHA algorithm does not use a salt and is less secure than the MD5 algorithm.
root@nginx:/opt/tngx310/html/www#
实际操作案例
1.准备一个用于练习认证模块的配置文件,注意要指定密码文件
vim /opt/tngx310/conf/extra/learn_auth.conf
root@nginx:/opt/tngx310/conf/extra# cat learn_auth.conf

server {
        listen          86;
        server_name		_;
        charset         utf-8;

        location / {
                root            html/www;
                index           index.html;
                auth_basic "learn nginx auth_module";
                # nginx 会去这个文件中验证账号密码
                auth_basic_user_file            /opt/tngx310/conf/extra/htpasswd;
        }
}
生成密码文件
1. 生成密码文件

root@nginx:/opt/tngx310/conf/extra# ls
195.conf  85.conf  bbs.conf   learn_auth.conf      learn_nginx_yy.conf  my_location.conf  www.conf
196.conf  90.conf  blog.conf  learn_nginx_cc.conf  learn_rewrite.conf   status.conf

生成密码文件命令:
root@nginx:/opt/tngx310/conf/extra# htpasswd -bc ./htpasswd longchi 123456
Adding password for user longchi
root@nginx:/opt/tngx310/conf/extra# ls
195.conf  85.conf  bbs.conf   htpasswd         learn_nginx_cc.conf  learn_rewrite.conf  status.conf
196.conf  90.conf  blog.conf  learn_auth.conf  learn_nginx_yy.conf  my_location.conf    www.conf
root@nginx:/opt/tngx310/conf/extra#


2. 创建 learn_auth 目录  用来存储 生成的账号密码  即密码文件
root@nginx:/opt/tngx310/conf/extra# cd /opt/tngx310/html/
root@nginx:/opt/tngx310/html# ls
50x.html  index.html
root@nginx:/opt/tngx310/html# mkdir -p learn_auth
root@nginx:/opt/tngx310/html# ls
50x.html  index.html  learn_auth

# 创建 www 目录
root@nginx:/opt/tngx310/html# mkdir -p www
root@nginx:/opt/tngx310/html# ls
50x.html  index.html  learn_auth  www
root@nginx:/opt/tngx310/html# cd www/
root@nginx:/opt/tngx310/html/www# ls
root@nginx:/opt/tngx310/html/www# touch index.html
root@nginx:/opt/tngx310/html/www# nginx -t
nginx: the configuration file /opt/tngx310/conf/nginx.conf syntax is ok
nginx: configuration file /opt/tngx310/conf/nginx.conf test is successful
root@nginx:/opt/tngx310/html/www# nginx
root@nginx:/opt/tngx310/html/www# nginx -s reload
root@nginx:/opt/tngx310/html/www# vim /opt/tngx310/conf/extra/learn_auth.conf
root@nginx:/opt/tngx310/html/www# nginx -t
nginx: the configuration file /opt/tngx310/conf/nginx.conf syntax is ok
nginx: configuration file /opt/tngx310/conf/nginx.conf test is successful
root@nginx:/opt/tngx310/html/www# nginx -s reload
root@nginx:/opt/tngx310/html/www# ls
index.html
root@nginx:/opt/tngx310/html/www# vim index.html
root@nginx:/opt/tngx310/html/www# pwd
/opt/tngx310/html/www
root@nginx:/opt/tngx310/html/www# cat index.html
<meta charset=utf-8>
感谢大家的观看,希望大家好好学习 nginx, nginx 很重要,下一节课再会~~~
root@nginx:/opt/tngx310/html/www#
此时我们就针对某一个站点设置了账号密码
访问 http://172.18.22.133:86/
或 http://172.18.22.133:86//index.html 如图

输入登录账号密码,点击登录后就可以访问资源了
Nginx 主配置文件参数详解
root@nginx:/opt/tngx310/conf# ls
extra                 fastcgi_params          koi-win             nginx.conf          scgi_params          uwsgi_params.default
fastcgi.conf          fastcgi_params.default  mime.types          nginx.conf.bak      scgi_params.default  win-utf
fastcgi.conf.default  koi-utf                 mime.types.default  nginx.conf.default  uwsgi_params
root@nginx:/opt/tngx310/conf# vim nginx.conf
root@nginx:/opt/tngx310/conf# cat nginx.conf

user  tengine;
worker_processes  3;

#error_log  logs/error.log;
#error_log  logs/error.log  notice;
#error_log  logs/error.log  info;
#error_log  "pipe:rollback logs/error_log interval=1d baknum=7 maxsize=2G";

pid        logs/nginx.pid;


events {
    worker_connections  1024;
}

# nginx web 功能的核心配置点
http {
    include       mime.types;
    default_type  application/octet-stream;

    # 定义日志的内容格式(记录内容的详细程度)
    log_format  main  '$remote_addr - $remote_user [$time_local] "$request" '
                      '$status $body_bytes_sent "$http_referer" '
                      '"$http_user_agent" "$http_x_forwarded_for"';

    # 定义日志存储的路径
    #access_log     logs/cc_access.log main;
    access_log  logs/access.log  main;
    # 默认是不定义下面这些功能参数,然后我们对 nginx 做日志切割这么一个操作
    #access_log  "pipe:rollback logs/access_log interval=1d baknum=7 maxsize=2G"  main;

    sendfile        on;
    #tcp_nopush     on;

    #keepalive_timeout  0;
    keepalive_timeout  65;

    #gzip  on;
    gzip    on;
    gzip_http_version       1.1;
    gzip_comp_level 4;
    gzip_types      text/plain      application/javascript  application/x-javascript text/css       application/xml text/javascript application/x-httpd-php     image/jpeg      image/gif image/png;


    # nginx.conf 通过 server 关键字来定义虚拟主机
    # nginx.conf 支持编写多个 server{} 标签,可以平级写多个 server{} 标签
    # nginx.conf 第一个虚拟主机站点配置如下
    server {
        # 定义虚拟主机站点的端口号,也是用户访问网站的入口
        # listen       192.168.222.133:80;
        listen          80;
        # 填写虚拟主机的域名配置,没有域名就可以写 localhost 或者 _ 也可以
        server_name             learn_nginx.com;
        # server_name  localhost;
        # server_name www.chaoge.cc;

        # 给 nginx 定义网站的编码
        charset         utf-8;
        #charset koi8-r;


        # 针对虚拟主机,单独指定错误日志文件
        error_log logs/learn_nginx_error.log;

        # nginx 访问日志功能,我们只需要去掉注释,就可以使用日志功能
        #access_log  logs/host.access.log  main;
        #access_log  "pipe:rollback logs/host.access_log interval=1d baknum=7 maxsize=2G"  main;

        # 看到 location 就是 nginx 的核心配置
        # nginx 的路径匹配规则 通过 location 后面的参数就可以对路径进行匹配
        # 如下的规则是最低级匹配,任何的 nginx 请求,都会进入如下 location 的配置,去它所定义的目录中寻找资料
        # 最最基本的默认规则 location 后面跟 '/' 代表根目录 表示的是 nginx(http://192.168.22.18:80/index.html) 80端口后面的 '/' 斜杠
        # 可以去 location / 后面的 root 去寻找资料
        # location 是针对用户请求做匹配的 '/' 会去'root /www/html'文件夹下找用户请求的资源 如果存在就返回请求的资源,如果没有,则返回 404 页面
        # 域名匹配,所有的请求都会进入如下的目录解析
        # 访问 learn_nginx.com 就会去找关键词 root /www/learn_nginx 目录下找到 关键词 index  index.html 文件访问
        # 访问 learn_nginx.com/hehe  会去 关键词 root /www/learn_nginx 目录下找到  关键词 index  找 hehe 找到了就返回,没有找到,就返回 404 页面
        # learn_nginx.com
        # learn_nginx.com/hehe
        location / {
                # root 关键词 是定义网页根目录的,这个 html 是以 nginx 安装的路径为相对路径
    			# root   html;
                # root /www/html;
                root    /www/learn_nginx;
                # root  /www/133;
                # root  /www/80;
                # index 关键词,定义 nginx 的首页文件名字,默认找那个文件
    			index  index.html index.htm;
        }

        # 添加 location 路径匹配,判断当请求后缀是
        location ~ .*\.(gif|jpg|jpeg|png|bmp|swf)$ {
                root    /www/learn_nginx;
                expires         30d;    # 设置过期时间 30 天
        }

        # 判断当请求url后缀是js,css文件类型的时候,就进行浏览器缓存
        location ~ .*\.(js|css)?$ {
                root    /www/learn_nginx;
                expires         1h;             # 设置过期时间
        }

        #error_page  404              /404.html;

        # redirect server error pages to the static page /50x.html
        #
        error_page   500 502 503 504  /50x.html;
        location = /50x.html {
            root   html;
        }
    }
    # 将当前的 extra 目录下所有的 *.conf 文件,都识别为 nginx 的配置文件
    include extra/*.conf;
}
root@nginx:/opt/tngx310/conf# pwd
/opt/tngx310/conf
root@nginx:/opt/tngx310/conf#
LNMP 黄金架构

LAMP架构( linux + apache + mysql[mariadb] + php/python)(商业软件收费)
比如 Redhat + apache + mysql,oracle + php/java/python
如何用自由软件(开源软件)替代商业化软件是互联网追求的特点,所有软件发行版都支持以下架构
LNMP架构( linux + nginx + mysql[mariadb] + php) (自由软件免费)(centos)
比如
编程语言(php,python),程序员在这里编写后端代码,逻辑处理,进行各种动态的请求解析
web 服务器(apache,nginx) 进行静态网页展示和动态请求转发
运维面试
因为运维搭建的笔记很多,只要你通过互联网解决互联网部署的问题,那么你就是拥有一定的运维能力的,面试要求你在现场搭建一个 lamp,lnmp 页面,然后根据一些互联网资料提出的需求,做一些页面的定制,比如说,用lamp,php去连接mysql,然后在页面上,通过 nginx 去访问 php 信息管理页面,然后通过 lnmp 搭建出开源的博客等等这样的需求你会做,我们就认为你你对基本的 lnmp 环境搭建维护是没有问题的。那么你就可以通过面试
由于 nginx 卓越的性能,更简单的配置,以及强悍的并发能力,更低的资源消耗,lamp 就渐渐地被 lnmp 替代了
lnmp 有一些很重要的架构概念,描述如下
lnmp架构他是网站在初期刚上线的时候,比如一个初创型的公司,他的产品刚上线,公司也刚成立,人手也少,前端,后端,运维,测试可能每个岗位就一个人,整个团队的人数还是比较少的,这种初创型的技术团队,对于技术的选型需要考虑一定的因素的。你要知道,杀鸡也用牛刀,你在做一些初创型网站架构的时候,不可能选择特别重型的网站架构去部署,给你的项目快速迭代,测试,运维部署,都是带来很大的压力的,因此,创建型公司技术选型我们要考虑如下几点
1. 在创业初期,研发经费有限,研发人力成本也是有限的,技术储备也有限,因此,初创型公司会选择一个容易维护的简单的技术架构,比如我们公司只有开发,让开发人员把前端,后端,测试,部署一起拿下,写完代码,自己去研发部署,这是有可能的情况
2. 产品需要快速研发上线,并且能够快速满足用户的新的需求,产品经理会提出可能会提出各种各样新的点子,符号市场所需要的一些功能,因此要求研发人员开始开发,快速上线,快速迭代等。现实情况决定了一开始,没有太多的精力来选择一个过于复杂的分步式架构等初创型的公司新出的点子我要快速的开发出来,部署上线,我们要让公司的投资者快速看到我们的产品成效,研发速度只需要一个字,快
3. 创业初期业务的复杂度还是较低的,可能我们只需要把后端程序写好,前端静态资源做一个展示,我们快速的把网站开发出来,上线,给用户展示一下,我们网站有哪些功能。整个的复杂度在初期还是较低的,用户量还是比较少的,业务量也比较小。如果选择过于复杂的架构,反而会增加研发难度以及运维难度。
4. 架构的选择它要遵循选择合适的技术架构,而不是过分的追求新型技术,一个优秀的架构师他要权衡研发效率和产品目标,同时创业初期,只有一个 php 研发人员,过于复杂的技术架构,必然会给程序员带来高昂的学习成本。
因此,我们综合如上几条,就奠定了 lnmp 最符合初创公司的运转架构
整个网站可以进行分层
用户层 用户可能是移动端(Android,ios)和PC端
接入层 用户的流量请求优先发给谁,我们说作为整个网站最外层的网关 nginx 接入层,nginx 这么一个优秀的 web 服务器,他能够在整个网站架构的最外层以及防火墙的最外层能够支撑互联网中恶意的,良性的,各种大型流量, nginx 都能够承载这样一个并发,并且他还能够进行一个请求的分发,作为一个负载均衡器再生,在外层器进行调度
系统层 整个网站数据支撑后台的架构,以及管理后台,比如读取数据库,向后台增删改查数据
存储层 mysql redis /mencached

lnmp架构就是最适合初创型公司
一般初创型的小公司,使用 lnmp 架构,最少三台服务器足已,Nginx 可以和后台程序直接部署在同一台机器上,
数据库 mysql 单独作为一台服务器
数据库 mencached 缓存数据库单独作为一台服务器
这样 三台服务器就可以把 lnmp 部署起来了
这样的架构优势在于:
1. 单体架构,架构很简单,清晰的分层结构
2. 可以快速的研发,满足产品快速迭代的需求
3. 没有复杂的技术架构,技术学习成本较低,同时运维成本也较低,不需要再单独招聘一个运维同学,节省公司的开支。
#
LNMP 组合搭建
LNMP 工作流
1. 用户通过浏览器输入域名访问到 nginx web 服务器
2. nginx 进行用户请求判断( location url 匹配的功能 动静态请求分析 ) 判断什么呢?静态请求则 nginx 直接响应给用户,如果是动态请求,比如是 .php结尾的,那么 nginx 就会通过 fastcgi 接口(fastcgi_pass 功能性模块参数将请求转发) 把请求转发给 php 后台程序的引擎 (php-fpm 的进程) 若是提交数据请求,php 直接请求解析;如果是用户请求需要向数据库拿数据,则通过 mysql_connect() 这么一个功能性参数连接 mysql,最终把 mysql 数据库中的数据取出,最终 nginx 把数据响应给用户客户端。
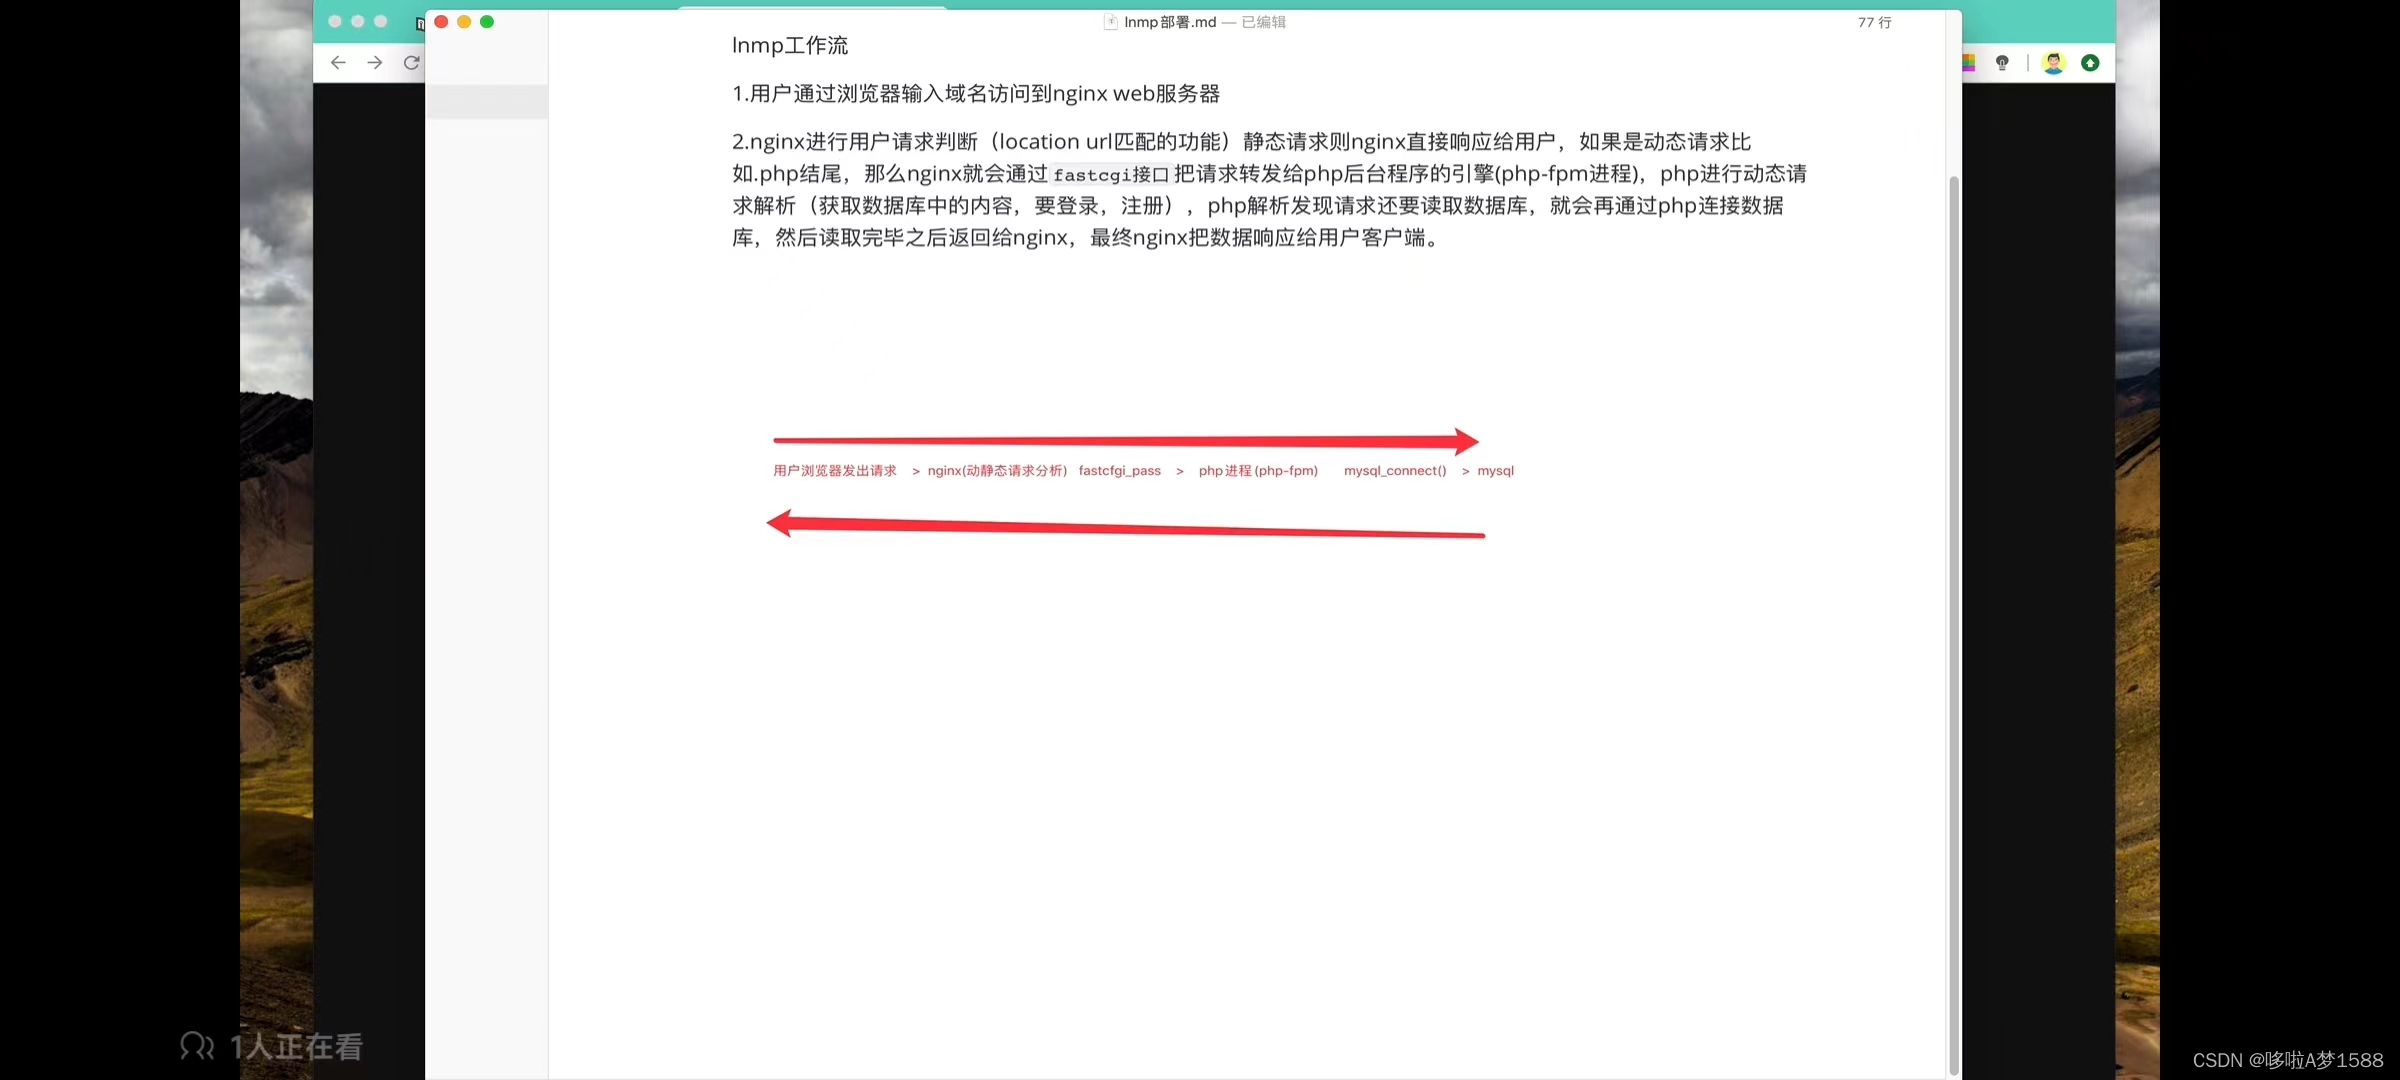
重点牢记:每个服务他在机器上都是 进程,比如我们会有 nginx 进程,会有php 后台进程,php 在后台进行数据处理,当动态请求转发给 php 的时候,php 进行动态请求解析 (比如说用户想要获取数据库的内容,要登录,注册等等),php 解析发现请求还要读取数据库,就会在通过 php 连接数据库,然后读取完毕之后返回给 nginx,最终 nginx 把数据响应给用户客户端。这就是响应的整个流程
LNMP 环境之 Nginx 安装与分析
# 没有在环境变量中找到 nginx,
root@lnmp:~# which nginx
root@lnmp:~# echo $PATH
/usr/local/sbin:/usr/local/bin:/usr/sbin:/usr/bin:/sbin:/bin:/usr/games:/usr/local/games:/snap/bin
root@lnmp:~#

# 添加 nginx 的 bin 目录到 PATH 中,且写入到环境变量文件中,开机就能够自动读取了 vim /etc/profile
cd nginx
PATH="$PATH:/mytools/nginx/sbin"

参数解释
'$PATH' 表示取出当前变量
'$PATH:/mytools/nginx/sbin' 表示取出当前变量,冒号后面表示在补充一个变量  就是我们要设置的环境变量


root@lnmp:/mytools/nginx# cd ../nginx1261
root@lnmp:/mytools/nginx1261# ls
conf  html  logs  sbin
root@lnmp:/mytools/nginx1261# cd ../
root@lnmp:/mytools# cd nginx
root@lnmp:/mytools/nginx# ls
conf  html  logs  sbin
root@lnmp:/mytools/nginx# cd sbin/
root@lnmp:/mytools/nginx/sbin# ls
nginx
root@lnmp:/mytools/nginx/sbin# pwd
/mytools/nginx/sbin
root@lnmp:/mytools/nginx/sbin# echo $PATH
/usr/local/sbin:/usr/local/bin:/usr/sbin:/usr/bin:/sbin:/bin:/usr/games:/usr/local/games:/snap/bin
root@lnmp:/mytools/nginx/sbin# vim /etc/profile
root@lnmp:/mytools/nginx/sbin# tail -1 /etc/profile
PATH="$PATH:/mytools/nginx/sbin"
root@lnmp:/mytools/nginx/sbin# source /etc/profile
root@lnmp:/mytools/nginx/sbin# echo $PATH
/usr/local/sbin:/usr/local/bin:/usr/sbin:/usr/bin:/sbin:/bin:/usr/games:/usr/local/games:/snap/bin:/mytools/nginx/sbin
root@lnmp:/mytools/nginx/sbin#

root@lnmp:/mytools/nginx/sbin# ps -ef | grep nginx
root        1386    1336  0 07:02 pts/0    00:00:00 grep --color=auto nginx
root@lnmp:/mytools/nginx/sbin# netstat -tunlp | grep nginx
root@lnmp:/mytools/nginx/sbin# nginx
root@lnmp:/mytools/nginx/sbin# netstat -tunlp | grep nginx
tcp        0      0 0.0.0.0:80              0.0.0.0:*               LISTEN      1390/nginx: master
root@lnmp:/mytools/nginx/sbin# ps -ef | grep nginx
root        1390       1  0 07:03 ?        00:00:00 nginx: master process nginx
nginx       1391    1390  0 07:03 ?        00:00:00 nginx: worker process
root        1395    1336  0 07:03 pts/0    00:00:00 grep --color=auto nginx

# 看到以下内容,表示 nginx 安装成功
root@lnmp:/mytools/nginx/sbin# curl 127.0.0.1
<!DOCTYPE html>
<html>
<head>
<title>Welcome to nginx!</title>
<style>
html { color-scheme: light dark; }
body { width: 35em; margin: 0 auto;
font-family: Tahoma, Verdana, Arial, sans-serif; }
</style>
</head>
<body>
<h1>Welcome to nginx!</h1>
<p>If you see this page, the nginx web server is successfully installed and
working. Further configuration is required.</p>

<p>For online documentation and support please refer to
<a href="http://nginx.org/">nginx.org</a>.<br/>
Commercial support is available at
<a href="http://nginx.com/">nginx.com</a>.</p>

<p><em>Thank you for using nginx.</em></p>
</body>
</html>
root@lnmp:/mytools/nginx/sbin#
LNMP部署之Nginx部署
运维部署就是要准备好笔记
1. 安装形式选择
yum
	自动下载软件包及其依赖关系,自动安装,省时省力
	都是默认的安装路径,以及版本不容易指定,自定制化太低,无法扩展第三方新功能


rpm包
	需要手动解决依赖关系,弃用


源代码编译安装
	自由下载软件版本,自定制安装路径,第三方功能扩展
	源代码编译安装步骤稍微复杂点

因为我们要将 php 结合,要开启一些功能,我们这里选择源代码安装


2.安装 nginx 前的系统依赖环境检查及其安装	任何软件都得解决一个依赖关系
# centos 安装依赖
yum install pcre pcre-devel openssl openssl-devel gcc wget curl -y	(centos)


# ubuntu 安装依赖
gzip 模块需要 zlib 库 ( apt install zliblg-dev ),
rewrite 模块需要 pcre 库( apt install libpcre3 libpcre3-dev ),
ssl 功能需要 openssl 库(apt install openssl),
gcc g++的依赖库(apt install build-essential libtool) # 多平台编译器

apt update
apt upgrade -y
sudo apt -y install gcc make openssl libssl-dev libpcre3 libpcre3-dev libgd-dev curl vim wget net-tools build-essential libtool zlib1g-dev		(ubuntu)

zliblg  没有

ubuntu 卸载 nginx 命令: apt --purge autoremove nginx      sudo apt purge nginx
删除三个目录命令: sudo rm -rf /var/log/nginx /var/www/html /etc/nginx
再删除依赖项命令: sudo apt autoremove

参数解释
'pcre pcre-devel'  pcre 语言支持正则表达式解析的一个模块 操作系统必须先安装这个模块,并且把 nginx 编译安装时让他 支持这个功能 nginx 才能进行 rewrite 以及 location 正则表达式的各种解析,是以这个模块为基础的

'openssl openssl-devel' 这个软件包不是瞎定义的,是在你出现问题,可以去搜索引擎,去谷歌上面检查的或者去官网找到一些学习资料的


'gcc' 编译器


/usr/sbin/nginx			主程序
/etc/nginx				存放配置文件
/usr/share/nginx		存放静态文件
/var/log/nginx			存放日志

3.下载 nginx 源代码包	taobao nginx  ,这里用 nginx 官方源代码
nginx 官网:https://nginx.org/		http://nginx.org/download/
wget http://nginx.org/download/nginx-1.16.0.tar.gz
wget https://nginx.org/download/nginx-1.26.1.tar.gz

# 显示 nginx 响应头信息
root@lnmp:~# curl -I nginx.org
HTTP/1.1 200 OK
Server: nginx/1.25.3
Date: Sat, 01 Jun 2024 23:31:12 GMT
Content-Type: text/html; charset=utf-8
Content-Length: 7255
Last-Modified: Wed, 29 May 2024 14:51:59 GMT
Connection: keep-alive
Keep-Alive: timeout=15
ETag: "6657410f-1c57"
Accept-Ranges: bytes


# 创建安装目录
mkdir /mytools
cd /mytools/
wget https://nginx.org/download/nginx-1.26.1.tar.gz

4. 解压缩,源代码包
tar -zxvf nginx-1.26.1.tar.gz
root@lnmp:/mytools# ls
nginx-1.26.1.tar.gz
root@lnmp:/mytools# tar -zxvf nginx-1.26.1.tar.gz
root@lnmp:/mytools# ls
nginx-1.26.1  nginx-1.26.1.tar.gz


# 源代码解释
nginx-1.26.1.tar.gz
他有两把锁, gz 锁, tar 锁
# 解压命令参数解释
tar -zxvf nginx-1.26.1.tar.gz
'-z' 解开 '.gz' 锁,
'-x' 去掉 '.tar' 锁,
'-v' 显示解压过程
'-f' f必须写在最后,指定具体解压的文件名


# 进入到源代码目录
root@lnmp:/mytools# cd nginx-1.26.1/
root@lnmp:/mytools/nginx-1.26.1# ls
auto  CHANGES  CHANGES.ru  conf  configure  contrib  html  LICENSE  man  README  src
root@lnmp:/mytools/nginx-1.26.1#


5.创建普通的 nginx 用户,用于运行 nginx 进程 降低 nginx 的系统权限  ps -ef
root@lnmp:/mytools/nginx-1.26.1# ps -ef
UID          PID    PPID  C STIME TTY          TIME CMD
root           1       0  0 22:40 ?        00:00:03 /sbin/init
root           2       0  0 22:40 ?        00:00:00 [kthreadd]

# 创建用户
useradd nginx -u 1111 -s /usr/sbin/nologin -M
root@lnmp:/mytools/nginx-1.26.1# useradd nginx -u 1111 -s /usr/sbin/nologin -M


命令参数解释
'/bin/bash'  表示这个用户是允许登录这台机器
'/usr/sbin/nologin' 表示禁止登录这台机器 比如 apache.mysql等服务 仅仅是用来运行服务  禁止该用户登录服务器,保证服务器安全
'-u' 指定一个UID
'-s' 指定它的 shell 解释器
'-M' 表示也不创建普通用户家目录


6.编译安装 nginx 服务
root@lnmp:/mytools/nginx-1.26.1# pwd
/mytools/nginx-1.26.1
root@lnmp:/mytools/nginx-1.26.1# ls
auto  CHANGES  CHANGES.ru  conf  configure  contrib  html  LICENSE  man  README  src
root@lnmp:/mytools/nginx-1.26.1#
准备如下这条命令
./configure --user=nginx --group=nginx --prefix=/mytools/nginx1261 --with-http_stub_status_module --with-http_ssl_module --with-http_realip_module --with-file-aio --with-http_gzip_static_module && make && make install

参数解释
'configure' 是用来编译之前的配置工作
'./configure -help' 输出详细的选项列表
'--user' 指定 nginx 用户
'--group' 指定 nginx 用户组,降低权限
'--prefix' 指定 nginx 的安装路径
'--with-http_stub_status_module' 开启 nginx 状态页功能
'--with-http_ssl_module' 开启 https 的加密功能 这个选项用于启用 nginx 的 SSL 模块,允许 Nginx 处理 HTTPS 请求。启用此模块后,Nginx 可以加密和解密通过 HTTPS 传输的数据,从而实现安全的数据传输。通常,在支持 HTTPS 的网站上,你需要启用这个模块,以便能够使用 SSL/TLS 协议进行加密通信。
'--with-http_realip_module' 这个选项用于启用 Nginx 的 RealIP 模块,它用于获取客户端的真实 IP 地址,即使 Nginx 位于代理服务器或负载均衡器后面。这对于确保你在日志记录和访问控制中使用的 IP 地址是客户端的真实 IP 地址,而不是代理服务器的 IP 地址。

'--with-http_ssl_module  --with-http_realip_module ' 这两个模块是 Nginx 的标准模块,常用于构建 Web 服务器,特别是在需要支持 HTTPS 和代理服务器等情况下。根据你的需求,你可以根据 Nginx 的编译选项来启用或禁用其他模块,以满足特定的功能和性能需求。


root@lnmp:/mytools/nginx-1.26.1# ls
auto  CHANGES  CHANGES.ru  conf  configure  contrib  html  LICENSE  man  README  src
root@lnmp:/mytools/nginx-1.26.1# ./configure --user=nginx --group=nginx --prefix=/mytools/nginx1261 --with-http_stub_status_module --with-http_ssl_module --with-http_realip_module --with-file-aio --with-http_gzip_static_module && make && make install
checking for OS
 + Linux 5.15.0-107-generic x86_64
checking for C compiler ... found
 + using GNU C compiler
 + gcc version: 11.4.0 (Ubuntu 11.4.0-1ubuntu1~22.04)
checking for gcc -pipe switch ... found
checking for -Wl,-E switch ... found
checking for gcc builtin atomic operations ... found


creating objs/Makefile

Configuration summary
  + using system PCRE library
  + using system OpenSSL library
  + using system zlib library

  nginx path prefix: "/mytools/nginx-1.26.1"
  nginx binary file: "/mytools/nginx-1.26.1/sbin/nginx"
  nginx modules path: "/mytools/nginx-1.26.1/modules"
  nginx configuration prefix: "/mytools/nginx-1.26.1/conf"
  nginx configuration file: "/mytools/nginx-1.26.1/conf/nginx.conf"
  nginx pid file: "/mytools/nginx-1.26.1/logs/nginx.pid"
  nginx error log file: "/mytools/nginx-1.26.1/logs/error.log"
  nginx http access log file: "/mytools/nginx-1.26.1/logs/access.log"
  nginx http client request body temporary files: "client_body_temp"
  nginx http proxy temporary files: "proxy_temp"
  nginx http fastcgi temporary files: "fastcgi_temp"
  nginx http uwsgi temporary files: "uwsgi_temp"
  nginx http scgi temporary files: "scgi_temp"

# 编译安装 nginx
root@lnmp:/mytools/nginx-1.26.1# make && make install

objs/ngx_modules.o \
-lcrypt -lpcre -lssl -lcrypto -lz \
-Wl,-E
sed -e "s|%%PREFIX%%|/mytools/nginx-1.26.1|" \
        -e "s|%%PID_PATH%%|/mytools/nginx-1.26.1/logs/nginx.pid|" \
        -e "s|%%CONF_PATH%%|/mytools/nginx-1.26.1/conf/nginx.conf|" \
        -e "s|%%ERROR_LOG_PATH%%|/mytools/nginx-1.26.1/logs/error.log|" \
        < man/nginx.8 > objs/nginx.8
make[1]: Leaving directory '/mytools/nginx-1.26.1'
make -f objs/Makefile install
make[1]: Entering directory '/mytools/nginx-1.26.1'
test -d '/mytools/nginx-1.26.1' || mkdir -p '/mytools/nginx-1.26.1'
test -d '/mytools/nginx-1.26.1/sbin' \
        || mkdir -p '/mytools/nginx-1.26.1/sbin'
test ! -f '/mytools/nginx-1.26.1/sbin/nginx' \
        || mv '/mytools/nginx-1.26.1/sbin/nginx' \
                '/mytools/nginx-1.26.1/sbin/nginx.old'
cp objs/nginx '/mytools/nginx-1.26.1/sbin/nginx'
test -d '/mytools/nginx-1.26.1/conf' \
        || mkdir -p '/mytools/nginx-1.26.1/conf'
cp conf/koi-win '/mytools/nginx-1.26.1/conf'
cp: 'conf/koi-win' and '/mytools/nginx-1.26.1/conf/koi-win' are the same file
make[1]: *** [objs/Makefile:1289: install] Error 1
make[1]: Leaving directory '/mytools/nginx-1.26.1'
make: *** [Makefile:13: install] Error 2
root@lnmp:/mytools/nginx-1.26.1#

root@lnmp:/mytools/nginx-1.26.1# ls ../
nginx-1.26.1  nginx1261  nginx-1.26.1.tar.gz
root@lnmp:/mytools/nginx-1.26.1# cd ../
root@lnmp:/mytools# ls
nginx-1.26.1  nginx1261  nginx-1.26.1.tar.gz


7. 最好给 nginx 配置一个软件连接,这是生产环境常用的操作,便于运维,开发,测试一起使用,也便于日后的 nginx 升级  软件连接命令 ln -s /mytools/nginx1261/ /mytools/nginx
root@lnmp:/mytools# ls
nginx-1.26.1  nginx1261  nginx-1.26.1.tar.gz
root@lnmp:/mytools# ll
total 1232
drwxr-xr-x  4 root root     4096 Jun  2 02:21 ./
drwxr-xr-x 21 root root     4096 Jun  1 23:38 ../
drwxr-xr-x  9  502 staff    4096 Jun  2 02:20 nginx-1.26.1/
drwxr-xr-x  6 root root     4096 Jun  2 02:21 nginx1261/
-rw-r--r--  1 root root  1244738 May 29 14:30 nginx-1.26.1.tar.gz
root@lnmp:/mytools# ln -s /mytools/nginx1261/ /mytools/nginx
root@lnmp:/mytools# ll
total 1232
drwxr-xr-x  4 root root     4096 Jun  2 03:17 ./
drwxr-xr-x 21 root root     4096 Jun  1 23:38 ../
lrwxrwxrwx  1 root root       19 Jun  2 03:17 nginx -> /mytools/nginx1261//
drwxr-xr-x  9  502 staff    4096 Jun  2 02:20 nginx-1.26.1/
drwxr-xr-x  6 root root     4096 Jun  2 02:21 nginx1261/
-rw-r--r--  1 root root  1244738 May 29 14:30 nginx-1.26.1.tar.gz
root@lnmp:/mytools# ls
nginx  nginx-1.26.1  nginx1261  nginx-1.26.1.tar.gz
root@lnmp:/mytools# cd nginx
root@lnmp:/mytools/nginx# pwd
/mytools/nginx
root@lnmp:/mytools/nginx# ls
conf  html  logs  sbin
root@lnmp:/mytools/nginx# cd ../nginx1261
root@lnmp:/mytools/nginx1261# ls
conf  html  logs  sbin
root@lnmp:/mytools/nginx1261# pwd
/mytools/nginx1261
root@lnmp:/mytools/nginx1261#
root@lnmp:/mytools/nginx1261# nginx
Command 'nginx' not found, but can be installed with:
apt install nginx-core    # version 1.18.0-6ubuntu14.4, or
apt install nginx-extras  # version 1.18.0-6ubuntu14.4
apt install nginx-light   # version 1.18.0-6ubuntu14.4
root@lnmp:/mytools/nginx1261#


8.配置 nginx 的环境变量  快捷键的使用
root@lnmp:/mytools/nginx# cd ../nginx1261
root@lnmp:/mytools/nginx1261# ls
conf  html  logs  sbin
root@lnmp:/mytools/nginx1261# cd ../
root@lnmp:/mytools# cd nginx
root@lnmp:/mytools/nginx# ls
conf  html  logs  sbin
root@lnmp:/mytools/nginx# cd sbin/
root@lnmp:/mytools/nginx/sbin# ls
nginx
root@lnmp:/mytools/nginx/sbin# pwd
/mytools/nginx/sbin
root@lnmp:/mytools/nginx/sbin# echo $PATH
/usr/local/sbin:/usr/local/bin:/usr/sbin:/usr/bin:/sbin:/bin:/usr/games:/usr/local/games:/snap/bin
root@lnmp:/mytools/nginx/sbin# vim /etc/profile
root@lnmp:/mytools/nginx/sbin# tail -1 /etc/profile
PATH="$PATH:/mytools/nginx/sbin"
root@lnmp:/mytools/nginx/sbin# source /etc/profile
root@lnmp:/mytools/nginx/sbin# echo $PATH
/usr/local/sbin:/usr/local/bin:/usr/sbin:/usr/bin:/sbin:/bin:/usr/games:/usr/local/games:/snap/bin:/mytools/nginx/sbin
root@lnmp:/mytools/nginx/sbin#

root@lnmp:/mytools/nginx/sbin# ps -ef | grep nginx
root        1386    1336  0 07:02 pts/0    00:00:00 grep --color=auto nginx
root@lnmp:/mytools/nginx/sbin# netstat -tunlp | grep nginx
root@lnmp:/mytools/nginx/sbin# nginx
root@lnmp:/mytools/nginx/sbin# netstat -tunlp | grep nginx
tcp        0      0 0.0.0.0:80              0.0.0.0:*               LISTEN      1390/nginx: master
root@lnmp:/mytools/nginx/sbin# ps -ef | grep nginx
root        1390       1  0 07:03 ?        00:00:00 nginx: master process nginx
nginx       1391    1390  0 07:03 ?        00:00:00 nginx: worker process
root        1395    1336  0 07:03 pts/0    00:00:00 grep --color=auto nginx
------------------------------------------------

# 安装GCC编译器(build-essential 包会安装GCC编译器以及其他一些用于编译源代码的必须工具)

sudo apt update && sudo apt install build-essential

# 安装PCRE

sudo apt update && sudo apt install libpcre3 libpcre3-dev

# 安装OpenSSL

sudo apt update && sudo apt install openssl

# 安装OpenSSL库

sudo apt update && sudo apt install libssl-dev

# 安装zlib库

sudo apt install zlib1g-dev

# 下载最新的nginx

wget https://nginx.org/download/nginx-1.25.4.tar.gz


# 解压

tar zxvf nginx-1.25.4.tar.gz


# 配置

./configure --prefix=/usr/local/nginx --with-http_stub_status_module --with-http_sub_module --with-http_ssl_module

# 编译和安装

make & make install

# 启动nginx(临时)

/usr/local/nginx/sbin/nginx

# 查看nginx进程

ps -ef|grep nginx

# 查看nginx版本和已安装的模块

/usr/local/nginx/sbin/nginx -V

# 创建服务文件

vim /usr/lib/systemd/system/nginx.service

添加下面的内容:

[Unit]
Description=nginx
After=network.target

[Service]
Type=forking
ExecStart=/usr/local/nginx/sbin/nginx
ExecReload=/usr/local/nginx/sbin/nginx -s reload
ExecStop=/usr/local/nginx/sbin/nginx -s quit
PrivateTmp=true

[Install]
WantedBy=multi-user.target

# 添加权限

chmod +x /usr/lib/systemd/system/nginx.service

# 设置开机自启

systemctl daemon-reload && systemctl enable tomcat.service

# 启动nginx

systemctl start nginx


------/mytools/nginx/sbin/nginx

vim /usr/lib/systemd/system/nginx.service

[Unit]
Description=nginx
After=network.target

[Service]
Type=forking
ExecStart=/mytools/nginx/sbin/nginx
ExecReload=/mytools/nginx/sbin/nginx -s reload
ExecStop=/mytools/nginx/sbin/nginx -s quit
PrivateTmp=true

[Install]
WantedBy=multi-user.target


chmod +x /usr/lib/systemd/system/nginx.service

systemctl start nginx.service
systemctl status nginx.service

systemctl daemon-reload && systemctl enable nginx.service


root@lnmp:~# systemctl daemon-reload && systemctl enable nginx.service
Created symlink /etc/systemd/system/multi-user.target.wants/nginx.service → /lib/systemd/system/nginx.service.
root@lnmp:~# systemctl status nginx.service
● nginx.service - nginx
     Loaded: loaded (/lib/systemd/system/nginx.service; enabled; vendor preset: enabled)
     Active: active (running) since Wed 2024-06-05 05:53:37 UTC; 3min 5s ago
   Main PID: 1432 (nginx)
      Tasks: 2 (limit: 4514)
     Memory: 1.8M
        CPU: 7ms
     CGroup: /system.slice/nginx.service
             ├─1432 "nginx: master process /mytools/nginx/sbin/nginx"
             └─1433 "nginx: worker process" "" "" "" ""

Jun 05 05:53:37 lnmp systemd[1]: Starting nginx...
Jun 05 05:53:37 lnmp systemd[1]: Started nginx.
root@lnmp:~#

root@lnmp:~# cat /usr/lib/systemd/system/nginx.service

[Unit]
Description=nginx
After=network.target

[Service]
Type=forking
ExecStart=/mytools/nginx/sbin/nginx
ExecReload=/mytools/nginx/sbin/nginx -s reload
ExecStop=/mytools/nginx/sbin/nginx -s quit
PrivateTmp=true

[Install]
WantedBy=multi-user.target
root@lnmp:~#

C:\Users\Administrator\Documents\WeChat Files\wxid_ex2x7y95ue9122\FileStorage\File\2024-06
访问 172.18.22.137/ 看到以下页面表示 nginx 安装成功

LNMP 之 mysql 安装详解
LNMP 环境搭建之 MYSQL 数据库
数据库-----大的文件夹------各种信息表格,存放在某一个文件夹中
数据表-----excel表----用户信息表,客户信息表...
mysql数据库也是以这种形式,把数据保存在不同的二维表中,并且用数据库去管理的数据表,把所有的数据表都放在一个大的仓库里面
# 准备两个文件夹	-----数据库
客户文件夹		------数据表
	用户电话表
	用户住址表

学生文件夹
	学生信息表
	学生成绩表
安装 mysql
mysql 跟 nginx 一样就是操作系统上的一款软件而与
一. 安装方式选择
1. yum ,rpm包安装,简单,快速,缺点是无法定制化,新手推荐用 yum

2. 二进制方式安装  作者已经把 mysql 安装完成了,并且跟它打包成一个二进制的压缩文件,把安装好后的 mysql 打包成压缩文件,用户可以解压缩后直接简单配置即可使用,无须再安装,速度较快。适合专业的 DBA使用


3.源代码编译安装
定制化软件功能,缺点 安装过程复杂。

二. 安装 mysql
官网下载
wget http://dev.mysql.com/Downloads/MySQL-5.7/mysql-5.7.28-linux-glibc2.12-x86_64.tar.gz

1.创建普通 mysql 用户,降低程序运行权限
useradd -s /sbin/nologin mysql

2.查看 mysql 用户信息
grep "mysql" /etc/passwd
id mysql

3.下载 mysql 二进制代码包 注意提前下载好 wget 工具
yum install wget -y

4. 下载 mysql 二进制
wget http://dev.mysql.com/Downloads/MySQL-5.7/mysql-5.7.28-linux-glibc2.12-x86_64.tar.gz

5.  检查 mysql 所需的依赖环境
yum install libaio-devel -y			(centos)
apt install libaio1 libaio-dev libncurses5-dev libncurses* -y	(ubuntu)


三,二进制方式安装 mysql(可以每台机器去跑一个服务比如 nginx,mysql,php等)也可以安装在同一台机器上。
1. 解压缩二进制 mysql 代码
tar -zxvf mysql-5.7.28-linux-glibc2.12-x86_64.tar.gz

root@lnmp:/mytools# tar -zxvf mysql-5.7.28-linux-glibc2.12-x86_64.tar.gz

# 注意 重要 重要 mysql 命令注解
'mysql' 用于登录客户端的命令
'mysqld' 用于启动服务端的命令

2. 配置软链接 快捷访问 mysql 生产环境常用的方式
ln -s /mytools/mysql-5.7.28-linux-glibc2.12-x86_64 /mytools/mysql

3. 安全性的准备工作,卸载可能 centos7 存在的 mariadb 相关的依赖关系
rpm -e --nodeps mariadb-libs
# mariadb 需要的时候再次用 yum 命令安装就可以了
# '-e'	代表卸载
# '--nodeps' 代表删除依赖关系


4.开始准备启动 mysql 的配置文件 [mysqld] 是区段的含义,以下的参数,对其生效
[mysqld] 这是代表对服务端生效的参数
[mysql]  这是代表对客户端生效的参数


vim /etc/my.cnf

[mysqld]
basedir=/mytools/mysql/
datadir=/mytools/mysql/data
socket=/tmp/mysql.sock
server_id=1
port=3306
log_error=/mytools/mysql/data/mysql_err.log

[mysql]
socket=/tmp/mysql.sock


四,初始化 mysql 服务端
1. 先卸载系统自带的 mariadb 的依赖
rpm -e --nodeps mariadb-libs

2. 检查 mysql 所需的依赖环境
yum install libaio-devel -y			(centos)
apt install libaio1 libaio-dev libncurses5-dev libncurses* -y	(ubuntu)


3.创建 mysql 数据文件夹,用于初始化数据,且进行权限控制
mkdir -p /opt/mysql/data/
chown -R mysql.mysql /opt/mysql/


chown -R mysql.mysql /mytools/mysql/
#修改 mysql 所有的内容 更改属主,属组 为 mysql 用户


4.初始化 mysql 数据库
删除 mysql 目录下的所有数据,再重新初始化
rm -rf /opt/mysql/*
/opt/mysql/bin/mysqld --initialize-insecure --user=mysql --basedir=/opt/mysql/ --datadir=/opt/mysql/data/ --innodb_undo_tablespaces=3 --explicit_defaults_for_timestamp


# 生成空密码
/mytools/mysql/bin/mysqld --initialize-insecure --user=mysql --basedir=/mytools/mysql/ --datadir=/mytools/mysql/data/ --innodb_undo_tablespaces=3 --explicit_defaults_for_timestamp

# 生成管理员临时密码
/mytools/mysql/bin/mysqld --initialize --user=mysql --basedir=/mytools/mysql/ --datadir=/mytools/mysql/data/ --innodb_undo_tablespaces=3 --explicit_defaults_for_timestamp


五,配置 mysql 客户端  使用系统服务 systemctl 命令去管理 mysql 服务 比如 nginx
systemctl start nginx.service
1. 编写 mysql 启动的脚本,定义一个 mysqld.service  路径必须放在 /etc/systemd/system/ 目录下,
touch /etc/systemd/system/mysqld.service	# 写入如下的内容
vim /etc/systemd/system/mysqld.service

[Unit]
Description=MySQL Server by longchi
Documentation=man:mysqld(8)
Documentation=http://dev.mysql.com/doc/refman/en/using-systemd.html
After=network.target
After=syslog.target

[Install]
WantedBy=multi-user.target

[Service]
User=mysql
Group=mysql
ExecStart=/mytools/mysql/bin/mysqld --defaults-file=/etc/my.cnf
LimitNOFILE=5000


六,启动 mysqld 服务端
由于我们配置了 mysqld.servics 脚本,直接用命令启动
systemctl start mysqld.service
systemctl start mysqld.service
systemctl enable mysqld.service


# 启动完成之后,检查数据库状态,检查为 active 状态,表示 mysql 就正常启动
systemctl status mysqld
 root@lnmp:~# systemctl daemon-reload
root@lnmp:~# systemctl start mysqld.service
root@lnmp:~# systemctl status mysqld.service
● mysqld.service - MySQL Server by longchi
     Loaded: loaded (/etc/systemd/system/mysqld.service; enabled; vendor preset: enabled)
     Active: active (running) since Thu 2024-06-06 12:46:23 UTC; 22s ago
       Docs: man:mysqld(8)
             http://dev.mysql.com/doc/refman/en/using-systemd.html
   Main PID: 1392 (mysqld)
      Tasks: 27 (limit: 9346)
     Memory: 183.4M
        CPU: 301ms
     CGroup: /system.slice/mysqld.service
             └─1392 /mytools/mysql/bin/mysqld --defaults-file=/etc/my.cnf

Jun 06 12:46:23 lnmp systemd[1]: Started MySQL Server by longchi.
root@lnmp:~#

# 检查进程 ps -ef | grep mysql
root@lnmp:~# ps -ef | grep mysql
mysql       1392       1  0 12:46 ?        00:00:00 /mytools/mysql/bin/mysqld --defaults-file=/etc/my.cnf
root        1528    1302  0 12:53 pts/0    00:00:00 grep --color=auto mysql
root@lnmp:~#


# 检查端口 netstat -tunlp | grep mysql
root@lnmp:~# netstat -tunlp | grep mysql
tcp6       0      0 :::3306    :::*                    LISTEN      1392/mysqld


七,登录 mysql 数据库
这个 mysql是 C/S 架构模式的,就好比登录QQ一样
先启动 mysql 服务端,然后用 mysql客户端命令登录即可

1. 如果你电脑之前装过其他的数据库,你可以用 yum 直接卸载,不会影响到你安装的二进制 mysql 数据库,
yum remove mysql -y  (centos)

2.退出会话,重新登录


3. 配置我们安装的二进制 mysql 的 PATH 环境变量
/mytools/mysql/bin	# 这是我们安装的二进制 mysql 命令目录
当前的环境变量
root@lnmp:/mytools/mysql/bin# echo $PATH
/usr/local/sbin:/usr/local/bin:/usr/sbin:/usr/bin:/sbin:/bin:/usr/games:/usr/local/games:/snap/bin:/mytools/nginx/sbin:/usr/local/lrzsz/bin


vim /etc/profile	# 写入如下新的 PATH 变量
PATH="$PATH:/mytools/mysql/bin:/mytools/nginx/sbin"
# 或者写入下面一行也是一样的
export PATH=/mytools/mysql/bin:/mytools/nginx/sbin:$PATH

保存退出之后,再次重新登录会话
或者 source /etc/profile 也可以,不用重新登录
exit

# 看到如下提示,则正确配置了 mysql 环境变量
root@lnmp:/mytools/mysql/bin# which mysql
/mytools/mysql/bin/mysql


八,登录 mysql 数据库,简单的使用 mysql
# 登录数据库的命令 mysql -uroot -p
root@lnmp:~# mysql -uroot -p
Enter password:		# 没有密码,直接回车
Welcome to the MySQL monitor.  Commands end with ; or \g.
Your MySQL connection id is 2
Server version: 5.7.28 MySQL Community Server (GPL)

Copyright (c) 2000, 2019, Oracle and/or its affiliates. All rights reserved.

Oracle is a registered trademark of Oracle Corporation and/or its
affiliates. Other names may be trademarks of their respective
owners.

Type 'help;' or '\h' for help. Type '\c' to clear the current input statement.

mysql>


九,简单的 SQL 语句查看
# 查看当前所有的数据SQL语句  show databases;
mysql> show databases;
+--------------------+
| Database           |
+--------------------+
| information_schema |
| mysql              |
| performance_schema |
| sys                |
+--------------------+
4 rows in set (0.42 sec)

# 创建数据库 lol		create database lol;
mysql> create database lol;
Query OK, 1 row affected (0.00 sec)

# 再次查看数据库
mysql> show databases;
+--------------------+
| Database           |
+--------------------+
| information_schema |
| lol                |
| mysql              |
| performance_schema |
| sys                |
+--------------------+
5 rows in set (0.00 sec)

# 进入 lol 数据库
mysql> use lol;
Database changed

# 此时已经进入了 mysql 的 lol 数据库,我们可以在这个数据库中创建数据表
# 展示 lol 数据库的所有数据表
mysql> show tables;	# 查看 lol 库中,是否有数据表
Empty set (0.00 sec)


十,修改 mysql 数据库密码
mysqladmin -u root password 'zg123456'
# 使用 mysqladmin 命令,修改 root 密码为 'zg123456'


root@lnmp:~# mysqladmin -u root password 'zg123456'
mysqladmin: [Warning] Using a password on the command line interface can be insecure.
Warning: Since password will be sent to server in plain text, use ssl connection to ensure password safety.
root@lnmp:~#

# 修改密码后再次想要登录数据库 mysql -uroot -p
root@lnmp:~# mysql -uroot -p
Enter password:
ERROR 1045 (28000): Access denied for user 'root'@'localhost' (using password: NO)
# 如果你不输入密码,或者输入错误,就会有如上的提示
# 正确输入 root 密码 显示结果如下
root@lnmp:~# mysql -uroot -p
Enter password:
Welcome to the MySQL monitor.  Commands end with ; or \g.
Your MySQL connection id is 6
Server version: 5.7.28 MySQL Community Server (GPL)

Copyright (c) 2000, 2019, Oracle and/or its affiliates. All rights reserved.

Oracle is a registered trademark of Oracle Corporation and/or its
affiliates. Other names may be trademarks of their respective
owners.

Type 'help;' or '\h' for help. Type '\c' to clear the current input statement.

mysql>


tail -f /var/log/syslog
tail -f /var/log/mysql/error.log
 /var/log/mysqld.log

'ibdata1' 该文件必须可写

 其中The innodb_system data file 'ibdata1' must be writable 告诉我们 'ibdata1'必须可写
 修改对应文件权限为可读可写可执行权限
 chmod 777 /mytools/mysql-5.7.28-linux-glibc2.12-x86_64/data/ibdata1

root@lnmp:~# find / -name ibdata1
/mytools/mysql-5.7.28-linux-glibc2.12-x86_64/data/ibdata1
root@lnmp:~# ll /mytools/mysql-5.7.28-linux-glibc2.12-x86_64/data/ibdata1
-rw-r----- 1 mysql mysql 12582912 Jun  6 07:17 /mytools/mysql-5.7.28-linux-glibc2.12-x86_64/data/ibdata1
root@lnmp:~# chmod 777 /mytools/mysql-5.7.28-linux-glibc2.12-x86_64/data/ibdata1
root@lnmp:~#

find / -name mysql.gtid_executed

root@lnmp:/usr/lib/systemd/system# systemctl enable mysqld.service
Synchronizing state of mysqld.service with SysV service script with /lib/systemd/systemd-sysv-install.
Executing: /lib/systemd/systemd-sysv-install enable mysqld
如何解压 .tar.xz 包
以 mysql-8.0.28-linux-glibc2.12-x86_64.tar.xz 为示例 分2步解压
1. 使用命令 xz -d xxx.tar.xz 将他解压成 xxx.tar 包
   '-k' 表示解压 'xxx.tar.xz'为tar包还保留 'xxx.tar.xz'压缩包

2. 再使用命令 tar xvf xxx.tar 来解压包


root@lnmp:/opt# cd /mytools/
root@lnmp:/mytools# ls
mysql-8.0.28-linux-glibc2.12-x86_64.tar.xz  nginx  nginx-1.26.1  nginx1261  nginx-1.26.1.tar.gz
root@lnmp:/mytools# xz -d mysql-8.0.28-linux-glibc2.12-x86_64.tar.xz
root@lnmp:/mytools# ls
mysql-8.0.28-linux-glibc2.12-x86_64.tar  nginx  nginx-1.26.1  nginx1261  nginx-1.26.1.tar.gz
root@lnmp:/mytools# tar xvf mysql-8.0.28-linux-glibc2.12-x86_64.tar

root@lnmp:/mytools# ls
mysql-8.0.28-linux-glibc2.12-x86_64  mysql-8.0.28-linux-glibc2.12-x86_64.tar  nginx  nginx-1.26.1  nginx1261  nginx-1.26.1.tar.gz
root@lnmp:/mytools#
Ubuntu安装二进制 mysql
官网下载
wget http://dev.mysql.com/Downloads/MySQL-5.7/mysql-5.7.28-linux-glibc2.12-x86_64.tar.gz

1. 所有操作前,系统先升级
root@nginx:/opt# apt update
root@nginx:/opt# apt update

2. 准备安装包 mysql-5.7.36-linux-glibc2.12-x86_64.tar.gz
root@lnmp:/mytools# scp -r ./mysql-5.7.36-linux-glibc2.12-x86_64.tar.gz  root@192.168.222.133:/opt/
root@nginx:/opt# ls
mysql-5.7.36-linux-glibc2.12-x86_64.tar.gz  tengine-3.0.0  tengine-3.0.0.tar.gz  tengine-3.1.0  tengine-3.1.0.tar.gz  tngx310
root@nginx:/opt#


3. 先卸载系统自带的 mariadb 依赖
rpm -e --nodeps mariadb-libs

4. 创建 mysql 用户
root@nginx:/opt# useradd mysql -u 1112 -s /usr/sbin/nologin -M


5. 检查 mysql 所需的依赖环境
yum install libaio-devel -y			(centos)
apt install libaio1 libaio-dev libncurses5-dev libncurses* -y	(ubuntu)


6. 解压 tar -zxvf mysql-5.7.36-linux-glibc2.12-x86_64.tar.gz
root@nginx:/opt# tar -zxvf mysql-5.7.36-linux-glibc2.12-x86_64.tar.gz


7. 配置软链接,快捷访问 mysql
ln -s /opt/mysql-5.7.36-linux-glibc2.12-x86_64 /opt/mysql
ln -s /mytools/mysql-8.0.28-linux-glibc2.12-x86_64 /mytools/mysql

8. 创建 mysql 数据文件夹,用于初始化数据,且进行权限控制
mkdir -p /opt/mysql/data
mkdir -p /opt/mysql/conf
mkdir -p /opt/mysql/logs

mkdir -p /mytools/mysql/data
mkdir -p /mytools/mysql/conf
mkdir -p /mytools/mysql/logs

# 修改 mysql 所有的内容,更改属主,属组为 mysql 用户
chown -R mysql.mysql /opt/mysql/

chown -R mysql.mysql /mytools/mysql/

9. 修改配置文件 编辑 /etc/my.cnf
vim /etc/my.cnf

[client]
port = 3306
socket = /tmp/mysql.sock

[mysqld]
server_id=1
port = 3306
user = mysql
character-set-server = utf8
default_storage_engine = innodb
log_timestamps = SYSTEM
socket = /tmp/mysql.sock
basedir = /mytools/mysql
datadir = /mytools/mysql/data
pid-file = /mytools/mysql/data/mysql.pid
max_connections = 5000
max_connect_errors = 1000
table_open_cache = 1024
max_allowed_packet = 128M
open_files_limit = 65535
log_bin = mysql-bin
binlog_format  = MIXED
query_cache_size = 128M
query_cache_limit = 4M
sort_buffer_size = 16M
join_buffer_size = 16M
wait_timeout=31536000
interactive_timeout=31536000
#####====================================[innodb]==============================
innodb_buffer_pool_size = 1024M
innodb_file_per_table = 1
innodb_write_io_threads = 4
innodb_read_io_threads = 4
innodb_purge_threads = 2
innodb_flush_log_at_trx_commit = 1
innodb_log_file_size = 512M
innodb_log_files_in_group = 2
innodb_log_buffer_size = 16M
innodb_max_dirty_pages_pct = 80
innodb_rollback_on_timeout = on
innodb_lock_wait_timeout = 28800
innodb_data_file_path=ibdata1:1024M:autoextend
innodb_undo_tablespaces=3
lower_case_table_names = 1
skip_name_resolve = on
#####====================================[log]==============================
log_error = /mytools/mysql/logs/mysql-error.log
slow_query_log = 1
long_query_time = 3
log-queries-not-using-indexes
slow_query_log_file = /mytools/mysql/logs/mysql-slow.log
sql_mode=NO_ENGINE_SUBSTITUTION,STRICT_TRANS_TABLES


# 复制到my.cnf配置文件里前,先在vim里把自动注释功能关闭
:set paste
-----老师  start-----
root@lnmp:/mytools/mysql# cat /etc/my.cnf

[mysqld]
 basedir=/mytools/mysql
 datadir=/mytools/mysql/data
 socket=/tmp/mysql.sock
 skip-name-resolve
 user=mysql
 ngram_token_size=2
 server_id=1
 port=3306
 log_error=/mytools/mysql/data/mysql_err.log
 character-set-server=utf8mb4
 default-storage-engine=INNODB


 [client]
 default-character-set=utf8mb4
 socket=/tmp/mysql.sock
root@lnmp:/mytools/mysql#

-----老师  end-----

10. 初始化 mysql 数据库
/opt/mysql/bin/mysqld --initialize-insecure --user=mysql --basedir=/opt/mysql --datadir=/opt/mysql/data --innodb_undo_tablespaces=3 --explicit_defaults_for_timestamp

/opt/mysql/bin/mysqld --initialize --user=mysql --basedir=/opt/mysql --datadir=/opt/mysql/data --innodb_undo_tablespaces=3 --explicit_defaults_for_timestamp

11.配置系统环境把 mysql 的信息添加进去
vim /etc/profile

export PATH=/opt/mysql/bin:$PATH

source /etc/profile

root@nginx:~# echo $PATH
/opt/mysql/bin:/usr/local/sbin:/usr/local/bin:/usr/sbin:/usr/bin:/sbin:/bin:/usr/games:/usr/local/games:/snap/bin:/opt/tngx310/sbin
root@nginx:~#


#系统和终端使用的环境变量
/etc/profile
/etc/profile.d/
/etc/bashrc
#用户使用的环境量
~/.bash_profile
~/.bashrc


12. 配置启动文件,并启动 mysql
cp /opt/mysql/support-files/mysql.server

root@nginx:/opt/mysql/support-files# cp /opt/mysql/support-files/mysql.server /etc/init.d/mysqld

# 检查配置文件
chkconfig --add mysqld
chkconfig mysqld on

systemctl start mysqld

# 查看错误日志
grep -i passwd /opt/mysql/logs/mysql-error.log


datadir=/opt/mysql/data
rm -rf /data/mysql/*
rm -rf /opt/mysql/*

再次初始化 mysql 数据库
root@lnmp:~# rm -rf /mytools/mysql/data/*

/mytools/mysql/bin/mysqld --initialize --user=mysql --basedir=/mytools/mysql --datadir=/mytools/mysql/data --innodb_undo_tablespaces=3 --explicit_defaults_for_timestamp


# 配置启动文件,并启动 mysql
root@lnmp:/mytools/mysql/bin# vim /usr/lib/systemd/system/mysql.service
root@lnmp:/mytools/mysql/bin# cat /usr/lib/systemd/system/mysql.service

[ Unit ]
Description=MySQL Server by longchi
Documentation=man:mysqld(5.7)
Documentation=http://dev.mysql.com/doc/refman/en/using-systemd.html
After=network.target
After=syslog.target

[ Install ]
WantedBy=multi-user.target

[ Service ]
User=mysql
Group=mysql
ExecStart=/mytools/mysql/bin/mysld --defaults-file=/etc/my.cnf
LimitNOFILE=5000
root@lnmp:/mytools/mysql/bin#


由于我们配置了 mysqld.service 脚本,直接用命令启动用
systemctl daemon-reload	# 加载配置文件
systemctl start mysqld.service  # 启动 mysqld 服务


在把 mysql.service 放到 /usr/lib/systemd/system  或者 /etc/systemd/system/  目录下
systemctl start mysqld.service   #启动
systemctl stop mysqld.service   #停止
systemctl restart mysqld.service  #重启
systemctl enable mysqld.service   #开机自启
systemctl status mysqld.service

root@lnmp:/usr/lib/systemd/system# bash mysqld.service start

[ $# -ge 1 ] && shift ${2-999}
[ $# -ge 1 ] && shift

root@lnmp:/usr/lib/systemd/system# touch /mytools/mysql/data/mysql.pid
root@lnmp:/usr/lib/systemd/system# ll /mytools/mysql/data/mysql.pid
-rw-r--r-- 1 root root 0 Jun  5 12:22 /mytools/mysql/data/mysql.pid
root@lnmp:/usr/lib/systemd/system# chown -R mysql.mysql /mytools/mysql/data/mysql.pid
root@lnmp:/usr/lib/systemd/system# ll /mytools/mysql/data/mysql.pid
-rw-r--r-- 1 mysql mysql 0 Jun  5 12:22 /mytools/mysql/data/mysql.pid

root@lnmp:/usr/lib/systemd/system# bash ./mysqld.service start
Starting MySQL. * The server quit without updating PID file (/mytools/mysql/data/mysql.pid).
root@lnmp:/usr/lib/systemd/system#


#基础路径定义
basedir='/application/mysql'
bindir='/application/mysql/bin'
lockdir='/var/lock/subsys'
lock_file_path="$lockdir/mysql"
mysqld_pid_file_path='$basedir/data/`uname -n`.pid'


ubuntu安装 mysql 数据库登录时缺少 libncurses.so.5 依赖包
解决方案安装如下依赖包以后就可以正常登录 mysql 数据库
sudo apt install libncurses* -y
MySQL 启动脚本和权限
#!/bin/bash
# chkconfig: 2345 64 36 #配置系统自启动
# description: A very fast and reliable SQL database engine.
##############################################################
# File Name: mysqld
# Version: V1.0
# Author:
# Organization:
# Created Time : 2020-03-05
##############################################################
#引入系统函数库
. /etc/init.d/functions

#基础路径定义
basedir='/application/mysql'
bindir='/application/mysql/bin'
lockdir='/var/lock/subsys'
lock_file_path="$lockdir/mysql"
mysqld_pid_file_path='$basedir/data/`uname -n`.pid'

#成功提示函数
log_success_msg(){
    #action为特殊的提示函数,$@为所有参数。
    action "SUCCESS! $@" /bin/true
}
#失败提示函数
log_failure_msg(){
    action  "ERROR! $@" /bin/false
  }

#mysql启动函数
start(){
    echo $"Starting MySQL"
    #测试mysqld_safe是否可执行
    if test -x $bindir/mysqld_safe
    then
        #后台执行启动mysql命令
        $bindir/mysqld_safe &>/dev/null &
        #获取返回值
        retval=$?
        #判断返回值是否为0
        if [ $retval -eq 0 ]
        then
            #调用成功提示函数。
            log_success_msg "mysql Startup"
            if test -w "$lockdir" #判断锁目录是否可写。
            then
                touch "$lock_file_path" #创建锁文件。
            fi
            return $retval #给返回值是专业的表现。
        else
            log_failure_msg "MySQL Startup" #调用失败函数提示。
            return $retval
        fi
    else
        log_failure_msg "Couldn't find MySQL server ($bindir/mysqld_safe)"
    fi
}
#停止MySQL函数。
stop(){
    #判断mysql pid file大小是否为0。
    if test -s "$mysqld_pid_file_path"
    then
        #读取pidfile
        mysqld_pid=`cat "$mysqld_pid_file_path"`
        #判断mysql pid对应的进程是否存在。
        if (kill -0 $mysqld_pid 2>/dev/null)
        then
            echo $"Shutting down MySQL"
            kill $mysqld_pid #停止MySQL命令。
            retval=$?
            if [ $retval -eq 0 ]
            then
                log_success_msg "MySQL Stop" #调用停止成功函数。
                if test -f "$lock_file_path"
                then
                    rm -f "$lock_file_path"  #删除锁文件。
                fi
                return $retval
            else
                log_failure_msg "MySQL Stop."
                return $retval
            fi
        else
            log_failure_msg "MySQL server process mysqld_pid is not running!"
            rm "$mysqld_pid_file_path"
        fi
    else
        log_failure_msg "MySQL server PID file is null or not exist!"
    fi
}
#接收传参判断并执行相应函数。
case "$1" in
    start)
        start
        retval=$?
        ;;
    stop)
        stop
        retval=$?
        ;;
    restart)
        stop
        sleep 2 #这里很重要,要休息一下。
        start
        retval=$?
        ;;
    *)
        echo $"Usage:$0 {start|stop|restart}"
        exit 2
esac
exit $retval    #执行脚本后,有返回值才更专业。
二进制 mysql 安装过程
准备安装包 'mysql-5.7.36-linux-glibc2.12-x86_64.tar.gz'
mysql 官网: https://www.mysql.com/
https://dev.mysql.com/downloads/file/?id=527196


如何查看系统中有改用户吗?
grep "mysql" /etc/passwd
root@lnmp:~# grep "mysql" /etc/passwd		表示没有 mysql 用户
[root@mail bin]# grep "mysql" /etc/passwd
mysql:x:27:27:MySQL Server:/var/lib/mysql:/sbin/nologin  表示已经有 mysql 用户
[root@mail bin]#


1. 创建普通 mysql 用户,降低程序运行权限 useradd -s /sbin/nologin mysql
useradd mysql -u 1112 -s /usr/sbin/nologin -M
root@lnmp:~# useradd mysql -u 1112 -s /usr/sbin/nologin -M


2. 查看用户 mysql 的信息
第一种方式查看用户 mysql 的信息
root@lnmp:~# grep "mysql" /etc/passwd
mysql:x:1112:1112::/home/mysql:/usr/sbin/nologin

第二种方式查看用户 mysql 的信息
root@lnmp:~# id mysql
uid=1112(mysql) gid=1112(mysql) groups=1112(mysql)


3. 下载 mysql 二进制代码包,注意提前下载好 wget 工具 yum install wget -y
# 欢迎访问网易开源镜像站 http://mirrors.163.com/
# 搜狐镜像网站	http://mirrors.sohu.com/
# 清华大学镜像	http://mirrors.tuna.tsinghua.edu.cn/
wget http://mirrors.sohu.com/mysql/MySQL-5.7/mysql-5.7.36-linux-glibc2.12-x86_64.tar.gz
# msql 官网 https://www.mysql.com/
# mysql 官方仓库 https://repo.mysql.com/
#

wget http://mirrors.163.com/mysql/Downloads/MySQL-5.7/mysql-5.7.26-linux-glibc2.12-x86_64.tar.gz

4. 下载 mysql 二进制包 'mysql-5.7.36-linux-glibc2.12-x86_64.tar.gz'  	wget
https://mirrors.aliyun.com/mysql/MySQL-5.7/mysql-5.7.36-linux-glibc2.12-x86_64.tar.gz
https://mirrors.aliyun.com/mysql/MySQL-5.7/mysql-5.7.37-linux-glibc2.12-x86_64.tar.gz
https://mirrors.aliyun.com/mysql/MySQL-5.7/mysql-5.7.38-linux-glibc2.12-x86_64.tar.gz
https://mirrors.aliyun.com/mysql/MySQL-8.0/mysql-8.0.27-linux-glibc2.12-x86_64.tar.xz
https://mirrors.aliyun.com/mysql/MySQL-8.0/mysql-8.0.28-linux-glibc2.12-x86_64.tar.xz


root@lnmp:~# ls
mysql-5.7.36-linux-glibc2.12-x86_64.tar.gz  snap
root@lnmp:~# ls /mytools/
nginx  nginx-1.26.1  nginx1261  nginx-1.26.1.tar.gz
root@lnmp:~# mv mysql-5.7.36-linux-glibc2.12-x86_64.tar.gz /mytools/
root@lnmp:~# ls /mytools/
mysql-5.7.36-linux-glibc2.12-x86_64.tar.gz  nginx  nginx-1.26.1  nginx1261  nginx-1.26.1.tar.gz
root@lnmp:~# cd /mytools/
root@lnmp:/mytools# ls
mysql-5.7.36-linux-glibc2.12-x86_64.tar.gz  nginx  nginx-1.26.1  nginx1261  nginx-1.26.1.tar.gz
root@lnmp:/mytools# ll -h
total 637M
drwxr-xr-x  4 root root  4.0K Jun  2 23:01 ./
drwxr-xr-x 21 root root  4.0K Jun  1 23:38 ../
-rw-r--r--  1 root root  636M Jun  2 22:28 mysql-5.7.36-linux-glibc2.12-x86_64.tar.gz
lrwxrwxrwx  1 root root    19 Jun  2 03:17 nginx -> /mytools/nginx1261//
drwxr-xr-x  9  502 staff 4.0K Jun  2 02:20 nginx-1.26.1/
drwxr-xr-x 11 root root  4.0K Jun  2 07:03 nginx1261/
-rw-r--r--  1 root root  1.2M May 29 14:30 nginx-1.26.1.tar.gz
root@lnmp:/mytools#


5. 解压 'mysql-5.7.36-linux-glibc2.12-x86_64.tar.gz' 这个二进制源代码安装包


我们这里是把 nginx ,mysql 服务安装在同一台服务器上 ,也可以将两者分别单独安装在服务器上,单独安装可以防止一台服务器故障导致所有服务瘫痪。
二进制方式安装 mysql
1. 解压缩二进制 mysql 代码
 root@lnmp:/mytools# tar -zxvf mysql-5.7.36-linux-glibc2.12-x86_64.tar.gz

 root@lnmp:/mytools# ls
mysql-5.7.36-linux-glibc2.12-x86_64  mysql-5.7.36-linux-glibc2.12-x86_64.tar.gz  nginx  nginx-1.26.1  nginx1261  nginx-1.26.1.tar.gz
root@lnmp:/mytools# cd mysql-5.7.36-linux-glibc2.12-x86_64

root@lnmp:/mytools/mysql-5.7.36-linux-glibc2.12-x86_64# ls
bin  docs  include  lib  LICENSE  man  README  share  support-files

root@lnmp:/mytools/mysql-5.7.36-linux-glibc2.12-x86_64# cd bin
root@lnmp:/mytools/mysql-5.7.36-linux-glibc2.12-x86_64/bin# ls
innochecksum    my_print_defaults           mysql_config         mysqldump         mysqlpump                  mysql_tzinfo_to_sql  resolve_stack_dump
lz4_decompress  mysql                       mysql_config_editor  mysqldumpslow     mysql_secure_installation  mysql_upgrade        zlib_decompress
myisamchk       mysqladmin                  mysqld               mysql_embedded    mysqlshow                  mysqlxtest
myisam_ftdump   mysqlbinlog                 mysqld-debug         mysqlimport       mysqlslap                  perror
myisamlog       mysqlcheck                  mysqld_multi         mysql_install_db  mysql_ssl_rsa_setup        replace
myisampack      mysql_client_test_embedded  mysqld_safe          mysql_plugin      mysqltest_embedded         resolveip
root@lnmp:/mytools/mysql-5.7.36-linux-glibc2.12-x86_64/bin#

# mysql 是 C/S 架构, mysql 有 client 客户端 和 server 服务端
'mysqld'  启动服务端
'mysql'   登录客户端


2. 配置软链接,快捷访问 mysql
ln -s /mytools/mysql-5.7.36-linux-glibc2.12-x86_64 /mytools/mysql

root@lnmp:/mytools# ln -s /mytools/mysql-5.7.36-linux-glibc2.12-x86_64 /mytools/mysql
root@lnmp:/mytools# ll
total 652180
drwxr-xr-x  5 root root       4096 Jun  2 23:37 ./
drwxr-xr-x 21 root root       4096 Jun  1 23:38 ../
lrwxrwxrwx  1 root root         44 Jun  2 23:37 mysql -> /mytools/mysql-5.7.36-linux-glibc2.12-x86_64/
drwxr-xr-x  9 root root       4096 Jun  2 23:28 mysql-5.7.36-linux-glibc2.12-x86_64/
-rw-r--r--  1 root root  666559924 Jun  2 22:28 mysql-5.7.36-linux-glibc2.12-x86_64.tar.gz
lrwxrwxrwx  1 root root         19 Jun  2 03:17 nginx -> /mytools/nginx1261//
drwxr-xr-x  9  502 staff      4096 Jun  2 02:20 nginx-1.26.1/
drwxr-xr-x 11 root root       4096 Jun  2 07:03 nginx1261/
-rw-r--r--  1 root root    1244738 May 29 14:30 nginx-1.26.1.tar.gz
root@lnmp:/mytools#


3. 安全性的准备工作,卸载可能 centos7 存在的 mariadb 相关的依赖关系
rpm -e --nodeps mariadb-libs
root@lnmp:/mytools# rpm -e --nodeps mariadb-libs	(ubuntu)
Command 'rpm' not found, but can be installed with:
apt install rpm


4. 开始准备启动 mysql 的配置文件, mysql 启动默认会去读取 /etc/my.cnf 这个文件
 vim /etc/my.cnf

 [mysqld]
 basedir=/mytools/mysql
 datadir=/mytools/mysql/data
 socket=/tmp/mysql.sock
 server_id=1
 port=3306
 log_error=/mytools/mysql/data/mysql_err.log

 [mysql]
 socket=/tmp/mysql.sock

 ---------------------------------------
 代码解释
  [mysqld]			# 区段   头    以下控制的是他的身体		服务端
 basedir=/opt/mysql/	# 指定 mysql 默认根路径(mysql的安装路径)
 datadir=/opt/mysql/data	# 指定 mysql 数据文件夹 ,mysql 产生的数据就会放在该目录下
 socket=/tmp/mysql.sock		# mysql 启动后产生的一个进程通信文件
 server_id=1	# 数据库主从复制时给数据库的唯一标识
 port=3306		# 指定数据库启动后默认端口
 log_error=/opt/mysql/data/mysql_err.log	# mysql 在运行时所产生的错误日志

 [mysql]		# 客户端
 socket=/tmp/mysql.sock

 '[mysqld]' 是区段的意思,以下的参数对其生效
 [mysqld] 这是代表对服务端生效的参数
 [mysql] 这是代表对客户端生效的参数


 root@lnmp:/mytools/mysql# pwd
/mytools/mysql
root@lnmp:/mytools/mysql# ls
bin  docs  include  lib  LICENSE  man  README  share  support-files


root@lnmp:/mytools/mysql# vim /etc/my.cnf
root@lnmp:/mytools/mysql# cat /etc/my.cnf
 [mysqld]
 basedir=/mytools/mysql
 datadir=/mytools/mysql/data
 socket=/tmp/mysql.sock
 skip-name-resolve
 user=mysql
 ngram_token_size=2
 server_id=1
 port=3306
 max_connections=1000
 character-set-server=utf8mb4
 default-storage-engine=INNODB
 lower_case_table_names=1
 default_authentication_plugin=mysql_native_password
 max_allowed_packet=500M
 sql_mode=NO_ENGINE_SUBSTITUTION,STRICT_TRANS_TABLES
 wait_timeout=28800
 interactive_timeout=28800
 max_connect_errors=100
 max_user_connections=0
 max_binlog_size=100M
 log_error=/mytools/mysql/data/mysql_err.log

 [mysql]
 # socket=/tmp/mysql.sock
 default-character-set=utf8mb4
root@lnmp:/mytools/mysql#


--------------
[mysql]
#设置mysql客户端默认字符集
default-character-set=utf8mb4
[mysqld]
skip-name-resolve
user=mysql
ngram_token_size=2
server-id=1
default_password_lifetime=0
port=3306
#设置安装目录
basedir=/opt/mysql
#数据存放目录
datadir=/data/mysql/data
log-error=/data/mysql/logs/err.log
#允许最大连接数
max_connections=1000
#服务端默认使用的字符集
character-set-server=utf8mb4
#创捷新表时默认的储存引擎
default-storage-engine=INNODB
#忘记密码时使用
#skip-grant-tables
#不区分大小写
lower_case_table_names=1
#认证方式
default_authentication_plugin=mysql_native_password
max_allowed_packet=500M
sql_mode=NO_ENGINE_SUBSTITUTION,STRICT_TRANS_TABLES
wait_timeout=28800
interactive_timeout=28800
max_connect_errors=100
max_user_connections=0
#日志文件大小
max_binlog_size=100M
初始化 mysql 服务端
1. 先卸载系统自带的 mariadb 依赖
rpm -e --nodeps mariadb-libs

2. 检查 mysql 所需的依赖环境
yum install libaio-devel -y			(centos)
apt install libaio1 libaio-dev libncurses5-dev libncurses* -y	(ubuntu)


3. 创建 mysql 数据文件夹,用于初始化数据,且进行权限控制
mkdir -p /mytools/mysql/data/
mkdir -p /mytools/mysql/conf/
mkdir -p /mytools/mysql/logs/

chown -R mysql.mysql /mytools/mysql/
# 修改 mysql 所有的内容,更改属主,属组为 mysql 用户


4. 初始化 mysql 数据库
# 生成空密码
/mytools/mysql/bin/mysqld --initialize-insecure --user=mysql --basedir=/mytools/mysql/ --datadir=/mytools/mysql/data/ --innodb_undo_tablespaces=3 --explicit_defaults_for_timestamp

# 生成管理员临时密码
/mytools/mysql/bin/mysqld --initialize --user=mysql --basedir=/mytools/mysql/ --datadir=/mytools/mysql/data/ --innodb_undo_tablespaces=3 --explicit_defaults_for_timestamp


命令参数解释
'libaio-devel' mysql 正常运行是需要这个 'libaio-devel' 工具包


root@lnmp:/mytools/mysql# ls
bin  conf  data  docs  include  lib  LICENSE  logs  man  README  share  support-files
root@lnmp:/mytools/mysql# chown -R mysql.mysql /mytools/mysql/
root@lnmp:/mytools/mysql# ll -h
total 308K
drwxr-xr-x 12 mysql mysql 4.0K Jun  3 02:09 ./
drwxr-xr-x  5 root  root  4.0K Jun  2 23:37 ../
drwxr-xr-x  2 mysql mysql 4.0K Jun  2 23:28 bin/
drwxr-xr-x  2 mysql mysql 4.0K Jun  3 02:09 conf/
drwxr-xr-x  2 mysql mysql 4.0K Jun  3 02:09 data/
drwxr-xr-x  2 mysql mysql 4.0K Jun  2 23:28 docs/
drwxr-xr-x  3 mysql mysql 4.0K Jun  2 23:28 include/
drwxr-xr-x  5 mysql mysql 4.0K Jun  2 23:28 lib/
-rw-r--r--  1 mysql mysql 254K Sep  7  2021 LICENSE
drwxr-xr-x  2 mysql mysql 4.0K Jun  3 02:09 logs/
drwxr-xr-x  4 mysql mysql 4.0K Jun  2 23:28 man/
-rw-r--r--  1 mysql mysql  566 Sep  7  2021 README
drwxr-xr-x 28 mysql mysql 4.0K Jun  2 23:28 share/
drwxr-xr-x  2 mysql mysql 4.0K Jun  2 23:28 support-files/
root@lnmp:/mytools/mysql#

# 初始化 mysql 服务端
root@lnmp:/mytools/mysql# /mytools/mysql/bin/mysqld --initialize-insecure --user=mysql --basedir=/mytools/mysql/ --datadir=/mytools/mysql/data/ --innodb_undo_tablespaces=3 --explicit_defaults_for_timestamp

生成空密码(mysql客户端登录时并没有密码)
/mytools/mysql/bin/mysqld --initialize-insecure --user=mysql --basedir=/mytools/mysql --datadir=/mytools/mysql/data --innodb_undo_tablespaces=3 --explicit_defaults_for_timestamp


# 生成管理员临时密码
root@lnmp:/usr/lib/systemd/system# /mytools/mysql/bin/mysqld --initialize-insecure --user=mysql --basedir=/mytools/mysql --datadir=/mytools/mysql/data --innodb_undo_tablespaces=3 --explicit_defaults_for_timestamp
root@lnmp:/usr/lib/systemd/system#


命令参数解释
'/mytools/mysql/bin/mysqld' # mysql的 bin 目录的 mysqld 命令
'--initialize-insecure'  # 代表进行初始化
'--user=mysql'		# 指定用户是 mysql
'--basedir=/mytools/mysql/'		# 指定 mysql 的根目录
'--datadir=/mytools/mysql/data/' 	# 指定 mysql 的数据放在哪里
配置 mysql 客户端
使用 systemctl 命令管理 mysql 数据库
系统服务管理命令 systemctl start nginx.service
1. 编写 myql 启动的脚本,定义一个系统管理服务的 mysqld.service 文件
路径必须放在 touch /etc/systemd/system/mysqld.service  # 写入如下的内容

[ Unit ]
Description=MySQL Server by longchi
Documentation=man:mysqld(5.7)
Documentation=http://dev.mysql.com/doc/refman/en/using-systemd.html
After=network.target
After=syslog.target

[ Install ]
WantedBy=multi-user.target

[ Service ]
User=mysql
Group=mysql
ExecStart=/mytools/mysql/bin/mysld --defaults-file=/etc/my.cnf
LimitNOFILE=5000


-----------------------------------------
代码解释如下
[ Unit ]	# 区段 头 以下的参数都被他生效(被他管控)
Description=MySQL Server by longchi
# 描述信息 mysql 服务端是 longchi 写的脚本
Documentation=man:mysqld(8)
# 你能够查看 mysql 的官网信息
Documentation=http://dev.mysql.com/doc/refman/en/using-systemd.html
# mysql 的官网为 http://dev.mysql.com/doc/refman/en/using-systemd.html
After=network.target
#
After=syslog.target

[ Install ]		# 区段 头 以下的参数都被他生效(被他管控)
WantedBy=multi-user.target

[ Service ]		# 区段 头 以下的参数都被他生效(被他管控)
User=mysql		# 执行用户
Group=mysql		# 执行属组
ExecStart=/mytools/mysql/bin/mysld --defaults-file=/etc/my.cnf
# 启动 mysql 的一个目录  指定默认的 /etc/my.cnf 配置文件
LimitNOFILE=5000
#


root@lnmp:/etc/systemd/system# vim mysqld.service
root@lnmp:/etc/systemd/system# cat mysqld.service

[ Unit ]
Description=MySQL Server by longchi
Documentation=man:mysqld(5.7)
Documentation=http://dev.mysql.com/doc/refman/en/using-systemd.html
After=network.target
After=syslog.target

[ Install ]
WantedBy=multi-user.target

[ Service ]
User=mysql
Group=mysql
ExecStart=/mytools/mysql/bin/mysqld --defaults-file=/etc/my.cnf
LimitNOFILE=5000
root@lnmp:/etc/systemd/system#


mysql.service: Service has no ExecStart=, ExecStop=, or SuccessAction=. Refusing.

systemctl daemon-reload   # 加载配置文件

cp /mytools/mysql/support-files/mysql.server /usr/lib/systemd/system/


root@lnmp:~# mysqld --version
mysqld  Ver 5.7.36 for linux-glibc2.12 on x86_64 (MySQL Community Server (GPL))
root@lnmp:~# which mysql
/mytools/mysql/bin/mysql
启动 mysqld 服务端
由于我们配置了 mysqld.service 脚本,直接用命令启动用
systemctl daemon-reload	# 加载配置文件
systemctl start mysqld.service  # 启动 mysqld 服务


在把 mysql.service 放到 /usr/lib/systemd/system  或者 /etc/systemd/system/  目录下
systemctl start mysqld.service   #启动
systemctl stop mysqld.service   #停止
systemctl restart mysqld.service  #重启
systemctl enable mysqld.service   #开机自启
systemctl status mysqld.service


root@lnmp:~# systemctl enable mysqld.service
Created symlink /etc/systemd/system/multi-user.target.wants/mysqld.service → /etc/systemd/system/mysqld.service.

root@nginx:/opt/mysql# systemctl enable mysqld.service
Synchronizing state of mysqld.service with SysV service script with /lib/systemd/systemd-sysv-install.
Executing: /lib/systemd/systemd-sysv-install enable mysqld
Created symlink /etc/systemd/system/multi-user.target.wants/mysqld.service → /etc/systemd/system/mysqld.service.
root@nginx:/opt/mysql#


/etc/systemd/system/

# 启动完了之后,检查数据库状态,检查为 active 状态,mysql 就正常启动了
root@lnmp:~# systemctl enable mysqld.service
Created symlink /etc/systemd/system/multi-user.target.wants/mysqld.service → /etc/systemd/system/mysqld.service.
root@lnmp:~# systemctl status mysqld
● mysqld.service - MySQL Server by longchi
     Loaded: loaded (/etc/systemd/system/mysqld.service; enabled; vendor preset: enabled)
     Active: active (running) since Mon 2024-06-03 09:33:46 UTC; 39min ago
       Docs: man:mysqld(5.7)
             http://dev.mysql.com/doc/refman/en/using-systemd.html
   Main PID: 1483 (mysqld)
      Tasks: 27 (limit: 4514)
     Memory: 200.9M
        CPU: 1.589s
     CGroup: /system.slice/mysqld.service
             └─1483 /mytools/mysql/bin/mysqld --defaults-file=/etc/my.cnf

Jun 03 09:33:46 lnmp systemd[1]: Started MySQL Server by longchi.


# 检查进程
ps -ef | grep mysqld
root@lnmp:~# ps -ef | grep mysqld
mysql       1483       1  0 09:33 ?        00:00:01 /mytools/mysql/bin/mysqld --defaults-file=/etc/my.cnf
root        1568    1354  0 10:18 pts/0    00:00:00 grep --color=auto mysqld


# 检查端口
netstat -tunlp | grep mysqld
netstat -tunlp | grep 3306

root@lnmp:~# netstat -tunlp | grep mysqld
tcp6       0      0 :::3306            :::*                    LISTEN      1483/mysqld
root@lnmp:~# netstat -tunlp | grep 3306
tcp6       0      0 :::3306            :::*                    LISTEN      1483/mysqld
root@lnmp:~#
登录 mysql 数据库
这个 mysql 是 C/S 架构模式的,就好比登录 qq 一样,
先启动 mysql 服务端,然后用 mysql 客户端命令登录即可
#  查看 mysql 安装命令  没有找到mysql命令,
root@lnmp:~# which mysql
root@lnmp:~# cd /mytools/mysql/bin/
root@lnmp:/mytools/mysql/bin# ls
innochecksum    my_print_defaults           mysql_config         mysqldump         mysqlpump                  mysql_tzinfo_to_sql  resolve_stack_dump
lz4_decompress  mysql                       mysql_config_editor  mysqldumpslow     mysql_secure_installation  mysql_upgrade        zlib_decompress
myisamchk       mysqladmin                  mysqld               mysql_embedded    mysqlshow                  mysqlxtest
myisam_ftdump   mysqlbinlog                 mysqld-debug         mysqlimport       mysqlslap                  perror
myisamlog       mysqlcheck                  mysqld_multi         mysql_install_db  mysql_ssl_rsa_setup        replace
myisampack      mysql_client_test_embedded  mysqld_safe          mysql_plugin      mysqltest_embedded         resolveip
root@lnmp:/mytools/mysql/bin# pwd
/mytools/mysql/bin
root@lnmp:/mytools/mysql/bin#


1. 如果你电脑之前装过其他的数据库,你可以用 yum 直接卸载,不会影响到你安装的二进制 mysql 数据库
yum remove mysql -y


2. 退出会话,重新登录
root@lnmp:/mytools/mysql/bin# which mysql
root@lnmp:/mytools/mysql/bin#

3.配置我们安装的二进制 mysql 	PATH环境变量
/mytools/mysql/bin	# 这是我们安装的二进制 mysql 命令目录
当前的 PATH 变量 	echo $PATH
root@lnmp:/mytools/mysql/bin# echo $PATH
/usr/local/sbin:/usr/local/bin:/usr/sbin:/usr/bin:/sbin:/bin:/usr/games:/usr/local/games:/snap/bin:/mytools/nginx/sbin
root@lnmp:/mytools/mysql/bin#


vim /etc/profile	# 写入如下新的 PATH 变量
PATH="$PATH:/mytools/mysql/bin"
PATH="$PATH:/mytools/mysql/bin:/mytools/nginx/sbin"


root@lnmp:/mytools/mysql/bin# vim /etc/profile
root@lnmp:/mytools/mysql/bin# tail -1 /etc/profile
PATH="$PATH:/mytools/mysql/bin"

root@lnmp:/mytools/mysql/bin# echo $PATH
/usr/local/sbin:/usr/local/bin:/usr/sbin:/usr/bin:/sbin:/bin:/usr/games:/usr/local/games:/snap/bin:/mytools/nginx/sbin

root@lnmp:/mytools/mysql/bin# source /etc/profile
root@lnmp:/mytools/mysql/bin# echo $PATH
/usr/local/sbin:/usr/local/bin:/usr/sbin:/usr/bin:/sbin:/bin:/usr/games:/usr/local/games:/snap/bin:/mytools/nginx/sbin:/mytools/nginx/sbin:/mytools/mysql/bin
root@lnmp:/mytools/mysql/bin# tail -1 /etc/profile
PATH="$PATH:/mytools/mysql/bin:/mytools/nginx/sbin"
root@lnmp:/mytools/mysql/bin#

保存退出之后,再次重新登录会话

exit


root@lnmp:~# echo $PATH
/usr/local/sbin:/usr/local/bin:/usr/sbin:/usr/bin:/sbin:/bin:/usr/games:/usr/local/games:/snap/bin:/mytools/mysql/bin:/mytools/nginx/sbin

# 看到如下提示,则正确配置了 mysql 环境变量
root@lnmp:~# which mysql
/mytools/mysql/bin/mysql
root@lnmp:~#
登录 mysql 数据库,简单的使用 mysql
# 登录数据库的命令,默认是没有密码的 直接回车就可以了
mysql -uroot -p
Enter password:
Welcome to the MySQL monitor,Commands end with:or \g:your MySQL connection id is 3
Server version: 5.7.28 MySQL Community Server(GPL)
Copyright (c) 2000,2010,oracle and/or its affiliates,All rights reserved.
Orcle is a register trademark of Oracle Corporation and/or its
affiliates,Other names may be trademarks of their respective owners;
Type 'help' or '\h' for help,Type '\c' to clear the current input statement.

mysql>
简单的 sql 语句查看
# 查看当前 mysql 有多少数据库SQL (数据库语句)
mysql> show databases;
1. information_schema
2. mysql
3. performance_schema
4. sys


# 创建数据库 chaoge , 相当于创建文件夹 chaoge
mysql> create database chaoge;
Query ok,1 row affected (0.00 sec)	# 表示操作成功 影响一行记录


# 进入chaoge数据库, use chaoge;
mysql> use chaoge;
Database changed

# 此时已经进入了 mysql  的 chaoge 数据库,我们可以在这个库中创建数据表
相当于我们进入文件夹创建文件一样。
# 展示所有的表格。 查看 chaoge 库中,是否有数据表
mysql> show tables;
Empty set(o.00 sec)  为空
修改mysql数据库密码 mysqladmin
# 使用 mysqladmin 修改 root 密码为 change666
mysqladmin -u root password 'change666'
修改密码后再次想要登录数据库
mysql -uroot -p
root@lnmp:~# mysql -uroot -p
Enter password:
ERROR 1045 (28000): Access denied for user 'root'@'localhost' (using passwor:NO)

# 如果你不输入密码,或者输入错误,就会有如上的提示
正确的输入 root 密码 chaoge666,就可以登录数据库了
查看错误日志
/mytools/mysql-5.7.36-linux-glibc2.12-x86_64/data/mysql_err.log
使用 scp 同步命令 示例如下
基本语法:scp [选项] [源文件] 目标地址(目标主机和绝对路径之间用冒号链接)
root@lnmp:/mytools# ls
mysql                                mysql-5.7.36-linux-glibc2.12-x86_64.tar.gz  nginx-1.26.1  nginx-1.26.1.tar.gz
mysql-5.7.36-linux-glibc2.12-x86_64  nginx                                       nginx1261     root@192.168.222.133
root@lnmp:/mytools#

# 参数 '-r' 表示递归复制
root@lnmp:/mytools# scp -r ./mysql-5.7.36-linux-glibc2.12-x86_64.tar.gz  root@192.168.222.133:/opt/
The authenticity of host '192.168.222.133 (192.168.222.133)' can't be established.
ED25519 key fingerprint is SHA256:nerso8R7A49tx8wIgi8qAgcoSa+44mg+UVbuEifBGaU.
This key is not known by any other names
Are you sure you want to continue connecting (yes/no/[fingerprint])? yes
Warning: Permanently added '192.168.222.133' (ED25519) to the list of known hosts.
root@192.168.222.133's password:
mysql-5.7.36-linux-glibc2.12-x86_64.tar.gz                                                                                100%  636MB 160.4MB/s   00:03

# 看到以下内容表示已经同步成功
root@nginx:~# cd /opt/
root@nginx:/opt# ls
mysql-5.7.36-linux-glibc2.12-x86_64.tar.gz  tengine-3.0.0  tengine-3.0.0.tar.gz  tengine-3.1.0  tengine-3.1.0.tar.gz  tngx310
root@nginx:/opt#
LNMP 解析流程
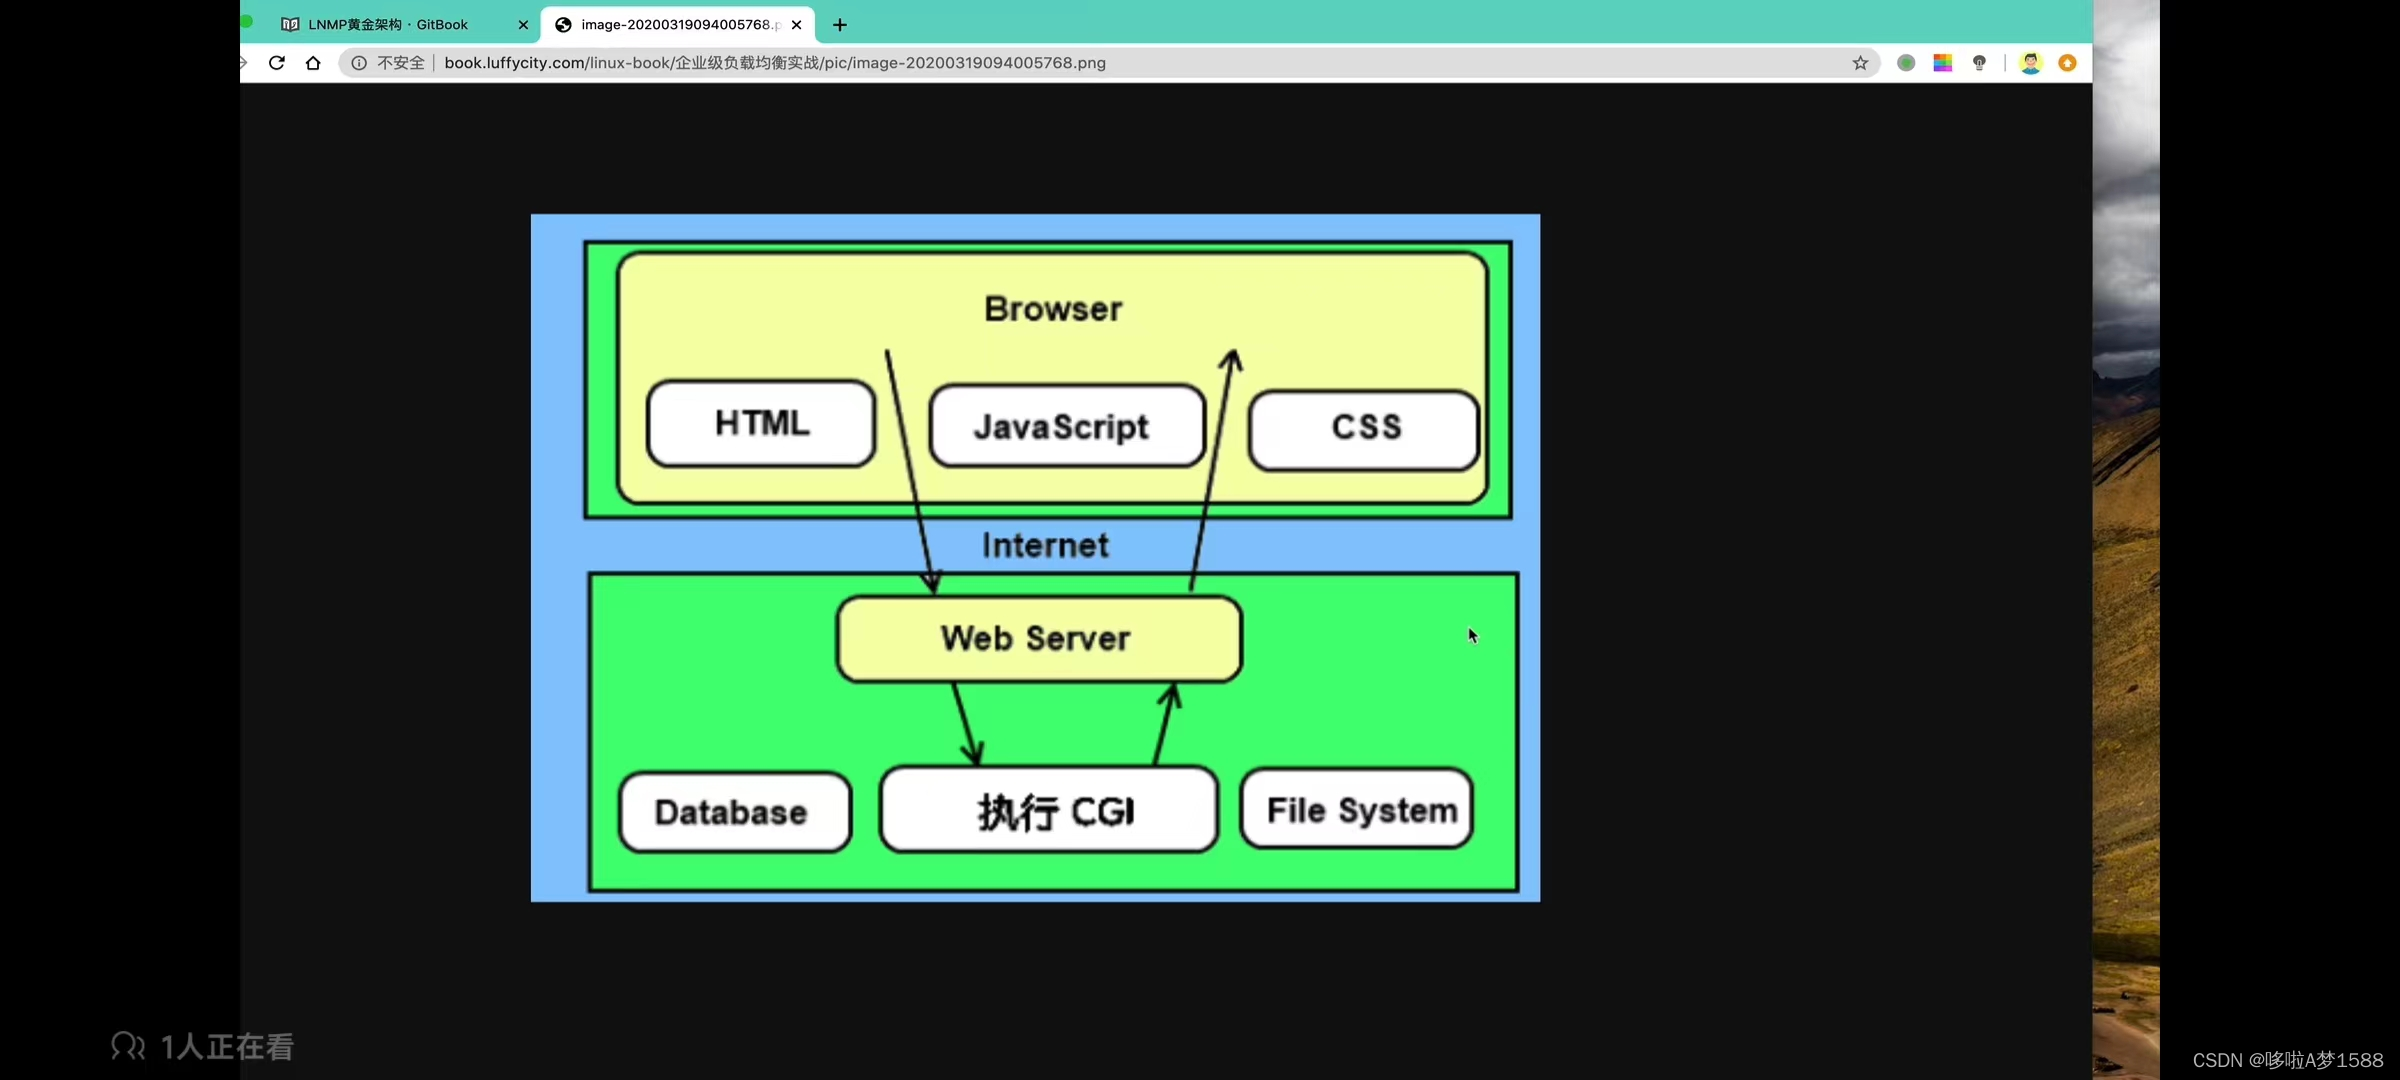
php
网站有动态网站和静态网站之分
Browser 是用户浏览器端,浏览器页面是由什么组成的呢
1.HTML 是网页标签语言
2 JavaScript 网页动态效果 当你点击某个标签,当你点击登录标签,你可能会看到弹出一个网页,或当你点击登录按钮,你的数据就向远程服务器发过去了,这是JavaScript 做的事
3.CSS 是网页布局功能
作为一个纯静态网站,他的网页元素肯定是比较单调的,现在的网站基本上大多都是动态的网站,你要学习动态网站,你就得知道,它整个的解析流程
我们的拉磨环境 LNMP,他指的就是一个动态网站的搭建,因为 nginx 仅仅能够解析静态网站,对于动态的请求, nginx 本身是没发解析的,他得交给别人来做这事情
LNMP 之PHP
FASTCGI
cgi 表示通用网关接口,用于 HTTP 服务器(nginx,apache)和其他应用服务器 (指的是另一个动态服务器上安装的 python,php 脚本编程语言编写的一个逻辑框架) 通信的一个工具
传统通用网关接口 cgi 程序性能是比较弱的,每当遇到 HTTP服务器,他来了一个动态请求的时候,都需要重启 cgi 解析器来执行,也就是重启 php 写的相关框架才能够执行,然后处理完成之后,才会交给 nginx
如果是在一个高并发的情况下,一个用户发来动态请求重启一下,两个用户,三个用户... N多个用户的情况下,给服务器带来的性能压力得多大,整个的处理效率就会很差强人意,因此,就诞生了 FASTCGI
fastcgi 的特点是:
是一个可伸缩可扩展性(可以有一个fastcgi 进程,也可以运行多个 fastcgi 进程,多进程可以提升解析的效率),高效的在 HTTP 服务器之间和动态脚本之间通信的网关接口,其实就是一个程序
在 linux 环境下,fastcgi 其实就是一个 socket 套接字进程文件,
如果 HTTP服务器和后端(php,java,python等)程序运行在两台服务器上,这个 fastcgi 通信形式就是 IP + 端口 的网络通信形式。
如果 HTTP 服务器和后端程序运行在同一台机器上,这个时候他就是本地的一个 socket 套接字进程文件(那么这个 socket 就可以是本地通信)
IP + port ,127.0.0.1 本地回环地址
socket 套接字文件
多数主流的 web 服务器都是 支持 fastcgi 网关接口的,比如 apache,nginx,lighttpd 也支持fastcgi
fastcgi 通用网关接口,也被多种脚本编程语言所支持,perl,php,python
当 http 服务器遇见静态请求,直接返回给用户,
动态请求 nginx 就转发给 fastcgi,fastcgi + php (fastcgi与后端程序做了一个结合),后端程序进行逻辑处理完毕后,再返回给 nginx,最终给用户响应
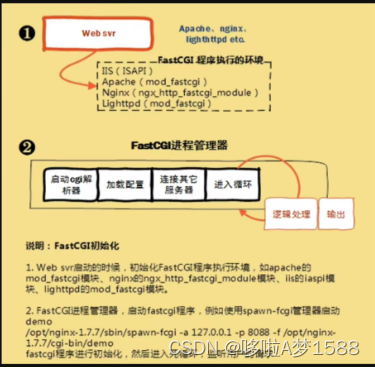
fastCGI 程序执行环境
IIS(ISAPI)
Apache (mod_fastcgi)
Nginx (ngx_http_fastcgi_module)
Ligthhpd (mod_fastcgi)
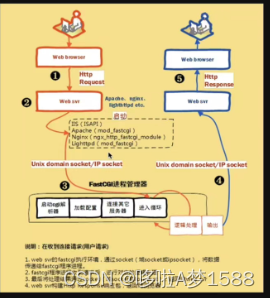
LNMP 环境流程描述
当一个用户通过 web browser 给某网站的服务器发送请求(http Request)给 web server (nginx,apache,lighttpd等),nginx 就在这里开始判断,你如果要的是静态请求,nginx 就在本地把文件找到,或者去 nfs 网络文件系统中把静态文件比如图片,视频,动态图,html网页文件等找出来,直接返回给用户就可以了
nginx 对静态文件解析还是非常高的。
如果用户是通过 post 提交了一些数据,我想要登录,注册等这样的相关动态请求,nginx 本身无法支持了,他就向后端做了一个转发,nginx 通过该 fastcgi_pass 模块去转发动态请求
Unix domain socket(同一台服务器)/IP socket (两台服务器用 IP + PORT)
此时 PHP 后台程序进行解析,判断用户的账号密码是否在数据库中已经存在了,如果已经存在了,系统会告诉用户,你填的账号密码已经存在了,请更换别的账号,你填的邮箱已经存在,请更换,
如果判断在数据库中不存在,就说明用户是首次注册,系统就会提示他注册成功
在后台程序在逻辑处理完毕之后,他就会把处理结果再次进行返回,还是一样,如果在本地直接通过 socket 套接字文件发 web server,如果是网络就是 ip + port 的形式把响应的信息发给 web server ,最终 nginx 构造响应体 HTTP Respose 给用户浏览器,用户浏览器把 nginx 发来的信息 body 数据,header 请求头,响应头,响应体做了一个渲染,用户就在浏览器中看到了一个美好的页面。
LNMP 之 PHP 编译安装
lnmp的部署
linux
nginx
mysql
php
mysql官网下载
wget http://dev.mysql.com/Downloads/MySQL-5.6/mysql-5.6.33-linux-glibc2.5-x86_64.tar.gz

wget http://dev.mysql.com/Downloads/MySQL-5.7/mysql-5.7.28-linux-glibc2.12-x86_64.tar.gz

wget http://dev.mysql.com/Downloads/MySQL-5.7/mysql-5.7.36-linux-glibc2.12-x86_64.tar.gz

wget http://dev.mysql.com/Downloads/MySQL-5.7/mysql-5.7.37-linux-glibc2.12-x86_64.tar.gz

wget http://dev.mysql.com/Downloads/MySQL-5.7/mysql-5.7.38-linux-glibc2.12-x86_64.tar.gz

wget https://dev.mysql.com/Downloads/MySQL-5.6/mysql-5.6.33-linux-glibc2.5-x86_64.tar.gz

wget http://mirrors.sohu.com/mysql/MySQL-5.7/mysql-5.7.36-linux-glibc2.12-x86_64.tar.gz

wget http://mirrors.sohu.com/mysql/MySQL-5.7/mysql-5.7.36-linux-glibc2.12-i686.tar.gz.md5

wget http://mirrors.sohu.com/mysql/MySQL-5.7/mysql-5.7.37-linux-glibc2.12-x86_64.tar.gz

wget http://mirrors.sohu.com/mysql/MySQL-5.7/mysql-5.7.37-linux-glibc2.12-x86_64.tar.gz.md5

wget http://mirrors.sohu.com/mysql/MySQL-5.7/mysql-5.7.38-linux-glibc2.12-x86_64.tar.gz

wget http://mirrors.sohu.com/mysql/MySQL-5.7/mysql-5.7.38-linux-glibc2.12-x86_64.tar.gz.md5
部署流程笔记
1. 先检查好 nginx 和 mysql 的安装和启动
# 检查进程
ps -ef | grep nginx
ps -ef | grep mysql

# 检查端口
netstat -tunlp | grep nginx
netstat -tunlp | grep mysql

root@lnmp:~# netstat -tunlp | grep -E "nginx|mysql"
tcp        0      0 0.0.0.0:80    0.0.0.0:*     LISTEN      931/nginx: master p
tcp6       0      0 :::3306         :::*        LISTEN      876/mysqld


netstat -tunlp | grep -E "nginx|mysql|php"
root@lnmp:~# netstat -tunlp | grep -E "nginx|mysql|php"
tcp        0      0 0.0.0.0:80   0.0.0.0:*    LISTEN      931/nginx: master p
tcp    0      0 127.0.0.1:9000    0.0.0.0:*   LISTEN      221778/php-fpm: mas
tcp6       0      0 :::3306   :::*            LISTEN      876/mysqld


2.安装 php 所必须有的依赖环境
# ubuntu 安装前系统先升级
sudo apt update && sudo apt upgrade -y

yum install gcc gcc-c++ make zlib-devel libxml2-devel libjpeg-devel libjpeg-turbo-devel libiconv-devel \
freetype-devel libpng-devel gd-devel libcurl-devel libxslt-devel -y	(centos)


sudo apt install gcc make openssl curl libbz2-dev libxml2-dev libjpeg-dev libpng-dev libfreetype6-dev libzip-dev -y		(ubuntu)
sudo apt-get update
sudo apt-get install build-essential libxml2-dev libcurl4-openssl-dev libssl-dev libbz2-dev libjpeg-dev libpng-dev libmcrypt-dev libxslt1-dev -y (ubuntu)


3. 发现 yum 仓库默认缺少一个 libiconv-devel 软件工具包,因此我们可以手动下载,自行编译安装该软件工具包。
wget http://ftp.gnu.org/pub/gnu/libiconv/libiconv-1.15.tar.gz

4.解压缩安装该软件包,编译安装三步曲
第一曲
tar -zxvf libiconv-1.15.tar.gz
cd libiconv-1.15
ls
第二曲
./configure --prefix=/mytools/libiconv
第三曲
make && make install


5.检查上述编译安装的命令是否正确结束了
echo $?
# linux的shell提供了一个特殊的变量$?,他能够取出上次命令执行的状态码,如果你上次命令编译安装结束了之后,echo $? 如果返回值是0,表示编译安装是正确的;非0.表示你上次执行的命令有问题
# 在执行上一条 shell 语句结束后,打印 $? 可以检查上一次的命令是否正确
lssss
echo $?
history  查看历史命令

root@lnmp:~# netstat -tunlp | grep mysql
root@lnmp:~# echo $?
1
root@lnmp:~# lsss
Command 'lsss' not found, did you mean:
  command 'lsns' from deb util-linux (2.37.2-4ubuntu3)
  command 'lssu' from deb nilfs-tools (2.2.8-1)
  command 'less' from deb less (590-1ubuntu0.22.04.1)
Try: apt install <deb name>
root@lnmp:~# echo $?
127
root@lnmp:~# ls
lrzsz-0.12.20  lrzsz-0.12.20.tar.gz  snap
root@lnmp:~# echo $?
0
root@lnmp:~#
编译安装PHP 三步曲
1.下载 PHP 源代码
wget http://mirrors.sohu.com/php/php-7.3.5.tar.gz


2. 解压缩 php 源代码,准备编译安装
tar -zxvf php-7.3.5.tar.gz
ls
cd php-7.3.5
ls 找一找 configure 脚本文件
准备编译环境,指定安装路径,开启额外的功能等等
参数解释:结尾 '\' 是换行符
./configure --prefix=/mytools/php7.3.5 \
--enable-msqld \		# 让 php 语言能够与 mysql 进行交互
--with-mysqli=mysqlnd \
--with-pdo-mysql=mysqlnd \
--with-iconv-dir=/mytools/libiconv \
--with-freetype-dir \
--with-png-dir \
--with-zlib \
--with-libxml-dir=/usr \
--enable-xml \
--disable-rpath \
--enable-bcmath \
--enable-shmop \
--enable-sysvsem \
--enable-inline-optimization \
--with-curl \
--enable-mbregex \
--enable-fpm \			# 开启 php 的多进程模式
--enable-mbstring \
--with-gd \
--with-openssl \		# 让 php 能够处理 https 的相关信息
--with-mhash \
--enable-pcntl \
--enable-sockets \
--with-xmlrpc \
--enable-soap \
--enable-short-tags \
--enable-static \
--with-xsl \
--with-fpm-user=nginx \
--with-fpm-group=nginx \
--enable-ftp \
--enable-opcache=no


-----------------------------------------------------------------

./configure --prefix=/mytools/php7.3.5 \
--enable-mwsqld \
--with-mysqli=mysqlnd \
--with-pdo-mysql=mysqlnd \
--with-iconv-dir=/mytools/libiconv \
--with-freetype-dir \
--with-png-dir \
--with-zlib \
--with-libxml-dir=/usr \
--enable-xml \
--disable-rpath \
--enable-bcmath \
--enable-shmop \
--enable-sysvsem \
--enable-inline-optimization \
--with-curl \
--enable-mbregex \
--enable-fpm \
--enable-mbstring \
--with-gd \
--with-openssl \
--with-mhash \
--enable-pcntl \
--enable-sockets \
--with-xmlrpc \
--enable-soap \
--enable-short-tags \
--enable-static \
--with-xsl \
--with-fpm-user=nginx \
--with-fpm-group=nginx \
--enable-ftp \
--enable-opcache=no

系统环境检查完毕后,准备开始编译且安装


3. 编译安装
make && make install


echo $?    # 验证编译安装是否正确
Nginx+PHP+MYSQL 完整测试
PHP配置文件
默认的 php 配置文件模板,在解压 php 源码的目录下即 php-7.3.5,然后我们把这个两个配置文件拷贝到我们编译安装的目录下 即 php7.3.5
1. 比较编译安装目录与解压源码目录的内容,在解压源码目录找到默认的配置文件模板

# 进入编译目录
cd php7.3.5
ls		# 查看编译后生成的文件
bin etc include lib php sbin var
ls bin
pear peardev pecl phar phar.phar php php-cgi php-config phpdbg phpize
cd ..


# 进入源代码目录
cd php-7.3.5
ls		# 查看源代码目录文件,发现里面有很多文件
ls php.init*	# 查看 php.init 开头的  配置文件
php.ini-development		# 用于测试环境
php.ini-production		# 用于生成环境即线上环境


root@lnmp:/mytools/php-7.3.5# ls php.ini*
php.ini-development  php.ini-production
root@lnmp:/mytools/php-7.3.5#


2. 拷贝该配置文件,放入到 php 的编译安装目录下 即 php7.3.5
# 查看编译安装目录下的内容
root@lnmp:/mytools/php-7.3.5# ls /mytools/php7.3.5/
bin  etc  include  lib  php  sbin  var

# 拷贝该配置文件,放入到 php 的编译安装目录下 即 php7.3.5
root@lnmp:/mytools/php-7.3.5# cp php.ini-development php.ini-production /mytools/php7.3.5/

# 查看拷贝该配置文件后编译安装目录下的内容 ,显示已经成功拷贝
root@lnmp:/mytools/php-7.3.5# ls /mytools/php7.3.5/
bin  etc  include  lib  php  php.ini-development  php.ini-production  sbin  var

# 将 'php.ini-development' 拷贝到 '/mytools/php7.3.5/lib/' 目录下并命名为 'php.ini'
root@lnmp:/mytools/php-7.3.5# cp php.ini-development /mytools/php7.3.5/lib/php.ini

#
# 比较两个配置文件区别 语法 'vimdiff conf1 conf2' 命令比较两个配置文件的差异
root@lnmp:/mytools/php-7.3.5# vim php.ini-development
root@lnmp:/mytools/php-7.3.5# vim php.ini-production

# 用 'vimdiff' 比较一下 php 的生成配置文件,和开发模式配置文件的区别
root@lnmp:/mytools/php-7.3.5# vimdiff php.ini-development php.ini-production
2 files to edit
root@lnmp:/mytools/php-7.3.5#

# 看完后,直接 :q 回车 退出一个编辑器,接着再次 在 ESC模式下输入 :q 回车退出编辑器
有关 FASTCGI 配置文件
PHP 编写的配置文件,以分号(;)开头表示是注释掉的内容
这两个配置文件跟 php 所支持的 fastcgi 相关的
# 这两个配置文件跟 php 所支持的 fastcgi 相关的
www.conf  www.conf.default


1. 检查 fastcgi 的默认配置文件
# etc 目录一般都是存放各种配置文件
root@lnmp:/mytools/php7.3.5# ls
bin  etc  include  lib  php  php.ini  sbin  var


root@lnmp:/mytools/php7.3.5/etc# pwd
/mytools/php7.3.5/etc
root@lnmp:/mytools/php7.3.5/etc# ls
php-fpm.conf.default  php-fpm.d


2. 拷贝模板配置文件,生成新的 php 配置文件
root@lnmp:/mytools/php7.3.5/etc# cp php-fpm.conf.default php-fpm.conf

root@lnmp:/mytools/php7.3.5/etc# ls
php-fpm.conf  php-fpm.conf.default  php-fpm.d

# 找到 'www' 配置相关的文件
root@lnmp:/mytools/php7.3.5/etc# cd php-fpm.d/
root@lnmp:/mytools/php7.3.5/etc/php-fpm.d# ls
www.conf.default

# 拷贝模板配置文件,生成新的 www 配置文件
root@lnmp:/mytools/php7.3.5/etc/php-fpm.d# cp www.conf.default www.conf
root@lnmp:/mytools/php7.3.5/etc/php-fpm.d# ls
www.conf  www.conf.default	# 这两个配置文件跟 php 所支持的 fastcgi 相关的

root@lnmp:/mytools/php7.3.5/etc# ls
php-fpm.conf  php-fpm.conf.default  php-fpm.d
root@lnmp:/mytools/php7.3.5/etc#
启动 PHP 服务,指定以 fastcgi 形式
1. 找到启动 PHP 进程的命令 'php-fpm'  用绝对路径启动 PHP 进程 /mytools/php7.3.5/sbin
root@lnmp:/mytools/php7.3.5# ls
bin  etc  include  lib  php  php.ini  sbin  var
root@lnmp:/mytools/php7.3.5# cd sbin
root@lnmp:/mytools/php7.3.5/sbin# ls
php-fpm
root@lnmp:/mytools/php7.3.5/sbin# pwd
/mytools/php7.3.5/sbin

# 启动 PHP 服务
/mytools/php7.3.5/sbin/php-fpm
root@lnmp:/mytools/php7.3.5/sbin# /mytools/php7.3.5/sbin/php-fpm


# 配置 php 环境变量
vim /etc/profile
/mytools/php7.3.5/bin
/mytools/php7.3.5/sbin

export PATH=/mytools/php7.3.5/bin:/mytools/php7.3.5/sbin:$PATH


# 设置 php 开机自启
systemctl start php-fpm
systemctl stop php-fpm


# 启动 php 后,检查端口和进程信息
root@lnmp:/mytools/php7.3.5/sbin# netstat -tunlp | grep php
tcp      0      0 127.0.0.1:9000  0.0.0.0:*   LISTEN      221778/php-fpm: mas
root@lnmp:/mytools/php7.3.5/sbin# ps -ef | grep php
root      221778       1  0 05:46 ?        00:00:00 php-fpm: master process (/mytools/php7.3.5/etc/php-fpm.conf)
nginx     221779  221778  0 05:46 ?        00:00:00 php-fpm: pool www
nginx     221780  221778  0 05:46 ?        00:00:00 php-fpm: pool www
root      221784   42031  0 05:48 pts/1    00:00:00 grep --color=auto php
root@lnmp:/mytools/php7.3.5/sbin#


下面要让 nginx,mysql ,php 三着联系起来
修改 nginx 支持 php 代码
1.注意这里的操作仅仅是学习阶段,为了让大家了解 include 语法的功能,对配置文件优化,进行的操作

 删除 nginx.conf 中其他无用的参数,然后用 include 语法,对每一个虚拟主机管理,进行配置文进行拆分。

vim /mytools/nginx/conf/nginx.conf
root@lnmp:/mytools/php7.3.5/sbin# vim /mytools/nginx/conf/nginx.conf
root@lnmp:/mytools/php7.3.5/sbin# cat /mytools/nginx/conf/nginx.conf

#user  nobody;
worker_processes  1;

#error_log  logs/error.log;
#error_log  logs/error.log  notice;
#error_log  logs/error.log  info;

#pid        logs/nginx.pid;

events {
    worker_connections  1024;
}


http {
    include       mime.types;
    default_type  application/octet-stream;

    sendfile        on;
    #tcp_nopush     on;

    #keepalive_timeout  0;
    keepalive_timeout  65;

    #gzip  on;
include extra/my_php.conf;
}


2.手动创建 extra 目录,以及 my_php.conf
vim /mytools/nginx/conf/extra/my_php.conf # 写入如下内容
server {
        listen          80;
        server_name     _;
        location / {
                root    html;
                index   index.html;
        }
        # 添加有关 php 程序的解析
        # 判断当请求 url 结尾是以php,php5的时候,就进入如下的 location 代码
        location ~ .*\.(php|php5)?$ {
        		root		html/myphp;
                fastcgi_pass    127.0.0.1:9000;
                fastcgi_index   index.php;
                include                 fastcgi.conf;
        }
}


3. 检查 nginx 语法 以及重启 nginx
nginx -t
nginx -s reload

root@lnmp:/mytools/nginx/conf/extra# nginx -t
nginx: the configuration file /mytools/nginx1261/conf/nginx.conf syntax is ok
nginx: configuration file /mytools/nginx1261/conf/nginx.conf test is successful
root@lnmp:/mytools/nginx/conf/extra# nginx -s reload
root@lnmp:/mytools/nginx/conf/extra#


4. 创建 php 的首页脚本文件
mkdir -p /mytools/nginx/html/myphp
root@lnmp:/mytools/nginx/conf/extra# mkdir -p /mytools/nginx/html/myphp

echo "<?php phpinfo(); ?>" > /mytools/nginx/html/myphp/index.php

root@lnmp:/mytools/nginx/conf/extra# echo "<?php phpinfo(); ?>" > /mytools/nginx/html/myphp/index.php


5. 测试 lnmp 的结合关系
nginx -s reload

root@lnmp:~# nginx -t
nginx: the configuration file /mytools/nginx1261/conf/nginx.conf syntax is ok
nginx: configuration file /mytools/nginx1261/conf/nginx.conf test is successful
root@lnmp:~# nginx -s reload
root@lnmp:~# netstat -tunlp | grep -E "nginx|mysql|php"
tcp        0      0 0.0.0.0:80              0.0.0.0:*               LISTEN      933/nginx: master p
tcp        0      0 127.0.0.1:9000          0.0.0.0:*               LISTEN      1412/php-fpm: maste
tcp6       0      0 :::3306                 :::*                    LISTEN      877/mysqld
root@lnmp:~# ps -ef | grep -E "mysql|nginx|php"
mysql        877       1  0 09:47 ?        00:00:01 /mytools/mysql/bin/mysqld --defaults-file=/etc/my.cnf
root         933       1  0 09:47 ?        00:00:00 nginx: master process /mytools/nginx/sbin/nginx
root        1412       1  0 09:56 ?        00:00:00 php-fpm: master process (/mytools/php7.3.5/etc/php-fpm.conf)
nginx       1413    1412  0 09:56 ?        00:00:00 php-fpm: pool www
nginx       1414    1412  0 09:56 ?        00:00:00 php-fpm: pool www
nginx       1419     933  0 09:56 ?        00:00:00 nginx: worker process
root        1426    1363  0 09:57 pts/0    00:00:00 grep --color=auto -E mysql|nginx|php
root@lnmp:~#


vim /mytools/nginx/html/myphp/index.php


root@lnmp:~# cd /mytools/nginx/conf/
root@lnmp:/mytools/nginx/conf# ls
fastcgi.conf          fastcgi_params          koi-utf  mime.types          nginx.conf          scgi_params          uwsgi_params          win-utf
fastcgi.conf.default  fastcgi_params.default  koi-win  mime.types.default  nginx.conf.default  scgi_params.default  uwsgi_params.default
root@lnmp:/mytools/nginx/conf# mkdir extra
root@lnmp:/mytools/nginx/conf# ls
extra         fastcgi.conf.default  fastcgi_params.default  koi-win     mime.types.default  nginx.conf.default  scgi_params.default  uwsgi_params.default
fastcgi.conf  fastcgi_params        koi-utf                 mime.types  nginx.conf          scgi_params         uwsgi_params         win-utf
root@lnmp:/mytools/nginx/conf# cd extra/
root@lnmp:/mytools/nginx/conf/extra# vim my_php.conf
---------代码解释如下-------------
server {
	listen		80;
	server_name		blog.chaoge.com;
	location / {
		root	html/blog;
		index	index.html;
	}
	# 添加有关 php 程序的解析
	location ~ .*\.(php|php5)?$ {
		root	html/blog;
		fastcgi_pass	127.0.0.1:9000;
		fastcgi_index	index.php;
		include			fastcgi.conf;
	}
}

---------代码解释描述如下-------------
# 添加有关 php 程序的解析
# 判断当请求 url 结尾是以php,php5的时候,就进入如下的 location 代码
	location ~ .*\.(php|php5)?$ {
		root		html/myphp;
		fastcgi_pass	127.0.0.1:9000;
		fastcgi_index	index.php;
		include			fastcgi.conf;
	}

'~' 代表在 location 里面是支持正则表达式的
'.*' 代表匹配任意的内容
'\.' 代表普通的小数点,表示以 .php  .php5 结尾的时候,就让他走这个 location
'?' 代表
'$' 代表
'fastcgi_pass' 请求转发,nginx通过 'fastcgi_pass' 把用户的动态请求发给了 '127.0.0.1:9000'即转发给 php 去处理,

root@lnmp:/mytools/nginx/conf/extra# netstat -tunlp | grep 9000
tcp   0      0 127.0.0.1:9000    0.0.0.0:*   LISTEN      221778/php-fpm: mas

'fastcgi_index' 代表 php 的首页文件 index.php
'include'	导入 php 的配置文件

---------代码解释如上-------------
root@lnmp:/mytools/nginx/conf/extra# cat my_php.conf

server {
        listen          80;
        server_name     _;
        location / {
                root    html;
                index   index.html;
        }
        # 添加有关 php 程序的解析
        location ~ .*\.(php|php5)?$ {
        		root		html/myphp;
                fastcgi_pass    127.0.0.1:9000;
                fastcgi_index   index.php;
                include                 fastcgi.conf;
        }
}
访问 172.18.22.137/index.php 链接。
当看到 phpinfo 的页面,表示 lnmp环境搭建好了,nginx 以及可以转发请求给 php 了。
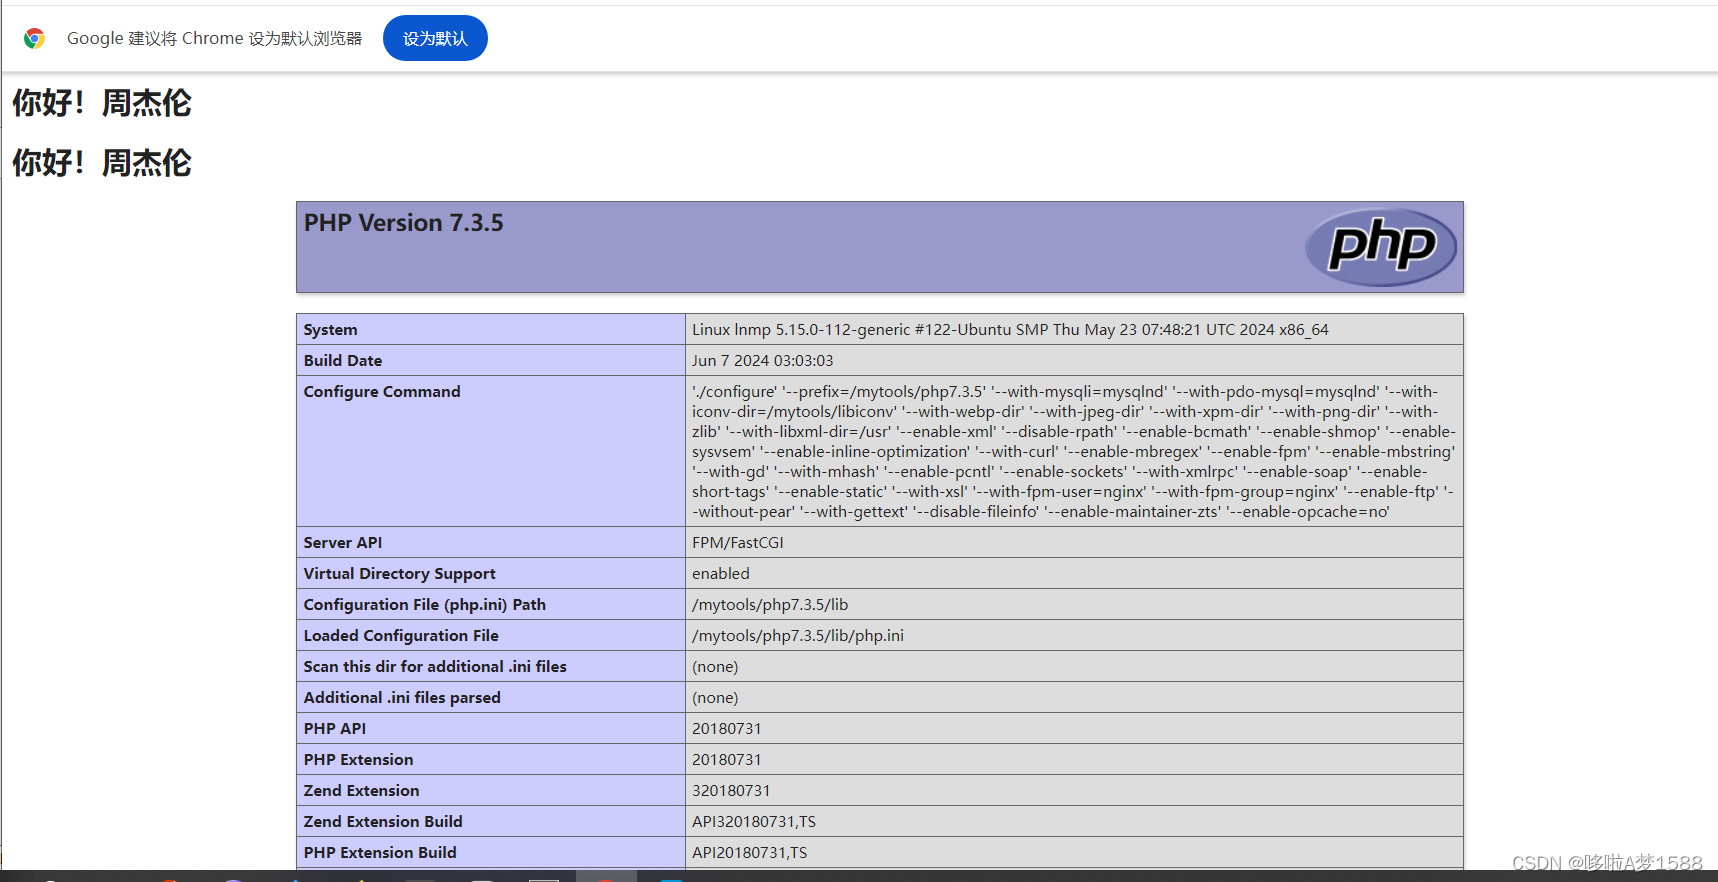
故障演示
ps -ef | grep php
root@lnmp:~# ps -ef | grep php
root        1412       1  0 09:56 ?        00:00:00 php-fpm: master process (/mytools/php7.3.5/etc/php-fpm.conf)
nginx       1413    1412  0 09:56 ?        00:00:00 php-fpm: pool www
nginx       1414    1412  0 09:56 ?        00:00:00 php-fpm: pool www
root        1444    1363  0 10:21 pts/0    00:00:00 grep --color=auto php
root@lnmp:~#

root@lnmp:~# kill 1412
root@lnmp:~# ps -ef | grep php
root        1448    1363  0 10:22 pts/0    00:00:00 grep --color=auto php
root@lnmp:~# netstat -tunlp | grep php
root@lnmp:~#
测试 php 访问 mysql
编写 php 脚本代码,直接在网页中解析即可
以下是脚本测试文件属于静态资源
vim /mytools/nginx/html/myphp/test_mysql.php
<?php
	$link_id=mysqli_connect('localhost','root','chaoge666') or mysql_error();
	if ($link_id) {
		echo "mysql connect successful by chaoge.\n";
	} else {
		echo mysql_error();
	}
?>


代码解释:
'mysqli_connect()' 这是一个功能函数
'localhost' 数据库的IP地址
'root' 账号
'chaoge666' 密码
'mysql_error()',这是 mysql 内置的错误信息函数,他会自动打印报错信息


------
如上脚本的中文解释
1. 建立 mysql 连接,把链接信息,赋值给变量 link_id
2. 如果 link_id 为true, 表示他正确连接了,那么就打印一串字符串信息告诉你,mysql连接成功了, 'mysql connect successful by chaoge.'
3. 否则给你输出 mysql 的报错信息,让你能够自行的调试程序
描述
进行mysql连接,填入账号密码,把这个值赋给前面 '$link_id' 这个变量,通过这个连接,进行判断,如果 '$link_id' 他连上了,代表 true,是一个正确的值,
再次测试连接 lnmp 环境,让 nginx 转发请求给PHP,然后测试是否能够连接 mysql
# 访问 172.16.22.137/test_mysql.php
返回:mysql connect successful by longchi.

#  停止 mysql,再次访问 172.18.22.137/test_mysql.php
root@lnmp:/mytools/nginx/html/myphp# systemctl stop mysqld
root@lnmp:/mytools/nginx/html/myphp# netstat -tunlp|grep mysql
root@lnmp:/mytools/nginx/html/myphp#

返回:
Warning: mysqli_connect(): (HY000/2002): No such file or directory in /mytools/nginx1261/html/myphp/test_mysql.php on line 3

Fatal error: Uncaught Error: Call to undefined function mysql_error() in /mytools/nginx1261/html/myphp/test_mysql.php:3 Stack trace: #0 {main} thrown in /mytools/nginx1261/html/myphp/test_mysql.php on line 3

# 启动数据库,再次访问172.18.22.137/test_mysql.php
返回:mysql connect successful by longchi.
root@lnmp:/mytools/nginx/html/myphp# systemctl start mysqld
root@lnmp:/mytools/nginx/html/myphp# netstat -tunlp|grep mysql
tcp6       0      0 :::3306                 :::*                    LISTEN      1511/mysqld
root@lnmp:/mytools/nginx/html/myphp#
LNMP环境搭建 wordpress
环境准备
1. 启动 mysql 数据库,创建用于 workpress 博客的数据库
每一个数据库相当于一个文件夹,每一个数据库中放很多数据表,相当于 excel 表

2.创建 wordpress 数据库
create database wordpress;

3. 创建用于 wordpress 专用的数据库用户
create user wordpress;

4. 给该用户授权
# 命令解释
# 给 wordpress 用户授权,允许在 localhost 本地登录 mysql,且有增删改查的权限且设置密码
grant all on wordpress.* to wordpress@'localhost' identified by 'changge666';

命令参数解释
'grant' 代表授以权限
'all' 表示授予所有权限
'on' 关键字 代表指定数据库数据表
'wordpress' 代表谁 数据库名
'.*' 点星 代表 数据库 'wordpress' 里面所有的数据表
'to' 代表指定哪个用户
'wordpress' 代表我们创建的用户
'@' 是占位符
'localhost' 允许用户在本地登录 mysql 数据库
'identified by' 代表给用户 'wordpress' 做一个密码验证

5. 刷新授权表
flush privileges;


6.查询刚才创建的用户信息
use mysql; # 进入mysql数据库
show tables;	# 查看所有的数据表
desc user;		# 查看 user 表的结构信息
select user,authentication_string,host from mysql.user;
# 查询 mysql 数据库中的 user 表中的几个字段信息
'user' 用户名字段
'authentication_string' 验证信息字段
'host' 主机字段

mysql> desc user;


'desc' 查询数据表的结构
'Field' 字段信息
'Type'  字段的类型
'Null'	字段的约束 是否为空
'Key'
'Default'
'Extra'


mysql> show databases;
+--------------------+
| Database           |
+--------------------+
| information_schema |
| lol                |
| mysql              |
| performance_schema |
| sys                |
+--------------------+
5 rows in set (0.47 sec)

mysql> create database wordpress;
Query OK, 1 row affected (0.00 sec)

mysql> show databases;
+--------------------+
| Database           |
+--------------------+
| information_schema |
| lol                |
| mysql              |
| performance_schema |
| sys                |
| wordpress          |
+--------------------+
6 rows in set (0.00 sec)
mysql> use mysql;
Reading table information for completion of table and column names
You can turn off this feature to get a quicker startup with -A

Database changed
mysql> show tables;
+---------------------------+
| Tables_in_mysql           |
+---------------------------+
| columns_priv              |
| db                        |
| engine_cost               |
| event                     |
| func                      |
| general_log               |
| gtid_executed             |
| help_category             |
| help_keyword              |
| help_relation             |
| help_topic                |
| innodb_index_stats        |
| innodb_table_stats        |
| ndb_binlog_index          |
| plugin                    |
| proc                      |
| procs_priv                |
| proxies_priv              |
| server_cost               |
| servers                   |
| slave_master_info         |
| slave_relay_log_info      |
| slave_worker_info         |
| slow_log                  |
| tables_priv               |
| time_zone                 |
| time_zone_leap_second     |
| time_zone_name            |
| time_zone_transition      |
| time_zone_transition_type |
| user                      |
+---------------------------+
31 rows in set (0.00 sec)

mysql> desc user;
+------------------------+-----------------------------------+------+-----+-----------------------+-------+
| Field                  | Type                              | Null | Key | Default               | Extra |
+------------------------+-----------------------------------+------+-----+-----------------------+-------+
| Host                   | char(60)                          | NO   | PRI |                       |       |
| User                   | char(32)                          | NO   | PRI |                       |       |
| Select_priv            | enum('N','Y')                     | NO   |     | N                     |       |
| Insert_priv            | enum('N','Y')                     | NO   |     | N                     |       |
| Update_priv            | enum('N','Y')                     | NO   |     | N                     |       |
| Delete_priv            | enum('N','Y')                     | NO   |     | N                     |       |
| Create_priv            | enum('N','Y')                     | NO   |     | N                     |       |
| Drop_priv              | enum('N','Y')                     | NO   |     | N                     |       |
| Reload_priv            | enum('N','Y')                     | NO   |     | N                     |       |
| Shutdown_priv          | enum('N','Y')                     | NO   |     | N                     |       |
| Process_priv           | enum('N','Y')                     | NO   |     | N                     |       |
| File_priv              | enum('N','Y')                     | NO   |     | N                     |       |
| Grant_priv             | enum('N','Y')                     | NO   |     | N                     |       |
| References_priv        | enum('N','Y')                     | NO   |     | N                     |       |
| Index_priv             | enum('N','Y')                     | NO   |     | N                     |       |
| Alter_priv             | enum('N','Y')                     | NO   |     | N                     |       |
| Show_db_priv           | enum('N','Y')                     | NO   |     | N                     |       |
| Super_priv             | enum('N','Y')                     | NO   |     | N                     |       |
| Create_tmp_table_priv  | enum('N','Y')                     | NO   |     | N                     |       |
| Lock_tables_priv       | enum('N','Y')                     | NO   |     | N                     |       |
| Execute_priv           | enum('N','Y')                     | NO   |     | N                     |       |
| Repl_slave_priv        | enum('N','Y')                     | NO   |     | N                     |       |
| Repl_client_priv       | enum('N','Y')                     | NO   |     | N                     |       |
| Create_view_priv       | enum('N','Y')                     | NO   |     | N                     |       |
| Show_view_priv         | enum('N','Y')                     | NO   |     | N                     |       |
| Create_routine_priv    | enum('N','Y')                     | NO   |     | N                     |       |
| Alter_routine_priv     | enum('N','Y')                     | NO   |     | N                     |       |
| Create_user_priv       | enum('N','Y')                     | NO   |     | N                     |       |
| Event_priv             | enum('N','Y')                     | NO   |     | N                     |       |
| Trigger_priv           | enum('N','Y')                     | NO   |     | N                     |       |
| Create_tablespace_priv | enum('N','Y')                     | NO   |     | N                     |       |
| ssl_type               | enum('','ANY','X509','SPECIFIED') | NO   |     |                       |       |
| ssl_cipher             | blob                              | NO   |     | NULL                  |       |
| x509_issuer            | blob                              | NO   |     | NULL                  |       |
| x509_subject           | blob                              | NO   |     | NULL                  |       |
| max_questions          | int(11) unsigned                  | NO   |     | 0                     |       |
| max_updates            | int(11) unsigned                  | NO   |     | 0                     |       |
| max_connections        | int(11) unsigned                  | NO   |     | 0                     |       |
| max_user_connections   | int(11) unsigned                  | NO   |     | 0                     |       |
| plugin                 | char(64)                          | NO   |     | mysql_native_password |       |
| authentication_string  | text                              | YES  |     | NULL                  |       |
| password_expired       | enum('N','Y')                     | NO   |     | N                     |       |
| password_last_changed  | timestamp                         | YES  |     | NULL                  |       |
| password_lifetime      | smallint(5) unsigned              | YES  |     | NULL                  |       |
| account_locked         | enum('N','Y')                     | NO   |     | N                     |       |
+------------------------+-----------------------------------+------+-----+-----------------------+-------+
45 rows in set (0.00 sec)

mysql> select user,authentication_string,host from mysql.user;
+---------------+-------------------------------------------+-----------+
| user          | authentication_string                     | host      |
+---------------+-------------------------------------------+-----------+
| root          | *5AE48F6954A1F229315162B2562C5B942A1D9E5B | localhost |
| mysql.session | *THISISNOTAVALIDPASSWORDTHATCANBEUSEDHERE | localhost |
| mysql.sys     | *THISISNOTAVALIDPASSWORDTHATCANBEUSEDHERE | localhost |
| wordpress     |                                           | %         |
| wordpress     | *5AE48F6954A1F229315162B2562C5B942A1D9E5B | localhost |
+---------------+-------------------------------------------+-----------+
5 rows in set (0.00 sec)

mysql>
确保 nginx 支持 php 程序的解析
vim /mytools/nginx/conf/extra/my_php.conf

server {
        listen          80;
        server_name     _;
        location / {
                root    html/myphp;
                index	index.php   index.html;
        }
        # 添加有关 php 程序的解析
        # 判断当请求 url 结尾是以php,php5的时候,就进入如下的 location 代码
        location ~ .*\.(php|php5)?$ {
                root            html/myphp;
                fastcgi_pass    127.0.0.1:9000;
                fastcgi_index   index.php;
                include                 fastcgi.conf;
        }
}


重启 nginx ,加载新的配置
nginx -t
nginx -s reload
wordpress 程序安装 以下是实际操作步骤
wget https://wordpress.org/latest.tar.gz
wget http://wp101.net/latest.tar.gz

root@lnmp:/mytools/nginx/conf/extra# cd /mytools/
root@lnmp:/mytools# ls
libiconv              mysql                                       nginx         nginx-1.26.1.tar.gz   php-7.3.5
libiconv-1.15         mysql-5.7.28-linux-glibc2.12-x86_64         nginx-1.26.1  openssl-3.0.1         php7.3.5
libiconv-1.15.tar.gz  mysql-5.7.28-linux-glibc2.12-x86_64.tar.gz  nginx1261     openssl-3.0.1.tar.gz  php-7.3.5.tar.gz

# 下载 wordpress 最新版本
root@lnmp:/mytools# wget https://wordpress.org/latest.tar.gz
--2024-06-07 13:27:30--  https://wordpress.org/latest.tar.gz
Resolving wordpress.org (wordpress.org)... 198.143.164.252
Connecting to wordpress.org (wordpress.org)|198.143.164.252|:443... connected.
HTTP request sent, awaiting response... 200 OK
Length: 24696852 (24M) [application/octet-stream]
Saving to: ‘latest.tar.gz’

latest.tar.gz                          100%[============================================================================>]  23.55M  6.47MB/s    in 4.2s

2024-06-07 13:27:35 (5.59 MB/s) - ‘latest.tar.gz’ saved [24696852/24696852]

root@lnmp:/mytools# ls
latest.tar.gz  libiconv-1.15.tar.gz                 mysql-5.7.28-linux-glibc2.12-x86_64.tar.gz  nginx1261            openssl-3.0.1.tar.gz  php-7.3.5.tar.gz
libiconv       mysql                                nginx                                       nginx-1.26.1.tar.gz  php-7.3.5
libiconv-1.15  mysql-5.7.28-linux-glibc2.12-x86_64  nginx-1.26.1                                openssl-3.0.1        php7.3.5

# 解压
root@lnmp:/mytools# tar -zxvf latest.tar.gz
wordpress/

root@lnmp:/mytools# ls
latest.tar.gz  libiconv-1.15.tar.gz                 mysql-5.7.28-linux-glibc2.12-x86_64.tar.gz  nginx1261            openssl-3.0.1.tar.gz  php-7.3.5.tar.gz
libiconv       mysql                                nginx                                       nginx-1.26.1.tar.gz  php-7.3.5             wordpress
libiconv-1.15  mysql-5.7.28-linux-glibc2.12-x86_64  nginx-1.26.1                                openssl-3.0.1        php7.3.5
root@lnmp:/mytools# ls wordpress/
index.php    wp-activate.php     wp-comments-post.php  wp-cron.php        wp-load.php   wp-settings.php   xmlrpc.php
license.txt  wp-admin            wp-config-sample.php  wp-includes        wp-login.php  wp-signup.php
readme.html  wp-blog-header.php  wp-content            wp-links-opml.php  wp-mail.php   wp-trackback.php
root@lnmp:/mytools# ls
latest.tar.gz  libiconv-1.15.tar.gz                 mysql-5.7.28-linux-glibc2.12-x86_64.tar.gz  nginx1261            openssl-3.0.1.tar.gz  php-7.3.5.tar.gz
libiconv       mysql                                nginx                                       nginx-1.26.1.tar.gz  php-7.3.5             wordpress
libiconv-1.15  mysql-5.7.28-linux-glibc2.12-x86_64  nginx-1.26.1                                openssl-3.0.1        php7.3.5

root@lnmp:/mytools# cd /mytools/nginx/html/
root@lnmp:/mytools/nginx/html# ls
50x.html  index.html  myphp
root@lnmp:/mytools/nginx/html# pwd
/mytools/nginx/html
root@lnmp:/mytools/nginx/html# cd myphp
root@lnmp:/mytools/nginx/html/myphp# ls
index.php  test_mysql.php
root@lnmp:/mytools/nginx/html/myphp# cd ../../
root@lnmp:/mytools/nginx# cd ../
root@lnmp:/mytools# ls
latest.tar.gz  libiconv-1.15.tar.gz                 mysql-5.7.28-linux-glibc2.12-x86_64.tar.gz  nginx1261            openssl-3.0.1.tar.gz  php-7.3.5.tar.gz
libiconv       mysql                                nginx                                       nginx-1.26.1.tar.gz  php-7.3.5             wordpress
libiconv-1.15  mysql-5.7.28-linux-glibc2.12-x86_64  nginx-1.26.1                                openssl-3.0.1        php7.3.5
root@lnmp:/mytools# cp -r wordpress/* /mytools/nginx/html/
root@lnmp:/mytools# cd /mytools/nginx/html
root@lnmp:/mytools/nginx/html# ls
50x.html    license.txt  wp-activate.php     wp-comments-post.php  wp-cron.php        wp-load.php   wp-settings.php   xmlrpc.php
index.html  myphp        wp-admin            wp-config-sample.php  wp-includes        wp-login.php  wp-signup.php
index.php   readme.html  wp-blog-header.php  wp-content            wp-links-opml.php  wp-mail.php   wp-trackback.php
root@lnmp:/mytools/nginx/html# vim index.php
root@lnmp:/mytools/nginx/html# ls
50x.html    license.txt  wp-activate.php     wp-comments-post.php  wp-cron.php        wp-load.php   wp-settings.php   xmlrpc.php
index.html  myphp        wp-admin            wp-config-sample.php  wp-includes        wp-login.php  wp-signup.php
index.php   readme.html  wp-blog-header.php  wp-content            wp-links-opml.php  wp-mail.php   wp-trackback.php
root@lnmp:/mytools/nginx/html# ls myphp/
index.php  test_mysql.php
root@lnmp:/mytools/nginx/html# vim myphp/index.php

root@lnmp:/mytools/nginx/html# cd ../../
root@lnmp:/mytools# ls
latest.tar.gz  libiconv-1.15.tar.gz                 mysql-5.7.28-linux-glibc2.12-x86_64.tar.gz  nginx1261            openssl-3.0.1.tar.gz  php-7.3.5.tar.gz
libiconv       mysql                                nginx                                       nginx-1.26.1.tar.gz  php-7.3.5             wordpress
libiconv-1.15  mysql-5.7.28-linux-glibc2.12-x86_64  nginx-1.26.1                                openssl-3.0.1        php7.3.5

# 解压后会在当前目录生成一个 wordpress 目录,将目录下所有内容拷贝到 nginx 服务器中,如下
root@lnmp:/mytools# cp -r wordpress/* /mytools/nginx/html/myphp/
root@lnmp:/mytools#
访问 172.18.22.137 看到以下页面,表示 wordpress博客已经搭建成功。以上是实操步骤
ubuntu 安装PHP
2021 年开始,Ubuntu 官方不再支持 PHP 5.6 版本的维护和更新,因此如果需要在 Ubuntu 上安装 PHP 5.6,则需要使用第三方的 PPA(个人软件包归档)来进行安装。
# 先更新软件源并升级
sudo apt update && sudo apt upgrade -y

# 安装software-properties-common软件管理器(这一步不是必须,有些发行版本已经安装好了)
sudo apt install software-properties-common

# 增加 ondrej/php PPA,提供了多个 PHP 版本   添加ppa仓库
sudo add-apt-repository ppa:ondrej/php

说明:上述命令是用于将第三方软件包仓库添加到 Ubuntu 系统的命令。这个特定的命令表示要添加 ondrej/php PPA(Personal Package Archive)。

PPA 是 Ubuntu 中用于存储个人或团队维护的软件包的仓库。通过添加 PPA,你可以轻松地访问和安装这些软件包,而不必手动下载和编译源代码。

在这种情况下,ondrej/php PPA 是由 Ondřej Surý 维护的一个 PHP 软件包仓库。它提供了较新版本的 PHP 和相关的扩展、工具等,可以在 Ubuntu 系统上使用。


CAVEATS:
1. If you are using php-gearman, you need to add ppa:ondrej/pkg-gearman
2. If you are using apache2, you are advised to add ppa:ondrej/apache2
3. If you are using nginx, you are advised to add ppa:ondrej/nginx-mainline
   or ppa:ondrej/nginx


# 再次更新
sudo apt update


---------------------------------------------
# 安装依赖,需要安装一些编译PHP所需要的依赖
sudo apt install gcc make openssl curl libbz2-dev libxml2-dev libjpeg-dev libpng-dev libfreetype6-dev libzip-dev -y

sudo apt-get update
sudo apt-get install build-essential libxml2-dev libcurl4-openssl-dev libssl-dev libbz2-dev libjpeg-dev libpng-dev libmcrypt-dev libxslt1-dev

apt install libfreetype6-dev -y

apt install openssl openssl-dev -y

# 可以通过以下命令在Linux中下载openssl的压缩包
wget https://www.openssl.org/source/openssl-3.0.1.tar.gz


# 安装常用的扩展
sudo apt install php7.3.5 php7.3.5-fpm php7.3.5-mysql php7.3.5-cli php7.3.5-fpm php7.3.5-json php7.3.5-common php7.3.5-mbstring php7.3.5-zip php7.3.5-gd php7.3.5-mysqli -y

# 启动并使 PHP 7.3.5 FPM 在启动时自动启动
sudo systemctl start php7.3.5-fpm
sudo systemctl enable php7.3.5-fpm

扩展解释:
在Web开发中使用MySQL数据库,可以安装PHP的MySQL扩展:
sudo apt install php-mysql

--------------PHP5.6 start-------------------------


php-fpm扩展
简介

PHP-FPM(PHP FastCGI 进程管理器)是一个用于管理 PHP FastCGI 进程的解决方案。它是 PHP 官方提供的一种替代 PHP-CGI(Common Gateway Interface)的方法,用于在 Web 服务器上执行 PHP 脚本。
PHP-FPM 的主要功能

(1)支持并发请求:PHP-FPM 支持并发处理多个请求,能够更高效地处理大量的并发请求。

(2)进程管理:PHP-FPM 可以独立地管理 PHP 进程,根据配置文件中的设置来启动、停止、重启和控制 PHP 进程的数量。

(3)进程池:PHP-FPM 使用进程池来处理请求,每个进程都可以独立地处理一个请求。进程池可以根据负载情况自动调整进程数量,并且可以为不同的虚拟主机或应用程序分配不同的进程池。

(4)资源限制:PHP-FPM 允许您为每个进程设置资源限制,如内存限制和执行时间限制,这有助于保护服务器免受资源滥用。

(5)日志记录:PHP-FPM 提供了详细的日志记录功能,可以记录每个请求的处理情况,便于故障排除和性能优化。
作用:与nginx结合使用

通过将 Nginx(或其他 Web 服务器)与 PHP-FPM 结合使用,可以实现高性能和可扩展的 PHP Web 应用程序环境。Nginx 作为前端 Web 服务器接收和处理 HTTP 请求,然后将 PHP 请求转发给 PHP-FPM 进程进行处理,并将处理结果返回给客户端。这种结构可以提供更高的性能和可靠性,同时允许灵活地配置和管理 PHP 进程。
PHP-FPM常用命令

根据你安装PHP时安装FPM扩展的有关,比如之前我安装的是php5.6-fpm

# 安装PHP5.6
sudo apt install php5.6

# 安装PHP5.6常用扩展
sudo apt install php5.6 php5.6-fpm php5.6-mysql php5.6-gd php5.6-mbstring php5.6-curl php5.6-soap php5.6-redis php5.6-xml php5.6-apcu php5.6-mcrypt -y

PHP-FPM常用命令
systemctl status php5.6-fpm		# 查看 php-fpm 的状态

systemctl start php5.6-fpm		# 启动 php-fpm

systemctl stop php5.6-fpm		# 停止 php-fpm

systemctl restart php5.6-fpm	# 重启 php-fpm

systemctl enable php5.6-fpm 	# 设置开机自启动

systemctl disable php5.6-fpm	# 禁止开启自启动

sudo apt-get purge php5.6		# 根据安装是PHP版本来卸载

sudo apt-get purge php5.6-common	# 删除PHP相关的配置文件

dpkg -l | grep php5.6		# 查看已安装的PHP扩展列表

apt-get purge php5.6-mysql	# 卸载 mysql 扩展

PS: 系统将提示你确认卸载操作,输入y来继续


配置PHP在编译前,需要对PHP进行配置,以供其生成对应的makefile文件
./configure --prefix=/usr/local/php --with-config-file-path=/usr/local/php/etc --enable-fpm --with-fpm-user=www --with-fpm-group=www --with-mysqli --with-pdo-mysql --with-iconv-dir --with-freetype-dir --with-jpeg-dir --with-png-dir --with-zlib --with-libxml-dir=/usr --enable-xml --disable-rpath --enable-bcmath --enable-shmop --enable-sysvsem --enable-inline-optimization --with-curl --enable-mbregex --enable-mbstring --enable-ftp --with-gd --with-openssl --with-mhash --enable-pcntl --enable-sockets --with-xmlrpc --enable-zip --enable-soap --without-pear --with-gettext --disable-fileinfo --enable-maintainer-zts

-----------------------------PHP5.6 end----------------
--enable-mysqld \
--with-libfreetype6-dir \
--with-openssl \

# 在安装目录进行编译
./configure --prefix=/mytools/php7.3.5 \
--with-mysqli=mysqlnd \
--with-pdo-mysql=mysqlnd \
--with-iconv-dir=/mytools/libiconv \
--with-webp-dir \
--with-jpeg-dir \
--with-xpm-dir \
--with-png-dir \
--with-zlib \
--with-libxml-dir=/usr \
--enable-xml \
--disable-rpath \
--enable-bcmath \
--enable-shmop \
--enable-sysvsem \
--enable-inline-optimization \
--with-curl \
--enable-mbregex \
--enable-fpm \
--enable-mbstring \
--with-gd \
--with-mhash \
--enable-pcntl \
--enable-sockets \
--with-xmlrpc \
--enable-soap \
--enable-short-tags \
--enable-static \
--with-xsl \
--with-fpm-user=nginx \
--with-fpm-group=nginx \
--enable-ftp \
--without-pear \
--with-gettext \
--disable-fileinfo \
--enable-maintainer-zts \
--enable-opcache=no


# 看到如下信息表示 php 编译成功

creating libtool
appending configuration tag "CXX" to libtool

Generating files
configure: creating ./config.status
creating main/internal_functions.c
creating main/internal_functions_cli.c
+--------------------------------------------------------------------+
| License:                                                           |
| This software is subject to the PHP License, available in this     |
| distribution in the file LICENSE.  By continuing this installation |
| process, you are bound by the terms of this license agreement.     |
| If you do not agree with the terms of this license, you must abort |
| the installation process at this point.                            |
+--------------------------------------------------------------------+

Thank you for using PHP.

config.status: creating php7.spec
config.status: creating main/build-defs.h
config.status: creating scripts/phpize
config.status: creating scripts/man1/phpize.1
config.status: creating scripts/php-config
config.status: creating scripts/man1/php-config.1
config.status: creating sapi/cli/php.1
config.status: creating sapi/fpm/php-fpm.conf
config.status: creating sapi/fpm/www.conf
config.status: creating sapi/fpm/init.d.php-fpm
config.status: creating sapi/fpm/php-fpm.service
config.status: creating sapi/fpm/php-fpm.8
config.status: creating sapi/fpm/status.html
config.status: creating sapi/phpdbg/phpdbg.1
config.status: creating sapi/cgi/php-cgi.1
config.status: creating ext/phar/phar.1
config.status: creating ext/phar/phar.phar.1
config.status: creating main/php_config.h
config.status: executing default commands
root@lnmp:/mytools/php-7.3.5#


make && make install


make: *** [Makefile:734: ext/openssl/openssl.lo] Error 1
make: *** [Makefile:698: ext/openssl/openssl.lo] Error 1

root@lnmp:/mytools# cd openssl-3.0.1
root@lnmp:/mytools/openssl-3.0.1# ls
ACKNOWLEDGEMENTS.md  config            crypto    FAQ.md       ms                NOTES-UNIX.md      README-ENGINES.md    test
apps                 config.com        demos     fuzz         NEWS.md           NOTES-VALGRIND.md  README-FIPS.md       tools
appveyor.yml         configdata.pm.in  doc       HACKING.md   NOTES-ANDROID.md  NOTES-VMS.md       README.md            util
AUTHORS.md           Configurations    engines   include      NOTES-DJGPP.md    NOTES-WINDOWS.md   README-PROVIDERS.md  VERSION.dat
build.info           Configure         e_os.h    INSTALL.md   NOTES-NONSTOP.md  os-dep             ssl                  VMS
CHANGES.md           CONTRIBUTING.md   external  LICENSE.txt  NOTES-PERL.md     providers          SUPPORT.md           wycheproof
root@lnmp:/mytools/openssl-3.0.1# ./Configure
Configuring OpenSSL version 3.0.1 for target linux-x86_64
Using os-specific seed configuration
Creating configdata.pm
Running configdata.pm
Creating Makefile.in
Creating Makefile

**********************************************************************
***                                                                ***
***   OpenSSL has been successfully configured                     ***
***                                                                ***
***   If you encounter a problem while building, please open an    ***
***   issue on GitHub <https://github.com/openssl/openssl/issues>  ***
***   and include the output from the following command:           ***
***                                                                ***
***       perl configdata.pm --dump                                ***
***                                                                ***
***   (If you are new to OpenSSL, you might want to consult the    ***
***   'Troubleshooting' section in the INSTALL.md file first)      ***
***                                                                ***
**********************************************************************
root@lnmp:/mytools/openssl-3.0.1# make && make install

root@lnmp:/mytools/openssl-3.0.1# ls
ACKNOWLEDGEMENTS.md  config.com        demos     HACKING.md    libcrypto.so.3  Makefile          NOTES-PERL.md      pod2htmd.tmp         SUPPORT.md
apps                 configdata.pm     doc       include       libssl.a        Makefile.in       NOTES-UNIX.md      providers            test
appveyor.yml         configdata.pm.in  engines   INSTALL.md    libssl.ld       ms                NOTES-VALGRIND.md  README-ENGINES.md    tools
AUTHORS.md           Configurations    e_os.h    libcrypto.a   libssl.pc       NEWS.md           NOTES-VMS.md       README-FIPS.md       util
build.info           Configure         external  libcrypto.ld  libssl.so       NOTES-ANDROID.md  NOTES-WINDOWS.md   README.md            VERSION.dat
CHANGES.md           CONTRIBUTING.md   FAQ.md    libcrypto.pc  libssl.so.3     NOTES-DJGPP.md    openssl.pc         README-PROVIDERS.md  VMS
config               crypto            fuzz      libcrypto.so  LICENSE.txt     NOTES-NONSTOP.md  os-dep             ssl                  wycheproof
root@lnmp:/mytools/openssl-3.0.1#

Build complete.
Don't forget to run 'make test'.

Installing PHP CLI binary:        /mytools/php7.3.5/bin/
Installing PHP CLI man page:      /mytools/php7.3.5/php/man/man1/
Installing PHP FPM binary:        /mytools/php7.3.5/sbin/
Installing PHP FPM defconfig:     /mytools/php7.3.5/etc/
Installing PHP FPM man page:      /mytools/php7.3.5/php/man/man8/
Installing PHP FPM status page:   /mytools/php7.3.5/php/php/fpm/
Installing phpdbg binary:         /mytools/php7.3.5/bin/
Installing phpdbg man page:       /mytools/php7.3.5/php/man/man1/
Installing PHP CGI binary:        /mytools/php7.3.5/bin/
Installing PHP CGI man page:      /mytools/php7.3.5/php/man/man1/
Installing build environment:     /mytools/php7.3.5/lib/php/build/
Installing header files:          /mytools/php7.3.5/include/php/
Installing helper programs:       /mytools/php7.3.5/bin/
  program: phpize
  program: php-config
Installing man pages:             /mytools/php7.3.5/php/man/man1/
  page: phpize.1
  page: php-config.1
/mytools/php-7.3.5/build/shtool install -c ext/phar/phar.phar /mytools/php7.3.5/bin
ln -s -f phar.phar /mytools/php7.3.5/bin/phar
Installing PDO headers:           /mytools/php7.3.5/include/php/ext/pdo/
root@lnmp:/mytools/php-7.3.5# ls


# 修改 nginx 支持 php 代码
root@lnmp:/mytools/nginx/conf# cd extra/
root@lnmp:/mytools/nginx/conf/extra# vim my_php.conf
root@lnmp:/mytools/nginx/conf/extra# cat my_php.conf

server {
        listen          80;
        server_name             blog.chaoge.com;
        location / {
                root    html/blog;
                index   index.html;
        }
        # 添加有关 php 程序的解析
        location ~ .*\.(php|php5)?$ {
                root    html/blog;
                fastcgi_pass    127.0.0.1:9000;
                fastcgi_index   index.php;
                include                 fastcgi.conf;
        }
}
root@lnmp:/mytools/nginx/conf/extra# pwd
/mytools/nginx/conf/extra
修改nginx 支持 php 代码
vim /mytools/nginx/conf/extra/my_php.conf
# 修改 nginx 支持 php 代码
root@lnmp:/mytools/nginx/conf# cd extra/
root@lnmp:/mytools/nginx/conf/extra# vim my_php.conf
root@lnmp:/mytools/nginx/conf/extra# cat my_php.conf

server {
        listen          80;
        server_name     blog.chaoge.com;
        location / {
                root    html/blog;
                index   index.html;
        }
        # 添加有关 php 程序的解析
        location ~ .*\.(php|php5)?$ {
                root    html/blog;
                fastcgi_pass    127.0.0.1:9000;
                fastcgi_index   index.php;
                include         fastcgi.conf;
        }
}
编译安装PHP
root@lnmp:/mytools/php-7.3.5# ./configure --prefix=/mytools/php7.3.5 \
--with-mysqli=mysqlnd \
--with-pdo-mysql=mysqlnd \
--with-iconv-dir=/mytools/libiconv \
--with-webp-dir \
--with-jpeg-dir \
--with-xpm-dir \
--with-png-dir \
--with-zlib \
--with-libxml-dir=/usr \
--enable-xml \
--disable-rpath \
--enable-bcmath \
--enable-shmop \
--enable-sysvsem \
--enable-inline-optimization \
--with-curl \
--enable-mbregex \
--enable-fpm \
--enable-mbstring \
--with-gd \
--with-mhash \
--enable-pcntl \
--enable-sockets \
--with-xmlrpc \
--enable-soap \
--enable-short-tags \
--enable-static \
--with-xsl \
--with-fpm-user=nginx \
--with-fpm-group=nginx \
--enable-ftp \
--without-pear \
--with-gettext \
--disable-fileinfo \
--enable-maintainer-zts \
--enable-opcache=no

# 看到如下信息表示 php 编译成功

creating libtool
appending configuration tag "CXX" to libtool

Generating files
configure: creating ./config.status
creating main/internal_functions.c
creating main/internal_functions_cli.c
+--------------------------------------------------------------------+
| License:                                                           |
| This software is subject to the PHP License, available in this     |
| distribution in the file LICENSE.  By continuing this installation |
| process, you are bound by the terms of this license agreement.     |
| If you do not agree with the terms of this license, you must abort |
| the installation process at this point.                            |
+--------------------------------------------------------------------+

Thank you for using PHP.

config.status: creating php7.spec
config.status: creating main/build-defs.h
config.status: creating scripts/phpize
config.status: creating scripts/man1/phpize.1
config.status: creating scripts/php-config
config.status: creating scripts/man1/php-config.1
config.status: creating sapi/cli/php.1
config.status: creating sapi/fpm/php-fpm.conf
config.status: creating sapi/fpm/www.conf
config.status: creating sapi/fpm/init.d.php-fpm
config.status: creating sapi/fpm/php-fpm.service
config.status: creating sapi/fpm/php-fpm.8
config.status: creating sapi/fpm/status.html
config.status: creating sapi/phpdbg/phpdbg.1
config.status: creating sapi/cgi/php-cgi.1
config.status: creating ext/phar/phar.1
config.status: creating ext/phar/phar.phar.1
config.status: creating main/php_config.h
config.status: executing default commands
root@lnmp:/mytools/php-7.3.5#


make && make install
centos7设置php开机自启
1.  添加服务
vim /usr/lib/systemd/system/php-fpm.service

# 内容如下:
[Unit]
Description=The PHP FastCGI Process Manager
After=syslog.target network.target

[Service]
Type=simple
PIDFile=/usr/local/php/var/run/php-fpm.pid
ExecStart=/usr/local/php/sbin/php-fpm --nodaemonize --fpm-config /usr/local/php/etc/php-fpm.conf
ExecReload=/bin/kill -USR2 $MAINPID
ExecStop=/bin/kill -SIGINT $MAINPID

[Install]
WantedBy=multi-user.target


2. 启动php服务
systemctl start php-fpm.service


3. 添加到开机启动
systemctl enable php-fpm.service

检查
systemctl is-enabled  php-fpm.service


4. systemctl 指令
systemctl enable *.service #开机运行服务
systemctl disable *.service #取消开机运行
systemctl start *.service #启动服务
systemctl stop *.service #停止服务
systemctl restart *.service #重启服务
systemctl reload *.service #重新加载服务配置文件
systemctl status *.service #查询服务运行状态
systemctl --failed #显示启动失败的服务


修改 php.ini 文件 设置 expose_php = Off
vim /usr/local/php7/etc/php.ini
找到 expose_php = On
改为 expose_php = Off


------------------作者 江小柴-------------------
在linux下php的启动依靠php-fpm,每次开关机都要手动去启动,太麻烦了,这次我直接把它加入服务启动。

首先进入服务目录

# cd /etc/init.d

然后再在系统服务目录新建启动文件

# vim /lib/systemd/system/php-fpm.service

写入以下内容(路径改成自己的)

[Unit]

Description=php-fpm

After=network.target

[Service]

Type=forking

ExecStart=/usr/local/php/sbin/php-fpm

PrivateTmp=true

[Install]

WantedBy=multi-user.target


参数解释:

Description:描述服务

After:描述服务类别

[Service]服务运行参数的设置

Type=forking是后台运行的形式

ExecStart为服务的具体运行命令

ExecReload为重启命令

ExecStop为停止命令

PrivateTmp=True表示给服务分配独立的临时空间

注意:[Service]的启动、重启、停止命令全部要求使用绝对路径

[Install]运行级别下服务安装的相关设置,可设置为多用户,即系统运行级别为3

设置开机启动

# systemctl enable php-fpm.service

使用下面命令可以直接启动停止php-fpm了

# systemctl start php-fpm.service  启动php-fpm服务

# systemctl stop php-fpm.service  停止服务

# systemctl restart php-fpm.service  重新启动服务

# systemctl list-units --type=service 查看所有已启动的服务

# systemctl status php-fpm.service 查看服务当前状态

# systemctl enable php-fpm.service 设置开机自启动

# systemctl disable php-fpm.service 停止开机自启动

# systemctl reload php-fpm.service  重新加载服务配置文件

重启下服务器

# shutdown -r now


-----------------------------------------
/mytools/php7.3.5/sbin
vim /usr/lib/systemd/system/php-fpm.service

[Unit]
Description=The PHP FastCGI Process Manager
After=syslog.target network.target

[Service]
Type=simple
PIDFile=/mytools/php7.3.5/var/run/php-fpm.pid
ExecStart=/mytools/php7.3.5/sbin/php-fpm --nodaemonize --fpm-config /mytools/php7.3.5/etc/php-fpm.conf
ExecReload=/bin/kill -USR2 $MAINPID
ExecStop=/bin/kill -SIGINT $MAINPID

[Install]
WantedBy=multi-user.target


---------
root@lnmp:/mytools/php7.3.5/etc# vim /usr/lib/systemd/system/php-fpm.service
root@lnmp:/mytools/php7.3.5/etc# vim /etc/systemd/system/php-fpm.service
root@lnmp:/mytools/php7.3.5/etc# cat /etc/systemd/system/php-fpm.service

[Unit]
Description=The PHP FastCGI Process Manager
After=syslog.target network.target

[Service]
Type=simple
PIDFile=/mytools/php7.3.5/var/run/php-fpm.pid
ExecStart=/mytools/php7.3.5/sbin/php-fpm --nodaemonize --fpm-config /mytools/php7.3.5/etc/php-fpm.conf
ExecReload=/bin/kill -USR2 $MAINPID
ExecStop=/bin/kill -SIGINT $MAINPID

[Install]
WantedBy=multi-user.target


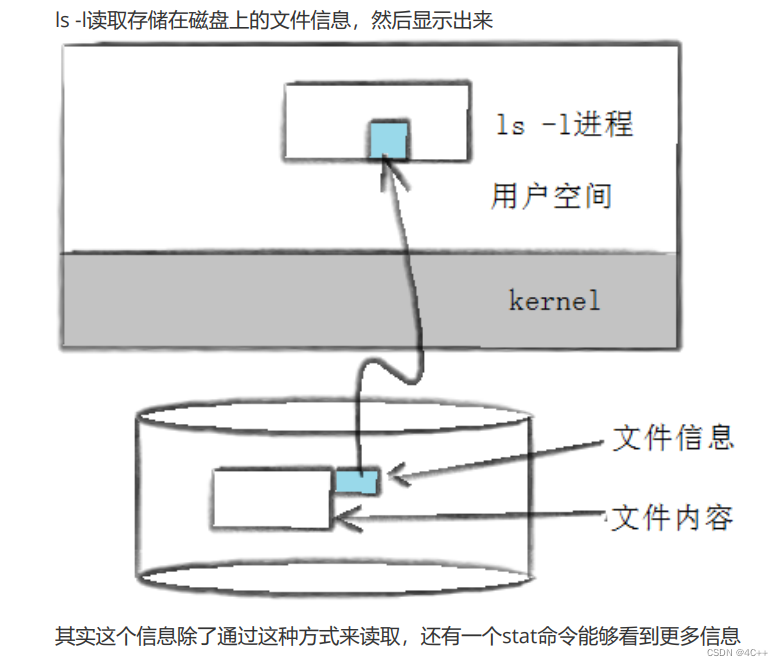


![[数据结构] 基于交换的排序 冒泡排序&&快速排序](https://i-blog.csdnimg.cn/direct/28ca1fe401ac4c2693aefd9439cd9727.png)