【华为】MPLS VPN 实验配置


实验需求
一、如图所示,环境中存在一共四个站点,分为A公司与B公司,其中A与B各有两个办公点,需要通过MPLS VPN进行站点间通讯。
解决思路
先做运营商内部
① 运营商的内部IP地址都配上
② 运营商内部都启用OSPF来实现内部全网互通
③ 运营商内部开启MPLS 功能,解决BGP的路由黑洞问题
④ PE1 和 PE4 之间开启MP-BGP,来传递A、B站点的路由信息,实现MPLS VPN 访问站点内部
二、A公司采用OSPF协议与PE设备进行路由条目交互,
B公司采用BGP协议与PE设备进行路由条目交互,其中B公司的两个办公点都采用AS 200。
解决思路
① 先把A、B公司基础IP地址配上
② A公司与PE之间,启用OPSF来传递内部路由信息
③ B公司与PE之间,启用BGP 来传递内部路由信息
④ PE上需要创建两个VPN实例 A、B,并且里面需要设定RD、RT值,来区分不同公司的路由,保证互不影响
⑤ 为了让A1、A2两个站点能学习到对方路由,需要在PE中,双向路由引入,BGP引入OSPF、OPSF引入BGP
⑥ 因为存在EBGP的as-path,防环措施,导致B1和B2两家公司不能相互学习到对方路由,这个时候需要在B1、B2中对EBGP邻居允许AS重复一次机制(双方公司站点均属于同一区域并且传递路由时触发EBGP环路避免机制,为打破该机制)
三、两个公司在满足VPN业务的基础上保证互联网数据通讯。
拓扑
第一题
如图所示,环境中存在一共四个站点,分为A公司与B公司,其中A与B各有两个办公点,需要通过MPLS VPN进行站点间通讯。
思路
先做运营商内部
① 运营商的内部IP地址都配上
② 运营商内部都启用OSPF来实现内部全网互通
③ 运营商内部开启MPLS 功能,解决BGP的路由黑洞问题
④ PE1 和 PE4 之间开启MP-BGP,来传递A、B站点的路由信息,实现MPLS VPN 访问站点内部
PE1
<Huawei>sys
Enter system view, return user view with Ctrl+Z.
[Huawei]sysname PE1

[PE1]undo info-center enable
Info: Information center is disabled.

[PE1]int LoopBack 0
[PE1-LoopBack0]ip address 1.1.1.1 32
[PE1-LoopBack0]quit

[PE1]int g0/0/0
[PE1-GigabitEthernet0/0/0]ip address 202.101.12.1 24
[PE1-GigabitEthernet0/0/0]quit

## 用IS-IS实现运营商内部全网互通
[PE1]isis 1
[PE1-isis-1]network-entity 10.0000.0000.0001.00
[PE1-isis-1]quit

[PE1]int g0/0/0
[PE1-GigabitEthernet0/0/0]isis enable 1
[PE1-GigabitEthernet0/0/0]quit

[PE1]int LoopBack 0
[PE1-LoopBack0]isis enable 1
[PE1-LoopBack0]quit

## 进入接口,启用MPLS功能
[PE1]mpls lsr-id 1.1.1.1                                   ## 记住,这个lsr-id,一定要有这个IP地址,而且掩码要为32位!
[PE1]mpls
Info: Mpls starting, please wait... OK!
[PE1-mpls]quit
[PE1]mpls ldp
[PE1-mpls-ldp]quit

[PE1]int g0/0/0
[PE1-GigabitEthernet0/0/0]mpls
[PE1-GigabitEthernet0/0/0]mpls ldp
[PE1-GigabitEthernet0/0/0]quit

## 与PE4建立MP-BGP的邻居关系,可以传输VPNv4的路由(VPN实例流量)
[PE1]bgp 100
[PE1-bgp]peer 4.4.4.4 as-number 100
[PE1-bgp]peer 4.4.4.4 connect-interface lo0

## 先建立BGP IPv4的邻居
[PE1-bgp]ipv4-family unicast
[PE1-bgp-af-ipv4]peer 4.4.4.4 enable
[PE1-bgp-af-ipv4]quit

## 再建立BGP VPNv4的邻居
[PE1-bgp]ipv4-family vpnv4
[PE1-bgp-af-vpnv4]peer 4.4.4.4 enable
[PE1-bgp-af-vpnv4]quit
[PE1-bgp]quit

============================================================================================
## 查看BGP VPNv4邻居
<PE1>dis bgp vpnv4 all peer

 BGP local router ID : 1.1.1.1
 Local AS number : 100
 Total number of peers : 1		  Peers in established state : 1

  Peer            V          AS  MsgRcvd  MsgSent  OutQ  Up/Down       State Pre
fRcv

  4.4.4.4         4         100       18       20     0 00:16:29 Established
   0
============================================================================================
# 查看MPLS LDP 邻居
<PE1>dis mpls ldp peer

 LDP Peer Information in Public network
 A '*' before a peer means the peer is being deleted.
 ------------------------------------------------------------------------------
 PeerID                 TransportAddress   DiscoverySource
 ------------------------------------------------------------------------------
 2.2.2.2:0              2.2.2.2            GigabitEthernet0/0/0
 ------------------------------------------------------------------------------
 TOTAL: 1 Peer(s) Found.

============================================================================================
# 查看MPLS 转发表
<PE1>dis mpls lsp
-------------------------------------------------------------------------------
                 LSP Information: LDP LSP
-------------------------------------------------------------------------------
FEC                In/Out Label  In/Out IF                      Vrf Name
1.1.1.1/32         3/NULL        -/-
2.2.2.2/32         NULL/3        -/GE0/0/0
2.2.2.2/32         1024/3        -/GE0/0/0
3.3.3.3/32         NULL/1025     -/GE0/0/0
3.3.3.3/32         1025/1025     -/GE0/0/0
4.4.4.4/32         NULL/1026     -/GE0/0/0
4.4.4.4/32         1026/1026     -/GE0/0/0
8.8.8.8/32         NULL/1027     -/GE0/0/0
8.8.8.8/32         1027/1027     -/GE0/0/0
<PE1>
P2
<Huawei>sys
Enter system view, return user view with Ctrl+Z.
[Huawei]sysname P2
[P2]undo info-center enable
Info: Information center is disabled.

[P2]int g0/0/0
[P2-GigabitEthernet0/0/0]ip address 202.101.12.2 24
[P2-GigabitEthernet0/0/0]quit

[P2]int g0/0/1
[P2-GigabitEthernet0/0/1]ip address 202.101.23.2 24
[P2-GigabitEthernet0/0/1]quit

[P2]int LoopBack 0
[P2-LoopBack0]ip address 2.2.2.2 32
[P2-LoopBack0]quit

[P2]isis 1
[P2-isis-1]network-entity 10.0000.0000.0002.00
[P2-isis-1]quit

[P2]int g0/0/0
[P2-GigabitEthernet0/0/0]isis enable 1
[P2-GigabitEthernet0/0/0]qu
[P2]int g0/0/1
[P2-GigabitEthernet0/0/1]isis enable 1
[P2-GigabitEthernet0/0/1]quit
[P2]int lo0
[P2-LoopBack0]isis enable 1
[P2-LoopBack0]quit

[P2]mpls lsr-id 2.2.2.2
[P2]mpls
Info: Mpls starting, please wait... OK!
[P2-mpls]quit
[P2]mpls ldp
[P2-mpls-ldp]quit

[P2]int g0/0/0
[P2-GigabitEthernet0/0/0]mpls
[P2-GigabitEthernet0/0/0]mpls ldp
[P2-GigabitEthernet0/0/0]quit

[P2]int g0/0/1
[P2-GigabitEthernet0/0/0]mpls
[P2-GigabitEthernet0/0/0]mpls ldp
[P2-GigabitEthernet0/0/0]quit

============================================================================================
## 查看MPLS  转发表
<P2>dis mpls lsp
-------------------------------------------------------------------------------
                 LSP Information: LDP LSP
-------------------------------------------------------------------------------
FEC                In/Out Label  In/Out IF                      Vrf Name
1.1.1.1/32         NULL/3        -/GE0/0/0
1.1.1.1/32         1024/3        -/GE0/0/0
2.2.2.2/32         3/NULL        -/-
3.3.3.3/32         NULL/3        -/GE0/0/1
3.3.3.3/32         1025/3        -/GE0/0/1
4.4.4.4/32         NULL/1024     -/GE0/0/1
4.4.4.4/32         1026/1024     -/GE0/0/1
8.8.8.8/32         NULL/3        -/GE0/0/1
8.8.8.8/32         1027/3        -/GE0/0/1
<P2>
============================================================================================
## 查看MPLS LDP邻居表
<P2>dis mpls ldp peer

 LDP Peer Information in Public network
 A '*' before a peer means the peer is being deleted.
 ------------------------------------------------------------------------------
 PeerID                 TransportAddress   DiscoverySource
 ------------------------------------------------------------------------------
 1.1.1.1:0              1.1.1.1            GigabitEthernet0/0/0
 3.3.3.3:0              3.3.3.3            GigabitEthernet0/0/1
 ------------------------------------------------------------------------------
 TOTAL: 2 Peer(s) Found.
P3
<Huawei>sys
Enter system view, return user view with Ctrl+Z.
[Huawei]sysname P3
[P3]undo info-center enable
Info: Information center is disabled.

[P3]int g0/0/0
[P3-GigabitEthernet0/0/0]ip address 202.101.23.3 24
[P3-GigabitEthernet0/0/0]quit

[P3]int g0/0/1
[P3-GigabitEthernet0/0/1]ip address 202.101.34.3 24
[P3-GigabitEthernet0/0/1]quit


[P3]int LoopBack 0
[P3-LoopBack0]ip address 8.8.8.8 32
[P3-LoopBack0]quit

[P3]int LoopBack 1
[P3-LoopBack1]ip address 3.3.3.3 32
[P3-LoopBack1]quit


[P3]isis 1
[P3-isis-1]network-entity 10.0000.0000.0003.00
[P3-isis-1]quit

[P3]int g0/0/0
[P3-GigabitEthernet0/0/0]isis enable 1
[P3-GigabitEthernet0/0/0]quit
[P3]int g0/0/1
[P3-GigabitEthernet0/0/1]isis enable 1
[P3-GigabitEthernet0/0/1]quit
[P3]int lo0
[P3-LoopBack0]isis enable 1
[P3-LoopBack0]quit
[P3]int lo1
[P3-LoopBack1]isis enable 1
[P3-LoopBack1]quit

[P3]mpls lsr-id 3.3.3.3
[P3]mpls
Info: Mpls starting, please wait... OK!
[P3-mpls]quit
[P3]mpls ldp
[P3-mpls-ldp]quit

[P3]int g0/0/0
[P3-GigabitEthernet0/0/0]mpls
[P3-GigabitEthernet0/0/0]mpls ldp
[P3-GigabitEthernet0/0/0]quit

[P3]int g0/0/1
[P3-GigabitEthernet0/0/1]mpls
[P3-GigabitEthernet0/0/1]mpls ldp
[P3-GigabitEthernet0/0/1]quit
[P3]


============================================================================================
## 查看MPLS 转发表
<P3>dis mpls lsp
-------------------------------------------------------------------------------
                 LSP Information: LDP LSP
-------------------------------------------------------------------------------
FEC                In/Out Label  In/Out IF                      Vrf Name
4.4.4.4/32         NULL/3        -/GE0/0/1
4.4.4.4/32         1024/3        -/GE0/0/1
3.3.3.3/32         3/NULL        -/-
8.8.8.8/32         3/NULL        -/-
1.1.1.1/32         NULL/1024     -/GE0/0/0
1.1.1.1/32         1026/1024     -/GE0/0/0
2.2.2.2/32         NULL/3        -/GE0/0/0
2.2.2.2/32         1027/3        -/GE0/0/0
<P3>
============================================================================================
## 查看MPLS 邻居
<P3>dis mpls ldp peer

 LDP Peer Information in Public network
 A '*' before a peer means the peer is being deleted.
 ------------------------------------------------------------------------------
 PeerID                 TransportAddress   DiscoverySource
 ------------------------------------------------------------------------------
 2.2.2.2:0              2.2.2.2            GigabitEthernet0/0/0
 4.4.4.4:0              4.4.4.4            GigabitEthernet0/0/1
 ------------------------------------------------------------------------------
 TOTAL: 2 Peer(s) Found.

<P3>
PE4
<Huawei>sys
Enter system view, return user view with Ctrl+Z.
[Huawei]sysn PE4
[PE4]undo info-center enable
Info: Information center is disabled.

[PE4]int g0/0/0
[PE4-GigabitEthernet0/0/0]ip address 202.101.34.4 24
[PE4-GigabitEthernet0/0/0]quit
[PE4]int lo0
[PE4-LoopBack0]ip address 4.4.4.4 32
[PE4-LoopBack0]quit

## 创建ISIS进程1
[PE4]isis 1
[PE4-isis-1]network-entity 10.0000.0000.0004.00
[PE4-isis-1]quit

## 接口下宣告
[PE4]int g0/0/0
[PE4-GigabitEthernet0/0/0]isis enable 1
[PE4-GigabitEthernet0/0/0]quit
[PE4]int lo0
[PE4-LoopBack0]isis enable 1
[PE4-LoopBack0]quit


[PE4]mpls lsr-id 4.4.4.4
[PE4]mpls
Info: Mpls starting, please wait... OK!
[PE4-mpls]quit
[PE4]mpls ldp
[PE4-mpls-ldp]quit

[PE4]int g0/0/0
[PE4-GigabitEthernet0/0/0]mpls
[PE4-GigabitEthernet0/0/0]mpls ldp
[PE4-GigabitEthernet0/0/0]quit


## 与PE1建立MP-BGP的邻居关系,可以传输VPNv4的路由(VRF)
[PE4]bgp 100
[PE4-bgp]peer 1.1.1.1 as-number 100
[PE4-bgp]peer 1.1.1.1 connect-interface lo0

## 先建立BGP IPv4的邻居
[PE4-bgp]ipv4-family unicast
[PE4-bgp-af-ipv4]peer 1.1.1.1 enable
[PE4-bgp-af-ipv4]quit

## 再建立BGP VPNv4的邻居
[PE4-bgp]ipv4-family vpnv4
[PE4-bgp-af-vpnv4]peer 1.1.1.1 enable
[PE4-bgp-af-vpnv4]quit
[PE4-bgp]quit

============================================================================================
## 查看BGP邻居建立情况
<PE4>dis bgp vpnv4 all peer

 BGP local router ID : 202.101.34.4
 Local AS number : 100
 Total number of peers : 1		  Peers in established state : 1

  Peer            V          AS  MsgRcvd  MsgSent  OutQ  Up/Down       State Pre
fRcv

  1.1.1.1         4         100       32       32     0 00:30:56 Established    0

============================================================================================
## 查看路由表
<PE4>dis ip routing-table
Route Flags: R - relay, D - download to fib
------------------------------------------------------------------------------
Routing Tables: Public
         Destinations : 14       Routes : 14

Destination/Mask    Proto   Pre  Cost      Flags NextHop         Interface

        1.1.1.1/32  ISIS-L1 15   30          D   202.101.34.3    GigabitEthernet 0/0/0
        2.2.2.2/32  ISIS-L1 15   20          D   202.101.34.3    GigabitEthernet 0/0/0
        3.3.3.3/32  ISIS-L1 15   10          D   202.101.34.3    GigabitEthernet 0/0/0
        4.4.4.4/32  Direct  0    0           D   127.0.0.1       LoopBack0
        8.8.8.8/32  ISIS-L1 15   10          D   202.101.34.3    GigabitEthernet 0/0/0
      127.0.0.0/8   Direct  0    0           D   127.0.0.1       InLoopBack0
      127.0.0.1/32  Direct  0    0           D   127.0.0.1       InLoopBack0
127.255.255.255/32  Direct  0    0           D   127.0.0.1       InLoopBack0
   202.101.12.0/24  ISIS-L1 15   30          D   202.101.34.3    GigabitEthernet 0/0/0
   202.101.23.0/24  ISIS-L1 15   20          D   202.101.34.3    GigabitEthernet 0/0/0
   202.101.34.0/24  Direct  0    0           D   202.101.34.4    GigabitEthernet 0/0/0
   202.101.34.4/32  Direct  0    0           D   127.0.0.1       GigabitEthernet 0/0/0
 202.101.34.255/32  Direct  0    0           D   127.0.0.1       GigabitEthernet 0/0/0
255.255.255.255/32  Direct  0    0           D   127.0.0.1       InLoopBack0

<PE4>

============================================================================================
## 查看MPLS 邻居
<PE4>dis mpls ldp peer

 LDP Peer Information in Public network
 A '*' before a peer means the peer is being deleted.
 ------------------------------------------------------------------------------
 PeerID                 TransportAddress   DiscoverySource
 ------------------------------------------------------------------------------
 3.3.3.3:0              3.3.3.3            GigabitEthernet0/0/0
 ------------------------------------------------------------------------------
 TOTAL: 1 Peer(s) Found.

<PE4>

============================================================================================
# 查看MPLS 转发表
<PE4>dis mpls lsp
-------------------------------------------------------------------------------
                 LSP Information: LDP LSP
-------------------------------------------------------------------------------
FEC                In/Out Label  In/Out IF                      Vrf Name
4.4.4.4/32         3/NULL        -/-
3.3.3.3/32         NULL/3        -/GE0/0/0
3.3.3.3/32         1024/3        -/GE0/0/0
8.8.8.8/32         NULL/3        -/GE0/0/0
8.8.8.8/32         1026/3        -/GE0/0/0
1.1.1.1/32         NULL/1026     -/GE0/0/0
1.1.1.1/32         1027/1026     -/GE0/0/0
2.2.2.2/32         NULL/1027     -/GE0/0/0
2.2.2.2/32         1028/1027     -/GE0/0/0
<PE4>
第二题
A公司采用OSPF协议与PE设备进行路由条目交互,
B公司采用BGP协议与PE设备进行路由条目交互,其中B公司的两个办公点都采用AS 200。
解决思路
① 先把A、B公司基础IP地址配上
② A公司与PE之间,启用OPSF来传递内部路由信息
③ B公司与PE之间,启用BGP 来传递内部路由信息
④ PE上需要创建两个VPN实例 A、B,分别划分给A、B公司,并且里面需要设定RD、RT值,来区分不同公司的路由,保证互不影响
⑤ 为了让A1、A2两个站点能学习到对方路由,需要在PE中,双向路由引入,BGP引入OSPF、OPSF引入BGP
⑥ 因为存在EBGP的as-path,防环措施,导致B1和B2两家公司不能相互学习到对方路由,这个时候需要在B1、B2中对EBGP邻居允许AS重复一次机制(双方公司站点均属于同一区域并且传递路由时触发EBGP环路避免机制,为打破该机制)
PE1
## 创建两个VPN实例
## 在VPN实例中添加RD、RT
## RD - 区分不同客户的私有路由条目  -- 标记
## RT - 控制路由条目的收发         -- 过滤

[PE1]ip vpn-instance A
[PE1-vpn-instance-A]ipv4-family
[PE1-vpn-instance-A-af-ipv4]quit

[PE1-vpn-instance-A]route-distinguisher 1:1                ## VPN实例A 的RD值 为1:1

## VPN实例A 进来的路由条目中只接受的RT值为100:1
[PE1-vpn-instance-A]vpn-target 100:1 import-extcommunity
 IVT Assignment result:
Info: VPN-Target assignment is successful.                ## 设置RT值成功

## VPN实例A 出去的路由条目中打上RT值为100:1
[PE1-vpn-instance-A]vpn-target 100:1 export-extcommunity
 EVT Assignment result:
Info: VPN-Target assignment is successful.                ## 设置RT值成功
[PE1-vpn-instance-A]quit


[PE1]ip vpn-instance B
[PE1-vpn-instance-B]ipv4-family
[PE1-vpn-instance-B-af-ipv4]quit
[PE1-vpn-instance-B]route-distinguisher 2:1

## VPN实例B 进来的路由条目只接受的RT值为200:1
[PE1-vpn-instance-B]vpn-target 200:1 import-extcommunity
 IVT Assignment result:
Info: VPN-Target assignment is successful.

## VPN实例B 出去的路由条目中打上RT值为200:1
[PE1-vpn-instance-B]vpn-target 200:1 export-extcommunity
 EVT Assignment result:
Info: VPN-Target assignment is successful.
[PE1-vpn-instance-B]quit


## 将端口划分进VPN实例
[PE1]int g0/0/1
[PE1-GigabitEthernet0/0/1]ip binding vpn-instance A
## 提示绑定上VPN实例,接口地址都会被移除,需要重新配置
Info: All IPv4 related configurations on this interface are removed!
Info: All IPv6 related configurations on this interface are removed!
[PE1-GigabitEthernet0/0/1]ip address 11.11.11.1 30
[PE1-GigabitEthernet0/0/1]quit

[PE1]int g0/0/2
[PE1-GigabitEthernet0/0/2]ip binding vpn-instance B
Info: All IPv4 related configurations on this interface are removed!
Info: All IPv6 related configurations on this interface are removed!
[PE1-GigabitEthernet0/0/2]ip address 12.12.12.1 30
[PE1-GigabitEthernet0/0/2]quit

## 和CE-A1建立ospf邻居,传递路由信息
[PE1]ospf 110 vpn-instance A
[PE1-ospf-110]area 0
[PE1-ospf-110-area-0.0.0.0]network 11.11.11.0 0.0.0.3
[PE1-ospf-110-area-0.0.0.0]quit
[PE1-ospf-110]quit


## 和CE-B1 建立EBGP邻居,传递路由信息
[PE1]bgp 100
[PE1-bgp]ipv4-family vpn-instance B
[PE1-bgp-B]peer 12.12.12.2 as-number 200
[PE1-bgp-B]quit
[PE1-bgp]quit


## 双向重分发
[PE1]ospf 110 vpn-instance A
[PE1-ospf-110]import-route bgp
[PE1-ospf-110]quit

[PE1]bgp 100
[PE1-bgp]ipv4-family vpn-instance A
[PE1-bgp-A]import-route ospf 110
[PE1-bgp-A]quit
[PE1-bgp]quit
CE-A1
<Huawei>sys
Enter system view, return user view with Ctrl+Z.
[Huawei]sysn CE

[CE]sysn CE-A1
[CE-A1]undo info-center enable
Info: Information center is disabled.

[CE-A1]int g0/0/0
[CE-A1-GigabitEthernet0/0/0]ip address 11.11.11.2 30
[CE-A1-GigabitEthernet0/0/0]quit

[CE-A1]int lo1
[CE-A1-LoopBack1]ip address 192.10.1.1 24
[CE-A1-LoopBack1]quit
[CE-A1]int lo2
[CE-A1-LoopBack2]ip address 192.10.2.1 24
[CE-A1-LoopBack2]quit
[CE-A1]int lo3
[CE-A1-LoopBack3]ip address 192.10.3.1 24
[CE-A1-LoopBack3]quit

[CE-A1]ospf 110
[CE-A1-ospf-110]area 0
[CE-A1-ospf-110-area-0.0.0.0]network 11.11.11.0 0.0.0.3
[CE-A1-ospf-110-area-0.0.0.0]network 192.10.0.0 0.0.255.255
[CE-A1-ospf-110-area-0.0.0.0]quit
[CE-A1-ospf-110]quit
CE-B1
<Huawei>sys
Enter system view, return user view with Ctrl+Z.
[Huawei]sysn CE-B1
[CE-B1]undo info-center enable
Info: Information center is disabled.

[CE-B1]int g0/0/0
[CE-B1-GigabitEthernet0/0/0]ip address 12.12.12.2 30
[CE-B1-GigabitEthernet0/0/0]quit

[CE-B1]int lo1
[CE-B1-LoopBack1]ip address 172.10.1.1 24
[CE-B1-LoopBack1]quit
[CE-B1]int lo2
[CE-B1-LoopBack2]ip address 172.10.2.1 24
[CE-B1-LoopBack2]quit
[CE-B1]int lo3
[CE-B1-LoopBack3]ip address 172.10.3.1 24
[CE-B1-LoopBack3]quit

[CE-B1]bgp 200
[CE-B1-bgp]peer 12.12.12.1 as-number 100
[CE-B1-bgp]ipv4-family unicast
[CE-B1-bgp-af-ipv4]peer 12.12.12.1 enable
[CE-B1-bgp-af-ipv4]network 172.10.1.0 24
[CE-B1-bgp-af-ipv4]network 172.10.2.0 24
[CE-B1-bgp-af-ipv4]network 172.10.3.0 24
[CE-B1-bgp-af-ipv4]network 12.12.12.0 30
[CE-B1-bgp-af-ipv4]quit
[CE-B1-bgp]quit
PE4
## 创建VPN实例
## 在VPN实例中添加RD、RT
## RD - 区分不同客户的私有路由条目  -- 标记
## RT - 控制路由条目的收发         -- 过滤

[PE4]ip vpn-instance A
[PE4-vpn-instance-A]ipv4-family
[PE4-vpn-instance-A-af-ipv4]quit
[PE4-vpn-instance-A]route-distinguisher 1:1
[PE4-vpn-instance-A]vpn-target 100:1 import-extcommunity
[PE4-vpn-instance-A]vpn-target 100:1 export-extcommunity
[PE4-vpn-instance-A]quit


[PE4]ip vpn-instance B
[PE4-vpn-instance-B]ipv4-family
[PE4-vpn-instance-B-af-ipv4]quit
[PE4-vpn-instance-B]route-distinguisher 2:1
[PE4-vpn-instance-B]vpn-target 200:1 import-extcommunity
[PE4-vpn-instance-B]vpn-target 200:1 export-extcommunity
[PE4-vpn-instance-B]quit

## 将端口划分进VPN实例中
[PE4]int g0/0/1
[PE4-GigabitEthernet0/0/1]ip binding vpn-instance A
[PE4-GigabitEthernet0/0/1]ip address 21.21.21.1 30
[PE4-GigabitEthernet0/0/1]quit

[PE4]int g0/0/2
[PE4-GigabitEthernet0/0/2]ip binding vpn-instance B
[PE4-GigabitEthernet0/0/2]ip address 22.22.22.1 30
[PE4-GigabitEthernet0/0/2]quit

## 与CE-A2 建立OSPF邻居,并学习A2的内部路由信息
[PE4]ospf 110 vpn-instance A
[PE4-ospf-110]area 0
[PE4-ospf-110-area-0.0.0.0]network 21.21.21.0 0.0.0.3
[PE4-ospf-110-area-0.0.0.0]quit
[PE4-ospf-110]quit


## 与CE-B2 建立EBGP邻居,并学习B2的内部路由信息
[PE4]bgp 100
[PE4-bgp]ipv4-family vpn-instance B
[PE4-bgp-B]peer 22.22.22.2 as-number 300
[PE4-bgp-B]network 22.22.22.0 30
[PE4-bgp-B]quit
[PE4-bgp]quit

## 将A公司内部路由重分布进MP-BGP的VRF A中,让对方站点也学到该路由(双向重分布)
[PE4]ospf 110 vpn-instance A
[PE4-ospf-110]import-route bgp
[PE4-ospf-110]quit

[PE4]bgp 100
[PE4-bgp]ipv4-family vpn-instance A
[PE4-bgp-A]import-route ospf 110
[PE4-bgp-A]quit
[PE4-bgp]quit
CE-A2
<H3C>sys
System View: return to User View with Ctrl+Z.
[H3C]sysname CE-A2

[CE-A2]int g0/0
[CE-A2-GigabitEthernet0/0]ip address 21.21.21.2 24
[CE-A2-GigabitEthernet0/0]quit

[CE-A2]int LoopBack 1
[CE-A2-LoopBack1]ip address 192.20.1.1 24
[CE-A2-LoopBack1]quit

[CE-A2]int LoopBack 2
[CE-A2-LoopBack2]ip address 192.20.2.1 24
[CE-A2-LoopBack2]quit

[CE-A2]int LoopBack 3
[CE-A2-LoopBack3]ip address 192.20.3.1 24
[CE-A2-LoopBack3]quit

[CE-A2]ospf 110
[CE-A2-ospf-110]area 0
[CE-A2-ospf-110-area-0.0.0.0]network 192.20.0.0 0.0.255.255
[CE-A2-ospf-110-area-0.0.0.0]network 21.21.21.0 0.0.0.255
[CE-A2-ospf-110-area-0.0.0.0]quit
[CE-A2-ospf-110]quit

============================================================================================

## 查看路由表
## 可以看到我A2站点已经学习到A1 站点的路由信息
<CE-A2>dis ip routing-table
Route Flags: R - relay, D - download to fib
------------------------------------------------------------------------------
Routing Tables: Public
         Destinations : 20       Routes : 20

Destination/Mask    Proto   Pre  Cost      Flags NextHop         Interface

     11.11.11.0/30  O_ASE   150  1           D   21.21.21.1      GigabitEthernet 0/0/0
     21.21.21.0/30  Direct  0    0           D   21.21.21.2      GigabitEthernet 0/0/0
     21.21.21.2/32  Direct  0    0           D   127.0.0.1       GigabitEthernet 0/0/0
     21.21.21.3/32  Direct  0    0           D   127.0.0.1       GigabitEthernet 0/0/0
      127.0.0.0/8   Direct  0    0           D   127.0.0.1       InLoopBack0
      127.0.0.1/32  Direct  0    0           D   127.0.0.1       InLoopBack0
127.255.255.255/32  Direct  0    0           D   127.0.0.1       InLoopBack0
     192.10.1.1/32  OSPF    10   3           D   21.21.21.1      GigabitEthernet 0/0/0
     192.10.2.1/32  OSPF    10   3           D   21.21.21.1      GigabitEthernet 0/0/0
     192.10.3.1/32  OSPF    10   3           D   21.21.21.1      GigabitEthernet 0/0/0
     192.20.1.0/24  Direct  0    0           D   192.20.1.1      LoopBack1
     192.20.1.1/32  Direct  0    0           D   127.0.0.1       LoopBack1
   192.20.1.255/32  Direct  0    0           D   127.0.0.1       LoopBack1
     192.20.2.0/24  Direct  0    0           D   192.20.2.1      LoopBack2
     192.20.2.1/32  Direct  0    0           D   127.0.0.1       LoopBack2
   192.20.2.255/32  Direct  0    0           D   127.0.0.1       LoopBack2
     192.20.3.0/24  Direct  0    0           D   192.20.3.1      LoopBack3
     192.20.3.1/32  Direct  0    0           D   127.0.0.1       LoopBack3
   192.20.3.255/32  Direct  0    0           D   127.0.0.1       LoopBack3
255.255.255.255/32  Direct  0    0           D   127.0.0.1       InLoopBack0

<CE-A2>
CE-B2
<Huawei>sys
Enter system view, return user view with Ctrl+Z.
[Huawei]sysn CE-B2

[CE-B2]undo info-center enable
Info: Information center is disabled.

[CE-B2]int g0/0/0
[CE-B2-GigabitEthernet0/0/0]ip address 22.22.22.2 30
[CE-B2-GigabitEthernet0/0/0]quit

[CE-B2]int l1
[CE-B2-LoopBack1]ip address 172.20.1.1 24
[CE-B2-LoopBack1]quit

[CE-B2]int l2
[CE-B2-LoopBack2]ip address 172.20.2.1 24
[CE-B2-LoopBack2]quit

[CE-B2]int l3
[CE-B2-LoopBack3]ip address 172.20.3.1 24
[CE-B2-LoopBack3]quit

## 与PE4建立BGP邻居,传递路由信息
[CE-B2]bgp 300
[CE-B2-bgp]peer 22.22.22.1 as-number 100
[CE-B2-bgp]ipv4-family unicast
[CE-B2-bgp-af-ipv4]network 22.22.22.0 30
[CE-B2-bgp-af-ipv4]network 172.20.1.0 24
[CE-B2-bgp-af-ipv4]network 172.20.2.0 24
[CE-B2-bgp-af-ipv4]network 172.20.3.0 24
[CE-B2-bgp-af-ipv4]quit
[CE-B2-bgp]quit

============================================================================================
## 查看路由表
## 可以看到我 B2 站点已经学习到B1 站点的内部路由信息
[CE-B2]dis ip routing-table
Route Flags: R - relay, D - download to fib
------------------------------------------------------------------------------
Routing Tables: Public
         Destinations : 20       Routes : 20

Destination/Mask    Proto   Pre  Cost      Flags NextHop         Interface

     12.12.12.0/30  EBGP    255  0           D   22.22.22.1      GigabitEthernet 0/0/0
     22.22.22.0/30  Direct  0    0           D   22.22.22.2      GigabitEthernet 0/0/0
     22.22.22.2/32  Direct  0    0           D   127.0.0.1       GigabitEthernet 0/0/0
     22.22.22.3/32  Direct  0    0           D   127.0.0.1       GigabitEthernet 0/0/0
      127.0.0.0/8   Direct  0    0           D   127.0.0.1       InLoopBack0
      127.0.0.1/32  Direct  0    0           D   127.0.0.1       InLoopBack0
127.255.255.255/32  Direct  0    0           D   127.0.0.1       InLoopBack0
     172.10.1.0/24  EBGP    255  0           D   22.22.22.1      GigabitEthernet 0/0/0
     172.10.2.0/24  EBGP    255  0           D   22.22.22.1      GigabitEthernet 0/0/0
     172.10.3.0/24  EBGP    255  0           D   22.22.22.1      GigabitEthernet 0/0/0
     172.20.1.0/24  Direct  0    0           D   172.20.1.1      LoopBack1
     172.20.1.1/32  Direct  0    0           D   127.0.0.1       LoopBack1
   172.20.1.255/32  Direct  0    0           D   127.0.0.1       LoopBack1
     172.20.2.0/24  Direct  0    0           D   172.20.2.1      LoopBack2
     172.20.2.1/32  Direct  0    0           D   127.0.0.1       LoopBack2
   172.20.2.255/32  Direct  0    0           D   127.0.0.1       LoopBack2
     172.20.3.0/24  Direct  0    0           D   172.20.3.1      LoopBack3
     172.20.3.1/32  Direct  0    0           D   127.0.0.1       LoopBack3
   172.20.3.255/32  Direct  0    0           D   127.0.0.1       LoopBack3
255.255.255.255/32  Direct  0    0           D   127.0.0.1       InLoopBack0

[CE-B2]
检测 MPLS VPN是否通信
A站点
ping -a 192.20.1.1 192.10.1.1
-a 后面是代表着源地址

B站点
ping -a 172.20.1.1 172.10.1.1
-a 后面是代表着源地址

第三题
两个公司在满足VPN业务的基础上保证互联网数据通讯。
这个时候,不单单做NAT就能够上网了
我们有使用VPN 实例(VRF)来划分,这个就是PE1的路由表就是变成了 VPN实例 路由表+全局路由表

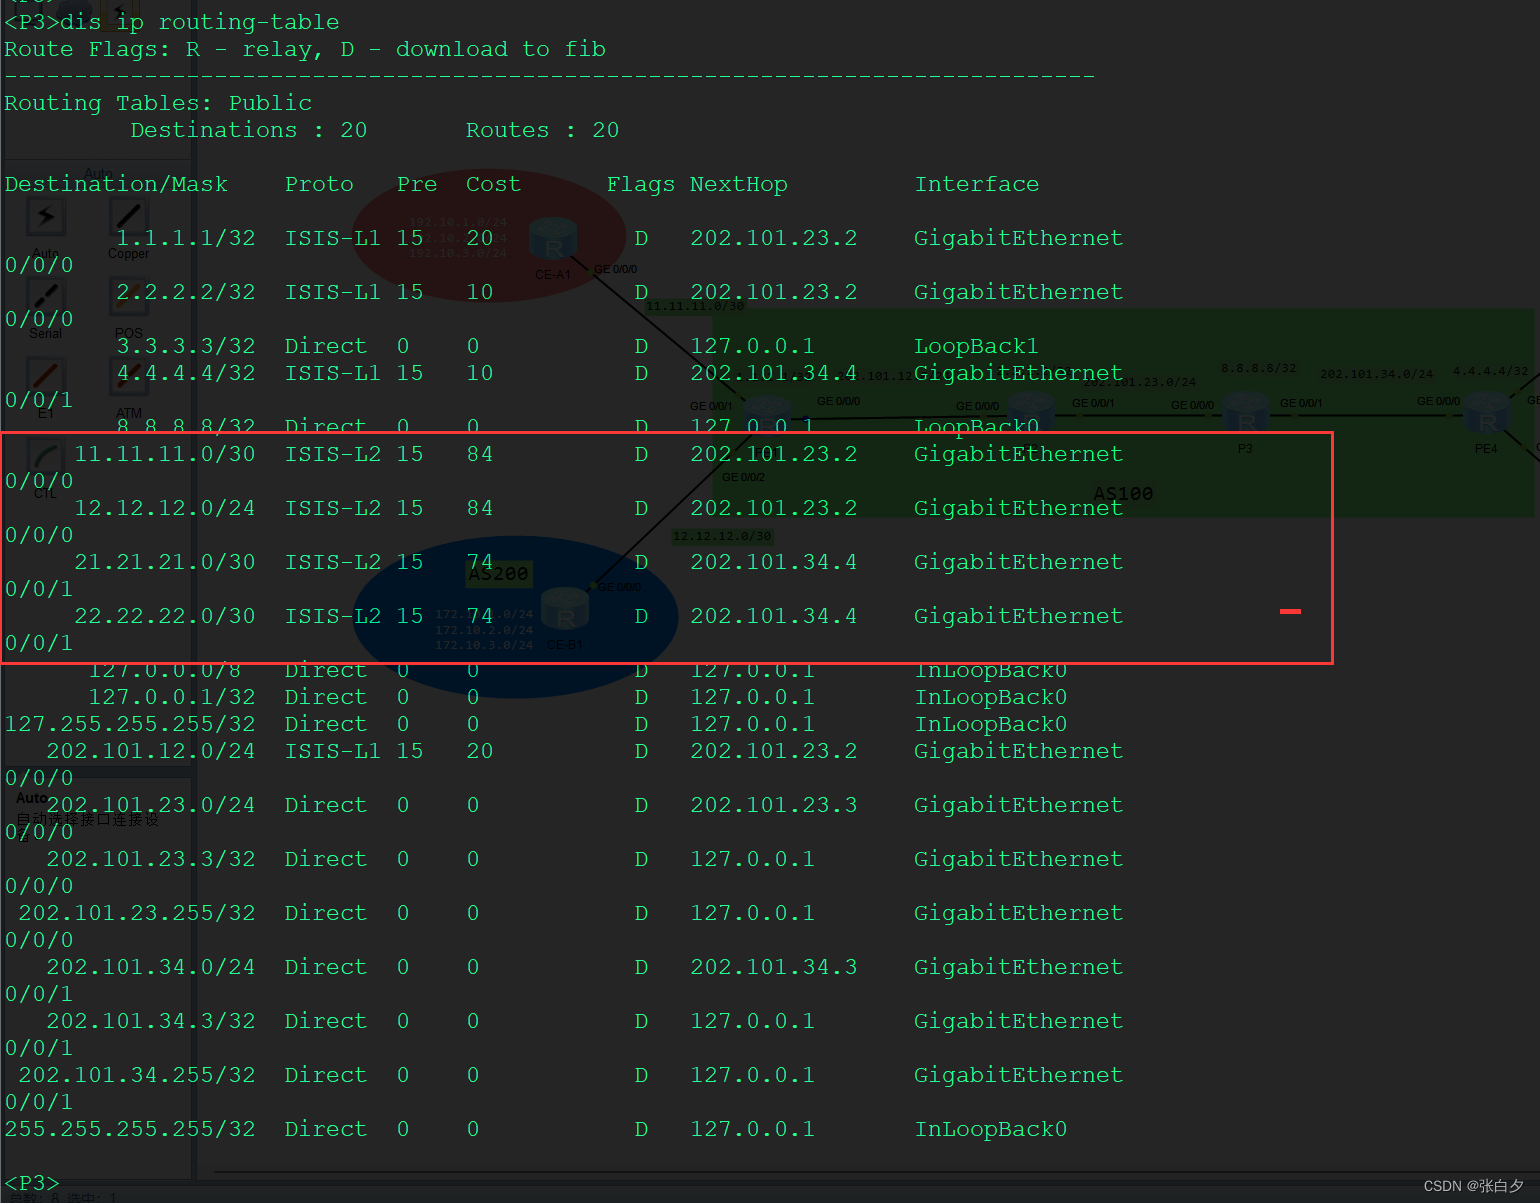
因为我们是要上网的,是要去访问P3的8.8.8.8路由条目,而8.8.8.8条目只存在全局路由表,如图所示

而我的VRF 中是不存在8.8.8.8 这条路由条目

解决办法:
用VPN 实例 指定路由
就是写一条默认路由,放进VPN 实例路由表
然后全局那边再写一条,这样子就相互有联系就可以上网
思路
CE-A1 与 CE-A2
PE1
## VPN实例 A 去往全局路由表中
[PE1]ip route-static vpn-instance A 0.0.0.0 0 202.101.12.2 public

## 全局路由表 回到VPN实例 A 路由表中
[PE1]ip route-static 11.11.11.0 30 vpn-instance A 11.11.11.2

## 将VPN实例 A所在的路由信息下发给运营商内部其它路由器

[PE1]isis 1
[PE1-isis-1]import-route static
[PE1-isis-1]quit
[PE1]
CE - A1
[CE-A1]acl number 2000
[CE-A1-acl-basic-2000]rule 5 permit source 192.10.0.0 0.0.255.255
[CE-A1-acl-basic-2000]quit

[CE-A1]int g0/0/0
[CE-A1-GigabitEthernet0/0/0]nat outbound 2000
[CE-A1-GigabitEthernet0/0/0]quit

[CE-A1]ip route-static 0.0.0.0 0.0.0.0 11.11.11.1


============================================================================================
## 上网的流量
[CE-A1]ping -a 192.10.1.1 8.8.8.8
Ping 8.8.8.8 (8.8.8.8) from 192.10.1.1: 56 data bytes, press CTRL+C to break
56 bytes from 8.8.8.8: icmp_seq=0 ttl=253 time=3.000 ms
56 bytes from 8.8.8.8: icmp_seq=1 ttl=253 time=2.000 ms
56 bytes from 8.8.8.8: icmp_seq=2 ttl=253 time=4.000 ms
56 bytes from 8.8.8.8: icmp_seq=3 ttl=253 time=3.000 ms
56 bytes from 8.8.8.8: icmp_seq=4 ttl=253 time=4.000 ms

--- Ping statistics for 8.8.8.8 ---
5 packet(s) transmitted, 5 packet(s) received, 0.0% packet loss
round-trip min/avg/max/std-dev = 2.000/3.200/4.000/0.748 ms
[CE-A1]%Jun  6 11:11:01:792 2024 CE-A1 PING/6/PING_STATISTICS: Ping statistics for 8.8.8.8: 5 packet(s) transmitted, 5 packet(s) received, 0.0% packet loss, round-trip min/avg/max/std-dev = 2.000/3.200/4.000/0.748 ms.


============================================================================================
## MPLS VPN 的流量    →  最好是等到两边都可以上网的时候再来试
[CE-A1]ping -a 192.10.1.1 192.20.1.1
Ping 192.20.1.1 (192.20.1.1) from 192.10.1.1: 56 data bytes, press CTRL+C to break
56 bytes from 192.20.1.1: icmp_seq=0 ttl=251 time=5.000 ms
56 bytes from 192.20.1.1: icmp_seq=1 ttl=251 time=6.000 ms
56 bytes from 192.20.1.1: icmp_seq=2 ttl=251 time=3.000 ms
56 bytes from 192.20.1.1: icmp_seq=3 ttl=251 time=4.000 ms
56 bytes from 192.20.1.1: icmp_seq=4 ttl=251 time=4.000 ms

--- Ping statistics for 192.20.1.1 ---
5 packet(s) transmitted, 5 packet(s) received, 0.0% packet loss
round-trip min/avg/max/std-dev = 3.000/4.400/6.000/1.020 ms
[CE-A1]%Jun  6 11:10:57:244 2024 CE-A1 PING/6/PING_STATISTICS: Ping statistics for 192.20.1.1: 5 packet(s) transmitted, 5 packet(s) received, 0.0% packet loss, round-trip min/avg/max/std-dev = 3.000/4.400/6.000/1.020 ms.
PE4
## 写一条默认路由表进入实例A中,下一跳为全局路由表内的路由
[PE4]ip route-static vpn-instance A 0.0.0.0 0 202.101.12.2 public

## 回程的路由,找21.21.21.0 的路由信息,去实例A的路由表去找
[PE4]ip route-static 21.21.21.0 30 vpn-instance A 12.12.12.2

## 将VPN实例 A所在的路由信息下发给运营商内部其它路由器
[PE4]isis 1
[PE4-isis-1]import-route static
[PE4-isis-1]quit
CE - A2
[CE-A2]acl 2000
[CE-A2-acl-basic-2000]rule permit source 192.20.0.0 0.0.255.255
[CE-A2-acl-basic-2000]quit

[CE-A2]int g0/0/0
[CE-A2-GigabitEthernet0/0/0]nat outbound 2000
[CE-A2-GigabitEthernet0/0/0]quit

[CE-A2]ip route-static 0.0.0.0 0.0.0.0 21.21.21.1

============================================================================================
## 上网的流量
[CE-A2]ping -a 192.20.1.1 8.8.8.8
Ping 8.8.8.8 (8.8.8.8) from 192.20.1.1: 56 data bytes, press CTRL+C to break
56 bytes from 8.8.8.8: icmp_seq=0 ttl=254 time=1.957 ms
56 bytes from 8.8.8.8: icmp_seq=1 ttl=254 time=1.891 ms
56 bytes from 8.8.8.8: icmp_seq=2 ttl=254 time=1.896 ms
56 bytes from 8.8.8.8: icmp_seq=3 ttl=254 time=1.180 ms
56 bytes from 8.8.8.8: icmp_seq=4 ttl=254 time=2.018 ms

--- Ping statistics for 8.8.8.8 ---
5 packet(s) transmitted, 5 packet(s) received, 0.0% packet loss
round-trip min/avg/max/std-dev = 1.180/1.788/2.018/0.308 ms
[CE-A2]%Jun  6 11:23:58:380 2024 CE-A2 PING/6/PING_STATISTICS: Ping statistics for 8.8.8.8: 5 packet(s) transmitted, 5 packet(s) received, 0.0% packet loss, round-trip min/avg/max/std-dev = 1.180/1.788/2.018/0.308 ms.

============================================================================================
## MPLS VPN 的流量
[CE-A2]ping -a 192.20.1.1 192.10.1.1
Ping 192.10.1.1 (192.10.1.1) from 192.20.1.1: 56 data bytes, press CTRL+C to break
56 bytes from 192.10.1.1: icmp_seq=0 ttl=251 time=4.369 ms
56 bytes from 192.10.1.1: icmp_seq=1 ttl=251 time=6.787 ms
56 bytes from 192.10.1.1: icmp_seq=2 ttl=251 time=4.215 ms
56 bytes from 192.10.1.1: icmp_seq=3 ttl=251 time=4.362 ms
56 bytes from 192.10.1.1: icmp_seq=4 ttl=251 time=6.033 ms

--- Ping statistics for 192.10.1.1 ---
5 packet(s) transmitted, 5 packet(s) received, 0.0% packet loss
round-trip min/avg/max/std-dev = 4.215/5.153/6.787/1.055 ms
[CE-A2]%Jun  6 11:24:01:537 2024 CE-A2 PING/6/PING_STATISTICS: Ping statistics for 192.10.1.1: 5 packet(s) transmitted, 5 packet(s) received, 0.0% packet loss, round-trip min/avg/max/std-dev = 4.215/5.153/6.787/1.055 ms.
CE-B1与CE-B2
PE1
## 写一条默认路由表进入实例A中,下一跳为全局路由表内的路由
[PE1]ip route-static vpn-instance B 0.0.0.0 0 202.101.34.3 public

## 回程的路由,找21.21.21.0 的路由信息,去实例A的路由表去找
[PE1]ip route-static 21.21.21.0 30 vpn-instance A  21.21.21.2

## 将VPN实例 A所在的路由信息下发给运营商内部其它路由器
[PE1]isis 1
[PE1-isis-1]import-route static
[PE1-isis-1]quit
CE-B1
[CE-B2]acl 2000
[CE-B2-acl-basic-2000]rule permit source 172.20.0.0 0.0.255.255
[CE-B2-acl-basic-2000]quit

[CE-B2]int g0/0/0
[CE-B2-GigabitEthernet0/0/0]nat outbound 2000
[CE-B2-GigabitEthernet0/0/0]quit

[CE-B2]ip route-static 0.0.0.0 0 22.22.22.1

============================================================================================
## 上网的流量
[CE-B1]ping -a 172.10.1.1 8.8.8.8
Ping 8.8.8.8 (8.8.8.8) from 172.10.1.1: 56 data bytes, press CTRL+C to break
56 bytes from 8.8.8.8: icmp_seq=0 ttl=253 time=3.317 ms
56 bytes from 8.8.8.8: icmp_seq=1 ttl=253 time=2.472 ms
56 bytes from 8.8.8.8: icmp_seq=2 ttl=253 time=2.082 ms
56 bytes from 8.8.8.8: icmp_seq=3 ttl=253 time=2.966 ms
56 bytes from 8.8.8.8: icmp_seq=4 ttl=253 time=3.238 ms

--- Ping statistics for 8.8.8.8 ---
5 packet(s) transmitted, 5 packet(s) received, 0.0% packet loss
round-trip min/avg/max/std-dev = 2.082/2.815/3.317/0.471 ms
[CE-B1]%Jun  6 11:33:05:353 2024 CE-B1 PING/6/PING_STATISTICS: Ping statistics for 8.8.8.8: 5 packet(s) transmitted, 5 packet(s) received, 0.0% packet loss, round-trip min/avg/max/std-dev = 2.082/2.815/3.317/0.471 ms.


============================================================================================
## MPLS VPN 的流量
[CE-B1]ping -a 172.10.1.1 172.20.1.1
Ping 172.20.1.1 (172.20.1.1) from 172.10.1.1: 56 data bytes, press CTRL+C to break
56 bytes from 172.20.1.1: icmp_seq=0 ttl=253 time=5.201 ms
56 bytes from 172.20.1.1: icmp_seq=1 ttl=253 time=3.717 ms
56 bytes from 172.20.1.1: icmp_seq=2 ttl=253 time=3.974 ms
56 bytes from 172.20.1.1: icmp_seq=3 ttl=253 time=3.544 ms
56 bytes from 172.20.1.1: icmp_seq=4 ttl=253 time=4.403 ms

--- Ping statistics for 172.20.1.1 ---
5 packet(s) transmitted, 5 packet(s) received, 0.0% packet loss
round-trip min/avg/max/std-dev = 3.544/4.168/5.201/0.592 ms
[CE-B1]%Jun  6 11:33:12:083 2024 CE-B1 PING/6/PING_STATISTICS: Ping statistics for 172.20.1.1: 5 packet(s) transmitted, 5 packet(s) received, 0.0% packet loss, round-trip min/avg/max/std-dev = 3.544/4.168/5.201/0.592 ms.
PE4
## VPN实例 B 去往全局路由表中
[PE4]ip route-static vpn-instance B 0.0.0.0 0 202.101.34.3 public

## 全局路由表 回到VPN实例 B 路由表中
[PE4]ip route-static 22.22.22.0 255.255.255.0 vpn-instance B 22.22.22.2

## 将VRF A 的目的网段下发给运营商内部其它路由器
[PE1]isis 1
[PE1-isis-1]import-route static
[PE1-isis-1]quit
CE - B2
[CE-B2]acl basic 2000
[CE-B2-acl-ipv4-basic-2000]rule permit source 172.20.0.0 0.0.255.255
[CE-B2-acl-ipv4-basic-2000]quit

[CE-B2]int g0/0
[CE-B2-GigabitEthernet0/0]nat outbound 2000
[CE-B2-GigabitEthernet0/0]quit

[CE-B2]ip route-static 0.0.0.0 0 22.22.22.1

============================================================================================
## 上网的流量
[CE-B2]ping -a 172.20.1.1 8.8.8.8
Ping 8.8.8.8 (8.8.8.8) from 172.20.1.1: 56 data bytes, press CTRL+C to break
56 bytes from 8.8.8.8: icmp_seq=0 ttl=254 time=1.000 ms
56 bytes from 8.8.8.8: icmp_seq=1 ttl=254 time=1.000 ms
56 bytes from 8.8.8.8: icmp_seq=2 ttl=254 time=2.000 ms
56 bytes from 8.8.8.8: icmp_seq=3 ttl=254 time=1.000 ms
56 bytes from 8.8.8.8: icmp_seq=4 ttl=254 time=2.000 ms

--- Ping statistics for 8.8.8.8 ---
5 packet(s) transmitted, 5 packet(s) received, 0.0% packet loss
round-trip min/avg/max/std-dev = 1.000/1.400/2.000/0.490 ms
[CE-B2]%Jun  6 11:18:34:483 2024 CE-B2 PING/6/PING_STATISTICS: Ping statistics for 8.8.8.8: 5 packet(s) transmitted, 5 packet(s) received, 0.0% packet loss, round-trip min/avg/max/std-dev = 1.000/1.400/2.000/0.490 ms.


============================================================================================
## MPLS VPN 的流量
[CE-B2]ping -a 172.20.1.1 172.10.1.1
Ping 172.10.1.1 (172.10.1.1) from 172.20.1.1: 56 data bytes, press CTRL+C to break
56 bytes from 172.10.1.1: icmp_seq=0 ttl=253 time=5.000 ms
56 bytes from 172.10.1.1: icmp_seq=1 ttl=253 time=6.000 ms
56 bytes from 172.10.1.1: icmp_seq=2 ttl=253 time=2.000 ms
56 bytes from 172.10.1.1: icmp_seq=3 ttl=253 time=3.000 ms
56 bytes from 172.10.1.1: icmp_seq=4 ttl=253 time=3.000 ms

--- Ping statistics for 172.10.1.1 ---
5 packet(s) transmitted, 5 packet(s) received, 0.0% packet loss
round-trip min/avg/max/std-dev = 2.000/3.800/6.000/1.470 ms
[CE-B2]%Jun  6 11:18:39:799 2024 CE-B2 PING/6/PING_STATISTICS: Ping statistics for 172.10.1.1: 5 packet(s) transmitted, 5 packet(s) received, 0.0% packet loss, round-trip min/avg/max/std-dev = 2.000/3.800/6.000/1.470 ms.
查看P3的路由表
此时是能看到公司的公网地址,说明都能ping得到