组件插槽slots
插槽内容与出口
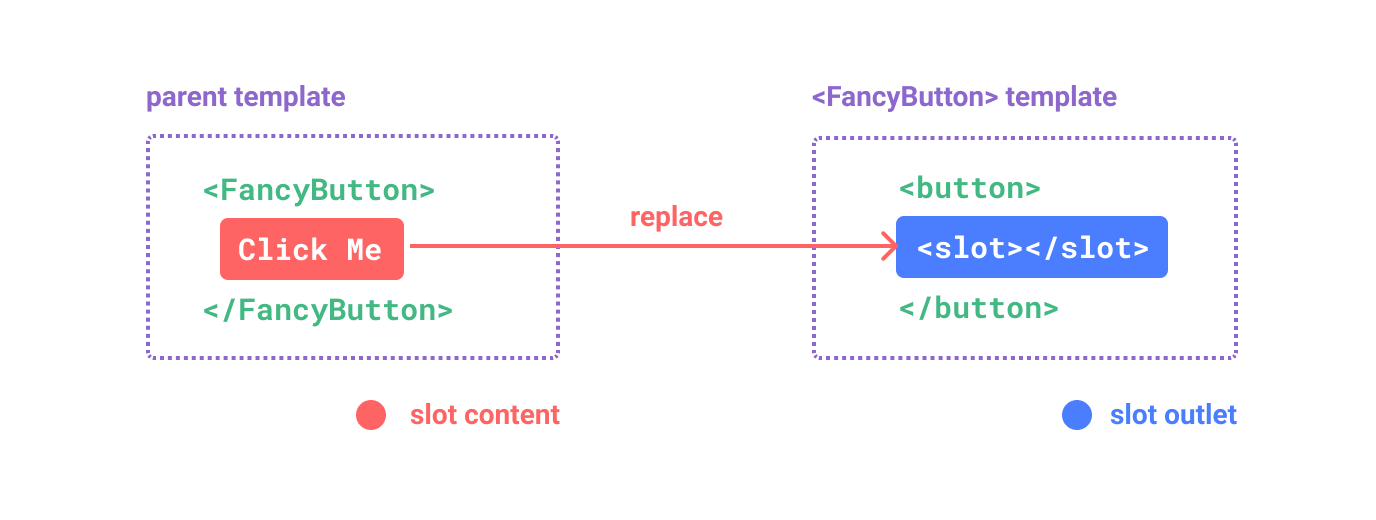
在某些场景中,我们可能想要为子组件传递一些模板片段,让子组件在它们的组件中渲染这些片段。这时就需要用到插槽。
如下例所示:
<!-- Parent.vue -->
<FancyButton>
  Click me! <!-- 插槽内容 -->
</FancyButton>

<!-- Child FancyButton.vue -->
<button class="fancy-btn">
  <slot></slot> <!-- 插槽出口 -->
</button>
<slot> 元素是一个插槽出口 (slot outlet),标示了父元素提供的插槽内容 (slot content) 将在哪里被渲染。
最终渲染出的 DOM :
<button class="fancy-btn">Click me!</button>插槽内容可以是任意合法的模板内容,不局限于文本。例如我们可以传入多个元素,甚至是组件:
<!-- Parent.vue -->
<FancyButton>
  <span style="color:red">Click me!</span>
  <AwesomeIcon name="plus" />
</FancyButton>

<!-- FancyButton.vue -->
<button class="fancy-btn">
  <slot></slot> <!-- 插槽出口 -->
</button>

<!-- 渲染出 -->
<button class="fancy-btn">
  <span style="color:red">Click me!</span>
  <AwesomeIcon name="plus" />
</button>
Vue 组件的插槽机制是受原生 Web Component <slot> 元素的启发而诞生。
渲染作用域
插槽内容可以访问到父组件的数据作用域,因为插槽内容本身是在父组件模板中定义的。如下例:
<span>{{ message }}</span>
<FancyButton>{{ message }}</FancyButton>
这里的两个 {{ message }} 插值表达式渲染的内容都是一样的。
插槽内容无法访问子组件的数据。Vue 模板中的表达式只能访问其定义时所处的作用域,这和 JavaScript 的词法作用域规则是一致的。
默认内容
在外部没有提供任何内容的情况下,可以为插槽指定默认内容。如下例:
<!-- submitButton.vue -->
<button type="submit">
  <slot>
    Submit <!-- 默认内容 -->
  </slot>
</button>

<!-- Parent.vue -->
<!-- 父组件中没有提供任何插槽内容时 -->
<SubmitButton />

<!-- 将被渲染为 -->
<button type="submit">Submit</button>
如果上例中,父组件提供了插槽内容:
<!-- Parent.vue -->
<SubmitButton>Save</SubmitButton>

<!-- 将被渲染为 -->
<button type="submit">Save</button>
具名插槽
有时一个组件中需要包含多个插槽出口,这时就需要给插槽命名来区分开:
<div class="container">
  <header>
    <slot name="header"></slot>
  </header>
  <main>
    <!-- 没命名的为default -->
    <slot></slot>
  </main>
  <footer>
    <slot name="footer"></slot>
  </footer>
</div>
这类带 name 的插槽被称为具名插槽 (named slots)。
要为具名插槽传入内容,我们需要使用一个含 v-slot 指令的 <template> 元素,并将目标插槽的名字传给该指令:
<BaseLayout>
  <template v-slot:header>
    <!-- header 插槽的内容放这里 -->
  </template>
  <template v-slot:default>
  <!-- default 插槽的内容放这里 -->
  </template>
  <template v-slot:footer>
  <!-- footer 插槽的内容放这里 -->
  </template>
</BaseLayout>
v-slot 可简写为 # ,如 <template v-slot:header> 可以简写为 <template #header> 。其意思就是“将这部分模板片段传入子组件的 header 插槽中”。
上例可简写为:
<BaseLayout>
  <template #header>
    <h1>Here might be a page title</h1>
  </template>

  <template #default>
    <p>A paragraph for the main content.</p>
    <p>And another one.</p>
  </template>

  <template #footer>
    <p>Here's some contact info</p>
  </template>
</BaseLayout>
所有位于顶级的非 <template> 节点都被隐式地视为默认插槽的内容,所以上例中的默认插槽也可写为:
<BaseLayout>
  <template #header>
    <h1>Here might be a page title</h1>
  </template>

  <!-- 隐式的默认插槽 -->
  <p>A paragraph for the main content.</p>
  <p>And another one.</p>

  <template #footer>
    <p>Here's some contact info</p>
  </template>
</BaseLayout>
上面所有例子最终都渲染出:
<div class="container">
  <header>
    <h1>Here might be a page title</h1>
  </header>
  <main>
    <p>A paragraph for the main content.</p>
    <p>And another one.</p>
  </main>
  <footer>
    <p>Here's some contact info</p>
  </footer>
</div>
条件插槽
有时你需要根据插槽是否存在来渲染某些内容。如希望包装插槽以提供额外的样式,就需要判断插槽内容是否存在:
<template>
  <div class="card">
    <div v-if="$slots.header" class="card-header">
      <slot name="header" />
    </div>

    <div v-if="$slots.default" class="card-content">
      <slot />
    </div>

    <div v-if="$slots.footer" class="card-footer">
      <slot name="footer" />
    </div>
  </div>
</template>
动态插槽名
动态指令参数在 v-slot 上也是有效的,即可以定义下面这样的动态插槽名:
<base-layout>
  <template v-slot:[dynamicSlotName]>
    ...
  </template>
  <!-- 缩写为 -->
  <template #[dynamicSlotName]>
    ...
  </template>
</base-layout>
作用域插槽
如上渲染作用域所述,插槽内容无法访问子组件域内的数据。但有时我们又需要显示子组件域内的数据,这时就需要在子组件的插槽出口中,像props传递一样的形式向一个插槽的出口上传递 attributes:
<!-- myComponent.vue -->
<div>
  <slot :text="greetingMessage" :count="1"></slot>
</div>

<!-- Parent.vue -->
<!-- 默认插槽的写法 -->
<MyComponent v-slot="slotProps">
  {{ slotProps.text }} {{ slotProps.count }}
</MyComponent>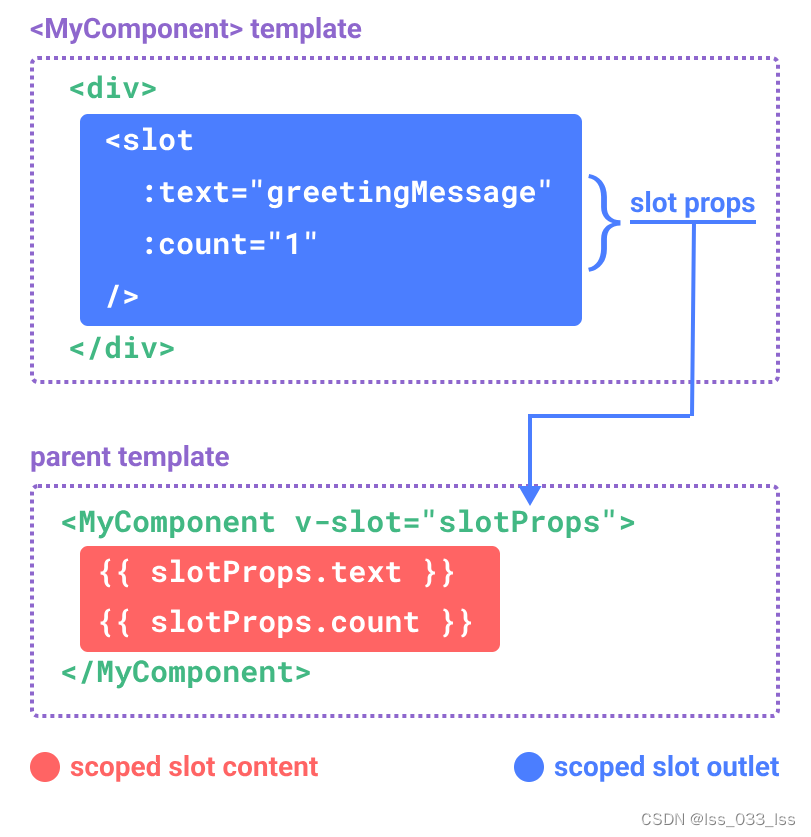
v-slot="slotProps" 可以类比这里的函数签名,和函数的参数类似,我们也可以在 v-slot 中使用解构:
<MyComponent v-slot="{ text, count }">
  {{ text }} {{ count }}
</MyComponent>
具名作用域插槽
上面的例子是默认插槽的,具名作用域插槽的工作方式也是类似的,插槽 props 可以作为 v-slot 指令的值被访问到:v-slot:name="slotProps"。当使用缩写时是这样:
<!-- myComponent.vue -->
<slot name="header" message="hello"></slot>

<!-- Parent.vue -->
<MyComponent>
  <template #header="headerProps">
    {{ headerProps }}
  </template>

  <template #default="defaultProps">
    {{ defaultProps }}
  </template>

  <template #footer="footerProps">
    {{ footerProps }}
  </template>
</MyComponent>
注意:
- 插槽上的 name 是一个 Vue 特别保留的 attribute,不会作为 props 传递给插槽。因此最终 headerProps 的结果是 { message: 'hello' }。
- 如果你同时使用了具名插槽与默认插槽并且需要传递数据,则需要为默认插槽使用显式的 <template> 标签。
无渲染组件
一些组件可能只包括了逻辑而不需要自己渲染内容,视图输出通过作用域插槽全权交给了消费者组件。我们将这种类型的组件称为无渲染组件。
如下的无渲染例子,是一个封装了追踪当前鼠标位置逻辑的组件:
<!-- App.vue -->
<script setup>
import MouseTracker from './MouseTracker.vue'
</script>

<template>
	<MouseTracker v-slot="{ x, y }">
  	Mouse is at: {{ x }}, {{ y }}
	</MouseTracker>
</template>

<!-- MouseTracker.vue -->
<script setup>
import { ref, onMounted, onUnmounted } from 'vue'

const x = ref(0)
const y = ref(0)

const update = e => {
  x.value = e.pageX
  y.value = e.pageY
}

onMounted(() => window.addEventListener('mousemove', update))
onUnmounted(() => window.removeEventListener('mousemove', update))
</script>

<template>
  <slot :x="x" :y="y"/>
</template>
依赖注入
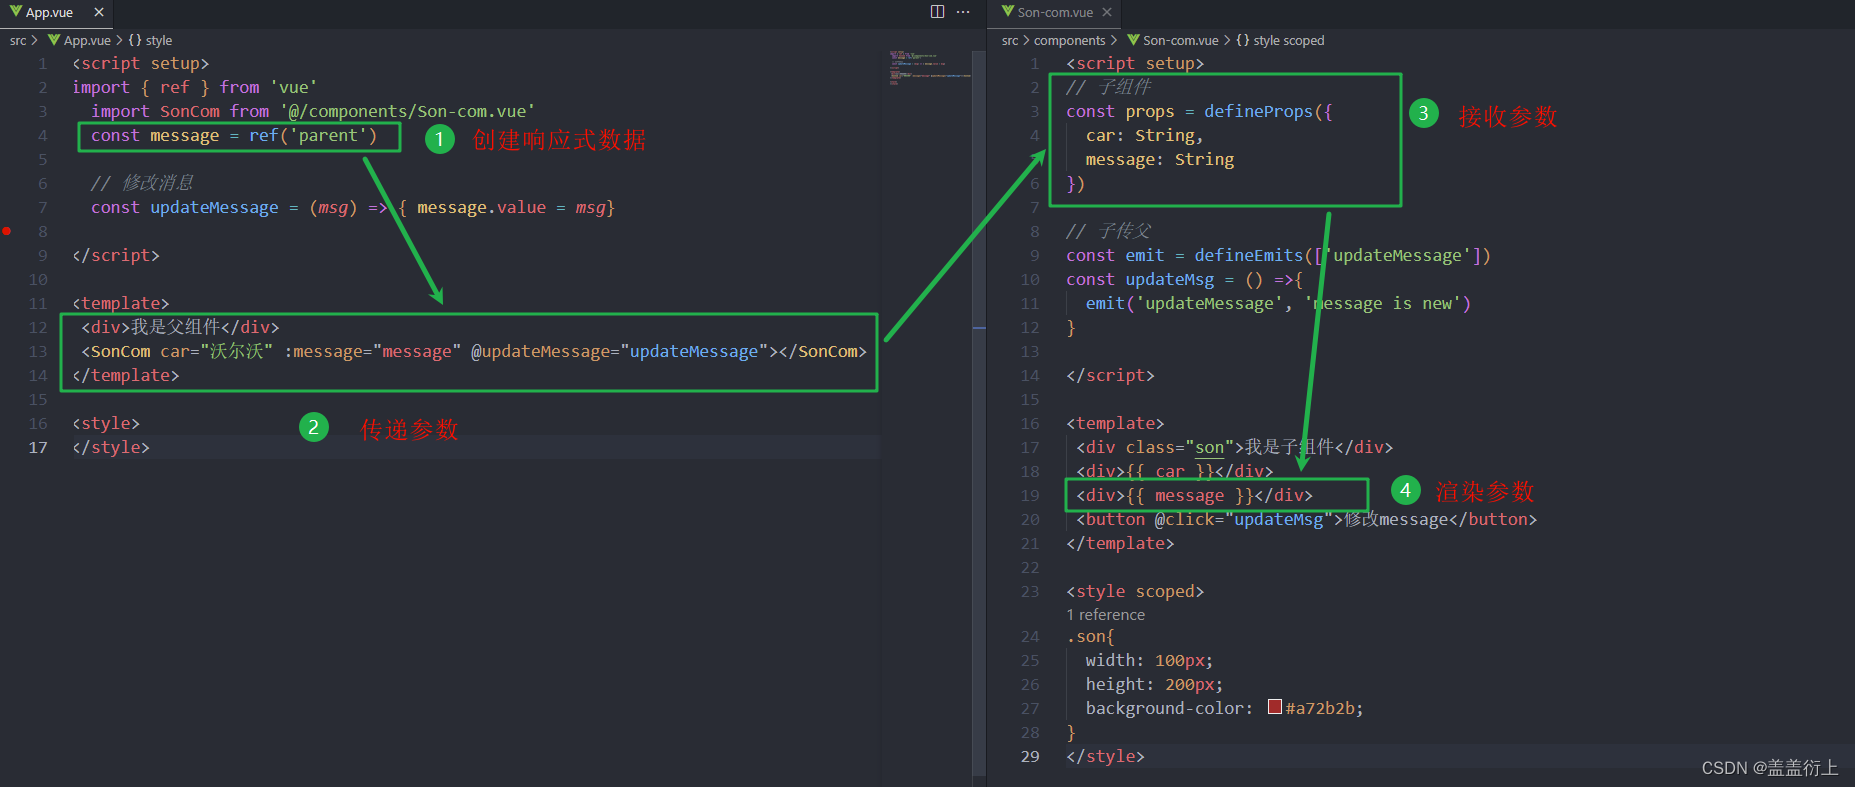
通常情况下,当我们需要从父组件向子组件传递数据时,会使用 props。如果有一个嵌套层级比较深的组件,需要从第一级传数据到最后一级时,如果用 props 来传递,则必须将其沿着组件链逐级传递下去,这会使得工作非常麻烦:

中间的 <Footer> 组件虽然用不着porps数据,但为了 <DeepChild> 能正常使用porps数据,仍然需要定义并向下传递。如果组件链路非常长,可能会影响到更多这条路上的组件。
provide 和 inject 可以帮助我们解决这一问题。一个父组件相对于其所有的后代组件,会作为依赖提供者。任何后代的组件树,无论层级有多深,都可以注入由父组件提供给整条链路的依赖。

Provide (提供)
要为组件后代提供数据,需要使用到 provide() 函数:
<script setup>
import { provide } from 'vue'

provide(/* 注入名 */ 'message', /* 值 */ 'hello!')
</script>
在setup选项中使用:
import { provide } from 'vue'

export default {
  setup() {
    provide(/* 注入名 */ 'message', /* 值 */ 'hello!')
  }
}
provide() 函数接收两个参数。第一个参数被称为注入名,可以是一个字符串或是一个 Symbol。后代组件会用注入名来查找期望注入的值。一个组件可以多次调用 provide(),使用不同的注入名,注入不同的依赖值。
第二个参数是提供的值,值可以是任意类型,包括响应式的状态,比如一个 ref:
import { ref, provide } from 'vue'

const count = ref(0)
provide('key', count)
提供的响应式状态使后代组件可以由此和提供者建立响应式的联系。
除了在一个组件中提供依赖,我们还可以在整个应用层面提供依赖:
import { createApp } from 'vue'

const app = createApp({})

app.provide(/* 注入名 */ 'message', /* 值 */ 'hello!')
在应用级别提供的数据在该应用内的所有组件中都可以注入。这在你编写插件时会特别有用,因为插件一般都不会使用组件形式来提供值。
Inject (注入)
要注入上层组件提供的数据,需使用 inject() 函数:
<script setup>
import { inject } from 'vue'

const message = inject('message')
</script>
如果提供的值是一个 ref,注入进来的会是该 ref 对象,而不会自动解包为其内部的值。这使得注入方组件能够通过 ref 对象保持了和供给方的响应性链接。
在setup选项中使用:
import { inject } from 'vue'

export default {
  setup() {
    const message = inject('message')
    return { message }
  }
}
provide() 和 inject() 的完整例子:
// App.vue
<script setup>
import { ref, provide } from 'vue'
import Child from './Child.vue'

// by providing a ref, the GrandChild
// can react to changes happening here.
const message = ref('hello')
provide('message', message)
</script>

<template>
  <input v-model="message">
  <Child />
</template>
// Child.vue
<script setup>
import GrandChild from './GrandChild.vue'
</script>
<template>
<GrandChild />
</template>// GrandChild.vue
<script setup>
import { inject } from 'vue'
const message = inject('message')
</script>
<template>
<p>
Message to grand child: {{ message }}
</p>
</template>
注入默认值
默认情况下,inject 假设传入的注入名会被某个祖先链上的组件提供。如果该注入名的确没有任何组件提供,则会抛出一个运行时警告。
如果在注入一个值时不要求必须有提供者,那么我们应该声明一个默认值,和 props 类似:
// 如果没有祖先组件提供 "message"
// `value` 会是 "这是默认值"
const value = inject('message', '这是默认值')
在一些场景中,默认值可能需要通过调用一个函数或初始化一个类来取得。为了避免在用不到默认值的情况下进行不必要的计算或产生副作用,我们可以使用工厂函数来创建默认值:
const value = inject('key', () => new ExpensiveClass(), true)第三个参数表示默认值应该被当作一个工厂函数。
如何在注入更改提供的响应式状态
当提供 / 注入响应式的数据时,建议尽可能将任何对响应式状态的变更都保持在供给方组件中。这样可以确保所提供状态的声明和变更操作都内聚在同一个组件内,使其更容易维护。
如果需要再注入方组件中更改数据,建议在供给方组件内声明并提供一个更改数据的方法函数:
<!-- 在供给方组件内 -->
<script setup>
import { provide, ref } from 'vue'

const location = ref('North Pole')

function updateLocation() {
  location.value = 'South Pole'
}

provide('location', {
  location,
  updateLocation
})
</script>
<!-- 在注入方组件 -->
<script setup>
import { inject } from 'vue'
const { location, updateLocation } = inject('location')
</script>
<template>
<button @click="updateLocation">{{ location }}</button>
</template>如果你想确保提供的数据不能被注入方的组件更改,你可以使用 readonly() 来包装提供的值。
<script setup>
import { ref, provide, readonly } from 'vue'

const count = ref(0)
provide('read-only-count', readonly(count))
</script>