组件注册
分为全局注册和局部注册两种。
全局注册:
在main.js或main.ts中,使用 Vue 应用实例的 .component() 方法,让组件在当前 Vue 应用中全局可用。
import { createApp } from 'vue'
import MyComponent from './App.vue'

const app = createApp({})

app.component('MyComponent', MyComponent)
.component() 方法可以被链式调用:
app
  .component('ComponentA', ComponentA)
  .component('ComponentB', ComponentB)
  .component('ComponentC', ComponentC)
全局注册后,组件可以在此应用的任意组件的模板中使用:
<!-- 这在当前应用的任意组件中都可用 -->
<ComponentA/>
<ComponentB/>
<ComponentC/>
全局注册存在的问题:
- 全局注册,但并没有被使用的组件无法在生产打包时被自动移除 (也叫“tree-shaking”)。如果你全局注册了一个组件,即使它并没有被实际使用,它仍然会出现在打包后的 JS 文件中。
- 全局注册在大型项目中使项目的依赖关系变得不那么明确。在父组件中使用子组件时,不太容易定位子组件的实现。和使用过多的全局变量一样,这可能会影响应用长期的可维护性。
局部组件:
一、在使用 <script setup> 的单文件组件中,导入的组件可以直接在模板中使用,无需注册:
<script setup>
import ComponentA from './ComponentA.vue'
</script>

<template>
  <ComponentA />
</template>
二、如果没有使用 <script setup>,则需要使用 components 选项来显式注册:
import ComponentA from './ComponentA.js'

export default {
  components: {
    ComponentA: ComponentA // 根据ES2015可直接缩写成ComponentA
  },
  setup() {
    // ...
  }
}
Tips:
局部注册的组件仅在当前组件中可用,在后代组件中不可用。
组件数据传递
props接收声明
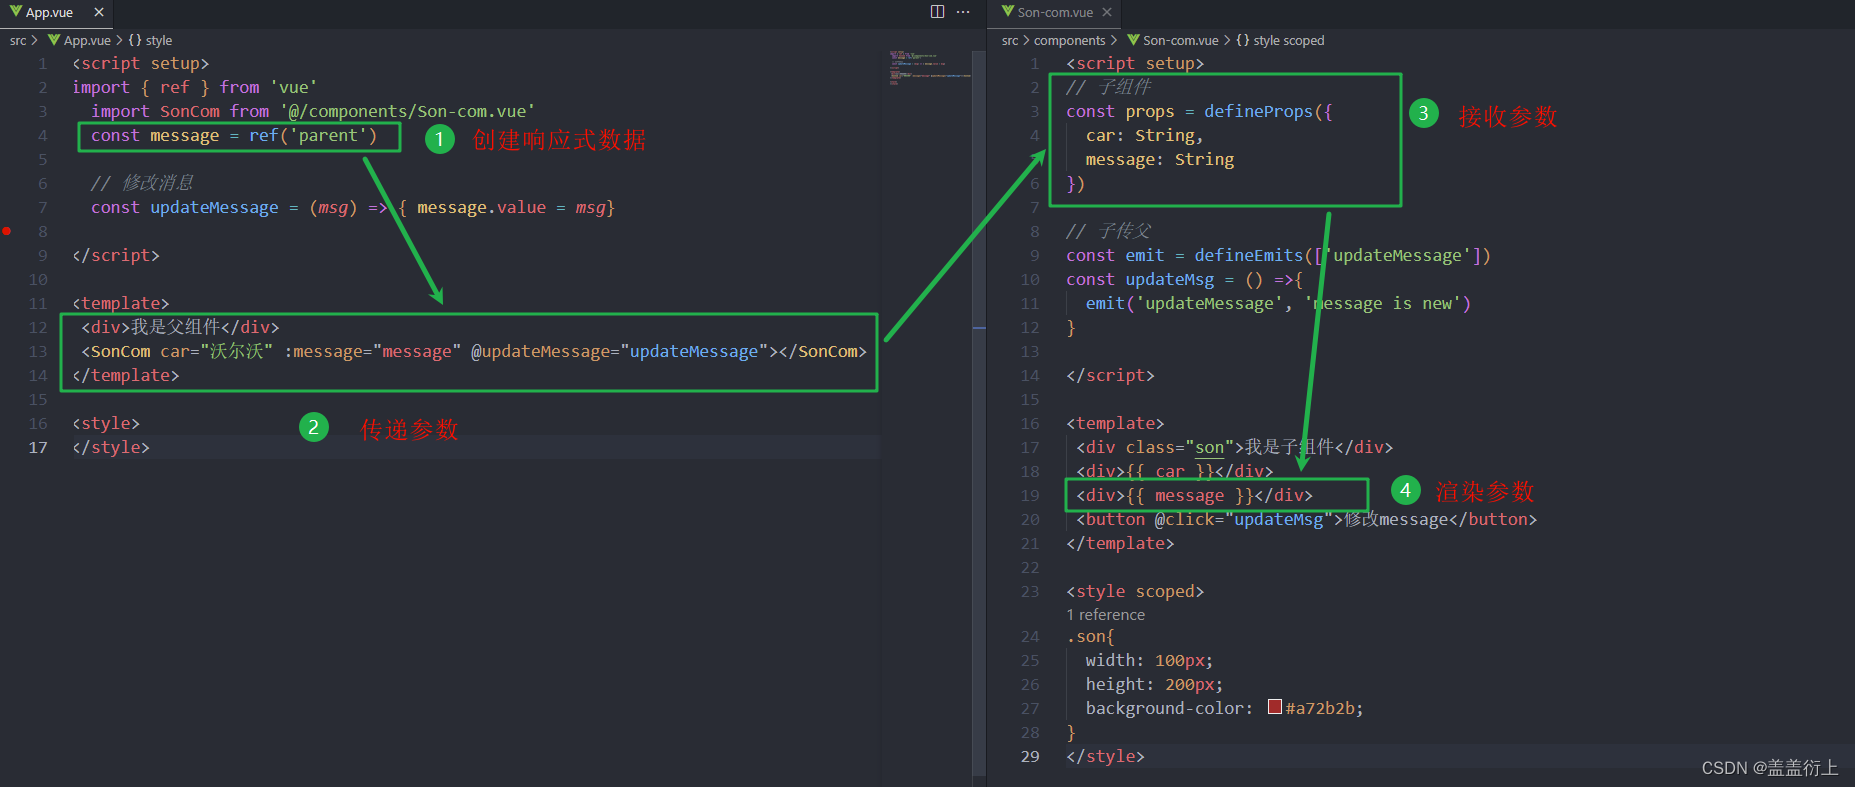
在使用 <script setup> 的单文件组件中,props 可以使用 defineProps() 宏(所有的宏都无需引入)来声明:
<script setup>
const props = defineProps(['foo'])

console.log(props.foo)
</script>在没有使用 <script setup> 的组件中,props 可以使用 props 选项来声明:
export default {
  props: ['foo'],
  setup(props) {
    // setup() 接收 props 作为第一个参数
    console.log(props.foo)
  }
}
除了使用字符串数组来声明 prop 外,还可以使用对象的形式,并声明prop项的类型:
// 对于以对象形式声明的每个属性,key 是 prop 的名称,而值则是该 prop 预期类型的构造函数。
// 使用 <script setup>
defineProps({
  title: [String, Number], // 字符串或数字类型
  likes: Number
})
// 非 <script setup>
export default {
  props: {
    title: [String, Number],
    likes: Number
  }
}

// 在ts中也可以使用类型标注来声明
<script setup lang="ts">
    defineProps<{
      title?: string
      likes?: number
    }>()
</script>
Prop 名字格式
为了和 HTML attribute 对齐,我们通常在向子组件传递 props时,会将其写为 kebab-case 形式:
<MyComponent greeting-message="hello" />还可以传入动态值:
<!-- 根据一个变量的值动态传入 -->
<BlogPost :likes="post.likes" />

<!-- 仅写上 prop 但不传值,会隐式转换为 `true` -->
<BlogPost is-published />
使用一个对象绑定多个 prop
如果你想要将一个对象的所有属性都当作 props 传入,你可以使用没有参数的 v-bind,即只使用 v-bind 而非 :prop-name。如下所示:
const post = {
  id: 1,
  title: 'My Journey with Vue'
}
<BlogPost v-bind="post" />
// 等价于
<BlogPost :id="post.id" :title="post.title" />
单向数据流
所有的 props 都遵循着单向绑定原则,props 因父组件的更新而变化,自然地将新的状态向下流往子组件,而不会逆向传递。这避免了子组件意外修改父组件的状态的情况,不然应用的数据流将很容易变得混乱而难以理解。如果强行在子组件上修改props,Vue 会在控制台上向你抛出警告。
如果实在有修改的需求,可以用prop作为初始值后,新定义一个局部数据属性:
const props = defineProps(['initialCounter'])
// 计数器只是将 props.initialCounter 作为初始值
// 像下面这样做就使 prop 和后续更新无关了
const counter = ref(props.initialCounter)
后子组件通过抛出事件defineEmits,来通知父组件同步更改的传入的prop。
Prop校验
写了类型的声明时,如果传入的值不满足类型要求,Vue 会在浏览器控制台中抛出警告来提醒使用者。这在开发给其他开发者使用的组件时非常有用。
声明对 props 的校验有如下方法:
defineProps({
  // 基础类型检查
  // (给出 `null` 和 `undefined` 值则会跳过任何类型检查)
  propA: Number,
  // 多种可能的类型
  propB: [String, Number],
  // 必传,且为 String 类型
  propC: {
    type: String,
    required: true
  },
  // 必传但可为空的字符串
  propD: {
    type: [String, null],
    required: true
  },
  // Number 类型的默认值
  propE: {
    type: Number,
    default: 100
  },
  // 对象类型的默认值
  propF: {
    type: Object,
    // 对象或数组的默认值
    // 必须从一个工厂函数返回。
    // 该函数接收组件所接收到的原始 prop 作为参数。
    default(rawProps) {
      return { message: 'hello' }
    }
    // 可简写为
    default: () => ({ message: 'hello' })
  },
  // 自定义类型校验函数
  // 在 3.4+ 中完整的 props 作为第二个参数传入
  propG: {
    validator(value, props) {
      // The value must match one of these strings
      return ['success', 'warning', 'danger'].includes(value)
    }
  },
  // 函数类型的默认值
  propH: {
    type: Function,
    // 不像对象或数组的默认,这不是一个
    // 工厂函数。这会是一个用来作为默认值的函数
    default() {
      return 'Default function'
    }
  }
})
vue3+TS时,语法如下:
export interface Props {
  msg?: string
  labels?: string[]
}

const props = withDefaults(defineProps<Props>(), {
  msg: 'hello',
  labels: () => ['one', 'two']
})
Tips:
- defineProps() 宏中的参数不可以访问 <script setup> 中定义的其他变量,因为在编译时整个表达式都会被移到外部的函数中。
- 所有 prop 默认都是可选的,除非声明了 required: true。
- 除 Boolean 外的未传递的可选 prop 将会有一个默认值 undefined。
- Boolean 类型的未传递 prop 将被转换为 false。这可以通过为它设置 default 来更改——例如:设置为 default: undefined 将与非布尔类型的 prop 的行为保持一致。
- 如果声明了 default 值,那么在 prop 的值被解析为 undefined 时,无论 prop 是未被传递还是显式指明的 undefined,都会改为 default 值。
运行时类型检查
Vue 主要通过 instanceof 来检查类型是否匹配。
如果 type 仅为 null 而非使用数组语法,它将允许任何类型。
校验中的type可以是哪些:
1、构造函数
- String
- Number
- Boolean
- Array
- Object
- Date
- Function
- Symbol
- Error
2、type 也可以是自定义的类或构造函数
例子:
class Person {
  constructor(firstName, lastName) {
    this.firstName = firstName
    this.lastName = lastName
  }
}
defineProps({
  author: Person
})
Boolean 类型转换
声明为 Boolean 类型的 props 有特别的类型转换规则。
例子:
defineProps({
  disabled: Boolean
})
// 应用
<!-- 等同于传入 :disabled="true" -->
<MyComponent disabled />
<!-- 等同于传入 :disabled="false" -->
<MyComponent />当prop被声明为多种类型,并且类型中有String时,Boolean放置的位置会影响Boolean 的转换规则应用。
// disabled 将被转换为 true
defineProps({
  disabled: [Boolean, Number]
})

// disabled 将被转换为 true
defineProps({
  disabled: [Boolean, String]
})

// disabled 将被转换为 true
defineProps({
  disabled: [Number, Boolean]
})

// disabled 将被解析为空字符串 (disabled="")
defineProps({
  disabled: [String, Boolean]
})
组件事件
触发与监听事件
子组件在模板表达式中,可以直接使用 $emit 方法触发自定义事件:
<!-- MyComponent -->
<button @click="$emit('someEvent')">Click Me</button>
父组件可以通过 v-on (缩写为 @) 来监听事件(组件的事件监听器也支持 .once 修饰符):
<MyComponent @some-event="callback" />Tips:
和原生 DOM 事件不一样,组件触发的事件没有冒泡机制。你只能监听直接子组件触发的事件。平级组件或是跨越多层嵌套的组件间通信,应使用一个外部的事件总线,或是使用一个状态管理 | Vue.js。
带参数事件
有时候我们会需要在触发事件时附带一个特定的值。
子组件中使用$emit 方法触发自定义事件,提供一个额外的参数:
<button @click="$emit('increaseBy', 1)">
  Increase by 1
</button>
父组件接收:
// 方法一
<MyButton @increase-by="(n) => count += n" />

// 方法二
<MyButton @increase-by="increaseCount" />
function increaseCount(n) {
  count.value += n
}
Tips:
所有传入 $emit() 的额外参数都会被直接传向监听器。举例来说,$emit('foo', 1, 2, 3) 触发后,监听器函数将会收到这三个参数值。
用defineEmits()声明触发的事件
组件可以显式地通过 defineEmits() 宏来声明它要触发的事件:
<script setup>
defineEmits(['inFocus', 'submit'])
</script>
在 <template> 中使用的 $emit 方法不能在组件的 <script setup> 部分中使用,但 defineEmits() 会返回一个相同作用的函数供我们使用:
<script setup>
const emit = defineEmits(['inFocus', 'submit'])

function buttonClick() {
  emit('submit')
}
</script>
defineEmits() 宏不能在子函数中使用。如上所示,它必须直接放置在 <script setup> 的顶级作用域下。
使用选项式setup的写法:
export default {
  emits: ['inFocus', 'submit'],
  setup(props, ctx) {
    ctx.emit('submit')
  }
}
// ctx支持解构
export default {
  emits: ['inFocus', 'submit'],
  setup(props, { emit }) {
    emit('submit')
  }
}
emits 选项和 defineEmits() 宏还支持对象语法。通过 TypeScript 为参数指定类型,它允许我们对触发事件的参数进行验证:
<script setup lang="ts">
const emit = defineEmits({
  submit(payload: { email: string, password: string }) {
    // 通过返回值为 `true` 还是为 `false` 来判断验证是否通过
  }
})
</script>
完整版:
<script setup lang="ts">
const emit = defineEmits({
  // 没有校验
  click: null,

  // 校验 submit 事件
  submit: (payload: { email: string, password: string }) => {
    if (email && password) {
      return true
    } else {
      console.warn('Invalid submit event payload!')
      return false
    }
  }
})

function submitForm(email: string, password: string) {
  emit('submit', { email, password })
}
</script>
也可以使用纯类型标注来声明触发的事件:
<script setup lang="ts">
const emit = defineEmits<{
  (e: 'change', id: number): void
  (e: 'update', value: string): void
}>()

// 3.3+: 可选的、更简洁的语法
const emit = defineEmits<{
  change: [id: number]
  update: [value: string]
}>()
</script>
Tips:
如果一个原生事件的名字 (例如 click) 被定义在 emits 选项中,则监听器只会监听组件触发的 click 事件而不会再响应原生的 click 事件。
组件v-model
基本用法
v-model 可以在组件上使用以实现双向绑定。
从 Vue 3.4 开始,推荐的实现方式是使用 defineModel() 宏:
<!-- Parent.vue -->
<Child v-model="countModel" />


<!-- Child.vue -->
<script setup>
const model = defineModel()

function update() {
  model.value++
}
</script>

<template>
  <div>Parent bound v-model is: {{ model }}</div>
</template>
defineModel() 返回的值是一个 ref。它可以像其他 ref 一样被访问以及修改,不过它能起到在父组件和当前变量之间的双向绑定的作用:
- 它的 .value 和父组件的 v-model 的值同步;
- 当它被子组件变更了,会触发父组件绑定的值一起更新。
底层机制:
defineModel 是一个便利宏。编译器将其展开为以下内容:
- 一个名为 modelValue 的 prop,本地 ref 的值与其同步;
- 一个名为 update:modelValue 的事件,当本地 ref 的值发生变更时触发。
defineModel 的实现原理如下:
子组件
<!-- Child.vue -->
<script setup>
const props = defineProps(['modelValue'])
const emit = defineEmits(['update:modelValue'])
</script>

<template>
  <input
    :value="props.modelValue"
    @input="emit('update:modelValue', $event.target.value)"
  />
</template>
父组件
<!-- Parent.vue -->
<Child
  :modelValue="foo"
  @update:modelValue="$event => (foo = $event)"
/>未使用defineModel 的代码显得十分冗长,使用defineModel 后可简洁如下:
子组件
<!-- Child.vue -->
<script setup>
const model = defineModel()
</script>

<template>
  <span>My input</span> <input v-model="model">
</template>
父组件
<!-- Parent.vue -->
<script setup>
import Child from './Child.vue'
import { ref } from 'vue'

const msg = ref('Hello World!')
</script>

<template>
  <h1>{{ msg }}</h1>
  <Child v-model="msg" />
</template>
因为 defineModel 相当于在底层声明了一个 prop,你可以通过给 defineModel 传递选项,来声明底层 prop 的选项:
// 使 v-model 必填
const model = defineModel({ required: true })

// 提供一个默认值
const model = defineModel({ default: 0 })
注意:
如果为 defineModel prop 设置了一个 default 值且父组件没有为该 prop 提供任何值,会导致父组件与子组件之间不同步。在下面的示例中,父组件的 myRef 是 undefined,而子组件的 model 是 1:
// 子组件:
const model = defineModel({ default: 1 })

// 父组件
const myRef = ref()
<Child v-model="myRef"></Child>
v-model 的参数
组件上的 v-model 也可以接受一个参数:
<MyComponent v-model:title="bookTitle" />在子组件中,我们可以通过将字符串作为第一个参数传递给 defineModel() 来支持相应的参数:
<!-- MyComponent.vue -->
<script setup>
const title = defineModel('title')
</script>

<template>
  <input type="text" v-model="title" />
</template>
如果需要额外的 prop 选项,应该在 model 名称之后传递:
const title = defineModel('title', { required: true })3.4 之前的用法
<!-- MyComponent.vue -->
<script setup>
defineProps({
  title: {
    required: true
  }
})
defineEmits(['update:title'])
</script>

<template>
  <input
    type="text"
    :value="title"
    @input="$emit('update:title', $event.target.value)"
  />
</template>
多个v-model的使用方法
<!-- Parent.vue -->
<UserName
  v-model:first-name="first"
  v-model:last-name="last"
/>
<!-- Child.vue -->
<script setup>
const firstName = defineModel('firstName')
const lastName = defineModel('lastName')
</script>
<template>
<input type="text" v-model="firstName" />
<input type="text" v-model="lastName" />
</template>3.4 之前的用法
<script setup>
defineProps({
  firstName: String,
  lastName: String
})

defineEmits(['update:firstName', 'update:lastName'])
</script>

<template>
  <input
    type="text"
    :value="firstName"
    @input="$emit('update:firstName', $event.target.value)"
  />
  <input
    type="text"
    :value="lastName"
    @input="$emit('update:lastName', $event.target.value)"
  />
</template>
处理 v-model 修饰符
如下所示,capitalize(将输入的字符串值第一个字母转为大写)为自定义的修饰符:
<MyComponent v-model.capitalize="myText" />解构 defineModel() 的返回值,可以在子组件中访问添加到组件 v-model 的修饰符:
<script setup>
const [model, modifiers] = defineModel()

console.log(modifiers) // { capitalize: true }
</script>

<template>
  <input type="text" v-model="model" />
</template>
defineModel() 中传入 get 和 set 这两个选项,在从模型引用中读取或设置值时会接收到当前的值,并且它们都应该返回一个经过处理的新值。下面是一个例子,展示了如何利用 set 选项来应用 capitalize (首字母大写) 修饰符:
<script setup>
const [model, modifiers] = defineModel({
  set(value) {
    if (modifiers.capitalize) {
      return value.charAt(0).toUpperCase() + value.slice(1)
    }
    return value
  }
})
</script>

<template>
  <input type="text" v-model="model" />
</template>
3.4 之前的用法
<script setup>
const props = defineProps({
  modelValue: String,
  modelModifiers: { default: () => ({}) }
})

const emit = defineEmits(['update:modelValue'])

function emitValue(e) {
  let value = e.target.value
  if (props.modelModifiers.capitalize) {
    value = value.charAt(0).toUpperCase() + value.slice(1)
  }
  emit('update:modelValue', value)
}
</script>

<template>
  <input type="text" :value="modelValue" @input="emitValue" />
</template>
使用多个不同参数的 v-model 时使用修饰符:
<!-- Parent.vue -->
<UserName
  v-model:first-name.capitalize="first"
  v-model:last-name.uppercase="last"
/>

<!-- Child.vue -->
<script setup>
const [firstName, firstNameModifiers] = defineModel('firstName')
const [lastName, lastNameModifiers] = defineModel('lastName')

console.log(firstNameModifiers) // { capitalize: true }
console.log(lastNameModifiers) // { uppercase: true }
</script>
透传 Attributes
Attributes 继承
“透传 attribute”指的是传递给一个组件,却没有被该组件声明为 props 或 emits 的 attribute 或者 v-on 事件监听器。最常见的例子就是 class、style 和 id及其他传递了但没有声明使用的prop。
如下例子,一个组件以单个元素为根作渲染时,透传的 attribute 会自动被添加到根元素上。
<!-- <MyButton> -->
<button>Click Me</button>

<!-- Parent.vue -->
<MyButton class="large" />

<!-- 最后渲染出的 DOM 结果 -->
<!-- 父组件中的class透传到了MyButton组件的根元素button 上 -->
<button class="large">Click Me</button>
对 class 和 style 的合并
如果一个子组件的根元素已经有了 class 或 style attribute,它会和从父组件上继承的值合并。
<!-- <MyButton> -->
<button class="btn">Click Me</button>

<!-- Parent.vue -->
<MyButton class="large" />

<!-- 最后渲染出的 DOM 结果 -->
<button class="large btn">Click Me</button>
v-on 监听器继承
规则同上,而且事件也会合并。如果原生 button 元素自身也通过 v-on 绑定了一个事件监听器,则这个监听器和从父组件继承的监听器都会被触发。
深层组件继承
如果一个组件 (甲) 的根节点是另一个组件 (乙) ,甲组件接收的透传 attribute 会直接继续传给乙组件。
注意:
- 透传的 attribute 不会包含 甲组件 上声明过的 props 或是针对 emits 声明事件的 v-on 侦听函数,换句话说,声明过的 props 和侦听函数被 甲组件 “消费”了。
- 透传的 attribute 若符合声明,也可以作为 props 传入 乙组件。
禁用 Attributes 继承
如果要禁止一个组件自动继承attribute,可以在组件选项中设置 inheritAttrs: false。
Vue3.3+的使用方法,直接在 <script setup> 中使用 defineOptions:
<script setup>
defineOptions({
  inheritAttrs: false
})
// ...setup 逻辑
</script>
最常见的需要禁用 attribute 继承的场景就是 attribute 需要应用在根节点以外的其他元素上。通过设置 inheritAttrs 选项为 false,你可以完全控制透传进来的 attribute 被如何使用。
这些透传进来的 attribute 可以在模板的表达式中直接用 $attrs 访问到。
<span>Fallthrough attribute: {{ $attrs }}</span>注意:
- 和 props 有所不同,透传 attributes 在 JavaScript 中保留了它们原始的大小写,所以像 foo-bar 这样的一个 attribute 需要通过 $attrs['foo-bar'] 来访问。
- 像 @click 这样的一个 v-on 事件监听器将在此对象下被暴露为一个函数 $attrs.onClick。
如下例,如果我们要想在 <MyButton> 中的button接收透传进来的 attribute,而不是外层div上
<!-- <MyButton> -->
<div class="btn-wrapper">
  <button class="btn">Click Me</button>
</div>

<!-- Parent.vue -->
<MyButton class="large" />
则需要将 <MyButton> 改为:
<script setup>
defineOptions({
  inheritAttrs: false
})
</script>

<div class="btn-wrapper">
  <button class="btn" v-bind="$attrs">Click Me</button>
</div>
多根节点的 Attributes 继承
和单根节点组件有所不同,有着多个根节点的组件没有自动 attribute 透传行为。如果 $attrs 没有被显式绑定,将会抛出一个运行时警告。
如下例中,子组件中因为有多个根节点,并且没有显式绑定$attrs,控制台就会抛出一个警告。
<!-- Parent.vue -->
<CustomLayout id="custom-layout" @click="changeValue" />

<!-- Child.vue -->
<header>...</header>
<main>...</main>
<footer>...</footer>
需要在子组件中绑定$attrs,警告就会消失:
<!-- Child.vue -->
<header>...</header>
<main v-bind="$attrs">...</main>
<footer>...</footer>
在 JavaScript 中访问透传 Attributes
如果需要,你可以在 <script setup> 中使用 useAttrs() API 来访问一个组件的所有透传 attribute:
<script setup>
import { useAttrs } from 'vue'

const attrs = useAttrs()
</script>
如果使用的setup选项:
export default {
  setup(props, ctx) {
    // 透传 attribute 被暴露为 ctx.attrs
    console.log(ctx.attrs)
  }
}
注意:
虽然这里的 attrs 对象总是反映为最新的透传 attribute,但它并不是响应式的 (考虑到性能因素)。你不能通过侦听器去监听它的变化。如果你需要响应性,可以使用 prop。或者你也可以使用 onUpdated() 使得在每次更新时结合最新的 attrs 执行副作用。