这一节,接 音视频开发12 FFmpeg 解复用详情分析,前面我们已经对一个 MP4文件,或者 FLV文件,或者TS文件进行了 解复用,解出来的 视频是H264,音频是AAC,那么接下来就要对H264和AAC进行处理,这一节 主要是对 AAC进行处理。
⾳频解码过程

FFmpeg流程解码过程

关键函数说明
1.找到想要的编解码器
const AVCodec *avcodec_find_decoder(enum AVCodecID id);
根据AVCodecID 查找对应的AVCodec
根据AVCodecID 查找对应的AVCodec
/**
 * Find a registered decoder with a matching codec ID.
 *
 * @param id AVCodecID of the requested decoder
 * @return A decoder if one was found, NULL otherwise.
 */
const AVCodec *avcodec_find_decoder(enum AVCodecID id);


这个 AVCodecID 代表的是 解码器 或者 编码器 的 ID

enum AVCodecID {
    AV_CODEC_ID_NONE,
    ......

    //video codecs
    AV_CODEC_ID_H264,
    ......

    //audio codecs
    AV_CODEC_ID_MP3,
    AV_CODEC_ID_AAC,
    ......

    //pcm codecs
    AV_CODEC_ID_PCM_U16LE

    //subtitle codecs
    AV_CODEC_ID_DVD_SUBTITLE

}但是这里有一个问题,就是我们一般在解析一个文件的时候,并不知道这个文件的音频和视频用的什么编码,也就不知道用什么解码器解码比较好,合理的写法有两种,如下:
第一种,在前面解封装的时候,通过 avformat_find_stream_info 方法我们得到过文件的详细信息:然后通过 avformatcontext 得到 每一个AVStream,通过AVStream就可以得到codecid,然后就可以得到AVCodec。
但是这里无法分清楚那个是音频,哪个是视频,还需要进一步的判断:
    for (i = 0; i < ifmt_ctx->nb_streams; i++) {
        AVStream *stream = avformatcontext->streams[i];
        const AVCodec *dec = avcodec_find_decoder(stream->codecpar->codec_id);

        。。。。。。
    }
另一种方式:使用 av_find_best_stream 函数 获得指定的 avformatcontext中的最佳的stream。这时候通过传递进去一个 AVCodec,方法完成后就能得到对应的AVCodec
注意你要得到的 解码器 avcodec,是通过指针的形式传递进去的。
int av_find_best_stream(AVFormatContext *avformatcontext,
                        enum AVMediaType type,
                        int wanted_stream_nb,
                        int related_stream,
                        const struct AVCodec **decoder_ret,
                        int flags);

参数说明
ic:AVFormatContext指针,表示输入的媒体文件上下文。
type:要查找的媒体流类型,可以是音频流、视频流或字幕流等。
wanted_stream_nb:期望的媒体流索引号,可以是特定的索引号,也可以是AV_NOPTS_VALUE(-1)表示任意流。
related_stream:前一个相关流的索引号,如果没有前一个相关流,则传入-1。
decoder_ret:返回解码器指针。
flags:查找最佳流的标志位,默认为0。
返回值:
找到的最佳匹配媒体流的索引号,如果找不到则返回AVERROR_STREAM_NOT_FOUND。


 * @return  the non-negative stream number in case of success,
 *          AVERROR_STREAM_NOT_FOUND if no stream with the requested type
 *          could be found,
 *          AVERROR_DECODER_NOT_FOUND if streams were found but no decoder
 *
 * @note  If av_find_best_stream returns successfully and decoder_ret is not
 *        NULL, then *decoder_ret is guaranteed to be set to a valid AVCodec.
•avcodec_find_decoder_by_name():根据解码器名字 找到解码器,这里有一个问题,这个name从哪里得到呢?
在windows cmd 下,输入 ffmpeg -h,就可以看到
Print help / information / capabilities:
-L                  show license
-h <topic>          show help
-version            show version
-muxers             show available muxers
-demuxers           show available demuxers
-devices            show available devices
-decoders           show available decoders
-encoders           show available encoders
-filters            show available filters
-pix_fmts           show available pixel formats
-layouts            show standard channel layouts
-sample_fmts        show available audio sample formats
我们是要找解码器的,因此 ffmpeg -decoders 就可以将所有的解码器列出来,为了方便查找,还可以将存储到 一个txt 中
ffmpeg -decoders > a.txt
在a.txt中看当前ffmpeg 支持的 decoder 的name有哪些,对应的如下的012v,4xm就是video的解码器名字,也可以当前查找关键字,例如aac,h264 就更快一些。
Decoders:
 V..... = Video
 A..... = Audio
 S..... = Subtitle
 .F.... = Frame-level multithreading
 ..S... = Slice-level multithreading
 ...X.. = Codec is experimental
 ....B. = Supports draw_horiz_band
 .....D = Supports direct rendering method 1
 ------
 V....D 012v                 Uncompressed 4:2:2 10-bit
 V....D 4xm                  4X Movie
 V....D 8bps                 QuickTime 8BPS video
...................
 A....D aac                  AAC (Advanced Audio Coding)
 A....D aac_fixed            AAC (Advanced Audio Coding) (codec aac)
 A....D libfdk_aac           Fraunhofer FDK AAC (codec aac)
 A....D aac_latm             AAC LATM (Advanced Audio Coding LATM syntax)
.................

 V....D h261                 H.261
 V...BD h263                 H.263 / H.263-1996, H.263+ / H.263-1998 / H.263 version 2
 V...BD h263i                Intel H.263
 V...BD h263p                H.263 / H.263-1996, H.263+ / H.263-1998 / H.263 version 2
 VFS..D h264                 H.264 / AVC / MPEG-4 AVC / MPEG-4 part 10
 VFS..D hap                  Vidvox Hap
 VF...D hdr                  HDR (Radiance RGBE format) image
/**
* Find a registered decoder with the specified name.
*
* @param name name of the requested decoder
* @return A decoder if one was found, NULL otherwise.
*/
const AVCodec *avcodec_find_decoder_by_name(const char *name);到这里,我们就有了解码器了(AVCodec),有了解码器还不行,还需要有解码器上下文,这里谈一下为什么有了解码器 还需要有 解码器上下文。
假设有一个视频文件,里面有3路视频,3路音频,有两路视频都是H264的,如果数据都保存到解码器里面,多路解码的时候,数据会有冲突,因此要多设计一个AVCodecContext.
也就是说,在ffmpeg 中,AVCodec 中一般存储的是方法,AVCodecContext 中则存储了该AVCodec中的具体数据。实际上 ffmpeg 中一直就延续这种风格,xxxcontext中存储的都是对应的xxx的数据,而 xxx中则是对应的方法之类的。
我们具体的来看:struct AVCodec
我们观察AVCodec, 看到AVCodec 中的内容,都是
该 AVCodec支持的supported_framerates 数组。
该 AVCodec支持的 enum AVPixelFormat *pix_fmt 数组。
该 AVCodec支持的 supported_samplerates 数组。
该 AVCodec支持的 AVSampleFormat 数组。
typedef struct AVCodec {
    /**
     * Name of the codec implementation.
     * The name is globally unique among encoders and among decoders (but an
     * encoder and a decoder can share the same name).
     * This is the primary way to find a codec from the user perspective.
     */
    const char *name;
    /**
     * Descriptive name for the codec, meant to be more human readable than name.
     * You should use the NULL_IF_CONFIG_SMALL() macro to define it.
     */
    const char *long_name;
    enum AVMediaType type;
    enum AVCodecID id;
    /**
     * Codec capabilities.
     * see AV_CODEC_CAP_*
     */
    int capabilities;
    uint8_t max_lowres;                     ///< maximum value for lowres supported by the decoder
    const AVRational *supported_framerates; ///< array of supported framerates, or NULL if any, array is terminated by {0,0}
    const enum AVPixelFormat *pix_fmts;     ///< array of supported pixel formats, or NULL if unknown, array is terminated by -1
    const int *supported_samplerates;       ///< array of supported audio samplerates, or NULL if unknown, array is terminated by 0
    const enum AVSampleFormat *sample_fmts; ///< array of supported sample formats, or NULL if unknown, array is terminated by -1
    const AVClass *priv_class;              ///< AVClass for the private context
    const AVProfile *profiles;              ///< array of recognized profiles, or NULL if unknown, array is terminated by {AV_PROFILE_UNKNOWN}

    /**
     * Group name of the codec implementation.
     * This is a short symbolic name of the wrapper backing this codec. A
     * wrapper uses some kind of external implementation for the codec, such
     * as an external library, or a codec implementation provided by the OS or
     * the hardware.
     * If this field is NULL, this is a builtin, libavcodec native codec.
     * If non-NULL, this will be the suffix in AVCodec.name in most cases
     * (usually AVCodec.name will be of the form "<codec_name>_<wrapper_name>").
     */
    const char *wrapper_name;

    /**
     * Array of supported channel layouts, terminated with a zeroed layout.
     */
    const AVChannelLayout *ch_layouts;
} AVCodec;
再来看一下 AVCodecContext 的内容。里面存储了当前的avcodec的具体的数据,我们的这个
AVCodecContext 内容太多了。 这里如果要看,直接看源码比较好
2. 给解码器 分配 解码器上下文,并初始化一些default value,注意这时候 解码器上下文还是没有值
我们在这里debug 一下,看这时候 AVCodecContext 里面的内容是啥?
AVCodecContext *avcodec_alloc_context3(const AVCodec *codec);
/**
 * Allocate an AVCodecContext and set its fields to default values. The
 * resulting struct should be freed with avcodec_free_context().
 *
 * @param codec if non-NULL, allocate private data and initialize defaults
 *              for the given codec. It is illegal to then call avcodec_open2()
 *              with a different codec.
 *              If NULL, then the codec-specific defaults won't be initialized,
 *              which may result in suboptimal default settings (this is
 *              important mainly for encoders, e.g. libx264).
 *
 * @return An AVCodecContext filled with default values or NULL on failure.
 */
AVCodecContext *avcodec_alloc_context3(const AVCodec *codec);
3. 打开 解码器上下文 avcodec_open2
int avcodec_open2(AVCodecContext *avctx, const AVCodec *codec, AVDictionary **options);
/**
 * Initialize the AVCodecContext to use the given AVCodec. Prior to using this
 * function the context has to be allocated with avcodec_alloc_context3().
 *
 * The functions avcodec_find_decoder_by_name(), avcodec_find_encoder_by_name(),
 * avcodec_find_decoder() and avcodec_find_encoder() provide an easy way for
 * retrieving a codec.
 *
 * Depending on the codec, you might need to set options in the codec context
 * also for decoding (e.g. width, height, or the pixel or audio sample format in
 * the case the information is not available in the bitstream, as when decoding
 * raw audio or video).
 *
 * Options in the codec context can be set either by setting them in the options
 * AVDictionary, or by setting the values in the context itself, directly or by
 * using the av_opt_set() API before calling this function.
 *
 * Example:
 * @code
 * av_dict_set(&opts, "b", "2.5M", 0);
 * codec = avcodec_find_decoder(AV_CODEC_ID_H264);
 * if (!codec)
 *     exit(1);
 *
 * context = avcodec_alloc_context3(codec);
 *
 * if (avcodec_open2(context, codec, opts) < 0)
 *     exit(1);
 * @endcode
 *
 * In the case AVCodecParameters are available (e.g. when demuxing a stream
 * using libavformat, and accessing the AVStream contained in the demuxer), the
 * codec parameters can be copied to the codec context using
 * avcodec_parameters_to_context(), as in the following example:
 *
 * @code
 * AVStream *stream = ...;
 * context = avcodec_alloc_context3(codec);
 * if (avcodec_parameters_to_context(context, stream->codecpar) < 0)
 *     exit(1);
 * if (avcodec_open2(context, codec, NULL) < 0)
 *     exit(1);
 * @endcode
 *
 * @note Always call this function before using decoding routines (such as
 * @ref avcodec_receive_frame()).
 *
 * @param avctx The context to initialize.
 * @param codec The codec to open this context for. If a non-NULL codec has been
 *              previously passed to avcodec_alloc_context3() or
 *              for this context, then this parameter MUST be either NULL or
 *              equal to the previously passed codec.
 * @param options A dictionary filled with AVCodecContext and codec-private
 *                options, which are set on top of the options already set in
 *                avctx, can be NULL. On return this object will be filled with
 *                options that were not found in the avctx codec context.
 *
 * @return zero on success, a negative value on error
 * @see avcodec_alloc_context3(), avcodec_find_decoder(), avcodec_find_encoder(),
 *      av_dict_set(), av_opt_set(), av_opt_find(), avcodec_parameters_to_context()
 */
int avcodec_open2(AVCodecContext *avctx, const AVCodec *codec, AVDictionary **options);
4. 获取裸流的解析器上下文 AVCodecParserContext(数据) + AVCodecParser(方法)
AVCodecParserContext *av_parser_init(int codec_id);
parser = av_parser_init(codec->id);
5.打开输入文件
infile = fopen(filename, "rb");
if (!infile) {
fprintf(stderr, "Could not open %s\n", filename);
exit(1);
}
6.打开输出文件
outfile = fopen(outfilename, "wb");
if (!outfile) {
av_free(codec_ctx);
exit(1);
}
7. 从 输入文件中读取数据,注意技巧
由于我们读取的数据 是流,因此一个一个字节的读取,会比较安全,
data = inbuf;
data_size = fread(inbuf, 1, AUDIO_INBUF_SIZE, infile);
从infile 中读取,读取的数据存储到 inbuf 中,i并让data指向inbuf的头部指针。读取的大小为 AUDIO_INBUF_SIZE 20480
    //注意的是 我们给的 inbuf 的大小为 uint8_t inbuf[AUDIO_INBUF_SIZE + AV_INPUT_BUFFER_PADDING_SIZE];实际上为 20480 + 64,为什么要多一个64呢?
    //这个在 AV_INPUT_BUFFER_PADDING_SIZE 的说明中可以看到,大致意思是有些编解码器有优化,会用32或者64做为一整组数据,如果数据是该文件的末尾,那么就需要有一个buffer,那么64就比较合理
    //也就是说,我们这时候读取的aac 文件的前20480字节 在 inbuf中,
    在标头 <stdio.h> 定义
    size_t fread( void *restrict buffer, size_t size, size_t count,
               FILE *restrict stream );


从给定输入流 stream 读取至多 count 个对象到数组 buffer 中,如同以对每个对象调用 size 次 fgetc ,并按顺序存储结果到转译为 unsigned char 数组的 buffer 中的相继位置。流的文件位置指示器前进读取的字符数。

若出现错误,则流的文件位置指示器的结果值不确定。若读入部分的元素,则元素值不确定。

参数

buffer - 指向要读取的数组中首个对象的指针
size - 每个对象的字节大小
count - 要读取的对象数
stream - 读取来源的输入文件流

返回值

成功读取的对象数,若出现错误或文件尾条件,则可能小于 count 。

若 size 或 count 为零,则 fread 返回零且不进行其他动作。
8. 通过av_parser_parse2函数将读取的数据 转化成 ffmpeg可以操作的 AVPacket
这时候数据已经到了inbuf 中了,也就是data指针的指向,我们要经过AVCodecParserContext和AVCodecContext将 data指向的数据转换成 ffmpeg 中可以操作的avpacket
ret = av_parser_parse2(parser, codec_ctx, &pkt->data, &pkt->size,
                      data, data_size,
                      AV_NOPTS_VALUE, AV_NOPTS_VALUE, 0);
// av_parser_parse2 函数说明,将 要转化的数据(第五个参数) 和 要转化的数据的大小(第六个参数),
//经过解析器和加码器 转化成 传出dada数据(第三个参数) 和 传出data数据大小(第四个参数)
//参数1:解析器上下文
//参数2:解码器上下文
//参数3:传出data数据,从参数5中读取到的数据经过 解析器 和 解码器 处理后,存放到这里
//参数4:传出data数据大小,从参数5中读取到的数据经过 解析器 和 解码器 处理后的大小,存放到这里
//参数5:要转化的数据地址
//参数6:要转化的数据大小
//参数7: 是否pts数据
//参数7: *@param pts输入演示时间戳。在这里输入AV_NOPTS_VALUE
//参数8: *@param dts输入解码时间戳。在这里输入AV_NOPTS_VALUE
//参数9: *@param pos输入流中的字节位置。在这里输入 0
// 从第5个参数buf中,拿数据,最多拿 buf_size个数据,实际上要拿很多次。
//返回值:为每次读取的数据大小。
//转化后传出的数据是 AVPacket格式,因此前面会通过 av_packet_alloc 分配
// int av_parser_parse2(AVCodecParserContext *s,
// AVCodecContext *avctx,
// uint8_t **poutbuf,
// int *poutbuf_size,
// const uint8_t *buf,
// int buf_size,
// int64_t pts,
// int64_t dts,
// int64_t pos);9.数据已经到AVPacket 了,那么就要将AVpacket 数据变成 AVframe数据了。
到这里需要学习和理解一下AVPacket 的知识点,链接为:
//这里的 我们通过 自己定义的decode 函数 将这一串串工作 包起来,核心工作是 通过 avcodec_send_packet 和 avcodec_receive_frame 完成的
自己包装起来的方法:
static void decode(AVCodecContext *dec_ctx, AVPacket *pkt, AVFrame *frame,
FILE *outfile)
核心实现是:
ret = avcodec_send_packet(dec_ctx, pkt);
ret = avcodec_receive_frame(dec_ctx, frame);
10.这时候数据已经转换成avframe了, 需要将avframe数据写入本地文件,并且测试
//到这里理论上 avframe 中 就有了pcm的数据了,那么这个pcm的数据是什么格式的呢?是几声道的呢?一个avframe中存储了多少数据呢?
//为什么要知道格式呢?因为不同的格式存储是不一样的,例如AV_SAMPLE_FMT_S16 和 AV_SAMPLE_FMT_S16P 就不一样
//一个是非平面的,一个是平面的。平面和非平面的存储方式是不一样的,这决定了我们如果如何将pcm数据存储起来。这里可以参考PCM的存储方式问题
//当然有几个声道也是必须知道的,因为平面存储和声道有关系的。
//当然不同的加码器 解码 AAC 后的 pcm 格式也不一样,ffmpeg默认带的是 aac是 对应 AV_SAMPLE_FMT_S32P 格式的,fdk-aac则是 对应的AV_SAMPLE_FMT_S16
//我们这里之所以关心 pcm 的格式是啥,主要的原因是我们要把pcm存储到本地,然后播放测试,但是pcm能播放的格式是 非planar的,因此如果是planar的,则存储的时候要重新排列。
//也就是说:我们这里有两个问题:非planar(交错模式)的pcm,我们要怎么存储呢? planar 的pcm 如何转换成非planar(交错模式),然后存储呢?
//需要注意的一点是planar仅仅是FFmpeg内部使用的储存模式,我们实际中所使用的音频都是packed模式的,也就是说我们使用FFmpeg解码出音频PCM数据后,如果需要写入到输出文件,应该将其转为packed模式的输出。
//为了弄清楚这个问题,我们需要翻看一下前面关于pcm的相关资料,然后从avframe中找到对应的 成员。
// 在avframe中, uint8_t *data[AV_NUM_DATA_POINTERS];代表了存储数据的真正位置,音频和视频都是这么存储的。AV_NUM_DATA_POINTERS的值是8
// 我们可以理解为 avframe 将音频分为8个声道,如果是planar模式,则每个声道存储在 data[i]中。如果是交错模式,则都存储在data[0] 中
//
//如果是交错模式,就是这样了:LRLRLRLRLRLR...... 每一个LR 就是一样音频帧,所有的数据都是存储在 avframe的第一个平面。
// 存储的位置已经有了,那么存储的大小是多少呢? 这就就要看 avframe 中的这个值了:int linesize[AV_NUM_DATA_POINTERS];
//我们既然已经得到了avformat,就可以通过avformat得到想到的值了。
// 通过 int av_sample_fmt_is_planar(enum AVSampleFormat sample_fmt); 知道是不是planar
主要用到的方法以及说明:
1.得到AVSampleFormat-采样格式
对于音频,先得到用的是那个 AVSampleFormat;对于视频 ,先得到用的是那个 AVPixelFormat
/**
* format of the frame, -1 if unknown or unset
* Values correspond to enum AVPixelFormat for video frames,
* enum AVSampleFormat for audio)
*/
enum AVSampleFormat avsampleformat = (enum AVSampleFormat)frame->format;
2.如果是音频,得到有多少声道
int nbchannels = frame->ch_layout.nb_channels;
3.每个声道有多少音频样本
int nb_samples = frame->nb_samples;
4.每个音频样本占多少位?
int data_size = av_get_bytes_per_sample(avsampleformat);
5.那么上述三者相乘 就可以得到这个 AVFrame 占了多少字节了,
nbchannels * nb_samples * data_size
6.还需要判断我们当前avframe 中的数据是 交错模式 还是 planar 模式。
int isplanar = av_sample_fmt_is_planar(avsampleformat);
1表示是planar 模式,0表示是交错模式。
是planar 模式 还是交错模式,是和我们用的解码器相关的。
对于aac 来说,如果用的默认的ffmpeg 自带的 aac,那么是planar模式;
如果使用的是 libfdk_aac, 则是交错模式;
在测试代码中我们两种都用了。
有了这些数据,怎么使用呢?
这就需要对于 AVFrame 这个类有一些认识了,参考链接:
P表示Planar(平面),其数据格式排列方式为 :
LLLLLLRRRRRRLLLLLLRRRRRRLLLLLLRRRRRRL...(每个LLLLLLRRRRRR为一个音频帧)
而不带P的数据格式(即交错排列)排列方式为:
LRLRLRLRLRLRLRLRLRLRLRLRLRLRLRLRLRLRL...(每个LR为一个音频样本)
播放范例: ffplay -ar 48000 -ac 2 -f f32le believe.pcm
7.以交错模式存储pcm数据
为啥要用交错模式存储pcm数据呢?用planar模式不行吗?
--不行,原因是 :planar仅仅是FFmpeg内部使用的储存模式,我们实际中所使用的音频都是packed模式的,也就是说我们使用FFmpeg解码出音频PCM数据后,如果需要写入到输出文件,应该将其转为packed模式的输出。
那么这个 planar模式有啥用呢?实际上再 传输的过程中,planar模式很重要,后面才会用到,这里先知道这玩意有用就行了。
7.1 以交错模式存储
注意,我们在存储交错模式的时候,存储的地方是 frame->data[0],那么要存储多少呢?
如下是两种写法,
一种是直接使用avframe 提供的 frame->linesize[0]
一种是 声道数 * 每个声道有多少个音频样本 * 每个样本占用多少个字节
用这两种方式生成了两个不同的pcm,
believejiaocuolinesize0.pcm 和 believejiaocuochannel_persameple.pcm。
对比,发现大小不一样
于是使用ffmpeg 6.0的命令 生成一个 48000_2_s16le.pcm,
发现 其大小和 believejiaocuochannel_persameple.pcm 相同
结论: 就用 nbchannels * frame->nb_samples * data_size 这种方法。
另外,打log,将每次 nbchannels * frame->nb_samples * data_size 的大小 和 frame->linesize[0]对比,发现,frame->linesize[0]在不满4096的时候,其实就是第一次log 和最后一次log,frame->linesize[0]都比nbchannels * frame->nb_samples * data_size 大 64,这说明在 AVFrame的内部实现机制上,也会有一个64的buffer
这里记住这个结论,使用的时候注意下,万一有问题,才回头看源码,目前这个阶段 源码有些地方还看不明白,暂时忽略
另外:这两个pcm播放起来是没有问题的。
还有一点,在使用ffmpeg 7.0 中的ffplay 播放的pcm的时候,ffplay -ar 48000 -ac 2 -f s16le believejiaocuolinesize0.pcm
总是提示 -ac 后面的值是2有问题,查看了ffmpeg 的官网,也没有说这个参数会变化呀,在源码中查找了一下,也没有看到 有啥变化,此处原因不明,
不管是自己build ffmpeg 7.0 添加了libfdk-aac的源码,还是ffmpeg7.0提供的full build 好的源码,ffplay -ac 的参数都不行
测试播放时使用 ffmpeg 6.1.1 中的ffplay
7.2 将 planar 模式转换成交错模式,然后存储
目的是将planar 模式的pcm转换成 交错模式然后 存储
//将 LLLLRRRR 变成LRLRLR的过程,对于planar 模式,frame->data[0]存储的是LLLLLL,frame->data[1]存储的是 RRRRRR,
//fwrite 函数的说明是,size_t fwrite( const void *restrict buffer, size_t size, size_t count, FILE *restrict stream );
//写 count 个来自给定数组 buffer 的对象到输出流stream。如同转译每个对象为 unsigned char 数组,并对每个对象调用 size 次 fputc 以将那些 unsigned char 按顺序写入 stream 一般写入。文件位置指示器前进写入的字节数。
for (i = 0; i < frame->nb_samples; i++)
{
for (ch = 0; ch < dec_ctx->ch_layout.nb_channels; ch++) // 交错的方式写入, 大部分float的格式输出
}8.测试播放
我们播放pcm 数据需要知道:采样率,声道数,采样格式
采样率:
int sample_rate = frame->sample_rate;
声道数:
int nbchannels = frame->ch_layout.nb_channels;
采样格式:
enum AVSampleFormat avsampleformat = (enum AVSampleFormat)frame->format;
如果使用的默认ffmpeg 的aac,这个值是8,对应 AV_SAMPLE_FMT_FLTP,是planar模式;
如果使用的libfdk_aac,,这个值是1,对应 AV_SAMPLE_FMT_S16,是交错模式。
当我们使用的交错模式的时候,那么播放使用命令为:
ffplay -ar 48000 -ac 2 -f s16le believe.pcm
如果我们是从 AV_SAMPLE_FMT_FLTP的planar 模式转换成 交错模式,那么播放使用命令为:
ffplay -ar 48000 -ac 2 -f f32le believe.pcm
这里-ar 48000 是log中看出来的,我们在转换的时候没有进行处理。
-ac 2 也是从log 中看出来的,我们在转换的时候也没有进行处理。
那么从 AV_SAMPLE_FMT_FLTP 转成 交错模式后,为什么-f 是 f32le呢?
这就要看ffmpeg 给我提供的 ffmpeg -sample_fmts 命令中的说明了,我们看到fltp 对应的是32,而我们是在windows上播放的,windows上用的是le,也就是小端模式,因此 -f后面的参数是f32le。
name depth
u8 8
s16 16
s32 32
flt 32
dbl 64
u8p 8
s16p 16
s32p 32
fltp 32
dblp 64
s64 64
s64p 649.额外说明:
在代码中,实际上还有一些技巧。
1.关于指针跳动和减去已经使用的size;
2.当读入的数据过小时,马上开始读取的一些优化操作,看代码时需要认真研读。
11. avcodec_send_packet、avcodec_receive_frame说明
avcodec_send_packet、avcodec_receive_frame的API是FFmpeg3版本加⼊的。为了正确
的使⽤它们,有必要阅读FFmpeg的⽂档说明(请点击链接)。
以下内容摘译⾃⽂档说明
FFmpeg提供了两组函数,分别⽤于编码和解码:
解码:avcodec_send_packet()、avcodec_receive_frame()。
解码:avcodec_send_frame()、avcodec_receive_packet()。
API的设计与编解码的流程⾮常贴切
建议的使⽤流程如下:
1. 像以前⼀样设置并打开AVCodecContext。
2. 输⼊有效的数据:
解码:调⽤avcodec_send_packet()给解码器传⼊包含原始的压缩数据的AVPacket对
象。
编码:调⽤ avcodec_send_frame()给编码器传⼊包含解压数据的AVFrame对象。
两种情况下推荐AVPacket和AVFrame都使⽤refcounted(引⽤计数)的模式,否则
libavcodec可能不得不对输⼊的数据进⾏拷⻉。
3. 在⼀个循环体内去接收codec的输出,即周期性地调⽤avcodec_receive_*()来接收codec
输出的数据:
解码:调⽤avcodec_receive_frame(),如果成功会返回⼀个包含未压缩数据的
AVFrame。
编码:调⽤avcodec_receive_packet(),如果成功会返回⼀个包含压缩数据的
AVPacket。
反复地调⽤avcodec_receive_packet()直到返回 AVERROR(EAGAIN)或其他错误。返回
AVERROR(EAGAIN)错误表示codec需要新的输⼊来输出更多的数据。对于每个输⼊的
packet或frame,codec⼀般会输出⼀个frame或packet,但是也有可能输出0个或者多
于1个。
4. 流处理结束的时候需要flush(冲刷) codec。因为codec可能在内部缓冲多个frame或
packet,出于性能或其他必要的情况(如考虑B帧的情况)。 处理流程如下:
调⽤avcodec_send_*()传⼊的AVFrame或AVPacket指针设置为NULL。 这将进⼊
draining mode(排⽔模式)。
反复地调⽤avcodec_receive_*()直到返回AVERROR_EOF,该⽅法在draining mode
时不会返回AVERROR(EAGAIN)的错误,除⾮你没有进⼊draining mode。
当重新开启codec时,需要先调⽤ avcodec_flush_buffers()来重置codec。
说明:
1. 编码或者解码刚开始的时候,codec可能接收了多个输⼊的frame或packet后还没有输出
数据,直到内部的buffer被填充满。上⾯的使⽤流程可以处理这种情况。
2. 理论上,只有在输出数据没有被完全接收的情况调⽤avcodec_send_*()的时候才可能会发
⽣AVERROR(EAGAIN)的错误。你可以依赖这个机制来实现区别于上⾯建议流程的处理⽅
式,⽐如每次循环都调⽤avcodec_send_*(),在出现AVERROR(EAGAIN)错误的时候再
去调⽤avcodec_receive_*()。
3. 并不是所有的codec都遵循⼀个严格、可预测的数据处理流程,唯⼀可以保证的是 “调⽤
avcodec_send_*()/avcodec_receive_*()返回AVERROR(EAGAIN)的时候去
avcodec_receive_*()/avcodec_send_*()会成功,否则不应该返回AVERROR(EAGAIN)
的错误。”⼀般来说,任何codec都不允许⽆限制地缓存输⼊或者输出。
4. 在同⼀个AVCodecContext上混合使⽤新旧API是不允许的,这将导致未定义的⾏为。
avcodec_send_packet
函数:int avcodec_send_packet(AVCodecContext *avctx, const AVPacket *avpkt);
作⽤:⽀持将裸流数据包送给解码器
警告:
输⼊的avpkt-data缓冲区必须⼤于AV_INPUT_PADDING_SIZE,因为优化的字节流读取
器必须⼀次读取32或者64⽐特的数据
不能跟之前的API(例如avcodec_decode_video2)混⽤,否则会返回不可预知的错误
备注:
在将包发送给解码器的时候,AVCodecContext必须已经通过avcodec_open2打开
参数:
avctx:解码上下⽂
avpkt:输⼊AVPakcet.通常情况下,输⼊数据是⼀个单⼀的视频帧或者⼏个完整的⾳频
帧。调⽤者保留包的原有属性,解码器不会修改包的内容。解码器可能创建对包的引⽤。
如果包没有引⽤计数将拷⻉⼀份。跟以往的API不⼀样,输⼊的包的数据将被完全地消耗,
如果包含有多个帧,要求多次调⽤avcodec_recvive_frame,直到
avcodec_recvive_frame返回VERROR(EAGAIN)或AVERROR_EOF。输⼊参数可以为
NULL,或者AVPacket的data域设置为NULL或者size域设置为0,表示将刷新所有的包,
意味着数据流已经结束了。第⼀次发送刷新会总会成功,第⼆次发送刷新包是没有必要
的,并且返回AVERROR_EOF,如果×××缓存了⼀些帧,返回⼀个刷新包,将会返回所有的
解码包
返回值:
0: 表示成功
AVERROR(EAGAIN):当前状态不接受输⼊,⽤户必须先使⽤avcodec_receive_frame() 读
取数据帧;
AVERROR_EOF:解码器已刷新,不能再向其发送新包;
AVERROR(EINVAL):没有打开解码器,或者这是⼀个编码器,或者要求刷新;
AVERRO(ENOMEN):⽆法将数据包添加到内部队列。
avcodec_receive_frame
函数:int avcodec_receive_frame ( AVCodecContext * avctx, AVFrame * frame )
作⽤:从解码器返回已解码的输出数据。
参数:
avctx: 编解码器上下⽂
frame: 获取使⽤reference-counted机制的audio或者video帧(取决于解码器类型)。请
注意,在执⾏其他操作之前,函数内部将始终先调⽤av_frame_unref(frame)。
返回值:
0: 成功,返回⼀个帧
AVERROR(EAGAIN): 该状态下没有帧输出,需要使⽤avcodec_send_packet发送新的
packet到解码器
AVERROR_EOF: 解码器已经被完全刷新,不再有输出帧
AVERROR(EINVAL): 编解码器没打开
其他<0的值: 具体查看对应的错误码12. 刷新解码器,
/* 冲刷解码器 */
pkt->data = NULL; // 让其进入drain mode
pkt->size = 0;
decode(codec_ctx, pkt, decoded_frame, outfile);源码demo:
/**
* @projectName 07-05-decode_audio
* @brief 解码音频,主要的测试格式aac和mp3
* @author Liao Qingfu
* @date 2020-01-16
*/
#include <stdio.h>
#include <stdlib.h>
#include <string.h>
#include <libavutil/frame.h>
#include <libavutil/mem.h>
#include <libavcodec/avcodec.h>
#include <libavutil/samplefmt.h>
#include <libavformat/avformat.h>
#define AUDIO_INBUF_SIZE 20480
#define AUDIO_REFILL_THRESH 4096
static char err_buf[128] = {0};
static char* av_get_err(int errnum)
{
av_strerror(errnum, err_buf, 128);
return err_buf;
}
static void print_sample_format(const AVFrame *frame)
{
printf("ar-samplerate: %uHz\n", frame->sample_rate);
printf("ac-channel: %u\n", frame->ch_layout.nb_channels);
printf("f-format: %u\n", frame->format);// 格式需要注意,实际存储到本地文件时已经改成交错模式
}
//这里的 pkt 中存储的是从 infile 读取到的数据,通过 avcodec_send_packet 将avpacket的数据发送到 AVCodecContext,
//AVCodecContext内部会处理,将avpacket 转化成 avframe
static void decode(AVCodecContext *dec_ctx, AVPacket *pkt, AVFrame *frame,
FILE *outfile)
{
int i, ch;
int ret, data_size;
/* send the packet with the compressed data to the decoder */
//返回值为0,表示发送成功,如果为EAGAIN 表示要重新读,如果是其他error,说明该方法调用有问题
ret = avcodec_send_packet(dec_ctx, pkt);
if(ret == AVERROR(EAGAIN))
{
fprintf(stderr, "Receive_frame and send_packet both returned EAGAIN, which is an API violation.\n");
}
else if (ret < 0)
{
fprintf(stderr, "Error submitting the packet to the decoder, err:%s, pkt_size:%d\n",
av_get_err(ret), pkt->size);
// exit(1);
return;
}
/* read all the output frames (infile general there may be any number of them */
while (ret >= 0)
{
// 对于frame, avcodec_receive_frame内部每次都先调用
ret = avcodec_receive_frame(dec_ctx, frame);
if (ret == AVERROR(EAGAIN) || ret == AVERROR_EOF)
return;
else if (ret < 0)
{
fprintf(stderr, "Error during decoding\n");
exit(1);
}
//到这里理论上 frame 中 就有了pcm的数据了,那么这个pcm的数据是什么格式的呢?是几声道的呢?一个音频帧有多少个字节呢?
//为什么要知道格式呢?因为不同的格式存储是不一样的,例如AV_SAMPLE_FMT_S16 和 AV_SAMPLE_FMT_S16P 就不一样
//一个是非平面的,一个是平面的。平面和非平面的存储方式是不一样的,这决定了我们如果如何将pcm数据存储起来。这里可以参考PCM的存储方式问题
//当然有几个声道也是必须知道的,因为平面存储和声道有关系的。
//当然不同的加码器 解码 AAC 后的 pcm 格式也不一样,ffmpeg默认带的是 aac是 对应 AV_SAMPLE_FMT_S32P 格式的,fdk-aac则是 对应的AV_SAMPLE_FMT_S16
//我们这里之所以关心 pcm 的格式是啥,主要的原因是我们要把pcm存储到本地,然后播放测试,但是pcm能播放的格式是 非planar的,因此如果是planar的,则存储的时候要重新排列。
//也就是说:我们这里有两个问题:非planar(交错模式)的pcm,我们要怎么存储呢? planar 的pcm 如何转换成非planar(交错模式),然后存储呢?
//需要注意的一点是planar仅仅是FFmpeg内部使用的储存模式,我们实际中所使用的音频都是packed模式的,也就是说我们使用FFmpeg解码出音频PCM数据后,如果需要写入到输出文件,应该将其转为packed模式的输出。
//为了弄清楚这个问题,我们需要翻看一下前面关于pcm的相关资料,然后从avframe中找到对应的 成员。
// 在avframe中, uint8_t *data[AV_NUM_DATA_POINTERS];代表了存储数据的真正位置,音频和视频都是这么存储的。AV_NUM_DATA_POINTERS的值是8
// 我们可以理解为 avframe 将音频分为8个声道,如果是planar模式,则每个声道存储在 data[i]中。如果是交错模式,则都存储在data[0] 中
//
//如果是交错模式,就是这样了:LRLRLRLRLRLR...... 每一个LR 就是一样音频帧,所有的数据都是存储在 avframe的第一个平面。
// 存储的位置已经有了,那么存储的大小是多少呢? 这就就要看 avframe 中的这个值了:int linesize[AV_NUM_DATA_POINTERS];
//我们既然已经得到了avformat,就可以通过avformat得到想到的值了。
// 通过 int av_sample_fmt_is_planar(enum AVSampleFormat sample_fmt); 知道是不是planar
enum AVSampleFormat avsampleformat = (enum AVSampleFormat)frame->format;
printf("avsampleformat = %d\n",avsampleformat);
int linesize0 = frame->linesize[0];
// printf("linesize0 = %d\n",linesize0);
int nbchannels = frame->ch_layout.nb_channels;
// printf("nbchannels = %d\n",nbchannels);
int sample_rate = frame->sample_rate;
printf("sample_rate = %d\n",sample_rate); // 48000
int nb_samples = frame->nb_samples;
printf("nb_samples = %d\n",nb_samples); //1024 实际上就是一个aac 的avframe,应该有1024个样本
int isplanar = av_sample_fmt_is_planar(avsampleformat);
// printf("isplanar = %d\n",isplanar);
data_size = av_get_bytes_per_sample(dec_ctx->sample_fmt);
// printf("111 dec_ctx->sample_fmt = %d\n",dec_ctx->sample_fmt);
// printf("data_size = %d\n",data_size);
if (data_size < 0)
{
/* This should not occur, checking just for paranoia */
fprintf(stderr, "Failed to calculate data size\n");
exit(1);
}
static int s_print_format = 0;
//根据自己在该方法前面加的log打印,就会明白,这里为什么要有一个 static int s_print_format,因为这个方法会不停的走进来,打印的太多了
if(s_print_format == 0)
{
s_print_format = 1;
print_sample_format(frame);
}
/**
P表示Planar(平面),其数据格式排列方式为 :
LLLLLLRRRRRRLLLLLLRRRRRRLLLLLLRRRRRRL...(每个LLLLLLRRRRRR为一个音频帧)
而不带P的数据格式(即交错排列)排列方式为:
LRLRLRLRLRLRLRLRLRLRLRLRLRLRLRLRLRLRL...(每个LR为一个音频样本)
播放范例: ffplay -ar 48000 -ac 2 -f f32le believe.pcm
*/
if(isplanar){
static int s_print_format111 = 0;
//根据自己在该方法前面加的log打印,就会明白,这里为什么要有一个 static int s_print_format,因为这个方法会不停的走进来,打印的太多了
if(s_print_format111 == 0)
{
s_print_format111 = 1;
printf("isplanner insert data ... \n");
}
//将 LLLLRRRR 变成LRLRLR的过程,对于planar 模式,frame->data[0]存储的是LLLLLL,frame->data[1]存储的是 RRRRRR,
//fwrite 函数的说明是,size_t fwrite( const void *restrict buffer, size_t size, size_t count, FILE *restrict stream );
//写 count 个来自给定数组 buffer 的对象到输出流stream。如同转译每个对象为 unsigned char 数组,并对每个对象调用 size 次 fputc 以将那些 unsigned char 按顺序写入 stream 一般写入。文件位置指示器前进写入的字节数。
for (i = 0; i < frame->nb_samples; i++)
{
for (ch = 0; ch < dec_ctx->ch_layout.nb_channels; ch++) // 交错的方式写入, 大部分float的格式输出
fwrite(frame->data[ch] + data_size*i, 1, data_size, outfile);
}
} else {
static int s_print_format222 = 0;
//根据自己在该方法前面加的log打印,就会明白,这里为什么要有一个 static int s_print_format,因为这个方法会不停的走进来,打印的太多了
if(s_print_format222 == 0)
{
s_print_format222 = 1;
printf("not isplanner insert data ... \n");
}
//注意,我们在存储交错模式的时候,存储的地方是 frame->data[0],那么要存储多少呢?
//如下是两种写法,一种是直接使用avframe 提供的 frame->linesize[0]
//一种是 声道数 * 每个声道有多少个音频样本 * 每个样本占用多少个字节
//用这两种方式生成了两个不同的pcm,believejiaocuolinesize0.pcm 和 believejiaocuochannel_persameple.pcm 对比,发现大小不一样
//于是使用ffmpeg 6.0的命令 生成一个 48000_2_s16le.pcm,发现 其大小和 believejiaocuochannel_persameple.pcm 相同
//结论: 就用 nbchannels * frame->nb_samples * data_size 这种方法。
//另外,打log,将每次 nbchannels * frame->nb_samples * data_size 的大小 和 frame->linesize[0]对比,发现,frame->linesize[0]在不满4096的时候,其实就是第一次log 和最后一次log,frame->linesize[0]都比nbchannels * frame->nb_samples * data_size 大 64,这说明在 AVFrame的内部实现机制上,也会有一个64的buffer
//这里记住这个结论,使用的时候注意下,万一有问题,才回头看源码,目前这个阶段 源码有些地方还看不明白,暂时忽略
//这两个pcm播放起来是没有问题的。
//还有一点,在使用ffmpeg 7.0 中的ffplay 播放的pcm的时候,ffplay -ar 48000 -ac 2 -f s16le believejiaocuolinesize0.pcm
// 总是提示 -ac 后面的值是2有问题,查看了ffmpeg 的官网,也没有说这个参数会变化呀,在源码中查找了一下,也没有看到 有啥变化,此处原因不明,
//不管是自己build ffmpeg 7.0 添加了libfdk-aac的源码,还是ffmpeg7.0提供的full build 好的源码,ffplay -ac 的参数都不行
//测试播放时使用 ffmpeg 6.1.1 中的ffplay
//fwrite(frame->data[0], 1, frame->linesize[0], outfile);
fwrite(frame->data[0], 1, nbchannels * frame->nb_samples * data_size, outfile);
static int s_print_format333 = 0;
//根据自己在该方法前面加的log打印,就会明白,这里为什么要有一个 static int s_print_format,因为这个方法会不停的走进来,打印的太多了
// if(s_print_format333 == 0)
// {
s_print_format333 = 1;
printf("not isplanner insert data nbchannels * frame->nb_samples * data_size = %d ... \n",nbchannels * frame->nb_samples * data_size);
printf("frame->line[0] = %d\n",frame->linesize[0]);
// }
}
}
}
// 播放范例: ffplay -ar 48000 -ac 2 -f f32le believe.pcm
int main(int argc, char **argv)
{
//输出文件的名字
const char *outfilename;
//输入文件的名字
const char *filename;
//1.解码器
const AVCodec *codec;
//2.解码器上下文
AVCodecContext *codec_ctx= NULL;
//3.解析器上下文,解码的时候要用到这个。
AVCodecParserContext *parser = NULL;
int len = 0;
int ret = 0;
FILE *infile = NULL;
FILE *outfile = NULL;
uint8_t inbuf[AUDIO_INBUF_SIZE + AV_INPUT_BUFFER_PADDING_SIZE];
uint8_t *data = NULL;
size_t data_size = 0;
AVPacket *pkt = NULL;
AVFrame *decoded_frame = NULL;
//我们这里直接指定文件,不使用参数传递的形式
// if (argc <= 2)
// {
// fprintf(stderr, "Usage: %s <input file> <output file>\n", argv[0]);
// exit(0);
// }
// filename = argv[1];
// outfilename = argv[2];
filename = "D:/AllInformation/qtworkspacenew/07-05-decode_audio/believe.aac";
// outfilename = "D:/AllInformation/qtworkspacenew/07-05-decode_audio/believejiaocuolinesize0.pcm";
outfilename = "D:/AllInformation/qtworkspacenew/07-05-decode_audio/believejiaocuochannel_persameple.pcm";
pkt = av_packet_alloc();
enum AVCodecID audio_codec_id = AV_CODEC_ID_AAC;
if(strstr(filename, "aac") != NULL)
{
audio_codec_id = AV_CODEC_ID_AAC;
}
else if(strstr(filename, "mp3") != NULL)
{
audio_codec_id = AV_CODEC_ID_MP3;
}
else
{
printf("default codec id:%d\n", audio_codec_id);
}
// 1.查找解码器 AVCodec
// codec = avcodec_find_decoder(audio_codec_id); // AV_CODEC_ID_AAC
codec = avcodec_find_decoder_by_name("libfdk_aac");
if (!codec) {
fprintf(stderr, "Codec not found\n");
exit(1);
}
printf("编解码器id :codec->id = %d\n",codec->id);//86018 AV_CODEC_ID_AAC,
printf("编解码器的name :codec->name = %s\n",codec->name);//aac
printf("编解码器的long name :codec->long_name = %s\n",codec->long_name);//AAC (Advanced Audio Coding)
printf("编解码器的类型 :codec->type = %d\n",codec->type);//1,对应的是AVMediaType 是 AVMEDIA_TYPE_AUDIO
printf("解码支持的低分辨率的最大值 : codec->max_lowres = %d\n",codec->max_lowres); //由于当前测试的aac,是声音,因此这个值是0
printf("编解码器功能:codec->capabilities = %d\n",codec->capabilities);//0100 0000 0010 对应如下两个 | 起来, #define AV_CODEC_CAP_CHANNEL_CONF (1 << 10) #define AV_CODEC_CAP_DR1 (1 << 1)
//const AVRational *supported_framerates; ///< array of supported framerates, or NULL if any, array is terminated by {0,0}
//AVRational 是一个分子分母的结构,对于音频来说,就是采样率,每秒中采集的样本数量; 对于视频来说,就是每秒中播放多少帧。
if (codec->supported_framerates==NULL) {
printf("编解码器支持的帧速率阵列 codec->supported_framerates = null\n"); //结果为:codec->supported_framerates = null
} else {
int i =0;
while(1){
if(codec->supported_framerates[i].den == 0 && codec->supported_framerates[i].num == 0){
break;
}
else {
printf("编解码器支持的帧速率阵列 codec->supported_framerates[%d].den = %d,codec->supported_framerates[%d].num = %d\n",
i,codec->supported_framerates[i].den,i,codec->supported_framerates[i].num);
i++;
}
}
}
//const enum AVPixelFormat *pix_fmts; ///< array of supported pixel formats, or NULL if unknown, array is terminated by -1
//AVPixelFormat,AV_PIX_FMT_YUV420P,对应的是视频的格式,是YUVP的,还是RGB888的
if (codec->pix_fmts==NULL) {
printf("codec->pix_fmts = null\n"); //结果为:codec->pix_fmts = null
} else {
int i =0;
while(1){
if(codec->pix_fmts[i] == -1){
break;
}else{
printf("codec->pix_fmts[%d] = %d\n",i,codec->pix_fmts[i]);
i++;
}
}
}
//const enum AVSampleFormat *sample_fmts; ///< array of supported sample formats, or NULL if unknown, array is terminated by -1
// AVSampleFormat AV_SAMPLE_FMT_S16, 对应的是音频的 采样格式
if (codec->sample_fmts==NULL) {
printf("codec->sample_fmts = null\n");
} else {
int i =0;
while(1){
if(codec->sample_fmts[i] == -1){
break;
}else{
printf("codec->sample_fmts[%d] = %d\n",i,codec->sample_fmts[i]);//结果为:codec->sample_fmts[0] = 8,8对应的是AV_SAMPLE_FMT_FLTP ///< float, planar
i++;
}
}
}
//const int *supported_samplerates; ///< array of supported audio samplerates, or NULL if unknown, array is terminated by 0
//支持的音频采样率阵列
if (codec->supported_samplerates==NULL) {
printf("codec->supported_samplerates = null\n"); //结果为:codec->supported_samplerates = null
} else {
int i =0;
while(1){
if(codec->supported_samplerates[i] == 0){
break;
}else{
printf("codec->supported_samplerates[%d] = %d\n",i,codec->supported_samplerates[i]);
i++;
}
}
}
//const AVClass *priv_class; ///< AVClass for the private context
//这个 AVClass 暂时不知道在哪里用到。因此暂时不打印log
//const AVProfile *profiles; ///< array of recognized profiles, or NULL if unknown, array is terminated by {AV_PROFILE_UNKNOWN}
//已识别的配置文件阵列,这里理解为 当前编解码器应该有多种编解码方式,比如,AAC 有 LC模式,MAIN模式,等,
if (codec->profiles==NULL) {
printf("codec->profiles = null\n"); //这时候还是null
} else {
int i =0;
while(1){
if(codec->profiles[i].profile == AV_PROFILE_UNKNOWN){
break;
}else{
printf("codec->profiles[%d].name = %s\n",i,codec->profiles[i].name);
printf("codec->profiles[%d].profile = %d\n",i,codec->profiles[i].profile);
i++;
}
}
}
//const char *wrapper_name;
if (codec->wrapper_name==NULL) {
printf("codec->wrapper_name = null\n"); //这时候还是null
} else {
printf("codec->wrapper_name = %s\n",codec->wrapper_name);
}
// /**
// * Array of supported channel layouts, terminated with a zeroed layout.
// */
// const AVChannelLayout *ch_layouts;
//当前编解码器支持的 声道数量
if (codec->ch_layouts==NULL) {
printf("codec->ch_layouts = null\n");
} else {
int i =0;
while(1){
if(codec->ch_layouts[i].nb_channels==0){
break;
}else{
printf("codec->ch_layouts[i].nb_channels = %d\n",i,codec->ch_layouts[i].nb_channels);
i++;
}
}
}
printf("1111111\n");
// 2.分配codec上下文 AVCodecContext
codec_ctx = avcodec_alloc_context3(codec);
if (!codec_ctx) {
fprintf(stderr, "Could not allocate audio codec context\n");
exit(1);
}
printf("2222\n");
// 3.将解码器和解码器上下文进行关联
if (avcodec_open2(codec_ctx, codec, NULL) < 0) {
fprintf(stderr, "Could not open codec\n");
exit(1);
}
printf("33333333\n");
// 4.获取裸流的解析器 AVCodecParserContext(数据) + AVCodecParser(方法)
parser = av_parser_init(codec->id);
if (!parser) {
fprintf(stderr, "Parser not found\n");
exit(1);
}
printf("44444444\n");
// 5.打开输入文件
infile = fopen(filename, "rb");
if (!infile) {
fprintf(stderr, "Could not open %s\n", filename);
exit(1);
}
// 6.打开输出文件
outfile = fopen(outfilename, "wb");
if (!outfile) {
av_free(codec_ctx);
exit(1);
}
// 7.读取文件进行解码,从infile 中读取,读取的数据存储到 inbuf 中,i并让data指向inbuf的头部指针。读取的大小为 AUDIO_INBUF_SIZE 20480
//注意的是 我们给的 inbuf 的大小为 uint8_t inbuf[AUDIO_INBUF_SIZE + AV_INPUT_BUFFER_PADDING_SIZE];实际上为 20480 + 64,为什么要多一个64呢?
//这个在 AV_INPUT_BUFFER_PADDING_SIZE 的说明中可以看到,大致意思是有些编解码器有优化,会用32或者64做为一整组数据,如果数据是该文件的末尾,那么就需要有一个buffer,那么64就比较合理
//也就是说,我们这时候读取的aac 文件的前20480字节 在 inbuf中,
data = inbuf;
data_size = fread(inbuf, 1, AUDIO_INBUF_SIZE, infile);
while (data_size > 0)
{
if (!decoded_frame)
{
if (!(decoded_frame = av_frame_alloc()))
{
fprintf(stderr, "Could not allocate audio frame\n");
exit(1);
}
}
        // av_parser_parse2 函数说明,将 要转化的数据(第五个参数) 和 要转化的数据的大小(第六个参数),
        //经过解析器和加码器 转化成 传出dada数据(第三个参数) 和 传出data数据大小(第四个参数)
        //参数1:解析器上下文
        //参数2:解码器上下文
        //参数3:传出data数据,从参数5中读取到的数据经过 解析器 和 解码器 处理后,存放到这里
        //参数4:传出data数据大小,从参数5中读取到的数据经过 解析器 和 解码器 处理后的大小,存放到这里
        //参数5:要转化的数据地址
        //参数6:要转化的数据大小
        //参数7: 是否pts数据
        //参数7: *@param pts输入演示时间戳。在这里输入AV_NOPTS_VALUE
        //参数8: *@param dts输入解码时间戳。在这里输入AV_NOPTS_VALUE
        //参数9: *@param pos输入流中的字节位置。在这里输入 0
        // 从第5个参数buf中,拿数据,最多拿 buf_size个数据,实际上要拿很多次。
        //返回值:为每次读取的数据大小。
        //转化后传出的数据是 AVPacket格式,因此前面会通过 av_packet_alloc 分配
        //        int av_parser_parse2(AVCodecParserContext *s,
        //                             AVCodecContext *avctx,
        //                             uint8_t **poutbuf,
        //                             int *poutbuf_size,
        //                             const uint8_t *buf,
        //                             int buf_size,
        //                             int64_t pts,
        //                             int64_t dts,
        //                             int64_t pos);
ret = av_parser_parse2(parser, codec_ctx, &pkt->data, &pkt->size,
data, data_size,
AV_NOPTS_VALUE, AV_NOPTS_VALUE, 0);
if (ret < 0)
{
fprintf(stderr, "Error while parsing\n");
exit(1);
}
data += ret; // 跳过已经解析的数据
data_size -= ret; // 对应的缓存大小也做相应减小
//经过av_parser_parse2后,真正的数据,这时候已经在pkt 中了,因此要将pkt中的数据处理成 pcm数据。通过自己写的decode方法完成,解码后的数据就是 原始数据了,在ffmpeg中通过 AVFrame存储,因此这里要存储到 AVFrame中
if (pkt->size)
decode(codec_ctx, pkt, decoded_frame, outfile);
if (data_size < AUDIO_REFILL_THRESH) // 如果数据少了则再次读取
{
memmove(inbuf, data, data_size); // 把之前剩的数据拷贝到buffer的起始位置
data = inbuf;
// 读取数据 长度: AUDIO_INBUF_SIZE - data_size
len = fread(data + data_size, 1, AUDIO_INBUF_SIZE - data_size, infile);
if (len > 0)
data_size += len;
}
}
/* 冲刷解码器 */
    pkt->data = NULL;   // 让其进入drain mode
    pkt->size = 0;
    decode(codec_ctx, pkt, decoded_frame, outfile);
fclose(outfile);
fclose(infile);
avcodec_free_context(&codec_ctx);
av_parser_close(parser);
av_frame_free(&decoded_frame);
av_packet_free(&pkt);
printf("main finish, please enter Enter and exit\n");
return 0;
}


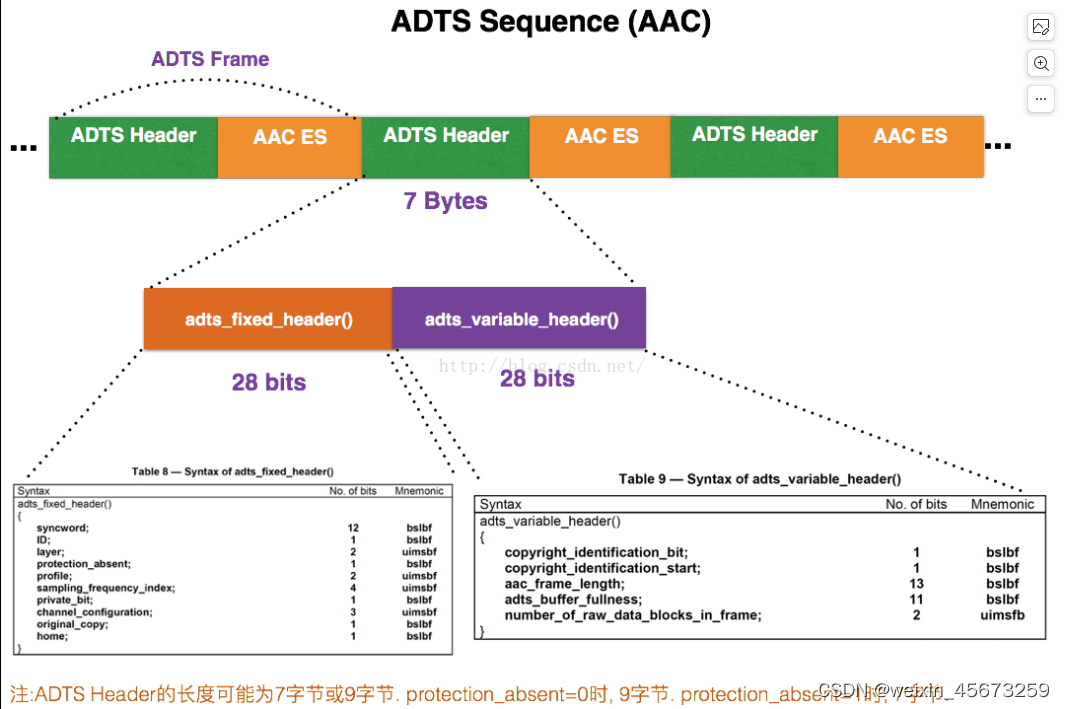
![[一]<span style='color:red;'>ffmpeg</span><span style='color:red;'>音</span><span style='color:red;'>视频</span><span style='color:red;'>解码</span>](https://img-blog.csdnimg.cn/direct/5ac1a3e1409c40158f019ca2e69b110e.png)










![[ubuntu]docker 卡登录 You‘ve been signed out](https://img-blog.csdnimg.cn/direct/fd95fb40f19941438656dcc3d986c927.png)


