代码实现的功能
1.重采样
1.1 为什么要重采样?
1.2 什么是重采样
1.3 可调节的参数
2 对应参数解析
2.1 采样率
2.2 采样格式及量化精度(位宽)
enum AVSampleFormat {
    AV_SAMPLE_FMT_NONE = -1,
    AV_SAMPLE_FMT_U8,          ///< unsigned 8 bits
    AV_SAMPLE_FMT_S16,         ///< signed 16 bits
    AV_SAMPLE_FMT_S32,         ///< signed 32 bits
    AV_SAMPLE_FMT_FLT,         ///< float
    AV_SAMPLE_FMT_DBL,         ///< double

    AV_SAMPLE_FMT_U8P,         ///< unsigned 8 bits, planar
    AV_SAMPLE_FMT_S16P,        ///< signed 16 bits, planar
    AV_SAMPLE_FMT_S32P,        ///< signed 32 bits, planar
    AV_SAMPLE_FMT_FLTP,        ///< float, planar
    AV_SAMPLE_FMT_DBLP,        ///< double, planar
    AV_SAMPLE_FMT_S64,         ///< signed 64 bits
    AV_SAMPLE_FMT_S64P,        ///< signed 64 bits, planar

    AV_SAMPLE_FMT_NB           ///< Number of sample formats. DO NOT USE if linking dynamically
};
2.3 平面模式和交错模式 - 分⽚(plane)和打包(packed)
2.4 声道分布(channel_layout)
#define AV_CH_LAYOUT_MONO              (AV_CH_FRONT_CENTER)
#define AV_CH_LAYOUT_STEREO            (AV_CH_FRONT_LEFT|AV_CH_FRONT_RIGHT)
#define AV_CH_LAYOUT_2POINT1           (AV_CH_LAYOUT_STEREO|AV_CH_LOW_FREQUENCY)
#define AV_CH_LAYOUT_2_1               (AV_CH_LAYOUT_STEREO|AV_CH_BACK_CENTER)
#define AV_CH_LAYOUT_SURROUND          (AV_CH_LAYOUT_STEREO|AV_CH_FRONT_CENTER)
2.5 ⾳频帧的数据量计算
u8        8
s16      16
s32      32
flt      32
dbl      64
u8p       8
s16p     16
s32p     32
fltp     32
dblp     64
s64      64
s64p 642.6 ⾳频播放时间计算
3 FFmpeg重采样API
3.1 分配⾳频重采样的上下⽂
/**
 * Allocate SwrContext.
 *
 * If you use this function you will need to set the parameters (manually or
 * with swr_alloc_set_opts2()) before calling swr_init().
 *
 * @see swr_alloc_set_opts2(), swr_init(), swr_free()
 * @return NULL on error, allocated context otherwise
 */
struct SwrContext *swr_alloc(void);
3.2 给音频重采样上下文设置参数
    /* set options */
    // 输入参数
    int64_t src_ch_layout = AV_CH_LAYOUT_STEREO;
    int src_rate = 48000;
    enum AVSampleFormat src_sample_fmt = AV_SAMPLE_FMT_DBL;

    // 设置输入参数
    av_opt_set_int(swr_ctx, "in_channel_layout",    src_ch_layout, 0);
    av_opt_set_int(swr_ctx, "in_sample_rate",       src_rate, 0);
    av_opt_set_sample_fmt(swr_ctx, "in_sample_fmt", src_sample_fmt, 0);


    // 输出参数
    int64_t dst_ch_layout = AV_CH_LAYOUT_STEREO;
    int dst_rate = 44100;
    enum AVSampleFormat dst_sample_fmt = AV_SAMPLE_FMT_S16;

    // 设置输出参数
    av_opt_set_int(swr_ctx, "out_channel_layout",    dst_ch_layout, 0);
    av_opt_set_int(swr_ctx, "out_sample_rate",       dst_rate, 0);
    av_opt_set_sample_fmt(swr_ctx, "out_sample_fmt", dst_sample_fmt, 0);
3.1.2 上述两步可以直接弄成一步
/**
 * Allocate SwrContext if needed and set/reset common parameters.
 *
 * This function does not require *ps to be allocated with swr_alloc(). On the
 * other hand, swr_alloc() can use swr_alloc_set_opts2() to set the parameters
 * on the allocated context.
 *
 * @param ps              Pointer to an existing Swr context if available, or to NULL if not.
 *                        On success, *ps will be set to the allocated context.
 * @param out_ch_layout   output channel layout (e.g. AV_CHANNEL_LAYOUT_*)
 * @param out_sample_fmt  output sample format (AV_SAMPLE_FMT_*).
 * @param out_sample_rate output sample rate (frequency in Hz)
 * @param in_ch_layout    input channel layout (e.g. AV_CHANNEL_LAYOUT_*)
 * @param in_sample_fmt   input sample format (AV_SAMPLE_FMT_*).
 * @param in_sample_rate  input sample rate (frequency in Hz)
 * @param log_offset      logging level offset
 * @param log_ctx         parent logging context, can be NULL
 *
 * @see swr_init(), swr_free()
 * @return 0 on success, a negative AVERROR code on error.
 *         On error, the Swr context is freed and *ps set to NULL.
 */
int swr_alloc_set_opts2(struct SwrContext **ps,
                        const AVChannelLayout *out_ch_layout, enum AVSampleFormat out_sample_fmt, int out_sample_rate,
                        const AVChannelLayout *in_ch_layout, enum AVSampleFormat  in_sample_fmt, int  in_sample_rate,
                        int log_offset, void *log_ctx);
3.3 当设置好相关的参数后,使⽤此函数来初始化SwrContext结构体
 * Initialize context after user parameters have been set.
 * @note The context must be configured using the AVOption API.
 *
 * @see av_opt_set_int()
 * @see av_opt_set_dict()
 *
 * @param[in,out]   s Swr context to initialize
 * @return AVERROR error code in case of failure.
 */
int swr_init(struct SwrContext *s);
3.4 创建输入缓冲区 - 这时候理论上是就要通过SwrContext 转化了,那么这里就有一个问题了,转化的数据应该放在哪里呢?--- 因此这一步 是 创建输入缓冲区
如何创建这个输入缓冲区呢?又根据哪些参数创建这个输入缓冲区呢?
很显然,输入缓冲区是要根据 输入的音频的三要素 来创建的。创建出来的缓冲区放在哪里呢?
int av_samples_alloc_array_and_samples(uint8_t ***audio_data,
int *linesize,
int nb_channels,
int nb_samples,
enum AVSampleFormat sample_fmt,
int align);
第一个参数audio_data为:输入缓冲区的首地址,是个三级指针,本质上是对于 一个二级指针的 取地址,out参数
这里要说明一下为什么 audio_data 是个三级指针,首先是一个输出参数,那么意味着,我们传递进来的要改动的就是二级指针,这个二级指针可以想象成是一个 uint8_t * audiodata[8], 每一个audiodata[i] 都是指向的 每个planar的具体数据。实际上这里就是为了兼容planar才弄了个三级指针。如果不考虑planar 的,二级指针就够了。
第二个参数linesize为:输入缓冲区对齐的音频缓冲区大小,可能为 NULL,out参数
这个linesize 是每个 audio_data[x]的大小,并不是输入缓冲区整体的大小。这个文档中并没有明确的说明,但是debug的时候可以发现。
我们以 2声道,1024个样本数, 每个样本都是s16le(2个字节),交错模式计算:
那么linesize 的 大小为:2*1024*2 = 4096字节
我们以 2声道,1024个样本数, 每个样本都是s16le(2个字节),planar模式计算:
那么linesize 的 大小为:2*1024 = 2048字节
因为在planar模式下,audio_data[0] 中存储的是LLLLLLLLL,audio_data[1] 中存储的是RRRRRRRR
只是当我们在交错模式的时候,所有的pcm的数据都是存储在 audio_data[0]中的,因此linesize就表示的全部的大小
如果在palnar模式下,
第三个参数nb_channels为:输入源的 声道数
第四个参数nb_samples为:输入源每个声道的样本数,aac 为1024。也就是说,aac每一帧有1024个样本帧,还记得采样率吗?采样率是44100的话,就说明1秒钟采集44100个样本帧。这里不要搞混淆了。
第五个参数sample_fmt为:输入源的AVSampleFormat -- 类似AV_SAMPLE_FMT_DBL
第六个参数align为:是否要字节对齐,0为对齐,1为不对齐,一般都要对齐
为什么通过3,4,5参数,就能计算出来 输入缓存大小呢?
还记得这个吗? 每一帧的大小 = 声道 * 每个声道的样本数量 * 每个样本的大小
这就对应着,参数3,4,5呀。通过5可以得到每个样本的大小。因此这么设计的内部实现,估计也就是这几个参数相乘得到的。再加上是否需要字节对齐。
/**
 * Allocate a samples buffer for nb_samples samples, and fill data pointers and
 * linesize accordingly.
 * The allocated samples buffer can be freed by using av_freep(&audio_data[0])
 * Allocated data will be initialized to silence.
 *
 * @see enum AVSampleFormat
 * The documentation for AVSampleFormat describes the data layout.
 *
 * @param[out] audio_data  array to be filled with the pointer for each channel
 * @param[out] linesize    aligned size for audio buffer(s), may be NULL
 * @param nb_channels      number of audio channels
 * @param nb_samples       number of samples per channel
 * @param sample_fmt       the sample format
 * @param align            buffer size alignment (0 = default, 1 = no alignment)
 * @return                 >=0 on success or a negative error code on failure
 * @todo return the size of the allocated buffer in case of success at the next bump
 * @see av_samples_fill_arrays()
 * @see av_samples_alloc_array_and_samples()
 */
int av_samples_alloc(uint8_t **audio_data, int *linesize, int nb_channels,
                     int nb_samples, enum AVSampleFormat sample_fmt, int align);

/**
 * Allocate a data pointers array, samples buffer for nb_samples
 * samples, and fill data pointers and linesize accordingly.
 *
 * This is the same as av_samples_alloc(), but also allocates the data
 * pointers array.
 *
 * @see av_samples_alloc()
 */
int av_samples_alloc_array_and_samples(uint8_t ***audio_data, int *linesize, int nb_channels,
                                       int nb_samples, enum AVSampleFormat sample_fmt, int align);
3.5 创建输出缓冲区
3.5.1 计算输出缓冲区的 每个声道的样本数
第三个参数nb_channels为:输入源的 声道数
第四个参数nb_samples为:输入源每个声道的样本数,aac 一帧为1024个样本。
第五个参数sample_fmt为:输入源的AVSampleFormat -- 类似AV_SAMPLE_FMT_DBL
第三个参数nb_channels为:输出源的 声道数,这个是我们写代码前就规定的,
比如说我们的目的就是将一个 -ar 44100 -ac 2 -f f32le 变成 -ar 48000 -ac 1 -f s16le 的.
那么这个 输出源的nb_channels 就是1,输出源的 sample_fmt就是 AV_SAMPLE_FMT_S16。
第四个参数nb_samples为:输出源每个声道的样本数,aac一帧 为1024个样本。
不管怎么变化,你将一首2分钟的歌曲,转化后应该还是2分钟的歌曲,时间是不能变化的。
有了这个认识,我们再来看,下面就比较好理解了。
我们要从 44100 ---- 变成 48000,也就是说,之前1秒钟,采集的样本数量是44100个,我们一帧是1024个样本,花费的时间是 1000/44100*1024 单位是毫秒。
那么我们知道了时间是没有办法变化的,48000又是我们规定的,输出后的时间应该是:
1000/48000 * x = 1000/44100*1024, 转化后得到
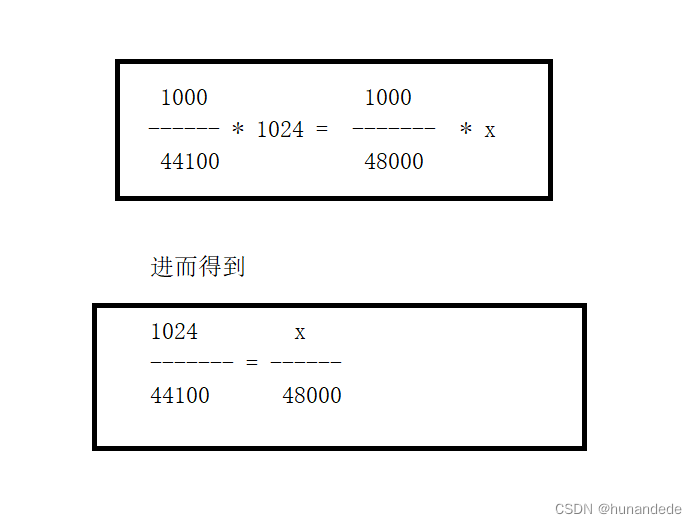
计算公式为:
输出源每个声道的样本个数 =
输出源采样率 * 输入源每个声道的样本数 / 输入源每个声道的样本个数
ffmpeg 已经贴心的给我们准备了函数,因为上述计算可能有计算溢出,等各种问题
/**
 * Rescale a 64-bit integer with specified rounding.
 *
 * The operation is mathematically equivalent to `a * b / c`, but writing that
 * directly can overflow, and does not support different rounding methods.
 * If the result is not representable then INT64_MIN is returned.
 *
 * @see av_rescale(), av_rescale_q(), av_rescale_q_rnd()
 */
int64_t av_rescale_rnd(int64_t a, int64_t b, int64_t c, enum AVRounding rnd) av_const;第五个参数sample_fmt为:输出源的AVSampleFormat -- 类似 AV_SAMPLE_FMT_DBL
3.5.2 根据上述计算出来的 输出缓冲区的每个声道的样本数,创建缓冲区
int av_samples_alloc_array_and_samples(uint8_t ***audio_data,
int *linesize,
int nb_channels, //在代码写之前就规定了的
int nb_samples, //通过 3.5.1 计算出来的
enum AVSampleFormat sample_fmt, //在代码写之前就规定了的
int align);
3.6 从文件中读取数据,读取的数据存储到 输入缓冲区
3.6.1 再来回顾我们的前提,我们代码的目的是
3.6.2 再来回顾一下,交错模式的pcm的存储
交错模式的pcm 的数据都是存储在 AVFrame 的 data[0] 中,大小是在 AVframe的linesize[0] 中,对应在上面的 av_samples_alloc_array_and_samples 方法中的第一个参数和第二个参数。
也就是说,我们要将infile的数据 读取到 第一个参数 和 第二个参数
int * linesize,
int nb_channels, //在代码写之前就规定了的
int nb_samples, //通过 3.5.1 计算出来的
enum AVSampleFormat sample_fmt, //在代码写之前就规定了的
int align);
3.6.3 我们再来看一下 音频重编码 的原理图
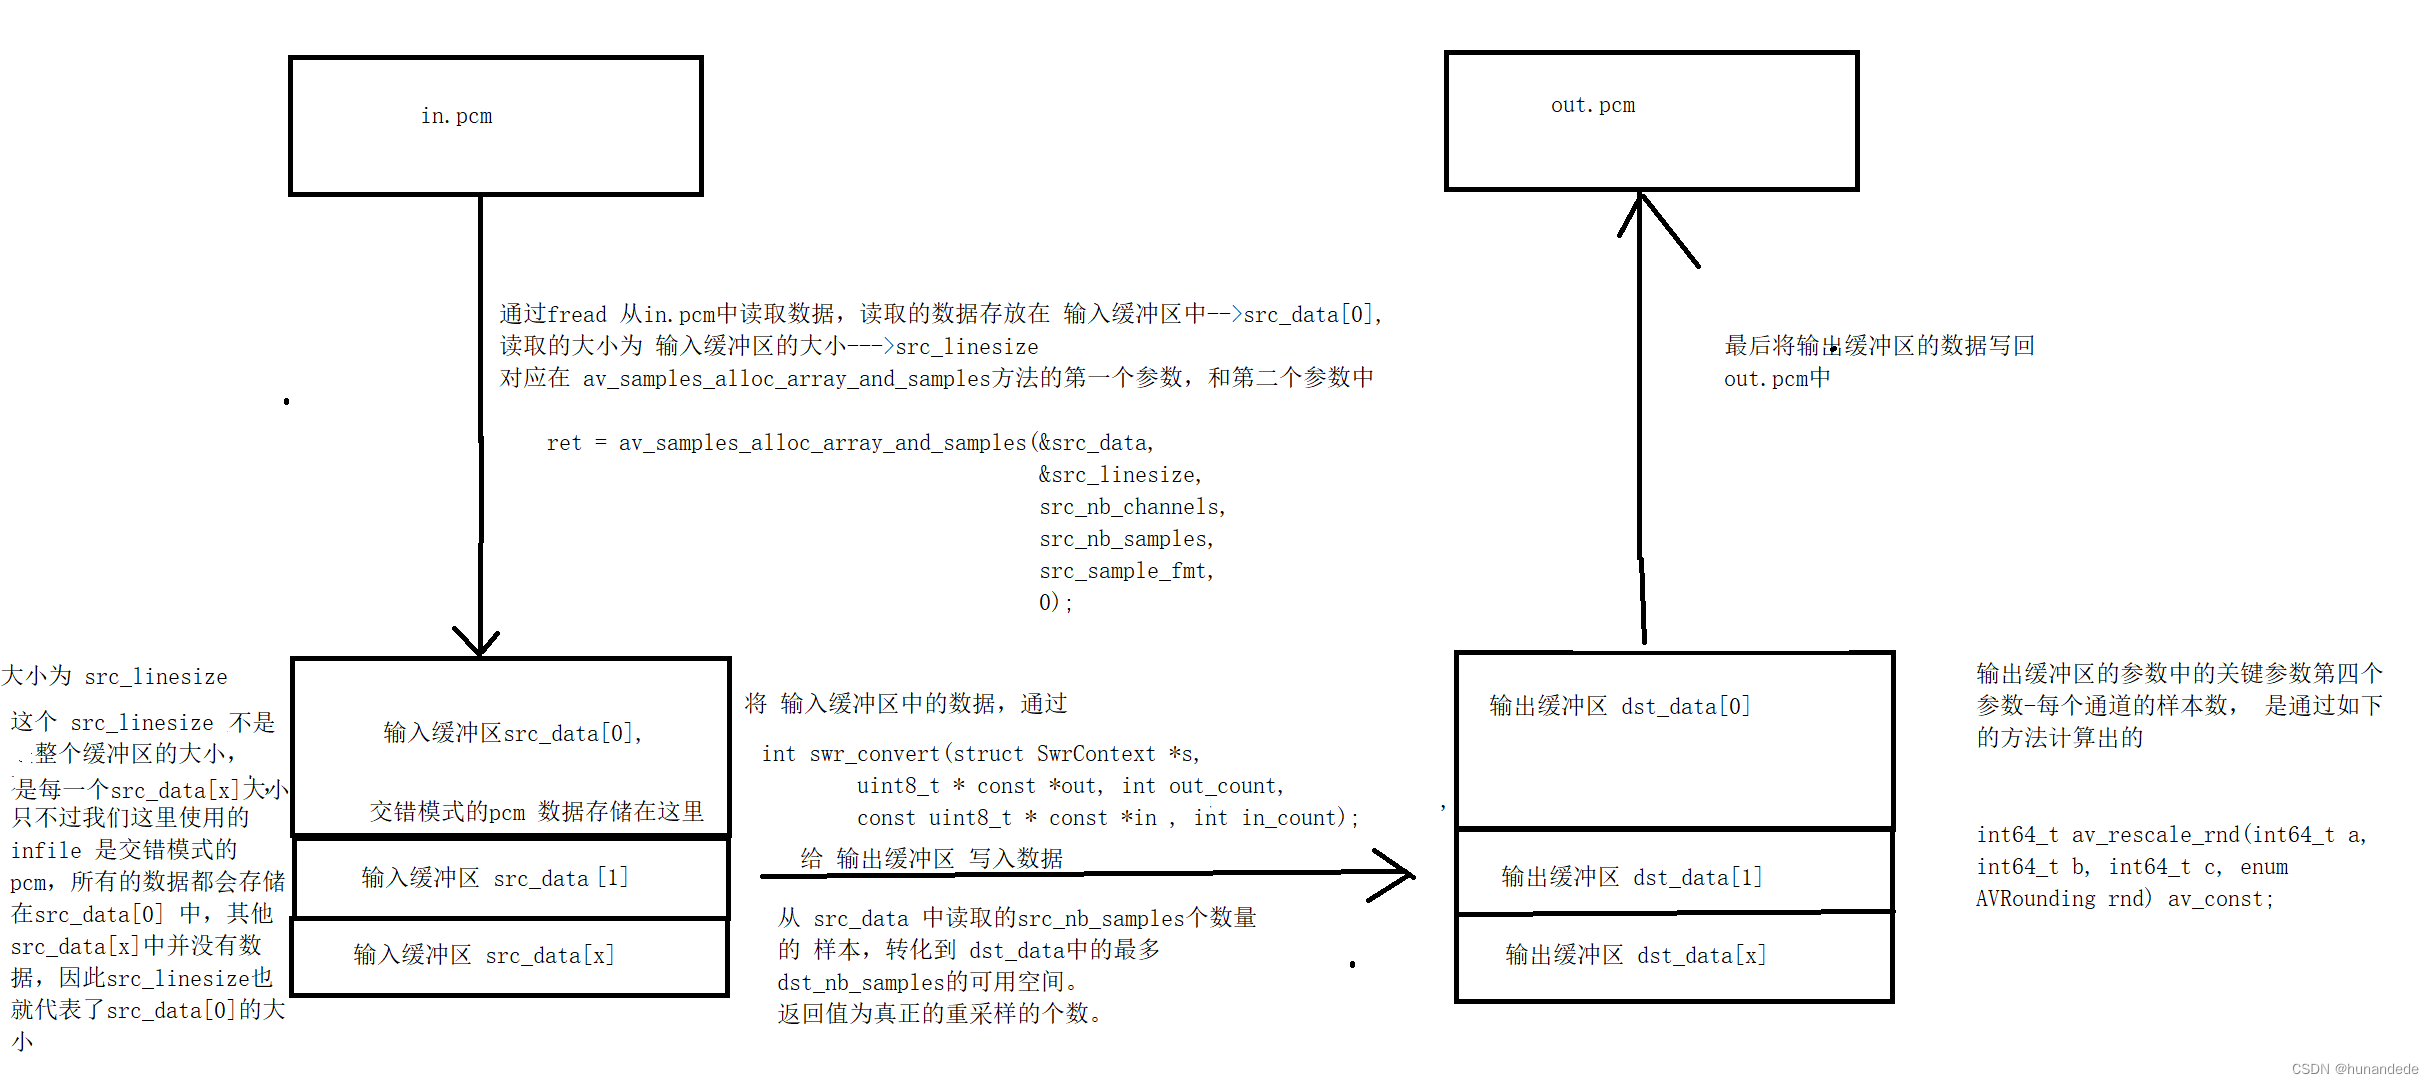
3.7 将输入缓冲区中的数据,通过swr_convert方法转化后,存储到输出缓冲区中
    //这里从infile 中读取数据,读取的数据存储到 输入缓冲区中,大小为 输入缓冲区的大小
    while ((len = inFile.read((char *) src_data[0], src_linesize)) > 0) {
        // 计算真正读取到的样本数量,前面肯定是1024,但是最后一次大几率是小于1024的,因此这里要重新计算:src_nb_samples

        int inBytesPerSample = src_nb_channels * av_get_bytes_per_sample(src_sample_fmt);

        src_nb_samples = len / inBytesPerSample;

        // 重采样(返回值转换后的样本数量),
        // 从 src_data 中读取的src_nb_samples个数量的 样本,转化到 dst_data中的最多dst_nb_samples的可用空间。
        //返回值为真正的重采样的个数。
        ret = swr_convert(swr_ctx,
                          dst_data,
                          dst_nb_samples,
                          (const uint8_t **) src_data,
                          src_nb_samples
                         );

        if (ret < 0) {
//            ERROR_BUF(ret);
//            qDebug() << "swr_convert error:" << errbuf;
//            goto end;
        }

        // 将转换后的数据写入到输出文件中
        outFile.write((char *) dst_data[0], ret * outBytesPerSample);
    }
关键函数
/** Convert audio.
 *
 * in and in_count can be set to 0 to flush the last few samples out at the
 * end.
 *
 * If more input is provided than output space, then the input will be buffered.
 * You can avoid this buffering by using swr_get_out_samples() to retrieve an
 * upper bound on the required number of output samples for the given number of
 * input samples. Conversion will run directly without copying whenever possible.
 *
 * @param s         allocated Swr context, with parameters set
 * @param out       output buffers, only the first one need be set in case of packed audio
 * @param out_count amount of space available for output in samples per channel
 * @param in        input buffers, only the first one need to be set in case of packed audio
 * @param in_count  number of input samples available in one channel
 *
 * @return number of samples output per channel, negative value on error
 */
int swr_convert(struct SwrContext *s, uint8_t * const *out, int out_count,
                                const uint8_t * const *in , int in_count);
3.8 将 输出缓冲区中的数据,存储到 out.pcm中
3.9 刷新 。检查一下输出缓冲区是否还有残留的样本(已经重采样过的,转换过的)
while ((convert_ret = swr_convert(swrContext,
                          outData, outSamples,
                          nullptr, 0)) > 0) {
    qDebug()<<"outSamples111 = " << outSamples;
    qDebug()<<"convert_ret = " << convert_ret;

    fwrite(outData[0], 1, convert_ret * outBytesPerSample, outFile);
}
3.9 测试
最终文件为:一个采样率为48000,采样通道为1,格式为AV_SAMPLE_FMT_S16 的 out.pcm 数据
ffplay -ar 48000 -ac 1 -f s16le out.pcm
3.10额外的思考
我们当前的demo 是从 一个写好的in.pcm,转换成out.pcm
都是从一个交错模式,变成另一个交错模式。
那么现在我们把问题变化一下:从planar 模式的pcm 转换成 交错模式的pcm,应该怎么处理呢?
我们查看一下swr_convert方法的说明:
/** Convert audio.
 *
 * in and in_count can be set to 0 to flush the last few samples out at the
 * end.
 *
 * If more input is provided than output space, then the input will be buffered.
 * You can avoid this buffering by using swr_get_out_samples() to retrieve an
 * upper bound on the required number of output samples for the given number of
 * input samples. Conversion will run directly without copying whenever possible.
 *
 * @param s         allocated Swr context, with parameters set
 * @param out       output buffers, only the first one need be set in case of packed audio
 * @param out_count amount of space available for output in samples per channel
 * @param in        input buffers, only the first one need to be set in case of packed audio
 * @param in_count  number of input samples available in one channel
 *
 * @return number of samples output per channel, negative value on error
 */
int swr_convert(struct SwrContext *s, uint8_t * const *out, int out_count,
                                const uint8_t * const *in , int in_count);
并没有说planar模式不能转化,那么怎么转呢?
我们知道 planar 模式的是这样存储的 LLLLLLLL........RRRRRRRR.........
示例代码为:
    while(1){
        //假设有3个声道,src_data[0] 中存储 都是L,src_data[1] 中存储 都是R,src_data[2] 中存储 都是第三个声道,src_linesize大小为每个src_data[x]的大小
        for(int i =0;i <channel_num; ++i){
            ret = inFile.read((char *) src_data[i], src_linesize);
            if(ret < 0 ){
                //到到结尾了,结束循环
                return;
            }
            //ret 返回值为真正读取到的字节大小,在最后一次的时候,这个ret在绝大部分下是小于 src_linesize的,因此这里最好使用 读取到的字节数,重新计算一个src number,

            ret = swr_convert(swr_ctx,
                              dst_data[i],
                              dst_nb_samples,//这个不用变化
                              (const uint8_t **) src_data[i],
                              src_nb_samples//这个也不用变化
                             );

            //第一次循环的时候,到这里,dst_data[i] 中存放的就是已经转好的LLLLLL,那么怎么存储就看是要要求是存储成 planar模式,还是 交错模式了
        }
    }
3.11 图片如果需要重采样,应该怎么办呢?
3.12 关键源码
#include "audioresamplethread.h"

AudioResampleThread::AudioResampleThread(QObject *parent) : QThread(parent)
{
    qDebug()<<"AudioResampleThread 构造方法 start";
    //这段代码的含义是,当run 方法执行完成后,就会有finished的信号发出来,这时候就会执行deletelater的槽函数,实际上就是执行析构函数。
    //要这样使用的原因是:当user 点击了 “停止录音后”, run()方法就会执行结束,但是线程并没有被delete掉,如果user不停的点击 开始录音--停止录音,会导致内存泄漏
    //因此我们需要在run方法执行完成后,将该线程 delete 掉,防止内存泄漏
    connect(this,&AudioResampleThread::finished,
            this,&AudioResampleThread::deleteLater);
}

AudioResampleThread::~AudioResampleThread(){
    //当都要析构自己了,就没有必要还让之前有的连接占有自己的空间,直接通过disconnect断开所有的信号
    // 断开所有的连接
    disconnect();
    // 内存回收之前,正常结束线程。这是防止user 点击大窗口关闭,
    requestInterruption();
    // 安全退出
    quit();
    wait();
    qDebug() << this << " AudioResampleThread 析构(内存被回收)";
}


void AudioResampleThread::run(){
    qDebug()  << " AudioResampleThread run start";
    int ret =0;

    // 第一步 :创建重采样上下文
    struct SwrContext *swr_ctx = nullptr;

    /* create resampler context */
    swr_ctx = swr_alloc();
    if (!swr_ctx) {
        fprintf(stderr, "Could not allocate resampler context\n");
        ret = AVERROR(ENOMEM);
        //        goto END;
    }

    // 第二步:设置 要转码source文件的三件套 和 生成des 文件的三件套 到 swr_ctx
    // 我们的目的是将 44100_2_s16le 转成 48000_1_s16le
    /* set options */
    AVChannelLayout src_ch_layout = AV_CHANNEL_LAYOUT_STEREO;
    int src_rate = 44100;
    enum AVSampleFormat src_sample_fmt = AV_SAMPLE_FMT_S16;

    AVChannelLayout dst_ch_layout = AV_CHANNEL_LAYOUT_MONO;
    int dst_rate = 48000;
    enum AVSampleFormat dst_sample_fmt = AV_SAMPLE_FMT_S16;

    av_opt_set_chlayout(swr_ctx, "in_chlayout",    &src_ch_layout, 0);
    av_opt_set_int(swr_ctx, "in_sample_rate",       src_rate, 0);
    av_opt_set_sample_fmt(swr_ctx, "in_sample_fmt", src_sample_fmt, 0);

    av_opt_set_chlayout(swr_ctx, "out_chlayout",    &dst_ch_layout, 0);
    av_opt_set_int(swr_ctx, "out_sample_rate",       dst_rate, 0);
    av_opt_set_sample_fmt(swr_ctx, "out_sample_fmt", dst_sample_fmt, 0);


    //第三步:初始化 重采样上下文。
    /* initialize the resampling context */
    if ((ret = swr_init(swr_ctx)) < 0) {
        fprintf(stderr, "Failed to initialize the resampling context\n");
//        goto end;
    }

    //第四步:将src 和 des 的声道数算出来
    int src_nb_channels = 0, dst_nb_channels = 0;
    src_nb_channels = src_ch_layout.nb_channels;
    dst_nb_channels = dst_ch_layout.nb_channels;

    // 第五步:创建输入缓冲区,作用是 将src文件写入 该缓冲区  src_data 是 缓冲区的头部指针,最终从src文件写数据就是给这个里面写。src_linesize就是 输入缓冲区的大小
    uint8_t **src_data = NULL; //这个是在作为输出参数的,也就是当 av_samples_alloc_array_and_samples 函数执行完毕的时候,这个就有值了
    int src_linesize;// 这个也是做为输出参数的,也就是说当 av_samples_alloc_array_and_samples 函数执行完毕的时候,这个也就有值了
    int src_nb_samples = 1024;


    /**
      * 分配一个数据指针数组,为 nb_samples 采样缓冲区样本,并相应地填充数据指针和线宽。
      *
      * 这与 av_samples_alloc() 相同,但也分配数据指针数组。
      *
      * @see av_samples_alloc()
      */
//    int av_samples_alloc_array_and_samples(uint8_t ***audio_data,
//                                           int *linesize,
//                                           int nb_channels,
//                                           int nb_samples,
//                                           enum AVSampleFormat sample_fmt,
//                                           int align);


    /**
     * 为 nb_samples 样本分配一个样本缓冲区,并相应地填充数据指针和 linesize。
     * 分配的样本缓冲区可以通过使用 av_freep(&audio_data[0]) 释放分配的数据将被初始化为静音。
     *
     * @see enum AVSampleFormat
     *  AVSampleFormat 的文档描述了数据布局。
     *
     * @param [out] audio_data    数组要填充每个通道的指针
     * @param [out] linesize      对齐的音频缓冲区大小,可能为 NULL
     * @param nb_channels         音频通道数
     * @param nb_samples          每个通道的样本数
     * @param sample_fmt          采样格式
     * @param align               缓冲区大小对齐(0 = 默认,1 = 无对齐)
     * @return >=0                成功或失败时返回负错误代码
     * @todo                      如果在下一次开辟内存空间成功,则返回已分配缓冲区的大小
     * @see av_samples_fill_arrays()
     * @see av_samples_alloc_array_and_samples()
     */
//    int av_samples_alloc(uint8_t **audio_data,
//                         int *linesize,
//                         int nb_channels,
//                         int nb_samples,
//                         enum AVSampleFormat sample_fmt,
//                         int align);

    ret = av_samples_alloc_array_and_samples(&src_data,
                                             &src_linesize,
                                             src_nb_channels,
                                             src_nb_samples,
                                             src_sample_fmt,
                                             0);

    if (ret < 0) {
        fprintf(stderr, "Could not allocate source samples\n");
//        goto end;
    }

    //第六步:创建输出缓冲区,该缓冲区的目的是将数据从输入缓冲区  resample  到输出缓冲区
    uint8_t **dst_data = NULL;
    int  dst_linesize;
    int  dst_nb_samples, max_dst_nb_samples;
    //6.1 计算dst_nb_samples,
    //为什么要计算呢?原因是:src_nb_samples 样本个数我们是规定了:1024,
    //由于不管怎么转码,时间都是不能变的,但是我们的重采样,是将44100变成48000
    //也就是说 : 原本1s中采样 44100,现在要采样  48000, 那么就要保证,source中的样本数量1024,和想要转变的 样本数量成比例
    //   44100        48000
    //  ------- =   -------
    //   1024          ?
    //注意,44100,48000 是采样率,1024 是样本数量,也就是一帧有多少个样本数量。刚开始的时候再这里有点搞不清,总是将样本数量和缓冲区的大小混为一谈。搞清楚,这个是1024是样本数量,你要计算的也是样本数量
    //那么播放的时候,ffplay -ar 44100 -ac 2 -f s16le a.pcm 是这样播放的,不管是源pcm ,还是最后生成的 pcm,都是这样播放的,

    /* compute the number of converted samples: buffering is avoided
     * ensuring that the output buffer will contain at least all the
     * converted input samples */
    max_dst_nb_samples = dst_nb_samples =
        av_rescale_rnd(src_nb_samples, dst_rate, src_rate, AV_ROUND_UP);

    ret = av_samples_alloc_array_and_samples(&dst_data,
                                             &dst_linesize,
                                             dst_nb_channels,
                                             dst_nb_samples,
                                             dst_sample_fmt,
                                             0);

    if (ret < 0) {
        fprintf(stderr, "Could not allocate destination samples\n");
//        goto end;
    }

    //第七步: 从文件写入到 输入缓冲器,然后重采样 ,完毕后,

    // 打开文件
    // 文件名
    QString inFilename = "D:/yinshipin/yinpin/005AudioResample/44100_2_s16le.pcm";
    QString outFilename = "D:/yinshipin/yinpin/005AudioResample/out.pcm";

    QFile inFile(inFilename);
    QFile outFile(outFilename);
    if (!inFile.open(QFile::ReadOnly)) {
        qDebug() << "file open error:" << inFilename;
//        goto end;
    }
    if (!outFile.open(QFile::WriteOnly)) {
        qDebug() << "file open error:" << outFilename;
//        goto end;
    }

    // 读取文件数据
    // inData[0] == *inData
    int len =0;
    int outBytesPerSample = dst_nb_channels * av_get_bytes_per_sample(dst_sample_fmt);

    //这里从infile 中读取数据,读取的数据存储到 输入缓冲区中,大小为 输入缓冲区的大小
    while ((len = inFile.read((char *) src_data[0], src_linesize)) > 0) {
        // 计算真正读取到的样本数量,前面肯定是1024,但是最后一次大几率是小于1024的,因此这里要重新计算:src_nb_samples

        int inBytesPerSample = src_nb_channels * av_get_bytes_per_sample(src_sample_fmt);

        src_nb_samples = len / inBytesPerSample;

        // 重采样(返回值转换后的样本数量),
        // 从 src_data 中读取的src_nb_samples个数量的 样本,转化到 dst_data中的最多dst_nb_samples的可用空间。
        //返回值为真正的重采样的个数。
        ret = swr_convert(swr_ctx,
                          dst_data,
                          dst_nb_samples,
                          (const uint8_t **) src_data,
                          src_nb_samples
                         );

        if (ret < 0) {
//            ERROR_BUF(ret);
//            qDebug() << "swr_convert error:" << errbuf;
//            goto end;
        }

        // 将转换后的数据写入到输出文件中
        outFile.write((char *) dst_data[0], ret * outBytesPerSample);
    }

    // 检查一下输出缓冲区是否还有残留的样本(已经重采样过的,转换过的)
    while ((ret = swr_convert(swr_ctx,
                              dst_data, dst_nb_samples,
                              nullptr, 0)) > 0) {
        outFile.write((char *) dst_data[0], ret * outBytesPerSample);
    }


    // 释放资源
        // 关闭文件
        inFile.close();
        outFile.close();

        // 释放输入缓冲区
        if (src_data) {
            av_freep(&src_data[0]);
        }
        av_freep(&src_data);

        // 释放输出缓冲区
        if (dst_data) {
            av_freep(&dst_data[0]);
        }
        av_freep(&dst_data);

        // 释放重采样上下文
        swr_free(&swr_ctx);


    qDebug()  << " AudioResampleThread run end";

}


![[C++数据结构之看懂就这一篇]图(上)](https://img-blog.csdnimg.cn/img_convert/eeb8b9c37b5b95fbc9a52148ab0ee21d.gif)