Now, it’s time to create the backend server!
现在,让我们开始开发我们的后端服务吧!
A single Django project can contain one or more apps that work together to power an API.
一个Django项目可以包含一个或者多个应用,用于一起写作以提供强大的API功能。
Django uses the concept of projects and apps to keep code clean and readable.
Django使用应用来划分各个模块的核心功能,用来保障代码的整洁和可读性!
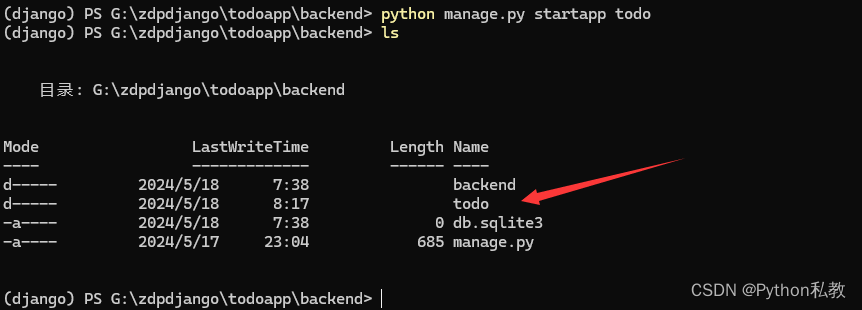
In the bakend folder, create a new app “todo” with the command.
在bakend根目录下,使用下面的命令,来创建一个叫做todo的新应用。
python manage.py startapp todo

A new folder todo will be added to the project.
一个叫做todo的文件夹会被添加到项目中。
As we progress along the book, we will explain the files inside the folder.
在接下来的开发中,我们会解释这个文件夹内部的各个文件为用法。
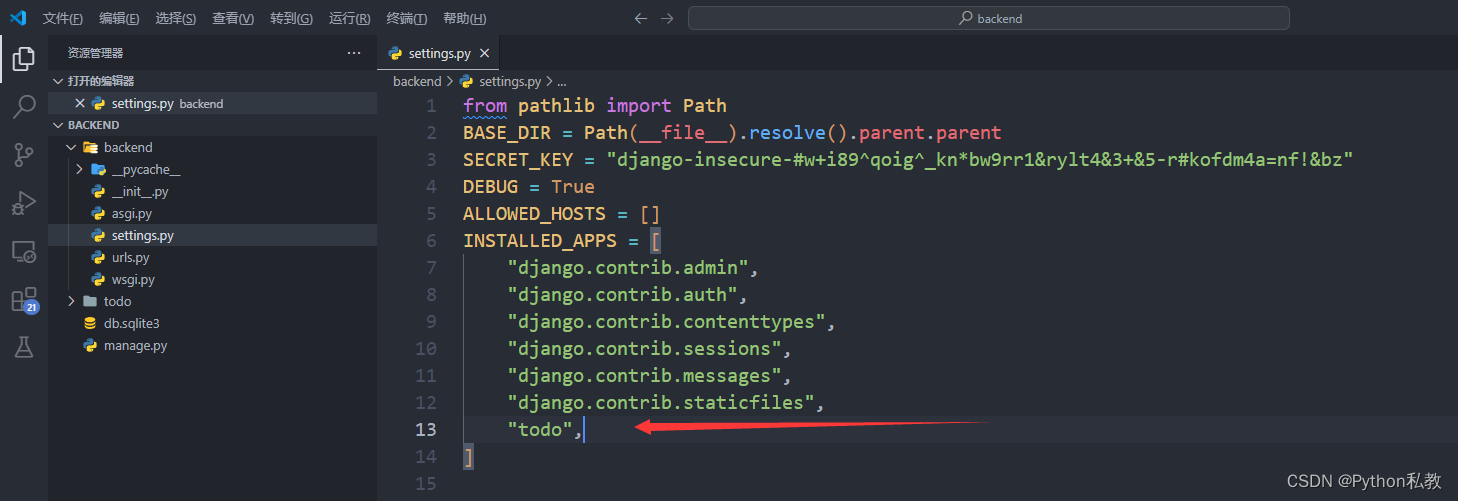
Though our new app exists in our Django project, Django doesn’t know it till we explicitly add it.
尽管我们的应用已经存在项目目录了,但是Django无法自动识别它,除非我们显式的添加它。
To do so, we specify it in settings.py.
所以,我们在settings.py中来配置它。
So go to /backend/settings.py, under INSTALLED_APPS, add the app name:
修改/backend/settings.py,在INSTALL_APPS属性中,添加我们刚创建的应用名称。
INSTALLED_APPS = [
    "django.contrib.admin",
    "django.contrib.auth",
    "django.contrib.contenttypes",
    "django.contrib.sessions",
    "django.contrib.messages",
    "django.contrib.staticfiles",
    "todo",
]
Models
Working with databases in Django involves working with models.
在Django中和数据库打交道就是和模型打交道。
We create a database model and Django turns these models into a database table for us.
我们创建数据库的模型,Django会自动将模型转换为数据库中的表。
In /backend/todo, you have the file models.py where we create our models.
在/backend/todo文件夹中,Django已经在我们创建应用的时候,自动给我们创建了这个应用的models.py文件。
Let’s create our todo model by filling in the following.
让我们在models.py中输入如下代码,来设计我们的todo模型。
from django.db import models
from django.contrib.auth.models import User

class Todo(models.Model):
    title = models.CharField(max_length=100,verbose_name="标题")
    detail = models.TextField(blank=True, verbose_name="详情")
    completed = models.BooleanField(default=False, verbose_name="是否完成")
    user = models.ForeignKey(User, on_delete=models.CASCADE)
    create_time = models.DateTimeField(auto_now_add=True, verbose_name="添加时间")
    update_time = models.DateTimeField(auto_now_add=True, auto_now=True, verbose_name="修改时间")

    def __str__(self):
        return f"<Todo title={self.title}>"

    def __repr__(self) -> str:
        return self.__str__()

    class Meta:
        db_table = "tb_todo"
        verbose_name = "待办事项"
        verbose_name_plural = verbose_name
Code Explanation
from django.db import models
Django imports a module models to help us build database model which “model” the characteristics of the data in the database.
导入Django的models模块来帮我们处理数据库的交互。
In our case, we created a todo model to store the title, detail ,time of creation, time of completion and user who created the todo.
在我们的案例中,我们创建了一个待办事项的模型,包含标题,详情,创建时间,更新时间,完成状态,关联用户等信息。
class Todo(models.Model):
class Todo inherits from the Model class.
Todo类继承了models.Model类。
The Model class allows us to interact with the database, create a table, retrieve and make changes to data in the database.
models.Model类允许我们和数据库交互,创建表,查询和修改数据等。
Note that we use Django’s built in User Model as the creator of the todo.
注意我们使用了Django内置的用户作为我们待办事项的作者。
title = models.CharField(max_length=100,verbose_name="标题")
detail = models.TextField(blank=True, verbose_name="详情")
completed = models.BooleanField(default=False, verbose_name="是否完成")
user = models.ForeignKey(User, on_delete=models.CASCADE)
create_time = models.DateTimeField(auto_now_add=True, verbose_name="添加时间")
update_time = models.DateTimeField(auto_now=True, verbose_name="修改时间")
We then have the properties of the model.
我们有了模型的属性。
Notice that the properties have types like CharField, TextField, DateTimeField.
注意这些属性是用于类型的,比如CharField, TextField, DateTimeField。
Django provides many other model fields to support common types like dates, integers, emails, etc.
Django提供了很多其他的类型用来支持通用的数据库类型,比如日期,整数,邮箱等等。
To have a complete documentation of the kinds of types and how to use them, refer to the Model field reference in the Django documentation https://docs.djangoproject.com/en/4.0/ref/models/fields/.
关于模型信息的详细文档可以查看 https://docs.djangoproject.com/en/4.0/ref/models/fields/。
def __str__(self):
    return f"<Todo title={self.title}>"
We also include a __str__ method so that the title of a todo will display in the admin later on.
我们实现了__str__方法,这个方法决定模型在后台中的显式效果。
With this model, we can create a Todo table in our database.
基于这个模型,我们可以在数据库中创建一个待办事项表。
Migrations
Whenever we create a new model or make changes to it in models.py, we need to update Django in a two-step process.
无论我们是创建新模型还是修改模型,我们需要执行两个步骤来执行更新。
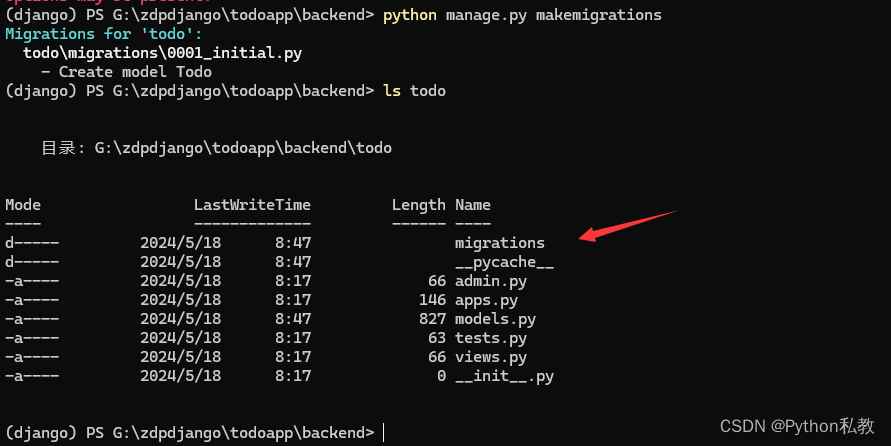
First, in /backend, we create a migration file with the makemigrations command.
第一步,在bakend根目录下,我们使用makemigrations命令创建数据库的迁移文件:
python manage.py makemigrations
Second,we build the actual database with the following.
第二步,我们执行下面的命令让迁移文件映射到数据库的更新。
python manage.py migrate
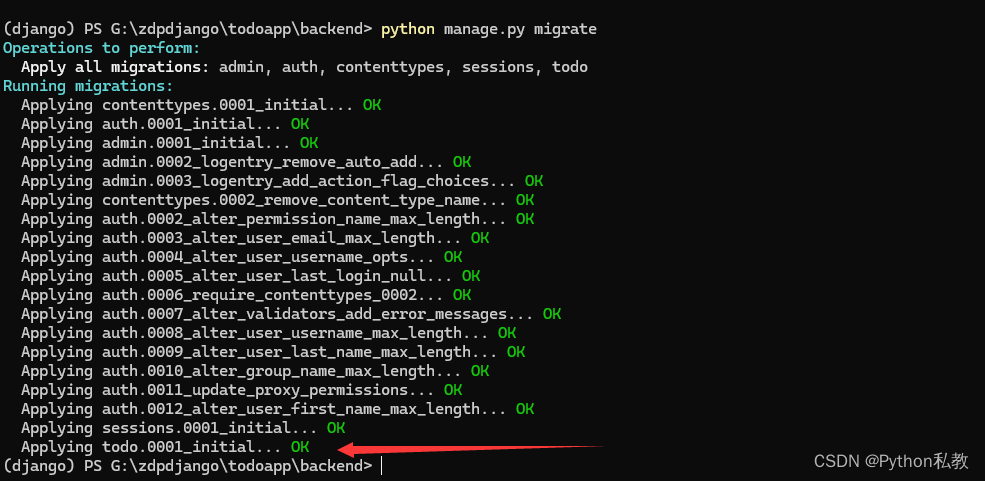
The migrate command creates an initial database based on Django’s default settings and executes the SQL commands in the migrations file.
migrate命令使用Django默认配置执行数据库的迁移,并执行SQL命令真实的影响到数据库。
Notice there is a db.sqlite3 file in the project folder.
注意,我们这里使用的是项目目录中的db.sqlite3文件。
The file represents our SQLite database.
这个文件提供给我们一个SQLite数据库。
It is creted the first time we run migrate.
当我们执行migrate的时候,它是首先被创建的。
migrate syncs the database with the current state of any database models in the project and listed in INSTALLED_APPS.
migrate命令会同步数据库,无论我们发生了任何修改,这个命令会找到INSTALLED_APPS中注册的所有应用,将每个应用更新后的状态同步到数据库中。
It is thus essential that after we update a model, we need to run migrate.
当我们更新了模型以后,执行migrate命令是非常有必要的。
In summary, each time you make changes to a model file, you have to run:
总的来说,每次你更新了模型文件以后,你都需要执行如下命令:
python manage.py makemigrations
python manage.py migrate
Adding todos to the database
We will add some todo data via the built-in admin site.
我们会使用内置的后台管理系统添加一些待办事项数据。
Django has a powerful built-in admin interface which provides a visual way of managing all aspects of a Django project, e.g. users, making changes to model data.
Django有一个非常强大的内置的后台管理系统,用来管理我们的模型数据,比如用户,自定义的模型等。
To access the Admin site, start your local Django server by going to /backend and running in the Terminal.
为了访问后台管理系统,我们需要在 backend根目录中执行下面的命令:
python manage.py runserver
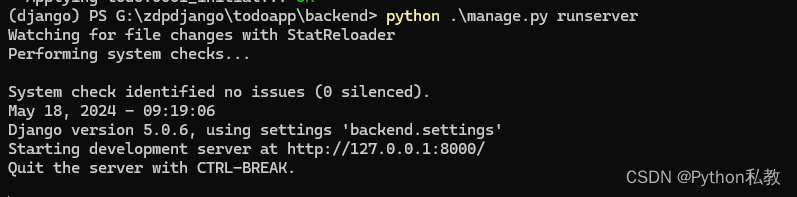
In the browser, go to http://127.0.0.1:8000/admin where you will see a lo gin form.
在浏览器中,访问 http://127.0.0.1:8000/admin 你会发现一个登录表单:
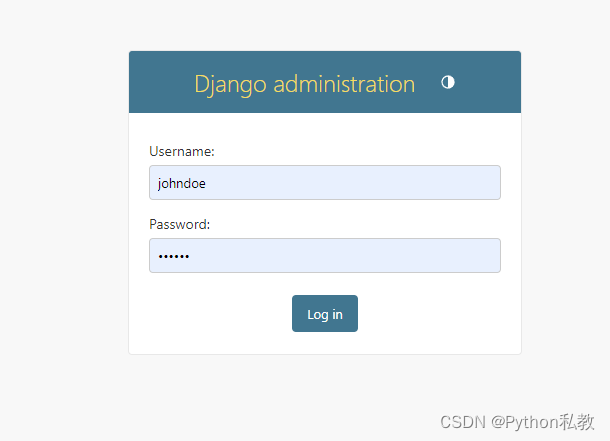
With what username and password do we log in to Admin?
我们使用什么账号密码来登录后台?
We will have to first create a superuser in the Terminal.
我们会创建一个超级用户。
Open a new Terminal, and in bakend run:
打开终端,在backend目录中执行:
python manage.py createsuperuser
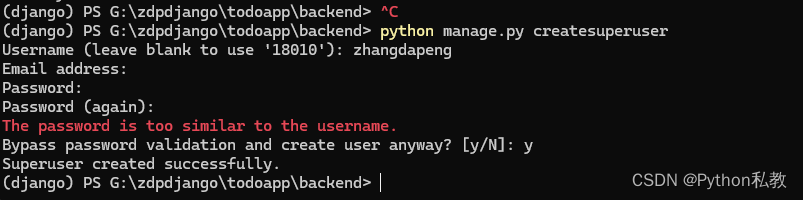
You will then be asked to specify a username, email and password.
你会被要求输入用户名和密码。
Note that anyone can access the admin path on your site, so make sure your password is something secure.
注意,请确保你密码的安全,因为你要用它等登录你的后台站点。
We next have to add the Todo model to admin by going to /backend/todo/admin.py, and register out Todo model with:
记下来,我们在 /backend/todo/amdin.py中编写代码,将Todo模型注册到后台。
from django.contrib import admin
from .models import Todo

admin.site.register(Todo)
接着,我们还需要去/backend/settings.py中配置一下中国的时区和后台中文的展示:
LANGUAGE_CODE = "zh-hans"
TIME_ZONE = "Asia/Shanghai"
USE_I18N = True
USE_TZ = True
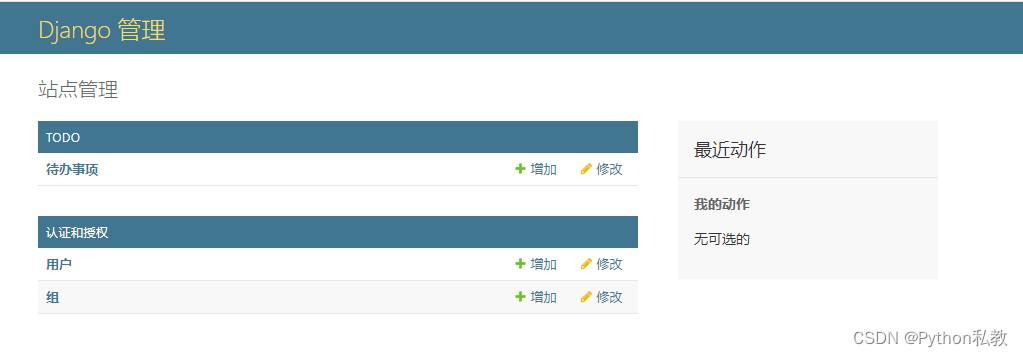
When you save your file and log back into http://localhost:8000/admin.
当你保存修改,然后重新访问 http://localhost:8000/admin 登录后台。
The Todo model will now show up.
Todo模型现在会在后台出现。
Try adding a todo object by click ong “+Add”.
尝试点击增加按钮。
You will be brought to a Add Todo form.
你会看到一个增加表单。
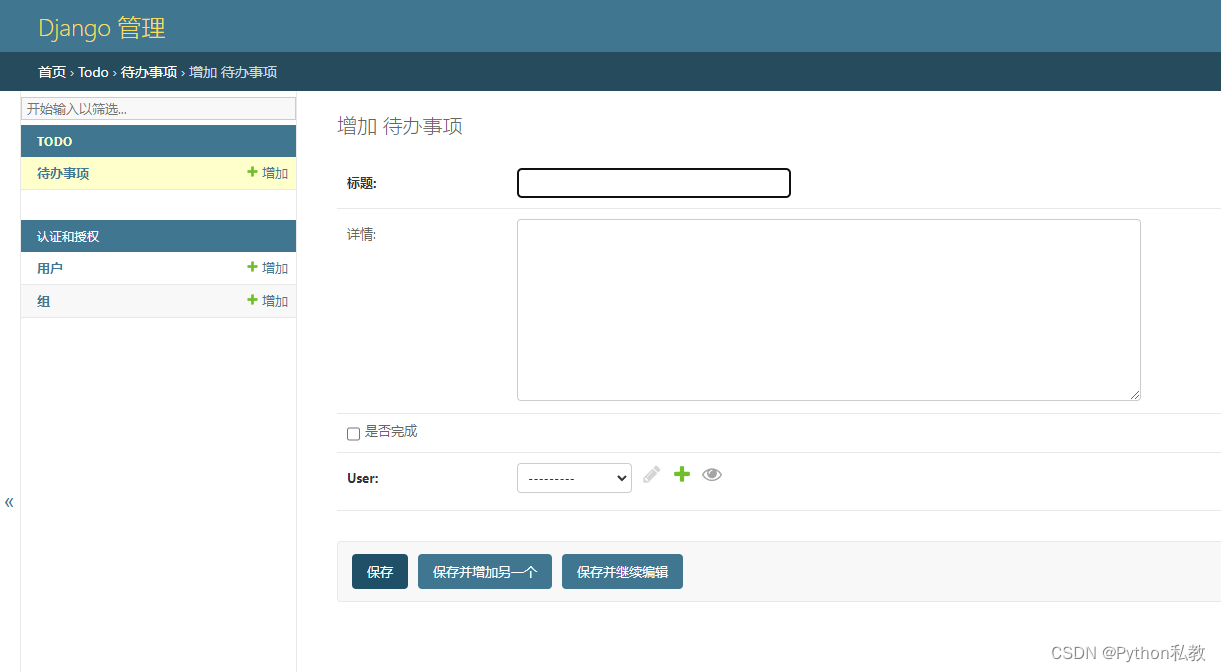
Try addming a todo and hit “Save”.
尝试添加待办事项的内容,然后点击保存。
Note that you have to specify a user.
注意,你必须要指定一个用户。

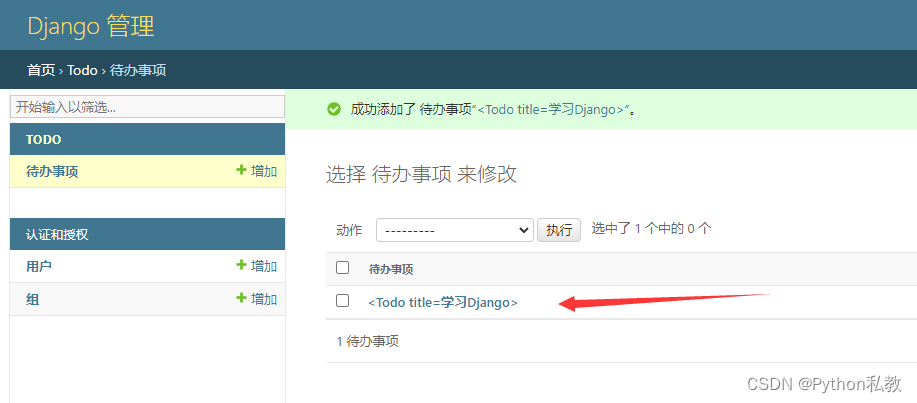
Your todo object will be saved to the database and reflected in the admin.
你的待办事项会被保存到数据库并在后台管理系统中展示。
Now that we know how to add todo objects to our database via admin, let’s carry on with building our API.
现在我们知道了如何通过后台管理系统添加待办事项到数据库,让我们开始构建我们的API。


![[数据集][目标检测]风力涡轮机缺陷检测数据集VOC+YOLO格式2992张2类别](https://img-blog.csdnimg.cn/direct/4bcc40b39b7a4bf09f8b4446f23062f1.png)