近期,某用户的ORACLE ODA一体机在例行机房巡检时出现亮黄灯告警;用户反馈次问题后我们立刻通过远程方式,登陆ODA的控制台进行查看;
对于ODA一体机(2个计算节点+1个存储节点),计算节点可以通过ilom管理界面登陆进行详细的硬件信息查看和管理,当然通过命令行也可以。
对于存储节点,是没有图形界面可以看,可以通过ODA管理台(7093/mgmt/index.html)或者命令查看;
本次问题查看为存储节点的1个电源故障,由于双电源配置,系统仍然可以正常工作;并且电源的更好工作是可以在线进行的。
如下为排查分析过程:
1、故障灯及系统中查看故障原因


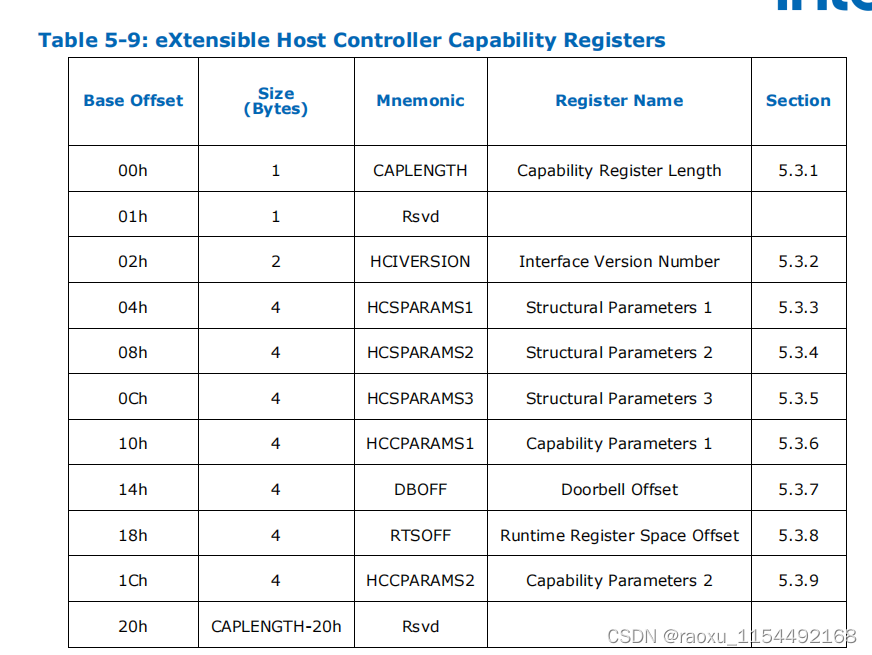
[root@TEST2 ~]# odaadmcli show enclosure
NAME SUBSYSTEM STATUS METRIC
_FAN0 Cooling OK 4910 rpm
_FAN1 Cooling OK 4540 rpm
_FAN2 Cooling OK 4920 rpm
_FAN3 Cooling OK 4530 rpm
_IOM0 Encl_Electronics OK -
_IOM1 Encl_Electronics OK -
_PSU0 Power_Supply Critical - ===>>>显示故障
_PSU1 Power_Supply OK -
_TEMP0 Amb_Temp OK 23 C
_TEMP1 Midplane_Temp OK 22 C
_TEMP2 PCM0_Inlet_Temp OK 30 C
_TEMP3 PCM0_Hotspot_Temp OK 24 C
_TEMP4 PCM1_Inlet_Temp OK 42 C
_TEMP5 PCM1_Hotspot_Temp OK 39 C
_TEMP6 IOM0_Temp OK 22 C
_TEMP7 IOM1_Temp OK 22 C
4 、更换电源(可以先尝试插拔电源线,电源线松动是可能的,插拔后也可能就恢复了)
更换的步骤MOS文档(How to confirm power supply status about storage shelf on ODA X7-2 (Doc ID 2419846.1),How To Replace an ODA (Oracle Database Appliance) X6-2HA, X7-2HA, X8-2HA, X9-2HA DE3-24C Power Supply/Cooling Unit [VCAP] (Doc ID 2960220.1))有视频和步骤,没有特殊的难度,参考如下:
WHAT ACTION DOES THE FIELD ENGINEER/ADMINISTRATOR NEED TO TAKE?:
1. Locate the PSU by amber LED
The following LEDs are lit when a power supply fault is detected:
* Front and rear Service Required LEDs
* Rear PS Failure LED on the bezel of the server
* Failure LED on the faulty power supply
2. Verify the PSU part number in the System Handbook and re-confirm.
3. Removing the PSU as follows.
3.1 Clear access to the PSU of any cables harnesses or assemblies.
3.2 Ensure the PSU On/Off switch is in the 'Off' Position.
3.3 Disconnect the power cord tie strap from the power cord, and unplug the power cord from the PSU.
3.4 Remove installed PSU by, Grasping the PSU handle, push the release button and slide out PSU.
4. Installing the Power Supply as follows or use the "online" Help Guide.
4.1 On the replacement PSU verify that the Release button is open .
4.2 Align PSU with empty bay in chassis and slide in .
4.3 Push the lever fully closed until you hear or feel a click.
4.4 Connect AC power cord to new PSU. Use the power cord retaining clips.
4.4 If required , place cable harness or assemblies back into normal position.
4.5 Turn the On/OFF switch to the On position .
5. Verify the replacement by checking for Green LED
IMPORTANT NOTE :
PSUs have a 3 minute Service time limit . When you remove a PSU the
fans on the remaining PSU go to 100 % duty cycle . Testing has shown that
HDD temperatures can exceed their operating temperature when a PSU has
been removed for 3 minutes.
5、检查最终状态(注意次命令的输出,ODA 的2个计算节点的的输出是不一致的,简单说是检测到恢复正常是有时间差的,如节点1显示OK,节点2可能过几分钟才显示OK)
[root@TEST2 ~]# odaadmcli show enclosure
NAME SUBSYSTEM STATUS METRIC
_FAN0 Cooling OK 4910 rpm
_FAN1 Cooling OK 4540 rpm
_FAN2 Cooling OK 4910 rpm
_FAN3 Cooling OK 4540 rpm
_IOM0 Encl_Electronics OK -
_IOM1 Encl_Electronics OK -
_PSU0 Power_Supply OK -
_PSU1 Power_Supply OK -
_TEMP0 Amb_Temp OK 23 C
_TEMP1 Midplane_Temp OK 22 C
_TEMP2 PCM0_Inlet_Temp OK 29 C
_TEMP3 PCM0_Hotspot_Temp OK 24 C
_TEMP4 PCM1_Inlet_Temp OK 41 C
_TEMP5 PCM1_Hotspot_Temp OK 39 C
_TEMP6 IOM0_Temp OK 22 C
_TEMP7 IOM1_Temp OK 28 C