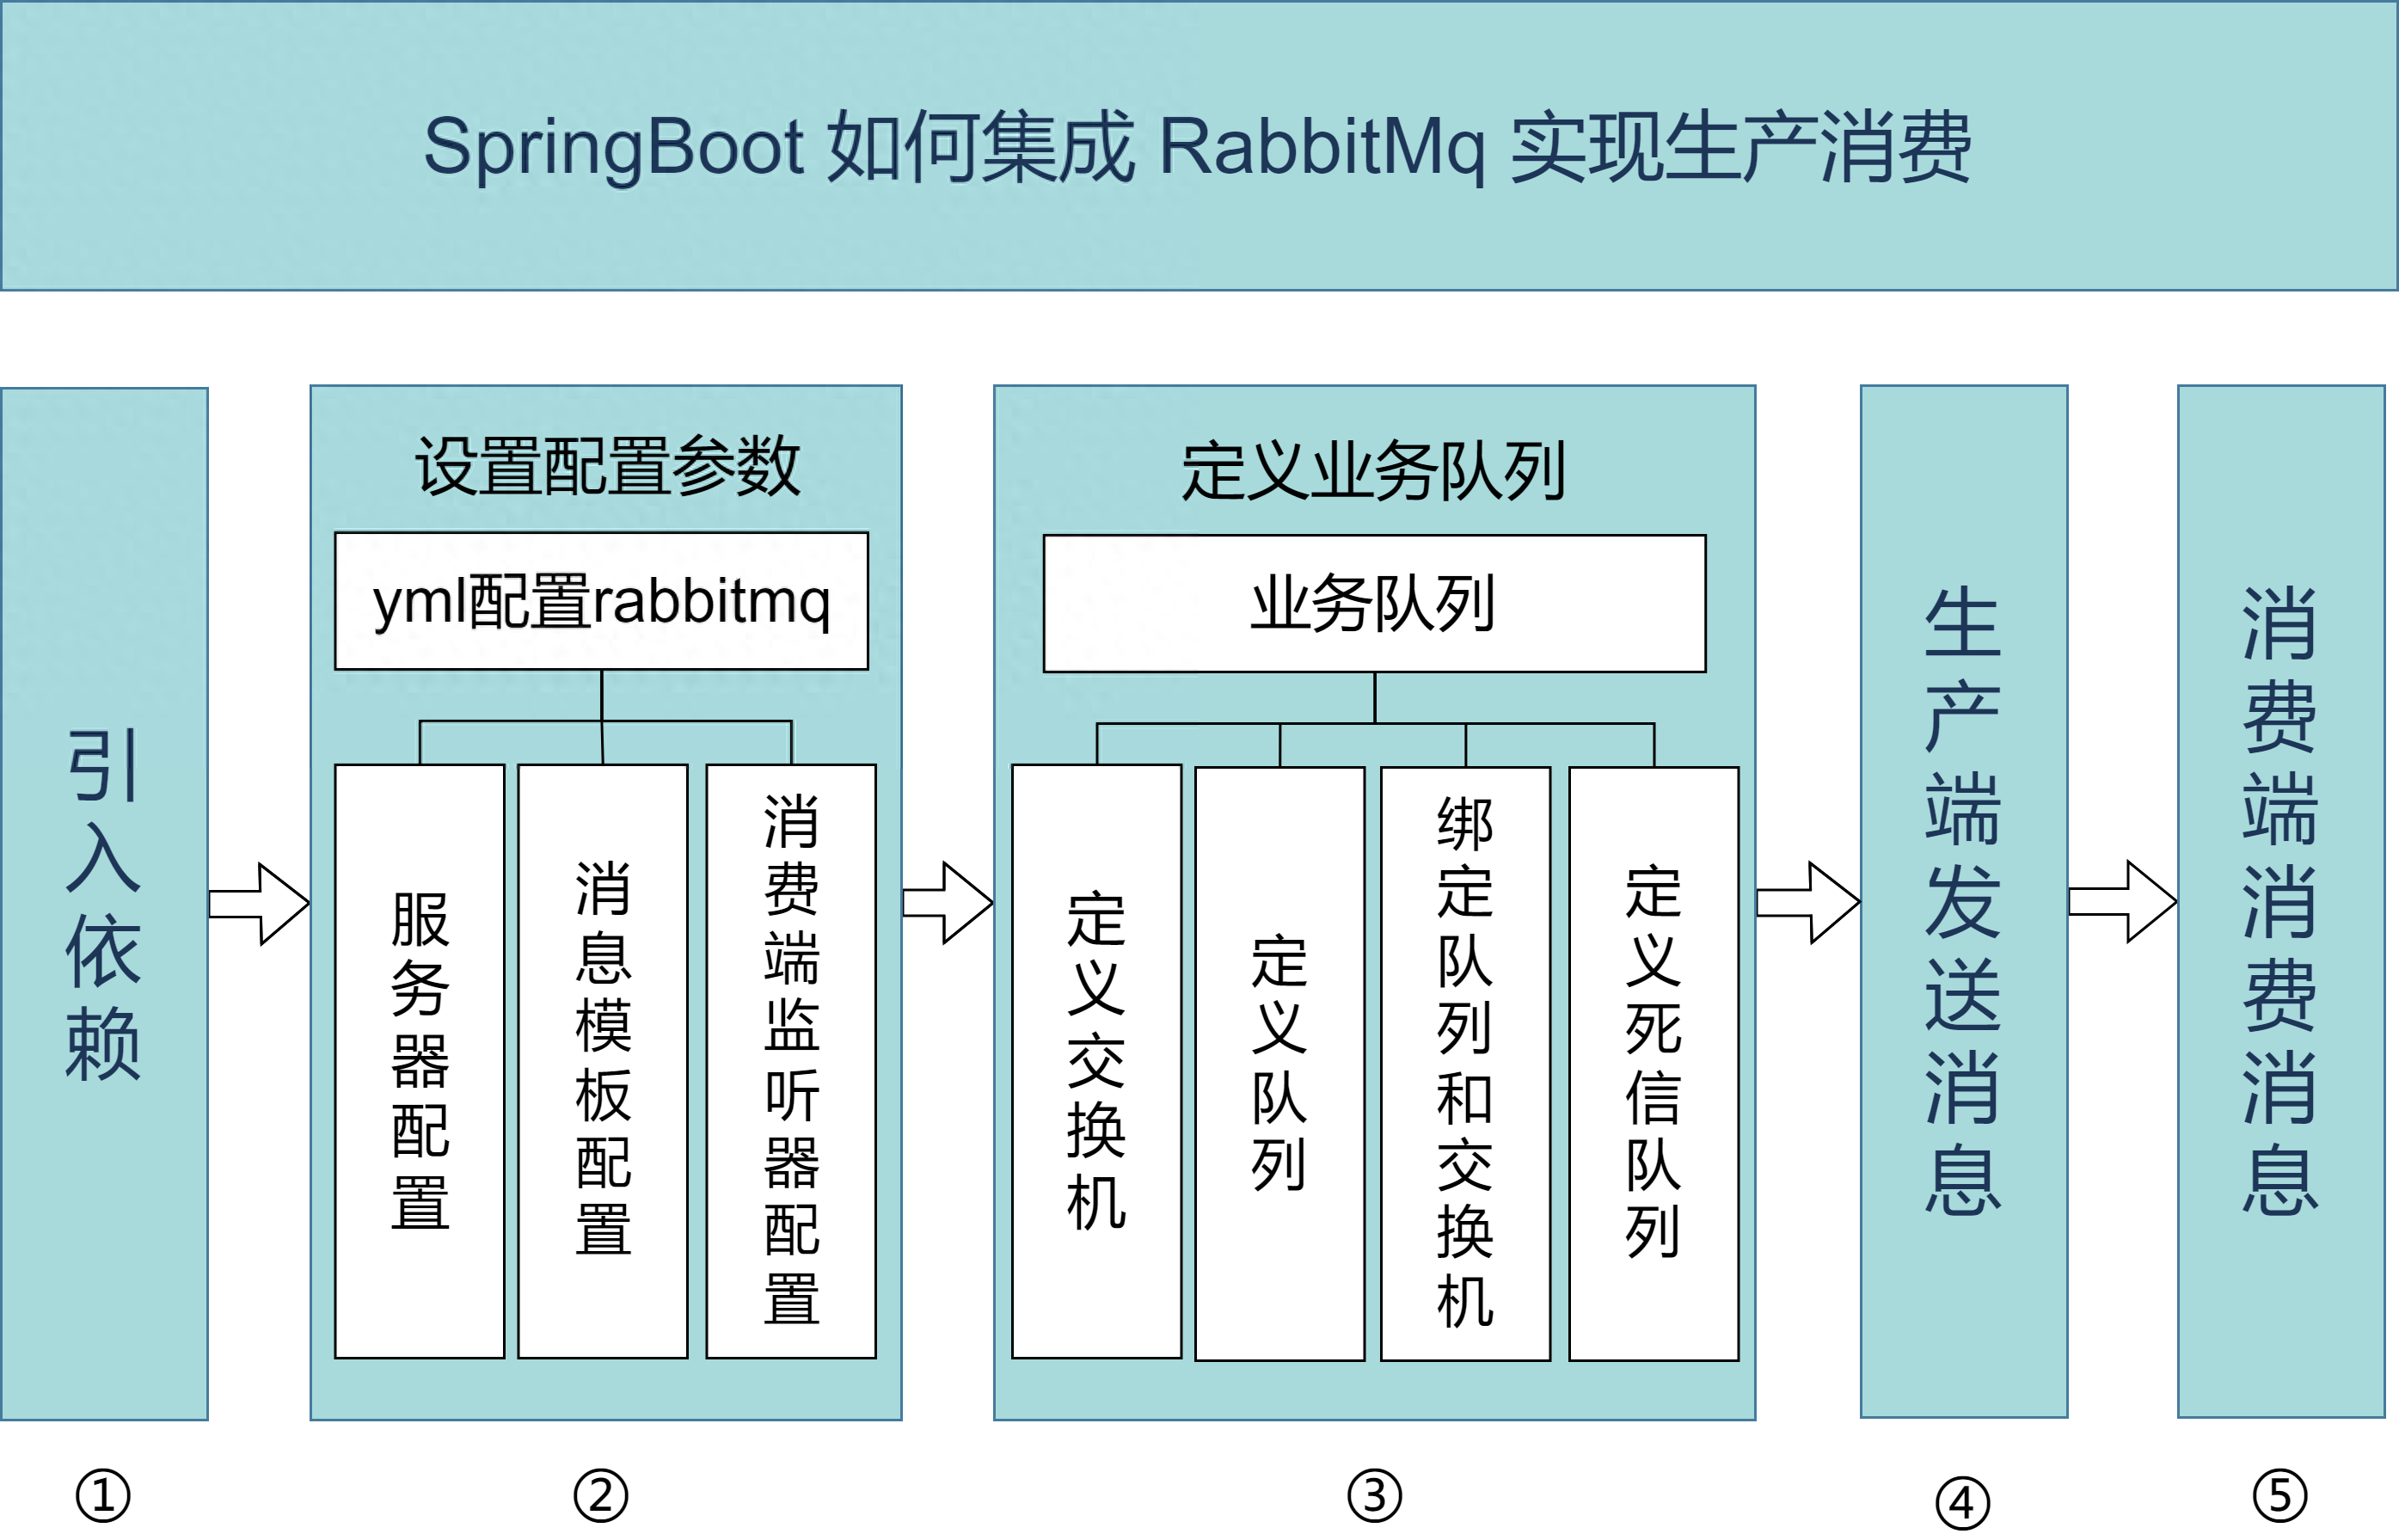
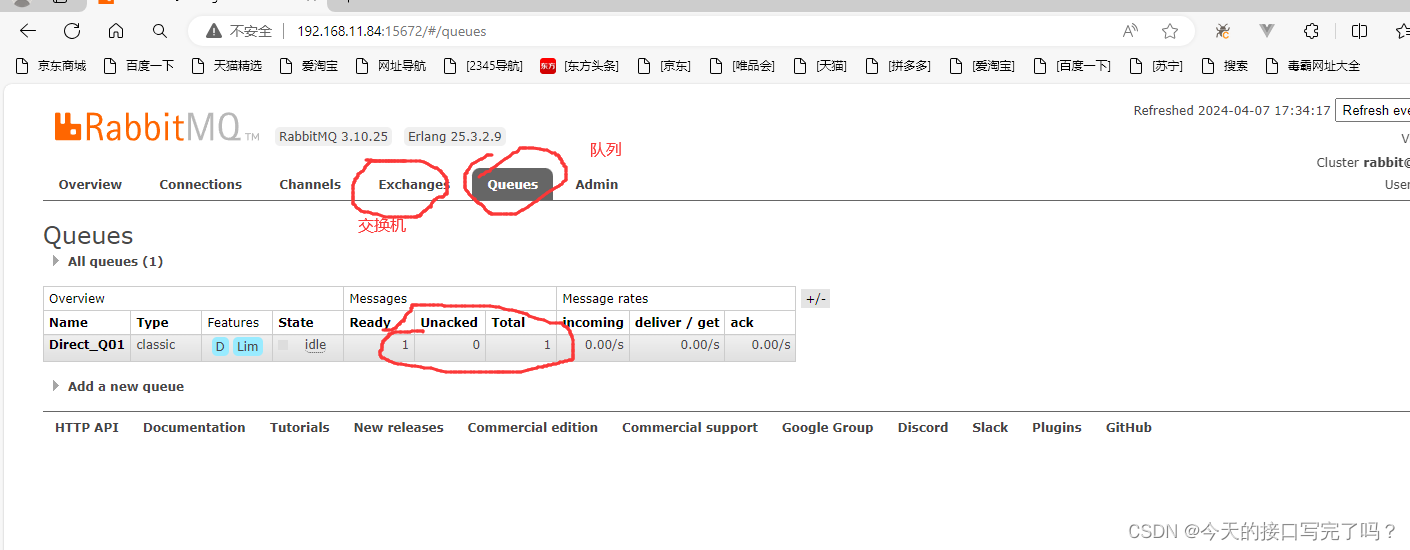
SpringtBoot整合RabbitMQ
1.依赖
        <dependency>
            <groupId>org.springframework.boot</groupId>
            <artifactId>spring-boot-starter-amqp</artifactId>
        </dependency>
        <dependency>
            <groupId>org.springframework.boot</groupId>
            <artifactId>spring-boot-starter-web</artifactId>
        </dependency>

        <dependency>
            <groupId>org.projectlombok</groupId>
            <artifactId>lombok</artifactId>
            <optional>true</optional>
        </dependency>
        <dependency>
            <groupId>org.springframework.boot</groupId>
            <artifactId>spring-boot-starter-test</artifactId>
            <scope>test</scope>
        </dependency>
        <dependency>
            <groupId>org.springframework.amqp</groupId>
            <artifactId>spring-rabbit-test</artifactId>
            <scope>test</scope>
        </dependency>
2.配置
server:
port: 9090
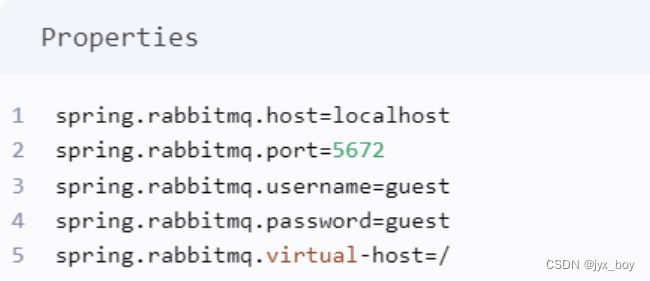
spring:
rabbitmq:
host: 192.168.29.200
port: 5672
username: admin
password: admin
virtual-host: /
RabbitMQ的7种模式
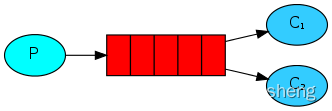
1.简单模式(Hello World)

- 做最简单的事情,一个生产者对应一个消费者,RabbitMQ相当于一个消息代理,负责将A的消息转发给B
应用场景
- 将发送的电子邮件放到消息队列,然后邮件服务在队列中获取邮件并发送给收件人
代码示例
- 配置类
@Configuration public class HelloWorldConfig { public static final String HELLO_WORLD_QUEUE_NAME = "hello_world_queue"; @Bean public Queue queue1() { return new Queue(HELLO_WORLD_QUEUE_NAME); } } - 监听并消费消息
@Component public class HelloWorldConsumer { @RabbitListener(queues = HelloWorldConfig.HELLO_WORLD_QUEUE_NAME) public void receive(String msg) { System.out.println("msg = " + msg); } } - 生产消息并发送
@SpringBootTest
class MyMqBootApplicationTests {
    @Resource
    RabbitTemplate rabbitTemplate;
    @Test
    void helloworld() {
        rabbitTemplate.convertAndSend(HelloWorldConfig.HELLO_WORLD_QUEUE_NAME, "hello world!!!");
    }
}
2.工作队列模式(Work queues)
- 在多个消费者之间分配任务(竞争的消费者模式),一个生产者对应多个消费者,一般适用于执行资源密集型任务,单个消费者处理不过来,需要多个消费者进行处理
- 一个队列对应了多个消费者,默认情况下,由队列对消息进行平均分配,消息会被分到不同的消费者手中。消费者可以配置各自的并发能力,进而提高消息的消费能力,也可以配置手动 ack,来决定是否要消费某一条消息。
应用场景
- 一个订单的处理需要10s,有多个订单可以同时放到消息队列,然后让多个消费者同时处理,这样就是并行了,而不是单个消费者的串行情况
代码示例
监听并消费消息
@Component
public class HelloWorldConsumer {
    @RabbitListener(queues = HelloWorldConfig.HELLO_WORLD_QUEUE_NAME)
    public void receive(String msg) {
        System.out.println("receive = " + msg);
    }
	// concurrency 为 10,此时,receive2将会同时存在 10 个子线程去消费消息
    @RabbitListener(queues = HelloWorldConfig.HELLO_WORLD_QUEUE_NAME,concurrency = "10")
    public void receive2(String msg) {
        System.out.println("receive2 = " + msg+"------->"+Thread.currentThread().getName());
    }
}
生产消息并发送
    @Test
    void work() {
        for (int i = 0; i < 10; i++) {
            rabbitTemplate.convertAndSend(HelloWorldConfig.HELLO_WORLD_QUEUE_NAME, "hello");
        }
    }
运行结果:运行结果每次不一定一样
receive2 = hello------->org.springframework.amqp.rabbit.RabbitListenerEndpointContainer#1-9
receive2 = hello------->org.springframework.amqp.rabbit.RabbitListenerEndpointContainer#1-10
receive2 = hello------->org.springframework.amqp.rabbit.RabbitListenerEndpointContainer#1-1
receive2 = hello------->org.springframework.amqp.rabbit.RabbitListenerEndpointContainer#1-3
receive2 = hello------->org.springframework.amqp.rabbit.RabbitListenerEndpointContainer#1-7
receive2 = hello------->org.springframework.amqp.rabbit.RabbitListenerEndpointContainer#1-5
receive = hello
receive2 = hello------->org.springframework.amqp.rabbit.RabbitListenerEndpointContainer#1-4
receive2 = hello------->org.springframework.amqp.rabbit.RabbitListenerEndpointContainer#1-6
receive2 = hello------->org.springframework.amqp.rabbit.RabbitListenerEndpointContainer#1-8
手动 ack
手动 ack可以自行决定是否消费 RabbitMQ 发来的消息
代码示例
- 配置文件:配置手动ack
server:
  port: 9090
spring:
  rabbitmq:
    host: 192.168.29.200
    port: 5672
    username: admin
    password: admin
    virtual-host: /
    listener:
      simple:
        acknowledge-mode: manual # 配置手动ack
- 消费代码:receive2 拒绝了所有消息,第一个消费者消费了所有消息
@Component public class HelloWorldConsumer { @RabbitListener(queues = HelloWorldConfig.HELLO_WORLD_QUEUE_NAME) public void receive(Message message, Channel channel) throws IOException { System.out.println("receive="+message.getPayload()); //手动确认 channel.basicAck(((Long) message.getHeaders().get(AmqpHeaders.DELIVERY_TAG)),true); } @RabbitListener(queues = HelloWorldConfig.HELLO_WORLD_QUEUE_NAME, concurrency = "10") public void receive2(Message message, Channel channel) throws IOException { System.out.println("receive2 = " + message.getPayload() + "------->" + Thread.currentThread().getName()); //手动拒绝 channel.basicReject(((Long) message.getHeaders().get(AmqpHeaders.DELIVERY_TAG)), true); } } - 测试结果(生产代码不变)
- 此时receive2 拒绝了所有消息,receive消费了所有消息(如果receive2没有拒绝,receive断然不会消费10次)
3.订阅模式(Publish/Subscribe)
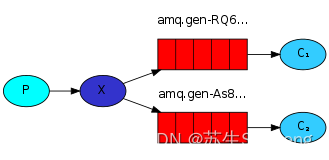
- 一次向许多消费者发送消息,一个生产者发送的消息会被多个消费者获取,也就是将消息将广播到所有的消费者中。
- 一个生产者,多个消费者,每一个消费者都有自己的一个队列,生产者没有将消息直接发送到队列,而是发送到了交换机,每个队列绑定交换机,生产者发送的消息经过交换机,到达队列,实现一个消息被多个消费者获取的目的。
- 需要注意的是,如果将消息发送到一个没有队列绑定的 Exchange上面,那么该消息将会丢失,这是因为在 RabbitMQ 中 Exchange 不具备存储消息的能力,只有队列具备存储消息的能力
应用场景
- 更新商品库存后需要通知多个缓存和多个数据库,这里的结构应该是:
- 一个fanout类型交换机扇出两个个消息队列,分别为缓存消息队列、数据库消息队列
- 一个缓存消息队列对应着多个缓存消费者
- 一个数据库消息队列对应着多个数据库消费者
代码示例
具体内容看本文单独的目录 RabbitMQ的四种交换机 , 我这里单独拿出来解释了
4.路由模式(Routing)
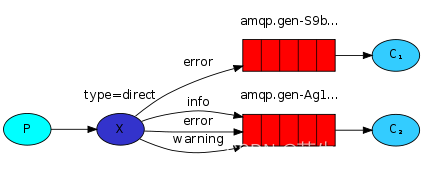
- 有选择地(Routing key)接收消息,发送消息到交换机并且要指定路由key ,消费者将队列绑定到交换机时需要指定路由key,仅消费指定路由key的消息
- 一个生产者,一个交换机,两个队列,两个消费者,生产者在创建 Exchange 后,根据 RoutingKey 去绑定相应的队列,并且在发送消息时,指定消息的具体 RoutingKey 即可
应用场景
- 如在商品库存中增加了1台iphone12,iphone12促销活动消费者指定routing key为iphone12,只有此促销活动会接收到消息,其它促销活动不关心也不会消费此routing key的消息
代码示例
参考本文单独的目录 RabbitMQ的四种交换机-1
5.主题模式(Topics)
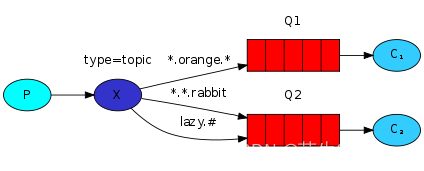
- 根据主题(Topics)来接收消息,将路由key和某模式进行匹配,此时队列需要绑定在一个模式上,#匹配一个词或多个词,*只匹配一个词。
- 一个生产者,一个交换机,两个队列,两个消费者,生产者创建 Topic 的 Exchange 并且绑定到队列中,这次绑定可以通过 * 和 # 关键字,对指定 RoutingKey 内容,编写时注意格式 xxx.xxx.xxx 去编写
应用场景
同上,iphone促销活动可以接收主题为iphone的消息,如iphone12、iphone13,iphone…等
代码示例
参考本文单独的目录 RabbitMQ的四种交换机-3
6.远程过程调用(RPC)
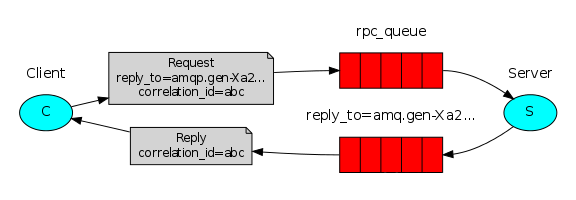
如果我们需要在远程计算机上运行功能并等待结果就可以使用RPC,具体流程可以看图。
- 首先 Client 发送一条消息,和普通的消息相比,这条消息多了两个关键内容:一个是 correlation_id,这个表示这条消息的唯一 id,还有一个内容是 reply_to,这个表示消息回复队列的名字。
- Server 从消息发送队列获取消息并处理相应的业务逻辑,处理完成后,将处理结果发送到 reply_to 指定的回调队列中。
- Client 从回调队列中读取消息,就可以知道消息的执行情况是什么样子了。
这种情况其实非常适合处理异步调用。
应用场景
- 需要等待接口返回数据,如订单支付
代码示例
消息生产者开发
依赖
        <dependency>
            <groupId>org.springframework.boot</groupId>
            <artifactId>spring-boot-starter-amqp</artifactId>
        </dependency>
        <dependency>
            <groupId>org.springframework.boot</groupId>
            <artifactId>spring-boot-starter-web</artifactId>
        </dependency>

        <dependency>
            <groupId>org.springframework.boot</groupId>
            <artifactId>spring-boot-starter-test</artifactId>
            <scope>test</scope>
        </dependency>
        <dependency>
            <groupId>org.springframework.amqp</groupId>
            <artifactId>spring-rabbit-test</artifactId>
            <scope>test</scope>
        </dependency>
  		<dependency>
            <groupId>org.projectlombok</groupId>
            <artifactId>lombok</artifactId>
            <optional>true</optional>
   		</dependency>
配置
server:
  port: 7777
spring:
  rabbitmq:
    host: 192.168.29.200
    port: 5672
    username: admin
    password: admin
    virtual-host: /
    publisher-confirm-type: correlated # 配置消息确认方式,我们通过 correlated 来确认,只有开启了这个配置,将来的消息中才会带 correlation_id,只有通过 correlation_id 我们才能将发送的消息和返回值之间关联起来。
    publisher-returns: true #开启发送失败退回。
配置类
/**
 * @author: zjl
 * @datetime: 2024/5/9
 * @desc:
 * 这个配置类中我们分别配置了消息发送队列 msgQueue 和消息返回队列 replyQueue,
 * 然后将这两个队列和消息交换机进行绑定。常规操作。
 * 在 Spring Boot 中我们负责消息发送的工具是 RabbitTemplate,
 * 默认情况下,系统自动提供了该工具,但是这里我们需要对该工具重新进行定制,
 * 主要是添加消息发送的返回队列,最后我们还需要给返回队列设置一个监听器
 */
@Configuration
public class RabbitConfig {

    public static final String RPC_QUEUE1 = "queue_1";
    public static final String RPC_QUEUE2 = "queue_2";
    public static final String RPC_EXCHANGE = "rpc_exchange";

    /**
     * 设置消息发送RPC队列
     */
    @Bean
    public Queue msgQueue() {
        return new Queue(RPC_QUEUE1);
    }

    /**
     * 设置返回队列
     */
    @Bean
    public Queue replyQueue() {
        return new Queue(RPC_QUEUE2);
    }

    /**
     * 设置交换机
     */
    @Bean
    public TopicExchange exchange() {
        return new TopicExchange(RPC_EXCHANGE);
    }

    /**
     * 请求队列和交换器绑定
     */
    @Bean
    public Binding msgBinding() {
        return BindingBuilder.bind(msgQueue()).to(exchange()).with(RPC_QUEUE1);
    }

    /**
     * 返回队列和交换器绑定
     */
    @Bean
    public Binding replyBinding() {
        return BindingBuilder.bind(replyQueue()).to(exchange()).with(RPC_QUEUE2);
    }

    /**
     * 使用 RabbitTemplate发送和接收消息
     * 并设置回调队列地址
     */
    @Bean
    public RabbitTemplate rabbitTemplate(ConnectionFactory connectionFactory) {
        RabbitTemplate template = new RabbitTemplate(connectionFactory);
        template.setReplyAddress(RPC_QUEUE2);
        template.setReplyTimeout(6000);
        return template;
    }

    /**
     * 给返回队列设置监听器
     */
    @Bean
    public SimpleMessageListenerContainer replyContainer(ConnectionFactory connectionFactory) {
        SimpleMessageListenerContainer container = new SimpleMessageListenerContainer();
        container.setConnectionFactory(connectionFactory);
        container.setQueueNames(RPC_QUEUE2);
        container.setMessageListener(rabbitTemplate(connectionFactory));
        return container;
    }
}
消息发送
/**
 * @author: zjl
 * @datetime: 2024/5/9
 * @desc:
 *     消息发送调用 sendAndReceive 方法,该方法自带返回值,返回值就是服务端返回的消息。
 *     服务端返回的消息中,头信息中包含了 spring_returned_message_correlation 字段,
 *     这个就是消息发送时候的 correlation_id,通过消息发送时候的 correlation_id
 *     以及返回消息头中的 spring_returned_message_correlation 字段值,
 *     我们就可以将返回的消息内容和发送的消息绑定到一起,
 *     确认出这个返回的内容就是针对这个发送的消息的。
 */
@RestController
@Slf4j
public class RpcClientController {
    @Resource
    private RabbitTemplate rabbitTemplate;

    @GetMapping("/send")
    public String send(String message) {
        // 创建消息对象
        Message newMessage = MessageBuilder.withBody(message.getBytes()).build();

        log.info("client send:{}", newMessage);

        //客户端发送消息
        Message result = rabbitTemplate.sendAndReceive(RabbitConfig.RPC_EXCHANGE, RabbitConfig.RPC_QUEUE1, newMessage);

        String response = "";
        if (result != null) {
            // 获取已发送的消息的 correlationId
            String correlationId = newMessage.getMessageProperties().getCorrelationId();
            log.info("correlationId:{}", correlationId);

            // 获取响应头信息
            HashMap<String, Object> headers = (HashMap<String, Object>) result.getMessageProperties().getHeaders();

            // 获取 server 返回的消息 id
            String msgId = (String) headers.get("spring_returned_message_correlation");

            if (msgId.equals(correlationId)) {
                response = new String(result.getBody());
                log.info("client receive:{}", response);
            }
        }
        return response;
    }
}
这就是整个消息生产者的开发,其实最最核心的就是 sendAndReceive 方法的调用。调用虽然简单,但是准备工作还是要做足够。例如如果我们没有在 application.properties 中配置 correlated,发送的消息中就没有 correlation_id,这样就无法将返回的消息内容和发送的消息内容关联起来
消息发送者开发
依赖
        <dependency>
            <groupId>org.springframework.boot</groupId>
            <artifactId>spring-boot-starter-amqp</artifactId>
        </dependency>
        <dependency>
            <groupId>org.springframework.boot</groupId>
            <artifactId>spring-boot-starter-web</artifactId>
        </dependency>

        <dependency>
            <groupId>org.springframework.boot</groupId>
            <artifactId>spring-boot-starter-test</artifactId>
            <scope>test</scope>
        </dependency>
        <dependency>
            <groupId>org.springframework.amqp</groupId>
            <artifactId>spring-rabbit-test</artifactId>
            <scope>test</scope>
        </dependency>
        <dependency>
            <groupId>org.projectlombok</groupId>
            <artifactId>lombok</artifactId>
            <optional>true</optional>
   		 </dependency>
配置
server:
  port: 8888
spring:
  rabbitmq:
    host: 192.168.29.200
    port: 5672
    username: admin
    password: admin
    virtual-host: /
    publisher-confirm-type: correlated # 配置消息确认方式,我们通过 correlated 来确认,只有开启了这个配置,将来的消息中才会带 correlation_id,只有通过 correlation_id 我们才能将发送的消息和返回值之间关联起来。
    publisher-returns: true #开启发送失败退回。
配置类
@Configuration
public class RabbitConfig {

    public static final String RPC_QUEUE1 = "queue_1";
    public static final String RPC_QUEUE2 = "queue_2";
    public static final String RPC_EXCHANGE = "rpc_exchange";

    /**
     * 配置消息发送队列
     */
    @Bean
    Queue msgQueue() {
        return new Queue(RPC_QUEUE1);
    }

    /**
     * 设置返回队列
     */
    @Bean
    Queue replyQueue() {
        return new Queue(RPC_QUEUE2);
    }

    /**
     * 设置交换机
     */
    @Bean
    TopicExchange exchange() {
        return new TopicExchange(RPC_EXCHANGE);
    }

    /**
     * 请求队列和交换器绑定
     */
    @Bean
    Binding msgBinding() {
        return BindingBuilder.bind(msgQueue()).to(exchange()).with(RPC_QUEUE1);
    }

    /**
     * 返回队列和交换器绑定
     */
    @Bean
    Binding replyBinding() {
        return BindingBuilder.bind(replyQueue()).to(exchange()).with(RPC_QUEUE2);
    }
}
消息消费
@RestController
@Slf4j
public class RpcConsumerReceiver {
    /** 服务端首先收到消息并打印出来。
    * 服务端提取出原消息中的 correlation_id。
    * 服务端调用 sendAndReceive 方法,将消息发送给 RPC_QUEUE2 队列,同时带上 correlation_id 参数。
    */
    @Resource
    private RabbitTemplate rabbitTemplate;
    @RabbitListener(queues = RabbitConfig.RPC_QUEUE1)
    public void process(Message msg) {
        log.info("server receive : {}",msg.toString());
        Message response = MessageBuilder.withBody(("i'm receive:"+new String(msg.getBody())).getBytes()).build();
        CorrelationData correlationData = new CorrelationData(msg.getMessageProperties().getCorrelationId());
        rabbitTemplate.sendAndReceive(RabbitConfig.RPC_EXCHANGE, RabbitConfig.RPC_QUEUE2, response, correlationData);
    }
}
7.发布者确认(Publisher Confirms)
- 与发布者进行可靠的发布确认,发布者确认是RabbitMQ扩展,可以实现可靠的发布。
- 在通道上启用发布者确认后,RabbitMQ将异步确认发送者发布的消息,这意味着它们已在服务器端处理
应用场景
- 对于消息可靠性要求较高,比如钱包扣款
RabbitMQ的四种交换机
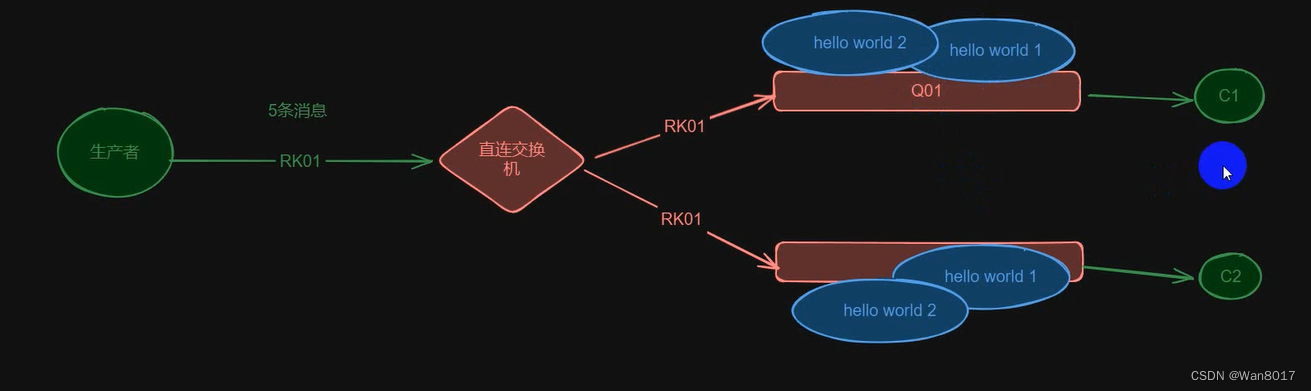
1.直连交换机(Direct exchange)
- 具有路由功能的交换机,绑定到此交换机的时候需要指定一个routing_key,交换机发送消息的时候需要routing_key,会将消息发送道对应的队列
- DirectExchange 的路由策略是将消息队列绑定到一个 DirectExchange 上,当一条消息到达 DirectExchange 时会被转发到与该条消息 routing key 相同的 Queue 上
- 例如消息队列名为 “hello-queue”,则 routingkey 为 “hello-queue” 的消息会被该消息队列接收。
代码示例
- 配置类
@Configuration public class RabbitDirectConfig { //首先提供一个消息队列Queue,然后创建一个DirectExchange对象,三个参数分别是名字,重启后是否依然有效以及长期未用时是否删除。 //创建一个Binding对象将Exchange和Queue绑定在一起。 //DirectExchange和Binding两个Bean的配置可以省略掉,即如果使用DirectExchange,可以只配置一个Queue的实例即可。 public final static String DIRECTNAME = "mq-direct"; @Bean public Queue queue() { return new Queue("hello-queue"); } @Bean public DirectExchange directExchange() { return new DirectExchange(DIRECTNAME, true, false); } @Bean public Binding binding() { return BindingBuilder.bind(queue()) .to(directExchange()).with("direct"); } } - 消费者
通过 @RabbitListener 注解指定一个方法是一个消息消费方法,方法参数就是所接收到的消息@Component public class DirectReceiver { @RabbitListener(queues = "hello-queue") public void handler1(String msg) { System.out.println("DirectReceiver:" + msg); } } - 生产者发送消息
@RestController
public class SendController {
    @Resource
    private RabbitTemplate rabbitTemplate;
    @RequestMapping("/send")
    public String send(){
        rabbitTemplate.convertAndSend("hello-queue", "hello direct!");
        return "success";
    }
}
2.扇形交换机(Fanout exchange)
- 广播消息到所有队列,没有任何处理,速度最快
- FanoutExchange 的数据交换策略是把所有到达 FanoutExchange 的消息转发给所有与它绑定的 Queue 上,在这种策略中,routingkey 将不起任何作用
代码示例
配置类
@Configuration
public class RabbitFanoutConfig {
    //在这里首先创建 FanoutExchange,参数含义与创建 DirectExchange 参数含义一致,
    // 然后创建两个 Queue,再将这两个 Queue 都绑定到 FanoutExchange 上
    public final static String FANOUTNAME = "mq-fanout";
    @Bean
    public FanoutExchange fanoutExchange() {
        return new FanoutExchange(FANOUTNAME, true, false);
    }
    @Bean
    public Queue queueOne() {
        return new Queue("queue-one");
    }
    @Bean
    public Queue queueTwo() {
        return new Queue("queue-two");
    }
    @Bean
    public Binding bindingOne() {
        return BindingBuilder.bind(queueOne()).to(fanoutExchange());
    }
    @Bean
    public Binding bindingTwo() {
        return BindingBuilder.bind(queueTwo()).to(fanoutExchange());
    }
}
消费者
@Component
public class FanoutReceiver {
    @RabbitListener(queues = "queue-one")
    public void receiver1(String message) {
        System.out.println("FanoutReceiver:receiver1:" + message);
    }
    @RabbitListener(queues = "queue-two")
    public void receiver2(String message) {
        System.out.println("FanoutReceiver:receiver2:" + message);
    }
}
生产者发送消息
@RestController
public class SendController {
    @Resource
    private RabbitTemplate rabbitTemplate;
    @RequestMapping("/send")
    public String send(){
        //注意这里发送消息时不需要 routingkey,指定 exchange 即可,routingkey 可以直接传一个 null
        rabbitTemplate.convertAndSend(RabbitFanoutConfig.FANOUTNAME,null, "hello fanout!");
        return "success";
    }
}
3.主题交换机(Topic exchange)
- 在直连交换机基础上增加模式匹配,也就是对routing_key进行模式匹配,*代表一个单词,#代表多个单词
- TopicExchange 是比较复杂但是也比较灵活的一种路由策略,在 TopicExchange 中,Queue 通过 routingkey 绑定到 TopicExchange 上,
- 当消息到达 TopicExchange 后,TopicExchange 根据消息的 routingkey 将消息路由到一个或者多个 Queue 上
代码示例
配置类
@Configuration
public class RabbitTopicConfig {
    /**
     * 首先创建 TopicExchange,参数和前面的一致。
     * 然后创建三个 Queue,第一个 Queue 用来存储和 “xiaomi” 有关的消息,
     * 第二个 Queue 用来存储和 “huawei” 有关的消息,
     * 第三个 Queue 用来存储和 “phone” 有关的消息。
     *
     * 将三个 Queue 分别绑定到 TopicExchange 上,
     * 第一个 Binding 中的 “xiaomi.#” 表示消息的 routingkey 凡是以 “xiaomi” 开头的,都将被路由到名称为 “xiaomi” 的 Queue 上,
     * 第二个 Binding 中的 “huawei.#” 表示消息的 routingkey 凡是以 “huawei” 开头的,都将被路由到名称为 “huawei” 的 Queue 上,
     * 第三个 Binding 中的 “#.phone.#” 则表示消息的 routingkey 中凡是包含 “phone” 的,都将被路由到名称为 “phone” 的 Queue 上。
     */
    public final static String TOPICNAME = "mq-topic";
    @Bean
    public TopicExchange topicExchange() {
        return new TopicExchange(TOPICNAME, true, false);
    }
    @Bean
    public Queue xiaomi() {
        return new Queue("xiaomi");
    }
    @Bean
    public Queue huawei() {
        return new Queue("huawei");
    }
    @Bean
    public Queue phone() {
        return new Queue("phone");
    }
    @Bean
    public Binding xiaomiBinding() {
        return BindingBuilder.bind(xiaomi()).to(topicExchange())
                .with("xiaomi.#");
    }
    @Bean
    public Binding huaweiBinding() {
        return BindingBuilder.bind(huawei()).to(topicExchange())
                .with("huawei.#");
    }
    @Bean
    public Binding phoneBinding() {
        return BindingBuilder.bind(phone()).to(topicExchange())
                .with("#.phone.#");
    }
}
消费者
@Component
public class TopicReceiver {
    @RabbitListener(queues = "phone")
    public void receiver1(String message) {
        System.out.println("PhoneReceiver:" + message);
    }
    @RabbitListener(queues = "xiaomi")
    public void receiver2(String message) {
        System.out.println("XiaoMiReceiver:"+message);
    }
    @RabbitListener(queues = "huawei")
    public void receiver3(String message) {
        System.out.println("HuaWeiReceiver:"+message);
    }
}
生产者发送消息
@RestController
public class SendController {
    @Resource
    private RabbitTemplate rabbitTemplate;
    @RequestMapping("/send")
    public String send(){
    	//根据 RabbitTopicConfig 中的配置,
    	//第一条消息将被路由到名称为 “xiaomi” 的 Queue 上,
    	//第二条消息将被路由到名为 “huawei” 的 Queue 上,
    	//第三条消息将被路由到名为 “xiaomi” 以及名为 “phone” 的 Queue 上,
    	//第四条消息将被路由到名为 “huawei” 以及名为 “phone” 的 Queue 上,
    	//最后一条消息则将被路由到名为 “phone” 的 Queue 上
        rabbitTemplate.convertAndSend(RabbitTopicConfig.TOPICNAME,
                "xiaomi.news","小米新闻..");
        rabbitTemplate.convertAndSend(RabbitTopicConfig.TOPICNAME,
                "huawei.news","华为新闻..");
        rabbitTemplate.convertAndSend(RabbitTopicConfig.TOPICNAME,
                "xiaomi.phone","小米手机..");
        rabbitTemplate.convertAndSend(RabbitTopicConfig.TOPICNAME,
                "huawei.phone","华为手机..");
        rabbitTemplate.convertAndSend(RabbitTopicConfig.TOPICNAME,
                "phone.news","手机新闻..");
        return "success";
    }
}
4.首部交换机(Headers exchange)
- 忽略routing_key,使用Headers信息(一个Hash的数据结构)进行匹配,优势在于可以有更多更灵活的匹配规则
- HeadersExchange 是一种使用较少的路由策略,HeadersExchange 会根据消息的 Header 将消息路由到不同的 Queue 上,这种策略也和 routingkey无关
代码示例
配置类
@Configuration
public class RabbitHeaderConfig {
    /**
     * 这里的配置大部分和前面介绍的一样,差别主要体现的 Binding 的配置上,
     * 第一个 bindingName 方法中,
     * whereAny 表示消息的 Header 中只要有一个 Header 匹配上 map 中的 key/value,
     * 就把该消息路由到名为 “name-queue” 的 Queue 上,
     * 这里也可以使用 whereAll 方法,
     * 表示消息的所有 Header 都要匹配。
     * whereAny 和 whereAll 实际上对应了一个名为 x-match 的属性。
     * bindingAge 中的配置则表示只要消息的 Header 中包含 age,不管 age 的值是多少,
     * 都将消息路由到名为 “age-queue” 的 Queue 上
     */
    public final static String HEADERNAME = "mq-header";
    @Bean
    public HeadersExchange headersExchange() {
        return new HeadersExchange(HEADERNAME, true, false);
    }
    @Bean
    public Queue queueName() {
        return new Queue("name-queue");
    }
    @Bean
    public Queue queueAge() {
        return new Queue("age-queue");
    }
    @Bean
    public Binding bindingName() {
        Map<String, Object> map = new HashMap<>();
        map.put("name", "mq");
        return BindingBuilder.bind(queueName())
                .to(headersExchange()).whereAny(map).match();
    }
    @Bean
    public Binding bindingAge() {
        return BindingBuilder.bind(queueAge())
                .to(headersExchange()).where("age").exists();
    }
}
消费者
@Component
public class HeaderReceiver {
	//注意这里的参数用 byte 数组接收
    @RabbitListener(queues = "name-queue")
    public void receiver1(byte[] msg) {
        System.out.println("HeaderReceiver:name:" + new String(msg, 0, msg.length));
    }
    @RabbitListener(queues = "age-queue")
    public void receiver2(byte[] msg) {
        System.out.println("HeaderReceiver:age:" + new String(msg, 0, msg.length));
    }
}
生产者发送消息
package cn.smbms.controller;

import cn.smbms.config.RabbitFanoutConfig;
import org.springframework.amqp.core.Message;
import org.springframework.amqp.core.MessageBuilder;
import org.springframework.amqp.rabbit.core.RabbitTemplate;
import org.springframework.web.bind.annotation.RequestMapping;
import org.springframework.web.bind.annotation.RestController;

import javax.annotation.Resource;

/**
 * @author: zjl
 * @datetime: 2024/5/9
 * @desc:
 */
@RestController
public class SendController {
    @Resource
    private RabbitTemplate rabbitTemplate;
    @RequestMapping("/send")
    public String send(){
		//这里创建两条消息,两条消息具有不同的 header,不同 header 的消息将被发到不同的 Queue 中去
        Message nameMsg = MessageBuilder
                .withBody("hello header! name-queue".getBytes())
                .setHeader("name", "sang").build();
        Message ageMsg = MessageBuilder
                .withBody("hello header! age-queue".getBytes())
                .setHeader("age", "99").build();
        rabbitTemplate.send(RabbitHeaderConfig.HEADERNAME, null, ageMsg);
        rabbitTemplate.send(RabbitHeaderConfig.HEADERNAME, null, nameMsg);
        return "success";
    }
}