今天看到同事在写轮播图,由于是jq的写法,我没有过多参与,我只写vue的部分。。。虽然语言不一样,但是用法还是要会的。下面介绍通过swiper组件来实现轮播效果。
解决步骤1:安装swiper
npm install swiper@5.4.5
我这边安装的版本是5.4.5
解决步骤2:在指定页面中局部注册
import Swiper from 'swiper'; // 注意引入的是Swiper
import 'swiper/css/swiper.min.css'; // 注意这里的引入
解决步骤3:多图轮播效果

参考链接:https://blog.csdn.net/qq_51055690/article/details/132402936
3.1html代码
 <div class="banshi">
      <div class="swiper-container">
        <div class="swiper-wrapper">
          <div
            v-for="item in swiperList"
            :key="item.id"
            class="swiper-slide"
            :style="`background-image:url(${item.imgUrl})`"
          >
            <h3>{{ item.title }}</h3>
            <el-button>立即办理</el-button>
          </div>
        </div>
        <div class="swiper-pagination"></div>
        <div class="swiper-button-next"></div>
        <div class="swiper-button-prev"></div>
      </div>
    </div>
3.2 js代码
swiper: null,
swiperList: [
 {
   id: 1,
   title: '采集国家二级保护野生植物审批',
   imgUrl:
     'https://img0.baidu.com/it/u=2639758887,1655012884&fm=253&fmt=auto&app=138&f=PNG?w=632&h=500',
 },
 {
   id: 2,
   title: '农村危房改造',
   imgUrl:
     'https://img0.baidu.com/it/u=2639758887,1655012884&fm=253&fmt=auto&app=138&f=PNG?w=632&h=500',
 },
 {
   id: 3,
   title: '农村危房改造',
   imgUrl:
     'https://img0.baidu.com/it/u=2639758887,1655012884&fm=253&fmt=auto&app=138&f=PNG?w=632&h=500',
 },
 {
   id: 4,
   title: '农村危房改造',
   imgUrl:
     'https://img0.baidu.com/it/u=2639758887,1655012884&fm=253&fmt=auto&app=138&f=PNG?w=632&h=500',
 },
],
3.3 methods方法
getSwiper() {
   this.swiper = new Swiper('.swiper-container', {
     loop: true, // 无缝
        autoplay: { //自动开始
            delay: 3000, //时间间隔
            disableOnInteraction: false, //*手动操作轮播图后不会暂停*
        },
        paginationClickable: true,
        slidesPerView: 4, // 一组三个
        spaceBetween: 30, // 间隔
        // 如果需要前进后退按钮
        navigation: {
            nextEl: '.swiper-button-next',
            prevEl: '.swiper-button-prev',
        },
        // 窗口变化,重新init,针对F11全屏和放大缩小,必须加
        observer: true,
        observeParents: true,
        // 如果需要分页器
        pagination: {
            el: '.swiper-pagination',
            clickable: true, // 分页器可以点击
        },
    });
 },
此方法要在mounted中使用:
mounted() {
  this.getSwiper();
},
3.4 css样式
<style lang="less">
.banshi {
  width: 1200px;
  margin: 0 auto;
  padding: 70px 0;
  .swiper-slide {
    position: relative;
    height: 328px;
    width: 264px;
    padding: 36px 22px;
    background-repeat: no-repeat;
    background-size: contain;
    background-color: #f7f8fa;
    .el-button {
      z-index: 2;
    }
  }
}
</style>
解决步骤4:层叠轮播效果
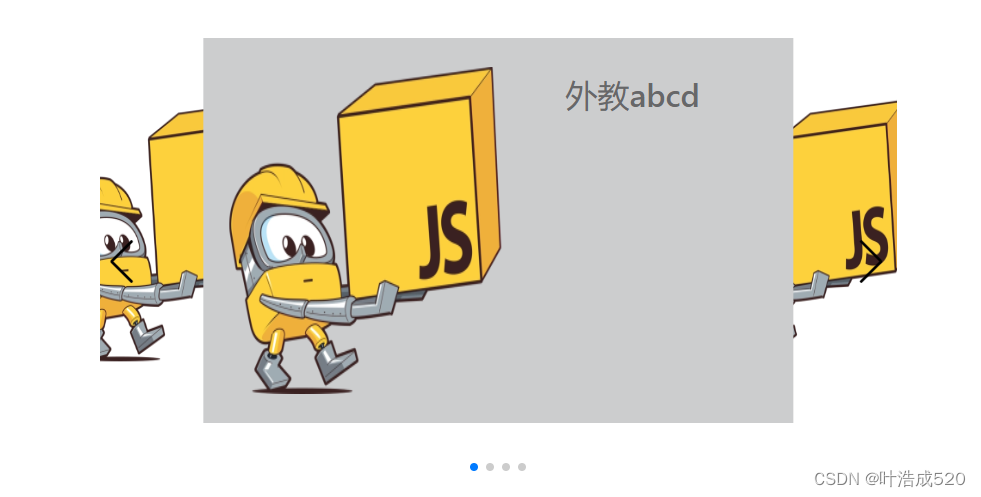
参考链接:https://www.cnblogs.com/a973692898/p/13364563.html
4.1 html代码
<div class="ours-main">
      <div class="ours-swiper">
        <div class="swiper-container">
          <div class="swiper-wrapper">
            <div class="swiper-slide">
              <div class="s-left">
                <div class="s-l-block">
                  <img
                    src="https://img0.baidu.com/it/u=2639758887,1655012884&fm=253&fmt=auto&app=138&f=PNG?w=632&h=500"
                  />
                </div>
              </div>
              <div class="s-right">
                <div class="s-r-title">
                  <span>外教abcd</span>
                </div>
              </div>
            </div>
            <div class="swiper-slide">
              <div class="s-left">
                <div class="s-l-block">
                  <img
                    src="https://img0.baidu.com/it/u=2639758887,1655012884&fm=253&fmt=auto&app=138&f=PNG?w=632&h=500"
                  />
                </div>
              </div>
              <div class="s-right">
                <div class="s-r-title">
                  <span>外教abcd</span>
                </div>
              </div>
            </div>
            <div class="swiper-slide">
              <div class="s-left">
                <div class="s-l-block">
                  <img
                    src="https://img0.baidu.com/it/u=2639758887,1655012884&fm=253&fmt=auto&app=138&f=PNG?w=632&h=500"
                  />
                </div>

              </div>
              <div class="s-right">
                <div class="s-r-title">
                  <span>外教abcd</span>
                </div>
              </div>
            </div>
            <div class="swiper-slide">
              <div class="s-left">
                <div class="s-l-block">
                  <img
                    src="https://img0.baidu.com/it/u=2639758887,1655012884&fm=253&fmt=auto&app=138&f=PNG?w=632&h=500"
                  />
                </div>
              </div>
              <div class="s-right">
                <div class="s-r-title">
                  <span>外教abcd</span>
                </div>
              </div>
            </div>
          </div>
          <div class="swiper-pagination"></div>
          <!-- Add Arrows -->
          <div class="swiper-button-next swiper-button-black"></div>
          <div class="swiper-button-prev swiper-button-black"></div>
        </div>
      </div>
    </div>
4.2 methods方法
getSwiper() {
  var swiper = new Swiper('.swiper-container', {
    slidesPerView: 1.5, //设置slider容器能够同时显示的slides数量(carousel模式)。
    spaceBetween: -180, //在slide之间设置距离(单位px)。
    centeredSlides: true, //设置活动块居中
    loop: true,
    pagination: {
      el: '.swiper-pagination',
      clickable: true,
    },
    navigation: {
      nextEl: '.swiper-button-next',
      prevEl: '.swiper-button-prev',
    },
    autoplay: {
      stopOnLastSlide: true,
      delay: 5000,
    },
  });
},
此方法要在mounted中使用:
mounted() {
  this.getSwiper();
},
4.3 css样式
<style scoped lang="less">
/*展示区域*/
.ours-main {
  width: 100%;
  height: 28rem;
  margin-top: 3rem;
  display: flex;
  justify-content: center;
}
.ours-swiper {
  height: 100%;
  width: 49.8%;
}
/*自定义swiper样式*/
.swiper-container {
  position: relative;
  width: 100%;
  height: 100%;
}
.swiper-wrapper {
  width: 100%;
  height: 100%;
}
.swiper-slide {
  text-align: center;
  height: 86%;
  background: #cccdce;
  display: flex;
  justify-content: center;
  align-items: center;
  transition: 300ms;
  transform: scale(0.8);
}

.swiper-slide-active,
.swiper-slide-duplicate-active {
  transform: scale(1);
}
.swiper-button-next,
.swiper-button-prev {
  display: block;
}
.swiper-slide-active {
  z-index: 999 !important;
}
.swiper-slide-prev .s-right {
  display: none;
}
.swiper-slide-prev .s-left {
  margin-left: 35%;
}
.swiper-slide-prev {
  background-color: #fff;
}
.swiper-slide-next {
  background-color: #fff;
}
/*要展示的div左侧样式*/
.s-left {
  width: 50%;
  height: 100%;
  display: flex;
  justify-content: center;
  align-items: center;
}
.s-l-block {
  width: 92.2%;
  height: 85%;
}
.s-l-block img {
  width: 100%;
  height: 100%;
}
/*要展示div的右侧样式*/
.s-right {
  width: 45%;
  height: 100%;
}
.s-r-title {
  margin-top: 2rem;
  margin-right: 10%;
  font-size: 2rem;
  color: #676769;
  font-weight: 500;
}
</style>









![[C++] 类和对象:运算符重载](https://img-blog.csdnimg.cn/img_convert/565e1eccafb1168e88402956ea5604bf.png)


