Python学习从0开始——项目一day02数据库连接
一、在线云数据库
找了一个在线数据库,需要邮箱注册,这个永久免费。如果本地装了数据库,也可以使用本地的。
这个在线的数据库功能比较简单,基本上都是通过SQL语句操作,也可以去注册阿里云等云服务器,阿里云有三个月MySQL服务器的免费试用期。
我使用的云服务器,如果使用这个云服务器一定要将那个返回的页面拍下来,我直接识图复制文本的时候,密码中有些字母的大小写是混淆了的,这个密码只会显示一次,很重要。
进入数据库后,直接建表:
CREATE TABLE picture(
    pid INT AUTO_INCREMENT PRIMARY KEY,
    width INT ,
    height INT,
    oriwidth INT,
    oriheight INT,
    thumbnailUrl varchar(128),
    fromUrl varchar(128),
    contSign  varchar(128)
);
alter table picture COMMENT  '爬虫图片';
二、测试数据库连接
看原始代码,参照建立我们自己数据库的配置
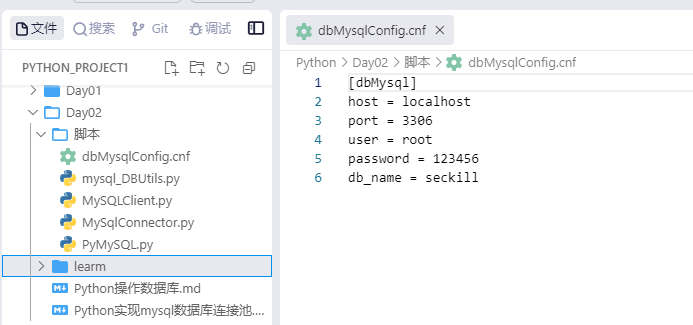
新建一个PyMySQL.py文件
#!/usr/bin/python3
import pymysql

def test_mysql_connection(host, user, password, db_name):
    try:
        # 尝试连接到MySQL数据库
        conn = pymysql.connect(host=host, user=user, password=password, db=db_name)
        print("成功连接到MySQL数据库")

        # 使用 cursor() 方法创建一个游标对象 cursor
        with conn.cursor() as cursor:
            cursor.execute("SHOW TABLES;")
            tables = cursor.fetchall()
            print("数据库中的表:", tables)

        # 关闭连接
        conn.close()

    except pymysql.MySQLError as e:
        print(f"无法连接到MySQL数据库: {e}")

# 主方法
def main():
    # 使用你的MySQL数据库的主机名、用户名、密码和数据库名替换这里的值
    test_mysql_connection("mysql.sqlpub.com", "12345", "12345", "12345")

if __name__ == '__main__':
    main()
#终端输入
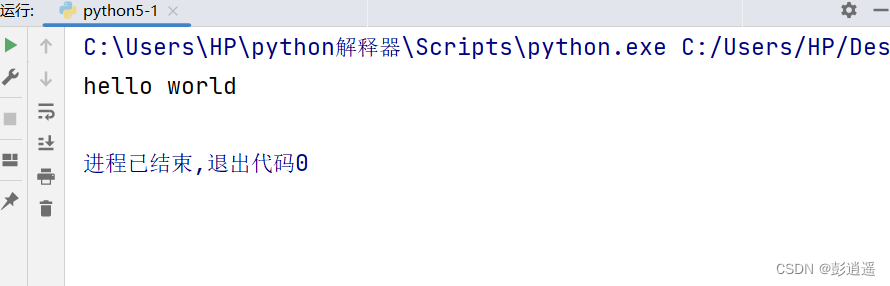
cd Python/Day02/learm
python3 PyMySQL.py
#终端输出
成功连接到MySQL数据库
数据库中的表: (('picture',),)
数据库成功连接。
以上配置的用户名密码等按照该网站的要求,不能泄漏到公共环境,测试时替换为自己的连接。
三、数据库驱动介绍
- 1.mysql-connector 是 MySQL 官方提供的驱动器, 它在Python中重新实现MySQL协议,它比较慢,但不需要C库,可移植性好。
- 2.pymysql是由纯python实现的mysql模块。它相对于mysql.connector, MYSQLdb来说比较年轻。它的效率和可移植性和my-connector理论上是差不多的。
- 3.MySQLdb是一个围绕_mysql简化的Python包装器,不支持Python 3,_mysql依赖C库,MYSQLdb也依赖C库,可移植性不太好。
- 4.MysqlClient 是 Python 操作 MySql 的一个驱动程序,是 MySQL-python 的另外一个分支,目前MySQL-python 只支持到Python2,而 MysqlClient 支持 Python3 并且修复了一些bug。
四、SQL执行
4.1插入测试数据
在查询前,先来插入一条数据,数据取自day01爬虫生成的txt文件。
insert into picture(pid,width,height,oriwidth,oriheight,thumbnailUrl,fromUrl,contSign)values(
144520, 1200, 562, 1200, 562, "https://t7.baidu.com/it/u=1819248061,230866778&fm=193&f=GIF", "https://www.vcg.com/creative/1274231988","1819248061,230866778"
)
列名混杂了大写字母,没注意,先改一下
alter table picture
change
 thumbnailUrl thumbnail_url varchar(128),
 change fromUrl from_url varchar(128),
 change contSign cont_sign varchar(128);
4.2安装数据库连接模块
#input
pip3 install mysql-connector-python
#output
Looking in indexes: http://mirrors.aliyun.com/pypi/simple/
Collecting mysql-connector-python
  Downloading http://mirrors.aliyun.com/pypi/packages/0c/54/64c541bd569a3f250e54372be5a9e7ef28b519ff98b58ab4ef1a6f242c3b/mysql_connector_python-8.3.0-cp39-cp39-manylinux_2_17_x86_64.whl (21.5 MB)
     ━━━━━━━━━━ 21.5/21.5  634.6 kB/s eta 0:00:00
                MB
Installing collected packages: mysql-connector-python
Successfully installed mysql-connector-python-8.3.0
WARNING: Running pip as the 'root' user can result in broken permissions and conflicting behaviour with the system package manager. It is recommended to use a virtual environment instead: https://pip.pypa.io/warnings/venv
如果用到MySQLdb,可以使用如下语句:
import pymysql as MySQLdb
安装mysqlclient报错:
pip install mysqlclient
Looking in indexes: http://mirrors.aliyun.com/pypi/simple/
Collecting mysqlclient
  Using cached http://mirrors.aliyun.com/pypi/packages/79/33/996dc0ba3f03e2399adc91a7de1f61cb14b57ebdb4cc6eca8a78723043cb/mysqlclient-2.2.4.tar.gz (90 kB)
  Installing build dependencies ... done
  Getting requirements to build wheel ... error
  error: subprocess-exited-with-error

  × Getting requirements to build wheel did not run successfully.
  │ exit code: 1
  ╰─> [24 lines of output]
解决方法:手动下载再安装,在这不测试。
4.3测试SQL语句执行
复制原始代码到新建的learn文件夹下,修改每个文件里策参数为测试成功的参数。
#MySqlConnector.py文件
#!/usr/bin/python3
import mysql.connector
# 打开数据库连接
db = mysql.connector.connect(
  host="mysql.sqlpub.com",
  user="12345",
  passwd="12345",
  database="12345"
)

# 使用 cursor() 方法创建一个游标对象 cursor
cursor = db.cursor()
# 使用 execute()  方法执行 SQL 查询
cursor.execute("SELECT * FROM picture")
# 使用 fetchall() 方法获取s所有数据
data = cursor.fetchall()
print(data)
# 关闭数据库连接
db.close()
#终端
#input
python3 MySqlConnector.py
#output
[(144520, 1200, 562, 1200, 562, 'https://t7.baidu.com/it/u=1819248061,230866778&fm=193&f=GIF', 'https://www.vcg.com/creative/1274231988', '1819248061,230866778')]
4.4执行SQL的固定步骤及示例
#step1.创建数据库连接
#step2.创建游标对象
#step3.写sql
#step4.执行
#step5.若有返回,则取回结果
#step6.关闭连接
示例:
#step1.创建数据库连接
import mysql.connector

db = mysql.connector.connect(
  host="mysql.sqlpub.com",
  user="12345",
  passwd="12345",
  database="12345"
)
#step2.创建游标对象
cursor = db.cursor()
#step3.写sql
#step4.执行
#step5.若有返回,则取回结果
#step6.关闭连接
db.close()