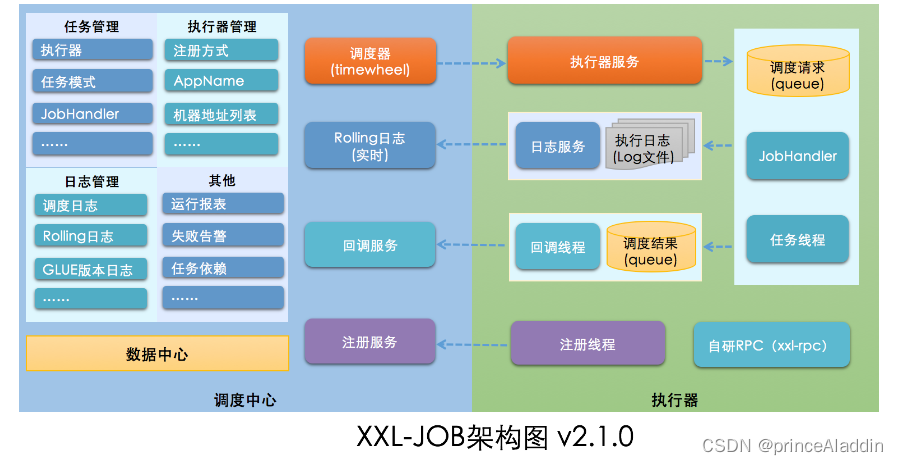
xxljob可以对定时任务进行调度,现在看下定时任务调度的过程。XxlJobAdminConfig实现了InitializingBean接口,spring会调用afterPropertiesSet()进行初始化。大致有以下几个过程:
admin服务端初始化
JobTriggerPoolHelper.java#toStart()方法中会初始化两个调用任务的线程池,快线程池最大线程数为200,慢线程池最大线程数为100。然后启动线程定时轮询需要调度的定时任务。首先计算每秒能处理的定时任务数量,公式为(快线程池的最大线程数+满线程池的最大线程数)*20(1000ms/每个任务处理的时长50ms),最多为6000。从数据库中加锁查出任务触发时间<当前时间+预读时间(5s)的任务,然后分情况处理。
- 当前时间大于任务触发时间+预读时间,即任务触发时间已经过期超过5s,此时不做任何处理,只刷新任务下次触发时间
- 当前时间大于任务触发时间但不超过5s,即任务虽然过期但是过期时间不到5s,此时触发任务,将任务数据保存到ringData
private volatile static Map<Integer, List<Integer>> ringData = new ConcurrentHashMap<>();,ringData的key是秒数,value是jobid,然后刷新任务的下次触发时间 - 当前时间小于任务触发时间,即还没到任务的触发时间,此时也会将任务写道ringData中,等到期就会进行处理,因为在内存中查询任务比到数据库查询要快很多。
int preReadCount = (XxlJobAdminConfig.getAdminConfig().getTriggerPoolFastMax() + XxlJobAdminConfig.getAdminConfig().getTriggerPoolSlowMax()) * 20;

                while (!scheduleThreadToStop) {
                    boolean preReadSuc = true;
                    try {

                        preparedStatement = conn.prepareStatement(  "select * from xxl_job_lock where lock_name = 'schedule_lock' for update" );
                        preparedStatement.execute();

                        // 1、pre read
                        long nowTime = System.currentTimeMillis();
                        List<XxlJobInfo> scheduleList = XxlJobAdminConfig.getAdminConfig().getXxlJobInfoDao().scheduleJobQuery(nowTime + PRE_READ_MS, preReadCount);
                        if (scheduleList!=null && scheduleList.size()>0) {
                            for (XxlJobInfo jobInfo: scheduleList) {

                                if (nowTime > jobInfo.getTriggerNextTime() + PRE_READ_MS) {
                                    refreshNextValidTime(jobInfo, new Date());

                                } else if (nowTime > jobInfo.getTriggerNextTime()) {
                                    JobTriggerPoolHelper.trigger(jobInfo.getId(), TriggerTypeEnum.CRON, -1, null, null);
                                    refreshNextValidTime(jobInfo, new Date());

                                    if (jobInfo.getTriggerStatus()==1 && nowTime + PRE_READ_MS > jobInfo.getTriggerNextTime()) {
                                        int ringSecond = (int)((jobInfo.getTriggerNextTime()/1000)%60);
                                        pushTimeRing(ringSecond, jobInfo.getId());
                                        refreshNextValidTime(jobInfo, new Date(jobInfo.getTriggerNextTime()));
                                    }

                                } else {
                                    int ringSecond = (int)((jobInfo.getTriggerNextTime()/1000)%60);
                                    pushTimeRing(ringSecond, jobInfo.getId());
                                    refreshNextValidTime(jobInfo, new Date(jobInfo.getTriggerNextTime()));
                                }

                            }
最后判断任务调度状态,TimeUnit.MILLISECONDS.sleep((preReadSuc?1000:PRE_READ_MS) - System.currentTimeMillis()%1000);,有任务需要调度则下一秒继续扫描,如果没有发现任务则睡眠5s(PRE_READ_MS)。
刚才说到待执行的任务会加入ringData,现在往下看怎么处理ringData的。这里会回退一秒,因为可能出现任务超时的情况,导致任务处理时遗漏。处理的逻辑很简单,到了某秒时,根据秒数取出对应的jobid集合,然后依次处理触发每个任务即可。触发任务的逻辑我们稍微再说。
                        List<Integer> ringItemData = new ArrayList<>();
                        int nowSecond = Calendar.getInstance().get(Calendar.SECOND);   // 避免处理耗时太长,跨过刻度,向前校验一个刻度;
                        for (int i = 0; i < 2; i++) {
                            List<Integer> tmpData = ringData.remove( (nowSecond+60-i)%60 );
                            if (tmpData != null) {
                                ringItemData.addAll(tmpData);
                            }
                        }

                        if (ringItemData.size() > 0) {
                            for (int jobId: ringItemData) {
                                JobTriggerPoolHelper.trigger(jobId, TriggerTypeEnum.CRON, -1, null, null);
                            }
                            ringItemData.clear();
                        }
客户端初始化
客户端创建定时任务只要在bean中添加@XxlJob注解即可,调度任务是通过XxlJobSpringExecutor实现的。过程是到spring容器中获取所有bean,找出对方法使用了@XxlJob的bean,然后使用MethodJobHandler进行封装,注册到jobHandlerRepositoryprivate static ConcurrentMap<String, IJobHandler> jobHandlerRepository = new ConcurrentHashMap<String, IJobHandler>();。
        String[] beanDefinitionNames = applicationContext.getBeanDefinitionNames();
        for (String beanDefinitionName : beanDefinitionNames) {
            Object bean = applicationContext.getBean(beanDefinitionName);
            Method[] methods = bean.getClass().getDeclaredMethods();
            for (Method method: methods) {
                XxlJob xxlJob = AnnotationUtils.findAnnotation(method, XxlJob.class);
                if (xxlJob != null) {
                    String name = xxlJob.value();
                    method.setAccessible(true);

                    if(xxlJob.init().trim().length() > 0) {
                            initMethod = bean.getClass().getDeclaredMethod(xxlJob.init());
                            initMethod.setAccessible(true);
                    }
                    if(xxlJob.destroy().trim().length() > 0) {
                            destroyMethod = bean.getClass().getDeclaredMethod(xxlJob.destroy());
                            destroyMethod.setAccessible(true);
                    }

                    registJobHandler(name, new MethodJobHandler(bean, method, initMethod, destroyMethod));
                }
            }
        }
客户端会启动一个netty服务器,xxl-job底层的核心就是netty,监听${xxl.job.executor.port}配置的端口,等待来自服务端的调度。
                    ServerBootstrap bootstrap = new ServerBootstrap();
                    ((ServerBootstrap)bootstrap.group(bossGroup, workerGroup).channel(NioServerSocketChannel.class)).childHandler(new ChannelInitializer<SocketChannel>() {
                        public void initChannel(SocketChannel channel) throws Exception {
                            channel.pipeline().addLast(new ChannelHandler[]{new IdleStateHandler(0L, 0L, 90L, TimeUnit.SECONDS)}).addLast(new ChannelHandler[]{new HttpServerCodec()}).addLast(new ChannelHandler[]{new HttpObjectAggregator(5242880)}).addLast(new ChannelHandler[]{new NettyHttpServerHandler(xxlRpcProviderFactory, serverHandlerPool)});
                        }
                    }).childOption(ChannelOption.SO_KEEPALIVE, true);
                    ChannelFuture future = bootstrap.bind(xxlRpcProviderFactory.getPort()).sync();
                    NettyHttpServer.logger.info(">>>>>>>>>>> xxl-rpc remoting server start success, nettype = {}, port = {}", NettyHttpServer.class.getName(), xxlRpcProviderFactory.getPort());
                    NettyHttpServer.this.onStarted();
                    future.channel().closeFuture().sync();
服务端触发任务
触发任务是从JobTriggerPoolHelper.java#addTrigger()中开始的。默认是快线程池触发,如果1min内执行时间超过500ms的次数大于10,则改为满线程池。
    public void addTrigger(final int jobId, final TriggerTypeEnum triggerType, final int failRetryCount, final String executorShardingParam, final String executorParam) {

        ThreadPoolExecutor triggerPool_ = fastTriggerPool;
        AtomicInteger jobTimeoutCount = jobTimeoutCountMap.get(jobId);
        if (jobTimeoutCount!=null && jobTimeoutCount.get() > 10) {      // job-timeout 10 times in 1 min
            triggerPool_ = slowTriggerPool;
        }

        triggerPool_.execute(new Runnable() {
            @Override
            public void run() {

                long start = System.currentTimeMillis();

                try {
                    // do trigger
                    XxlJobTrigger.trigger(jobId, triggerType, failRetryCount, executorShardingParam, executorParam);
                } catch (Exception e) {
                    logger.error(e.getMessage(), e);
                } finally {

                    long minTim_now = System.currentTimeMillis()/60000;
                    if (minTim != minTim_now) {
                        minTim = minTim_now;
                        jobTimeoutCountMap.clear();
                    }

                    long cost = System.currentTimeMillis()-start;
                    if (cost > 500) {       // ob-timeout threshold 500ms
                        AtomicInteger timeoutCount = jobTimeoutCountMap.putIfAbsent(jobId, new AtomicInteger(1));
                        if (timeoutCount != null) {
                            timeoutCount.incrementAndGet();
                        }
真正执行是在processTrigger()方法中,先根据调度策略获取处理任务的客户端地址,默认是轮询策略。先获取任务id,然后找到任务对应的客户端索引,通过nextInt()方法找到下个索引,再到客户端地址列表中根据索引获取地址。
    private static void processTrigger(XxlJobGroup group, XxlJobInfo jobInfo, int finalFailRetryCount, TriggerTypeEnum triggerType, int index, int total){

        XxlJobLog jobLog = new XxlJobLog();
        XxlJobAdminConfig.getAdminConfig().getXxlJobLogDao().save(jobLog);

        TriggerParam triggerParam = new TriggerParam();

        String address = null;

                routeAddressResult = executorRouteStrategyEnum.getRouter().route(triggerParam, group.getRegistryList());
                if (routeAddressResult.getCode() == ReturnT.SUCCESS_CODE) {
                    address = routeAddressResult.getContent();
                }


            triggerResult = runExecutor(triggerParam, address);
//轮询策略调度任务
    private static int count(int jobId) {
        // cache clear
        if (System.currentTimeMillis() > CACHE_VALID_TIME) {
            routeCountEachJob.clear();
            CACHE_VALID_TIME = System.currentTimeMillis() + 1000*60*60*24;
        }

        // count++
        Integer count = routeCountEachJob.get(jobId);
        count = (count==null || count>1000000)?(new Random().nextInt(100)):++count;  // 初始化时主动Random一次,缓解首次压力
        routeCountEachJob.put(jobId, count);
        return count;
    }

    @Override
    public ReturnT<String> route(TriggerParam triggerParam, List<String> addressList) {
        String address = addressList.get(count(triggerParam.getJobId())%addressList.size());
        return new ReturnT<String>(address);
    }
处理任务时通过proxy进行动态代理,在XxlRpcReferenceBean.class#getObject为调度的定时任务生成了动态代理对象,在InvocationHandler的invoke()方法中实现了逻辑增强,最终到NettyHttpClient#asyncSend()将消息发送到客户端netty服务器。
客户端执行定时任务
客户端是在NettyHttpServerHandler#channelRead0()中处理定时任务的,先对服务器的字节流进行反序列化,在XxlRpcProviderFactory.class#invokeService()以反射方式远程调用ExecutorBizImpl.java#run()方法。
                Class<?> serviceClass = serviceBean.getClass();
                String methodName = xxlRpcRequest.getMethodName();
                Class<?>[] parameterTypes = xxlRpcRequest.getParameterTypes();
                Object[] parameters = xxlRpcRequest.getParameters();
                Method method = serviceClass.getMethod(methodName, parameterTypes);
                method.setAccessible(true);
                Object result = method.invoke(serviceBean, parameters);
                xxlRpcResponse.setResult(result);
在run方法中启动处理任务的JobThread进行处理,JobThread中就是根据定时任务名获取对应的MethodJobHandler,取出要执行的Method,再反射执行即可。
 IJobHandler newJobHandler = XxlJobExecutor.loadJobHandler(triggerParam.getExecutorHandler());
         if (jobThread == null) {
            jobThread = XxlJobExecutor.registJobThread(triggerParam.getJobId(), jobHandler, removeOldReason);
        }

        ReturnT<String> pushResult = jobThread.pushTriggerQueue(triggerParam);
总结下,xxl-job首先在服务端启动线程轮询要执行的定时任务,计算定时任务的触发时间,然后后获取代理对象,将要执行的任务信息通过netty发送到客户端,客户端以反射方式执行定时任务。有不对的地方请大神指出,欢迎大家一起讨论交流,共同进步。


