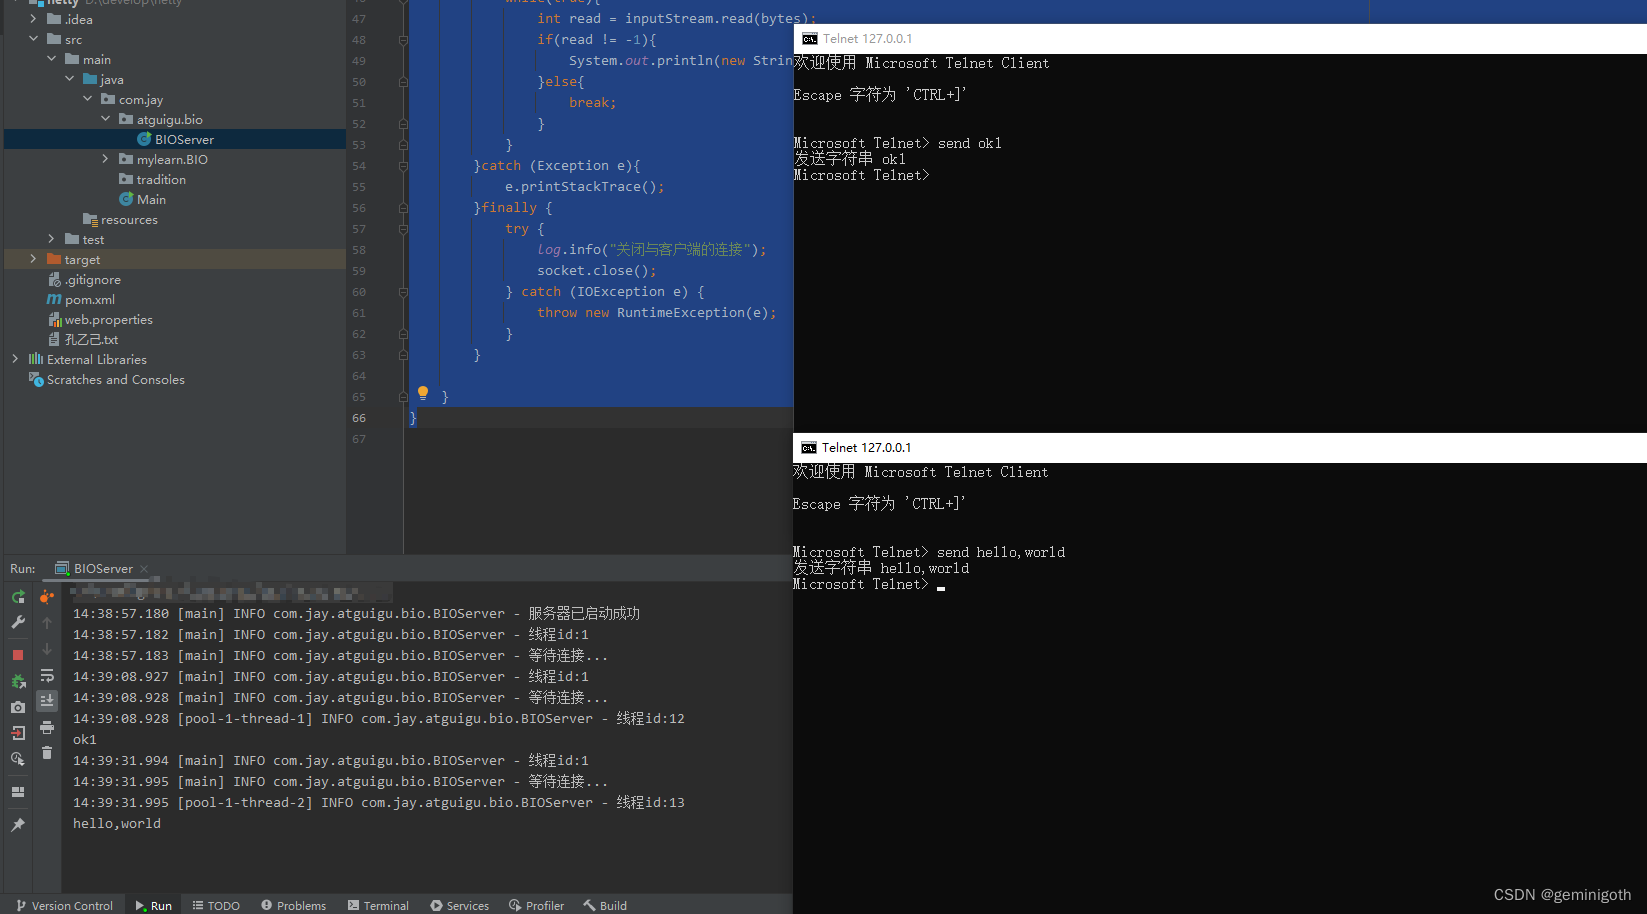
1 BIO 实战代码
@Slf4j
public class BIOServer {
    public static void main(String[] args) throws IOException {
        //1 创建线程池
        ExecutorService threadPool = Executors.newCachedThreadPool();
        //2 创建ServerSocket
        ServerSocket serverSocket = new ServerSocket(8000);

        log.info("服务器已启动成功");
        //3 监听,等待客户端连接
        while(true){
            log.info("线程id:{}",Thread.currentThread().getId());
            log.info("等待连接...");
            //4 客户端连接后,创建一个线程,与客户端通信
            final Socket socket = serverSocket.accept();
            threadPool.execute(new Runnable() {
                @Override
                public void run() {
                    handler(socket);
                }
            });
        }

    }

    //编写一个handler方法,与客户端通信
    public static  void handler(Socket socket){
        try {
            log.info("线程id:{}",Thread.currentThread().getId());
            //创建一个byte[]数组
            byte[] bytes = new byte[1023];
            //通过socket获取输入流
            InputStream inputStream = socket.getInputStream();
            //循环读取客户端发送的消息
            while(true){
                int read = inputStream.read(bytes);
                if(read != -1){
                    System.out.println(new String(bytes,0,read));
                }else{
                    break;
                }
            }
        }catch (Exception e){
            e.printStackTrace();
        }finally {
            try {
                log.info("关闭与客户端的连接");
                socket.close();
            } catch (IOException e) {
                throw new RuntimeException(e);
            }
        }

    }
}
运行结果
2 NIO实战
2.1 Buffer实战
@Slf4j
public class BasicBuffer {
    public static void main(String[] args) {
        //1 创建一个Buffer
        IntBuffer buffer = IntBuffer.allocate(10);
        //2 往Buffer存储数据
        for (int i = 0; i < buffer.capacity(); i++) {
            buffer.put(i * 2);
        }
        //3 Buffer读写切换
        buffer.flip();
        //4 Buffer 读数据
        while(buffer.hasRemaining()){
            log.info("{}",buffer.get());
        }
    }
}
2.2 FileChannel实战
使用NIO的FileChannel和ByteBuffer,把一段文字写入到指定的文件中。
//把文字写入到指定文件中
public class FileChannelWrite{
    public static void main(String[] args) throws IOException {
        //1 指定文字
        String str = "hello,孔乙己";
        //2 创建一个输出流
        FileOutputStream fileOutputStream = new FileOutputStream("D:\\develop\\java-base\\test\\test01.txt");
        //3 通过输出流创建FileChannel
        java.nio.channels.FileChannel fileChannel = fileOutputStream.getChannel();
        //4 创建一个缓冲区
        ByteBuffer buffer = ByteBuffer.allocate(1024);
        //5 把文字放入缓冲区buffer中
        buffer.put(str.getBytes());
        //6 对buffer进行翻转
        buffer.flip();
        //7 把buffer的数据写入到FileChannel
        fileChannel.write(buffer);
        //8 关闭流
        fileOutputStream.close();
    }
}
使用NIO的FileChannel和Bytebuffer,读取指定文件中的内容,并打印到控制台
@Slf4j
public class FileChannelRead {
    public static void main(String[] args) throws IOException {
        //1 创建输入流
        File file = new File("D:\\develop\\java-base\\test\\test01.txt");
        FileInputStream fileInputStream = new FileInputStream(file);
        //2 通过输入流创建FileChannel
        FileChannel fileChannel = fileInputStream.getChannel();
        //3 创建缓冲区
        ByteBuffer buffer = ByteBuffer.allocate((int) file.length());
        //4 把通道的数据读取到缓冲区
        fileChannel.read(buffer);
        //5 把bytebuffer 转成 string
        log.info("文件的内容是: {}",new String(buffer.array()));
        //6 关闭输入流
        fileInputStream.close();
    }
}
使用一个Buffer,FileChannel和read/write方法,完成文件的拷贝 .
public class FileChannelCopy {
    public static void main(String[] args) throws IOException {
        FileInputStream fileInputStream = new FileInputStream("D:\\develop\\java-base\\test\\source.txt");
        FileChannel inputChannel = fileInputStream.getChannel();

        FileOutputStream fileOutputStream = new FileOutputStream("D:\\develop\\java-base\\test\\target.txt");
        FileChannel outChannel = fileOutputStream.getChannel();

        ByteBuffer buffer = ByteBuffer.allocate(1024);

        while (true){
            buffer.clear();
            int read = inputChannel.read(buffer);
            if(read == -1){
                break;
            }
            buffer.flip();
            outChannel.write(buffer);
        }
        fileInputStream.close();
        fileOutputStream.close();

    }
}
使用transferFrom方法拷贝文件
public class FileChannelCopy01 {
    public static void main(String[] args) throws IOException {
        FileInputStream fileInputStream = new FileInputStream("D:\\develop\\java-base\\test\\source.png");
        FileOutputStream fileOutputStream = new FileOutputStream("D:\\develop\\java-base\\test\\dest.png");

        FileChannel inChannel = fileInputStream.getChannel();
        FileChannel outChannel = fileOutputStream.getChannel();

        outChannel.transferFrom(inChannel,0,inChannel.size());

        fileInputStream.close();
        fileOutputStream.close();
    }
}
2.3 MappedByteBufer
MappedByteBufer 可以让文件直接在内存(堆外内存)修改,操作系统不需要再拷贝一次
//原来的内容是:hello,孔乙己
//修改后的内容是:HelLo,孔乙己
public class MappedByteBuffer {
    public static void main(String[] args) throws IOException {
        RandomAccessFile randomAccessFile = new RandomAccessFile("D:\\develop\\java-base\\test\\test01.txt", "rw");
        FileChannel channel = randomAccessFile.getChannel();
        java.nio.MappedByteBuffer map = channel.map(FileChannel.MapMode.READ_WRITE, 0, 5);
        map.put(0,(byte) 'H');
        map.put(3,(byte) 'L');
        randomAccessFile.close();
    }
}
2.4 ServerSocketChannel和SocketChannel
@Slf4j
public class ServerSocketChannelAndSocketChannel {
    public static void main(String[] args) throws IOException {
        //1 使用ServerSocketChannel和SocketChannel 网络
        ServerSocketChannel serverSocketChannel = ServerSocketChannel.open();
        InetSocketAddress address = new InetSocketAddress(8000);

        //2 绑定端口到socket,并启动
        serverSocketChannel.socket().bind(address);
        //3 创建 ByteBuffer数组
        ByteBuffer[] buffers = new ByteBuffer[2];
        buffers[0] = ByteBuffer.allocate(5);
        buffers[1] = ByteBuffer.allocate(3);
        //4 等待客户端连接
        SocketChannel socketChannel = serverSocketChannel.accept();
        int messageLength = 8;//假定从客户端接收到8个字节
        //5 循环读取
        while(true){
            int byteRead = 0;
            while(byteRead < messageLength){
                long read = socketChannel.read(buffers);
                byteRead += read;
                log.info("byteRead = ,{}",byteRead);
                //使用流打印,查看当前的这个buffer的position和limit
                Arrays.asList(buffers).stream().
                        map(buffer -> "position = " +
                                buffer.position() +
                                ",limit = " + buffer.limit()
                        ).forEach(System.out::println);
            }
            // 6 将所有的buffer进行翻转
            Arrays.asList(buffers).forEach(buffer -> buffer.flip());
            // 将数据读取到客户端
            long byteWrite = 0;
            while(byteWrite < messageLength){
                long l = socketChannel.write(buffers);
                byteWrite += l;
            }
            //将所有的buffer进行翻转
            Arrays.asList(buffers).forEach(buffer ->{buffer.clear();
            });
            log.info("byteRead = ,{},byteWrite = {},messageLength = {}",byteRead,byteWrite,messageLength);
        }

    }
}
2.5 使用NIO开发服务端和客户端
NIOServer.java
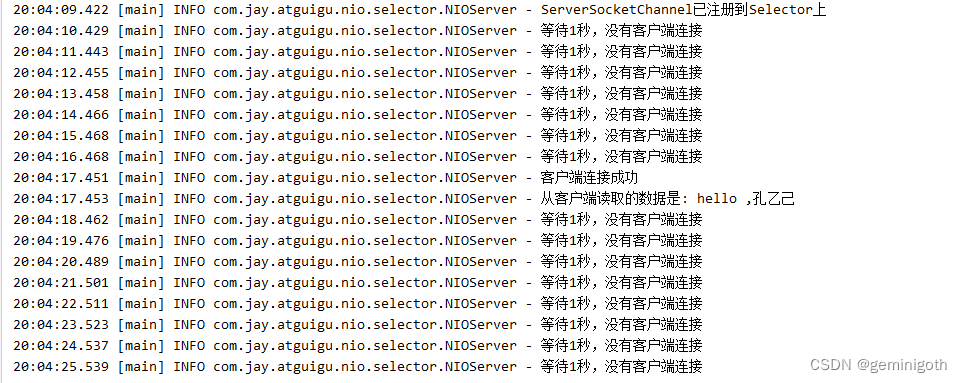
@Slf4j
public class NIOServer {
    public static void main(String[] args) throws Exception{
        //1 创建ServerSocketChannel
        ServerSocketChannel serverSocketChannel = ServerSocketChannel.open();
        //2 创建Selector对象
        Selector selector = Selector.open();
        //3 绑定端口 8000,在服务器监听
        serverSocketChannel.socket().bind(new InetSocketAddress(8000));
        //4 ServerSocketChannel设置为非阻塞
        serverSocketChannel.configureBlocking(false);
        //5 把ServerSocketChannel的OP_ACCEPT注册到selector
        serverSocketChannel.register(selector, SelectionKey.OP_ACCEPT);
        log.info("ServerSocketChannel已注册到Selector上");
        // 6 循环,等待客户端连接
        while(true){
            //7 等待一秒,如果没有事件发生,就返回
            if(selector.select(1000) == 0){
                log.info("等待1秒,没有客户端连接");
                continue;
            }
            //8 如果有事件发生,就获取selectedKyes,返回关注事件的集合
            Set<SelectionKey> selectededKeys = selector.selectedKeys();
            Iterator<SelectionKey> keyIterator = selectededKeys.iterator();
            //9 遍历selectedKeys集合,获取事件类型
            while(keyIterator.hasNext()){

                SelectionKey key = keyIterator.next();
                if(key.isAcceptable()){
                    log.info("客户端连接成功");
                    //10_1 如果是OP_ACCEPT事件,证明有新的客户端连接,为该客户端创建一个SocketChannel
                    SocketChannel socketChannel = serverSocketChannel.accept();
                    socketChannel.configureBlocking(false);
                    //10_1_1 将SocketChannel注册到selector上,事件类型是OP_READ,并绑定一个缓冲区
                    socketChannel.register(selector,SelectionKey.OP_READ, ByteBuffer.allocate(1024));
                }
                if(key.isReadable()){
                    //10_2  如果是OP_READ事件,通过selectedKey 反向获取 SocketChannel
                    SocketChannel channel =(SocketChannel) key.channel();
                    //10_2_1  获取该channel绑定的buffer,并读取
                    ByteBuffer buffer = (ByteBuffer)key.attachment();
                    channel.read(buffer);
                    log.info("从客户端读取的数据是: {}",new String(buffer.array()));
                }
                //11 移除selectedKey,防止重复操作
                keyIterator.remove();

            }

        }

    }
}
NIOClient.java
@Slf4j
public class NIOClient {
    public static void main(String[] args) throws Exception {
        //1 创建SocketChannel
        SocketChannel socketChannel = SocketChannel.open();
        //2 设置非阻塞模式
        socketChannel.configureBlocking(false);
        //3  提供服务器的ip和端口
        InetSocketAddress address = new InetSocketAddress("127.0.0.1", 8000);
        //4 连接服务器
        if(!socketChannel.connect(address)){
            // 4_1 连接失败
            while(!socketChannel.finishConnect()){
                log.info("连接需要时间,此时客户端不会阻塞,可以做其他工作。。。");
            }
        }
        //4_2 连接成功,发送数据
        String str = "hello ,孔乙己";
        ByteBuffer buffer = ByteBuffer.wrap(str.getBytes());
        socketChannel.write(buffer);
        System.in.read();
    }
}
运行结果: