一、泛型算法
泛型算法 = 函数模板 + 迭代器范围(注意迭代器的类型) + 函数符(策略使用)
----------------------------------------------------------------------------------------------
请注意:算法的迭代器的类型 是否与容器中的迭代器匹配。
---------------------------------------------------------------------
常用算法:
------------------
sort算法,
binary_search二分查找算法,
find,find_if算法,
for_each遍历算法。
-------------------------------------------
#include <iostream>
#include <vector>
#include <algorithm>
using namespace std;
int main()
{
vector<int> v;
for(int i = 0; i < 20; i++)
{
v.push_back(rand() % 100 + 1);
}
for(vector<int>::iterator it = v.begin(); it != v.end(); ++it)
{
cout << *it << " ";
}
cout << endl;
for(int k : v)
{
cout << k << " ";
}
cout << endl;
for(int i = 0; i < v.size();i++)
{
cout << v[i] << " ";
}
cout << endl;
for_each(v.begin(),v.end(),[](int val){ cout << val << " "; });
cout << endl;
sort(v.begin(), v.end());
for_each(v.begin(),v.end(),[](int val){ cout << val << " "; });
cout << endl;
sort(v.begin(),v.end(),[](int val1, int val2){return val1 > val2;});
for_each(v.begin(),v.end(),[](int val){ cout << val << " "; });
cout << endl;
bool ok = binary_search(v.begin(),v.end(),79,[](int val1, int val2){return val1 > val2;});
if(ok)
{
cout << "79 找到了" << endl;
}
else {
cout << "79没有找到" << endl;
}
auto it = find(v.begin(),v.end(),79);
if(it != v.end())
{
cout << "找到了79,所在的下标为:" << it - v.begin() << endl;
}
else
{
cout << "没有找到79" << endl;
}
it = find_if(v.begin(),v.end(),[](int val){return 26 > val;});
if(it != v.end())
{
it = v.insert(it,26);
}
for( int k : v)
{
cout << k << " ";
}
cout << endl;
return 0;
}
加入空间配置器与迭代器后的容器实现:
------------------------------------------------
#include <iostream>
#include <algorithm>
using namespace std;
template <class T>
struct MyAllocate
{
T* allocate(size_t size)
{
T* temp = (T*)malloc(sizeof(T) * size);
if(temp == nullptr)
{
throw bad_alloc();
}
return temp;
}
void constructor(T* p,const T& obj)
{
new (p) T(obj);
}
void destructor(T* p)
{
p->~T();
}
void destroy(T* p)
{
free(p);
}
};
template <class T, class Allocate = MyAllocate<T>>
class Vector
{
private:
T* _first;
T* _last;
T* _end;
Allocate _allocater;
public:
Vector(int size = 10)
{
this->_first = _allocater.allocate(size);
this->_last = this->_first;
this->_end = this->_first + size;
}
~Vector()
{
if(this->_first != nullptr)
{
for(T* p = this->_first; p != this->_last; ++p)
{
_allocater.destructor(p);
}
_allocater.destroy(this->_first);
this->_first = this->_last = this->_end = nullptr;
}
}
Vector(const Vector& other)
{
int size = other._end - other._first;
this->_first = _allocater.allocate(size);
int len = other._last - other._first;
memcpy(this->_first,other._first, len * sizeof(T));
this->_last = this->_first + len;
this->_end = this->_first + size;
}
Vector& operator=(const Vector& other)
{
if(this == &other)
{
return *this;
}
if(this->_first != nullptr)
{
for(T* p = this->_first; p != this->_last; ++p)
{
_allocater.destructor(p);
}
_allocater.destroy(this->_first);
}
int size = other._end - other._first;
this->_first = _allocater.allocate(size);
int len = other._last - other._first;
memcpy(this->_first, other._first,sizeof(T) * len);
this->_last = this->_first + len;
this->_end = this->_first + size;
return *this;
}
void expand()
{
int size = this->_end - this->_first;
T* temp = _allocater.allocate(size * 2);
memcpy(temp, this->_first, sizeof(T) * size);
for(T* p = this->_first; p != this->_last; ++p)
{
_allocater.destructor(p);
}
_allocater.destroy(this->_first);
this->_first = temp;
this->_last = this->_first + size;
this->_end = this->_first + 2 * size;
}
bool full()
{
return this->_last == this->_end;
}
bool empty()
{
return this->_first == this->_last;
}
void push_back(const T& val)
{
if(this->full())
{
this->expand();
}
_allocater.constructor(_last,val);
_last++;
}
int size()
{
return this->_last - this->_first;
}
int capacity()
{
return this->_end - this->_first;
}
void pop_back()
{
if(this->empty())
{
throw out_of_range("已经为空了");
}
_last--;
_allocater.destructor(_last);
}
T& operator[](int index)
{
if(index < 0 || index >= this->size())
{
throw out_of_range("越界");
}
return this->_first[index];
}
class iterator
{
private:
T* ptr;
public:
iterator(T* ptr = nullptr)
{
this->ptr = ptr;
}
iterator& operator++()
{
++this->ptr;
return *this;
}
iterator& operator++(int)
{
return ++*this;
}
bool operator !=(const iterator& other)
{
return this->ptr != other.ptr;
}
T& operator*()
{
return *ptr;
}
T* operator->()
{
return ptr;
}
};
iterator begin()
{
return iterator(this->_first);
}
iterator end()
{
return iterator(this->_last);
}
};
class A
{
public:
A()
{
cout << "A的构造" << endl;
}
~A()
{
cout << "A的析构" << endl;
}
};
int main()
{
Vector<int> v;
for(int i = 0; i < 20; i++)
{
v.push_back(rand()%100+1);
}
for(int i = 0; i < v.size(); i++)
{
cout << v[i] << " ";
}
cout << endl;
Vector<A> v1;
cout << "----------------------------------------" << endl;
for(int k : v)
{
cout << k << " ";
}
cout << endl;
for_each(v.begin(),v.end(),[](int val){cout << val << " ";});
return 0;
}
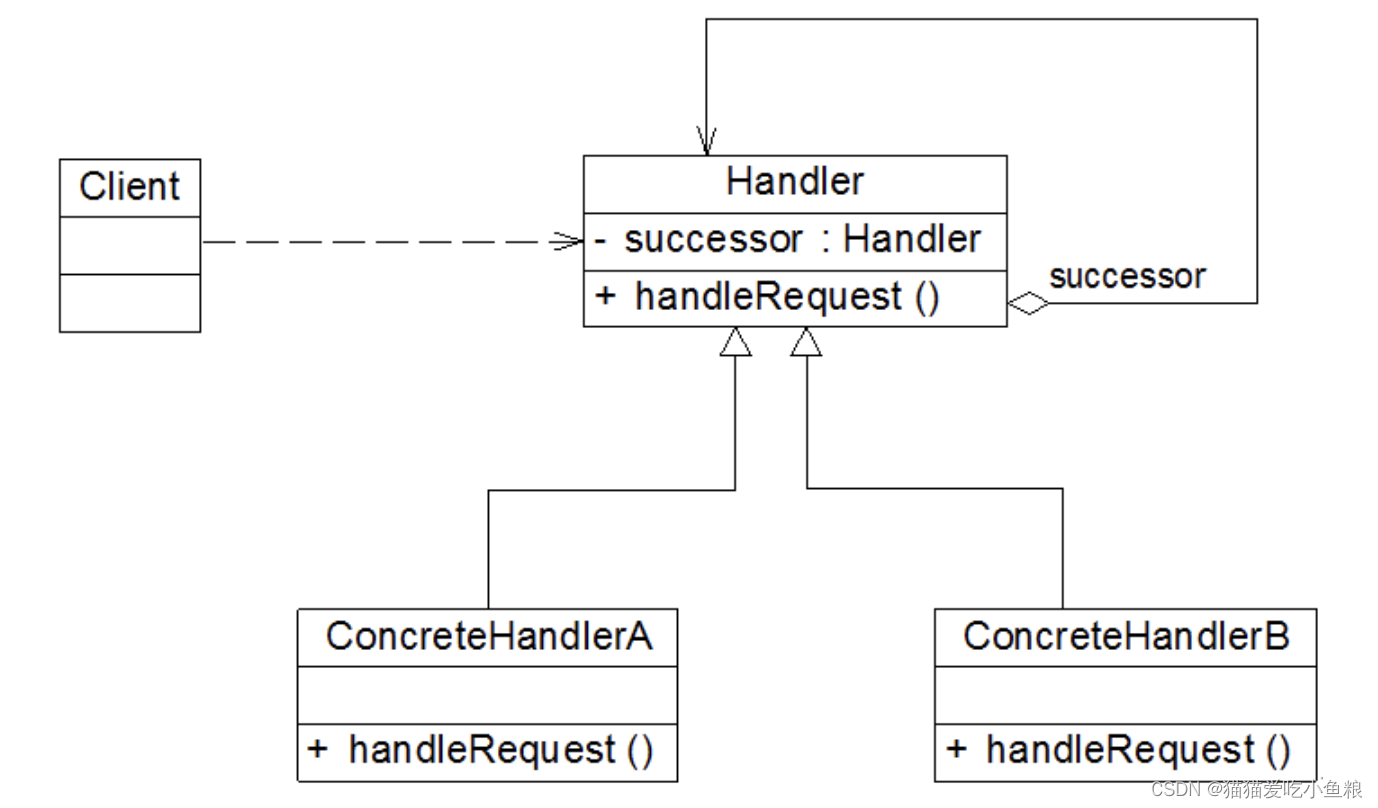
二、观察者设计模式
C++设计模式:观察者设计模式:
-----------------------------------------
什么是观察者设计模式?
---------------------------------
观察者模式是一种对象行为模式。
它定义对象间的一种一对多的通信关系,
当一个对象的状态发生改变时,
所有依赖于它的对象都得到通知并被自动更新。
在观察者模式中,主体是通知的发布者,
它发出通知时并不需要知道谁是它的观察者,
可以有任意数目的观察者订阅并接收通知。
观察者模式不仅被广泛应用于软件界面元素之间的交互,
在业务对象之间的交互、权限管理等方面也有广泛的应用。
观察者模式(Observer)完美的将观察者和被观察的对象分离开。
观察者模式在模块之间划定了清晰的界限,提高了应用程序的可维护性和重用性。
-------------------------------------------------
观察者设计模式是来解决什么问题?
--------------------------------------------
观察者设计模式定义了对象间的一种一对多的组合关系,
以便一个对象的状态发生变化时,所有依赖于它的对象都得到通知并自动刷新。
观察者和被观察者之间存在“观察”的逻辑关联,
当被观察者发生改变的时候,观察者就会观察到这样的变化,并且做出相应的响应。
-------------------------------------------------------
观察者设计模式的简易编程套路是什么?
--------------------------------------------------
1.设定两者类,一个为观察者类,一个为被观察者类。
2.观察者类中,定义一个对某个事件感兴趣的处理函数,一般也叫槽函数。
3.被观察者类中,定义一个数据结构,
用来保存观察者对哪一个事件id(信号)感兴趣,
使用数据结构建立信号与对象之间的映射关系。
4.被观察者类中,定义两个方法函数:
一个方法为:添加观察者与其感兴趣的事件id(信号)加入到容器之中。
另一个方法为:信号函数:通知事件函数执行逻辑:首先遍历容器之中,
有没有感兴趣的事件ID,如果有,则代表一系列的观察者,
对这个事件感兴趣,那么再次遍历观察者列表,
让每一个观察者执行相应的槽函数。
------------------------------------------------------------
#include <iostream>
#include <map>
#include <list>
using namespace std;
class Recv
{
public:
void slot_funcions(int msgid)
{
switch (msgid) {
case 1:
cout << "接收到1信号" << this << "并执行了1信号的对应的槽函数" << endl;
break;
case 2:
cout << "接收到2信号" << this << "并执行了2信号的对应的槽函数" << endl;
break;
case 3:
cout << "接收到3信号" << this << "并执行了3信号的对应的槽函数" << endl;
break;
case 4:
cout << "接收到4信号" << this << "并执行了4信号的对应的槽函数" << endl;
break;
}
}
};
class Sender
{
private:
map<int,list<Recv*>> recvMap;
public:
void connect(int msgid,Recv* recv)
{
this->recvMap[msgid].push_back(recv);
}
void signal(int msgid)
{
auto it = this->recvMap.find(msgid);
if(it != this->recvMap.end())
{
for(Recv* recv : it->second)
{
recv->slot_funcions(msgid);
}
}
}
};
int main()
{
Sender sender;
Recv r1;
Recv r2;
Recv r3;
Recv r4;
Recv r5;
sender.connect(1,&r1);
sender.connect(2,&r2);
sender.connect(3,&r3);
sender.connect(4,&r4);
sender.connect(1,&r5);
int msgid = 0;
while (true) {
cin >> msgid;
if(msgid == -1)
{
break;
}
sender.signal(msgid);
}
return 0;
}
三、单例设计模式
-------------------------------------------
懒汉式:
--------------------------
加了锁,使用互斥锁来达到线程安全。
这里使用了两个 if判断语句的技术称为双重检测锁;
好处是,只有判断指针为空的时候才加锁,避免每次调用 get_instance的方法都加锁,
锁的开销毕竟还是有点大的。
--------------------------------------------------------
static Singleton* getInstance()
{
if(myInstance == nullptr)
{
lock_guard<mutex> lock(mtx);
if(myInstance == nullptr)
{
myInstance = new Singleton();
}
}
return myInstance;
}
-----------------------------------------------------
单例模式可以分为 懒汉式 和 饿汉式 ,
-----------------------------------------------
两者之间的区别在于创建实例的时间不同。
----------------------------------------
懒汉式 :
---------------------------
系统运行中,实例并不存在,
只有当需要使用该实例时,才会去创建并使用实例。
这种方式要考虑多线程的线程安全问题。
----------------------------------
饿汉式:
--------------------
系统一运行,就初始化创建实例,当需要时,直接调用即可。
这种方式本身就线程安全,没有多线程的线程安全问题
-------------------------------
单例模式:
----------------
在整个系统生命周期内,保证一个类只能产生一个实例,确保该类的唯一性。
------------------------------------------
为什么需要单例模式
--------------------------
两个原因:
---------------------------
节省资源:
---------------------
一个类只有一个实例,不存在多份实例,节省资源。
--------------------
方便控制:
----------------------
在一些操作公共资源的场景时,避免了多个对象引起的复杂操作。
----------------------------
但是在实现单例模式时,需要考虑到线程安全的问题。
--------------------------------------------------
什么是线程安全?
-----------------------------
在拥有共享数据的多条线程并行执行的程序中,
线程安全的代码会通过同步机制保证各个线程都可以正常且正确的执行,
不会出现数据污染等意外情况。
---------------------------------------
如何保证线程安全?
------------------------------------
给共享的资源加把锁,
保证每个资源变量每时每刻至多被一个线程占用。
让线程也拥有资源,不用去共享进程中的资源。
如:使用threadlocal可以为每个线程维护一个私有的本地变量。
---------------------------------------------------------------------------
单例类的特点:
----------------------
构造函数和析构函数为私有类型,
目的是禁止外部构造和析构。
----------------------------------
拷贝构造函数和赋值构造函数是私有类型,
目的是禁止外部拷贝和赋值,确保实例的唯一性。
类中有一个获取实例的静态方法,可以全局访问。
------------------------------------------------------------
饿汉式单例:
--------------
1.构造函数私有化
2.提供一个公有接口来返回一个实例的指针
3.把这个公有有接口升级为static静态方法
4.类中静态实例指针,在类外全局区进行初始化
----------------
注:饿汉式单例一般不提供析构方式
---------------------------------------------------
11.1何为单例?
-----------------------
一个类型在定义对象,有且只能有一个实例对象。
-----------------------------------------------------------
11.2如何设计出一个单例?单例的设计套路是什么?
请思考:如何设计出一种机制来保证一个类只有一个实例?
--------------------------------------------------------------------------
1.即然外部不可以定义对象,也就是说是不可以从外部调到类的构造函数,
所以就必须把构造函数私有化。
--------------------------------------------
但是私有化带来的问题是,在外部一个对象也定义不出来了。
所以必须在类内定义一个公开的接口,返回本类对象的指针。
---------------------------------------------------------------------------
2.即使用public权限下定义一函数,返回出本类对象的指针。
但是,如果这个函数是一个普通函数的话,
那么他还是依赖于类对象的调用才可以,
这又与只产生一个单例相矛盾了。
所以必须,把这个函数升级为静态函数。
--------------------------------------------------------
3.把这个函数升级为静态函数。
但是,升级为静态函数之后呢?函数就没有this指针,无法调取类中属性,
所以也要把类中这个属性升级为静态属性。
-----------------------------------------------------------
4.把类中的本类的指针,升级为静态属性。并在类外完成初始化,
初始化则给定一个唯一的实例.
至此,一个单例模式的程序完成。
四、this指针
需要注意的是,this 指针只能在非静态成员函数中使用,
因为静态成员函数不属于任何一个特定的类对象。此外,* this 是一个指针,
使用 * 对它进行解引用时,可以得到当前对象。
---------------------------------------------------------------------------------------------------
在c++代码中自定义操作符的时候,例如前置++, = 赋值操作的时候会返回*this。
this是类自带的指针,指代的是对象本身。
*this对指针解引用,因此使用*this返回的就是一个对象本身。
这样的操作可以满足连续的= (赋值操作)。试想一下如果返回的是this,那么返回的是指针。
---------------------------------------------
this只能在成员函数中使用。全局函数,静态函数都不能使用this。
------------------------------------------------------------
可以理解为 *this为去改指针的内容即是当前的对象,所以return *this 返回的应该是
当前的对象本身或者说是该对象的克隆 ;
而this既然为指针,改指针指向的是当前的对象,
所以return this表示返回当前对象的地址;
---------------------------------------------------------
this 是指针,那么,*this 是指向该地址的值吗,值的话,为什么是本体啊?
----------------------
因为对象可能包含多个成员(可能有很多个值),所以只能返回对象本身
--------------------------------------------------------------
this指针的在哪?
------------------------
this指针隐藏在成员函数的最左侧。
(构造函数的初始化列表中是没有this的)
----------------------------------------------
this指针的作用?
-----------------------
-----------------------------------
class Stu
{
private:
string name;
int age;
public:
Stu(string name, int age)
{
this->name = name;
this->age = age;
}
Stu& setName(const string& name)
{
this->name = name;
return *this;
}
void showInfo()
{
cout << "姓名:" << this->name << ",年龄:" << this->age << endl;
}
};
-------------------------------------
main.c
----------------
Stu stu("lisi",25);
stu.showInfo();
stu.setName("zhangsan").showInfo();
--------------------------------------------------------
五、综述
STL采用泛型思想
---------------------------


把C中所用到的所有的数据结构,按照一定的标准,全部封装成了一个个类模板。


也被称为数据容器。
-----------------------


STL就是用来解决容器中数据元素的操作的问题的。
--------------------------------------------------------

并且他按排标准统一封装了操作容器元素的算法,


即一个个的函数模板。
------------------------------


-------------------------------------------
为了配合统一的算法去操作不同的容器,

他又按标准统一封装了不同的迭代器,

即一个个不同类型的具有指针特性的类模板。

---------------------------------------------------

STL的核心
---------------------
容器-------迭代器------- 算法
---------------------------------------


有了统一的数据结构,即容器,

有了统一的算法,每一个容器都使用各自的不同的迭代器,


从而实现了对数据结构元素的标准操作
---------------------------------------------


容器:
-----------

线性容器(线性表结构):
--------------
vector、deque、list


有序关联容器(平衡二叉树结构):
-----------------
set、map

无序关联容器(哈希表结构):
-----------------------


迭代器:
--------------
广义的指针

每一种容器都有适配的迭代器

迭代器的类型
----------------------
输入只读
输出只写
双向
随机
----------------------------------


算法:
------------

algrthm算法库
----------------------

常用的排序及遍历
------------------------

sort

binar_search

find

find_if

for_each
-------------------------------------


函数符:
----------------

函数指针
仿函数

匿名函数:
-------------------
Lambda表达式


适配器:
-------------
容器适配器


迭代器适配器
------------------
反向
插入
流
------------------------