1 Selenium简介
Selenium是一个用于网站应用程序自动化的工具,它可以直接运行在浏览器中,就像真正的用户在操作一样。它相当于一个机器人,可以模拟人类在浏览器上的一些行为,比如输入文本、点击、回车等。Selenium支持多种浏览器,本文以Chrome浏览器为例。chromedriver是一个驱动Chrome浏览器的驱动程序,针对不同的浏览器有不同的driver。
1.1 Selenium的优缺点
优点:浏览器能请求到的数据,Selenium同样能请求到,爬虫稳定,适用于所有类型的动态渲染网页。
缺点:代码量大、容易被反爬、性能低。笔者认为性能低、速度慢是其最大缺点。
2 浏览器基本操作
浏览器基本操作包括打开浏览器、设置窗口大小、设置打开浏览器位置、关闭浏览器、前进、后退、刷新、获取网页代码等。下面先通过代码来演示如何打开网页并设置浏览器窗口的大小以及打开位置:
from selenium import webdriver
from selenium.webdriver.chrome.service import Service
from selenium.webdriver.chrome.options import Options

url = 'https://hotels.ctrip.com/hotels/396376.html#ctm_ref=hp_htl_pt_pro_01'  # 携程上海虹桥宾馆主页
service = Service(executable_path=r'D:\anaconda\Scripts\chromedriver.exe')  # 指定chromedriver位置
opt = Options()
opt.add_argument(
    'user-agent="Mozilla/5.0 (Windows NT 10.0; Win64; x64) AppleWebKit/537.36 (KHTML, like Gecko) Chrome/102.0.0.0 Safari/537.36"')
opt.add_argument('--disable-blink-features=AutomationControlled')  # 隐藏浏览器痕迹
driver = webdriver.Chrome(service=service, options=opt)  # 实例化浏览器对象
# driver.maximize_window()  # 浏览器窗口最大化
# driver.set_window_position(1000, 20)    # 设置浏览器打开位置
# driver.set_window_size(800,800)    # 设置浏览器窗口大小
driver.get(url)  # 打开网页
接下来演示如何前进、后退、刷新网页。需要注意的是,Selenium打开不同的网页或者进行前进、后退时,都是在同一个窗口下操作的,不会打开新的窗口:
driver.get('https://hotels.ctrip.com/hotels/396376.html#ctm_ref=hp_htl_pt_pro_01')  # 打开携程
time.sleep(1)

url2 = 'https://www.jd.com'    # 打开京东
driver.get(url2)
time.sleep(1)

driver.back()    # 回退
time.sleep(1)

driver.forward()    # 前进
time.sleep(1)

driver.refresh()    # 刷新页面
time.sleep(1)

source = driver.page_source    # 获取当前页面源代码
接下来用一个表格展示Selenium浏览器的基本操作:
| 方法 | 说明 |
| get() | 打开浏览器 |
maximize_window() |
浏览器窗口最大化 |
set_window_position() |
设置浏览器打开位置 |
set_window_size() |
设置浏览器窗口大小 |
| back() | 回退 |
| forward() | 前进 |
| refresh() | 刷新页面 |
| page_source | 获取网页源代码 |
| close() | 关闭当前标签页 |
| quit() | 退出浏览器 |
3 网页元素定位
Selenium抓取网页信息是在开发者工具的Elements选项卡里,Selenium定位网页元素主要通过元素的属性值或者元素在HTML里的路径位置,主要的定位方式如下:
| 定位方式 | 方法 |
| ID定位 | driver.find_element(By.ID, 'ID') |
| name定位 | driver.find_element(By.NAME, 'NAME') |
| class定位 | driver.find_element(By.CLASS_NAME, 'CLASS_NAME') |
| 标签名定位 | driver.find_element(By.TAG_NAME, 'TAG_NAME') |
| xpath定位 | driver.find_element(By.XPATH, 'XPATH') |
| CSS选择器定位 | driver.find_element(By.CSS_SELECTOR, 'CSS_SELECTOR') |
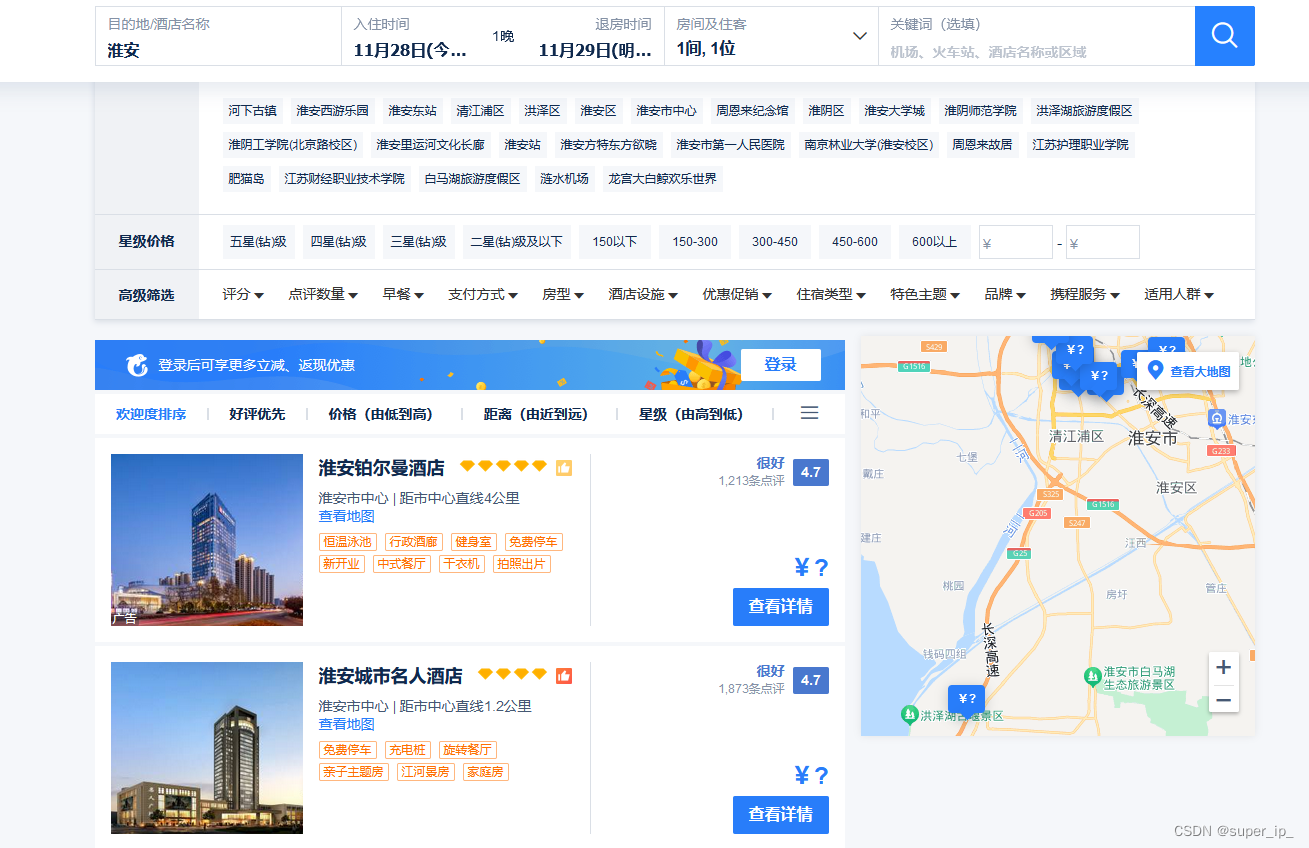
下面来演示如何定位评论标签,并点击,先看下图:
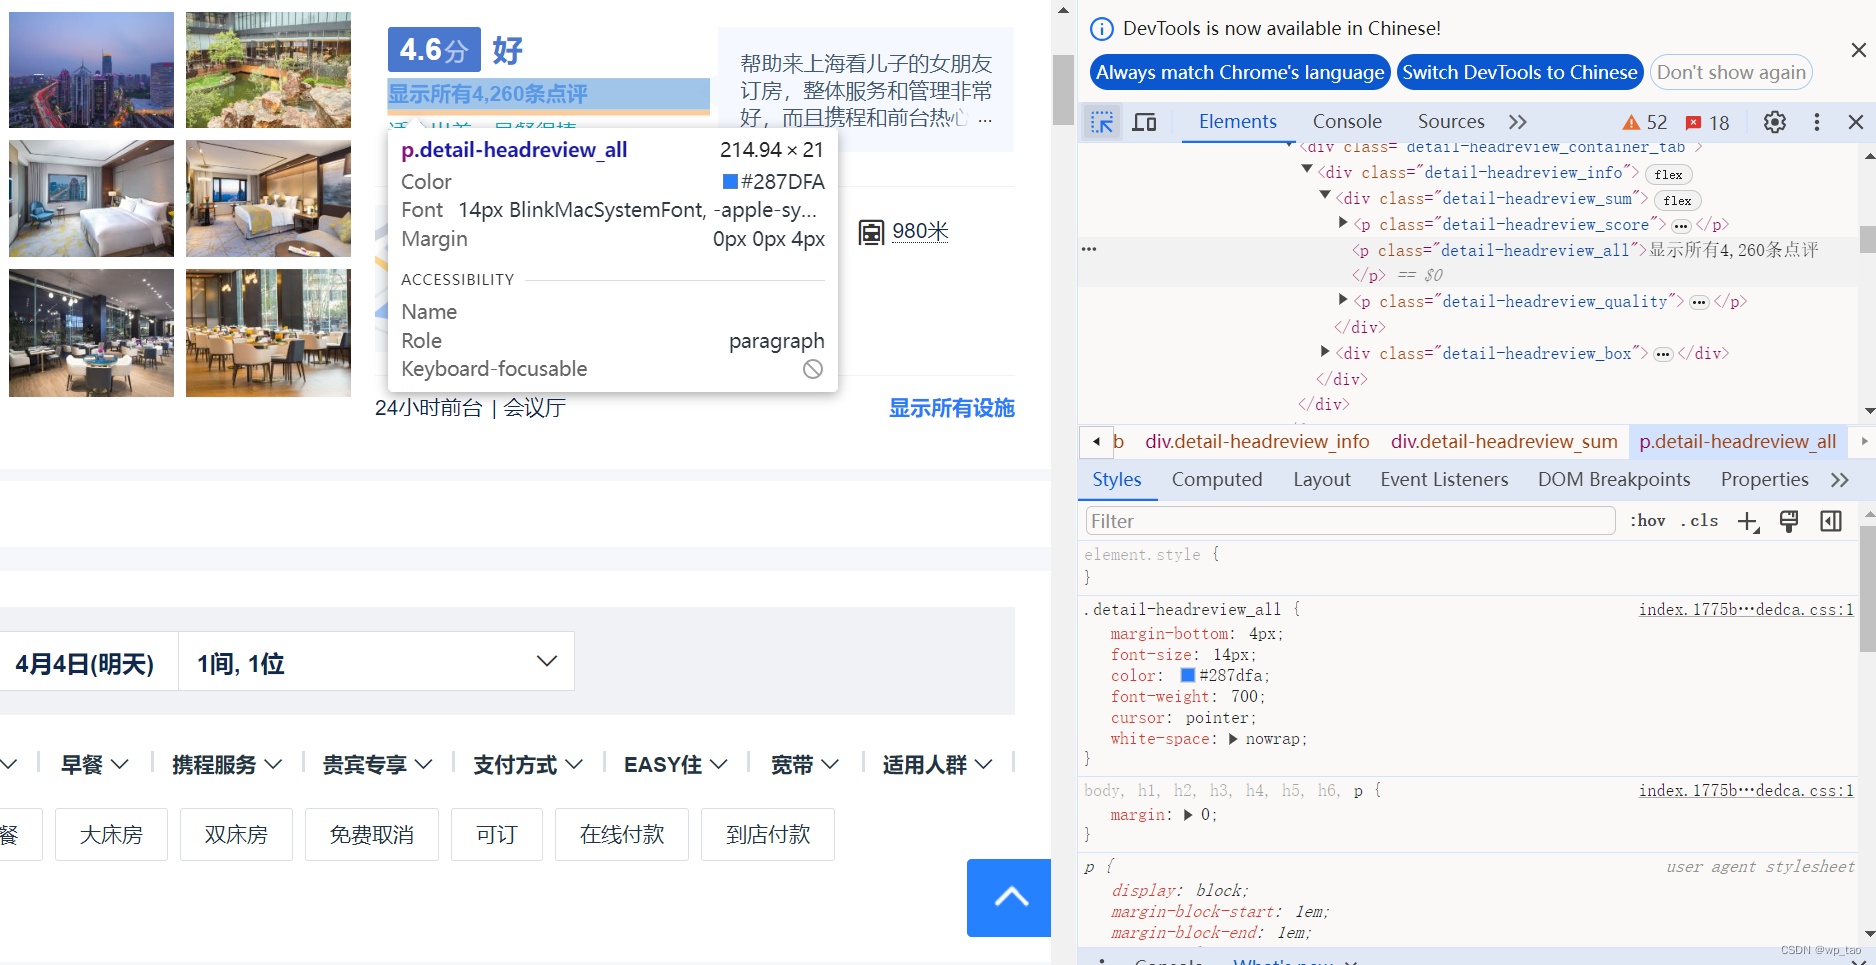
打开携程任意一个酒店页面,这里以上海虹桥宾馆为例,打开开发者工具,点击Elements选项卡左侧的箭头,然后将鼠标悬停在页面“显示所有...条点评”链接上,点击,开发者工具中就自动定位到了选中的标签,在选中的标签上右击--Copy--Copy XPath,这样就复制了该标签的XPath路径,为“//*[@id="ibu-hotel-detail-head"]/div[2]/div[2]/div[1]/div/div/div[1]/p[2]”,然后调用click()方法点击,代码如下:
element_comment = driver.find_element(By.XPATH,
                                      '//*[@id="ibu-hotel-detail-head"]/div[2]/div[2]/div[1]/div/div/div[1]/p[2]')
element_comment.click()
4 网页元素操控
操控网页元素在网页元素定位后才能执行,Selenium可以模拟任何操作,比如单机、右击、拖拉、滚动、复制粘贴或者文本输入等,操作方式可分为三大类:常规操作、鼠标事件操作和键盘事件操作。
4.1 常规操作
常规操作包含文本清除、文本输入、单击元素、提交表单、获取元素值等。下面以打开京东首页并在搜索框输入mate60Pro,按回车搜索为例:
import time

from selenium import webdriver
from selenium.webdriver.common.by import By
from selenium.webdriver.common.keys import Keys

url = 'https://jd.com'
driver = webdriver.Chrome()
driver.get(url)
driver.maximize_window()
# 输入昵称和密码
input_element = driver.find_element(By.XPATH, '//*[@id="key"]')
input_element.send_keys('mate60Pro', Keys.ENTER)
time.sleep(3)
上述例子分别执行了打开京东首页、窗口最大化、定位搜索框位置、输入文本“mate60Pro”、键盘按下回车操作。
下面列出一些实际开发中常见的操作方式:
| 代码 | 作用 |
| driver.find_element(By.ID, 'X').clear() | 清除X标签的内容 |
| driver.find_element(By.ID, 'X').location | 获取元素在网页中的坐标位置,坐标格式:{'y':20, 'x':100} |
| driver.find_element(By.ID, 'X').get_attribute('id') | 获取元素的某个属性值 |
| driver.find_element(By.ID, 'X').is_displayed() | 判断X元素在网页上是否可见 |
| driver.find_element(By.ID, 'X').is_selected() | 判断X元素是否被选,通常用于checkbox和radio标签,返回值为True或False |
| “”“selected标签的选值”“” from selenium.webdriver.support.select import Select | |
| Select(driver.find_element(By.ID, 'X')).select_by_index('2') | 根据下拉框的索引来选取 |
| Select(driver.find_element(By.ID, 'X')).select_by_index('book') | 根据下拉框的value属性来选取 |
| Select(driver.find_element(By.ID, 'X')).select_by_visible_text('beijing') | 根据下拉框的值来选取 |
4.2 鼠标事件
鼠标事件操作由Selenium的ActionChains类来实现。ActionChains类定义了多种鼠标操作方法,具体的操作方法如下表所示:
| 操作方法 | 说明 | 示例 |
| perform | 执行鼠标事件 | click(element).perform(),click是鼠标单击事件,perform是执行这个单击事件 |
| reset_actions | 取消鼠标事件 | click(element).reset_actions(),click 是鼠标单击事件,reset_actions是取消单击事件 |
| click | 鼠标单击 | click(element),element是某个元素对象 |
| click_and_hold | 长按鼠标左键 | click_and_hold(element),element是某个元素对象 |
| context_click | 长按鼠标右键 | context_click(element),element是某个元素对象 |
| double_click | 鼠标双击 | double_click(element),element是某个元素对象 |
| drag_and_drop | 对元素长按左键并移动到另一个元素的位置后释放鼠标左键 | drag_and_drop(element,element1),element是某个元素对象,element1是目标元素对象 |
| drag_and_drop_by_offset | 对元素长按左键并移动到指定的坐标位置 | drag_and_drop_by_offset(element, x, y),element是某个元素对象,x是偏移的x坐标, y是偏移的y坐标 |
| key_down | 对元素长按键盘中的某个按键 | key_down(Keys.CONTROL, element),Keys.CONTROL是由Keys定义的键盘事件,element是某个元素对象 |
| key_up | 对元素释放键盘中的某个按键 | key_up(Keys.CONTROL, element),Keys.CONTROL是由Keys定义的键盘事件,element是某个元素对象 |
| move_by_offset | 对当前鼠标所在位置进行偏移 | move_by_offset(x, y),x是偏移的x坐标, y是偏移的y坐标 |
| move_to_element | 将鼠标移动到某个元素所在的位置 | move_to_element(element),element是某个元素对象 |
| move_to_element_with_offset | 将鼠标移动到某个元素并偏移一定位置 | move_to_element_with_offset(element, x, y),element是某个元素对象,x是偏移的x坐标, y是偏移的y坐标 |
| pause | 设置暂停执行时间 | pause(60) |
| release | 释放鼠标长按操作 | release(element),element是某个元素对象,如果element为空,对当前鼠标的位置长按操作进行释放 |
| send_keys | 执行文本输入 | send_keys(value),value是输入的内容 |
| send_keys_to_element | 对当前元素执行文本输入 | send_keys_to_element(element, value), element是某个元素对象,value是输入的内容 |
以上方法都是在ActionChains类所定义的类方法,若想使用这些操作方法,必须将ActionChains类实例化后才能调用。以B站的登录页面为例,通过鼠标操作方法去双击网页中的“登录”按钮。
import time

from selenium import webdriver
from selenium.webdriver.common.by import By
from selenium.webdriver.common.keys import Keys
from selenium.webdriver.common.action_chains import ActionChains

url = 'https://passport.bilibili.com/login'
driver = webdriver.Chrome()
driver.get(url)
driver.maximize_window()
time.sleep(1)
# 输入昵称和密码
element = driver.find_element(By.CLASS_NAME, 'btn_primary disabled')
ActionChains(driver).double_click(element).perform()
time.sleep(3)
上述代码中,首先将ActionChains实例化,实例化的时候传入driver对象。实例化之后就可以直接调用鼠标事件操作方法,这些方法需要传入element对象,element是网页中某个标签元素。最后再调用perform方法,这是一个执行命令,因为鼠标可以执行拖拉、长按等持久性的操作,调用perform方法可以让这个鼠标操作马上执行。
4.3 键盘事件
键盘事件是模拟人为按下键盘的某个按键,主要通过send_keys方法来实现。以百度搜索为例,利用键盘的快捷键实现搜索内容的变换。代码如下:
import time

from selenium import webdriver
from selenium.webdriver.common.by import By
from selenium.webdriver.common.keys import Keys

url = 'https://www.baidu.com'
driver = webdriver.Chrome()
driver.get(url)

# 获取输入框标签对象
element = driver.find_element(By.XPATH, '//*[@id="kw"]')
element.send_keys('我爱python')
time.sleep(2)

# 删除最后的一个文字
element.send_keys(Keys.BACK_SPACE)
time.sleep(2)

# 添加输入空格键和“教程”
element.send_keys(Keys.SPACE)
element.send_keys('教程')
time.sleep(2)

# ctrl+a 全选输入框内容
element.send_keys(Keys.CONTROL, 'a')
time.sleep(2)

# ctrl+x 剪切输入框内容
element.send_keys(Keys.CONTROL, 'x')
time.sleep(2)

# ctrl+v 粘贴内容到输入框
element.send_keys(Keys.CONTROL, 'v')
time.sleep(2)

# 通过回车键来代替单击操作
driver.find_element(By.ID, 'su').send_keys(Keys.ENTER)
5 携程酒店评论采集
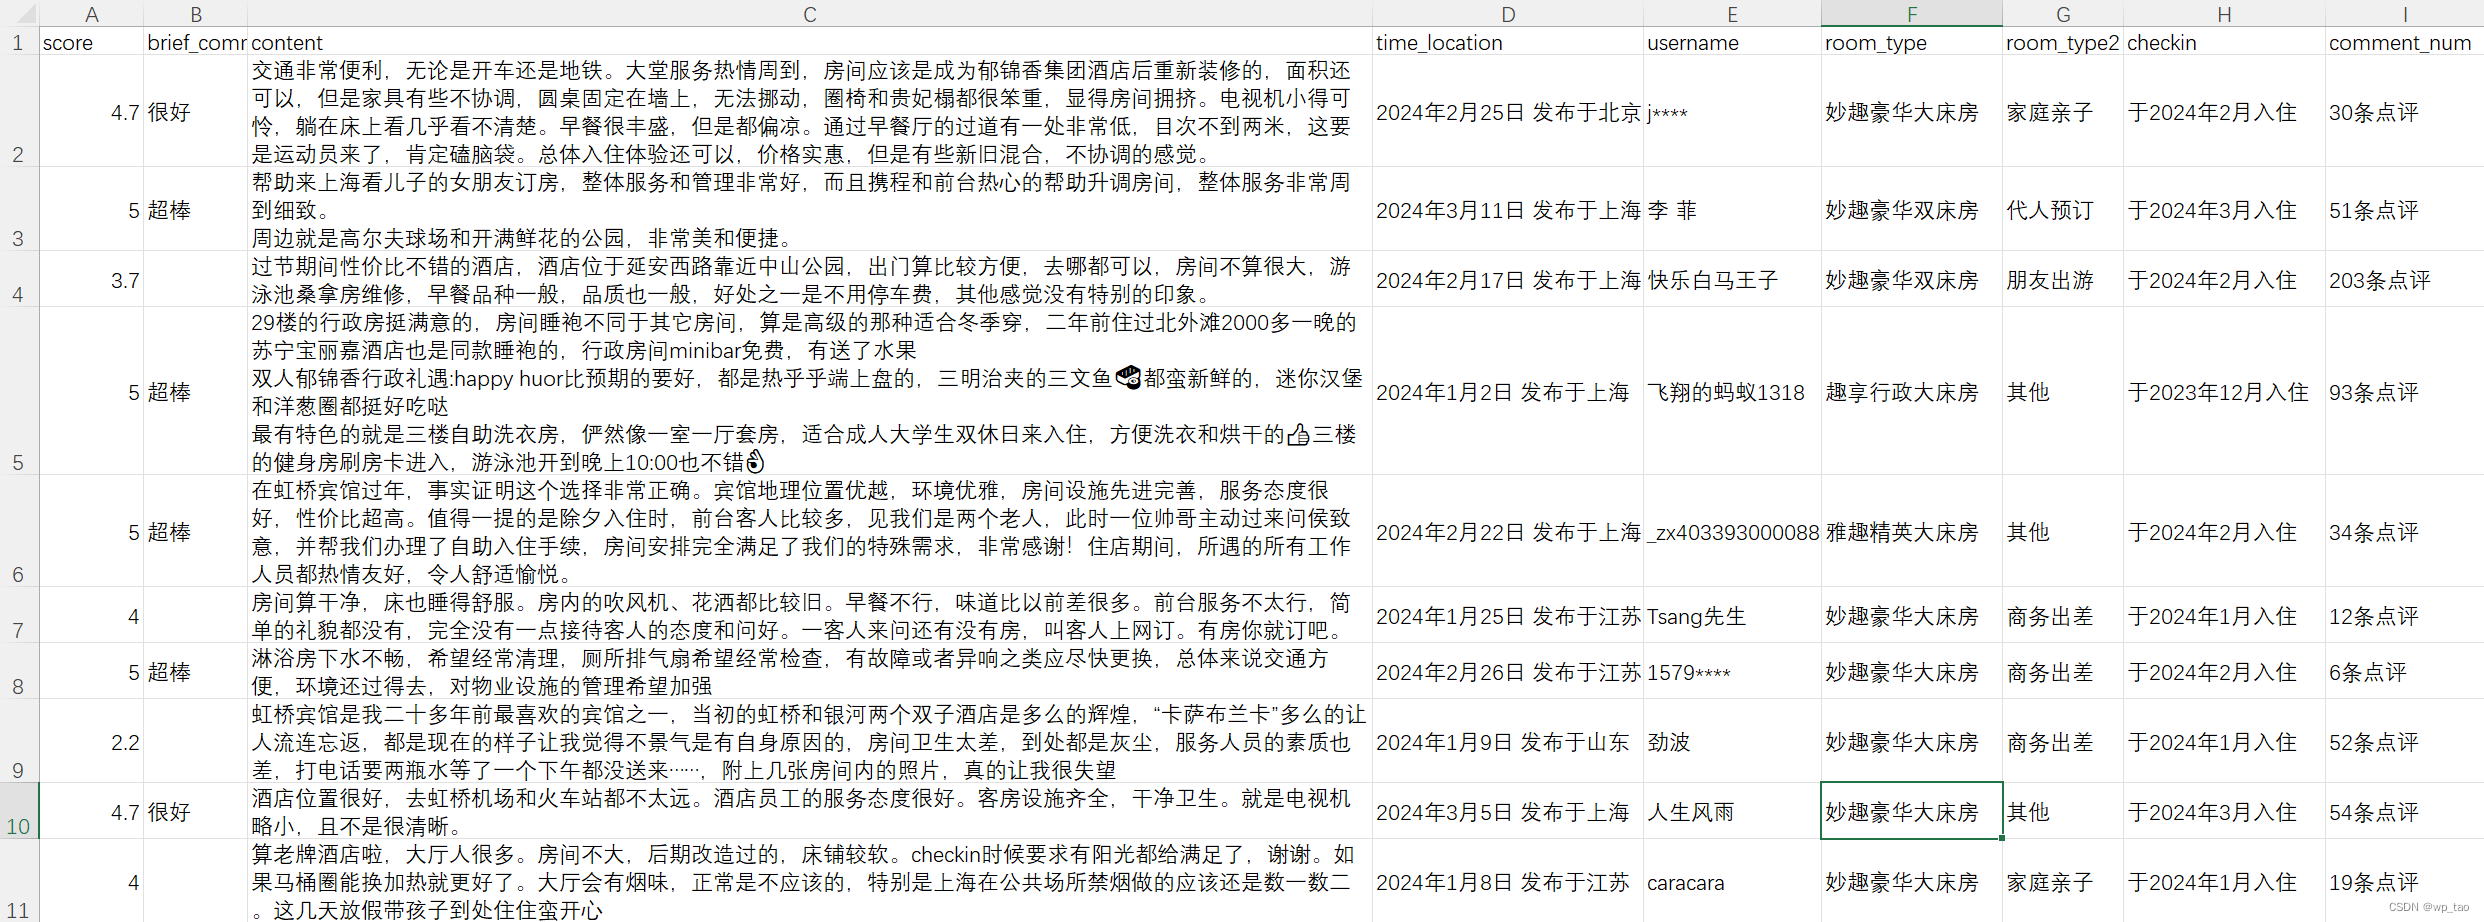
先看一下采集的评论:
附上完整代码:
import csv
import time
from selenium import webdriver
from selenium.webdriver.chrome.service import Service
from selenium.webdriver.chrome.options import Options
from selenium.webdriver.common.by import By
from selenium.webdriver.support.wait import WebDriverWait
from selenium.webdriver.common.action_chains import ActionChains
from lxml import etree


class XcSpider:
    def __init__(self):
        self.opt = Options()
        self.opt.debugger_address = '127.0.0.1:8888'
        self.opt.add_argument(
            'user-agent="Mozilla/5.0 (Windows NT 10.0; Win64; x64) AppleWebKit/537.36 (KHTML, like Gecko) Chrome/102.0.0.0 Safari/537.36"')
        self.opt.add_argument('--incognito')
        self.opt.add_argument('--disable-blink-features=AutomationControlled')  # 隐藏浏览器痕迹
        self.service = Service(executable_path=r'D:\anaconda\Scripts\chromedriver.exe')
        self.driver = webdriver.Chrome(options=self.opt, service=self.service)
        self.driver.implicitly_wait(10)
        self.f = open('携程酒店评论.csv', 'a', encoding='utf-8-sig', newline='')
        self.writer = csv.DictWriter(self.f,
                                     fieldnames=['score', 'brief_comment', 'content', 'time_location', 'username',
                                                 'room_type', 'room_type2', 'checkin', 'comment_num'])
        self.writer.writeheader()

    def fetch_source(self, url):

        self.driver.get(url)
        time.sleep(3)
        self.driver.find_element(by=By.XPATH,
                                 value='//*[@id="ibu-hotel-detail-head"]/div[2]/div[2]/div[1]/div/div/div[1]/p[2]').click()
        source = self.driver.page_source
        self.parse_html(source)
        ActionChains(driver=self.driver).move_by_offset(400, 400).perform()
        time.sleep(3)
        # 执行js代码,滚动条往下拉500像素
        js = "window.scrollTo(0,500);"
        self.driver.execute_script(js)
        count = 1
        while count < 235:
            print(f'正在爬取第{count}页数据...')
            count += 1
            next_button = self.driver.find_element(by=By.XPATH,
                                                   value='//*[@id="ibu_hotel_review"]/div/ul[2]/li/div/div[2]/div[2]/div[12]/ul/li[3]/a/i')
            next_button.click()
            time.sleep(1)
            source = self.driver.page_source
            self.parse_html(source)
            self.driver.execute_script(js)

    def parse_html(self, source):
        tree = etree.HTML(source)
        div_list = tree.xpath('//*[@id="ibu_hotel_review"]/div/ul[2]/li/div/div[2]/div[2]/div[position() < 11]')
        for div in div_list:
            score = div.xpath('./div/div[2]/div[1]/div/div[1]/strong/text()')
            score = self.handle_list(score)
            brief_comment = div.xpath('./div/div[2]/div[1]/div/div[2]/text()')
            brief_comment = self.handle_list(brief_comment)
            content = div.xpath('./div/div[2]/div[2]/p/text()')
            content = self.handle_list(content)
            time_location = div.xpath('./div/div[2]/div[3]/div[2]/text()')
            time_location = self.handle_list(time_location)
            username = div.xpath('./div/div[1]/div[1]/div/p/text()')
            username = self.handle_list(username)
            room_type = div.xpath('./div/div[1]/div[2]/ul/li[1]/span/text()')
            room_type = self.handle_list(room_type)
            checkin = div.xpath('./div/div[1]/div[2]/ul/li[2]/span/text()')
            checkin = self.handle_list(checkin)
            room_type2 = div.xpath('./div/div[1]/div[2]/ul/li[3]/span/text()')
            room_type2 = self.handle_list(room_type2)
            comment_num = div.xpath('./div/div[1]/div[2]/ul/li[4]/span/text()')
            comment_num = self.handle_list(comment_num)
            dit = {
                'score':score,
                'brief_comment': brief_comment,
                'content': content,
                'time_location': time_location,
                'username': username,
                'room_type': room_type,
                'room_type2': room_type2,
                'checkin': checkin,
                'comment_num': comment_num,
            }
            self.writer.writerow(dit)

    def handle_list(self, xpath_list):
        if xpath_list:
            xpath_list = xpath_list[0].strip()
            return xpath_list
        else:
            return ''

    def main(self):
        self.fetch_source('https://hotels.ctrip.com/hotels/396376.html#ctm_ref=hp_htl_pt_pro_01')
        self.f.close()


if __name__ == '__main__':
    XS = XcSpider()
    XS.main()


![MapReduce [OSDI‘04] 论文阅读笔记](https://img-blog.csdnimg.cn/direct/8ec1bb193cbe45babdef2b83c47f9496.png#pic_center)