我们先简单介绍一下基本的概念
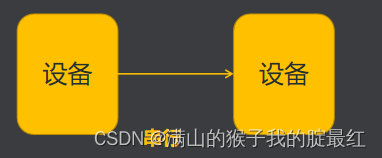
1数据的通信方式:
 2 这里三种数据传输方向分类大家需要记住。后面的通信都会涉及到。
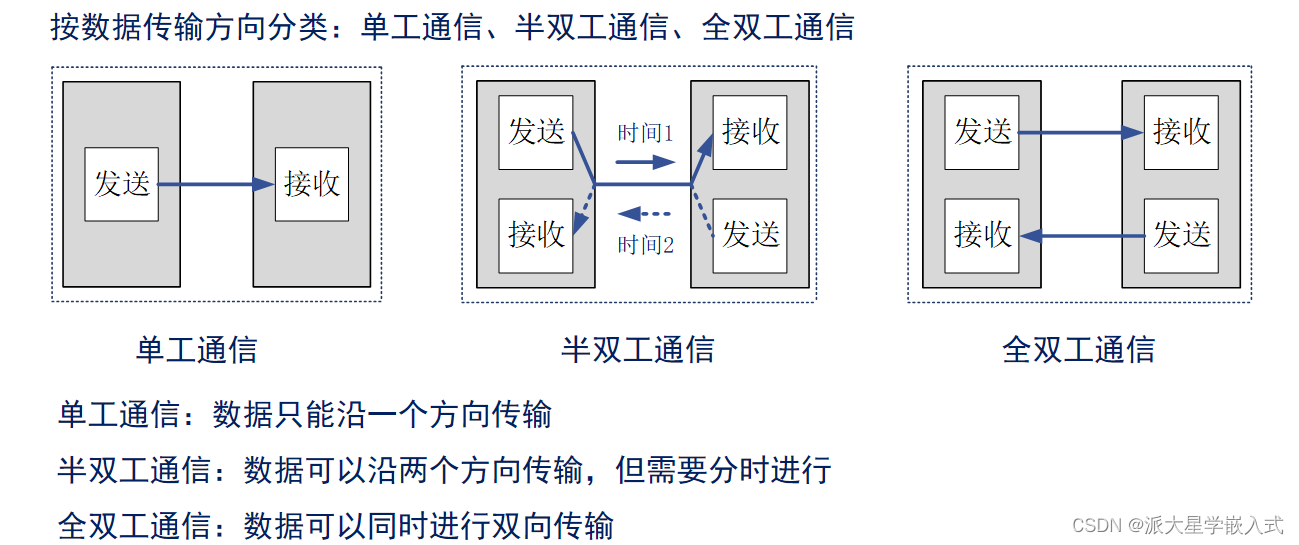
3

我们来看一下常见的通信,这里我们使用usart
一什么是串口
1.1概述 :
指按位发送和接收的接口

但是,rs233的电平逻辑和其他的是否一致呢? 我们知道在单片机我们是通过电平的变化来区分逻辑1和逻辑0 然后进行分析得到的数据
那我们来看一下RS232的逻辑电平和COMS和TTL的,这里CMOS和TTL是我们控制器的电平
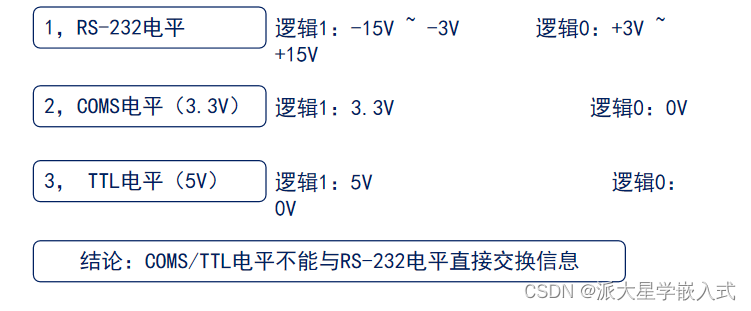
不一致,所以需要进行转换,一般是需要使用串口工具进行转换的,但是我使用版子上有usb转串口所以就不需要外接串口工具了。
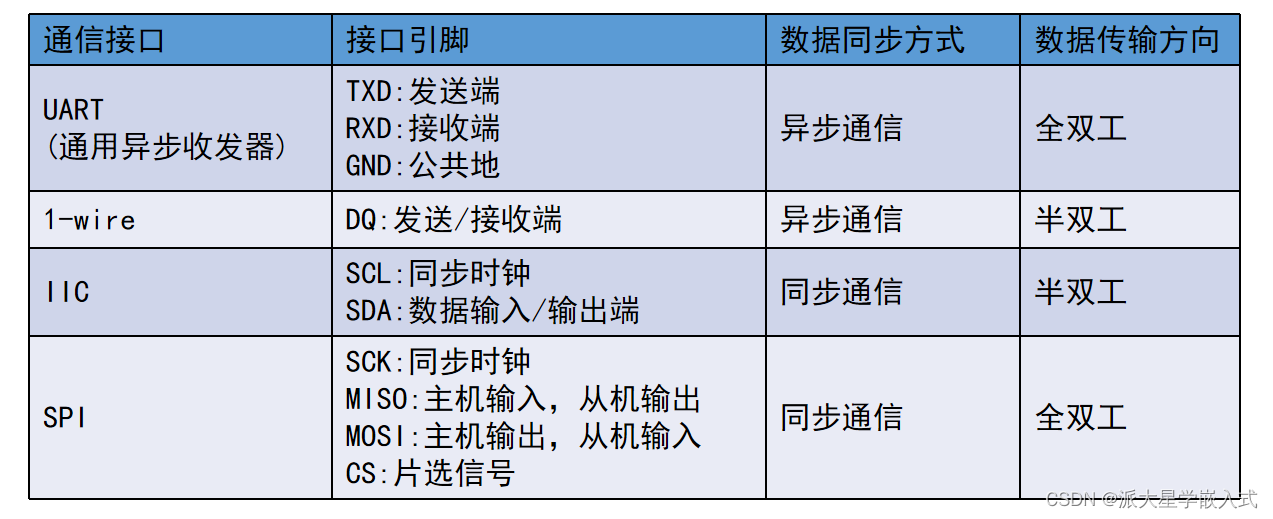
usart和uart都是全双工异步通信
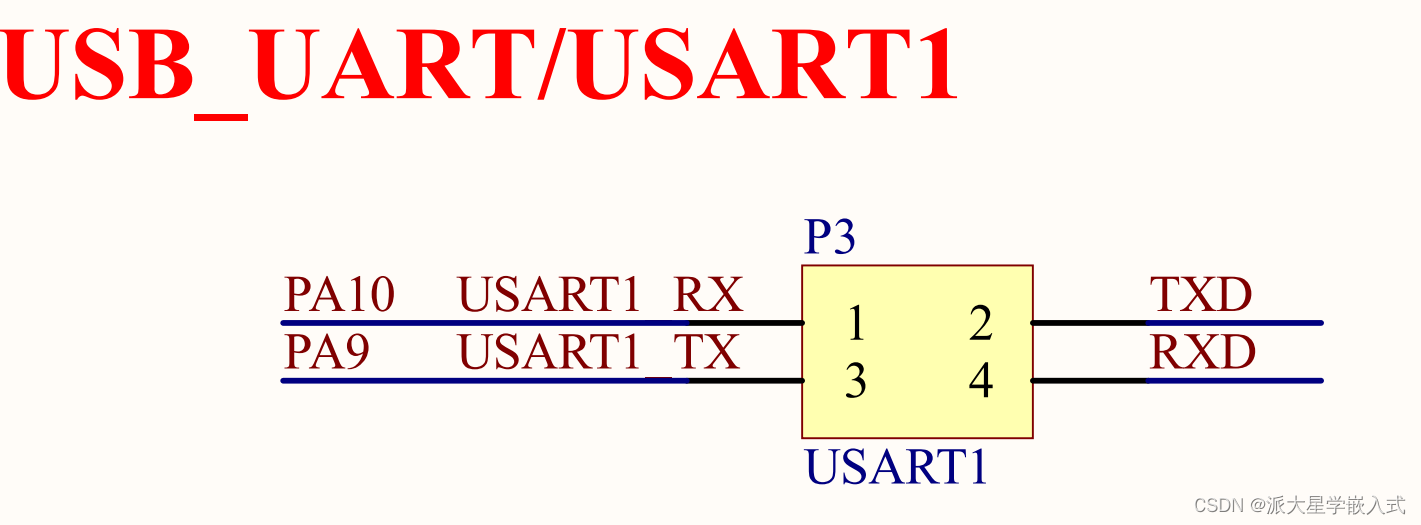
二分析原理图
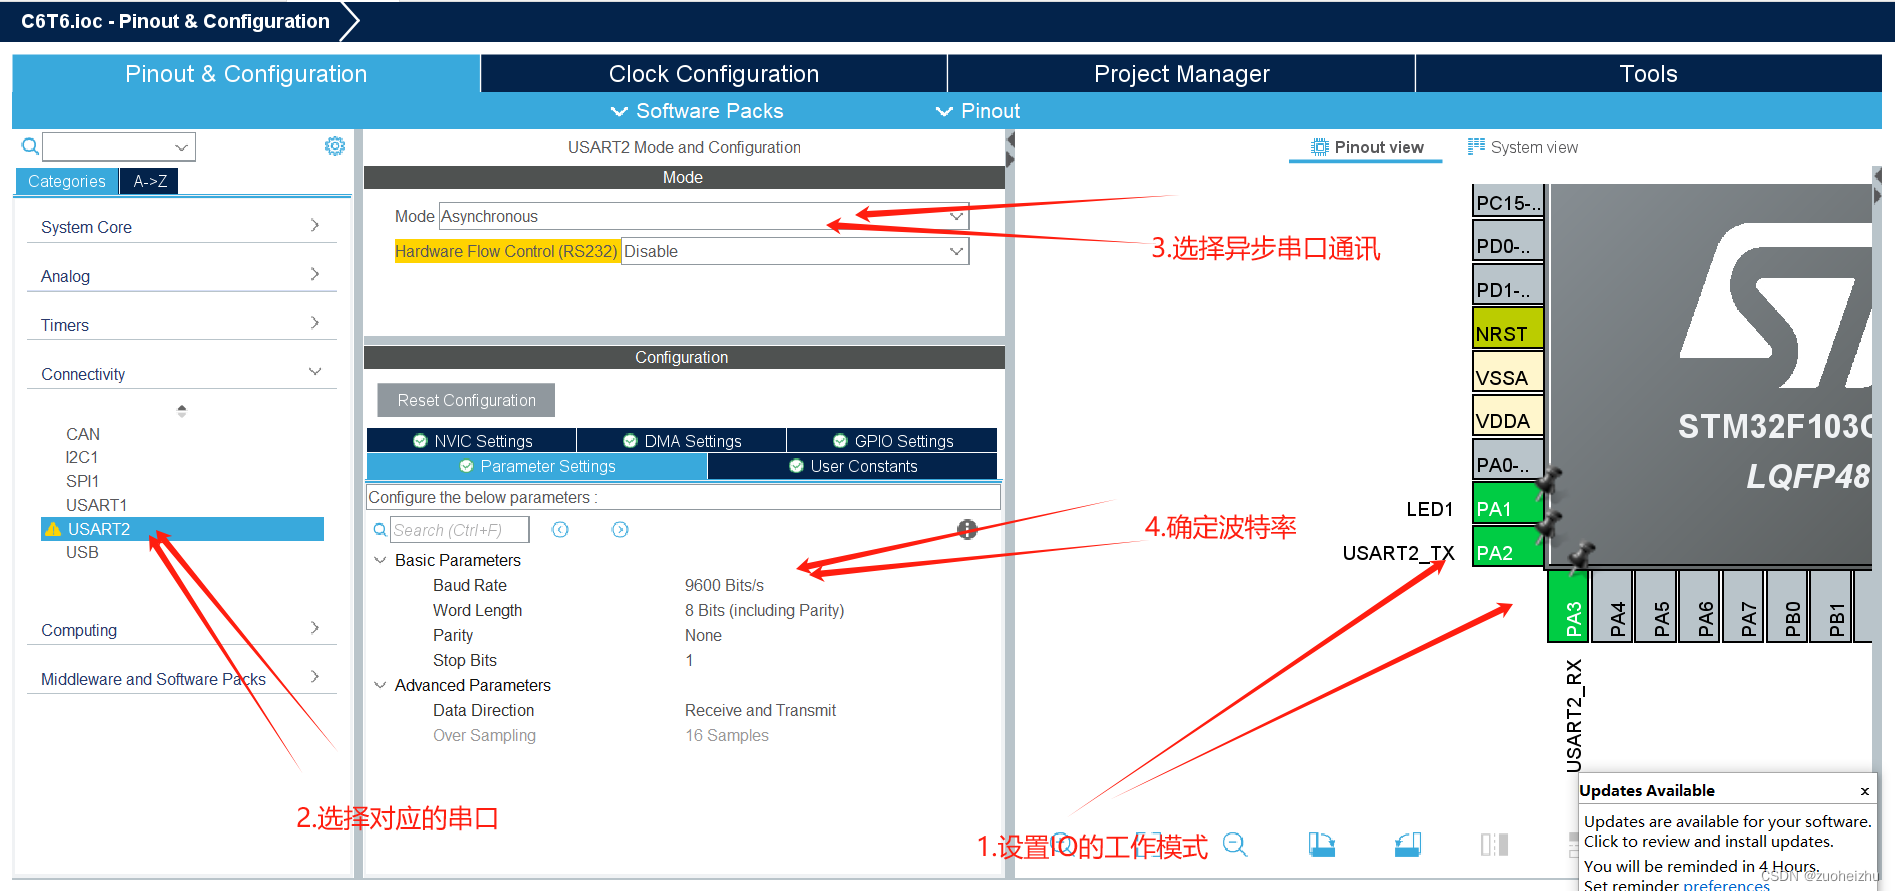
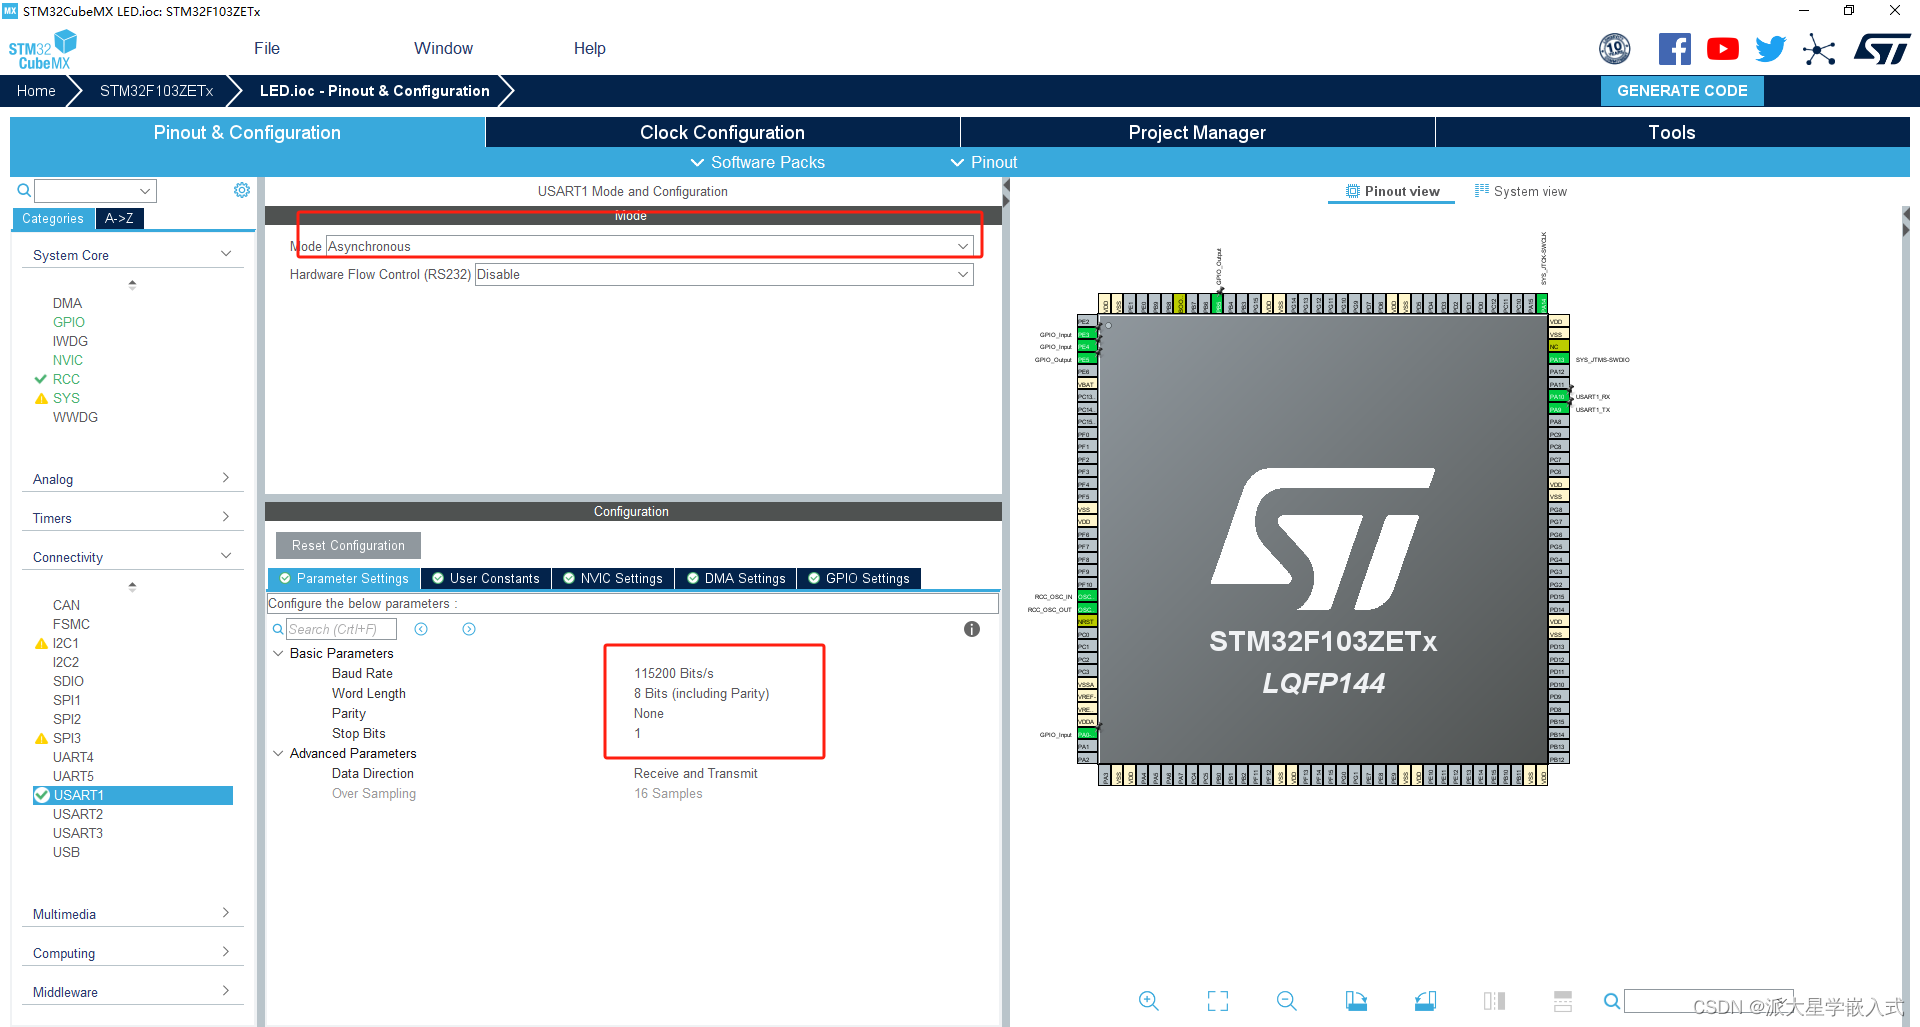
三stm32cubemx配置
在LED的基础上进行配置
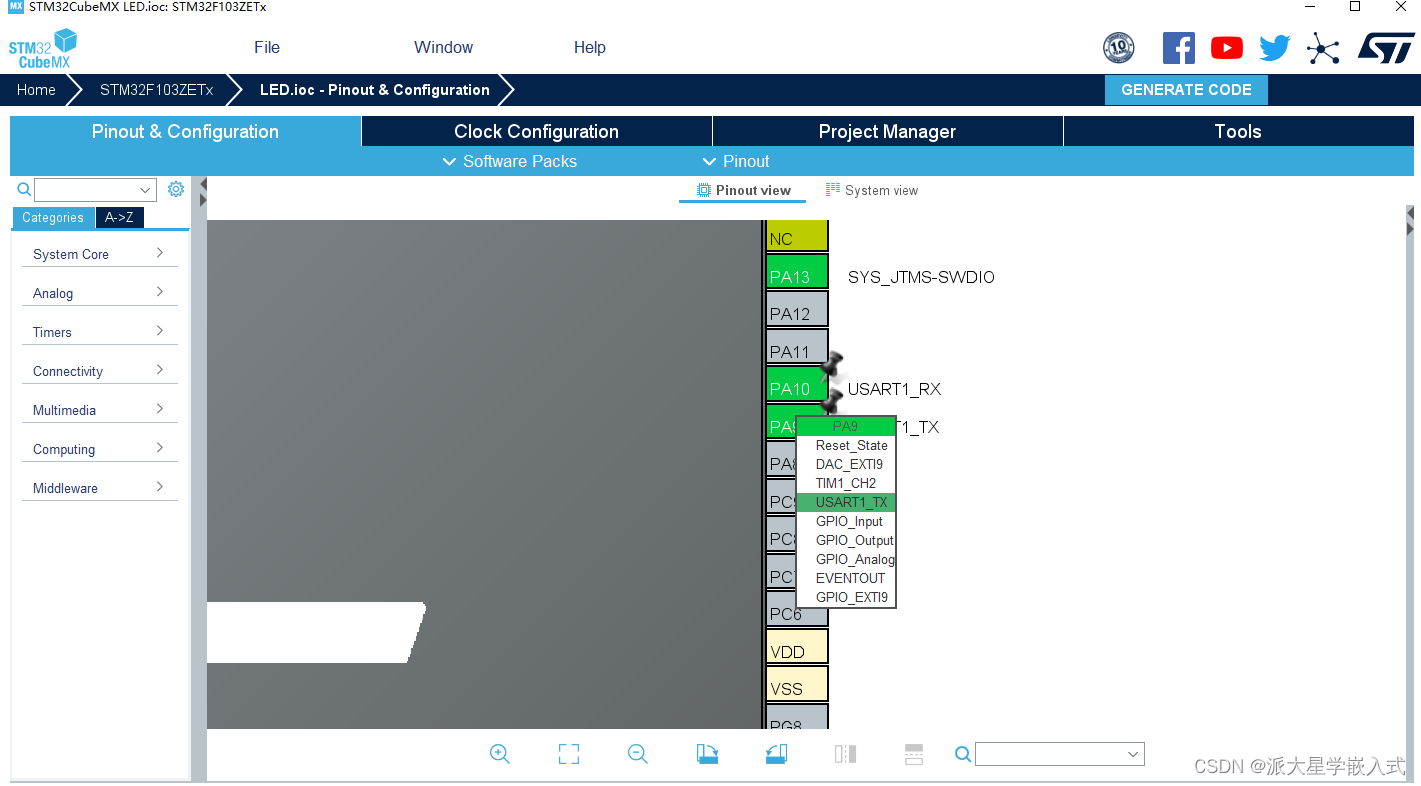
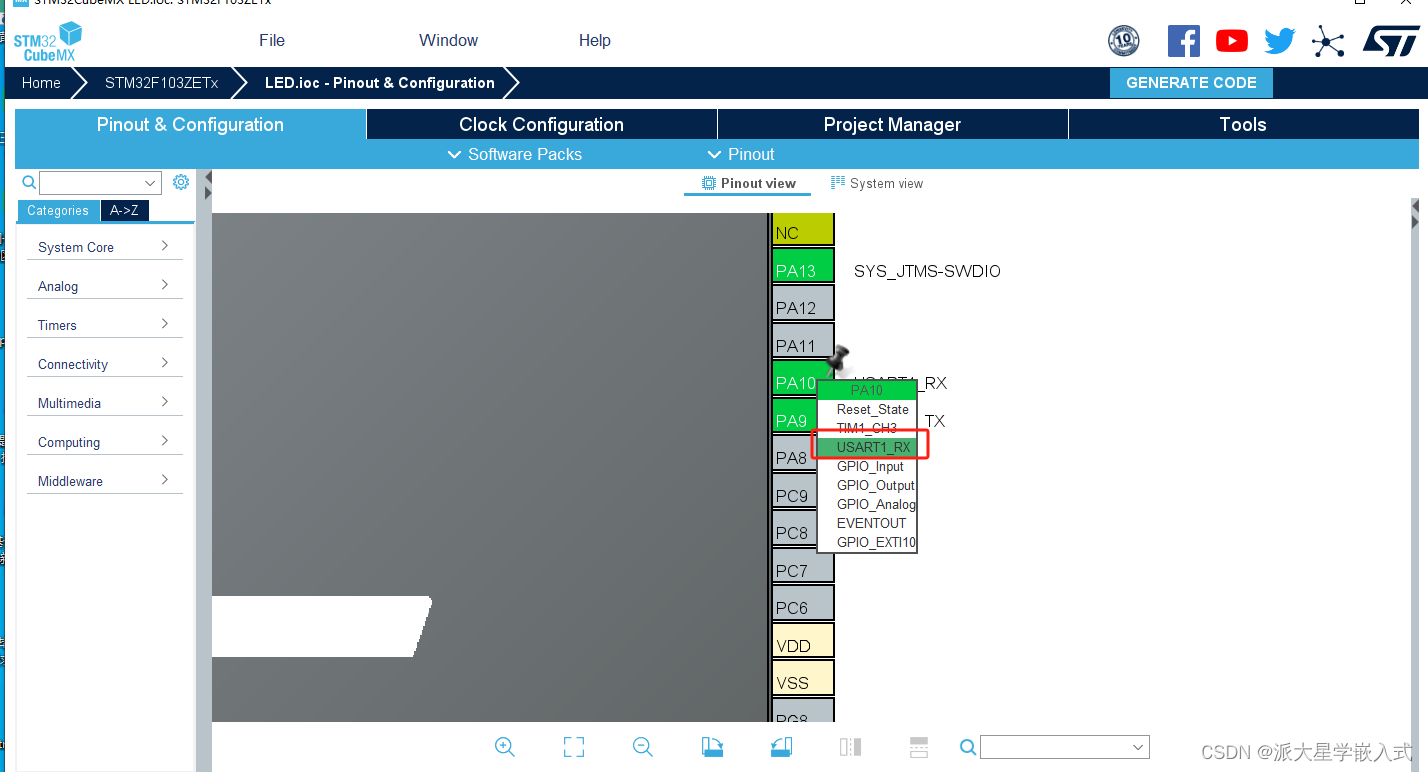
配置为Asynchronous(异步)波特率是115200
四代码分析
这里说个题外的
如果我们想使用printf输出相关数据到屏幕上好方便定位问题我们在usart.c里面加
#include "stdio.h" //不能忘记
#if 1

#if (__ARMCC_VERSION >= 6010050)            /* 使用AC6编译器时 */
__asm(".global __use_no_semihosting\n\t");  /* 声明不使用半主机模式 */
__asm(".global __ARM_use_no_argv \n\t");    /* AC6下需要声明main函数为无参数格式,否则部分例程可能出现半主机模式 */

#else
/* 使用AC5编译器时, 要在这里定义__FILE 和 不使用半主机模式 */
#pragma import(__use_no_semihosting)

struct __FILE
{
    int handle;
    /* Whatever you require here. If the only file you are using is */
    /* standard output using printf() for debugging, no file handling */
    /* is required. */
};

#endif

/* 不使用半主机模式,至少需要重定义_ttywrch\_sys_exit\_sys_command_string函数,以同时兼容AC6和AC5模式 */
int _ttywrch(int ch)
{
    ch = ch;
    return ch;
}

/* 定义_sys_exit()以避免使用半主机模式 */
void _sys_exit(int x)
{
    x = x;
}

char *_sys_command_string(char *cmd, int len)
{
    return NULL;
}


/* FILE 在 stdio.h里面定义. */
FILE __stdout;

/* MDK下需要重定义fputc函数, printf函数最终会通过调用fputc输出字符串到串口 */
int fputc(int ch, FILE *f)
{
    while ((USART1->SR & 0X40) == 0);     /* 等待上一个字符发送完成 */

    USART1->DR = (uint8_t)ch;             /* 将要发送的字符 ch 写入到DR寄存器 */
    return ch;
}
#endif
记住一定要在BEGIN 和END之间添加不然下次配置的时候就会消失

这里就是串口的基础配置
我们来看几个HAL函数
1 我复制了一部分 其中函数名和函数的官方解释
/**
  * @brief  Sends an amount of data in blocking mode.
  * @note   When UART parity is not enabled (PCE = 0), and Word Length is configured to 9 bits (M1-M0 = 01),
  *         the sent data is handled as a set of u16. In this case, Size must indicate the number
  *         of u16 provided through pData.
  * @param  huart Pointer to a UART_HandleTypeDef structure that contains
  *               the configuration information for the specified UART module.
  * @param  pData Pointer to data buffer (u8 or u16 data elements).
  * @param  Size  Amount of data elements (u8 or u16) to be sent
  * @param  Timeout Timeout duration
  * @retval HAL status
  */
HAL_StatusTypeDef HAL_UART_Transmit(UART_HandleTypeDef *huart, const uint8_t *pData, uint16_t Size, uint32_t Timeout)
函数的意思是以阻塞发送串口数据 第一个变量是串口几 这里我们使用是串口1
第二个变量是一个指针,指向发送数据的一个指针 类型是uint8_t uint16_t 如果不是这俩个类型需要加强制类型转换
第三个是发送数据的大小
第四个是发送的最大时间
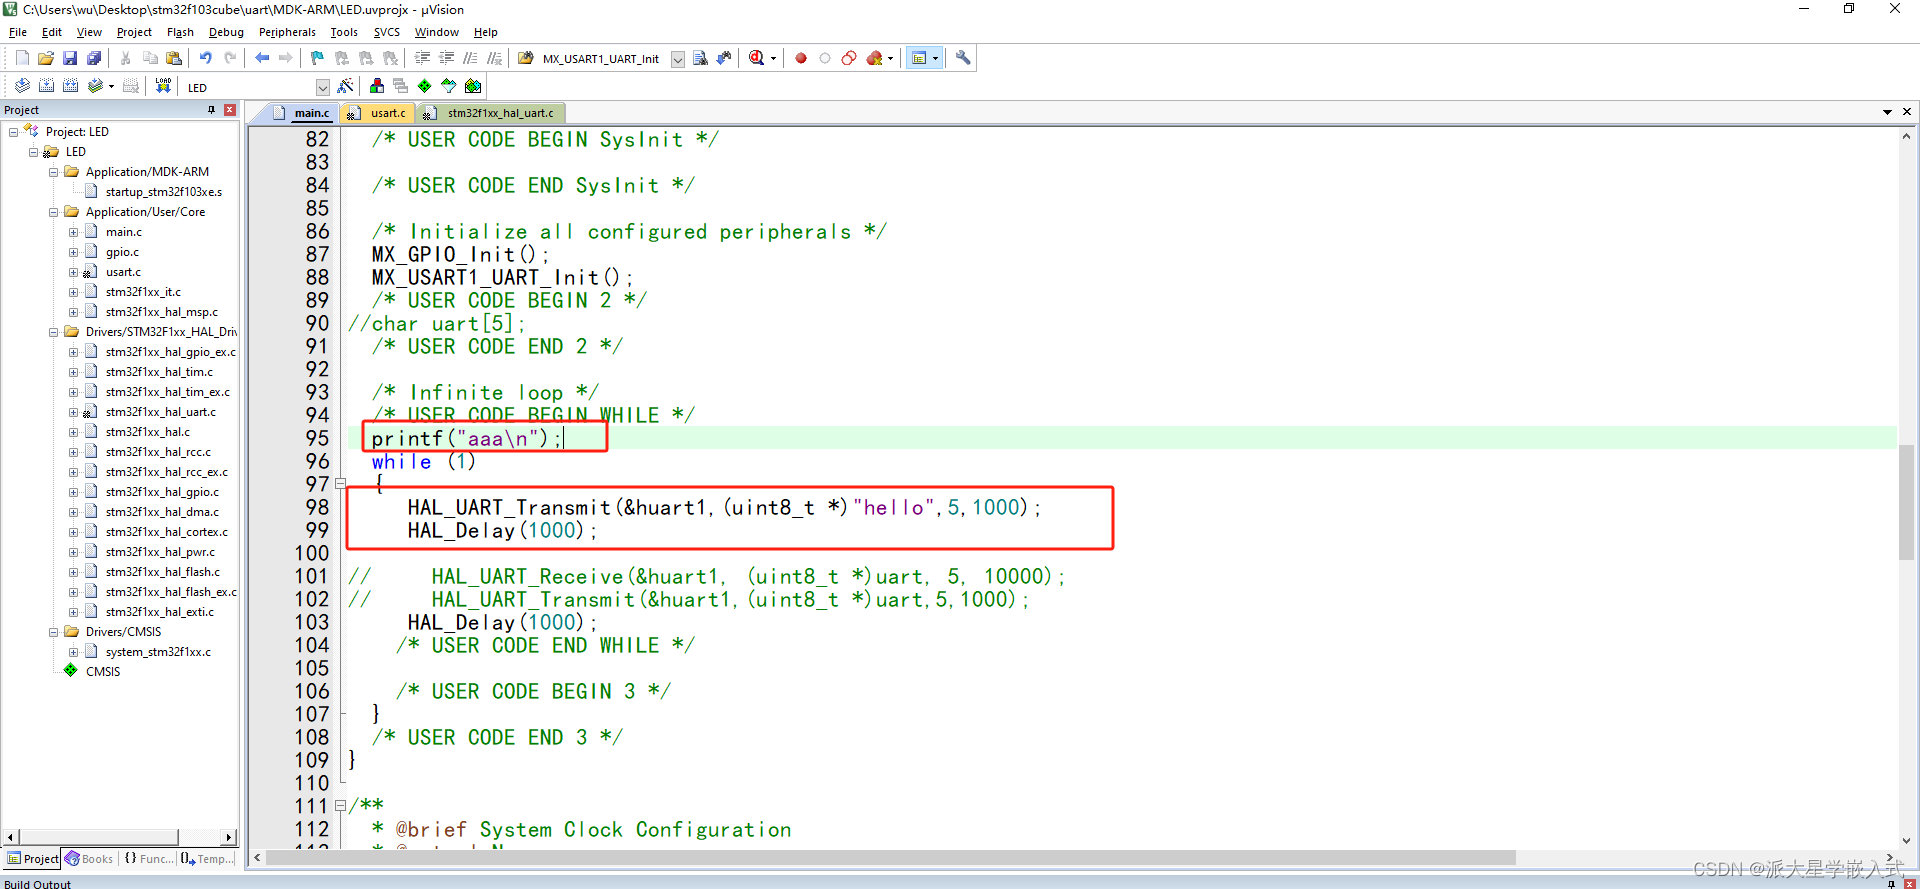
4.1比如我们使用串口发送hello 使用printf输出aaa
这里hello不是函数要求得数据类型,所以我们需要进行强制类型转换
我们打开串口工具,这里我使用的正点原子的,大家也可以使用其他的都一样
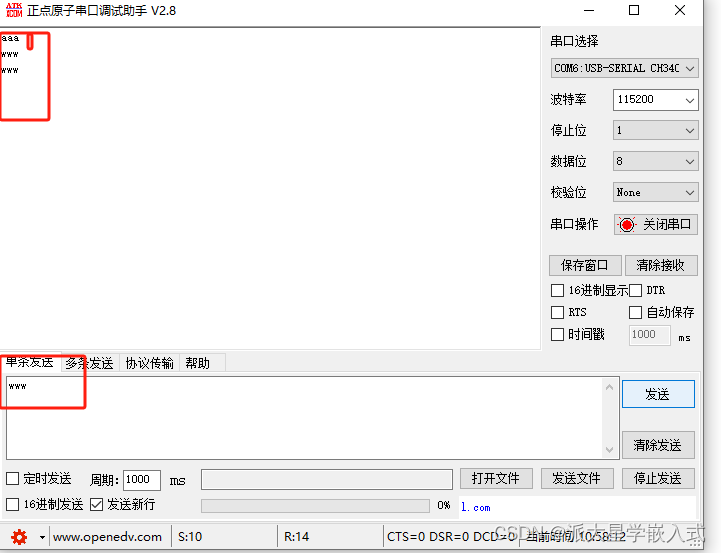
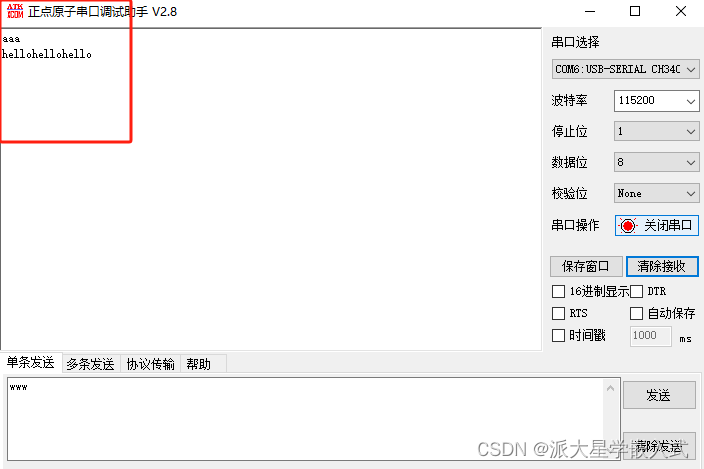 可以看到正常发送数据到串口助手上了
4.2 接收数据并将接收到得数据发送
这里我们还是先介绍一个HAL库函数
/**
  * @brief  Receives an amount of data in blocking mode.
  * @note   When UART parity is not enabled (PCE = 0), and Word Length is configured to 9 bits (M1-M0 = 01),
  *         the received data is handled as a set of u16. In this case, Size must indicate the number
  *         of u16 available through pData.
  * @param  huart Pointer to a UART_HandleTypeDef structure that contains
  *               the configuration information for the specified UART module.
  * @param  pData Pointer to data buffer (u8 or u16 data elements).
  * @param  Size  Amount of data elements (u8 or u16) to be received.
  * @param  Timeout Timeout duration
  * @retval HAL status
  */
HAL_StatusTypeDef HAL_UART_Receive(UART_HandleTypeDef *huart, uint8_t *pData, uint16_t Size, uint32_t Timeout)
函数的作用:在阻塞模式下接收大量数据
这里参数和上面的类似 我就不一一说明了
代码如下
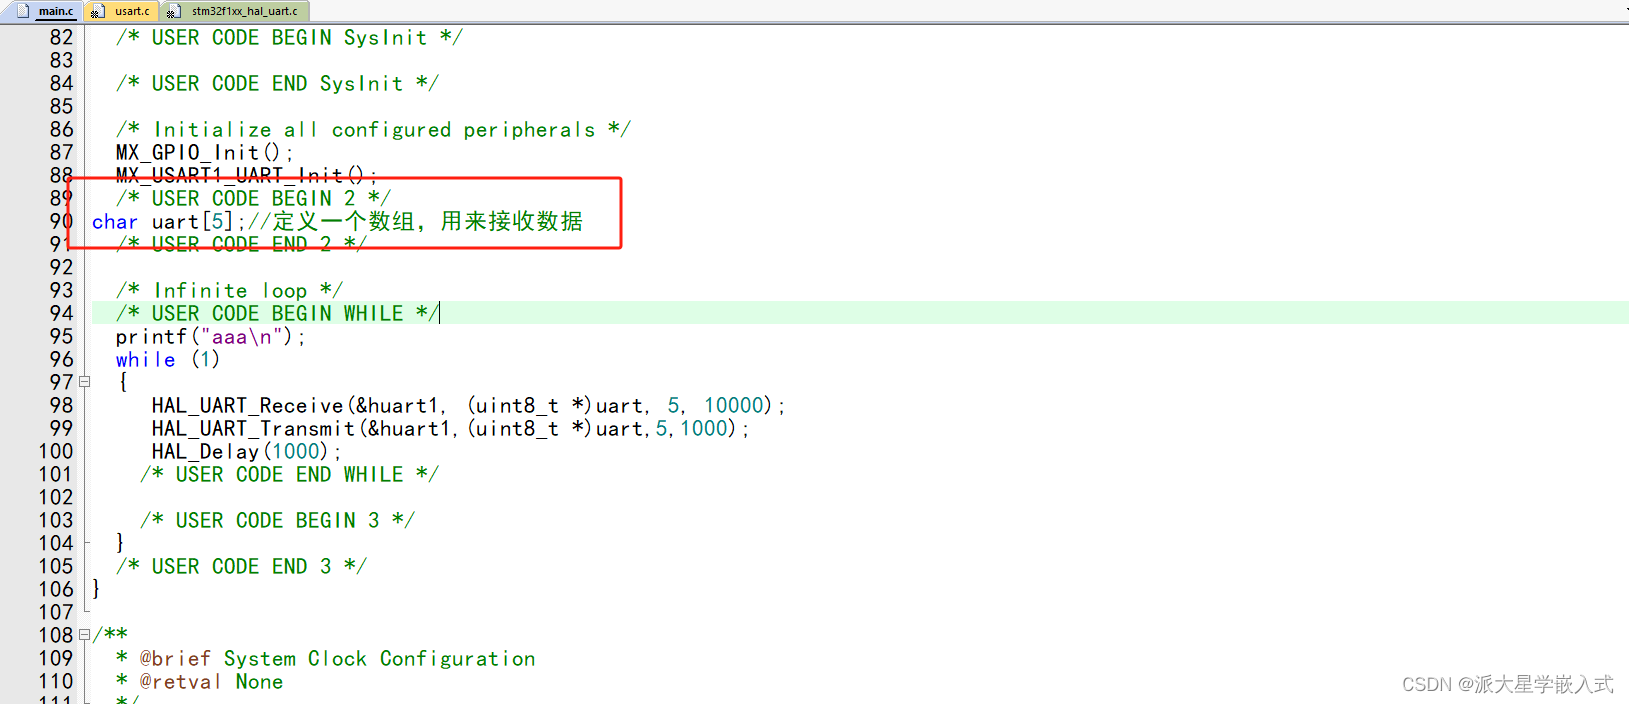
这里我发送的是www,串口接收到放到uart里面,然后再发送出来
 到这里基本知识已经结束,但是大家想一想如果每次都需要在主函数里面去执行接收语句是不是很浪费时间,并且如果发送数据的时候,在执行其他的语句就会导致无法接收到数据。
其次阻塞的发送,太浪费CPU了
所以我们结合上节课使用的中断(触发某个条件的时候)执行串口语句
即当有数据过来,触发中断,告诉cpu需要处理中断(串口的数据)然后再执行其他的
同理我们也可以通过串口接收的数据进行判断,该数据是要表达出什么意思
五中断方式的串口接收数据

在上面配置的基础打开串口1的中断。
 这个时候我们可以看到关于中断的一些配置,同理我们找到中断回调函数
void HAL_UART_RxCpltCallback(UART_HandleTypeDef *huart)我们在这里去编写代码
同理我们先介绍HAL库函数
1 函数得作用是以中断得形式接收数据
/**
  * @brief  Receives an amount of data in non blocking mode.
  * @note   When UART parity is not enabled (PCE = 0), and Word Length is configured to 9 bits (M1-M0 = 01),
  *         the received data is handled as a set of u16. In this case, Size must indicate the number
  *         of u16 available through pData.
  * @param  huart Pointer to a UART_HandleTypeDef structure that contains
  *               the configuration information for the specified UART module.
  * @param  pData Pointer to data buffer (u8 or u16 data elements).
  * @param  Size  Amount of data elements (u8 or u16) to be received.
  * @retval HAL status
  */
HAL_StatusTypeDef HAL_UART_Receive_IT(UART_HandleTypeDef *huart, uint8_t *pData, uint16_t Size)
2 函数作用:以中断得形式发送数据
/**
  * @brief  Sends an amount of data in non blocking mode.
  * @note   When UART parity is not enabled (PCE = 0), and Word Length is configured to 9 bits (M1-M0 = 01),
  *         the sent data is handled as a set of u16. In this case, Size must indicate the number
  *         of u16 provided through pData.
  * @param  huart Pointer to a UART_HandleTypeDef structure that contains
  *               the configuration information for the specified UART module.
  * @param  pData Pointer to data buffer (u8 or u16 data elements).
  * @param  Size  Amount of data elements (u8 or u16) to be sent
  * @retval HAL status
  */
HAL_StatusTypeDef HAL_UART_Transmit_IT(UART_HandleTypeDef *huart, const uint8_t *pData, uint16_t Size)
这里需要注意,以中断得形式接收数据是需要我们去打开得即

我们在初始化得时候,需要设置一下接收。然后我们看中断回调函数
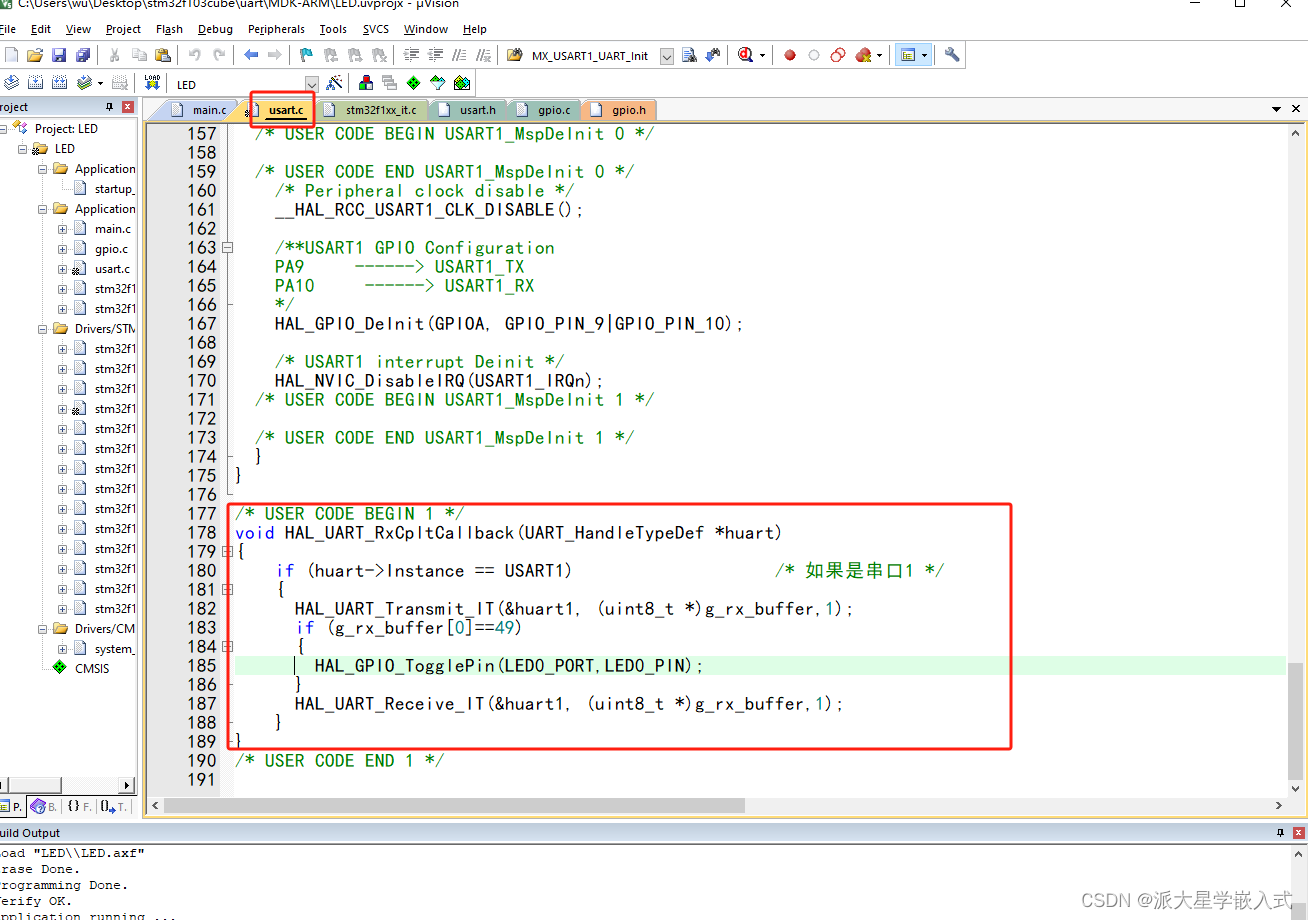
这里我把回调函数放在了uart.c里面去写
代码实现得比较简单 先接收数据 然后发送 根据接收得数据是否为1 是则进行led0得电平翻转
这里 可以看到为什么代码里面写得是 ==49 因为我们通过串口发送的1 实际上对计算机来说是‘1’
即字符1 通过ascall码表 可以知道对应的十进制数是49