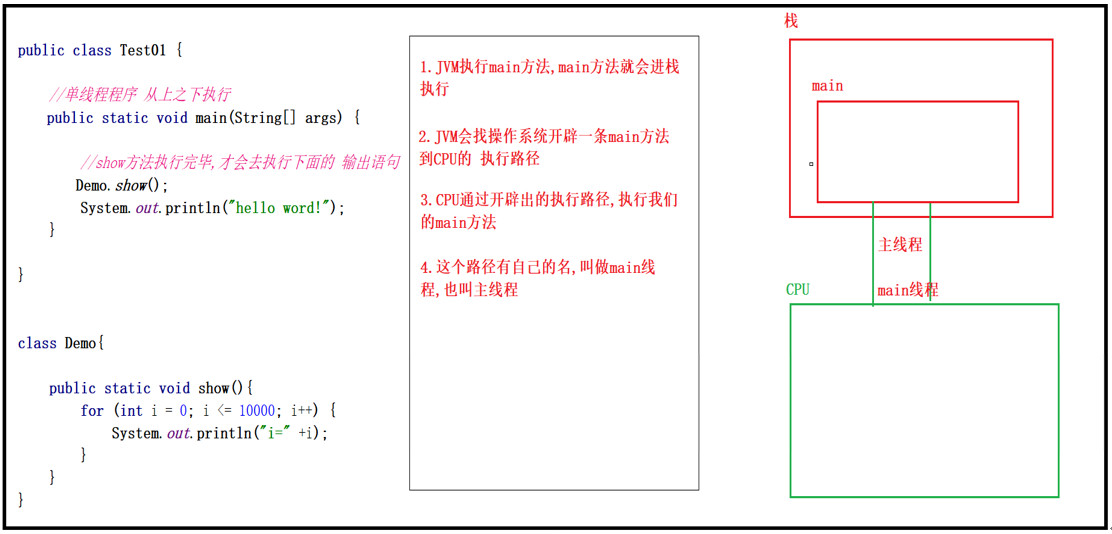
线程的生命周期
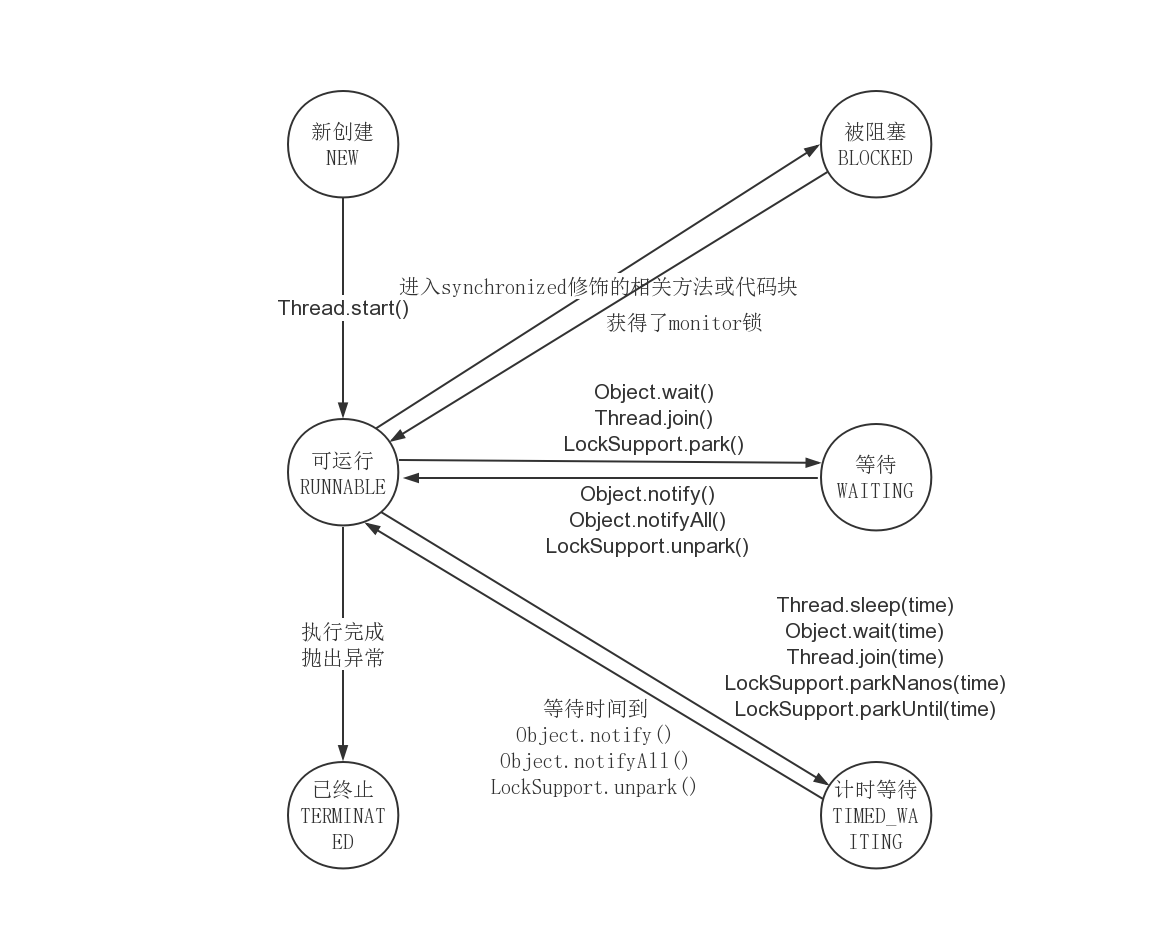
线程的生命周期是线程对象的生老病死,即线程的状态。线程生命周期可以通过 getState()方法获得,线程的状态是 Thread.State 枚举类型定义的,由以下几种:
NEW,新建状态。创建了线程对象,在调用start()启动之前的状态。
RUNNABLE,可运行状态。它是一个复合状态,包含:READY 和 RUNNING 两个状态。READY 状态该线程可以被线程调度器进行调度使它处于 RUNNING 状态,RUNING 状态表示该线程正在执行。Thread.yield()方法可以把线程由 RUNNING 状态转换为READY 状态。
BLOCKED,阻塞状态。线程发起阻塞的 I/O 操作,或者申请由其他线程占用的独占资源,线程会转换为 BLOCKED 阻塞状态。处于阻塞状态的线程不会占用CPU 资源。当阻塞 I/O 操作执行完,或者线程获得了其申请的资源,线程可以转换为 RUNNABLE。
WAITING,等待状态。线程执行了 object.wait(),thread.join(),方法会把线程转换为 WAITING 等待状态,执行 object.notify() 方法,或者thread.join() 的线程执行完毕,当前线程会转换为 RUNNABLE 状态。
TIMED_WAITING,计时等待状态,与 WAITING 状态类似,都是等待状态。区别在于处于该状态的线程不会无限的等待,如果线程没有在指定的时间范围内完成期望的操作,该线程自动转换为RUNNABLE。
TERMINATED,终止状态,线程结束处于终止状态。

多线程编程的优势与存在的风险
多线程编程具有以下优势:
1)提高系统的吞吐率(Throughout)。多线程编程可以使一个进程有多个并发(concurrent,即同时进行的)的操作。
2)提高响应性(Responsiveness)。Web 服务器会采用一些专门的线程负责用户的请求处理,缩短了用户的等待时间。
3)充分利用多核(Multicore)处理器资源。通过多线程可以充分的利用 CPU 资源。
多线程编程存在的问题与风险:
1)线程安全(Thread safe)问题。多线程共享数据时,如果没有采取正确的并发访问控制措施,就可能会产生数据一致性问题,如读取脏数据(过期的数据),如丢失数据更新。
2)线程活性(thread liveness)问题。由于程序自身的缺陷或者由资源稀缺性导致线程一直处于非 RUNNABLE 状态,这就是线程活性问题,常见的活性故障有以下几种:
1、死锁(Deadlock),类似鹬蚌相争。2、锁死(Lockout),类似于睡美人故事中王子挂了。3、活锁(Livelock), 类似于小猫咬自己尾巴。4、饥饿(Starvation),类似于健壮的雏鸟总是从母鸟嘴中抢到食物。
3)上下文切换(Context Switch)。处理器从执行一个线程切换到执行另外一个线程。
4)可靠性。可能会由一个线程导致 JVM 意外终止,其他的线程也无法执行。
非线程安全主要是指多个线程对同一个对象的实例变量进行操作时,会出现值被更改,值不同步的情况。
线程安全问题表现为三个方面: 原子性,可见性和有序性。
原子性
原子(Atomic)就是不可分割的意思。原子操作的不可分割有两层含义:
1)访问(读,写)某个共享变量的操作从其他线程来看,该操作要么已经执行完毕,要么尚未发生,即其他线程看不到当前线程操作的中间结果。
2)访问同一组共享变量的原子操作是不能够交错的。
Java 有两种方式实现原子性:一种是使用锁;另一种利用处理器的 CAS(Compare and Swap)指令。锁具有排它性,保证共享变量在某一时刻只能被一个线程访问。CAS 指令直接在硬件(处理器和内存)层次上实现,看作是硬件锁。
可见性
在多线程环境中,一个线程对某个共享变量进行更新之后,后续其他的线程可能无法立即读到这个更新的结果, 这就是线程安全问题的另外一种形式:可见性(visibility)。如果一个线程对共享变量更新后,后续访问该变量的其他线程可以读到更新的结果,称这个线程对共享变量的更新对其他线程可见,否则称这个线程对共享变量的更新对其他线程不可见。 多线程程序因为可见性问题可能会导致其他线程读取到了旧数据(脏数据)。
有序性
有序性(Ordering)是指在什么情况下一个处理器上运行的一个线程所执行的内存访问操作在另外一个处理器运行的其他线程看来是乱序的(Out of Order)。乱序是指内存访问操作的顺序看起来发生了变化。可以使用 volatile 关键字,synchronized 关键字实现有序性。
重排序
在多核处理器的环境下,编写的顺序结构,这种操作执行的顺序可能是没有保障的:
编译器可能会改变两个操作的先后顺序;处理器也可能不会按照目标代码的顺序执行;
这种一个处理器上执行的多个操作,在其他处理器来看它的顺序与目标代码指定的顺序可能不一样,这种现象称为重排序。
重排序是对内存访问有序操作的一种优化,可以在不影响单线程程序正确的情况下提升程序的性能。但是,可能对多线程程序的正确性产生影响,即可能导致线程安全问题。
重排序与可见性问题类似,不是必然出现的。与内存操作顺序有关的几个概念:
源码顺序,就是源码中指定的内存访问顺序。
程序顺序,处理器上运行的目标代码所指定的内存访问顺序。
执行顺序,内存访问操作在处理器上的实际执行顺序。
感知顺序,给定处理器所感知到的该处理器及其他处理器的内存访问操作的顺序。
可以把重排序分为指令重排序与存储子系统重排序两种。
指令重排序主要是由 JIT 编译器,处理器引起的,指程序顺序与执行顺序不一样。
存储子系统重排序是由高速缓存、写缓冲器引起的,感知顺序与执行顺序不一致。
- 指令重排序
在源码顺序与程序顺序不一致,或者程序顺序与执行顺序不一致的情况下,我们就说发生了指令重排序(Instruction Reorder)。指令重排是一种动作,确实对指令的顺序做了调整,重排序的对象指令。
javac 编译器一般不会执行指令重排序,而 JIT 编译器可能执行指令重排序。处理器也可能执行指令重排序,使得执行顺序与程序顺序不一致。 指令重排不会对单线程程序的结果正确性产生影响,可能导致多线程程序出现非预期的结果。
- 存储子系统重排序
存储子系统是指写缓冲器与高速缓存。高速缓存(Cache)是 CPU 中为了匹配与主内存处理速度不匹配而设计的一个高速缓存。写缓冲器(Store buffer,Write buffer)用来提高写高速缓存操作的效率。
即使处理器严格按照程序顺序执行两个内存访问操作,在存储子系统的作用下,其他处理器对这两个操作的感知顺序与程序顺序不一致,即这两个操作的顺序顺序看起来像是发生了变化,这种现象称为存储子系统重排序。
存储子系统重排序并没有真正的对指令执行顺序进行调整,而是造成一种指令执行顺序被调整的现象。存储子系统重排序对象是内存操作的结果。从处理器角度来看,读内存就是从指定的 RAM 地址中加载数据到寄存器,称为 Load 操作;写内存就是把数据存储到指定的地址表示的 RAM 存储单元中,称为 Store 操作。内存重排序有以下四种可能:
Load Load 重排序,一个处理器先后执行两个读操作 L1 和 L2,其他处理器对两个内存操作的感知顺序可能是 L2 -> L1
Store Store 重排序,一个处理器先后执行两个写操作 W1 和 W2,其他处理器对两个内存操作的感知顺序可能是 W2 -> W1
Load Store 重排序,一个处理器先执行读内存操作 L1 再执行写内存操作 W1,其他处理器对两个内存操作的感知顺序可能是 W1 -> L1
Store Load 重排序,一个处理器先执行写内存操作 W1 再执行读内存操作 L1,其他处理器对两个内存操作的感知顺序可能是 L1 -> W1
内存重排序与具体的处理器微架构有关,不同架构的处理器所允许的内存重排序不同。
内存重排序可能会导致线程安全问题,假设有两个共享变量 int data = 0; boolean ready = false;
| 处理器1 | 处理器2 |
|---|---|
| data = 1; // S1 read = true; // S2 |
|
| while(!read) {} // L3 sout{data} // L4 |
- 貌似串行语义
JIT 编译器,处理器、存储子系统是按照一定的规则对指令、内存操作的结果进行重排序,给单线程程序造成一种假象————指令是按照源码的顺序执行的,这种假象称为貌似串行语义。并不能保证多线程环境程序的正确性。
为了保证貌似串行语义,有数据依赖关系的语句不会被重排序,只有不存在数据依赖关系的语句才会被重排序。
如果两个操作(指令)访问同一个变量,且其中一个操作(指令)为写操作,那么这两个操作之间就存在数据依赖关系(Data dependency)。如:
x = 1; y = x + 1; // 后一条语句的操作数包含前一条语句的执行结果;
y = x; x = 1; // 先读取 x 变量,再更新 x 变量的值;
x = 1; x = 2; // 两条语句同时对一个变量进行写操作
如果不存在数据依赖关系则可能重排序,如:
double price = 45.8;
int quantity = 10;
double sum = price * quantity;
存在控制依赖关系的语句允许重排。一条语句(指令)的执行结果会决定另一条语句(指令)能否被执行,这两条语句(指令)存在控制依赖关系(Control Dependency)。如在 if 语句中允许重排,可能存在处理器先执行 if 代码块,再判断 if 条件是否成立。
线程同步
线程同步机制是一套用于协调线程之间的数据访问的机制,该机制可以保障线程安全。Java 平台提供的线程同步机制包括: 锁,volatile 关键字,final 关键字,static 关键字,以及相关的 API,如 Object.wait()/Object.notify()等。
- 锁概述
线程安全问题的产生前提是多个线程并发访问共享数据。
将多个线程对共享数据的并发访问转换为串行访问,即一个共享数据一次只能被一个线程访问。锁就是复用这种思路来保障线程安全的。
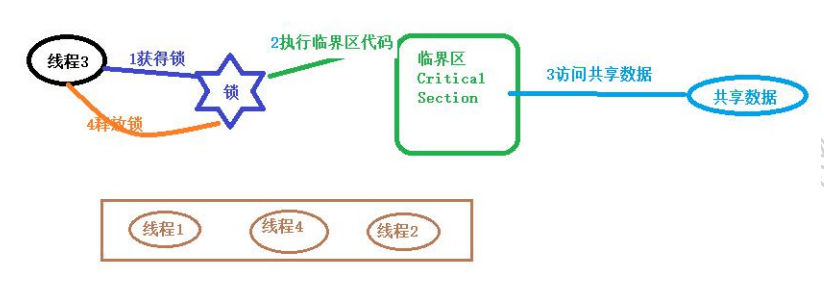
锁(Lock)可以理解为对共享数据进行保护的一个许可证。对于同一个许可证保护的共享数据来说,任何线程想要访问这些共享数据必须先持有该许可证。一个线程只有在持有许可证的情况下才能对这些共享数据进行访问;并且一个许可证一次只能被一个线程持有;获得许可证的线程在结束对共享数据的访问后必须释放其持有的许可证。
一线程在访问共享数据前必须先获得锁;获得锁的线程称为锁的持有线程;一个锁一次只能被一个线程持有。锁的持有线程在获得锁之后和释放锁之前这段时间所执行的代码称为临界区(Critical Section)。锁具有排他性(Exclusive),即一个锁一次只能被一个线程持有。这种锁称为排它锁或互斥锁(Mutex)。
JVM 把锁分为内部锁和显示锁两种。内部锁通过 synchronized 关键字实现;显示锁通过 java.concurrent.locks.Lock 接口的实现类实现的。
锁可以实现对共享数据的安全访问。保障线程的原子性,可见性与有序性。
原子性,锁是通过互斥保障原子性。一个锁只能被一个线程持有,这就保证临界区的代码一次只能被一个线程执行,使得临界区代码所执行的操作自然而然的具有不可分割的特性,即具备了原子性。
可见性,可见性的保障是通过写线程冲刷处理器的缓存和读线程刷新处理器缓存这两个动作实现的。在 java 平台中,锁的获得隐含着刷新处理器缓存的动作(读),锁的释放隐含着冲刷处理器缓存的动作(写)。
有序性,锁能够保障有序性。写线程在临界区所执行的在读线程所执行的临界区看来像是完全按照源码顺序执行的。
注意:
使用锁保障线程的安全性,必须满足以下条件:
这些线程在访问共享数据时必须使用同一个锁,即使是读取共享数据的线程也需要使用同步锁。
- 锁相关的概念
1)可重入性。可重入性(Reentrancy)描述这样一个问题:一个线程持有该锁的时候能再次(多次)申请该锁。
void methodA() {
	申请 a 锁
	methodB();
	释放 a 锁
}

void methodB() {
	申请 a 锁
	....
	释放 a 锁
}
如果一个线程持有一个锁的时候还能够继续成功申请该锁,称该锁是可重入的,否则就称该锁为不可重入的。
2)锁的争用与调度
Java 平台中内部锁(通过 synchronized 关键字实现)属于非公平锁,显示Lock 锁既支持公平锁又支持非公平锁。
3)锁的粒度
一个锁可以保护的共享数据的数量大小称为锁的粒度。锁保护共享数据量大,称该锁的粒度粗,否则就称该锁的粒度细。锁的粒度过粗会导致线程在申请锁时会进行不必要的等待,锁的粒度过细会增加锁调度的开销。
- 内部锁:synchronized 关键字
Java 中的每个对象都有一个与之关联的内部锁(Intrinsic lock)。这种锁也称为监视器(Monitor),这种内部锁是一种排他锁,可以保障原子性,可见性与有序性。
内部锁是通过 synchronized 关键字实现的,synchronized 关键字修饰代码块,修饰该方法。
修饰代码块的语法:
synchronized ( 对象锁 ) {
	同步代码块,可以在同步代码块中访问共享数据
}
修饰实例方法就称为同步实例方法
修饰静态方法称称为同步静态方法
- synchronized 同步代码块
1、要想实现同步必须使用同一个对象
public class Test01 {
    public static void main(String[] args) {
        //创建两个线程,分别调用 mm()方法,
        // 先创建 Test01 对象,通过对象名调用 mm()方法
        // 【要想实现同步必须使用同一个对象】
        Test01 obj = new Test01();

        new Thread(new Runnable() {
            @Override
            public void run() {
                obj.mm();//使用的锁对象this就是obj对象
            }
        }).start();

        new Thread(() -> obj.mm()).start(); // 使用的锁对象this也是obj对象
    }

    //定义方法,打印 100 行字符串
    public void mm() {
        synchronized (this) { // 经常使用 this 当前对象作为锁对象,这里的当前对象就是调用方 obj 喽!
            for (int i = 1; i <= 2000; i++) {
                System.out.println(Thread.currentThread().getName() + " --> " + i);
            }
        }
    }
}
2、如果线程的锁不同,不能实现同步。想要同步必须使用同一个锁对象。
public class Test02 {
    public static void main(String[] args) {
        //创建两个线程,分别调用 mm()方法
        // 先创建 Tes't02 对象,通过对象名调用 mm()方法
         Test02 obj = new Test02();
         Test02 obj2 = new Test02();
        new Thread(() -> obj.mm()).start(); // 此线程使用的锁对象 this 就是 obj 对象

        new Thread(() -> obj2.mm()).start(); // 而这个线程使用的锁对象 this 是 obj2 对象,而不是 obj1 对象.

    }

    public void mm(){
        synchronized ( this ) { // 经常使用this当前对象作为锁对象
            for (int i = 1; i <= 2000; i++) {
                System.out.println(Thread.currentThread().getName() + " --> " + i); } }
    }
}
3、使用一个常量对象作为锁对象
public class Test03 {
    public static void main(String[] args) {
        // 创建两个线程,分别调用 mm()方法
        // 先创建两个 Test03 对象,通过对象名调用 mm()方法
        Test03 obj = new Test03();
        Test03 obj2 = new Test03();

        new Thread(() -> obj.mm()).start(); // 使用的锁对象 OBJ 常量

        new Thread(() -> obj2.mm()).start(); // 使用的锁对象 OBJ 常量
    }

    public static final Object OBJ = new Object(); // 定义一个常量

    public void mm() {
        synchronized (OBJ) { // 使用一个常量对象作为锁对象
            for (int i = 1; i <= 100; i++) {
                System.out.println(Thread.currentThread().getName() + " --> " + i);
            }
        }
    }
}
4、使用一个常量对象作为锁对象,不同方法中的同步代码块也可以同步
public class Test04 {

    public static void main(String[] args) {
        // 创建两个线程,分别调用 mm()方法
        // 先创建 Test04 对象,通过对象名调用 mm()方法
        Test04 obj = new Test04();
        Test04 obj2 = new Test04();

        new Thread(() -> obj.mm()).start(); // 使用的锁对象 OBJ 常量
        new Thread(() -> obj2.mm()).start(); // 使用的锁对象 OBJ 常量

        // 第三个线程调用静态方法
        new Thread(() -> sm()).start(); // 使用的锁对象 OBJ 常量
    }

    public void mm() {
        synchronized (OBJ) { // 使用一个常量对象作为锁对象
            for (int i = 1; i <= 100; i++) {
                System.out.println(Thread.currentThread().getName() + " --> " + i);
            }
        }
    }

	public static final Object OBJ = new Object(); // 定义一个常量
    public static void sm() {
        synchronized (OBJ) { // 使用一个常量对象作为锁对象
            for (int i = 1; i <= 100; i++) {
                System.out.println(Thread.currentThread().getName() + " --> " + i);
            }
        }
    }
}
- synchronized 同步方法
1、synchronized 同步实例方法
把整个方法体作为同步代码块,默认的锁对象是 this 对象
public class Test05 {
    public static void main(String[] args) {
        //创建两个线程,分别调用 mm()方法
        // 先创建 Test05 对象,通过对象名调用 mm()方法
        // Java 中的每个对象都有一个与之关联的内部锁(Intrinsic lock)
        Test05 obj = new Test05();

//        new Thread(() -> obj.mm()).start(); // 使用的锁对象 this 就是 obj 对象
        new Thread(() -> obj.mm22()).start(); // 使用的锁对象 this 就是 obj 对象

        // 另一个线程调用 mm22()方法
        new Thread(new Runnable() {
            @Override
            public void run() {
//                obj.mm22(); // 使用的锁对象 this 也是 obj 对象
                new Test05().mm22(); // 使用的锁对象 this 是刚刚 new 创建的一个新对象,不是同一个锁对象不能同步
            }
        }).start();
    }

    public void mm() {
        synchronized (this) { // 经常使用 this 当前对象作为锁对象
            for (int i = 1; i <= 2000; i++) {
                System.out.println(Thread.currentThread().getName()
                        + " --> " + i);
            }
        }
    }

    // 使用 synchronized 修饰实例方法,同步实例方法,默认 this 作为锁对象
    public synchronized void mm22() {
        for (int i = 1; i <= 2000; i++) {
            System.out.println(Thread.currentThread().getName() + " --> " + i);
        }
    }
}
2、synchronized 同步静态方法
把整个方法体作为同步代码块,默认的锁对象是当前类的运行时类对象:Test06.class,有人称它为类锁
public class Test06 {
    public static void main(String[] args) {
        // 创建两个线程,分别调用 m1()方法,
        // 先创建 Test06 对象,通过对象名调用 m1()方法
        Test06 obj = new Test06();

        new Thread(() -> obj.m1()).start(); // 使用的锁对象是 Test06.class

        // 另一个线程调用 sm2()方法
        new Thread(new Runnable() {
            @Override
            public void run() { // 静态方法通过类名直接调用即可
                Test06.sm2(); // 使用的锁对象是 Test06.class
            }
        }).start();
    }

    public void m1() {
        synchronized (Test06.class) { // 注意这里
            for (int i = 1; i <= 2000; i++) {
                System.out.println(Thread.currentThread().getName() + " --> " + i);
            }
        }
    }

    // 使用当前类的运行时类对象作为锁对象,可以简单的理解 为把 Test06 类的字节码文件作为锁对象
    public synchronized static void sm2() {
        for (int i = 1; i <= 2000; i++) {
            System.out.println(Thread.currentThread().getName() + " --> " + i);
        }
    }

}
3、synchronized 同步方法与同步代码块如何选择
同步方法锁的粒度粗,执行效率低,同步代码块执行效率高
public class Test07 {
    public static void main(String[] args) {
        Test07 obj = new Test07();
        new Thread(() -> obj.doLongTimeTask2()).start();
        new Thread(() -> obj.doLongTimeTask2()).start();
    }

    // 同步方法,执行效率低
    public synchronized void doLongTimeTask() {
        try {
            long start = System.currentTimeMillis();
            Thread.sleep(3000); // 模拟任务需要准备3秒钟
            System.out.println("开始同步");
            for (int i = 1; i <= 2000; i++) {
                System.out.println(Thread.currentThread().getName() + "-->" + i);
            }
            System.out.println("同步方法耗时:" + (System.currentTimeMillis() - start) + "毫秒");
        } catch (InterruptedException e) {
            e.printStackTrace();
        }
    }

    // 同步代码块,锁的粒度细,执行效率高
    public void doLongTimeTask2() {
        try {
            long start = System.currentTimeMillis();
            Thread.sleep(3000); // 模拟任务需要准备3秒钟
            synchronized (this) {
                System.out.println("开始同步代码块");
                for (int i = 1; i <= 2000; i++) {
                    System.out.println(Thread.currentThread().getName() + "-->" + i);
                }
            }
            System.out.println("同步代码块耗时:" + (System.currentTimeMillis() - start) + "毫秒");
        } catch (InterruptedException e) {
            e.printStackTrace();
        }
    }
}
- 脏读
脏读就是读取属性值时出现了一些意外,读取的是中间值,而不是修改之后的值。
出现脏读的原因是,对共享数据的修改与对共享数据的读取不同步。
解决方法:不仅对修改数据的代码块进行同步,还要对读取数据的代码块同步。
即:使用锁,保障线程的安全性,必须满足以下条件:
这些线程在访问共享数据时必须使用同一个锁,即使是读取共享数据的线程也需要使用同步锁。
public class Test08 {
    public static void main(String[] args) throws InterruptedException {
        // 开启子线程设置用户名和密码
        PublicValue publicValue = new PublicValue(); // publicValue对象 此时是"MySQL","123456"
        SubThread t1 = new SubThread(publicValue);
        t1.start(); // run方法执行会修改名字和密码,但是修改密码需要1000毫秒的时间,然后输出结果
        // 为了确定设置成功,主线程睡了100毫秒,肯定先执行完,修改的名字、密码应该看不到
        Thread.sleep(100);
        // 在 main 线程中读取用户名、密码
        publicValue.getValue();
    }

    // 定义线程,设置用户名和密码
    static class SubThread extends Thread {
        private PublicValue publicValue;

        public SubThread(PublicValue publicValue) {
            this.publicValue = publicValue;
        }

        @Override
        public void run() {
            publicValue.setValue("Linux", "root");
        }
    }

    static class PublicValue {
        private String name = "MySQL";
        private String pwd = "123456";

//        public synchronized void getValue() {
        public void getValue() {
            System.out.println(Thread.currentThread().getName() + ", getter -- name: " + name + ", --pwd: " + pwd);
        }

        public synchronized void setValue(String name, String pwd) {
//        public void setValue(String name, String pwd) {
            this.name = name;
            try {
                Thread.sleep(1000); // 给 name 属性赋值后,修改线程睡眠1秒
            } catch (InterruptedException e) {
                e.printStackTrace();
            }
            this.pwd = pwd;
            System.out.println(Thread.currentThread().getName() + ", setter --name:" + name + ", --pwd: " + pwd);
        }
    }
}
修改数据的代码块进行同步,读取数据的代码块没有同步,结果是:
main, getter -- name: Linux, --pwd: 123456
Thread-0, setter --name:Linux, --pwd: root
- 线程出现异常会自动释放锁
在重写的 run() 方法中,我们只能够进行异常的捕获而不能够抛出异常,原因是因为在 Runnable 接口中,run() 方法没有抛出异常,则实现 Runnable 的子类或者接口就无法抛出异常(子类在重写父类方法时只能够抛出与父类相同的异常或者父类异常的子类)。
两种情况要注意,
1、比如下面的 m1() 方法,如果在该方法内部对可能的 FileNotFoundException 进行 try - catch,那么捕获异常后,不会释放锁,继续往下走。直到碰见非必须捕获的异常,比如 NumberFormatException,才自动释放锁。
2、假如下面的 m1() 方法,如果在该方法内部没有对可能的 FileNotFoundException 进行 try - catch,那么重写的 run() 方法就必须对可能的 FileNotFoundException 进行 try - catch ,一旦捕获到异常,线程就会自动释放锁。
把上面的搞混了,正常的程序捕获了异常,如果没有再向外抛的话,依旧会继续往下走,和线程没关系。
public class Test09 {
    public static void main(String[] args) throws UnsupportedEncodingException {
        // 创建两个线程,分别调用 m1()方法
        // 先创建 Test09 对象,通过对象名调用 m1()方法
        Test09 obj = new Test09();

        new Thread(() -> obj.m1()).start(); // 使用的锁对象是 obj
        new Thread(() -> Test09.sm2()).start(); // 静态方法通过类名直接调用即可,使用的锁对象是 Tes't09.class
    }

    // 使用 synchronized 修饰的静态方法,可以简单的理解为为把 Test09 类的字节码文件作为锁对象
    public synchronized static void sm2() {
        for (int i = 1; i <= 100; i++) {
            System.out.println(Thread.currentThread().getName() + " 正常 " + i);
        }
    }

    // 使用当前类的运行时类对象作为锁对象,可以简单的理解为把 Test09 类的字节码(.class)文件作为锁对象
    public void m1() {
        synchronized (Test09.class) {
            for (int i = 1; i <= 100; i++) {
                System.out.println(Thread.currentThread().getName() + " 异常 " + i);

                // IOException及其子类,是必须要捕获的异常
                if (i == 55) {
                    try {
                        System.out.println("==========");
                        InputStream input = new FileInputStream("不存在的文件");
                    } catch (FileNotFoundException e) {
                        System.out.println("----------");
                        e.printStackTrace();
                    }
                }

                //把字符串转换为 int 类型时,,如果字符串不符合,数字格式会产生异常
                if (i == 60) {
                    // 不需要捕获的异常,包括Error及其子类,RuntimeException及其子类。
                    Integer.parseInt("abc");
                }
            }
        }
    }
}
- 死锁
在多线程程序中,同步时可能需要使用多个锁,如果获得锁的顺序不一致,可能会导致死锁。比如下面的程序:
public class Test10 {
    public static void main(String[] args) {

        SubThread t1 = new SubThread();
        t1.setName("a");
        t1.start();

        SubThread t2 = new SubThread();
        t2.setName("b");
        t2.start();

    }

    static class SubThread extends Thread {
        private static final Object obj1 = new Object();
        private static final Object obj2 = new Object();

        @Override
        public void run() {
            if ("a".equals(Thread.currentThread().getName())) {
                synchronized (obj1) {
                    try {
                        Thread.sleep(200);//睡一会儿,必死锁
                    } catch (InterruptedException e) {
                        e.printStackTrace();
                    }
                    System.out.println("a 线程获得了 obj1 锁,还需 要获得 obj2 锁");
                    synchronized (obj2) {
                        System.out.println("a 线程获得 obj1 后又 获得了 obj2,可以想干任何想干的事");
                    }
                }
            }
            if ("b".equals(Thread.currentThread().getName())) {
                synchronized (obj2) {
                    System.out.println("b 线程获得了 obj2 锁,还需要获得 obj1 锁");
                    synchronized (obj1) {
                        System.out.println("b 线程获得 obj2 后又 获得了 obj1,可以想干任何想干的事");
                    }
                }
            }
        }
    }
}
当需要获得多个锁时,所有线程获得锁的顺序保持一致即可避免死锁。如下修改:
        public void run() {
            if ("a".equals(Thread.currentThread().getName())) {
                synchronized (obj1) {
                    try {
                        Thread.sleep(200);//睡一会儿,必死锁
                    } catch (InterruptedException e) {
                        e.printStackTrace();
                    }
                    System.out.println("a 线程获得了 obj1 锁,还需 要获得 obj2 锁");
                    synchronized (obj2) {
                        System.out.println("a 线程获得 obj1 后又 获得了 obj2,可以想干任何想干的事");
                    }
                }
            }
            if ("b".equals(Thread.currentThread().getName())) {
                synchronized (obj1) {
                    System.out.println("b 线程获得了 obj2 锁,还需要获得 obj1 锁");
                    synchronized (obj2) {
                        System.out.println("b 线程获得 obj2 后又 获得了 obj1,可以想干任何想干的事");
                    }
                }
            }
        }
- 轻量级同步机制:volative 关键字
volatile 与 synchronized 比较
1)volatile 关键字是线程同步的轻量级实现,所以 volatile 性能肯定比 synchronized 要好;volatile 只能修饰变量,而 synchronized 可以修饰方法,代码块。随着 JDK 新版本的发布,synchronized 的执行效率也有较大的提升,在开发中使用 sychronized 的比率还是很大的。
2)多线程访问 volatile 变量不会发生阻塞,而synchronized可能会阻塞。
3)volatile 能保证数据的可见性和有序性,但是不能保证原子性;而synchronized 可以保证可见性和有序性,也可以保证原子性。
4)关键字 volatile 解决的是变量在多个线程之间的可见性;synchronized 关键字解决多个线程之间访问公共资源的同步性。
1、volatile 的作用可以强制线程从公共内存中读取变量的值,而不是从工作内存中读取,使得变量在多个线程之间可见。下面这个例子举得不太好,
public class Test02 {

    public static void main(String[] args) {
        PrintString printString = new PrintString();
        // 开启子线程,让子线程执行 printString 对象的 printStringMethod()方法
        new Thread(() -> printString.printStringMethod()).start();

        // main 线程睡眠 1000 毫秒
        try {
            Thread.sleep(1000);
        } catch (InterruptedException e) {
            e.printStackTrace();
        }
        System.out.println("在 main 线程中修改打印标志——修改开始");
        printString.setContinuePrint(false);
        System.out.println("在 main 线程中修改打印标志——修改完成");
        //程序运行,查看在 main 线程中修改了打印标志之后 ,子线程打印是否可以结束打印

        // 程序运行后, 可能会出现死循环情况
        // 分析原因: main 线程修改了 printString 对象的打印标志后, 子线程读不到
        // 解决办法: 使用 volatile 关键字修饰 printString 对象的打印标志。
        // volatile 的作用可以强制线程从公共内存中读取变量的值,而不是从工作内存中读取
    }

    //定义类打印字符串
    static class PrintString {
//        private volatile boolean continuePrint = true;
        private boolean continuePrint = true;

        public PrintString setContinuePrint(boolean continuePrint) {
            this.continuePrint = continuePrint;
            return this;
        }

        public void printStringMethod() {
            System.out.println(Thread.currentThread().getName() + "开始....");
//            弹幕:jvm将while循环中的判断条件continuePrint优化为了true(不再是continuePrint这个变量)
//            而循环体内如果是变量的运算和判断,仍然会进入死循环
            while (continuePrint) {
                // 如果是空的循环体,并且volatile没有修饰continuePrint。那么永远不会打印“结束++++++++”
                // 如果是空的循环体,并且volatile修饰了continuePrint。会打印“结束++++++++”
                // 如果不是空循环体,并且volatile没有修饰continuePrint。会打印“结束++++++++”
                System.out.println(Thread.currentThread().getName());
                /*try {
                    Thread.sleep(500);
                } catch (InterruptedException e) {
                    e.printStackTrace();
                }*/
            }
            System.out.println(Thread.currentThread().getName() + "结束++++++++");
        }
    }
}
2、volatile 非原子特性
volatile 关键字增加了实例变量在多个线程之间的可见性,但是不具备原子性.。
public class Test03 {
    public static void main(String[] args) {
        // 在 main 线程中创建 100 个子线程
        for (int i = 0; i < 100; i++) {
            new MyThread().start();
        }
    }

    static class MyThread extends Thread {
        @Override
        public void run() {
            addCount();
        }

        public volatile static int count;

        public static void addCount() {
            //此处for循环,如果一次完整执行,应该是1000,1000的累加
            for (int i = 0; i < 1000; i++) {
                count++; // count++不是原子操作
            }
            System.out.println(Thread.currentThread().getName() + " count=" + count);
        }

        /*
        static修饰的变量,可以让 main 方法中100个线程可以共享。
        volatile 关键仅仅是表示所有线程从主内存读取 count 变量的值,原子操作还是不能保证。
        addCount()这段代码运行后不是线程安全的,想要线程安全,需要使用 synchronized 进行同步。
        如果使用 synchronized 同时,也就不需要 volatile 关键字了。
        */

        /*public static int count;

        public synchronized static void addCount() {
            //此处for循环,如果一次完整执行,因该是1000,1000的累加
            for (int i = 0; i < 1000; i++) {
                count++;
            }
            System.out.println(Thread.currentThread().getName() + " count=" + count);
        }*/
    }
}
- 常用原子类进行自增自减操作
我们知道 i++ 操作不是原子操作,除了使用Synchronized 进行同步外,也可以使用 AtomicInteger/AtomicLong 原子类进行实现。
public class Test04 {
    public static void main(String[] args) throws InterruptedException {
        // 在 main 线程中创建 1000 个子线程
        for (int i = 0; i < 1000; i++) {
            new MyThread().start();
        }
        Thread.sleep(1000); // main 线程休眠1秒
        System.out.println(MyThread.count.get());
    }

    static class MyThread extends Thread {
        // 使用 AtomicInteger 对象,static 修饰的变量可以让 main 方法中100个线程可以共享。
        private static AtomicInteger count = new AtomicInteger();

        public static void addCount() {
            for (int i = 0; i < 10000; i++) {
                count.getAndIncrement();
            }
            System.out.println(Thread.currentThread().getName() + " count=" + count.get());
        }

        @Override
        public void run() {
            addCount();
        }
    }
}
- CAS
CAS(Compare And Swap)是由硬件实现的。CAS 可以将 read - modify - write 这类的操作转换为原子操作。
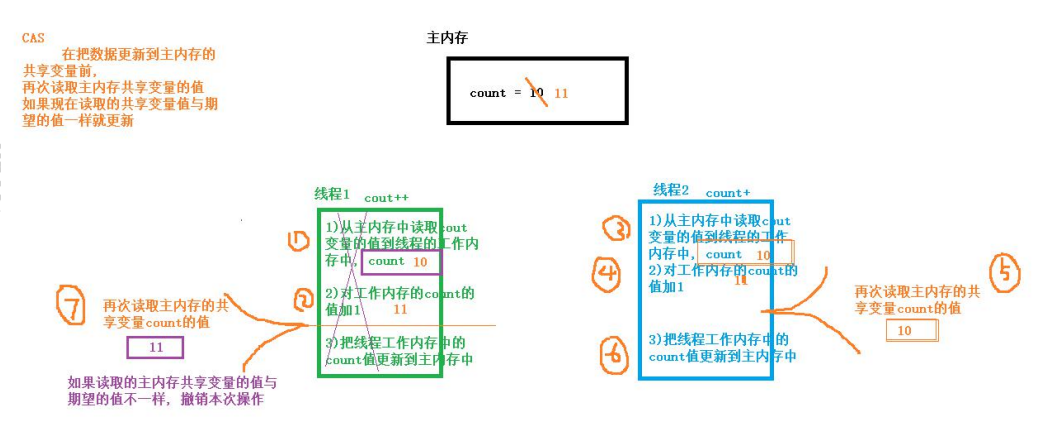
i++ 自增操作包括三个子操作:
从主内存读取 i 变量值
对 i 的值加 1
再把加 1 之后 的值保存到主内存CAS
原理:在把数据更新到主内存时,再次读取主内存变量的值,如果现在变量的值与期望的值(操作起始时读取的值)一样就更新。
使用 CAS 实现线程安全的计数器
public class CASTest {
    public static void main(String[] args) {
        CASCounter casCounter = new CASCounter();
        for (int i = 0; i < 2000; i++) {
            new Thread(() -> System.out.println(Thread.currentThread().getName() + ":" + casCounter.incrementAndGet())).start();
        }
    }
}

class CASCounter {
    volatile private long value; // 使用 volatile 修饰 value 值,使线程可见。默认值是0

    // 定义自增的方法
    public long incrementAndGet() {
        long oldValue;
        long newValue;
        do {
            oldValue = value; // 第一次时把默认值0赋值给 oldvalue:0
            newValue = oldValue + 1; // 第一次 oldvalue 的值+1后,再赋值给 newValue:1
        } while (!compareAndSwap(oldValue, newValue));
        return newValue;
    }

    // 定义 comare and swap 方法
    private boolean compareAndSwap(long expectedValue, long newValue) {
        // 如果当前 value 的值与期望的 expectedVAlue 值一样,
        // 就把当前的 Value 字段替换为 newValue 值
        // 修改值要同步,即 synchronized
        synchronized (this) {
            if (value == expectedValue) {
                value = newValue;
                return true;
            } else {
                return false;
            }
        }
    }
}
CAS 实现原子操作背后有一个假设:共享变量的当前值与当前线程提供的期望值相同,就认为这个变量没有被其他线程修改过。
实际上这种假设不一定总是成立,如有共享变量 count = 0
A 线程对 count 值修改为 10
B 线程对 count 值修改为 20
C 线程对 count 值修改为 0
当前线程看到 count 变量的值现在是0,现在是否认为 count 变量的值没有被其他线程更新呢?这种结果是否能够接受??
这就是 CAS 中的 ABA 问题,即共享变量经历了A -> B ->A 的更新。是否能够接收 ABA 问题跟实现的算法有关。
如果想要规避 ABA 问题,可以为共享变量引入一个修订号(时间戳),每次修改共享变量时,相应的修订号就会增加1。 ABA变量更新过程变量:[A,0] -> [B,1] -> [A,2],每次对共享变量的修改都会导致修订号的增加,通过修订号依然可以准确判断变量是否被其他线程修改过。AtomicStampedReference 类就是基于这种思想产生的。
- 原子变量类
原子变量类基于CAS实现的,当对共享变量进行 read - modify - write 更新操作时,通过原子变量类可以保障操作的原子性与可见性。对变量的 read - modify - write 更新操作是指当前操作不是一个简单的赋值,而是变量的新值依赖变量的旧值,如自增操作 i++。由于 volatile 只能保障可见性和有序性,无法保障原子性,原子变量类内部就是借助一个Volatile 变量,并且保障了该变量的 read-modify-write 操作的原子性,有时把原子变量类看作增强的 volatile 变量。原子变量类有12 个,如:
| 分组 | 原子变量类 |
|---|---|
| 基础数据型 | AtomicInteger, AtomicLong, AtomicBoolean |
| 数组型 | AtomicIntegerArray, AtomicLongArray, AtomicReferenceArray |
| 字段更新器 | AtomicIntegerFieldUpdater, AtomicLongFieldUpdater, AtomicReferenceFieldUpdater |
| 引用型 | AtomicReference, AtomicStampedReference, AtomicMarkableReference |
1、AtomicLong
使用原子变量类定义一个计数器,该计数器在整个程序中都能使用,并且所有的地方都使用这一个计数器,因此这个计数器可以设计为单例
public class Indicator { // 饿汉式单例模式
    /*
    优点:这种写法比较简单,就是在类装载的时候就完成实例化。避免了线程同
    步问题。
    缺点:在类装载的时候就完成实例化,没有达到 Lazy Loading 的效果。如果从始
    至终从未使用过这个实例,则会造成内存的浪费。
    */
    //构造方法私有化
    private Indicator() {
    }

    // 定义一个私有的本类静态的对象
    private static final Indicator INSTANCE = new Indicator();

    // 3)提供一个公共静态方法返回该类唯一实例。饿汉式单例模式
    public static Indicator getInstance() {
        return INSTANCE;
    }

    // 使用原子变量类保存请求总数,成功数,失败数
    private final AtomicLong requestCount = new AtomicLong(0); // 记录请求总数
    private final AtomicLong successCount = new AtomicLong(0); // 处理成功总数
    private final AtomicLong fialureCount = new AtomicLong(0); // 处理失败总数

    //有新的请求
    public void newRequestReceive() { requestCount.incrementAndGet(); }
    // 处理成功
    public void requestProcessSuccess() { successCount.incrementAndGet(); }
    // 处理失败
    public void requestProcessFailure() { fialureCount.incrementAndGet(); }

    // 查看总数,成功数,失败数
    public long getRequestCount() {  return requestCount.get(); }
    public long getSuccessCount() { return successCount.get(); }
    public long getFailureCount() { return fialureCount.get(); }

}

public class Test {
    public static void main(String[] args) {
        // 通过线程模拟请求,在实际应用中可以在 ServletFilter 中
        // 调用 Indicator计数器的相关方法
        for (int i = 0; i < 10000; i++) {
            new Thread(() -> {
                // 每个线程就是一个请求,请求总数要加 1
                Indicator.getInstance().newRequestReceive();
                int num = new Random().nextInt();
                if (num % 2 == 0) { // 偶数模拟成功
                    Indicator.getInstance().requestProcessSuccess();
                } else { // 处理失败
                    Indicator.getInstance().requestProcessFailure();
                }
            }).start();
        }
        try {
            Thread.sleep(3000); // 主线程睡3秒,保障10000线程能执行完毕
        } catch (InterruptedException e) {
            e.printStackTrace();
        }

        //打印结果
        System.out.println(Indicator.getInstance().getRequestCount()); // 总的请求数
        System.out.println(Indicator.getInstance().getSuccessCount()); // 成功数
        System.out.println(Indicator.getInstance().getFailureCount()); // 失败数
    }
}
2、AtomicIntegerArray
原子更新数组
public class Test {
    public static void main(String[] args) {
        // 1)创建一个指定长度的原子数组
        AtomicIntegerArray atomicIntegerArray = new AtomicIntegerArray(10);
        System.out.println(atomicIntegerArray); // [0, 0, 0, 0, 0, 0, 0, 0, 0, 0]
        // 2)返回指定位置的元素
        System.out.println(atomicIntegerArray.get(0)); // 0
        System.out.println(atomicIntegerArray.get(1)); // 0
        // 3)设置指定位置的元素
        atomicIntegerArray.set(0, 10);
        // 在设置数组元素的新值时,同时返回数组元素的旧值
        System.out.println(atomicIntegerArray.getAndSet(1, 11)); // 0
        System.out.println(atomicIntegerArray); // [10, 11, 0, 0, 0, 0, 0, 0, 0, 0]
        // 4)修改数组元素的值,把数组元素加上某个值
        System.out.println(atomicIntegerArray.addAndGet(0, 22)); // 32
        System.out.println(atomicIntegerArray.getAndAdd(1, 33)); // 11
        System.out.println(atomicIntegerArray); // [32, 44, 0, 0, 0, 0, 0, 0, 0, 0]
        // 5)CAS 操作
        // 如果数组中索引值为0的元素的值是32,就修改为 222
        System.out.println(atomicIntegerArray.compareAndSet(0, 32, 222)); // true
        System.out.println(atomicIntegerArray); // [222, 44, 0, 0, 0, 0, 0, 0, 0, 0]
        System.out.println(atomicIntegerArray.compareAndSet(1, 11, 333)); // false
        System.out.println(atomicIntegerArray);
        // 6)自增/自减
         System.out.println( atomicIntegerArray.incrementAndGet(0) ); // 223,相当于前缀++
        System.out.println(atomicIntegerArray.getAndIncrement(1)); // 44,相当于后缀++
        System.out.println(atomicIntegerArray); // [223, 45, 0, 0, 0, 0, 0, 0, 0, 0]
        System.out.println(atomicIntegerArray.decrementAndGet(2)); // -1
        System.out.println(atomicIntegerArray); // [223, 45, -1, 0, 0, 0, 0, 0, 0, 0]
        System.out.println(atomicIntegerArray.getAndDecrement(3)); // 0
        System.out.println(atomicIntegerArray); // [223, 45, -1, -1, 0, 0, 0, 0, 0, 0]
    }
}
3、在多线程中使用 AtomicIntegerArray 原子数组
public class Test02 {
    // 定义原子数组,数组大小是10,初始默认值都是0
    static AtomicIntegerArray atomicIntegerArray = new AtomicIntegerArray(10);

    public static void main(String[] args) {
        Thread[] threads = new Thread[10]; // 定义线程数组,里面都是默认值 null
        for (int i = 0; i < threads.length; i++) {
            threads[i] = new AddThread(); // 给空的线程数组赋值,赋 threads.length 个线程对象
        }

        for (Thread thread : threads) {
            thread.start(); // 开启子线程
        }
        // 在主线程中查看自增完以后原子数组中的各个元素(线程对象)的值,在主线程中需要在所有子线程都执行完后再查看
        // 把所有的子线程合并到当前主线程中。
        for (Thread thread : threads) {
            try {
                thread.join(); // 在主线程中需要在所有子线程都执行完!
            } catch (InterruptedException e) {
                e.printStackTrace();
            }
        }
        System.out.println(atomicIntegerArray);
    }

    //定义一个线程类,在线程类中修改原子数组,把原子数组的每个元素自增 1000 次
    static class AddThread extends Thread {
        @Override
        public void run() {
            for (int j = 0; j < 1000; j++) {
                for (int i = 0; i < atomicIntegerArray.length(); i++) {
                    atomicIntegerArray.getAndIncrement(i % atomicIntegerArray.length());

                }
            }

            /*
            // 给数组的每个元素自增一次
            atomicIntegerArray.getAndIncrement(0);
            atomicIntegerArray.getAndIncrement(1);
            // ......对数组里的10个元素分别自增,i++
            atomicIntegerArray.getAndIncrement(9);

            // 和上面的等价
            for(int i = 0; i < 10; i++){
                atomicIntegerArray.getAndIncrement(i % atomicIntegerArray.length());
            }

            // 如果要自增1000此就是把上面的代码执行1000次,可以写成循环

            for(int j = 0; j < 1000; j++){
                atomicIntegerArray.getAndIncrement(0);
                atomicIntegerArray.getAndIncrement(1);
                // ......对数组里的10个元素分别自增
                atomicIntegerArray.getAndIncrement(9);
            }

            for(int j = 0; j < 1000; j++){
                for(int i = 0; i < 10; i++){
                    atomicIntegerArray.getAndIncrement(i % atomicIntegerArray.length());
                }
            }
            // 这个特殊的循环又可以合二为一,直接小于10000
            for(int i = 0; i < 10000; i++){
                atomicIntegerArray.getAndIncrement(i % atomicIntegerArray.length());
            }
            */
        }
    }
}
4、AtomicIntegerFieldUpdater
AtomicIntegerFieldUpdater 可以对原子整数字段进行更新,要求:
1)字符必须使用 volatile 修饰,使线程之间可见
2)只能是实例变量,不能是静态变量,也不能使用 final 修饰
public class User {
    int id;
//    AtomicIntegerFieldUpdater 可以对原子整数字段进行更新
//    使用 AtomicIntegerFieldUpdater 更新的字段必须使用 volatile 修饰
    volatile int age;

    public User(int id, int age) {
        this.id = id;
        this.age = age;
    }

    @Override
    public String toString() {
        return "User{" + "id=" + id + ", age=" + age + '}';
    }
}

public class SubThread extends Thread {
    private User user; //要更新的 User 对象
    // 创建 AtomicIntegerFieldUpdater 更新器,这玩意儿是抽象类,不要new,否则要继承所有方法,否则此类为抽象类
    /*
    @CallerSensitive
    public static <U> AtomicIntegerFieldUpdater<U> newUpdater(Class<U> tclass, String fieldName) {
        return new AtomicIntegerFieldUpdaterImpl<U> (tclass, fieldName, Reflection.getCallerClass());
    }
    */
    private AtomicIntegerFieldUpdater<User> updater = AtomicIntegerFieldUpdater.newUpdater(User.class, "age");

    public SubThread(User user) {
        this.user = user;
    }

    @Override
    public void run() {
        //在子线程中对 user 对象的 age 字段自增 10 次
        for (int i = 0; i < 10; i++) {
            System.out.println(updater.getAndIncrement(user));
        }
    }
}

public class Test {
    public static void main(String[] args) {
        User user = new User(1234, 10);
        // 开启 10 个线程,更新同一个user
        for (int i = 0; i < 10; i++) {
            new SubThread(user).start();
        }
        try {
            Thread.sleep(1000); // 睡眠的目的,等10个线程都完毕
        } catch (InterruptedException e) {
            e.printStackTrace();
        }
        System.out.println(user);
    }
}
5、AtomicReference
AtomicReference 可以原子读写一个对象,使用 String 作为测试的引用类型
public class Test01 {
    // 创建一个 AtomicReference 对象
    static AtomicReference<String> atomicReference = new AtomicReference<>("abc");

    public static void main(String[] args) throws InterruptedException {
        // 创建 100 个线程修改字符串
        for (int i = 0; i < 100; i++) {
            new Thread(() -> {
                try {
                    Thread.sleep(new Random().nextInt(20));
                } catch (InterruptedException e) {
                    e.printStackTrace();
                }
                if (atomicReference.compareAndSet("abc", "def")) {
                    System.out.println(Thread.currentThread().getName() + "把字符串 abc 更改为 def");
                }
            }).start();
        }

        //再创建 100 个线程

        for (int i = 0; i < 100; i++) {
            new Thread(() -> {
                try {
                    Thread.sleep(new Random().nextInt(20));
                } catch (InterruptedException e) {
                    e.printStackTrace();
                }
                if (atomicReference.compareAndSet("def", "abc")) {
                    System.out.println(Thread.currentThread().getName() + "把字符串 还原为 abc");
                }
            }).start();
        }

        Thread.sleep(1000); // 主线程睡觉1秒,等线程执行完
        System.out.println(atomicReference.get());
        // 输出的少,说明cpu太快了。前100个线程等到第二批100个线程开始执行的时候,已经完成了
        // 所以在比较当前读取的值与主内存不一致,就直接跳过了,不修改
        // 所以睡眠就是让它多打印一些
    }
}
6、演示 AtomicReference 可能会出现 CAS 的 ABA 问题
// 演示 AtomicReference 可能会出现 CAS 的 ABA 问题
public class Test02 {
    private static AtomicReference<String> atomicReference = new AtomicReference<>("abc");

    public static void main(String[] args) throws InterruptedException {
        // 创建第一个线程,先把 abc 字符串改为 def ,再把字符串还原为 abc
        Thread t1 = new Thread(() -> {
            atomicReference.compareAndSet("abc", "def");
            System.out.println(Thread.currentThread().getName() + "--" + atomicReference.get());
            atomicReference.compareAndSet("def", "abc");
        });

        // 创建第二个线程,如果是 abc 就更新为 ghg
        Thread t2 = new Thread(() -> {
            try {
                TimeUnit.SECONDS.sleep(1);
            } catch (InterruptedException e) {
                e.printStackTrace();
            }
            System.out.println(Thread.currentThread().getName() + "--" + atomicReference.compareAndSet("abc", "ghg"));
        });
        t1.start();
        t2.start();
        t1.join(); // main 等待 t1 执行完毕
        t2.join(); // main 等待 t2 执行完毕
        System.out.println(Thread.currentThread().getName() + "--" + atomicReference.get());
    }
}
7、AtomicStampedReference 原子类可以解决 CAS 中的 ABA 问题
在 AtomicStampedReference 原子类中有一个整数标记值 stamp,每次执行 CAS 操作时,需要对比它的版本,即比较 stamp 的值
public class Test03 {
    // private static AtomicReference<String> atomicReference = new AtomicReference<>("abc");
    // 定义 AtomicStampedReference 引用操作 abc 字符串,指定初始化版本号为 0
    private static AtomicStampedReference<String> stampedReference = new AtomicStampedReference<>("abc", 0);

    public static void main(String[] args) throws InterruptedException {

        Thread t1 = new Thread(new Runnable() {
            @Override
            public void run() {
                // public boolean compareAndSet(V expectedReference, V newReference, int expectedStamp, int newStamp)
                stampedReference.compareAndSet("abc", "def", stampedReference.getStamp(), stampedReference.getStamp() + 1);
                System.out.println("t1--" + stampedReference.getReference() + "--t1--" + stampedReference.getStamp());
                stampedReference.compareAndSet("def", "abc", stampedReference.getStamp(), stampedReference.getStamp() + 1);
                System.out.println("t1##" + stampedReference.getReference() + "##t1##" + stampedReference.getStamp());
                // 新来的注意了,这是错误了 虽然一条替换是原子操作,但是 run() 里面写了两个替换就不是原子操作了
            }
        });

        Thread t2 = new Thread(new Runnable() {
            @Override
            public void run() {
                int stamp = stampedReference.getStamp(); // 这里获得版本号,可以防止 ABA
                try {
                    TimeUnit.SECONDS.sleep(2); // 睡的过程中,t3线程如果修改了 stamp,下面期待的和实际的 stamp 不一样
                } catch (InterruptedException e) {
                    e.printStackTrace();
                }
//                int stamp = stampedReference.getStamp(); // 获得版本号,不能防止ABA
                System.out.println("t2--" + stampedReference.getReference() + "--t2--" + stamp);
                System.out.println(stampedReference.compareAndSet("abc", "ggg", stamp, stamp + 1));
            }
        });

        Thread t3 = new Thread(new Runnable() {
            @Override
            public void run() {
                stampedReference.compareAndSet("abc", "def", stampedReference.getStamp(), stampedReference.getStamp() + 1);
                System.out.println("t3--" + stampedReference.getReference() + "--t3--" + stampedReference.getStamp());
                stampedReference.compareAndSet("def", "abc", stampedReference.getStamp(), stampedReference.getStamp() + 1);
                System.out.println("t3##" + stampedReference.getReference() + "##t3##" + stampedReference.getStamp());
                // 新来的注意了,这是错误了 虽然一条替换是原子操作,但是 run() 里面写了两个替换就不是原子操作了
            }
        });

        t1.start();
        t2.start();
        t3.start();
        t1.join();
        t2.join();
        t3.join();
        System.out.println(stampedReference.getReference());
    }
}
线程间的通信
- 等待/通知机制
在单线程编程中,如果要执行的操作需要满足一定的条件才能执行,可以把这个操作放在 if 语句块中。
在多线程编程中,可能 A 线程的条件只是暂时没有满足,稍后其他的线程 B 可能会更新条件使得 A 线程的条件得到满足。 那么我们可以先将A线程暂停,直到它的条件得到满足后再将 A 线程唤醒。它的伪代码:
atomics { // 原子操作
	while( 条件不成立 ) {
		等待
	}
当前线程被唤醒条件满足后,继续执行下面的操作
}
Object 类中的 wait() 方法可以使执行当前代码的线程等待,暂停执行,直到接到通知或被中断为止。注意:
1)wait() 方法只能在同步代码块中由锁对象调用
2)调用 wait() 方法,当前线程会释放锁其伪代码如下:
// 在调用 wait() 方法前获得对象的内部锁
synchronized ( 锁对象 ) {
	while( 条件不成立 ) {
	// 通过锁对象调用 wait() 方法暂停线程,会释放锁对象
	锁对象.wait();
	}
	// 线程的条件满足了继续向下执行
}
Object 类的 notify() 可以唤醒线程,该方法也必须在同步代码块中由锁对象调用。没有使用锁对象调用 wait()/notify() 会抛出 IlegalMonitorStateExeption 异常。如果有多个等待的线程,notify() 方法只能唤醒其中的一个。 在同步代码块中调用 notify() 方法后,并不会立即释放锁对象,需要等当前同步代码块执行完后才会释放锁对象,一般将 notify() 方法放在同步代码块的最后。它的伪代码如下:
synchronized ( 锁对象 ){
	// 执行修改保护条件的代码
	// 唤醒其他线程
	锁对象.notify();
}
任何对象都可以调用 wati() 和 notify() ,这两个方法是从Object继承来的,但是,wati() 和notify() 方法需要放到同步代码块当中,否则会抛出java.lang.IllegalMonitorStateException异常。
public class Test03Notify {
    public static void main(String[] args) throws InterruptedException {
        String str = "wkcto"; // 定义一个字符串作为锁对象
        Thread t1 = new Thread(new Runnable() {
            @Override
            public void run() {
                synchronized (str) {
                    System.out.println("线程 1 开始等待: " + System.currentTimeMillis());
                    try {
                        str.wait(); // 线程等待,会释放锁对象
                    } catch (InterruptedException e) {
                        e.printStackTrace();
                    }
                    System.out.println("线程 1 结束等待: " + System.currentTimeMillis());
                }
            }
        });

        //定义第二个线程,在第二个线程中唤醒第一个线程
        Thread t2 = new Thread(new Runnable() {
            @Override
            public void run() {
                // notify() 方法也需要在同步代码块中,由锁对象调用
                synchronized (str) {
                    System.out.println("线程 2 开始唤醒: " + System.currentTimeMillis());
                    str.notify(); // 唤醒在 lock 锁对象上等待的某一个线程
                    // 注意,并没有立即释放锁对象,要等代码块执行完毕才能释放锁对象
                    System.out.println("线程 2 结束唤醒: " + System.currentTimeMillis());
                }
            }
        });

        t1.start(); // 开启 t1 线程,t1 线程等待
        Thread.sleep(3000); // main 线程睡眠 3 秒,确保 t1 入睡(转入 blocked 阻塞状态)
        t2.start(); // t1 线程开启 3 秒后,再开启 t2 线程唤醒 t1 线程
    }
}
- notify() 与 notifyAll()、wait() 与 wait(long)
public class Test06NotifyAll {
    public static void main(String[] args) throws InterruptedException {
        Object obj = new Object(); // 定义一个对象作为子线程的锁对象
        SubThread t1 = new SubThread(obj);
        SubThread t2 = new SubThread(obj);
        SubThread t3 = new SubThread(obj);
        t1.setName("t1");
        t2.setName("t2");
        t3.setName("t3");
        t1.start();
        t2.start();
        t3.start();
        Thread.sleep(2000);

        synchronized (obj) {
            // 调用一次 notify()只能唤醒其中的一个线程,其他等待的线程依然处于等待状态,
            // 对于处于等待状态的线程来说,错过了通知信号,这种现象也称为信号丢失
            obj.notify();
//            obj.notifyAll(); // 唤醒所有的线程
        }
    }

    static class SubThread extends Thread {
        private Object obj; //定义实例变量作为锁对象
        public SubThread(Object obj) {
            this.obj = obj;
        }
        @Override
        public void run() {
            synchronized (obj) {
                try {
                    System.out.println(Thread.currentThread().getName() + " -- begin wait...");
                    obj.wait(9000); // 如果 5000 毫秒内没有被唤醒,会自动唤醒
//                    obj.wait(); // 如果上面的唤醒方法不是 notifyAll(),将会一直等
                    System.out.println(Thread.currentThread().getName() + " -- end wait...");
                } catch (InterruptedException e) {
                    e.printStackTrace();
                }
            }
        }
    }
}
当线程处于 wait() 等待状态时,调用线程对象的 interrupt() 方法会中断线程的等待状态,会产生 InterruptedException 异常。
public class Test05Interrupt {
    private static final Object OBJ = new Object(); // 定义常量作为锁对象

    public static void main(String[] args) throws InterruptedException {
        SubThread t = new SubThread();
        t.start();
        Thread.sleep(2000); // 主线程睡眠 2 秒,确保 t 线程处于 Wait 等待状态
        t.interrupt(); // 调用线程对象的 interrupt() 方法会中断线程的 wait()等待,执行catch语句
    }

    static class SubThread extends Thread {
        @Override
        public void run() {
            synchronized (OBJ) {
                try {
                    System.out.println("begin wait...");
                    OBJ.wait(); // 线程等待,会释放锁对象
                    System.out.println("end wait..");
                } catch (InterruptedException e) {
                    System.out.println("wait 等待被中断了****");
                }
            }
        }
    }
}
- 通知过早
线程 wait() 等待后,可以调用 notify() 唤醒线程,如果 notify() 唤醒的过早,在等待之前就调用了 notify() 可能会打乱程序正常的运行逻辑。
public class Test08 {
    public static void main(String[] args) {
        final Object OBJ = new Object(); // 定义对象作为锁对象
        Thread t1 = new Thread(() -> {
            synchronized (OBJ) {
                try {
                    System.out.println("begin wait");
                    OBJ.wait(); // 线程等待,会释放锁对象
                    System.out.println("wait end...");
                } catch (InterruptedException e) {
                    e.printStackTrace();
                }
            }
        });

        Thread t2 = new Thread(() -> {
            synchronized (OBJ) {
                System.out.println("begin notify");
                OBJ.notify();
                System.out.println("end nofity");
            }
        });
        // 如果先开启 t1,再开启 t2 线程,大多数情况下,t1 先等待,t2 再把 t1 唤醒
//         t1.start();
//         t2.start();

        // 如果先开启 t2 通知线程,再开启 t1 等待线程,可能会出现 t1 线程等待没有收到通知的情况
        t2.start();
        t1.start();
    }
}
通知过早,就不等待了
public class Test09 {
    static boolean isFirst = true; // 定义静态变量作为是否第一个运行的线程标志

    public static void main(String[] args) {

        final Object OBJ = new Object(); //定义对象作为锁对象

        Thread t1 = new Thread(new Runnable() {
            @Override
            public void run() {
                synchronized (OBJ) {
                    while (isFirst) { // 当线程是第一个开启的线程就等待,注意这里是 while 而不是 if
                        try {
                            System.out.println("begin wait");
                            OBJ.wait(); // 线程等待,会释放锁对象
                            System.out.println("wait end...");
                        } catch (InterruptedException e) {
                            e.printStackTrace();
                        }
                    }
                }
            }
        });

        Thread t2 = new Thread(new Runnable() {
            @Override
            public void run() {
                synchronized (OBJ) {
                    System.out.println("begin notify");
                    OBJ.notify();
                    System.out.println("end nofity");
                    // 如果t2先运行,通知后,就把第一个线程标志修改为 false,这样就不用等了
                    isFirst = false;
                }
            }
        });

        //如果先开启 t1,再开启 t2 线程,大多数情况下, t1 先等待,t1 再把 t1 唤醒
//         t1.start();
//         t2.start();

        // 如果先开启 t2 通知线程,再开启 t1 等待线程,可能会出现 t1 线程等待没有收到通 知的情况,
        t2.start();
        t1.start();

        //实际上,调用 start() 就是告诉线程调度器,当前线程准备就绪,
        // 线程调度器在什么时候开启这个线程不确定,
        // 即调用 start()方法的顺序,并不一定就是线程实际开启的顺序。

        // 在当前示例中,t1 等待后让 t2 线程唤醒,
        // 如果 t2 线程先唤醒了,就不让 t1 线程等待了
    }
}
wait 等待条件发生了变化
//        wait条件发生变化
//        1、定义一个集合
//        2、定义一个线程向集合中添加数据,添加完数据后通知另外的线程从集合中取数据
//        3、定义一个线程从集合中取数据,如果集合中没有数据就等待
public class Test10 {
    // 1)定义 List 集合
    static List list = new ArrayList<>();

    public static void main(String[] args) {

        ThreadAdd threadAdd = new ThreadAdd(); // 定义添加数据的线程对象
        ThreadSubtract threadSubtract = new ThreadSubtract(); // 定义取数据的线程对象
        threadSubtract.setName("subtract 1 ");

        /*
        //测试一: 先开启添加数据的线程,再开启一个取数据的线程,大多数情况下会正常取数据
         threadAdd.start();
         threadSubtract.start();
         */

        /*
        // 测试二: 先开启取数据的线程,再开启添加数据的线程,
        // 取数据的线程会先等待,等到添加数据之后,再取数据
         threadSubtract.start();
         threadAdd.start();
         */

        // 测试三: 开启两个取数据的线程,再开启添加数据的线程
        ThreadSubtract threadSubtract2 = new ThreadSubtract();
        threadSubtract2.setName("subtract 2 ");
        threadSubtract.start();
        threadSubtract2.start();
        threadAdd.start();

//        某一次执行结果如下:
//        subtract 1 begin wait....
//        subtract 2 从集合中取了 data 后,集合中数据的数量: 0
//        subtract 1 end wait..
//        Exception in thread "subtract 1 " java.lang.IndexOutOfBoundsException: 分析可能的执行顺序:

//        threadSubtract 线程先启动,取数据时,集合中没有数据,wait()等待
//        threadAdd 线程获得 CPU 执行权,添加数据,把 threadSubtract 线程唤醒
//        threadSubtract2 线程开启后获得 CPU 执行权,正常取数据
//        threadSubtract 线程获得 sun.plugin2.gluegen.runtime.CPU 执行权,打印 end wait...,然后再执行 list.remove(0) 取数据时,现在list集合中已经没有数据了,这时会产生 java.lang.IndexOutOfBoundsException 异常
//        出现异常的原因是: 向 list 集合中添加了一个数据,remove()了两次
//
//        如何解决?
//
//        当等待的线程被唤醒后,再判断一次集合中是否有数据可取。即需要把 sutract() 方法中的 if 判断改为 while

    }

    // 2)定义方法从集合中取数据
    public static void subtract() {
        synchronized (list) {
             if (list.size() == 0) {
//            while (list.size() == 0) {
                try {
                    System.out.println(Thread.currentThread().getName() + " begin wait....");
                    list.wait(); // 线程等待,释放锁对象
                    System.out.println(Thread.currentThread().getName() + " end wait..");
                } catch (InterruptedException e) {
                    e.printStackTrace();
                }
            }
            Object data = list.remove(0); // 从集合中取出一个数据
            System.out.println(Thread.currentThread().getName() + "从集合中取了" + data + "后,集合中数据的数量: " + list.size());
        }
    }

    // 3) 定义方法向集合中添加数据后,通知等待的线程取数据
    public static void add() {
        synchronized (list) {
            list.add("data");
            System.out.println(Thread.currentThread().getName() + "存储了一个数据");
            list.notifyAll();
        }
    }

    //4)定义线程类调用 add()取数据的方法
    static class ThreadAdd extends Thread {
        @Override
        public void run() {
            add();
        }
    }

    //定义线程类调用 subtract()方法
    static class ThreadSubtract extends Thread {
        @Override
        public void run() {
            subtract();
        }
    }
}
- 生产者消费者模式
在 Java 中,负责产生数据的模块是生产者,负责使用数据的模块是消费者。 生产者消费者解决数据的平衡问题,即先有数据然后才能使用,没有数据时,消费者需要等待。
// 定义一个操作数据的类
public class ValueOP {
    private String value = "";
    // 定义方法修改 value 字段的值,生产者生产数据
    public void setValue() {
        synchronized (this) {
//            if (!value.equalsIgnoreCase("")) {
            while (!value.equalsIgnoreCase("")) {
                try {
                    this.wait(); // 当 value 值不是空串就进入循环体等待,就是没有被消费,就暂时不生产了
                } catch (InterruptedException e) {
                    e.printStackTrace();
                }
            }
            // 如果 value 字段值是空串,就设置 value 字段的值。传的对象就是 null 啊!
            String value = System.currentTimeMillis() + " - " + System.nanoTime(); // 这个方法主要的应用还是集中在高精度计时上,纳秒级
            System.out.println("set 设置的值是: " + value);
            this.value = value;

//             在多生产者多消费者环境中,notify()不能保证是生产者唤醒消费者,也不确定唤醒的是哪一个消费者
//             如果生产者唤醒的还是生产者可能会出现假死的情况
//             this.notify();
            this.notifyAll();

            /*
            当1个生产者多个消费者或多个生产者多个消费者的场景下,用 notify() 通知 wait() 线程是容易出现假死线程,理解这个现象主要要理解下面两点:
            1、notify() 的唤醒消息发出后只能唤醒一个进入 wait() 的线程,但只是唤醒它,让 CPU 有调度它的可能性,并不是说一定会执行这个被唤醒的线程,是否被执行时随机的;
            2、唤醒了同类的线程,如多个消费者时,当1个消费者消费后应该唤醒异类即生产者的线程,但也可能唤醒的是同类的线程,如果唤醒的是同类线程就有进入假死状态的可能;
            解决方法:用 notifyall() 方法进行通知就可以避免假死现象了。
            */
        }
    }

    // 定义方法读取字段值,消费者消费数据
    public void getValue() {
        synchronized (this) {
//            if (value.equalsIgnoreCase("")) { // 生产,消费,一对一
            while (value.equalsIgnoreCase("")) {
                try {
                    this.wait(); // 如果 value 是空串就等待,没得消费可不就得等吗
                } catch (InterruptedException e) {
                    e.printStackTrace();
                }
            }
            // 不是空串,读取字段值
            System.out.println("get 的值是: " + this.value);
            this.value = "";
            this.notifyAll();
//            在多生产者多消费者环境中,notify() 不能保证是消费者唤醒生产者,
//             如果消费者唤醒的还是消费者可能会出现假死的情况
//            this.notify();
        }
    }
}


// 定义线程类模拟消费者
public class ConsumerThread extends Thread{
    // 消费者使用数据,就是使用 ValueOP 类的 value 字段值
    private ValueOP obj;
    public ConsumerThread(ValueOP obj) {
        this.obj = obj;
    }
    @Override
    public void run() {
        while (true) {
            obj.getValue();
        }
    }
}


// 定义线程类模拟生产者
public class ProducerThread extends Thread {
    // 生产者生产数据就是调用 ValueOP 类的 setValue 方法给 value 字段赋值
    private ValueOP obj;

    public ProducerThread(ValueOP obj) {
        this.obj = obj;
    }

    @Override
    public void run() {
        while (true) {
            obj.setValue();
        }
    }
}

// 两个线程,一个生产者,一个消费者。生产、消费,交替进行
public class Test1 {
    public static void main(String[] args) {
        ValueOP valueOP = new ValueOP();

        ProducerThread producerThread = new ProducerThread(valueOP);
        ConsumerThread consumerThread = new ConsumerThread(valueOP);

        producerThread.start();
        consumerThread.start();

    }
}


// 六个线程,三个生产者,三个消费者。生产、消费,交替进行
public class Test2 {
    public static void main(String[] args) {
        ValueOP valueOP = new ValueOP();
        ProducerThread p1 = new ProducerThread(valueOP);
        ProducerThread p2 = new ProducerThread(valueOP);
        ProducerThread p3 = new ProducerThread(valueOP);
        ConsumerThread c1 = new ConsumerThread(valueOP);
        ConsumerThread c2 = new ConsumerThread(valueOP);
        ConsumerThread c3 = new ConsumerThread(valueOP);
        p1.start();
        p2.start();
        p3.start();
        c1.start();
        c2.start();
        c3.start();
    }
}
- ThreadLocal 的使用
除了控制资源的访问外,还可以通过增加资源来保证线程安全。ThreadLocal 主要解决为每个线程绑定自己的值。
先打断一下,
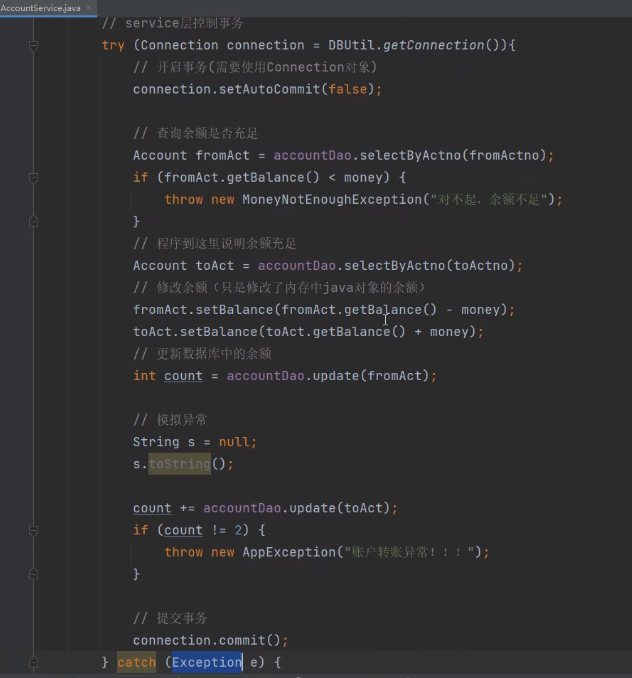
先看一个业务类 AcountService,在没有加 try - catch 语句之前一定会发送 NPE 导致数据不一致,所以手动开启、提交和回滚事务。但是这仍然不能解决事务问题,因为 service 层里面的 connection 对象和 dao 层方法里面的 connection 对象不是同一个,也就是说,控制事务的 connection 对象和操作数据库的 connection 对象不是同一个。
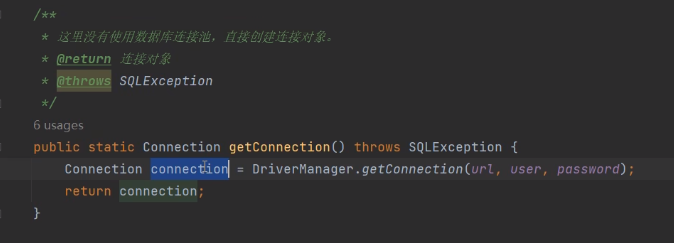
DriverManager 类来获取的 Connection 连接(底层是 java.sql.DriverManager.registerDriver(new Driver());)是无法重复利用的,每次使用完以后都要通过 Connection.close() 关闭物理连接,释放资源。
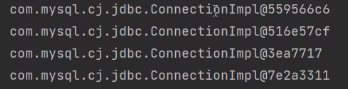
代码输出一下 connection 对象的地址,发现不是同一个,验证成功。
解决方法:传参数,有用,但很不优雅
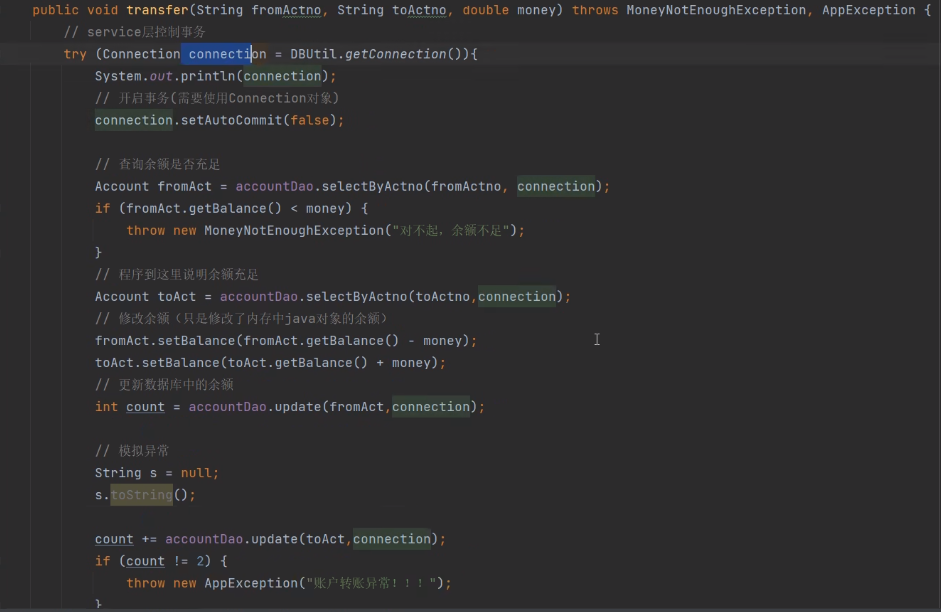
传参后可以看到是同一个 connection 对象
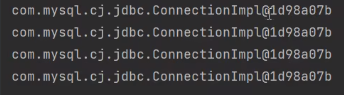
还有没有解决方法?不传参,还使用同一个 connection 对象就好了。
service 方法调用 dao的方法,是在同一个栈里面(同一个线程),因此下面两个 thread 是同一个


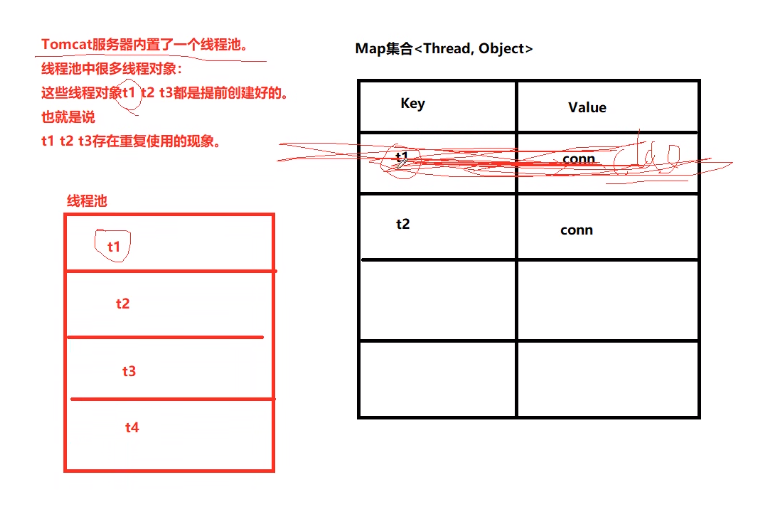
那可不可以把 connection 对象绑定到 thread 对象上呢?
定义一个 Map 集合:Map<Thread, Object>
| Key | Value |
|---|---|
| thread | connection |
同一个 key,可以获取到同一个 value。就是 service 调用 dao 的时候,dao里面通过 key 获取 value(通过线程对象获取连接对象)
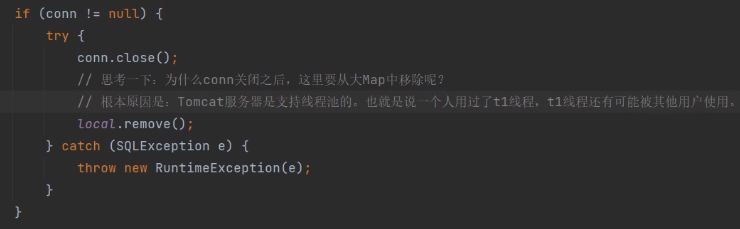
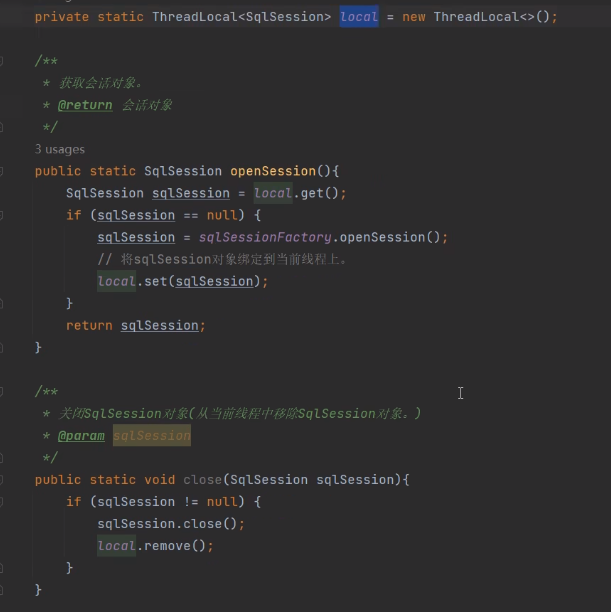
使用 ThreadLocal 解决
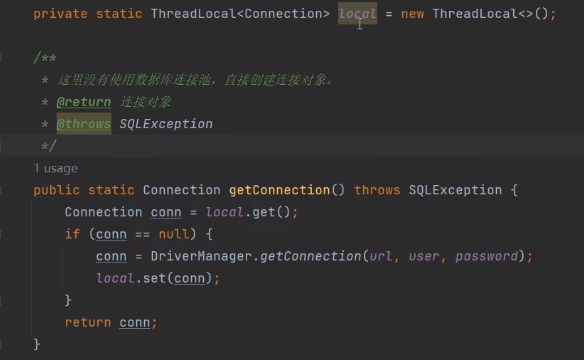
注意:考虑线程池情况
另外一个例子:
ThreadLocal 是全局的,服务器级别的,一个服务器定义一个即可
继续往下说
ThreadLocal翻译成中文比较准确的叫法应该是:线程局部变量。
// ThreadLocal 的基本使用
public class Test01ThreadLocal {
    // 定义 ThreadLocal 对象,就好比一个容器,为每个线程保存它的变量值
    static ThreadLocal threadLocal = new ThreadLocal();

    public static void main(String[] args) {
        Subthread t1 = new Subthread();
        Subthread t2 = new Subthread();
        t1.start();
        t2.start();
    }

    //定义线程类
    static class Subthread extends Thread {
        int k = 0;
        @Override
        public void run() {
            for (int i = 0; i < 20; i++,k++) {
                //设置线程关联的的值
                threadLocal.set(Thread.currentThread().getName() + " - " + k);
// 当我们在调用threadLocal.get()方法的时候,先获取当前线程,然后获取到当前线程的 ThreadLocalMap 对象,
// 如果非空,那么取出 ThreadLocal 的 value,否则进行初始化,
// 初始化就是将 initialValue 的值 set 到 ThreadLocal 中。
// 调用 get() 方法读取关联的值
                System.out.println(Thread.currentThread().getName() + " value = " + threadLocal.get());
            }
        }
    }
}


// 在多线程环境中,把字符串转换为日期对象,多个线程使用同一个 SimpleDateFormat 对象
// 可能会产生线程安全问题,有异常

// 为每个线程指定自己的 SimpleDateFormat 对象,使用 ThreadLocal
public class Test02 {
    // 定义 SimpleDateFormat 对象,该对象可以把字符串转换为日期
     private static SimpleDateFormat sdf = new SimpleDateFormat("yyyy 年 MM 月 dd 日 HH:mm:ss");
    static ThreadLocal<SimpleDateFormat> threadLocal = new ThreadLocal<>();

    public static void main(String[] args) {
        // 创建 500 个线程
        for (int i = 0; i < 500; i++) {
            new Thread(new ParseDate(i)).start();
        }
    }

    // 定义 Runnable 接口的实现类
    static class ParseDate implements Runnable {
        private int i = 0;

        public ParseDate(int i) {
            this.i = i;
        }

        @Override
        public void run() {
            try {
                // 构建日期字符串
                String text = "2024 年 3 月 28 日 11:17:" + i % 60; // 秒由 i 决定

//             Date date = sdf.parse(text); // 把字符串转换为日期

//             先判断当前线程是否有 SimpleDateFormat 对象,
//             如果当前线程没有 SimpleDateFormat 对象就创建一个,如果有就直接使用
                if (threadLocal.get() == null) {
                    threadLocal.set(new SimpleDateFormat("yyyy 年 MM 月 dd 日 HH:mm:ss"));
                }
                Date date = threadLocal.get().parse(text);
                System.out.println(i + " -- " + date);

            } catch (ParseException e) {
                e.printStackTrace();
            }
        }
    }
}


// 如何给 ThreadLocal 对象一个初始值?
// 定义ThreadLocal类的子类,在子类中重写 initialValue()方法指定初始值,在第一次调用 get() 方法不会返回 null
public class Test03SubThreadLocal {

    // 定义 ThreadLocal 对象
    // static ThreadLocal threadLocal = new ThreadLocal();
    // 直接使用自定义的 SubThreadLocal 对象
    static SubThreadLocal threadLocal = new SubThreadLocal();

    public static void main(String[] args) {
        SubThread t1 = new SubThread();
        t1.start();
        SubThread t2 = new SubThread();
        t2.start();
    }

    // 1)定义 ThreadLocal 的子类
    static class SubThreadLocal extends ThreadLocal<Date> {
        // 重写 initialValue 方法,设置初始值
        @Override
        protected Date initialValue() {
//         return new Date(); // 把当前日期设置为初始化
            return new Date(System.currentTimeMillis() - 1000 * 60 * 15);
        }
    }

    // 定义线程类
    static class SubThread extends Thread {
        @Override
        public void run() {
            for (int i = 0; i < 10; i++) {
                // 第一次调用 threadLocal 的 get() 方法会返回 null
                System.out.println("---------" + Thread.currentThread().getName() + " value=" + threadLocal.get());
                // 如果没有初始值就设置当前日期
                if (threadLocal.get() == null) {
                    System.out.println("*****************");
                    threadLocal.set(new Date());
                }
                try {
                    Thread.sleep(new Random().nextInt(500));
                } catch (InterruptedException e) {
                    e.printStackTrace();
                }
            }
        }
    }
}
Lock 显示锁
在 JDK5 中增加了 Lock 锁接口,有 ReentrantLock 实现类,ReentrantLock 锁称为可重入锁,它功能比 synchronized 多。
1、锁的可重入性
// 可重入锁是指【同一个线程可以多次获取同一把锁】。ReentrantLock和synchronized都是可重入锁。
// ReentrantLock 主要利用 CAS + AQS 队列来实现。它支持公平锁和非公平锁,两者的实现类似。
// AbstractQueuedSynchronizer简称 AQS

public class Test01Reentrance {

    public static void main(String[] args) {
        Test01Reentrance obj = new Test01Reentrance();
        new Thread(() -> obj.sm1()).start(); // 线程执行 sm1() 方法,默认this作为锁对象
    }

    public synchronized void sm1(){
        System.out.println("同步方法1");
        // 线程执行 sm1() 方法,默认【this】作为锁对象,在 sm1() 方法中调用了 sm2() 方法,
        // 注意当前线程还是持有 this 锁对象的

        // sm2() 同步方法默认的锁对象也是 this 对象,要执行 sm2() 必须先获得 this 锁对象,
        // 当前 this 对象被当前线程持有,可以【再次获得this对象】,这就是锁的可重入性。
        // 假设锁不可重入的话,可能会造成死锁
        sm2();
    }

    private synchronized void sm2() {
        System.out.println("同步方法2");
        sm3();
    }

    private synchronized void sm3() {
        System.out.println("同步方法3");
    }

}
2、Lock 锁的基本使用
lock() 和 unlock()
public class Test02unlock {

    static Lock lock = new ReentrantLock(); // 定义显示锁

    public static void main(String[] args) {
        Runnable r = () -> sm();
        // 启动三个线程
        new Thread(r).start();
        new Thread(r).start();
        new Thread(r).start();
    }
    // 定义方法
    public static void sm(){
        lock.lock(); // 先获得锁
        for (int i = 0; i < 100; i++) { // for 循环就是同步代码块
            System.out.println(Thread.currentThread().getName() + " -- " + i);
        }
        lock.unlock(); // 释放锁
    }
}
3、使用 Lock 锁,同步不同方法中的同步代码块
public class Test03 {
    public static void main(String[] args) {
//        其实这是一种匿名内部类的写法,new之后的括号中其实可以看做你写了一个类,
//        实现了这个接口,只不过这个类是匿名的,没有名字,所以称为匿名内部类。
//        如果不这么写的话,那么就必须写一个类实现接口,然后创建对象调用方法,
//        这样就会变的很复杂
        Runnable r1 = new Runnable() {
            @Override
            public void run() {
                sm1();
            }
        };
        Runnable r2 = new Runnable() {
            @Override
            public void run() {
                sm2();
            }
        };

        new Thread(r1).start();
        new Thread(r1).start();
        new Thread(r1).start();

        new Thread(r2).start();
        new Thread(r2).start();
        new Thread(r2).start();
    }

    static Lock lock = new ReentrantLock(); // 定义锁对象

    public static void sm1() {
        // 经常在 try 代码块中获得 Lock 锁,在 finally 子句中释放锁
        try {
            lock.lock(); //获得锁
            System.out.println(Thread.currentThread().getName() + "-- method 1 -- " + System.currentTimeMillis());
            Thread.sleep(new Random().nextInt(1000));
            System.out.println(Thread.currentThread().getName() + "-- method 1 -- " + System.currentTimeMillis());
        } catch (InterruptedException e) {
            e.printStackTrace();
        } finally {
            lock.unlock(); // 释放锁
        }
    }

    public static void sm2() {
        try {
            lock.lock(); // 获得锁,注意 sm2() 方法和 sm1() 方法是使用的同一个锁对象 lock
            System.out.println(Thread.currentThread().getName() + "!! method 22 !! " + System.currentTimeMillis());
            Thread.sleep(new Random().nextInt(1000));
            System.out.println(Thread.currentThread().getName() + "!! method 22 !! " + System.currentTimeMillis());
        } catch (InterruptedException e) {
            e.printStackTrace();
        } finally {
            lock.unlock(); // 释放锁
        }
    }
}
4、ReentrantLock 锁的可重入性
public class Test04Reentrance {

    public static void main(String[] args) throws InterruptedException {
        Subthread t1 = new Subthread();
        Subthread t2 = new Subthread();
        t1.start();
        t2.start();
        t1.join();
        t2.join();
        System.out.println( Subthread.num );
    }


    static class Subthread extends Thread{
//        定义锁对象,当没有 static 修饰的时候,注意它是实例变量
//        此时创建线程 t1 和 t2 时,它们分别都有自己的锁
//        加上【static】后就会共享了
        private static Lock lock = new ReentrantLock();
        public static int num = 0; // 定义变量
        @Override
        public void run() {
            for (int i = 0; i <10000 ; i++) {
                try {
                    // 可重入锁指可以反复获得该锁
                    lock.lock();
                    lock.lock();
                    num++;
                }finally {
                    lock.unlock();
                    lock.unlock();
                }
            }
        }
    }
}
5、lockInterruptibly() 方法
lockInterruptibly() 方法的作用:如果当前线程【未被中断】则获得锁,如果当前线程被中断则出现异常。
private static Lock lock = new ReentrantLock();
lock.lock(); // 必须等持有锁对象的线程做完事情,其他等待的线程才可以做事情。而且中途不能退出。
lock.lockInterruptibly(); // 也必须是等待持有锁对象的线程做完事情,其他线程才能做事情,但中途可以退出。
当通过 lockInterruptibly() 这个方法去获取锁时,如果线程正在等待获取锁,则这个线程能够响应中断,即中断线程的等待状态。也就是说,当两个线程同时通过 lock.lockInterruptibly() 想获取某个锁时,假若此时线程A获取到了锁,而线程B只有等待,那么对线程B调用 threadB.interrupt() 方法能够中断线程B的等待过程。
【注意是:等待的那个线程B可以被中断,不是正在执行的A线程被中断】
public class Test05lockInterruptibly {

    public static void main(String[] args) throws InterruptedException {
        Servier  s = new Servier();

        Runnable r = () -> s.serviceMethod(); // 匿名内部类

        Thread t1 = new Thread(r);
        t1.start(); // 开启 t1 线程

        Thread.sleep(50); // 主线程睡50毫秒后,创建并开启t2线程

        Thread t2 = new Thread(r);
        t2.start(); // 开启 t2 线程

        Thread.sleep(50); // 主线程睡50毫秒后,interrupt t2线程

        t2.interrupt();     // 中断 t2 线程
    }

    static class Servier{
        private Lock lock = new ReentrantLock(); //定义锁对象
        public void serviceMethod(){
            try {
                // lock.lock(); // 获得锁定,即使调用了线程的 interrupt() 方法,也没有真正的中断线程
                lock.lockInterruptibly(); // 如果线程被中断了(设置了中断标志),不会获得锁,会产生异常,直接到 catch 语句
                System.out.println(Thread.currentThread().getName() + "-- begin lock");
                for (int i = 0; i < Integer.MAX_VALUE; i++) {
                    new StringBuilder(); // 执行一段耗时的操作
                }
                System.out.println( Thread.currentThread().getName() + " -- end lock");
            } catch (InterruptedException e) {
                e.printStackTrace();
            } finally {
                System.out.println( Thread.currentThread().getName() + " ***** 释放锁111");
                lock.unlock(); // 释放锁,经常在 try 代码块中获得 Lock 锁,在 finally 子句中释放锁
                System.out.println( Thread.currentThread().getName() + " ***** 释放锁222");
            }
        }
    }
}


Thread-0-- begin lock
java.lang.InterruptedException
	at java.base/java.util.concurrent.locks.AbstractQueuedSynchronizer.doAcquireInterruptibly(AbstractQueuedSynchronizer.java:944)
	at java.base/java.util.concurrent.locks.AbstractQueuedSynchronizer.acquireInterruptibly(AbstractQueuedSynchronizer.java:1263)
	at java.base/java.util.concurrent.locks.ReentrantLock.lockInterruptibly(ReentrantLock.java:317)
	at com.jiayou.oLock.aReentrant.Test05lockInterruptibly$Servier.serviceMethod(Test05lockInterruptibly.java:35)
	at com.jiayou.oLock.aReentrant.Test05lockInterruptibly.lambda$main$0(Test05lockInterruptibly.java:15)
	at java.base/java.lang.Thread.run(Thread.java:830)
Exception in thread "Thread-1" java.lang.IllegalMonitorStateException
	at java.base/java.util.concurrent.locks.ReentrantLock$Sync.tryRelease(ReentrantLock.java:149)
	at java.base/java.util.concurrent.locks.AbstractQueuedSynchronizer.release(AbstractQueuedSynchronizer.java:1302)
	at java.base/java.util.concurrent.locks.ReentrantLock.unlock(ReentrantLock.java:439)
	at com.jiayou.oLock.aReentrant.Test05lockInterruptibly$Servier.serviceMethod(Test05lockInterruptibly.java:45)
	at com.jiayou.oLock.aReentrant.Test05lockInterruptibly.lambda$main$0(Test05lockInterruptibly.java:15)
	at java.base/java.lang.Thread.run(Thread.java:830)
Thread-1 ***** 释放锁111
Thread-0 -- end lock
Thread-0 ***** 释放锁111
Thread-0 ***** 释放锁222
6、isHeldByCurrentThread() 方法
通过 ReentrantLock 锁的 lockInterruptibly() 方法避免死锁的产生。对于 synchronized 内部锁来说,如果一个线程在等待锁,只有两个结果:要么该线程获得锁继续执行;要么就保持等待。对于 ReentrantLock 可重入锁来说,提供另外一种可能,在等待锁的过程中,程序可以根据需要取消对锁的请求。
public class Test06 {

    public static void main(String[] args) throws InterruptedException {
        IntLock intLock1 = new IntLock(11);
        IntLock intLock2 = new IntLock(22);

        Thread t1 = new Thread(intLock1);
        Thread t2 = new Thread(intLock2);
        t1.start();
        t2.start();

        // 在main线程,等待3000秒,如果还有线程没有结束就中断该线程
        Thread.sleep(3000);

        // 可以中断任何一个线程来解决死锁,t2线程会放弃对锁1的申请,同时释放锁2,t1线程会完成它的任务
        // if (t1.isAlive()){ t1.interrupt();}
        if (t2.isAlive()) {
            t2.interrupt();
        }
    }

    static class IntLock implements Runnable {
        // 创建两个 ReentrantLock 锁对象,声明用的是实现类,不是 Lock
        public static ReentrantLock lock1 = new ReentrantLock();
        public static ReentrantLock lock2 = new ReentrantLock();
        int lockNum; // 定义整数变量,决定使用哪个锁

        public IntLock(int lockNum) {
            this.lockNum = lockNum;
        }

        @Override
        public void run() {
            try {
                if (lockNum % 2 == 1) { // 奇数,先锁1,再锁2
                    lock1.lockInterruptibly(); // 不能是lock1.lock,这样会造成死锁,我们就是要通过 ReentrantLock 锁的 lockInterruptibly() 方法避免死锁的产生
                    System.out.println(Thread.currentThread().getName() + "获得锁1,还需要获得锁2");
                    Thread.sleep(new Random().nextInt(500));
                    lock2.lockInterruptibly();
                    System.out.println(Thread.currentThread().getName() + "同时获得了锁1与锁2....");
                } else {     // 偶数,先锁2,再锁1
                    lock2.lockInterruptibly();
                    System.out.println(Thread.currentThread().getName() + "获得锁2,还需要获得锁1");
                    Thread.sleep(new Random().nextInt(500));
                    lock1.lockInterruptibly();
                    System.out.println(Thread.currentThread().getName() + "同时获得了锁2与锁1....");
                }
            } catch (InterruptedException e) {
                e.printStackTrace();
            } finally {
                // 判断【当前线程】是否持有该锁,持有我就释放,没有持有不能乱释放
                if (lock1.isHeldByCurrentThread())
                    lock1.unlock();
                if (lock2.isHeldByCurrentThread())
                    lock2.unlock();
                System.out.println(Thread.currentThread().getName() + "线程退出");
            }
        }
    }
}
7、tryLock() 和 tryLock(long timeout, TimeUnit unit)
public class Test08tryLock {

    public static void main(String[] args) throws InterruptedException {
        Service service = new Service();
        Runnable r = new Runnable() {
            @Override
            public void run() {
                service.serviceMethod();
            }
        };

        Thread t1 = new Thread(r);
        t1.start();

        Thread.sleep(50); // 睡眠50毫秒,确保t1线程锁定

        Thread t2 = new Thread(r);
        t2.start();
    }

    static class Service{
        private ReentrantLock lock = new ReentrantLock();
        public void serviceMethod(){
            try {
                if (lock.tryLock()){
                    System.out.println(Thread.currentThread().getName() + "获得锁定");
                    Thread.sleep(3000); // 模拟执行任务的时长
                }else {
                    System.out.println(Thread.currentThread().getName() + "没有获得锁定");
                }
            } catch (InterruptedException e) {
                e.printStackTrace();
            } finally {
                if (lock.isHeldByCurrentThread()){
                    System.out.println(Thread.currentThread().getName() + "释放锁");
                    lock.unlock();
                }
            }
        }
    }
}


public class Test07tryLock {

    public static void main(String[] args) {
        TimeLock timeLock = new TimeLock();

        Thread t1 = new Thread(timeLock);
        Thread t2 = new Thread(timeLock);
        t1.start();
        t2.start();
    }

    static class TimeLock implements Runnable{
        private static ReentrantLock lock = new ReentrantLock(); // 定义锁对象

        @Override
        public void run() {
            try {
                if ( lock.tryLock(3, TimeUnit.SECONDS) ) { // 获得锁返回 true
                    System.out.println(Thread.currentThread().getName() + "获得锁,执行耗时任务");
                    /*假设Thread-0线程先持有锁,完成任务需要4秒钟,
                    Thread-1线程尝试获得锁,Thread-1线程在3秒内还没有获得锁的话,Thread-1线程会放弃
                    Thread.sleep(4000);

                    假设Thread-0线程先持有锁,完成任务需要2秒钟,
                    Thread-1线程尝试获得锁,Thread-1线程会一直尝试,在它约定尝试的3秒内可以获得锁对象*/
                    Thread.sleep(2000);
                }else { // 没有获得锁
                    System.out.println(Thread.currentThread().getName() + "没有获得锁");
                }
            } catch (InterruptedException e) {
                e.printStackTrace();
            } finally {
                if (lock.isHeldByCurrentThread()){
                    lock.unlock();
                }
            }
        }
    }
}
8、使用 try() 避免死锁
public class Test09 {

    public static void main(String[] args) {
        IntLock intLock1 = new IntLock(11);
        IntLock intLock2 = new IntLock(22);
        Thread t1 = new Thread(intLock1);
        Thread t2 = new Thread(intLock2);
        t1.start();
        t2.start();
        // 运行后,使用 tryLock ()尝试获得锁,不会傻傻的等待,
        // 通过循环不停的再次尝试,如果等待的【时间足够长】,线程总是会获得想要的资源
    }

    static class  IntLock implements Runnable{
        private static ReentrantLock lock1 = new ReentrantLock();
        private static ReentrantLock lock2 = new ReentrantLock();
        private int lockNum; // 用于控制锁的顺序

        public IntLock(int lockNum) {
            this.lockNum = lockNum;
        }

        @Override
        public void run() {
            if ( lockNum % 2 == 0 ){ // 偶数先锁1,再锁2
                while (true){ // tryLock() 得不到锁,就放弃了,所以需要不断尝试
                    try {
                        if (lock1.tryLock()){
                            System.out.println(Thread.currentThread().getName() + "获得锁1, 还想获得锁2");
                            Thread.sleep(new Random().nextInt(100));
                            try {
                                if (lock2.tryLock()){
                                    System.out.println(Thread.currentThread().getName() + "同时获得锁1与锁2 ----完成任务了");
                                    return; // 结束run()方法执行,即当前线程结束
                                }
                            } finally {
                                if (lock2.isHeldByCurrentThread()){
                                    lock2.unlock();
                                    System.out.println(Thread.currentThread().getName() + "释放锁2");
                                }
                            }
                        }
                    } catch (InterruptedException e) {
                        e.printStackTrace();
                    } finally {
                        if (lock1.isHeldByCurrentThread()){
                            lock1.unlock();
                            System.out.println(Thread.currentThread().getName() + "释放锁1");
                        }
                    }
                }
            }else { // 奇数就先锁2,再锁1
                while (true){
                    try {
                        if (lock2.tryLock()){
                            System.out.println(Thread.currentThread().getName() + "获得锁2, 还想获得锁1");
                            Thread.sleep(new Random().nextInt(100));
                            try {
                                if (lock1.tryLock()){
                                    System.out.println(Thread.currentThread().getName() + "同时获得锁1与锁2 ----完成任务了");
                                    return; // 结束 run() 方法执行,即当前线程结束
                                }
                            } finally {
                                if (lock1.isHeldByCurrentThread()){
                                    lock1.unlock();
                                    System.out.println(Thread.currentThread().getName() + "释放锁1");
                                }
                            }
                        }
                    } catch (InterruptedException e) {
                        e.printStackTrace();
                    } finally {
                        if (lock2.isHeldByCurrentThread()){
                            lock2.unlock();
                            System.out.println(Thread.currentThread().getName() + "释放锁2");
                        }
                    }
                }
            }
        }
    }
}


Thread-0获得锁2, 还想获得锁1
Thread-1获得锁1, 还想获得锁2
Thread-1释放锁1
Thread-1获得锁1, 还想获得锁2
Thread-0释放锁2
Thread-0获得锁2, 还想获得锁1
Thread-0释放锁2
...
Thread-0获得锁2, 还想获得锁1
Thread-1释放锁1
Thread-0同时获得锁1与锁2 ----完成任务了
Thread-1获得锁1, 还想获得锁2
Thread-0释放锁1
Thread-0释放锁2
Thread-1同时获得锁1与锁2 ----完成任务了
Thread-1释放锁2
Thread-1释放锁1
- Condition 等待与通知
关键字 synchronized 与 wait() / notify() 这两个方法一起使用可以实现等待/通知模式。Lock 锁的 newContition() 方法返回 Condition 对象,Condition 类也可以实现等待/通知模式。
使用 notify() 通知时,JVM 会随机唤醒某个等待的线程。使用Condition 类可以进行选择性通知。Condition 比较常用的两个方法:
await() 会使当前线程等待,同时会释放锁,当其他线程调用 signal() 时,线程会重新获得锁并继续执行。
signal() 用于唤醒一个等待的线程。
注意:在调用 Condition 的 await() / signal() 方法前,也需要线程持有相关的 Lock 锁。调用 await() 后线程会释放这个锁,在 singal() 调用后会从当前 Condition 对象的等待队列中,唤醒一个线程,唤醒的线程尝试获得锁,一旦获得锁成功就继续执行。
1、await() 和 signal()
public class Test01 {
    // 定义锁  静态的
    static Lock lock = new ReentrantLock();
    // 获得Condtion对象,
    static Condition condition = lock.newCondition();

    public static void main(String[] args) throws InterruptedException {
        SubThread t = new SubThread();
        t.start(); // 子线程启动后,会转入等待状态

        Thread.sleep(3000); // 主线程在睡眠3秒后,唤醒子线程的等待
        try {
            lock.lock(); //不管是等待还是唤醒,都要先持有锁
            System.out.println(Thread.currentThread().getName() + "obtain unlock");
            condition.signal();
            System.out.println(Thread.currentThread().getName() + "condition signal");
        } finally {
            lock.unlock();
            System.out.println(Thread.currentThread().getName() + "release unlock");
        }
    }

    //定义线程子类
    static class SubThread extends Thread{
        @Override
        public void run() {
            try {
                lock.lock(); // 在调用await()前必须先获得锁
                System.out.println(Thread.currentThread().getName() + "obtain lock");
                condition.await(); // 等待
                System.out.println(Thread.currentThread().getName() + "condition await");
            } catch (InterruptedException e) {
                e.printStackTrace();
            } finally {
                lock.unlock(); // 释放锁
                System.out.println(Thread.currentThread().getName() + "release unlock");
            }
        }
    }
}
2、多个 Condition 实现通知部分线程,使用更灵活
public class Test02 {

    public static void main(String[] args) throws InterruptedException {
        Service service = new Service();
        // 开启两个线程,分别调用waitMethodA()、waitMethodB()方法
        new Thread(() -> service.waitMethodA()).start();

        new Thread(() -> service.waitMethodB()).start();

        Thread.sleep(3000); // main线程睡眠3秒

        service.signalA(); // 唤醒 conditionA 对象上的等待,conditionB 上的等待依然继续等待
//        service.signalB();
    }

    static class Service {
        // 定义锁对象,注意,不是static修饰的,但是两个线程都是同一个对象 service
        private ReentrantLock lock = new ReentrantLock();
        // 定义两个 Condtion 对象
        private Condition conditionA = lock.newCondition();
        private Condition conditionB = lock.newCondition();

        // 定义方法,使用 conditionA 等待
        public void waitMethodA() {
            try {
                lock.lock(); // 在调用 await () 前必须先获得锁
                System.out.println(Thread.currentThread().getName() + " begin wait:" + System.currentTimeMillis());
                conditionA.await(); // 等待
                System.out.println(Thread.currentThread().getName() + " end wait:" + System.currentTimeMillis());
            } catch (InterruptedException e) {
                e.printStackTrace();
            } finally {
                lock.unlock();
            }
        }

        //定义方法,使用 conditionB 等待
        public void waitMethodB() {
            try {
                lock.lock(); // 在调用 await() 前必须先获得锁
                System.out.println(Thread.currentThread().getName() + " begin wait:" + System.currentTimeMillis());
                conditionB.await(); // 等待
                System.out.println(Thread.currentThread().getName() + " end wait:" + System.currentTimeMillis());
            } catch (InterruptedException e) {
                e.printStackTrace();
            } finally {
                lock.unlock();
            }
        }

        // 定义方法唤醒conditionA对象上的等待
        public void signalA() {
            try {
                lock.lock(); // 在调用 signal() 前必须先获得锁
                System.out.println(Thread.currentThread().getName() + " sigal A time = " + System.currentTimeMillis());
                conditionA.signal();
                System.out.println(Thread.currentThread().getName() + " sigal A time = " + System.currentTimeMillis());
            } finally {
                lock.unlock();
            }
        }

        // 定义方法唤醒conditionB对象上的等待
        public void signalB() {
            try {
                lock.lock(); // 在调用 signal() 前必须先获得锁
                System.out.println(Thread.currentThread().getName() + " sigal B time = " + System.currentTimeMillis());
                conditionB.signal();
                System.out.println(Thread.currentThread().getName() + " sigal B time = " + System.currentTimeMillis());
            } finally {
                lock.unlock();
            }
        }
    }
}
3、使用 Condition 实现生产者/消费者设计模式
// 案例一:两个线程交替打印
public class Test03 {
    public static void main(String[] args) {
        MyService myService = new MyService();
        // 创建线程打印--
        new Thread(() -> {
            for (int i = 0; i < 100; i++) {
                myService.printOne();
            }
        }).start();
        // 创建线程打印**
        new Thread(() -> {
            for (int i = 0; i < 100; i++) {
                myService.printTwo();
            }
        }).start();
    }

    static class  MyService{
        private Lock lock = new ReentrantLock(); // 创建锁对象
        private Condition condition = lock.newCondition(); // 创建 Condition 对象
        private boolean flag = true; // 定义交替打印标志

        // 定义方法只打印----横线
        public void printOne(){
            try {
                lock.lock(); // 在调用 await() 前必须先获得锁
                while (flag) { // 当 flag为 true 等待
                    System.out.println(Thread.currentThread().getName() + " waiting...");
                    condition.await();
                }
                // flag为 false 时打印
                System.out.println(Thread.currentThread().getName() + " ---------------- ");
                flag = true; // 修改交替打印标志
                condition.signal(); // 通知另外的线程打印
            } catch (InterruptedException e) {
                e.printStackTrace();
            } finally {
                lock.unlock(); // 释放锁对象
            }
        }

        //定义方法只打印***横线
        public void printTwo(){
            try {
                lock.lock(); // 在调用 await() 前必须先获得锁
                while (!flag){ // 当 flag为 false 等待
                    System.out.println(Thread.currentThread().getName() + " waiting...");
                    condition.await();
                }
                // flag 为 true 时打印
                System.out.println(Thread.currentThread().getName() + " **************** ");
                flag = false; // 修改交替打印标志
                condition.signal(); // 通知另外的线程打印
            } catch (InterruptedException e) {
                e.printStackTrace();
            } finally {
                lock.unlock(); // 释放锁对象
            }
        }

    }
}


// 案例二:多个线程交替打印
public class Test04 {
    public static void main(String[] args) {
        MyService myService = new MyService();
        // 创建10个线程打印,多个线程,用 all 唤醒
        for (int i = 0; i < 10; i++) {
            //创建线程打印 ------
            new Thread(() -> {
                for (int a = 0; a < 100; a++) {
                    myService.printOne();
                }
            }).start();
            // 创建线程打印 *******
            new Thread(() -> {
                for (int b = 0; b < 100; b++) {
                    myService.printTwo();
                }
            }).start();
        }
    }

    static class MyService {
        private Lock lock = new ReentrantLock(); // 创建锁对象
        private Condition condition = lock.newCondition(); // 创建 Condition 对象
        private boolean flag = true; // 定义交替打印标志

        // 定义方法只打印----横线
        public void printOne() {
            try {
                lock.lock(); // 锁定
                while (flag) { // 当 flag 为【true等待】
                    System.out.println(Thread.currentThread().getName() + " waiting...");
                    condition.await();
                }
                // flag 为 false 时打印
                System.out.println(Thread.currentThread().getName() + " ---------------- ");
                flag = true; // 修改交替打印标志
                condition.signalAll(); // 通知另外【所有】等待的线程打印
            } catch (InterruptedException e) {
                e.printStackTrace();
            } finally {
                lock.unlock(); // 释放锁对象
            }
        }

        // 定义方法只打印***横线
        public void printTwo() {
            try {
                lock.lock(); // 锁定
                while (!flag) { // 当 flag 为【false等待】
                    System.out.println(Thread.currentThread().getName() + " waiting...");
                    condition.await();
                }
                // flag 为 true 时打印
                System.out.println(Thread.currentThread().getName() + " **************** ");
                flag = false; // 修改交替打印标志
                condition.signalAll(); // 通知另外的【所有】线程打印
            } catch (InterruptedException e) {
                e.printStackTrace();
            } finally {
                lock.unlock(); // 释放锁对象
            }
        }
    }
}
- 公平锁与非公平锁
大多数情况下,锁的申请都是非公平的。如果线程1与线程2都在请求锁 A,当锁 A 可用时,系统只是会从阻塞队列中随机的选择一个线程,不能保证其公平性。
公平的锁会按照时间先后顺序,保证先到先得,公平锁的这一特点不会出现线程饥饿现象。
synchronized 内部锁就是非公平的。ReentrantLock 重入锁提供了一个构造方法:ReentrantLock(boolean fair),当在创建锁对象时实参传递 true 可以把该锁设置为公平锁。公平锁看起来很公平,但是要实现公平锁必须要求系统维护一个有序队列,公平锁的实现成本较高,性能也低。因此默认情况下锁是非公平的。不是特别的需求,一般不使用公平锁。
1、公平锁与非公平锁``
如果是非公平锁,系统倾向于让一个线程再次获得已经持有的锁,这种分配策略是高效的,非公平的。
如果是公平锁,多个线程不会发生同一个线程连续多次获得锁的可能,保证了公平性。
public class Test01 {
    static ReentrantLock lock = new ReentrantLock(); // 默认是非公平锁
    // static ReentrantLock lock = new ReentrantLock(true);  // 定义公平锁

    public static void main(String[] args) {
        Runnable runnable = () -> {
            while (true) {
                try {
                    lock.lock();
                    System.out.println(Thread.currentThread().getName() + " 获得了锁对象");
                } finally {
                    lock.unlock();
                }
            }
        };

        for (int i = 0; i < 5; i++) {
            new Thread(runnable).start();
        }
    }
}
2、常用方法
int getHoldCount() 返回当前线程调用 lock() 方法的次数(可重入是前提)
try {
    lock.lock();
    //打印线程调用 lock() 的次数
    System.out.println(Thread.currentThread().getName() + " ==== hold count : " + lock.getHoldCount());
}finally {
    lock.unlock();
}
int getQueueLength() 返回正等待获得锁的线程预估数
try {
    lock.lock();
    System.out.println(Thread.currentThread().getName() + "获得锁,执行方法,估计等待获得锁的线程数: " + lock.getQueueLength());
} finally {
    lock.unlock();
}
int getWaitQueueLength(Condition condition) 返回与 Condition 条件相关的等待的线程预估数
try {
    lock.lock();
    System.out.println(Thread.currentThread().getName() + " 进入等待前,现在该condtion条件上等待的线程预估数: " + lock.getWaitQueueLength(condition));
    condition.await();
} catch (InterruptedException e) {
    e.printStackTrace();
} finally {
    lock.unlock();
}
boolean hasQueuedThread(Thread thread) 查询参数指定的线程是否在等待获得锁
boolean hasQueuedThreads() 查询是否还有线程在等待获得该锁
boolean hasWaiters(Condition condition) 查询是否有线程正在等待指定的 Condition 条件
boolean isFair() 判断是否为公平锁
boolean isHeldByCurrentThread() 判断当前线程是否持有该锁
boolean isLocked() 查询当前锁是否被线程持有
try {
	System.out.println("是否公平锁?" + lock.isFair());
    System.out.println(" 当前锁是否被线程持有 -- " + lock.isLocked()); // false
    lock.lock();
    System.out.println("当前锁是否被线程持有 == " + lock.isLocked() ); // true
    Thread.sleep(2000);
} catch (InterruptedException e) {
    e.printStackTrace();
} finally {
    if ( lock.isHeldByCurrentThread()) { // 当前线程是否持有该锁
        lock.unlock();
    }
}
- ReentrantReadWriteLock 读写锁
synchronized 内部锁与 ReentrantLock 锁都是独占锁(排它锁), 同一时间只允许一个线程执行同步代码块,可以保证线程的安全性,但是执行效率低。
ReentrantReadWriteLock 读写锁是一种改进的排他锁,也可以称作共享/排他锁。允许多个线程同时读取共享数据,但是一次只允许一个线程对共享数据进行更新。
读写锁通过读锁与写锁来完成读写操作。线程在读取共享数据前必须先持有读锁,该读锁可以同时被多个线程持有,即它是共享的。线程在修改共享数据前必须先持有写锁,写锁是排他的,一个线程持有写锁时其他线程无法获得相应的锁。
读锁只是在读线程之间共享,任何一个线程持有读锁时,其他线程都无法获得写锁,保证线程在读取数据期间没有其他线程对数据进行更新,使得读线程能够读到数据的最新值,保证在读数据期间共享变量不被修改。
| 获得条件 | 排他性 | 作用 | |
|---|---|---|---|
| 读锁 | 写锁未被任意线程持有 | 对读线程是共享的,对写线程是排他的 | 允许多个读线程可以同时读取共享数据,保证在读共享数据时,没有其他线程对共享数据进行修改 |
| 写锁 | 该写锁未被其他线程持有,并且相应的读锁也未被其他线程持有 | 对读线程或者写线程都是排他的 | 保证写线程以独占的方式修改共享数据 |
读写锁允许读读共享,读写互斥,写写互斥。
在 java.util.concurrent.locks 包中定义了 ReadWriteLock 接口,该接口中定义了 readLock() 返回读锁,定义 writeLock() 方法返回写锁。该接口的实现类是 ReentrantReadWriteLock。
注意:readLock() 与 writeLock() 方法返回的锁对象是同一个锁的两个不同的角色,不是分别获得两个不同的锁。ReadWriteLock 接口实例可以充当两个角色。
读写锁的其他使用方法:
// 定义读写锁
ReadWriteLock rwLock = new ReentrantReadWriteLock();
// 获得读锁
Lock readLock = rwLock.readLock();
// 获得写锁
Lock writeLock = rwLock.writeLock();

// 读数据
readLock.lock(); // 申请读锁
try{
	读取共享数据
} finally {
	readLock.unlock(); // 总是在 finally 子句中释放锁
}

// 写数据
writeLock.lock(); // 申请写锁
try{
	更新修改共享数据
} finally {
	writeLock.unlock(); //总是在 finally 子句中释放锁
}
1、ReadWriteLock 读写锁可以实现读读共享,允许多个线程同时获得读锁
public class Test01ReadWriteLock {
    public static void main(String[] args) {
        Service service = new Service();
        // 创建5个线程,调用read()方法 读取数据
        for (int i = 0; i < 5; i++) {
            new Thread(() -> service.read()).start();
        }
        // 运行程序后,这多个线程几乎可以同时获得读锁,执行 lock() 后面的代码
    }

    static class Service{
        // 定义读写锁
        ReadWriteLock readWriteLock = new ReentrantReadWriteLock();
        // 定义方法读取数据
        public void read(){
            try {
                readWriteLock.readLock().lock(); // 获得读锁
                System.out.println(Thread.currentThread().getName() + "获得读锁,开始读取数据的时间--" + System.currentTimeMillis());
                TimeUnit.SECONDS.sleep(3);  // 模拟读取数据用时
            } catch (InterruptedException e) {
                e.printStackTrace();
            }finally {
                readWriteLock.readLock().unlock(); // 释放读锁
            }
        }
    }
}
2、ReadWriteLock的writeLock() 写锁是互斥的,只允许有一个线程持有
public class Test02 {
    public static void main(String[] args) {
        Service service = new Service();
        // 创建5个线程,调用 write() 方法修改数据
        for (int i = 0; i < 5; i++) {
            new Thread(() -> service.write()).start();
        }
        // 从执行结果来看,同一时间只有一个线程获得写锁
    }

    static class Service{

        ReadWriteLock readWriteLock = new ReentrantReadWriteLock(); // 先定义读写锁

        public void write(){ // 定义方法修改数据
            try {
                readWriteLock.writeLock().lock(); // 申请获得写锁
                System.out.println(Thread.currentThread().getName() + "获得写锁,开始修改数据的时间--" + System.currentTimeMillis());
                Thread.sleep(3000); // 模拟修改数据的用时
            } catch (InterruptedException e) {
                e.printStackTrace();
            }finally {
                System.out.println(Thread.currentThread().getName() + "修改数据完毕时的时间---------" + System.currentTimeMillis());
                readWriteLock.writeLock().unlock(); // 释放写锁
            }
        }
    }
}
3、ReadWriteLock 的读写互斥
注意:readLock() 与 writeLock() 方法返回的锁对象是同一个锁的两个不同的角色,不是分别获得两个不同的锁。
public class Test03 {
    public static void main(String[] args) {
        Service service = new Service();
        // 定义五个线程读数据
        for (int i = 0; i < 5; i++) {
            new Thread(() -> service.read()).start();
        }
        // 定义五个线程写数据
        for (int i = 0; i < 5; i++) {
            new Thread(() -> service.write()).start();
        }
    }

    static class Service {
        // 先定义读写锁
        ReadWriteLock readWriteLock = new ReentrantReadWriteLock();
        // 注意 readLock() 与 writeLock() 方法返回的锁对象是同一个锁的两个不同的角色,不是分别获得两个不同的锁
        Lock readLock = readWriteLock.readLock();  // 获得读锁
        Lock writeLock = readWriteLock.writeLock(); // 获得写锁

        // 定义方法读取数据
        public void read() {
            try {
                readLock.lock(); // 申请获得读锁
                System.out.println(Thread.currentThread().getName() + "获得读锁,开始读取数据的时间==" + System.currentTimeMillis());
                Thread.sleep(1000); // 模拟读取数据的用时
            } catch (InterruptedException e) {
                e.printStackTrace();
            } finally {
                System.out.println(Thread.currentThread().getName() + "读取数据完毕时的时间---------" + System.currentTimeMillis());
                readLock.unlock();  // 释放读锁
            }
        }

        // 定义方法修改数据
        public void write() {
            try {
                writeLock.lock(); // 申请获得写锁
                System.out.println(Thread.currentThread().getName() + "获得写锁,开始修改数据的时间==" + System.currentTimeMillis());
                Thread.sleep(3000); // 模拟修改数据的用时
            } catch (InterruptedException e) {
                e.printStackTrace();
            } finally {
                System.out.println(Thread.currentThread().getName() + "修改数据完毕时的时间---------" + System.currentTimeMillis());
                writeLock.unlock(); // 释放写锁
            }
        }
    }
}
线程管理
- 线程组
类似于在计算机中使用文件夹管理文件,也可以使用线程组来管理线程。在线程组中定义一组相似(相关)的线程,在线程组中也可以定义子线程组。
Thread 类有几个构造方法允许在创建线程时指定线程组,如果在创建线程时没有指定线程组则该线程就属于父线程所在的线程组。JVM 在创建 main 线程时会为它指定一个线程组,因此每个 Java 线程都有一个线程组与之关联,可以调用线程的 getThreadGroup() 方法返回线程组。
线程组开始是出于安全的考虑设计用来区分不同的 Applet(采用Java编程语言编写的小应用程序),然而 ThreadGroup 并未实现这一目标,在新开发的系统中,已经不常用线程组,现在一般会将一组相关的线程存入一个数组或一个集合中,如果仅仅是用来区分线程时,可以使用线程名称来区分,多数情况下,可以忽略线程组。
- 捕获线程的执行异常
在线程的 run() 方法中,如果有受检异常(包括 Exception 及其子类,但不包括RuntimeException 及其子类)必须进行捕获处理,如果想要获得 run() 方法中出现的运行时异常信息,可以通过回调 UncaughtExceptionHandler 接口获得哪个线程出现了运行时异常。
在Thread 类中有关处理运行异常的方法有:
setDefaultUncaughtExceptionHandler(Thread.UncaughtExceptionHandler eh) 设置全局的 UncaughtExceptionHandler
getDefaultUncaughtExceptionHandler() 获得全局的(默认的)UncaughtExceptionHandler
setUncaughtExceptionHandler(Thread.UncaughtExceptionHandler eh)
设置当前线程的 UncaughtExceptionHandler
getUncaughtExceptionHandler() 获得当前线程的 UncaughtExceptionHandler
当线程运行过程中出现异常,JVM 会调用 Thread 类的 dispatchUncaughtException(Throwable e) 方法,该方法会调用 getUncaughtExceptionHandler().uncaughtException(this, e); 如果想要获得线程中出现异常的信息,就需要设置线程的 UncaughtExceptionHandler。
设置线程的 UnCaughtExceptionHandler 回调接口,在实际开发中,这种设计异常处理的方式还是比较常用的,尤其是异步执行的方法。如果线程产生了异常,JVM会调用 dispatchUncaughtException()方法(仅仅由jvm调用),在该方法中调用了 getUncaughtExceptionHandler().uncaughtException(this, e); 如果当前线程设置了 UncaughtExceptionHandler 回调接口就直接调用它自己的 uncaughtException() 方法。
public class Test01UncaughtExceptionHandler {
    public static void main(String[] args) {
        // 1、设置线程全局的回调接口。 new Thread.UncaughtExceptionHandler(){}这是匿名内部类
        Thread.setDefaultUncaughtExceptionHandler(new Thread.UncaughtExceptionHandler() {
            @Override
            public void uncaughtException(Thread t, Throwable e) {
                // t 参数接收发生异常的线程,e 就是该线程中的异常。哪个线程产生了什么异常
                System.out.println(t.getName() + "线程产生了异常: " + e.getMessage());
            }
        });

        Thread t1 = new Thread(new Runnable() {
            @Override
            public void run() {
                System.out.println(Thread.currentThread().getName() + "开始运行");
                try {
                    Thread.sleep(2000);
                } catch (InterruptedException e) { // InterruptedException extends Exception
                    e.printStackTrace(); // 线程中的受检异常(包括 Exception 及其子类,但不包括RuntimeException 及其子类)必须捕获处理
                }
                System.out.println(12 / 0); // ArithmeticException extends RuntimeException,非受检异常

            }
        });
        t1.start();

        new Thread(new Runnable() {
            @Override
            public void run() {
                String txt = null;
                System.out.println(txt.length()); // NullPointerException extends RuntimeException,非受检异常
            }
        }).start();
    }
}
注入 Hook 钩子线程
现在很多软件包括 MySQL,Zookeeper,Kafka 等都存在 Hook 线程的校验机制,目的是校验进程是否已启动,防止重复启动程序。
Hook 线程也称为钩子线程,当 JVM 退出的时候会执行 Hook 线程。经常在程序启动时创建一个 .lock 文件,用 .lock 文件校验程序是否启动,在程序退出(JVM 退出)时删除该 .lock 文件,在 Hook 线程中除了防止重新启动进程外,还可以做资源释放,应尽量避免在 Hook 线程中进行复杂的操作。
public class TestHook {
    public static void main(String[] args) {
        // 1、注入 Hook 线程,在程序退出时删除.lock 文件
        Runtime.getRuntime().addShutdownHook(new Thread() {
            @Override
            public void run() {
                System.out.println("JVM 退出,会启动当前 Hook 线程,在 Hook 线程中删除 .lock 文件");
                getLockFile().toFile().delete();
            }
        });

        // 2、程序运行时,检查 lock 文件是否存在,如果 lock 文件存在,则抛出异常
        if (getLockFile().toFile().exists()) {
            throw new RuntimeException("程序已启动");
        } else { // 文件不存在,说明程序是第一次启动,创建 lock 文件
            try {
                getLockFile().toFile().createNewFile();
                System.out.println("程序在启动时创建了 lock 文件");
            } catch (IOException e) {
                e.printStackTrace();
            }
        }
        // 模拟程序运行
        for (int i = 0; i < 10; i++) {
            System.out.println("程序正在运行");
            try {
                TimeUnit.SECONDS.sleep(1);
            } catch (InterruptedException e) {
                e.printStackTrace();
            }
        }
    }

    private static Path getLockFile() {
        return Paths.get("", "tmp.lock");
    }
}
Paths 的简单介绍:
public final class Paths {
	// 无参构造方法
    private Paths() { }
    // // 将路径字符串或连接到路径字符串的字符串序列转换为 Path,可以 get("c:/abc"); 或者 get("c:","abc"),注意这里可以有多个参数 String... more 代表多个参数,这个比较常用
    public static Path get(String first, String... more) {
        return Path.of(first, more);
    }
    // // 将给定的 URI 转换为 Path 对象
    public static Path get(URI uri) {
        return Path.of(uri);
    }
}
Path 的简单介绍:
Java 标准库提供的 Path 接口,位于 java.nio.file 包中。该接口的实现是不可变且安全的,可供多个并行线程使用。
public interface Path extends Comparable<Path>, Iterable<Path>, Watchable {...}

public class TestPath {
    public static void main(String[] args) throws IOException {
        Path p1 = Paths.get(".", "project", "study"); // 构造一个 Path 对象
        System.out.println(p1);
        Path p2 = p1.toAbsolutePath(); // 转换为绝对路径
        System.out.println(p2);
        Path p3 = p2.normalize(); // 转换为规范路径
        System.out.println(p3);
        File f = p3.toFile(); // 转换为 File 对象
        System.out.println(f);
        for (Path p : Paths.get("..").toAbsolutePath()) { // 可以直接遍历 Path
            System.out.println("  " + p);
        }
    }
}
一开始的笔记(多线程的常用方法)
【currentThread()】public static native Thread currentThread();
【getName()】public final String getName() { return name; }
this.getName() 和 Thread.currentThread().getName() 的区别
public class MyThread02 extends Thread{

    public MyThread02(){
    	// Java 中的任何一段代码都是执行在某个线程当中的,执行当前代码的线程就是当前线程。同一段代码可能被不同的线程执行,因此当前线程是相对的,Thread.currentThread()方法的返回值是在代码实际运行时候的线程对象。
		// 在 main 线程中调用构造方法,所以构造方法中的当前线程就是 main线程
        System.out.println("构造方法中,Thread.currentThread().getName()是" + Thread.currentThread().getName());
		// 构造方法中,this.getName()是Thread-0
        System.out.println("构造方法中,this.getName()是" + this.getName());
    }

    @Override
    public void run() {
        // new MyThread02(myThread02)出来的对象,即线程:Thread-1
        System.out.println("run方法中,Thread.currentThread().getName()是" + Thread.currentThread().getName());
        // this是当前对象,即传入的参数myThread02,new MyThread02(myThread02)
        System.out.println("run方法中,this.getName()是" + this.getName());
    }
}

public class Test01 {
    public static void main(String[] args) throws InterruptedException {
        MyThread02 myThread02 = new MyThread02();
        myThread02.setName("myNameThread"); // 设置线程名字
        myThread02.start(); // 启动线程
        Thread.sleep(500); // 让线程睡500毫秒
        // Thread(Runnable)构造方法的形参是Runnable接口,调用时传递的实参是接口的实习类对象
        // 父类new Thread(myThread02)创造了新的线程(不会执行子类的构造方法)
        Thread threadRunnable = new Thread(myThread02);
        threadRunnable.start(); //启动新的线程,新的线程会执行run方法
    }
}
【join()】public final void join() throws InterruptedException {…}
helloThread.join()会让myThread线程进入等待状态,此时,如果对myThread线程调用interrupt(),join()方法会立刻抛出InterruptedException,因此,目标线程(myThread)只要捕获到join()方法抛出的InterruptedException,就说明有其他线程(main)对其(myThread)调用了interrupt()方法,通常情况下该线程(myThread)应该立刻结束运行。
main线程通过调用myThread.interrupt()从而通知myThread线程中断,而此时myThread线程正位于hello.join()的等待中,此方法会立刻结束等待并抛出InterruptedException。由于我们在myThread线程中捕获了InterruptedException,因此,就可以准备结束该myThread线程。在myThread线程结束前,对hello线程也进行了interrupt()调用通知其中断。如果去掉这一行代码,可以发现hello线程仍然会继续运行,且JVM不会退出。
public class Main {
    public static void main(String[] args) throws InterruptedException {
        Thread myThread = new MyThread();
        myThread.setName("myThread");
        myThread.start();
        Thread.sleep(1000);
        myThread.interrupt(); // mian线程向myThread线程发出中断信号
        myThread.join(); // mian线程等待myThread线程结束,如果myThread线程已经结束,对实例t调用join()会立刻返回。
        System.out.println("end");
    }
}

class MyThread extends Thread {
    public void run() {
        Thread helloThread = new HelloThread();
        helloThread.setName("helloThread");
        helloThread.start(); // 启动hello线程
        try {
            helloThread.join(); // 等待hello线程结束
        } catch (InterruptedException e) {
            System.out.println(Thread.currentThread().getName() + " interrupted!");
        }
        helloThread.interrupt(); // 注意这里,myThread应该停止运行
    }
}

class HelloThread extends Thread {
    public void run() {
        int n = 0;
        while (!isInterrupted()) {
        	System.out.println(isInterrupted());
            n++;
            System.out.println(Thread.currentThread().getName() + "--" + n + " hello!");
            try {
                Thread.sleep(100); // if any thread has interrupted the current thread. The interrupted status of the current thread is cleared when this exception is thrown.
            } catch (InterruptedException e) {
                break;
            }
        }
        System.out.println("aaaaa" + isInterrupted());
    }
}

这次打印了over,说明是在while循环中的break起作用了,而不是中断标志起作用
false
helloThread--1 hello!
false
helloThread--2 hello!
false
helloThread--3 hello!
false
helloThread--4 hello!
false
helloThread--5 hello!
false
helloThread--6 hello!
false
helloThread--7 hello!
false
helloThread--8 hello!
false
helloThread--9 hello!
myThread interrupted!
helloThread--9 over!
====false
main end

这次没有打印over,说明没有进入while循环,是中断标志起作用了
false
helloThread--1 hello!
false
helloThread--2 hello!
false
helloThread--3 hello!
false
helloThread--4 hello!
false
helloThread--5 hello!
false
helloThread--6 hello!
false
helloThread--7 hello!
false
helloThread--8 hello!
myThread interrupted!
main end
====true

Process finished with exit code 0
关于 run() 方法中的异常处理
public class MyThreadSleep extends Thread{
    @Override
    public void run() {
        // 选中代码,ctrl Alt t
        try {
            System.out.println("run, threadname=" + Thread.currentThread().getName() + " ,begin= " + System.currentTimeMillis());
			// Thread.sleep(millis); 让当前线程休眠指定的毫秒数
            Thread.sleep(2000); //当前线程睡眠 2000 毫秒
            System.out.println("run, threadname=" + Thread.currentThread().getName() + " ,end= " + System.currentTimeMillis());
        } catch (InterruptedException e) {
            // 在子线程的 run 方法中,如果有受检异常(编译时异常)需要处理,只能选择捕获处理,不能抛出处理
            // Runnable接口的run中没有抛异常,所以,你重写也不能抛异常
            e.printStackTrace();
        }
    }
【sleep(long millis)】public static native void sleep(long millis) throws InterruptedException;
public class SimpleTimer {
    public static void main(String[] args) {
        int remaining = 10; // 从 10 秒开始计时
        // 读取 main 方法的参数
        if (args.length == 1) {
            // Run -> Editor Configuration “Program arguments” 处运行
            remaining = Integer.parseInt(args[0]);
        }

        while(true){
            System.out.println("Remaining: " + remaining);
            remaining--;
            if (remaining < 0 ){
            	break;
            }
            try {
                Thread.sleep(1000); // 线程休眠
            } catch (InterruptedException e) {
                e.printStackTrace();
            }
        }
        System.out.println("Done!!");
    }
}
【isAlive()】public final native boolean isAlive();
public class TestIsAlive {
    public static void main(String[] args) throws InterruptedException {
        MyThreadIsAlive myThreadIsAlive = new MyThreadIsAlive();
        //false,在启动线程之前
        System.out.println("begin==" + myThreadIsAlive.isAlive());
        myThreadIsAlive.start();
        // 结果不一定,打印下面一行的时候,如果 myThreadIsAlive 线程还没结束就返回 true,如果 myThreadIsAlive 线程已结束,返回 false,比如让主线程睡一会儿,子线程就该执行完了
        Thread.sleep(1000);
        System.out.println("end==" + myThreadIsAlive.isAlive()); // 主线程输出myThreadIsAlive线程的状态
}

public class MyThreadIsAlive extends Thread{
    @Override
    public void run() {
        System.out.println("run 方法, isalive = " + this.isAlive()); // 运行状态,true
    }
}
【yield()】public static native void yield();
public class Test {
    public static void main(String[] args) {
        // 开启子线程,计算累加和
        MyThreadYield myThreadYield = new MyThreadYield();
        myThreadYield.start();
        // 在 main 线程中计算累加和
        long begin = System.currentTimeMillis();
        long sum = 0;
        for(int i = 1; i <= 100000; i++){
            sum += i;
        }
        long end = System.currentTimeMillis();
        System.out.println("mian方法用时: " + (end - begin));
    }
}

public class MyThreadYield extends Thread{
    @Override
    public void run() {
        long begin = System.currentTimeMillis();
        long sum = 0;
        for(int i = 1; i <= 100000; i++){
            sum += i;
            Thread.yield(); // 线程让步,放弃 CPU 执行权
        }
        long end = System.currentTimeMillis();
        System.out.println("子线程用时: " + (end - begin));
    }
}
mian方法用时: 5
子线程用时: 13028
【interrupt()】public void interrupt() {…}
public class Test02 {
    public static void main(String[] args) {
        MyThreadInterrupt02 myThreadInterrupt02 = new MyThreadInterrupt02();
        myThreadInterrupt02.start();
        for(int i = 1; i <= 1000; i++){
            System.out.println("main线程--->" + i);
        }
        // 中断子线程
        myThreadInterrupt02.interrupt(); // 仅仅是给子线程标记中断

    }
}

public class MyThreadInterrupt02 extends Thread{
    @Override
    public void run() {
        super.run(); // 这里的效果是什么呢?看下一个例子
        for(int i = 1; i <= 5000; i++){
            // 判断线程的中断标志,线程有 isInterrupted()方法,该方法返回线程的中断标志
            if ( this.isInterrupted() ) {
                System.out.println("当前线程的中断标志为 true, 我要退出了");
                // break; // 中断循环,run()方法体执行完毕,子线程运行完毕
                return; // 直接结束当前 run()方法的执行
            }
            System.out.println("子线程--->" + i);
        }
    }
}
super.run()
public class TestSuperRun {
    public static void main(String[] args) {
        new Thread(new Runnable() {
            @Override
            public void run() {
                System.out.println("Run of Runnable");
            }
        }) {
            public void run() {
                System.out.println("Run of Thread"); // 仅仅输出这一句!
            }
        }.start();
    }
}

public class TestSuperRun {
    public static void main(String[] args) {
        new Thread(new Runnable() {
            @Override
            public void run() {
                System.out.println("Run of Runnable");
            }
        }) {
            public void run() {
            	super.run(); // 会打印上面的一句话:Run of Runnable
                System.out.println("Run of Thread"); // 打印:Run of Thread
            }
        }.start();
    }
}

Thread类的源码
private Runnable target;
@Override
public void run() {
    if (target != null) {
        target.run();
    }
}
守护线程
【setDaemon(boolean on)】public final void setDaemon(boolean on) {…}
public class Test {
    public static void main(String[] args) throws InterruptedException {
        MyThreadSetDaemon myThreadSetDaemon = new MyThreadSetDaemon();
        // 设置守护线程的代码应该在线程启动前
        myThreadSetDaemon.setDaemon(true);
        myThreadSetDaemon.start();
        // 当前线程为 main 线程
        for(int i = 1; i <= 5 ; i++){
            System.out.println(Thread.currentThread().getName() + "----" + i);
        }
        Thread.sleep(8);
        // 当 main 线程结束,守护线程 thread 也销毁了
        // 守护线程不能单独运行,当 JVM 中没有其他用户线程,只有守护线程时,守护线程会自动销毁,JVM 会退出
    }
}

public class MyThreadSetDaemon extends Thread{
    @Override
    public void run() {
        super.run();
        while(true){
            System.out.println("sub thread.....");
        }
    }
}