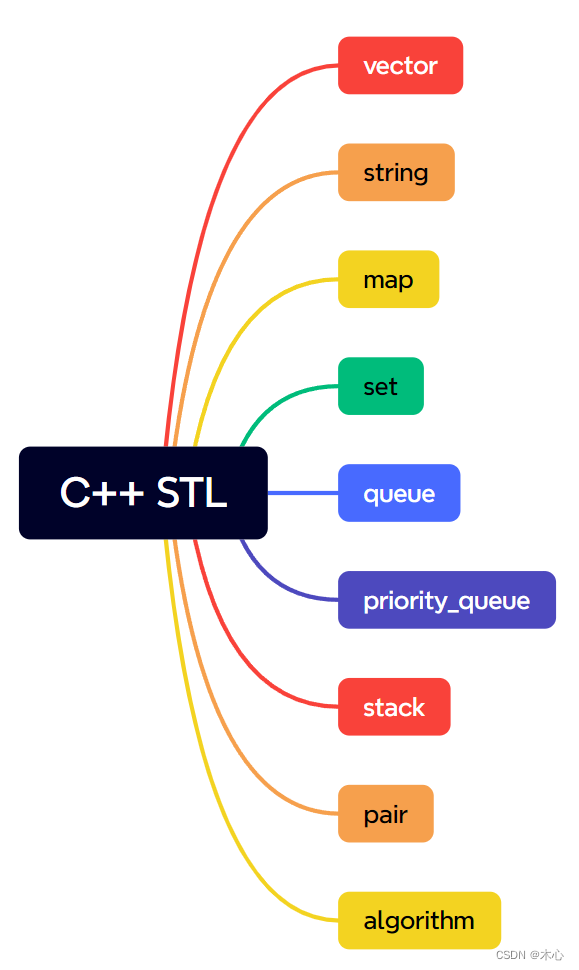
C++ STL教程
文章目录
C++ STL(standard template library)标准模板库,是一套强大的C++模板类,提供了通用了模板类和函数,这些模板类和函数可以实现多种流行和常用的算法和数据结构,如向量
vector,队列 deque,和映射 map等。
| 组件 | 描述 |
|---|---|
| 容器(Containers) | 容器是用来管理某一类对象的集合。C++ 提供了各种不同类型的容器,比如 deque、list、vector、map 等。 |
| 算法(Algorithms) | 算法作用于容器。它们提供了执行各种操作的方式,包括对容器内容执行初始化、排序、搜索和转换等操作。 |
| 迭代器(Iterators) | 迭代器用于遍历对象集合的元素。这些集合可能是容器,也可能是容器的子集。 |
1.1 std::vector
std::vector(向量),是一种变长数组,类似于python中的list,是一种可以“自动改变数组长度的数组”。在要使用std::vector的时候,我们需要添加头文件
#inlcude <vector>
using namespace std;			//如果没有这句,我们在使用时必须指明命名空间std::vector
1.1.1vector的定义
可以像定义普通变量一样来定义vector变量:
std::vector<类型名> 变量名;
可以是各种类型,也同样可以是STL容器,举个例子,
std::vector<int> my_vector;
std::vector<double> my_vector;
std::vector<char> my_vector;
std::vector<vector<int>> my_vector;		//这里定义了一个二维的向量
1.1.2vector容器的初始化
vector容器可以使用C中的初始化器{}来进行初始化,vector容器也可以使用构造函数()来进行初始化
std::vector<int> my_vector;			// 创建一个空的整数向量
std::vector<int> my_vector(5, 10);	// 创建一个整数向量初始化为5个10
std::vector<int> my_vector {1, 2, 3, 4, 5}	//创建一个整数向量为1,2,3,4,5
1.1.3vector容器内元素的访问和修改
std::vector容器一般有两种访问方式:
- 通过下标
[]来进行访问和修改,这种方式和python高度一致
#include <iostream>
#include <vector>
using namespace std;

int main() {
	std::vector<int> my_vector(4, 1);
	cout << my_vector[1] << endl;
	return 0;
}
- 通过迭代器(iterator)访问
迭代器可以理解为指针
std::vector<类型名>::iterator 变量名;
迭代器可以这样声明
std::vector<int>::iterator it;
std::vector<double>::iterator it;
举个例子
#include <iostream>
#include <vector>
using namespace std;

int main() {
	std::vector<int> my_vector;
	for (int i = 0; i < 5; i++) {
		my_vector.push_back(i+1);
	}

	std::vector<int>::iterator it = my_vector.begin();
	for (int i = 0; i < my_vector.size(); i++) {
		cout << it[i] << endl;
	}
	return 0;
}
输出如下:
1 2 3 4 5
可以将for循环读取部分简写为
for (std::vector<int>::iterator it = my_vector.begin(); it != my_vector.end(); it++) {
	cout << *it << " ";
}
1.1.4vector中的常用函数
push_back(),在vector的末尾添加元素,类似python中list.append()方法pop_back(),删除vector末尾的元素,类似python中list.pop()方法,但是没有返回值size(),返回vector的长度,类似python中的len(list)clear(),清空vector中的所有元素insert(),在指定的地址插入元素erase(),删除指定地址的元素
(1)push_back()
void std::vector<int>::push_back(const int &__x)
举例:
#include <iostream>
#include <vector>
using namespace std;

int main() {
	std::vector<int> v;
	for (int i = 0; i < 10; i++) {
		v.push_back(i + 1);				//使用push_back向vector的末尾添加元素
	}

	for (vector<int>::iterator it = v.begin(); it < v.end(); it++) {
		cout << *it << " ";
	}
	return 0;
}
结果如下:
1 2 3 4 5 6 7 8 9 10
(2)pop_back()
void std::vector<int>::pop_back()
举例:
#include <iostream>
#include <vector>
using namespace std;

int main() {
	std::vector<int> v;
	for (int i = 0; i < 10; i++) {
		v.push_back(i + 1);				//使用push_back向vector的末尾添加10个元素
	}
	for (vector<int>::iterator it = v.begin(); it < v.end(); it++) {
		cout << *it << " ";
	}
	for (int i = 0; i < 5; i++) {
		v.pop_back();
	}
	cout << endl;
	for (vector<int>::iterator it = v.begin(); it < v.end(); it++) {
		cout << *it << " ";				//使用pop_back()弹出5个元素
	}
	return 0;
}
结果如下:
1 2 3 4 5 6 7 8 9 10
1 2 3 4 5
(3)size()
std::size_t std::vector<int>::size()
举例:
int main() {
	std::vector<int> v;
	for (int i = 0; i < 10; i++) {
		v.push_back(i + 1);				//使用push_back向vector的末尾添加10个元素
	}
	cout << "Length of the vector is " << v.size();
	return 0;
}
结果如下:
Length of the vector is 10
(4)clear()
举例:
#include <iostream>
#include <vector>
using namespace std;

int main() {
	std::vector<int> v;
	for (int i = 0; i < 10; i++) {
		v.push_back(i + 1);				//使用push_back向vector的末尾添加10个元素
	}
	for (int i = 0; i < v.size(); i++) {
		cout << v[i] << " ";
	}
	cout << endl;
	cout << "Length of vector is " << v.size() << endl;
	v.clear();
	cout << "Length of vector is " << v.size();
	return 0;
}
结果如下:
1 2 3 4 5 6 7 8 9 10
Length of vector is 10
Length of vector is 0
(5)insert()
insert(__position, __x);
参数:
    __position: - A const_iterator into the vector.
    __x: - Data to be inserted.
举例:
#include <iostream>
#include <vector>
using namespace std;

int main() {
	std::vector<int> myVector = { 1, 2, 3, 4, 5 };
	for (int i = 0; i < myVector.size(); i++) {
		cout << myVector[i] << " ";
	}
	cout << endl;
	myVector.insert(myVector.begin(), -1);						// 在索引0的位置添加一个-1
	for (int i = 0; i < myVector.size(); i++) {
		cout << myVector[i] << " ";
	}
	cout << endl;
	myVector.insert(myVector.begin() + 1, { -1, -1 });			// 用初始化器在索引1的位置,插入两个元素-1
	for (int i = 0; i < myVector.size(); i++) {
		cout << myVector[i] << " ";
	}
	cout << endl;

	std::vector<int> antherVector = { -1, -1, -1 };
	myVector.insert(myVector.end(), antherVector.begin(), antherVector.end());		// 在末尾,插入另一个vector
	for (int i = 0; i < myVector.size(); i++) {
		cout << myVector[i] << " ";
	}
	cout << endl;
	return 0;
}
结果如下:
1 2 3 4 5
-1 1 2 3 4 5
-1 -1 -1 1 2 3 4 5
-1 -1 -1 1 2 3 4 5 -1 -1 -1
(6)erase()
erase(__position);
参数:
    __position: - A const_iterator into the vector.
指定删除的区间的时候,这个区间是左闭右闭的。
举例:
#include <iostream>
#include <vector>
using namespace std;

int main() {
	std::vector<int> v = { 1, 2, 3, 4, 5 };
	for (int i = 0; i < v.size(); i++) {
		cout << v[i] << " ";
	}
	cout << endl;
	v.erase(v.begin() + 1);			//删除索引为1的元素
	for (int i = 0; i < v.size(); i++) {
		cout << v[i] << " ";
	}
	cout << endl;
	v.erase(v.begin() + 1, v.end() - 1);		//删除一段区间的元素
	for (int i = 0; i < v.size(); i++) {
		cout << v[i] << " ";
	}
	cout << endl;
	return 0;
}
结果如下:
1 2 3 4 5
1 3 4 5
1 5
1.2 std::string
std::string(字符串),是C++标准库中用于表示和字符串的类,它提供了许多成员函数和操作符,用于处理字符串的各种操作,非常类似于Python中的str数据类型,当我们使用std::string的时候,我们需要提前包含头文件:
#include <string>
using namespace std;		//如果没有这句,我们在使用时必须指明命名空间std::string
1.2.1string的定义
std::string可以像普通类型一样进行定义
std::string str;
1.2.2string的初始化
std::string可以直接使用字符串字面量来进行初始化,或者使用另一个字符串变量来进行初始化,例如:
std::string str1 = "Hello, World!";		// 使用字符串字面量来初始化
std::string str2 = str1;					// 使用另一个字符串变量来初始化
举个能实际运行的例子:
#include <iostream>
#include <string>
using namespace std;

int main() {
	std::string str1 = "Hello World!";
	std::string str2 = str1;
	cout << str1 << endl << str2;
	return 0;
}
运行结果是:
Hello World!
Hello World!
1.2.3string中元素的访问和修改
std::string有两种访问和修改字符的方式,std::string和Python中str数据类型的不同点在于,Pythonstr类型不支持原地修改,而std::string支持,str类型支持切片操作,但是std::string不支持切片操作,可以使用std::string::substr()方法来代替。
- 使用
[]进行元素访问和修改
举个例子:
#include <iostream>
#include <string>
using namespace std;

int main() {
	string str = "Hello World!";
	cout << str << endl;
	cout << str[0] << endl;			//使用[]进行元素访问
	str[0] = 'C';					//使用[]进行元素修改
	cout << str;
	return 0;
}
运行结果如下:
Hello World!
H
Cello World!
- 使用
at进行元素修改和访问
举个例子:
#include <iostream>
#include <string>
using namespace std;

int main() {
	std::string str = "Hello World!";
	cout << str << endl;
	cout << str.at(0) << endl;			//使用at进行元素访问
	str.at(0) = 'C';					//使用at进行元素修改
	cout << str;
	return 0;
}
运行结果如下:
Hello World!
H
Cello World!
1.2.4string中连接字符串
std::string可以像Python中str一样进行使用+进行拼接,使用append()方法在末尾添加字符。
- 使用
+进行拼接,+会返回一个新的字符串
举个例子:
#include <iostream>
#include <string>
using namespace std;

int main() {
	string str1 = "Hello";
	cout << str1 << endl;
	string str2 = " World!";
	cout << str2 << endl;
	cout << str1 + str2;		// 使用+进行字符串拼接
	return 0;
}
运行结果如下:
Hello
 World!
Hello World!
- 使用
append()进行拼接,在原字符串的基础上进行添加
举个例子:
std::#include <iostream>
#include <string>
using namespace std;

int main() {
	std::string str1 = "Hello";
	cout << str1 << endl;
	std::string str2 = " World!";
	cout << str2 << endl;
	str1.append(str2);		// 使用append进行字符串拼接
	cout << str1;
	return 0;
}
运行结果如下:
Hello
 World!
Hello World!
1.2.5string中的常用函数
length()获取字符串的长度,size()获取字符串的长度,substr()获取字符串的子串,find()查找子串的位置
(1)length()和size()
size_t std::string::length() const;
size_t std::string::size() const;
举个例子:
#include <iostream>
#include <string>
using namespace std;

int main() {
	std::string str = "Hello World!";
	cout << str.length() << " " << str.size();
	return 0;
}
运行结果:
12 12
(2)substr()
std::string std::string::substr(size_t __pos, size_t __count) const;
substr()是用于获得子串的函数,这个区间是左闭右闭的。
举个例子:
#include <iostream>
#include <string>
using namespace std;

int main() {
	std::string str = "Hello World!";
	cout << str << endl;
	cout << str.substr(0, 4);
	return 0;
}
运行结果:
Hello World!
Hell
(3)find()
size_t std::string::find(const std::string& __str, size_t __pos = 0) const;
find()是用于查找子串的位置,返回子串首元出现在母船中的位置。
举个例子:
#include <iostream>
#include <string>
using namespace std;

int main() {
	std::string str = "Hello World!";
	std::string substr = "orld";
	cout << str.find(substr) << endl;
	return 0;
}
运行结果:
7
返回的是orld在字符串Hello World!中首元的位置,在下标7的地方。
1.3 std::map
std::map是一种键值对容器,在python中这种容器被称为字典dict,在std::map中数据都是成对出现的,每一对中的第一个值被称为关键字key,每个关键字只能在std::map中出现一次,第二个称之为关键的对应值。在使用std::map之前,我们需要包含头文件
#inlcude <map>
using namespace std;			//如果没有这句,我们在使用时必须指明命名空间std::map
1.3.1map的定义
std::map是一个模板类,需要的关键字和存储对象两个模板参数,定义如下:
std::map<关键字的类型名, 存储对象的类型名> 变量名;
类型名可以是各种类型,例如:
std::map<string, int> person;		//使用string需要先#include <string>
std::map<int, int> mydict;
1.3.2map的初始化
std::map可以使用初始化列表{}来进行初始化,例如:
std::map<string, int> myMap = { { "One", 1 }, {"Two", 2}, {"Three", 3} };
1.3.3map的遍历
std::map 并不直接支持使用下标进行遍历,因为它是一种按键排序的关联容器,而不是顺序容器。使用下标遍历会导致元素的顺序混乱,不符合 std::map 的特性。
- 使用迭代器遍历
举个例子,初始化一个std::map然后使用iterator遍历其中的键值对(key-value pair)
#include <iostream>
#include <string>
#include <map>
using namespace std;

int main() {
	std::map<string, int> myMap = { { "One", 1 }, {"Two", 2}, {"Three", 3} };
	for (std::map<string, int>::iterator it = myMap.begin(); it != myMap.end(); it++ ) {
		cout << "Key: " << it->first << "\tValue: " << it->second << endl;
	}
	return 0;
}
运行结果如下:
Key: One        Value: 1
Key: Three      Value: 3
Key: Two        Value: 2
在上述示例中,我们使用 myMap.begin() 获取指向第一个键值对的迭代器,使用 myMap.end() 获取指向最后一个键值对后面位置的迭代器。然后,通过迭代器遍历 std::map 中的键值对,并使用 it->first 获取键,it->second 获取值。
上述代码我们在指定迭代器的时候,手动去指定迭代器的类型,这样十分的麻烦,我们可以使用auto关键字来自动生成符合条件的迭代器,例如:
#include <iostream>
#include <string>
#include <map>
using namespace std;

int main() {
	std::map<string, int> myMap = { { "One", 1 }, {"Two", 2}, {"Three", 3} };
	for (auto it = myMap.begin(); it != myMap.end(); it++ ) {						// 使用auto关键字自动生成迭代器
		cout << "Key: " << it->first << "\tValue: " << it->second << endl;
	}
	return 0;
}
- 使用范围循环遍历
举个例子,初始化一个std::map然后使用std::pair遍历其中的键值对(key-value pair)
#include <iostream>
#include <string>
#include <map>
using namespace std;

int main() {
	std::map<string, int> myMap = { { "One", 1 }, {"Two", 2}, {"Three", 3} };
	for (const std::pair<string, int>& pair : myMap) {
		cout << "Key: " << pair.first << "\tValue: " << pair.second << endl;
	}
	return 0;
}
运行结果:
Key: One        Value: 1
Key: Three      Value: 3
Key: Two        Value: 2
同样我们也能使用关键字auto来自动推导类型
#include <iostream>
#include <string>
#include <map>
using namespace std;

int main() {
	std::map<string, int> myMap = { { "One", 1 }, {"Two", 2}, {"Three", 3} };
	for (auto& pair : myMap) {						// 使用auto关键字自动生成pair
		cout << "Key: " << pair.first << "\tValue: " << pair.second << endl;
	}
	return 0;
}
1.3.4map中元素的访问和修改
可以使用[]来访问并修改std::map中的元素,就类似于Python的dict一样,举个例子
#include <iostream>
#include <string>
#include <map>
using namespace std;

int main() {
	std::map<string, int> myMap = { { "One", 1 }, {"Two", 2}, {"Three", 3} };
	myMap["One"] = 10;								// 修改One对应的值
	for (auto& pair : myMap) {						// 使用auto关键字自动生成迭代器
		cout << "Key: " << pair.first << "\tValue: " << pair.second << endl;
	}
	return 0;
}
运行结果如下:
Key: One        Value: 10
Key: Three      Value: 3
Key: Two        Value: 2
1.3.5map中的常用函数
insert(),向map中插入一个键值对,erase(),删除指定键的键值对find(),查找指定键的迭代器count(),返回指定键在map中的出现次数size(),返回map的长度empty(),检查map是否为空clear(),清空map中的所有键值对beign(),返回指向第一个键值对的迭代器end(),返回指向最后一个键值对的迭代器
这里有很多函数的用法于之前介绍string和vector时的用法类似,这里就不再重复介绍了,
(1)insert()
void std::map<Key, T, Compare, Allocator>::insert(const std::pair<const Key, T>& __x)
std::map<Key, T, Compare, Allocator> 表示 std::map 的模板参数,其中 Key 是键的类型,T 是值的类型,Compare 是用于比较键的比较函数类型,Allocator 是分配器的类型。
而 insert() 函数的原型部分 const std::pair<const Key, T>& __x 表示参数 __x 是一个常量引用,类型为 std::pair<const Key, T>,即键值对的类型。
举个例子:
#include <iostream>
#include <string>
#include <map>
using namespace std;

int main() {
	std::map<string, int> myMap = { { "One", 1 }, {"Two", 2}, {"Three", 3} };
	for (auto& pair : myMap) {
		cout << "Key: " << pair.first << "\tValue: " << pair.second << endl;
	}
	cout << endl;
	myMap.insert({ "Four", 4 });					//插入单个键值对
	myMap.insert(pair<string, int>("Five", 5));		//插入std::pair键值对
	myMap.insert(make_pair("Six", 6));				//使用std::make_pair插入键值对
	for (auto& pair : myMap) {
		cout << "Key: " << pair.first << "\tValue: " << pair.second << endl;
	}
	return 0;
}
结果如下:
Key: One        Value: 1
Key: Three      Value: 3
Key: Two        Value: 2

Key: Five       Value: 5
Key: Four       Value: 4
Key: One        Value: 1
Key: Six        Value: 6
Key: Three      Value: 3
Key: Two        Value: 2
(2)erase()
void std::map<Key, T, Compare, Allocator>::erase(const Key& __x)
std::map<Key, T, Compare, Allocator> 表示 std::map 的模板参数,其中 Key 是键的类型,T 是值的类型,Compare 是用于比较键的比较函数类型,Allocator 是分配器的类型。
而 erase() 函数的原型部分 const Key& __x 表示参数 __x 是一个常量引用,类型为 Key,即要删除的键的类型。
举个例子:
#include <iostream>
#include <string>
#include <map>
using namespace std;

int main() {
	std::map<string, int> myMap = { { "One", 1 }, {"Two", 2}, {"Three", 3}, { "Four", 4 }, {"Five", 5} };
	for (auto& pair : myMap) {
		cout << "Key: " << pair.first << "\tValue: " << pair.second << endl;
	}
	cout << endl;
	myMap.erase("Two");							// 删除指定键的键值对

	auto it = myMap.find("Three");				// 删除指定迭代器指向的键值对
	if (it != myMap.end()) {
		myMap.erase(it);
	}
	auto start = myMap.find("Five");			// 删除一定范围内的键值对
	auto end = myMap.find("Four");
	myMap.erase(start, end);					// 左开右闭

	for (auto& pair : myMap) {
		cout << "Key: " << pair.first << "\tValue: " << pair.second << endl;
	}
	return 0;
}
运行结果:
Key: Five       Value: 5
Key: Four       Value: 4
Key: One        Value: 1
Key: Three      Value: 3
Key: Two        Value: 2

Key: Four       Value: 4
Key: One        Value: 1
1.4std::pair
std::pair是C++标准库中的模板类,用于表示两个值的有序对,它可以存储不同类型的值,并提供了一些成员函数和操作符来访问和操作这两个值,在使用std::pair之前,我们需要导入头文件
#include <utility>			// 导入该头文件才能正常使用pair

#include <iostream>			// 但是当我们使用了标准输入输出流的时候,就已经包括了该头文件,无需重复导入
1.4.1pair的定义和初始化
- 使用构造函数进行初始化
std::pair <int, std::string> myPair(42, "Hello");
- 使用初始化器
{}来初始化
std::pair <int, std::string> myPair = {42, "Hello"};
- 使用
make_pair函数进行初始化
auto myPair = std::make_pair(42, "Hello"); // 使用auto自动推断构建后的类型
1.4.2pair的访问与修改
使用.来访问std::pair中的值,std::pair 的第一个值可以通过 pair.first 访问,第二个值可以通过 pair.second 访问。需要注意的是,std::pair 是一个简单的容器,只包含两个值,没有提供像容器类(如 std::vector 或 std::map)那样的迭代器和成员函数。使用 std::pair 主要是为了方便地存储和传递两个相关的值。
std::pair<int, int> pair1(1, 2);
std::pair<int, int> pair2(3, 4);
cout << pair1.first << endl;			//访问pair1的第一个值
pair2.second = 5;						//修改pair2的第二个值
1.4.3pair的比较
举个例子:
#include <iostream>
using namespace std;

int main() {
	std::pair<int, int> pair1(1, 2);
	std::pair<int, int> pair2(3, 4);

	bool isEqual = (pair1 == pair2);
	bool isNotEqual = (pair1 != pair2);
	bool isLess = (pair1 < pair2);
	bool isGreater = (pair1 > pair2);
	cout << isEqual << " " << isNotEqual << " " << isLess << " " << isGreater;
}
输出的结果:
0 1 1 0
1.5std::set
std::set是C++标准库中的容器类,用于存储唯一且自动排序的元素集合,类似于Python中的set。要使用std::set,我们需要包含以下头文件
#include <set>
1.5.1set的定义
set是一个模板类,需要的一个模板参数,定义如下:
std::set<类型名> 变量名;
类型名可以是各种类型,例如:
std::set<int> mySet;
std::set<string> mySet;
1.5.2set的初始化
std::set可以使用多种方式来进行初始化
- 使用初始化列表来初始化
std::set<int> mySet = {1, 2, 3}; //使用初始化列表初始化set
- 使用迭代器范围初始化
std::vector<int> vec = {1, 2, 3};
std::set<int> mySet(vec.begin(), vec.end());		// 使用迭代器范围初始化set
- 使用另一个
std::set进行初始化
std::set<int> sourceSet = {1, 2, 3};
std::set<int> mySet(sourceSet);						// 使用另一个`std::set`进行初始化
1.5.3set的插入与删除
std::set中有关插入与修删除的函数分别是:
insert(),插入一个元素erase(),删除一个元素
插入元素的示例:
#include <iostream>
#include <set>

int  main() {
	std::set<int> mySet = { 1, 2, 3 };	// set初始化为1, 2, 3
	for (auto it = mySet.begin(); it != mySet.end(); it++) {
		std::cout << *it << " ";
	}
	mySet.insert(10);					// 插入一个元素10
	std::cout << std::endl;
	for (auto it = mySet.begin(); it != mySet.end(); it++) {
		std::cout << *it << " ";
	}
	return 0;
}
运行结果如下:
1 2 3
1 2 3 10
删除元素的示例:
#include <iostream>
#include <set>

int  main() {
	std::set<int> mySet = { 1, 2, 3 };	// set初始化为1, 2, 3
	for (auto it = mySet.begin(); it != mySet.end(); it++) {
		std::cout << *it << " ";
	}
	mySet.erase(1);					// 插入一个元素1
	std::cout << std::endl;
	for (auto it = mySet.begin(); it != mySet.end(); it++) {
		std::cout << *it << " ";
	}

	return 0;
}
运行结果如下:
1 2 3
2 3
1.5.4set的遍历
在C++标准库中std::set是基于红黑树实现的关联容器,其中元素按照特定的排序顺序规则进行存储和访问,所以std::set不支持使用[]通过下标来进行访问,对于std::set要访问其中的元素,我们可以使用迭代器或者范围-based for循环来访问
- 使用迭代器来遍历访问
举个例子:
#include <iostream>
#include <set>

int  main() {
	std::set<int> mySet = { 1, 2, 3 };	// set初始化为1, 2, 3
	for (std::set<int>::iterator it = mySet.begin(); it != mySet.end(); it++) {		// 手动指定迭代器类型
		std::cout << *it << " ";
	}
	std::cout << std::endl;
	for (auto it = mySet.begin(); it != mySet.end(); it++) {						// 使用auto关键字自动推断迭代器类型
		std::cout << *it << " ";
	}
	return 0;
}
运行结果如下:
1 2 3
1 2 3
- 使用范围-based for循环来遍历访问
举个例子:
#include <iostream>
#include <set>

int  main() {
	std::set<int> mySet = { 1, 2, 3 };	// set初始化为1, 2, 3
	for (const int& value : mySet) {			// 手动指定value的类型
		std::cout << value << " ";
	}
	std::cout << std::endl;
	for (const auto& value : mySet) {			// 使用auto关键字自动推导类型
		std::cout << value << " ";
	}

}
运行结果:
1 2 3
1 2 3
1.5.5set中的常用函数
count(),返回指定键在set中的出现次数find(),查找指定值的迭代器size(),获取元素的数量empty(),判断set是否为空clear(),清空set
(1)count()
std::set::count()会返回查找元素在容器中的次数,这里是std::set,不允许有重复的元素,所以如果查找到元素的话就返回1,没有查找到元素就返回0。
举个例子:
#include <iostream>
#include <set>

int  main() {
	std::set<int> mySet = { 1, 2, 3 };	// set初始化为1, 2, 3

	if (mySet.count(1) != 0) {		// 查找元素1
		std::cout << "找到元素";
	}
	else {
		std::cout << "未找到元素为";
	}
}
运行结果:
找到元素
(2)find()
std::set::find()会返回查找元素的迭代器,如果没找到,则遍历到std::set::end()
举个例子:
#include <iostream>
#include <set>

int  main() {
	std::set<int> mySet = { 1, 2, 3 };	// set初始化为1, 2, 3
	//auto it = mySet.find(3);
	auto it = mySet.find(5);

	if (it == mySet.end()) {
		std::cout << "遍历到末尾未找到元素" << std::endl;
	}
	else {
		std::cout << "找到元素为:" << *it << std::endl;
	}
}
运行结果为:
遍历到末尾未找到元素
找到元素为:3
1.6std::stack
在C++中,std::stack是一个容器适配器,它基于其他容器实现了栈的功能,栈是一种先进后出(first int last out, FILO)的数据结构,要使用std::stack我们得先包含头文件:
#include <stack>
1.6.1stack的初始化
std::stack的使用过程中一般使用默认初始化,即不给std::stack赋值,std::stack不支持使用花括号初始化器{}来进行初始化,但是std::stack可以使用其他容器来进行初始化,比如std::deque,这种初始化方式会调用适当的构建函数来构建栈对象。
举个例子:
#include <iostream>
#include <stack>
#include <deque>

int main() {
	std::deque<int> myDeque = { 1, 2, 3, 4, 5 };
	std::stack<int> myStack(myDeque);					// 使用std::deque来构建

	while (!myStack.empty()) {
		std::cout << myStack.top() << " ";
		myStack.pop();
	}
	return 0;
}
#include <iostream>
#include <stack>

int main() {
	std::stack<int> myStack({ 1, 2, 3, 4, 5 });		// // 使用std::deque作为底层容器

	while (!myStack.empty()) {
		std::cout << myStack.top() << " ";
		myStack.pop();
	}
	return 0;
}
运行结果如下:
5 4 3 2 1
1.6.2stack的常用函数
push(),向栈顶添加元素pop(),弹出栈顶元素,请注意无返回值top(),访问栈顶元素empty(),判断栈是否为空size(),获取栈中元素的数量
举个使用示例:
#include <iostream>
#include <stack>


int main() {
	std::stack<int> myStack;

	for (int i = 0; i < 10; i++) {
		myStack.push(i + 1);		// 向栈中添加元素
	}
	std::cout << "栈顶元素为: " << myStack.top() << std::endl;	// 查看栈顶元素
	std::cout << "弹出元素" << std::endl;		// 栈顶元素出栈
	myStack.pop();
	myStack.pop();
	std::cout << "栈中元素个数为: " << myStack.size() << std::endl;		// 查看元素个数
	std::cout << "栈是否为空: " << myStack.empty() << std::endl;			// 查看栈是否为空
	return 0;
}
运行结果如下:
栈顶元素为: 10
弹出元素
栈中元素个数为: 8
栈是否为空: 0
1.7std::queue
在C++标准库中,std::queue是一个容器适配器,它提供了队列的功能queue,队列是一种先进先出(first in first out)的数据结构,std::queue通过封装std:deque来实现队列操作,使用std::queue需要包含头文件:
#include <queue>
1.7.1queue的初始化
std::queue可以使用默认初始化
std::queue<int> myQueue;
std::queue也可以使用花括号初始化器{}来进行初始化
std::queue<int> myQueue = {1, 2, 3, 4, 5};
1.7.2queue的常用函数
push(),在队尾添加元素front(),访问队首元素pop(),移除队首元素,无返回值empty(),检查是否为空size(),返回队列中元素数量
举个例子:
#include <iostream>
#include <queue>

int main() {
	std::queue<int> myQueue;			// 默认初始化
	myQueue.push(1);					// 添加元素
	myQueue.push(2);
	myQueue.push(3);
	std::cout << "当前队首元素为: " << myQueue.front() << std::endl;		// 查看队首元素
	myQueue.pop();						// 移除队首元素
	std::cout << "当前队列中的元素数量为: " << myQueue.size() << std::endl;	// 查看队列中元素个数
	std::cout << "当前队列是否为空: " << myQueue.empty() << std::endl;		// 查看当前队列是否为空
	return 0;
}
运行结果:
当前队首元素为: 1
当前队列中的元素数量为: 2
当前队列是否为空: 0


![【Linux】服务器时区 [ <span style='color:red;'>CST</span> | UTC | GMT | RTC ]](https://img-blog.csdnimg.cn/direct/0ee9aa04da574dab937c119304cfd244.png)