前言
MySQL是一个关系型数据库管理系统,由瑞典 MySQL AB 公司开发,属于 Oracle 旗下产品。MySQL是最流行的关系型数据库管理系统之一,在 WEB 应用方面,MySQL是最好的RDBMS (Relational Database Management System,关系数据库管理系统)应用软件之一。
MySQL是一种关系型数据库管理系统,关系数据库将数据保存在不同的表中,而不是将所有数据放在一个大仓库内,这样就增加了速度并提高了灵活性。
一、数据库管理
数据库相当于文件夹
1.查看已有的数据库
show databases;
2.创建数据库
create database 数据库名字 DEFAULT CHARSET utf8 COLLATE utf8_general_ci;
- 例子:
create database d1 DEFAULT CHARSET utf8 COLLATE utf8_general_ci;
3.删除数据库
drop database 数据库名字;
4.进入数据库
use 数据库名字;
二、 数据表管理
数据表相当于文件
1.查看当前数据库下的所有数据表
show tables;
2.创建数据表
create table 表名称(
	列名称 类型,
    列名称 类型,
    列名称 类型
)default charset=utf8;
- 例子:
create table tb1(id int, name varchar(16),age int) default charset=utf8;
create table tb1(
    id int,
    name varchar(16),
    age int
) default charset=utf8;
create table tb1(
    id int,
    name varchar(16) not null,   -- 不允许为空
    age int null,                -- 允许为空(默认)
) default charset=utf8;
create table tb1(
    id int,
    name varchar(16),
    age int default 3        -- 插入数据时,age列的值默认3
) default charset=utf8;
create table tb1(
    id int primary key,     -- 主键(不允许为空,不允许重复)
                            --主键一般用于表示当前行的数据的编号(类似于人的身份证)
    name varchar(16),
    age int
) default charset=utf8;
create table tb1(
    id int auto_increment primary key, -- 内部维护,自增
    name varchar(16),
    age int
) default charset=utf8;
- 一般情况下,我们再创建表时都会这样来写:【标准】
create table tb1(
    id int not null auto_increment primary key,
    name varchar(16),
    age int
) default charset=utf8;
3.删除表
drop table 表名称;
4.查看表结构
mysql> desc tb1;
+-------+-------------+------+-----+---------+----------------+
| Field | Type        | Null | Key | Default | Extra          |
+-------+-------------+------+-----+---------+----------------+
| id    | int(11)     | NO   | PRI | NULL    | auto_increment |
| name  | varchar(16) | YES  |     | NULL    |                |
| age   | int(11)     | YES  |     | NULL    |                |
+-------+-------------+------+-----+---------+----------------+
3 rows in set (0.00 sec)
三、常用数据类型
1.整型
tinyint
- 有符号,取值范围:-128 ~ 127 (有正有负)【默认】
- 无符号,取值范围:0 ~ 255(只有正)
create table tb2(
    id int not null auto_increment primary key,
    age tinyint   -- 有符号:取值范围:-128 ~ 127
) default charset=utf8;
create table tb3(
    id int not null auto_increment primary key,
    age tinyint unsigned -- 无符号:取值范围:0 ~ 255
) default charset=utf8;
int
- int 表示有符号,取值范围:-2147483648 ~ 2147483647
- int unsigned 表示无符号,取值范围:0 ~ 4294967295
bigint
- 有符号,取值范围:-9223372036854775808 ~ 9223372036854775807
- 无符号,取值范围:0 ~ 18446744073709551615
2.浮点型
float
- 占4个字节,精度是6位
double
- double 占8个字节,精度是16位
decimal
- 准确的小数值,m是数字总个数(负号不算),d是小数点后个数。 m最大值为65,d最大值为30。
- 例子:
 create table tb3(
 	id int not null primary key auto_increment,
 	salary decimal(8,2)
 )default charset=utf8;

 insert into tb3(salary) values(1.28);
 insert into tb3(salary) values(5.289);
 insert into tb3(salary) values(5.282);
 insert into tb3(salary) values(122115.11);

 select * from tb3;
3.字符型
char(m)
- 速度快
- 定长字符串,m代表字符串的长度,最多可容纳255个字符
- char(11),固定用11个字符串进行存储,哪怕真是没有11个字符,也会按照11存储。
 create table tb4(
 	id int not null primary key auto_increment,
 	mobile char(11)
 )default charset=utf8;

 insert into tb4(mobile) values("151");
 insert into tb4(mobile) values("15131255555");
varchar(m)
- 节省空间
- 变长字符串,m代表字符的长度。 最大65535字节/3 = 最大的m
- varchar(11),真实数据有多少长久按照多长存储
 create table tb5(
 	id int not null primary key auto_increment,
 	mobile varchar(11)
 )default charset=utf8;

 insert into tb5(mobile) values("151");
 insert into tb5(mobile) values("15131255555");
text
- text数据类型用于保存变长的大字符串,可以组多到65535 (216 − 1)个字符。
- 一般情况下,长文本会用text类型。例如:文章、新闻等。
 create table tb6(
 	id int not null primary key auto_increment,
     title varchar(128),
 	content text
 )default charset=utf8;
mediumtext
- A TEXT column with a maximum length of 16,777,215 (224 − 1) characters.
longtext
- A TEXT column with a maximum length of 4,294,967,295 or 4GB (232 − 1)
4.时间
datetime
- YYYY-MM-DD HH:MM:SS(1000-01-01 00:00:00/9999-12-31 23:59:59)
date
- YYYY-MM-DD(1000-01-01/9999-12-31)
5.其他
- MySQL还有很多其他的数据类型,例如:
set、enum、TinyBlob、Blob、MediumBlob、LongBlob 等,详细见官方文档:https://dev.mysql.com/doc/refman/5.7/en/data-types.html
四、数据行操作
数据行相当于文件中的某一行内容
1. 新增数据
insert into 表名(列名,列名) values(值,值);
insert into 表名(列名,列名) values(值,值),(值,值),(值,值),(值,值);
2.删除数据
delete from 表名;
delete from 表名 where 条件;
- 例子:
delete from tb7;
delete from tb7 where id = 3;
delete from tb7 where id = 4 and name="谢涛";
delete from tb7 where id = 4 or name="谢涛";
delete from tb7 where id > 4;
delete from tb7 where id >= 4;
delete from tb7 where id != 4;
delete from tb7 where id in (1,5);
3.修改数据
update 表名 set 列=值;
update 表名 set 列=值,列=值;
update 表名 set 列=值 where 条件;
- 例子:
update tb7 set password="哈哈哈";
update tb7 set email="哈哈哈" where id > 5;

update tb7 set age=age+10 where id > 5;
4.查询数据
select * from 表名称;
select 列名称,列名称 from 表名称;

select 列名称,列名称 from 表名称 where 条件;
- 例子:
select * from tb7;
select id,name from tb7;
select id,name from tb7 where id > 10;
select id,name from tb7 where name="xx" and password="xx";
五、案例:员工管理
1.任务
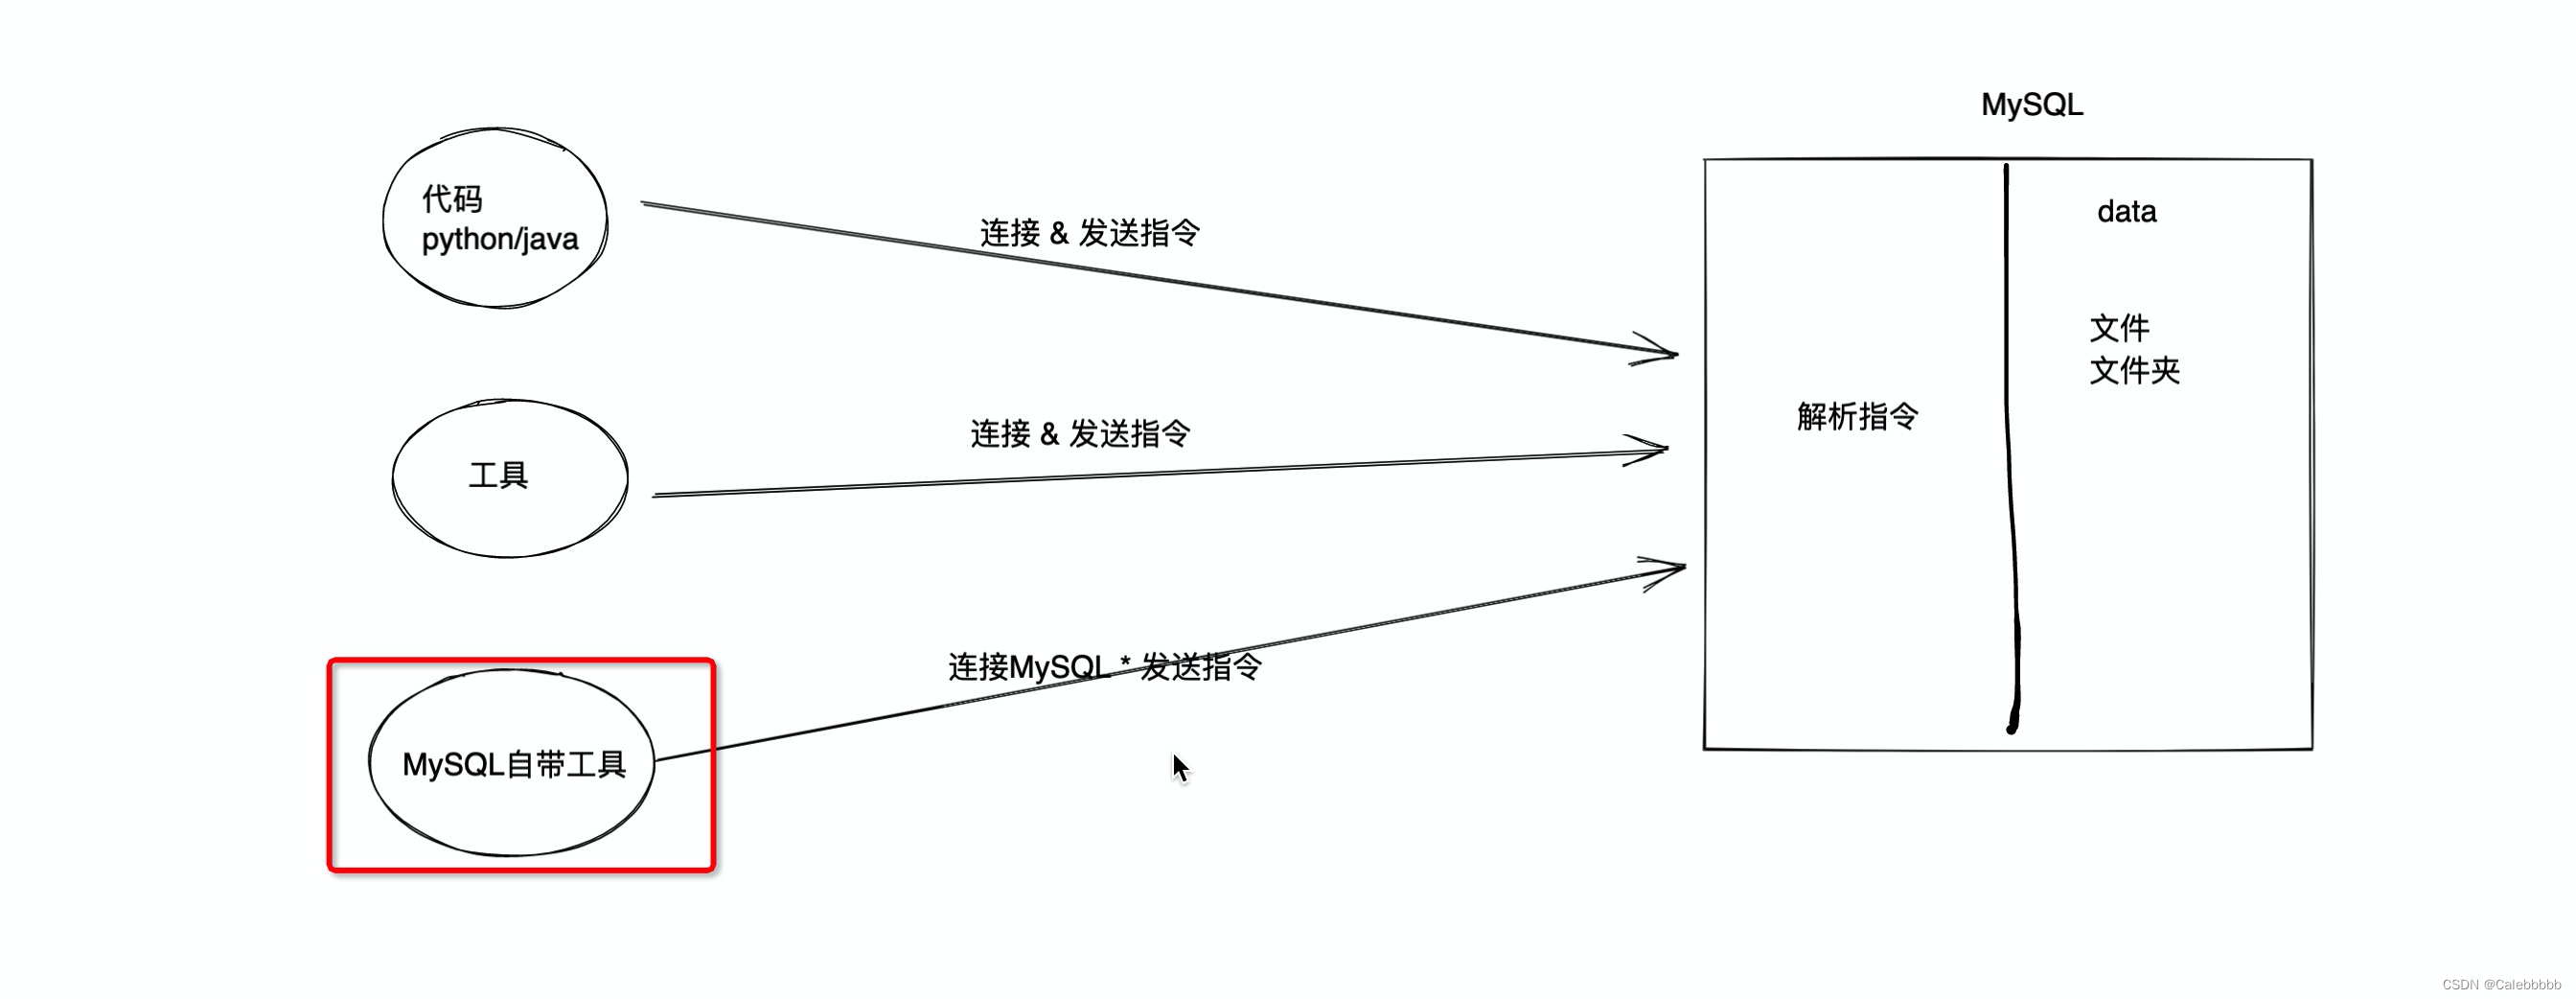
使用MySQL内置工具(命令)
创建数据库:unicom
数据一张表:admin
表名:admin
列:
    id,整型,自增,主键。
    username 字符串 不为空,
    password 字符串 不为空,
    mobile 字符串 不为空
Python代码实现:
- 添加用户
- 删除用户
- 查看用户
- 更新用户信息
2.创建表结构
create database unicom DEFAULT CHARSET utf8 COLLATE utf8_general_ci;
use unicom;
create table admin(
    id int not null auto_increment primary key,
    username varchar(16) not null,
    password varchar(64) not null,
    mobile char(11) not null
) default charset=utf8;
3.Python操作MySQL
- 用Python代码连接MySQL并发送指令。
pip install pymysql
创建数据
import pymysql

# 1.连接MySQL
conn = pymysql.connect(host="127.0.0.1", port=3306, user='root', passwd="root123", charset='utf8', db='unicom')
cursor = conn.cursor(cursor=pymysql.cursors.DictCursor)

# 2.发送指令
cursor.execute("insert into admin(username,password,mobile) values('wupeiqi','qwe123','15155555555')")
conn.commit()

# 3.关闭
cursor.close()
conn.close()
- 千万不要用字符串格式化去做SQL的拼接,安全隐患SQL注入
- 要使用列表或者对象的方式
import pymysql

# 1.连接MySQL
conn = pymysql.connect(host="127.0.0.1", port=3306, user='root', passwd="root123", charset='utf8', db='unicom')
cursor = conn.cursor(cursor=pymysql.cursors.DictCursor)

# 2.发送指令(千万不要用字符串格式化去做SQL的拼接,安全隐患SQL注入)
# 使用列表的方法
sql = "insert into admin(username,password,mobile) values(%s,%s,%s)"
cursor.execute(sql, ["韩超", "qwe123", "1999999999"])
# 使用对象的方法
sql = "insert into admin(username,password,mobile) values( %(n1)s, %(n2)s, %(n3)s)"
cursor.execute(sql, {"n1": "集宁", "n2": "qwe123", "n3": "1999999999"})


conn.commit()

# 3.关闭
cursor.close()
conn.close()
- 让用户输入信息
import pymysql

while True:
    user = input("用户名:")
    if user.upper() == 'Q':
        break
    pwd = input("密码:")
    mobile = input("手机号:")

    # 1.连接MySQL
    conn = pymysql.connect(host="127.0.0.1", port=3306, user='root', passwd="root123", charset='utf8', db='unicom')
    cursor = conn.cursor(cursor=pymysql.cursors.DictCursor)

    # 2.发送指令(千万不要用字符串格式化去做SQL的拼接,安全隐患SQL注入)
    sql = "insert into admin(username,password,mobile) values(%s,%s,%s)"
    cursor.execute(sql, [user, pwd, mobile])
    conn.commit()

    # 3.关闭
    cursor.close()
    conn.close()
查询数据
- fetchall得所有满足条件的
import pymysql

# 1.连接MySQL
conn = pymysql.connect(host="127.0.0.1", port=3306, user='root', passwd="root123", charset='utf8', db='unicom')
cursor = conn.cursor(cursor=pymysql.cursors.DictCursor)

# 2.发送指令( *** 千万不要用字符串格式化去做SQL的拼接,安全隐患SQL注入***)
cursor.execute("select * from admin where id > %s", [2, ])

# 获取符合条件的所有数据,得到的是 [ 字典,字典, ]    空列表
data_list = cursor.fetchall()
for row_dict in data_list:
    print(row_dict)

# 3.关闭连接
cursor.close()
conn.close()
- fetchone得第一个满足条件的
import pymysql

# 1.连接MySQL
conn = pymysql.connect(host="127.0.0.1", port=3306, user='root', passwd="root123", charset='utf8', db='unicom')
cursor = conn.cursor(cursor=pymysql.cursors.DictCursor)

# 2.发送指令( *** 千万不要用字符串格式化去做SQL的拼接,安全隐患SQL注入***)
cursor.execute("select * from admin where id > %s", [2, ])

# 获取符合条件的第一条数据,字典    None
res = cursor.fetchone()
print(res)  # {'id': 3, 'username': '集宁', 'password': 'qwe123', 'mobile': '1999999999'}

# 3.关闭连接
cursor.close()
conn.close()
删除数据
import pymysql

# 1.连接MySQL
conn = pymysql.connect(host="127.0.0.1", port=3306, user='root', passwd="root123", charset='utf8', db='unicom')
cursor = conn.cursor(cursor=pymysql.cursors.DictCursor)

# 2.发送指令( *** 千万不要用字符串格式化去做SQL的拼接,安全隐患SQL注入***)
cursor.execute("delete from admin where id=%s", [3, ])
conn.commit()

# 3.关闭
cursor.close()
conn.close()
修改数据
import pymysql

# 1.连接MySQL
conn = pymysql.connect(host="127.0.0.1", port=3306, user='root', passwd="root123", charset='utf8', db='unicom')
cursor = conn.cursor(cursor=pymysql.cursors.DictCursor)

# 2.发送指令( *** 千万不要用字符串格式化去做SQL的拼接,安全隐患SQL注入***)
cursor.execute("update admin set mobile=%s where id=%s", ["1888888888", 4, ])
conn.commit()

# 3.关闭
cursor.close()
conn.close()
强调
- 在进行 新增、删除、修改时,一定要记得commit,不然数据库么有数据。
 cursor.execute("..")
 conn.commit()
- 在查询时,不需要commit,执行fetchall / fetchone
 cursor.execute("...")

 # 第一条数据,字典,无数据时是空列表
 v1 = cursor.fetchone()

 # 所有数据,列表套字典,无数据时是None
 v1 = cursor.fetchall()
- 对于SQL语句不要用Python的字符串格式化进行拼接(会被SQL注入),一定要用execute+参数
cursor.execute(".%s..... %s", ["xx","xx"])
六、案例:用户管理(Flask + Mysql)
1.main.py
from flask import Flask, render_template, request
import pymysql

app = Flask(__name__)


# 添加用户
@app.route("/add/user", methods=['GET', 'POST'])
def addUser():
    if request.method == 'GET':
        return render_template("addUser.html")
    else:
        username = request.form.get('user')
        password = request.form.get('pwd')
        mobile = request.form.get('mobile')

        # 1.连接Mysql
        conn = pymysql.connect(host='127.0.0.1', port=3306, user='root',
                            passwd='Syz123!@#', charset='utf8', db='unicom')
        cursor = conn.cursor(cursor=pymysql.cursors.DictCursor)

        # 2.发送指令
        sql = "insert into admin(username, password, mobile) values(%s, %s, %s);"
        cursor.execute(sql, [username, password, mobile])
        conn.commit()

        # 3.关闭
        cursor.close()
        conn.close()

        return "添加成功"


# 展示用户
@app.route("/show/user", methods=['GET', 'POST'])
def showUser():
    username = request.form.get('user')
    password = request.form.get('pwd')
    mobile = request.form.get('mobile')

    # 1.连接Mysql
    conn = pymysql.connect(host='127.0.0.1', port=3306, user='root',
                        passwd='Syz123!@#', charset='utf8', db='unicom')
    cursor = conn.cursor(cursor=pymysql.cursors.DictCursor)

    # 2.发送指令
    sql = "select * from admin"
    cursor.execute(sql)
    data_list = cursor.fetchall()

    # 3.关闭
    cursor.close()
    conn.close()

    return render_template("showUser.html", data_list=data_list)


if __name__ == '__main__':
    app.run(host='0.0.0.0', port=5200, debug=True)
2.HTML
<!DOCTYPE html>
<html lang="en">
<head>
    <meta charset="UTF-8">
    <title>Document</title>

    <link rel="stylesheet" href="../static/plugins/bootstrap-3.4.1/css/bootstrap.css">

</head>
<body>
    <div class="container">
        <h1>用户列表</h1>
        <table class="table table-bordered">
            <thead>
                <tr>
                    <th>ID</th>
                    <th>姓名</th>
                    <th>密码</th>
                    <th>手机号</th>
                </tr>
            </thead>
            <tbody>
                {% for item in data_list %}
                <tr>
                    <td>{{ item.id }}</td>
                    <td>{{ item.username }}</td>
                    <td>{{ item.password }}</td>
                    <td>{{ item.mobile }}</td>
                </tr>
                {% endfor %}
            </tbody>
        </table>
    </div>

</body>

</html>
- 添加界面:


- 展示界面:















![[自研开源] 数据集成之分批传输 v0.7](https://img-blog.csdnimg.cn/direct/88890fff684d4ea0a005e1e62a2dd598.png)