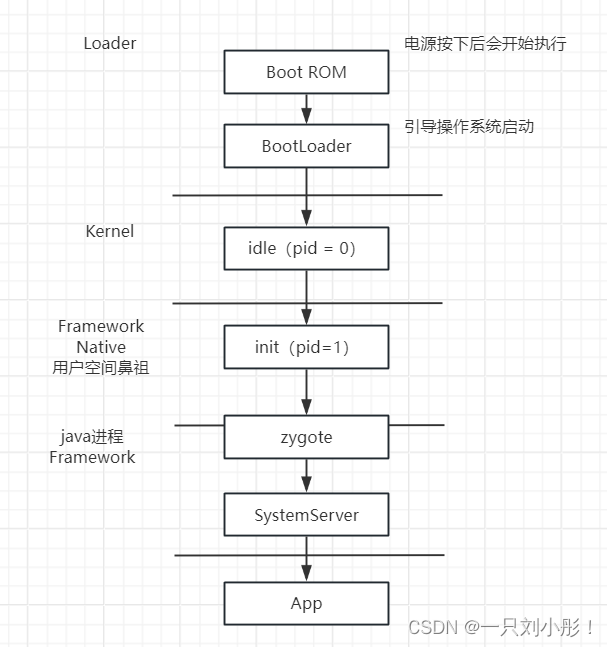
本文基于Android 7.1
在开机过程中,Systemserver 会启动 WindowManagerService,并调用其systemReady 方法。进而调用PhoneWindowManager的systemReady方法
@Override
    public void systemReady() {
        mKeyguardDelegate = new KeyguardServiceDelegate(mContext,
                this::onKeyguardShowingStateChanged);
        mKeyguardDelegate.onSystemReady();

        boolean bindKeyguardNow;

        synchronized (mLock) {
            mSystemReady = true;

            bindKeyguardNow = mDeferBindKeyguard;
			Slog.d(TAG,"bindKeyguardNow:"+bindKeyguardNow);
        }

        if (bindKeyguardNow) {
            mKeyguardDelegate.bindService(mContext);
            mKeyguardDelegate.onBootCompleted();
        }

    }
首先初始化 KeyguardServiceDelegate 对象,并调用其 onSystemReady 方法。
public void onSystemReady() {
		Slog.d(TAG,"mKeyguardService:"+mKeyguardService);
        if (mKeyguardService != null) {
            mKeyguardService.onSystemReady();
        } else {
            mKeyguardState.systemIsReady = true;
        }
    }
值得注意的是:
- PhoneWindowManager的 systemReady 方法中 ,bindKeyguardNow为false,所以并不会在这里 bindService
- KeyguardServiceDelegate 的 onSystemReady 方法中,mKeyguardService还是为null ,所以在改方法中只是将 mKeyguardState.systemIsReady 变量置为true
WindowManager: bindKeyguardNow:false
KeyguardServiceDelegate:mKeyguardService:null
真正bindService 的地方在 PhoneWindowManager 中的 systemBooted 方法。
@Override
    public void systemBooted() {
		Log.d(TAG,"systemBooted:",new Exception());
        boolean bindKeyguardNow = false;
        synchronized (mLock) {

            if (mKeyguardDelegate != null) {
                bindKeyguardNow = true;
            } else {
                mDeferBindKeyguard = true;
            }
        }
        if (bindKeyguardNow) {//绑定服务
            mKeyguardDelegate.bindService(mContext);
            mKeyguardDelegate.onBootCompleted();
        }
        synchronized (mLock) {
            mSystemBooted = true;
        }
        ......
    }
在前面已经初始化了mKeyguardDelegate对象,所以这里不为null,bindKeyguardNow为true,调用 KeyguardServiceDelegate 的 bindService 方法去绑定服务
public void bindService(Context context) {
        Intent intent = new Intent();
        final Resources resources = context.getApplicationContext().getResources();

        final ComponentName keyguardComponent = ComponentName.unflattenFromString(
                resources.getString(com.android.internal.R.string.config_keyguardComponent));
        intent.addFlags(Intent.FLAG_DEBUG_TRIAGED_MISSING);
        intent.setComponent(keyguardComponent);

        if (!context.bindServiceAsUser(intent, mKeyguardConnection,
                Context.BIND_AUTO_CREATE, mScrimHandler, UserHandle.SYSTEM)) {

           ......
        }


    	......
    }
这里 keyguardComponent 为 com.android.systemui/com.android.systemui.keyguard.KeyguardService
<!-- Keyguard component -->
    <string name="config_keyguardComponent" translatable="false">com.android.systemui/com.android.systemui.keyguard.KeyguardService</string>
该服务在 SystemUI中
<service
            android:name=".keyguard.KeyguardService"
            android:exported="true"
            android:enabled="@bool/config_enableKeyguardService" />
注意这里可以配置enable,不启动KeyguardService,即配置 config_enableKeyguardService 决定是否永远禁止锁屏界面.
绑定成功的话,会调用 mKeyguardConnection 的onServiceConnected 方法
private final ServiceConnection mKeyguardConnection = new ServiceConnection() {
        @Override
        public void onServiceConnected(ComponentName name, IBinder service) {
            if (DEBUG) Log.v(TAG, "*** Keyguard connected (yay!)");
            mKeyguardService = new KeyguardServiceWrapper(mContext,
                    IKeyguardService.Stub.asInterface(service), mShowingStateChangedCallback);
            if (mKeyguardState.systemIsReady) {
                // If the system is ready, it means keyguard crashed and restarted.
                mKeyguardService.onSystemReady();

                ......
        }
    };
前面已经将 mKeyguardState.systemIsReady 置为true 了,所以这里会调用 KeyguardServiceWrapper 的 onSystemReady方法, 最终 调用KeyguardViewMediator 的 onSystemReady 方法
public void onSystemReady() {
        synchronized (this) {
            if (DEBUG) Log.d(TAG, "onSystemReady");
            mSystemReady = true;
            doKeyguardLocked(null);
            mUpdateMonitor.registerCallback(mUpdateCallback);
        }

      ......
    }
在 doKeyguardLocked 方法中,经过一系列的判断,决定是否需要显示锁屏界面,如果需要显示,则调用showLocked 方法去显示锁屏界面。值得注意的是,这里 读取了 数据库中 lockscreen.disabled 字符串的值,来决定是否显示锁屏界面。而该值可以通过 def_lockscreen_disabled 来配置。即可以通过 配置 def_lockscreen_disabled 的值,来决定是否出厂默认禁止锁屏界面(该方法是LockPatternUtils的 isLockScreenDisabled,感兴趣的话自行分析)。
private void showLocked(Bundle options) {
        Trace.beginSection("KeyguardViewMediator#showLocked aqcuiring mShowKeyguardWakeLock");
        if (DEBUG) Log.d(TAG, "showLocked");
        // ensure we stay awake until we are finished displaying the keyguard
        mShowKeyguardWakeLock.acquire();
        Message msg = mHandler.obtainMessage(SHOW, options);
        mHandler.sendMessage(msg);
        Trace.endSection();
    }

private Handler mHandler = new Handler(Looper.myLooper(), null, true /*async*/) {
        @Override
        public void handleMessage(Message msg) {
            switch (msg.what) {
                case SHOW:
                    handleShow((Bundle) msg.obj);
                    break;
在 handleShow 中 调用StatusBarKeyguardViewManager 的show 方法
public void show(Bundle options) {
        mShowing = true;
        mStatusBarWindowManager.setKeyguardShowing(true);
        mScrimController.abortKeyguardFadingOut();
        reset();
    }


public void reset() {
        if (mShowing) {
            if (mOccluded) {
                ......
            } else {
                showBouncerOrKeyguard();
            }
            ......
        }
    }

protected void showBouncerOrKeyguard() {
        if (mBouncer.needsFullscreenBouncer()) {

           ......
        } else {
            ......
            mBouncer.prepare();
        }
    }
调用 KeyguardBouncer 的 prepare 方法
public void prepare() {
        boolean wasInitialized = mRoot != null;
        ensureView();
        if (wasInitialized) {
            mKeyguardView.showPrimarySecurityScreen();
        }
        mBouncerPromptReason = mCallback.getBouncerPromptReason();
    }
最终调用打 KeyguardSecurityContainer 的 showPrimarySecurityScreen 方法 ,先得到 锁屏的模式,然后去显示锁屏界面
void showPrimarySecurityScreen(boolean turningOff) {
        SecurityMode securityMode = mSecurityModel.getSecurityMode();
        if (DEBUG) Log.v(TAG, "showPrimarySecurityScreen(turningOff=" + turningOff + ")");
        showSecurityScreen(securityMode);//显示锁屏界面
    }