1、 Elasticsearch集群部署
服务器
| 安装软件 | 主机名 | IP地址 | 系统版本 | 配置 |
|---|---|---|---|---|
| Elasticsearch | Elk | 10.12.153.180 | centos7.5.1804 | 2核4G |
| Elasticsearch | Es1 | 10.12.153.178 | centos7.5.1804 | 2核4G |
| Elasticsearch | Es2 | 10.12.153.179 | centos7.5.1804 | 2核4G |
2、创建运行的ES普通用户

3、上传es的数据包
4、解压es数据包,并将数据包改名放到指定目录,方便我们后续操作

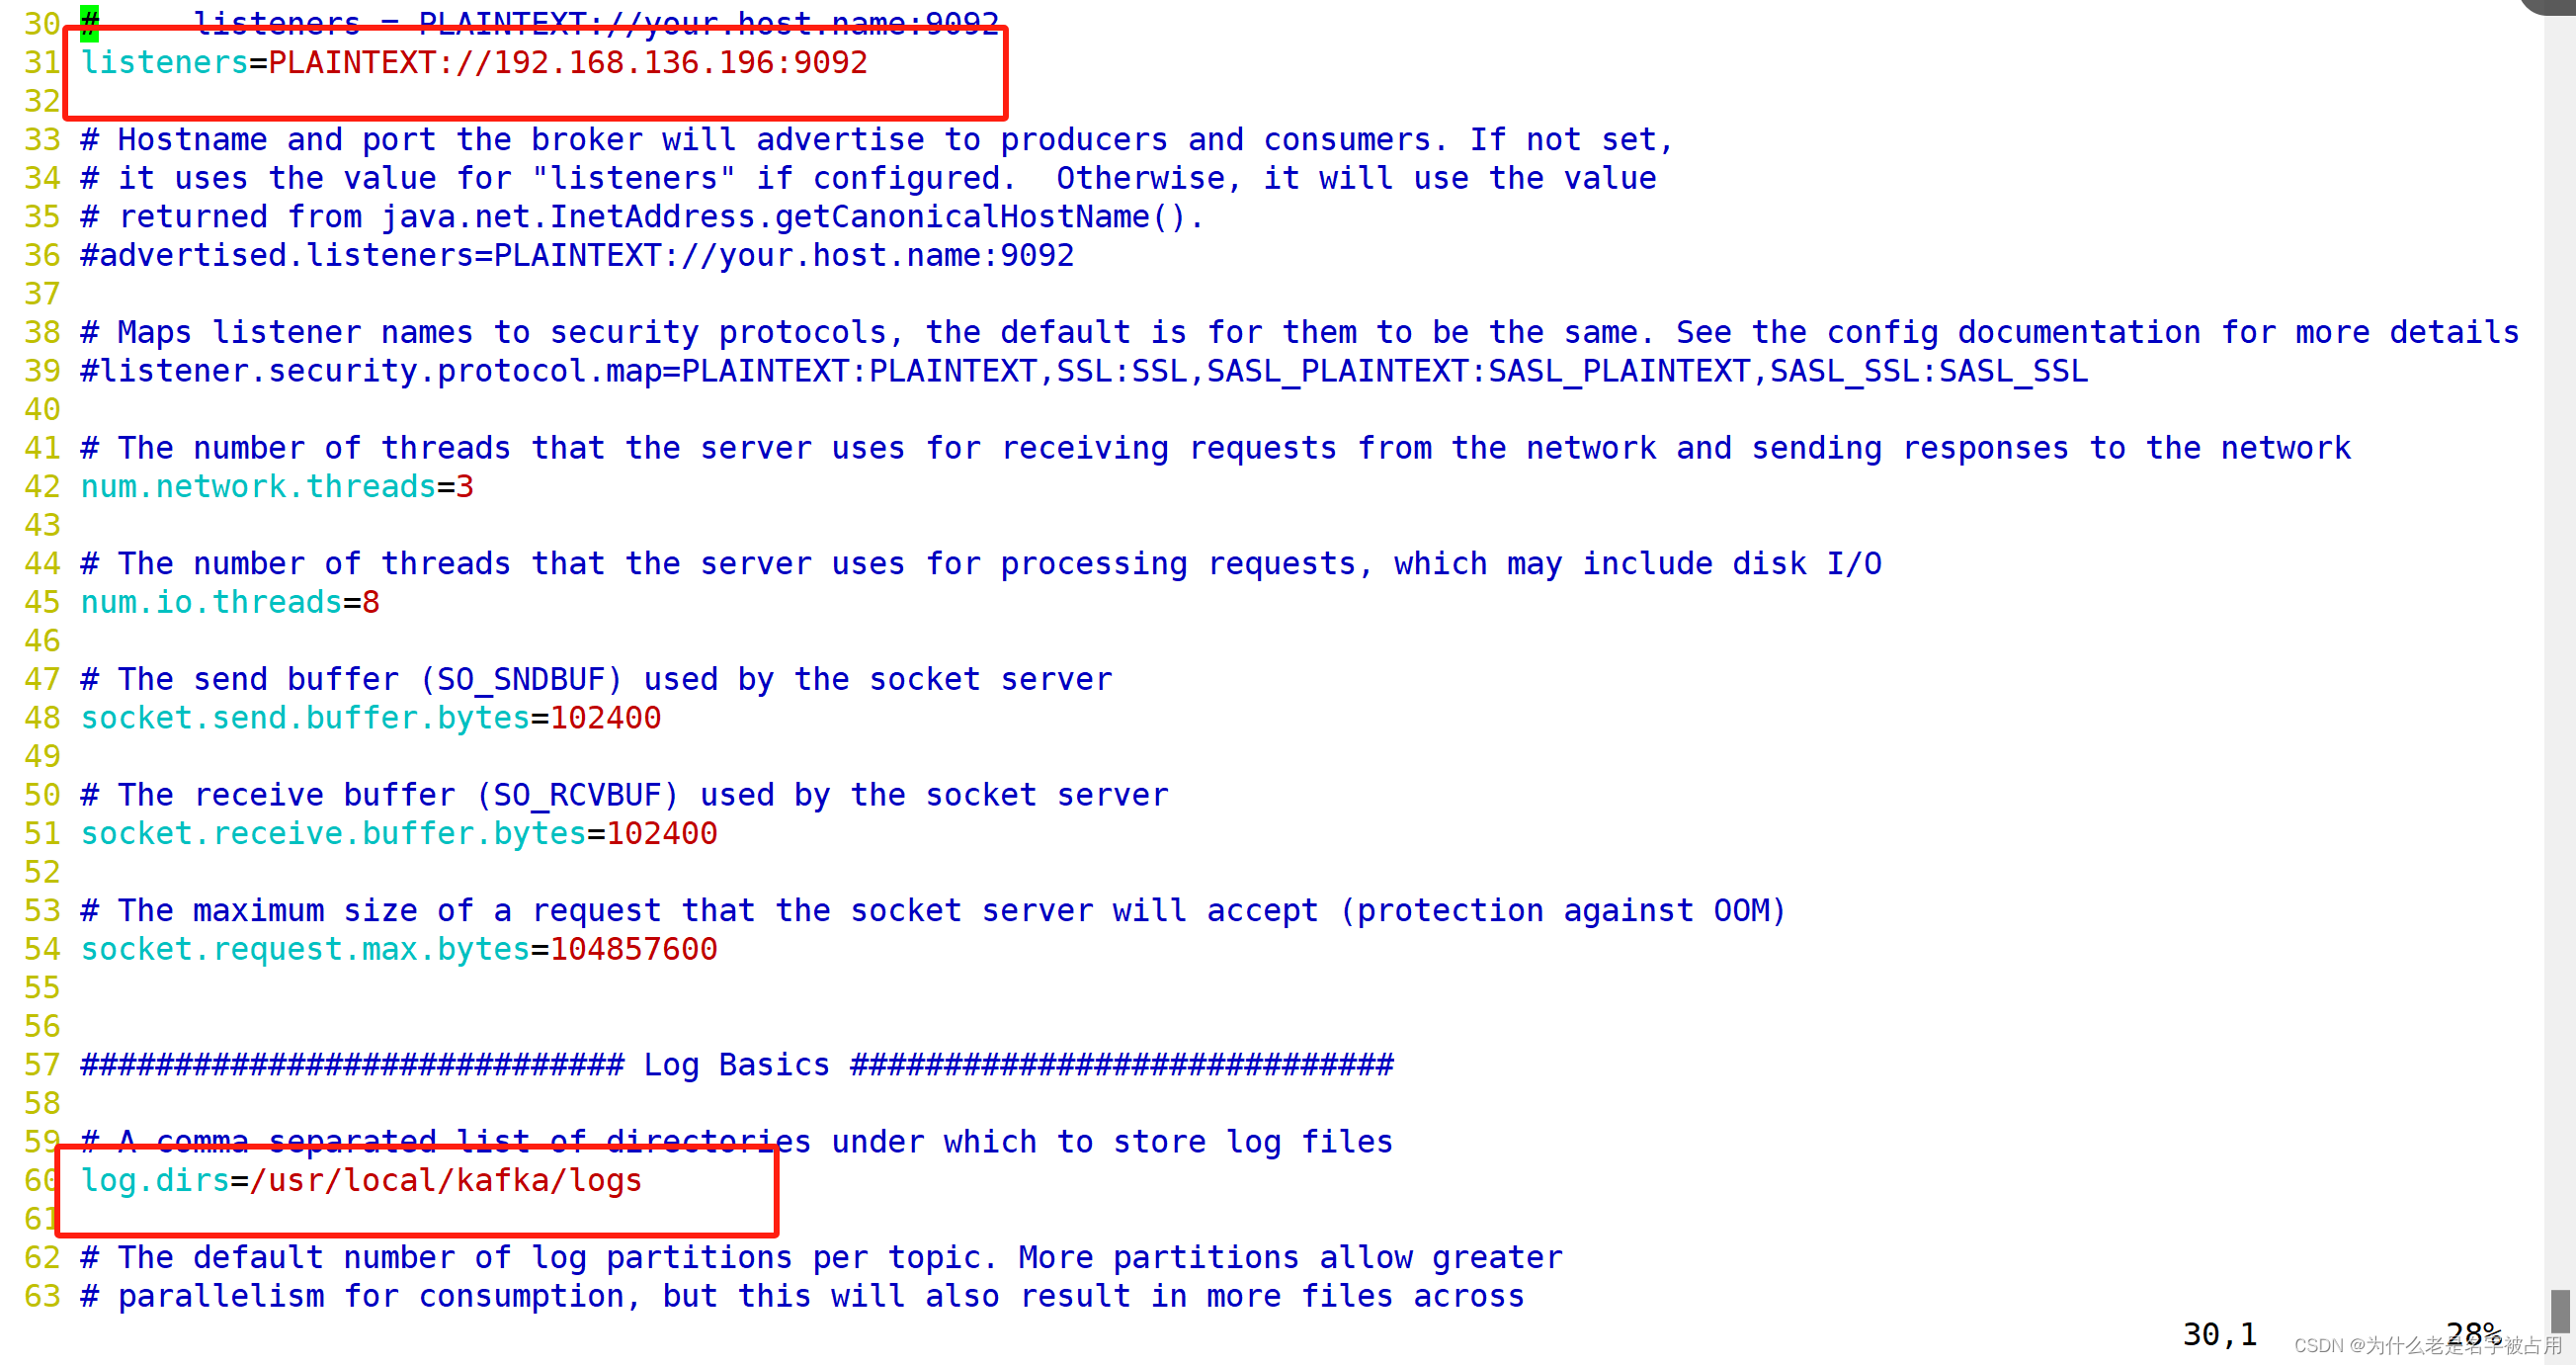
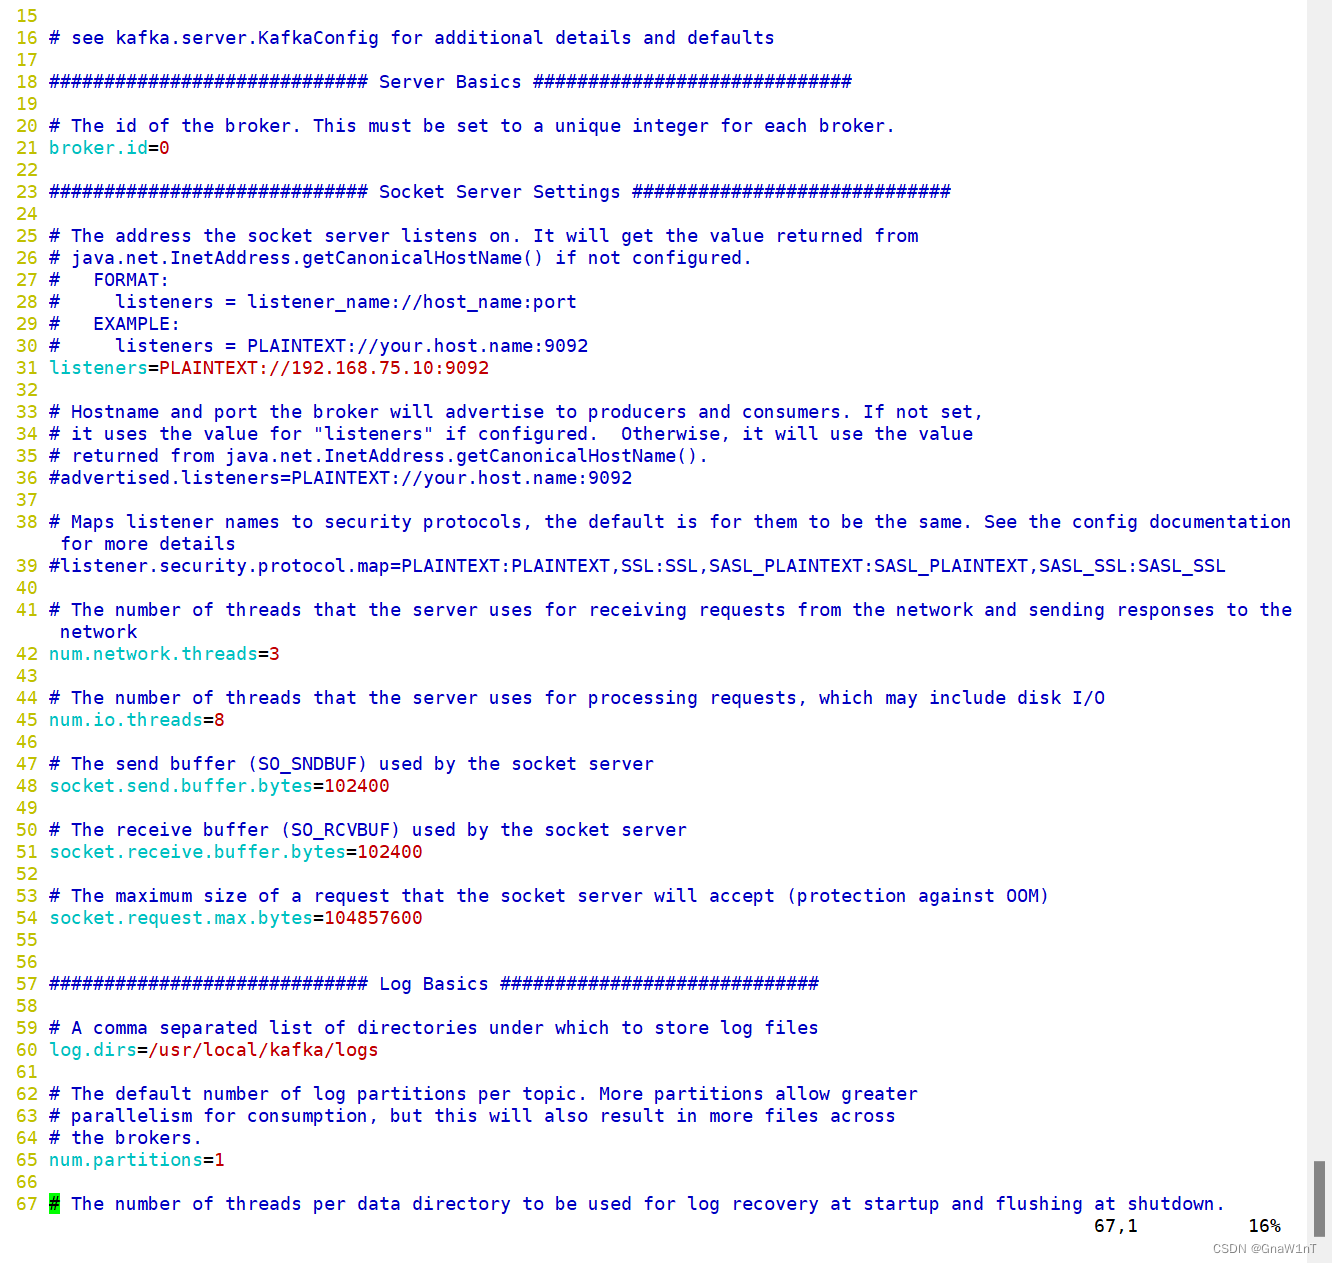
5、打开配置文件 vim /usr/local/es/config/elasticsearch.yml 将里面的内容全部删掉(dG)添加以下内容 我在这里做的是单节点模式
cluster.name: bjbpe01-elk #(集群名称不做修改)
cluster.initial_master_nodes: ["10.12.153.180","10.12.153.178","10.12.153.179"] # 单节点模式这里的地址只填写本机地址
node.name: elk01  #(做修改)
node.master: true
node.data: true
path.data: /data/elasticsearch/data
path.logs: /data/elasticsearch/logs
bootstrap.memory_lock: false
bootstrap.system_call_filter: false
network.host: 0.0.0.0
http.port: 9200
transport.tcp.port: 9300
# 单节点模式下,将discovery开头的行注释
discovery.seed_hosts: ["10.3.145.56","10.3.145.57"] #(改成另外两台服务器的名称)
discovery.zen.minimum_master_nodes: 2
discovery.zen.ping_timeout: 150s
discovery.zen.fd.ping_retries: 10
client.transport.ping_timeout: 60s
http.cors.enabled: true
http.cors.allow-origin: "*"

6、设置JVM堆的大小
[root@es1 ~]# sed -i 's/## -Xms4g/-Xms4g/' /usr/local/es/config/jvm.options
[root@es1 ~]# sed -i 's/## -Xmx4g/-Xmx4g/' /usr/local/es/config/jvm.options
7、创建ES数据及日志存储目录
[root@es1 ~]# mkdir -p /data/elasticsearch/data
[root@es1 ~]# mkdir -p /data/elasticsearch/logs
8、修改安装目录及储存目录权限
[root@es1 ~]# chown -R es.es /data/elasticsearch
[root@es1 ~]# chown -R es.es /usr/local/es
ES集群系统优化
9、
(1)增大最大文件打开数
永久生效方法:
[root@es1 ~]# echo "* soft nofile 65536" >> /etc/security/limits.conf
(2)增加最大进程数
[root@es1 ~]# echo "* soft nproc 65536" >> /etc/security/limits.conf
* soft nofile 65536
* hard nofile 131072
* soft nproc 4096
* hard nproc 4096
更多的参数调整可以直接用这个
3)增加最大内存映射数
[root@es1 ~]# echo "vm.max_map_count=262144" >> /etc/sysctl.conf
[root@es1 ~]# sysctl -p
10、启动ES集群
[root@es1 ~]# su - es -c "cd /usr/local/es && nohup bin/elasticsearch &"

测试:访问浏览器http://10.12.153.180:9200

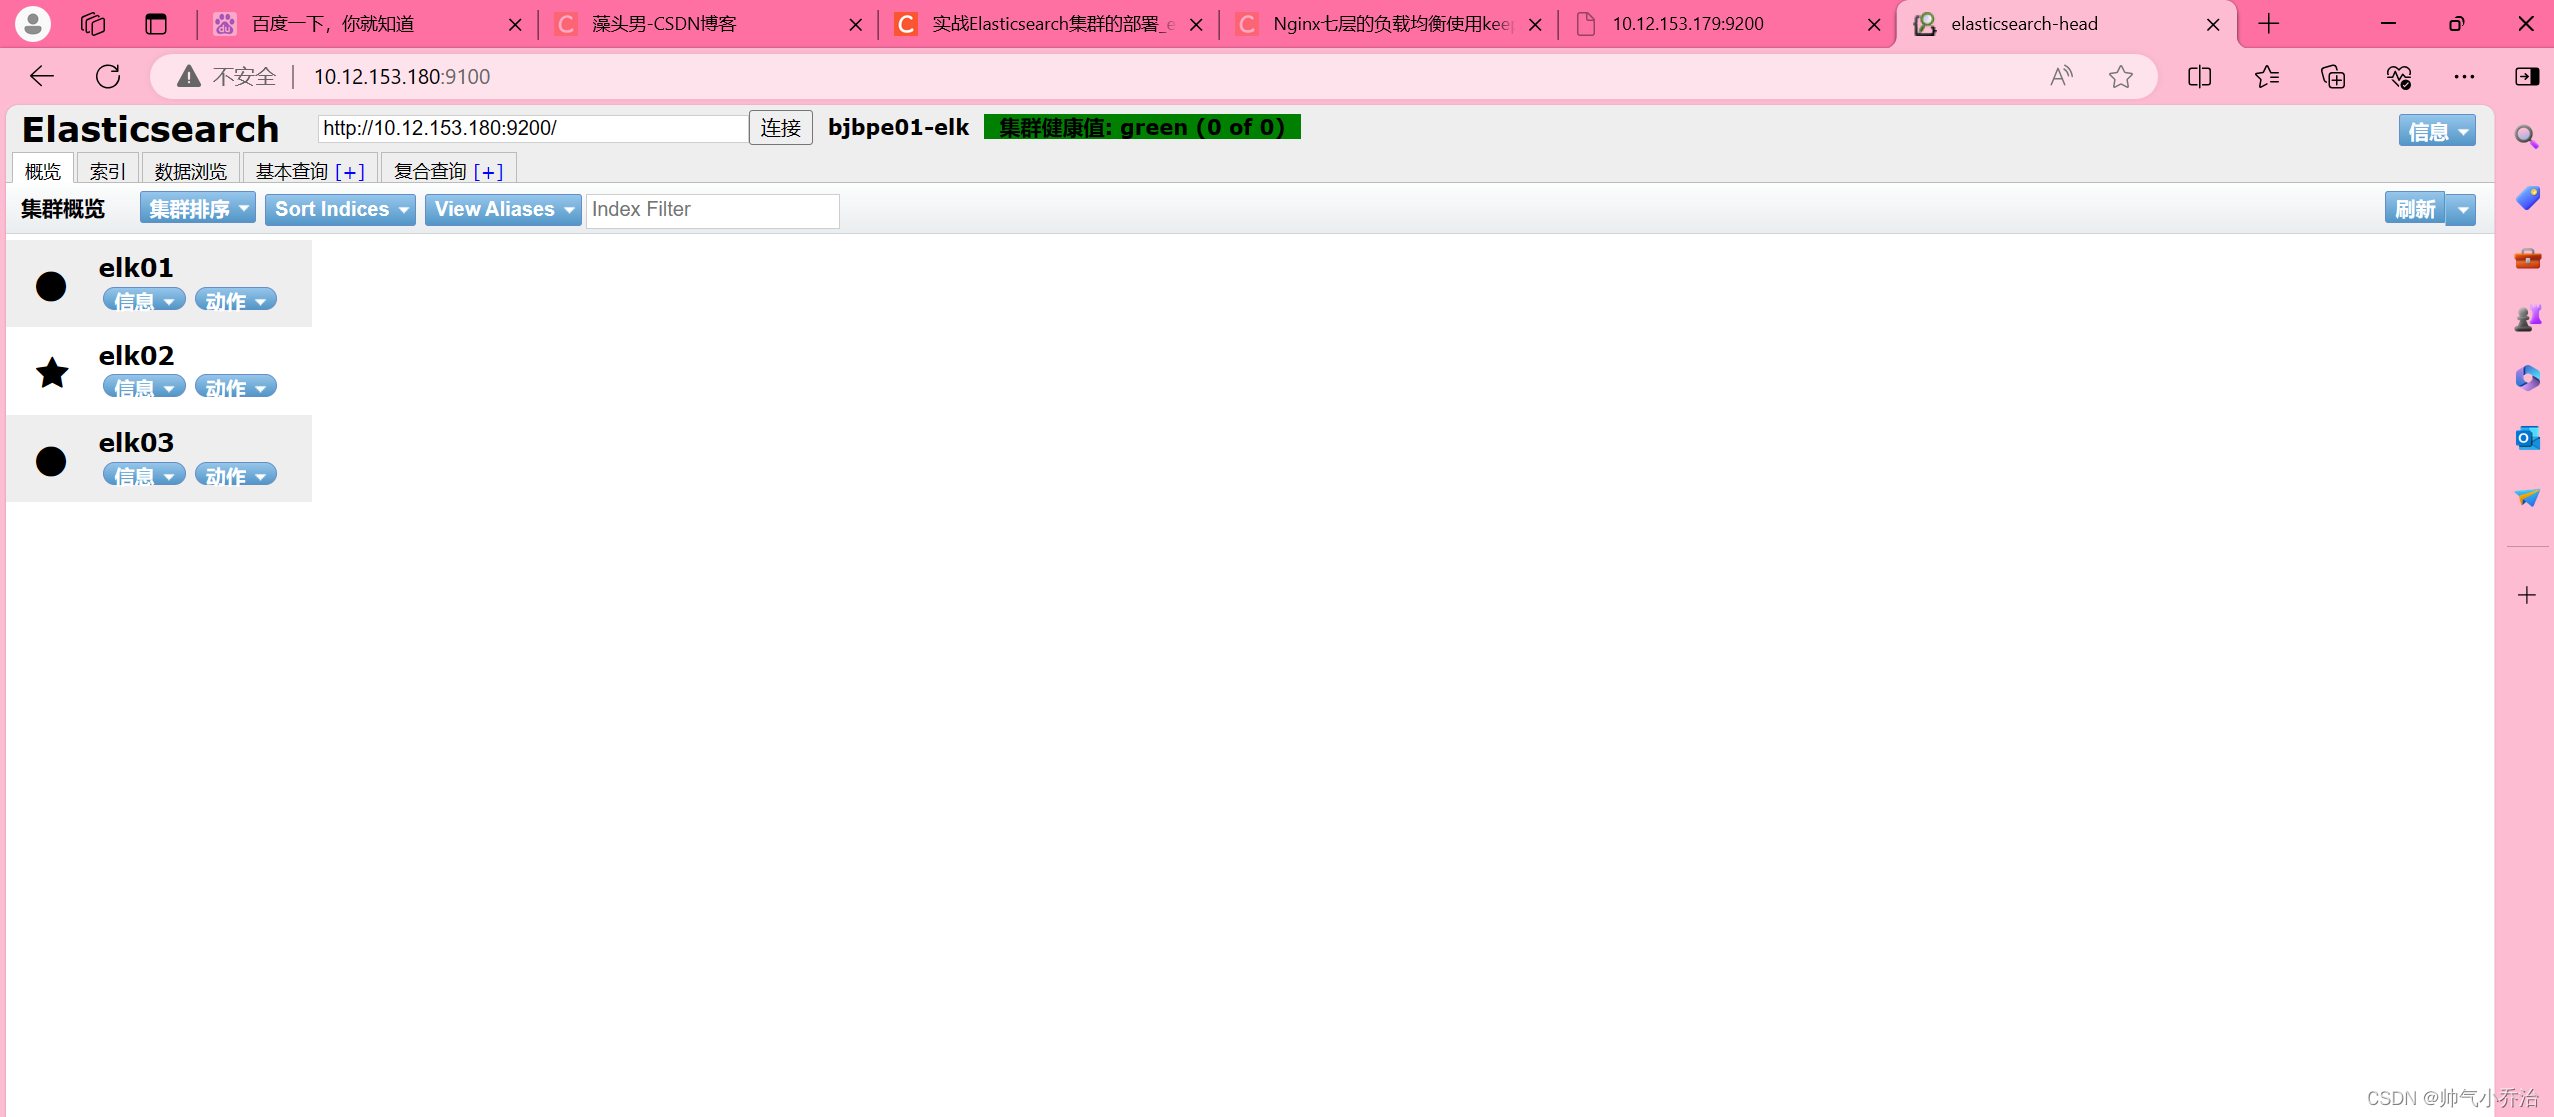
11、安装配置head监控插件 (只在第一台es部署)
| 安装软件 | 主机名 | IP地址 | 系统版本 | 配置 |
|---|---|---|---|---|
| Elasticsearch-head-master | Elk | 10.12.153.180 | centos7.5.1804 | 2核4G |
12、安装node
(1)安装node
[root@es1 ~]# wget https://npm.taobao.org/mirrors/node/latest-v10.x/node-v10.0.0-linux-x64.tar.gz
[root@es1 ~]# tar -zxf node-v10.0.0-linux-x64.tar.gz –C /usr/local
[root@es1 ~]# vim /etc/profile
export PATH=/usr/local/node-v10.24.1-linux-x64/bin:$PATH
[root@es1 ~]# source /etc/profile
[root@es1 ~]# node --version   #检查node版本号
(2)下载head插件
[root@es1 ~]# wget https://github.com/mobz/elasticsearch-head/archive/master.zip
[root@es1 ~]# unzip –d /usr/local elasticsearch-head-master.zip (yum安装 yum -y install unzip)
(3)安装grunt
[root@es1 ~]# cd /usr/local/elasticsearch-head-master
[root@es1 elasticsearch-head-master]# npm install -g grunt-cli
[root@es1 elasticsearch-head-master]# grunt -version  #检查grunt版本号
(4)修改head源码
vim /usr/local/elasticsearch-head-master/Gruntfile.js +99

[root@es1 ~]# vim /usr/local/elasticsearch-head-master/_site/app.js +4388

(5)下载head必要的文件
[root@es1 ~]# wget https://github.com/Medium/phantomjs/releases/download/v2.1.1/phantomjs-2.1.1-linux-x86_64.tar.bz2
[root@es1 ~]# yum -y install bzip2
[root@es1 ~]# mkdir /tmp/phantomjs
[root@es1 ~]# mv phantomjs-2.1.1-linux-x86_64.tar.bz2 /tmp/phantomjs/
[root@es1 ~]# chmod 777 /tmp/phantomjs -R
(6)运行head
[root@es1 ~]# cd /usr/local/elasticsearch-head-master/ [root@es1elasticsearch-head-master]# npm install [root@es1 elasticsearch-head-master]# nohup grunt server & [root@es1 elasticsearch-head-master]# ss -tnlp npm install 执行错误解析: npm ERR! code ELIFECYCLE npm ERR! errno 1 npm ERR! phantomjs-prebuilt@2.1.16 install: `node install.js` npm ERR! Exit status 1 npm ERR! npm ERR! Failed at the phantomjs-prebuilt@2.1.16 install script. npm ERR! This is probably not a problem with npm. There is likely additional logging output above. npm ERR! A complete log of this run can be found in: npm ERR! /root/.npm/_logs/2021-04-21T09_49_34_207Z-debug.log 解决: [root@elk elasticsearch-head-master]# npm install phantomjs-prebuilt@2.1.16 --ignore-scripts # 具体的版本按照上述报错修改
(7)测试
访问浏览器http://10.12.153.180:9100
13 kibana部署(本服务器)
服务器
| 安装软件 | 主机名 | IP地址 | 系统版本 | 配置 |
|---|---|---|---|---|
| Kibana | Elk | 10.12.153.180 | centos7.5.1804 | 2核4G |
| 软件版本:nginx-1.14.2、kibana-7.13.2-linux-x86_64.tar.gz |
1. 安装配置Kibana
(1)安装
[root@es1 ~]# tar zxf kibana-7.13.2-linux-x86_64.tar.gz -C /usr/local/
(2)配置
[root@es1 ~]# echo '
server.port: 5601
server.host: "10.12.153.180"
elasticsearch.hosts: ["http://10.12.153.180:9200"]
kibana.index: ".kibana"
i18n.locale: "zh-CN"
'>>/usr/local/kibana-7.13.2-linux-x86_64/config/kibana.yml
配置项含义:
server.port kibana服务端口,默认5601
server.host kibana主机IP地址,默认localhost
elasticsearch.url   用来做查询的ES节点的URL,默认http://localhost:9200
kibana.index        kibana在Elasticsearch中使用索引来存储保存的searches, visualizations和dashboards,默认.kibana
(3)启动
[root@es1 ~]# cd /usr/local/kibana-7.13.2-linux-x86_64/
[root@es1 ~]# nohup ./bin/kibana &


2. 安装配置Nginx反向代理
(1)配置YUM源:
[root@es1 ~]# rpm -ivh <http://nginx.org/packages/centos/7/noarch/RPMS/nginx-release-centos-7-0.el7.ngx.noarch.rpm>
(2)安装:
[root@es1 ~]# yum install -y nginx httpd-tools 注意:httpd-tools用于生成nginx认证访问的用户密码文件
(3)配置反向代理
[root@es1 ~]# cat /etc/nginx/nginx.conf
user nginx;
worker_processes 4;
error_log /var/log/nginx/error.log;
pid /var/run/nginx.pid;
worker_rlimit_nofile 65535;
events {
worker_connections 65535;
use epoll;
}
http {
include mime.types;
default_type application/octet-stream;
log_format main '$remote_addr - $remote_user [$time_local] "$request" '
'$status $body_bytes_sent "$http_referer" '
'"$http_user_agent" "$http_x_forwarded_for"';
access_log /var/log/nginx/access.log main;
server_names_hash_bucket_size 128;
autoindex on;
sendfile on;
tcp_nopush on;
tcp_nodelay on;
keepalive_timeout 120;
fastcgi_connect_timeout 300;
fastcgi_send_timeout 300;
fastcgi_read_timeout 300;
fastcgi_buffer_size 64k;
fastcgi_buffers 4 64k;
fastcgi_busy_buffers_size 128k;
fastcgi_temp_file_write_size 128k;
#gzip模块设置
gzip on; #开启gzip压缩输出
gzip_min_length 1k; #最小压缩文件大小
gzip_buffers 4 16k; #压缩缓冲区
gzip_http_version 1.0; #压缩版本(默认1.1,前端如果是squid2.5请使用1.0)
gzip_comp_level 2; #压缩等级
gzip_types text/plain application/x-javascript text/css application/xml; #压缩类型,默认就已经包含textml,所以下面就不用再写了,写上去也不会有问题,但是会有一个warn。
gzip_vary on;
#开启限制IP连接数的时候需要使用
#limit_zone crawler $binary_remote_addr 10m;
#tips:
#upstream bakend{#定义负载均衡设备的Ip及设备状态}{
# ip_hash;
# server 127.0.0.1:9090 down;
# server 127.0.0.1:8080 weight=2;
# server 127.0.0.1:6060;
# server 127.0.0.1:7070 backup;
#}
#在需要使用负载均衡的server中增加 proxy_pass http://bakend/;
server {
listen 80;
server_name 10.12.183.180;
#charset koi8-r;
# access_log /var/log/nginx/host.access.log main;
access_log off;
location / {
auth_basic "Kibana"; #可以是string或off,任意string表示开启认证,off表示关闭认证。
auth_basic_user_file /etc/nginx/passwd.db; #指定存储用户名和密码的认证文件。
proxy_pass http://10.12.153.180:5601;
proxy_set_header Host $host:5601;
proxy_set_header X-Real-IP $remote_addr;
proxy_set_header X-Forwarded-For $proxy_add_x_forwarded_for;
proxy_set_header Via "nginx";
}
location /status {
stub_status on; #开启网站监控状态
access_log /var/log/nginx/kibana_status.log; #监控日志
auth_basic "NginxStatus"; }
location /head/{
auth_basic "head";
auth_basic_user_file /etc/nginx/passwd.db;
proxy_pass http://10.12.153.180:9100/;
proxy_set_header Host $host:9100;
proxy_set_header X-Real-IP $remote_addr;
proxy_set_header X-Forwarded-For $proxy_add_x_forwarded_for;
proxy_set_header Via "nginx";
}
# redirect server error pages to the static page /50x.html
error_page 500 502 503 504 /50x.html;
location = /50x.html {
root html;
}
}
}
(4)配置授权用户和密码
[root@es1 ~]# htpasswd -cm /etc/nginx/passwd.db kibana
(5)启动nginx
[root@elk ~]# systemctl start nginx
浏览器访问http://10.12.153.180 刚开始没有任何数据,会提示你创建新的索引。
(kibana的5601端口要起起来)


![使用ChatGPT高效完成简历制作[中篇2]-有爱AI实战教程(九)](https://img-blog.csdnimg.cn/direct/fb702e9d58624f53bc73f9b40b13b9cf.png)