1、文本差值(大括号、v-text、v-htm指令)
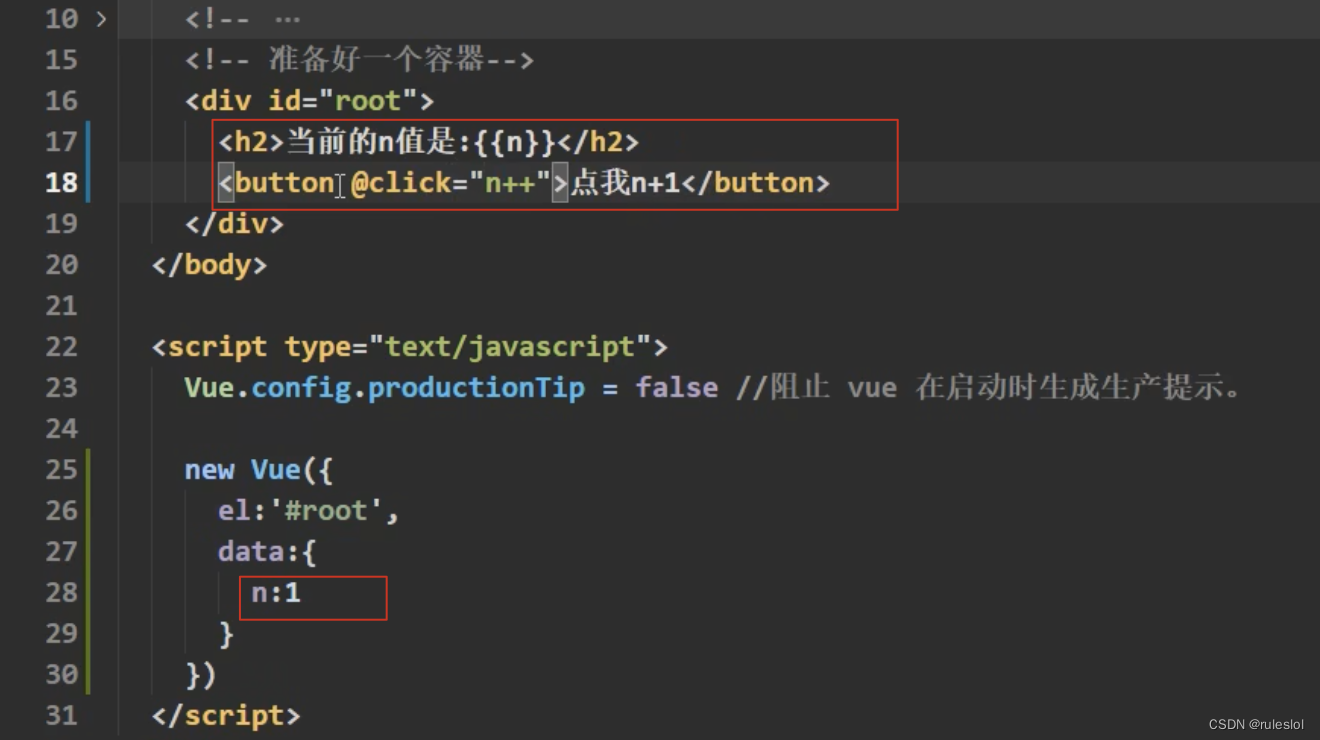
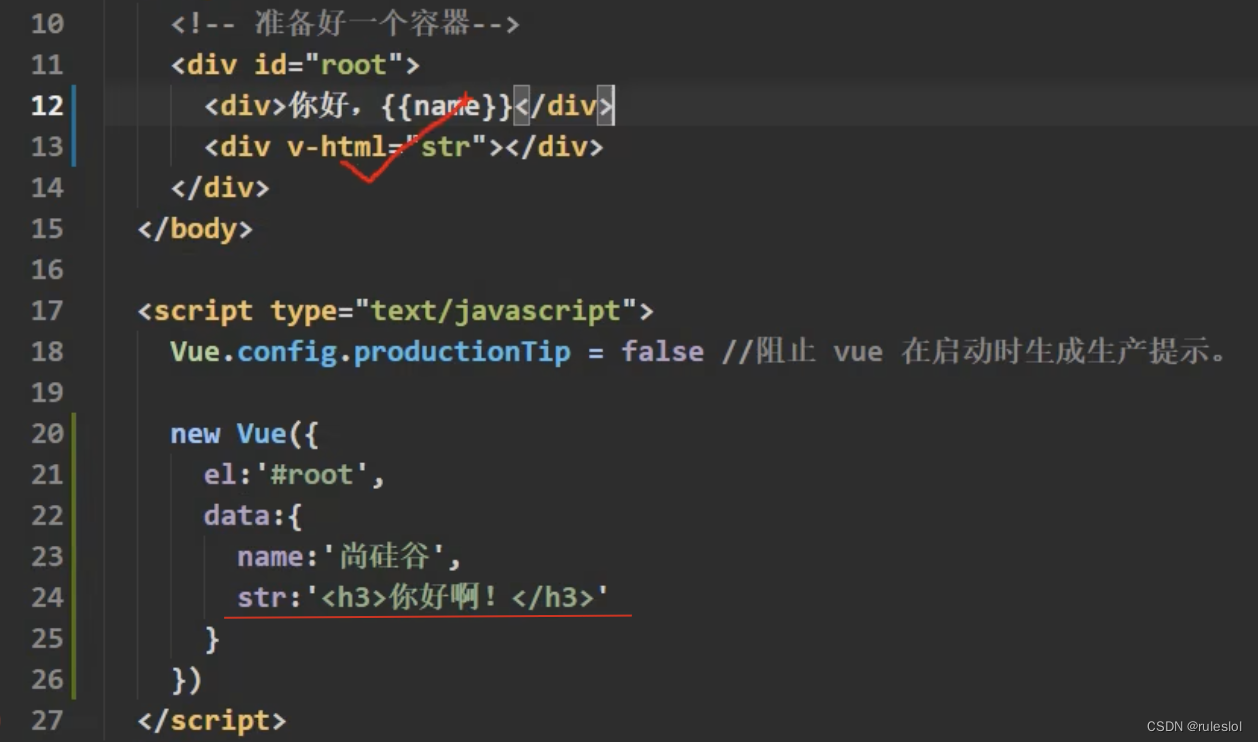
最基本的数据绑定就是文本差值,格式为“Mustache”语法(双大括号);
双大括号只能解析文本不能解析html,如需解析html则需使用v-html指令;后续指令再进行详解。v-作为指令前缀
<div id="app">
<p>{{ msg }}</p>
<p>你好<span v-html="rawHtml"></span></p>
</div>
//const msg = '测试';
//const rawHtml = '<b>加粗</b>';
//vue2
var vm = new Vue({
	el: '#app',
	data:{
		msg:'测试',
		rawHtml: '<b>加粗</b>'
	}
})
2、属性绑定v-bind指令,简写:(冒号)
响应式绑定html的属性,需要用到v-bind指令;
使用方法v-bind:html属性名,例如class的绑定,v-bind:class=“list_bar”;
绑定值为null或undefined时该属性会从渲染元素上移除。
简写:冒号;
<div :id="colorId">测试</div>
<div :class="colorClass">测试</div>
//布尔值
<button :disabled="btnDis">布尔值</button>
<input type="text" :value="inputVal" :autofocus="isFocus" placeholder="请输入用户名" />
//动态绑定多个值
<div v-bind="objAttrs">绑定多个属性</div>
//const colorId = ref('red');
//const colorClass = ref('green fontWeight');
//const btnDis = ref(true);
//const inputVal = ref('');
//const isFocus= ref(true);
//const objAttrs = {id: 'red',class:'fontWeight'}
使用 JavaScript 表达式,仅支持单一表达式;不支持运算符或者语句
2.1、class绑定
<div id="app">
	<div>{{state+2}}</div>
	<div>状态:<span :class="{ green : state==1 }">成功 state==1时green类名才显示</span></div>
	<div>状态:<span :class="state==1 ? 'green' : 'red'">{{state==1 ? '成功' : '失败'}}</span></div>
	<div>状态:<span :class="['classA',state==1 ? 'green' : 'red']">{{state==1 ? '成功' : '失败'}}</span></div>
	<div>状态:<span :class="['classA',{green:state==1}]">成功</span></div>
	<div>状态:<span :class="['classA',{'class_red':state==1}]">失败</span></div>
	<div>状态:<span :class="['classA',{'class_red':state==1,'green',type==2}]">失败</span></div>
	<div>{{ msg.split('').reverse().join('') }}</div>
</div>
组件一个根元素的使用
<!-- 子组件只有一个根元素 -->
<div class="red">我是子组件</div>
<!-- 在使用组件时,渲染结果为<div class="red className">我是子组件</div> -->
<MyComponent class="className" />

<!-- 布尔值判断,isTrue为ture时,渲染结果为<div class="red className">我是子组件</div> -->
<MyComponent :class="{className: isTrue}" />
组件多个根元素的使用
<!--MyComponent.vue 子组件多个根元素 -->
<template>
	<div class="red" :class="$attrs.class">我是子组件</div>
	<p>我不继承父组件类</p>
</template>

<script>
</script>

<style scoped>
	.red{
		color: #f00;
		font-weight: 700;
	}
</style>
/*home.vue 父组件*/
<template>
  <main>
	  <my-component class="className"></my-component>
  </main>
</template>
<style scoped>
	div{ padding: 5px 0px;}
</style>
<style>
	.className{
		font-style: italic;
		color: green;
	}
</style>
2.2、style绑定
<!-- 绑定内联样式 -->
<div :style="{fontSize: size + 'px'}"></div>
<div :style="{ color: activeColor, 'font-size': size + 'px' }"></div>
<div :style="{'margin-left':(isShow ? '20px' : '0px')}"></div>
<!-- 尽管推荐使用 camelCase,但 :style 也支持 kebab-cased 形式的 CSS 属性 key (对应其 CSS 中的实际名称) -->
<div :style="[styleObjectA, styleObjectB]"></div>
<div :style="{'text-align':textAlign}"></div>
//const size=ref(12);
//const styleObjectA = ref({color:'red'});
//const styleObjectB = ref({fontWeight:700});
//const textAlign = ref('left')
style多个样式时可直接绑定一个对象
const styleObject = reactive({
  color: 'red',
  fontSize: '13px'
})

<div :style="styleObject"></div>
样式多值的写法
Vue 是在运行时检查该属性是否支持在当前浏览器中使用。如果浏览器不支持某个属性,那么将尝试加上各个浏览器特殊前缀,以找到哪一个是被支持的
<div :style="{ display: ['-webkit-box', '-ms-flexbox', 'flex'] }"></div>
以下为不支持2种情况
<!-- 这是一个语句,而非表达式 -->
 {{ var a=1; }}
 <!-- 条件控制也不支持,可使用三元表达式 -->
 {{ if(ok){return message} }}
2.3、动态值绑定
<div :id="`list-${count}`">list-{{count}}</div>
3、条件渲染
v-if v-else v-else-if指令
v-if 指令用于条件性地渲染一块内容。这块内容只会在指令的表达式返回 true 值的时候被渲染。
- 其中v-if可单独使用;
- v-else配合v-if使用;
- v-else-if必须紧跟在一个v-if或一个v-else-if元素后面,v-else-if可多次重复使用;
- 当只需渲染判断,无需样式时可将v-if在< template >元素上使用;
//vue2 index.vue
<template>
<div class="main">
	<div>isShow的值为{{isShow}}<span v-if="isShow">显示</span></div>
	<button @click="buttonClick">{{isShow ? '隐藏' : '显示'}}</button>
</div>
</template>
<script>
export default {
	name: "Index",
	data() {
		return {
			isShow: true
		}
	},
	mounted(){},
	methods:{
		buttonClick(){
			this.isShow = !this.isShow;
		},
	}
}
</script>
//vue3  index.vue
<script setup>
import { ref  } from 'vue';
const isShow = ref(true);
function buttonClick(){
	isShow.value = !isShow.value;
}

const score = ref(85)
</script>
<template>
<div class='index-main'>
	<div>isShow的值为{{isShow}}<span v-if="isShow">显示</span></div>
	<button @click="buttonClick">{{isShow ? '隐藏' : '显示'}}</button>

	<div>小明的成绩为{{score}}</div>
	<p v-if="score>=90">优秀</p>
	<p v-else-if="score>=80">良好</p>
	<p v-else-if="score>=60">及格</p>
	<p v-else>不及格</p>
</div>
</template>
v-show指令
用法基本与v-if相同,true显示,false隐藏;
不同之处:v-show会在DOM渲染中保留该元素,为该元素增加了display:none的属性;
v-show不支持在template元素上使用,也不能与v-else搭配使用;
两者的区别
- v-if 是“真实的”按条件渲染,因为它确保了在切换时,条件区块内的事件监听器和子组件都会被销毁与重建。
- v-if 也是惰性的:如果在初次渲染时条件值为 false,则不会做任何事。条件区块只有当条件首次变为 true 时才被渲染。
- v-show 元素无论初始条件如何,始终会被渲染,只有 CSS display 属性会被切换。
- v-if 有更高的切换开销,而 v-show 有更高的初始渲染开销
- 如果需要频繁切换,则使用 v-show 较好;如果在运行时绑定条件很少改变,则 v-if 会更合适。
4、列表渲染 v-for指令
v-for的使用方法
- 格式1: v-for=“item in items”;其中item为迭代项别名;items为源数据的数组
- 格式2:v-for=“(item,index) in items”;支持第二个参数index,表示当前项的位置索引;
- 格式3:遍历对象,遍历对象时会按 Object.keys() 的结果遍历,但是不能保证它的结果在不同的 JavaScript 引擎下都一致。
//vue3 index.vue
<script setup>
import { ref  } from 'vue';
const items = ref(['列表一','列表二','列表三']);
const lists = ref([{id:1,name:'张三'},{id:2,name:'李四'}]);
const obj = ref({title:'vue.js',author:'Jane Doe',publishedAt:'2016-04-10'})
</script>
<template>
<div class='index-main'>
	<ul>
		<li v-for="item in items">{{item}}</li>
	</ul>
	<!-- index参数,index为列表当前项的索引位置 -->
	<p v-for="(list,index) in lists">
		index: {{index}}--id: {{list.id}}--name: {{list.name}}
	</p>
	<!-- 对象的渲染,支持三个参数,item为对象的值,name为对象的属性,index为当前项的索引位置 -->
	<p v-for="(item,name,index) in obj">
	 	item: {{item}} -- name: {{name}} -- index:{{index}}
	</p>
	<!-- 整数值的渲染,会基于1...n的取值范围重复多次 -->
	<div v-for="n in 10">{{n}}</div>
</div>
</template>
v-for也可使用template标签,template 不会渲染,只渲染template中间的html标签
 <template v-for="item in lists">
	 <p>{{item.name}}</p>
 </template>
当v-if遇到v-for
不推荐v-if与v-for一起使用;
当 v-if 与 v-for 一起使用时,v-for 具有比 v-if 更高的优先级;
//v-if与v-for同时使用
<div v-if="isShow" v-for="item in lists">{{item.name}}</div>

//建议改成下面的写法,当isShow为true时才进行列表渲染
<template v-if="isShow">
	<div v-for="item in lists">{{item.name}}</div>
</template>
//如需循环判断则可改为下面写法
<template v-for="item in lists">
 	<p>{{item.name}}<span v-if="item.id>1"> ID:{{item.id}}</span></p>
 </template>
Vue 默认按照“就地更新”的策略来更新通过 v-for 渲染的元素列表。当数据项的顺序改变时,Vue 不会随之移动 DOM 元素的顺序,而是就地更新每个元素,确保它们在原本指定的索引位置上渲染。
默认模式是高效的,但只适用于列表渲染输出的结果不依赖子组件状态或者临时 DOM 状态 (例如表单输入值) 的情况。
为了给 Vue 一个提示,以便它可以跟踪每个节点的标识,从而重用和重新排序现有的元素,你需要为每个元素对应的块提供一个唯一的 key attribute:
<div v-for="item in lists" :key="item.id">{{item.name}}</div>
建议:所有列表均增加key,提供一个唯一值;
key应该绑定一个基础类型(string或number类型);
组件使用v-for与普通元素没有区别,建议也提供一个唯一key值绑定;
数据变化侦听
以下变更方法影响数组时会被侦听响应且触发相关更新:
- push()
- pop()
- shift()
- unshift()
- splice()
- sort()
- reverse()
非变更方法,这些方法不会改变原数组,总是返回一个新数组,所以遇到此类变更方法时,需将就数组替换为新数组;
- filter()
- concat()
- slice()
const lists = refs([...]);
lists.value = lists.value.filter((item)=>{ return item.id>0 });
5、事件处理v-on指令
vue中使用v-on指令(简写@)来监听DOM事件,并在事件触发时执行对应的JavaScript
5.1、v-on的使用方法
//vue3 index.vue
<script setup>
import { ref,computed } from 'vue';
const count = ref(0);
function buttonClick(event){
//event.target.tagName可访问该DOM元素
console.log(event.target.tagName);
count.value++;
}
function sum(a,b){
console.log('结果:',a+b);
}
function btnClick(msg,event){
//传递参数
console.log('msg',msg);
//按钮宽度
console.log('e',event.target.clientWidth);
}
</script>
<template>
<div class="index-main">
<p>count的值为{{count}}</p>
<button @click="count++">内联事件处理器</button>
<button @click="buttonClick">方法事件处理器</button>
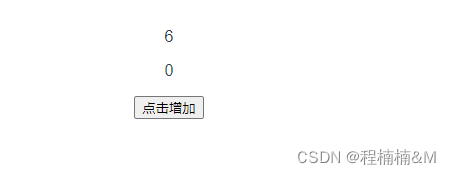
<!-- 内联处理器调用方法,可传参,得到的结果为6 -->
<button @click="sum(1,5)">传参</button>
<button @click="btnClick('特殊$event变量',$event)">特殊变量$event</button>
<button @click="(event) => btnClick('箭头函数',event)">箭头函数</button>
</div>
</template>
5.2、扩展介绍,v-on的修饰符
v-on事件修饰符
- .stop - 调用 event.stopPropagation()。阻止冒泡行为;
- .prevent - 调用 event.preventDefault()。取消事件的默认行为,例如form表单默认的提交行为
- .capture - 在捕获模式添加事件监听器。
- .self - 只有事件从元素本身发出才触发处理函数。
- .{keyAlias} - 只在某些按键下触发处理函数。
- .once - 最多触发一次处理函数。
- .left - 只在鼠标左键事件触发处理函数。
- .right - 只在鼠标右键事件触发处理函数。
- .middle - 只在鼠标中键事件触发处理函数。
- .passive - 通过 { passive: true } 附加一个 DOM 事件
使用修饰符时需要注意调用顺序,因为相关代码是以相同的顺序生成的。
@click.prevent.self 会阻止元素及其子元素的所有点击事件的默认行为;
@click.self.prevent 则只会阻止对元素本身的点击事件的默认行为
.capture、.once 和 .passive 修饰符与原生 addEventListener 事件相对应
<!-- 方法处理函数 -->
<button v-on:click="doThis"></button>
<!-- 动态事件 -->
<button v-on:[event]="doThis"></button>
<!-- 内联声明 -->
<button v-on:click="doThat('hello', $event)"></button>
<!-- 缩写 -->
<button @click="doThis"></button>
<!-- 使用缩写的动态事件 -->
<button @[event]="doThis"></button>
<!-- 停止传播 -->
<button @click.stop="doThis"></button>
<!-- 阻止默认事件 -->
<button @click.prevent="doThis"></button>
<!-- 不带表达式地阻止默认事件 -->
<form @submit.prevent></form>
<!-- 链式调用修饰符 -->
<button @click.stop.prevent="doThis"></button>
<!-- 按键用于 keyAlias 修饰符-->
<input @keyup.enter="onEnter" />
<!-- 点击事件将最多触发一次 -->
<button v-on:click.once="doThis"></button>
<!-- 对象语法  当使用对象语法时,不支持任何修饰符 -->
<button v-on="{ mousedown: doThis, mouseup: doThat }"></button>
当用于普通元素,只监听原生 DOM 事件。当用于自定义元素组件,则监听子组件触发的自定义事件。
按键修饰符
<!-- DOM的onkeyup 仅在键盘为enter时调用submit方法 -->
<input @keyup.enter="submit" />
<!-- 仅会在 $event.key 为 'PageDown' 时调用事件处理  按键名需转换kebab-case形式 -->
<input @keyup.page-down="onPageDown" />
vue为一些常用按键提供了别名:
| 按键 | 介绍 |
|---|---|
| .enter | enter回车键 |
| .tab | 键盘tab键 |
| .delete | 键盘delete及backspace均会触发 |
| .esc | 键盘Esc退出按键 |
| .space | 键盘空格按键 |
| .up | 键盘上箭头 |
| .down | 键盘下箭头 |
| .left | 键盘左箭头 |
| .right | 键盘右箭头 |
系统按键修饰符:
- .ctrl
- .alt
- .shift
- .meta
在 Mac 键盘上,meta 是 Command 键 (⌘)。
在 Windows 键盘上,meta 键是 Windows 键 (⊞)。
在 Sun 微机系统键盘上,meta 是钻石键 (◆)。
在某些键盘上,特别是 MIT 和 Lisp 机器的键盘及其后代版本的键盘,如 Knight 键盘,space-cadet 键盘,meta 都被标记为“META”。
在 Symbolics 键盘上,meta 也被标识为“META”或“Meta”。
.exact 修饰符允许控制触发一个事件所需的确定组合的系统按键修饰符。
<!-- Alt + Enter,按住alt键时松开enter键触发 -->
<input @keyup.alt.enter="submit" />

<!-- Ctrl + 点击  按住ctrl键执行鼠标点击事件触发; -->
<!-- 若按住ctrl及shift键点击也会触发,只要ctrl键被按住的情况均会触发,不管同时是否触发多个按键 -->
<!-- 若需限制仅按住ctrl触发,需使用.exact修饰符 -->
<div @click.ctrl="submit">Do something</div>
!-- 仅当按下 Ctrl 且未按任何其他键时才会触发 -->
<div @click.ctrl.exact="submit">Do something</div>

<!-- 按住ctrl键不松开的同时再松开其他按键时触发,仅松开ctrl键不会触发 -->
<div @keyup.ctrl="submit">Do something</div>

<!-- 仅当没有按下任何系统按键时触发 -->
<button @click.exact="onClick">A</button>
5.3、DOM事件—常用事件介绍
鼠标事件
| 属性 | 描述 |
|---|---|
| onclick | 当用户点击某个对象时调用的事件句柄。 |
| oncontextmenu | 在用户点击鼠标右键打开上下文菜单时触发 |
| ondblclick | 当用户双击某个对象时调用的事件句柄。 |
| onmousedown | 鼠标按钮被按下 |
| onmouseenter | 当鼠标指针移动到元素上时触发 |
| onmouseleave | 当鼠标指针移出元素时触发 |
| onmousemove | 鼠标被移动。 |
| onmouseover | 鼠标移到某元素之上 |
| onmouseout | 鼠标从某元素移开 |
| onmouseup | 鼠标按键被松开 |
键盘事件
| 属性 | 描述 |
|---|---|
| onkeydown | 某个键盘按键被按下 |
| onkeypress | 某个键盘按键被按下并松开 |
| onkeyup | 某个键盘按键被松开 |
表单事件
| 属性 | 描述 |
|---|---|
| onblur | 元素失去焦点时触发 |
| onchange | 该事件在表单元素的内容改变时触发( , , , 和 ) |
| onfocus | 元素获取焦点时触发 |
| onfocusin | 元素即将获取焦点时触发 |
| onfocusout | 元素即将失去焦点时触发 |
| oninput | 元素获取用户输入时触发 |
| onreset | 表单重置时触发 |
| onsearch | 用户向搜索域输入文本时触发 ( <input=“search”>) |
| onselect | 用户选取文本时触发 ( 和 ) |
| onsubmit | 表单提交时触发 |
6、表单输入绑定v-model指令
6.1、v-model的使用方法

对于单选按钮,复选框和选择器选项,v-model 绑定的值通常是静态的字符串
//vue3 index.vue
<script setup>
import { ref  } from 'vue';
const text = ref('123');
const textArea = ref('多行输入框');
const checkedNames = ref(['write']);
const radioVal = ref('man');
const selectVal = ref('1');
const selectVal2 = ref(['1','2']);
const selectVa3 = ref();

const selectData = ref([
	{text:'一年级',value:'1'},
	{text:'二年级',value:'2'},
	{text:'三年级',value:'3'},
	{text:'四年级',value:'4'},
])
</script>
<template>
<div class='index-main'>
	<input v-model="text" type="text" placeholder="请输入内容" />
	<div>input输入内容:{{text}}</div>
	<textarea v-model="textArea" placeholder="请输入内容"></textarea>
	<div>textarea输入内容:{{textArea}}</div>
	<label>
		<input v-model="checkedNames" type="checkbox" value="read" />读书
	</label>
	<label>
		<input v-model="checkedNames" type="checkbox" value="write" />写字
	</label>
	<div>checkbox多选选中值:{{checkedNames}}</div>
	<input v-model="radioVal" id="first" type="radio" value="man" />
	<label for="first">男</label>
	<input v-model="radioVal" id="second" type="radio" value="woman" />
	<label for="second">女</label>
	<div>radio单选选中值:{{radioVal}}</div>
	<select v-model="selectVal">
		<option value="1">一年级</option>
		<option value="2">二年级</option>
		<option value="3">三年级</option>
		<option value="4">四年级</option>
	</select>
	<div>select选中值:{{selectVal}}</div>
	<select v-model="selectVal2" multiple>
		<option value="1">一年级</option>
		<option value="2">二年级</option>
		<option value="3">三年级</option>
		<option value="4">四年级</option>
	</select>
	<div>select选中值:{{selectVal2}}</div>
	<select v-model="selectVal3">
		<option v-for="(item,index) in selectData" :value="item.text" :key="index">{{item.text}}</option>
	</select>
</div>
</template>

多选时定义的类型不是数组,选中后v-model绑定的类型为布尔类型( true ),而非checkbox的value值;
当定义类型为数组时,选中后v-model绑定值为value值
//vue3 index.vue
<script setup>
import { ref  } from 'vue';
const checkboxVal = ref();
const checkboxArr = ref([]);
</script>
<template>
<div class='index-main'>
	<label style="display: block;">
		<input v-model="checkboxVal" type="checkbox" value="text" />
		<span>选中值:{{checkboxVal}}</span>
	</label>
	<label>
		<input v-model="checkboxArr" type="checkbox" value="textArr" />
		<span>选中值:{{checkboxArr}}</span>
	</label>
</div>
<template>
自定义绑定值
<!-- 选中值:yes,非选中值:no -->
<label style="display: block;">
	<input v-model="checkboxVal" type="checkbox" true-value="yes" false-value="no" />
	<span>选中值:{{checkboxVal}}</span>
</label>
true-value 和 false-value 是 Vue 特有的 attributes,仅支持和 v-model 配套使用
//vue3 index.vue
<script setup>
import { ref  } from 'vue';
const checkboxVal = ref();
const trueVal = ref('已选中');
const falseVal = ref('未选中');
</script>
<template>
<div class='index-main'>
	<label style="display: block;">
		<input v-model="checkboxVal" type="checkbox" :true-value="trueVal" :false-value="falseVal" />
		<span>选中值:{{checkboxVal}}</span>
	</label>
</div>
<template>
非字符串类型绑定
//vue3 index.vue
<script setup>
import { ref  } from 'vue';
const selectVal = ref();
const selectData=[
	{title:'HTML',value:1},
	{title:'Vue3',value:2},
	{title:'JavaScript',value:3}
]
</script>
<template>
<div class='index-main'>
	<select v-model="selectVal">
		<option v-for="(item,index) in selectData" :value="item">{{item.title}}</option>
	</select>
	<div>选中值:{{selectVal}}</div>
	<!-- selectVal格式:{ "title": "HTML", "value": 1 } -->
</div>
<template>
6.2、v-model修饰符
- .lazy——取代 input 监听 change 事件(默认在input输入时就触发v-model的值变化,加上lazy修饰符会在change时触发)
- .number——输入字符串转为有效的数字;number 修饰符会在输入框有 type=“number” 时自动启用(只能支持简单的数字限制)
- .trim——输入首尾空格过滤
//vue3 index.vue
<script setup>
import { ref  } from 'vue';
const age = ref();
const carNo = ref();
/*正整数输入限制*/
function numChange(e){
	if( e<0 ){
		this.$nextTick(() => {
			age.value=0;
		})
	}
}
/*提交时的正则验证*/
function submitHandle(){
	//车牌号正则
	var reg6 = /^[京津沪渝冀豫云辽黑湘皖鲁新苏浙赣鄂桂甘晋蒙陕吉闽贵粤青藏川宁琼使领A-Z]{1}[A-Z]{1}[A-Z0-9]{4}[A-Z0-9挂学警港澳]{1}$/;
	if( !reg6.test( carNo.value ) ){
		console.log('车牌号输入格式不正确');
		return
	}
}
</script>
<template>
<div class='index-main'>
	<input v-model.number="age" @input="numChange" />
	<input v-model="carNo" />
	<button @click="submitHandle">提交</button>
</div>
</template>
7、内置指令汇总
指令是带有 v- 前缀的特殊 attribute。Vue 提供了许多内置指令,包括上面我们所介绍的 v-bind 和 v-html。
| 指令 | 期望绑定值类型 | 介绍 |
|---|---|---|
| v-text | string | 更新元素的文本内容 |
| v-html | string | 更新元素的 innerHTML |
| v-show | any | 基于表达式值的真假性,来改变元素的可见性;v-show 通过设置内联样式的 display CSS 属性来工作,当元素可见时将使用初始 display 值。当条件改变时,也会触发过渡效果 |
| v-if | any | 基于表达式值的真假性,来条件性地渲染元素或者模板片段。此指令会触发组件的销毁与重建,false时该内容不会被渲染;可用template包含文本或条件块;v-if优先级》v-for |
| v-else | 无需传入表达式 | 一般配合v-if或v-else-if链式调用 |
| v-else-if | any | 表示 v-if 的“else if 块”。可以进行链式调用 |
| v-for | Array, Object,number, string , Iterable | 基于原始数据多次渲染元素或模板块;指令值必须使用特殊语法 alias in expression 为正在迭代的元素提供一个别名 |
| v-on | function,inline statement,object | 给元素绑定事件监听器;缩写@ |
| v-bind | any(带参数),object(不带参数) | 动态的绑定一个或多个 attribute,也可以是组件的 prop。缩写:冒号或者. 当时用.prop修饰符 |
| v-model | 随表单类型 | 在表单控件或者组件上创建双向绑定 |
| v-slot | 可放置在函数参数位置的 JavaScript 表达式 | 缩写# 提供具名插槽或需要接收 prop 的插槽 |
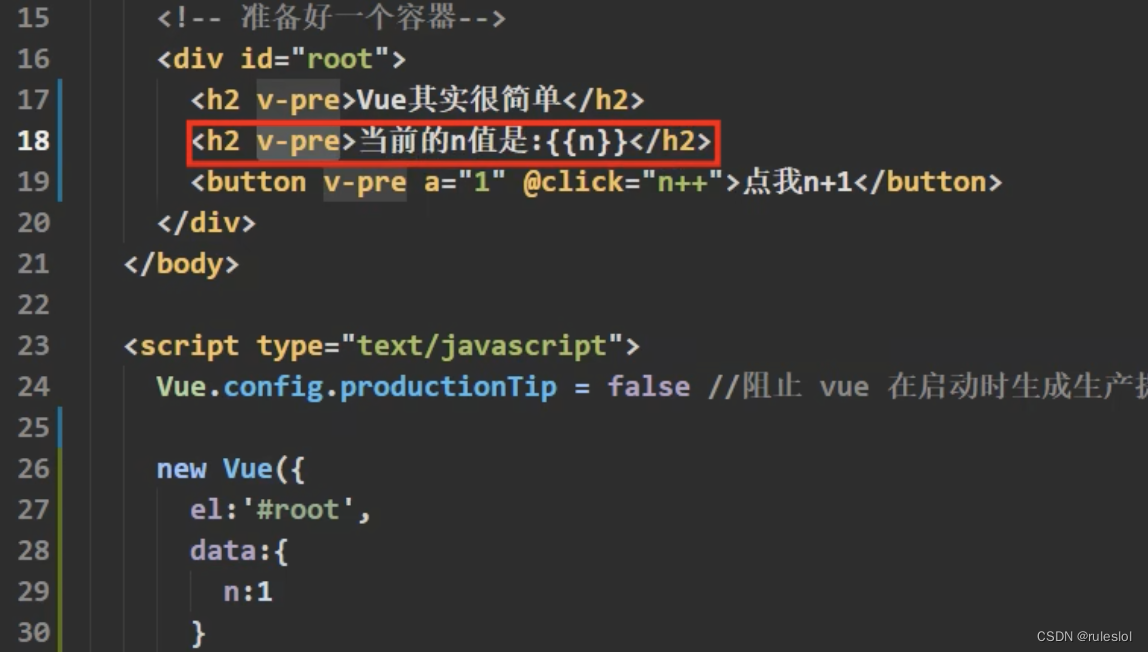
| v-pre | 跳过这个元素和它的子元素的编译过程。可以用来显示原始 Mustache 标签。跳过大量没有指令的节点会加快编译 | |
| v-cloak | 这个指令保持在元素上直到关联实例结束编译。和 CSS 规则如 [v-cloak] { display: none } 一起用时,这个指令可以隐藏未编译的 Mustache 标签直到实例准备完毕。 | |
| v-once | 只渲染元素和组件一次。随后的重新渲染,元素/组件及其所有的子节点将被视为静态内容并跳过。这可以用于优化更新性能 |
7.1、v-clock
当使用直接在 DOM 中书写的模板时,可能会出现一种叫做“未编译模板闪现”的情况:用户可能先看到的是还没编译完成的双大括号标签,直到挂载的组件将它们替换为实际渲染的内容。
v-cloak 会保留在所绑定的元素上,直到相关组件实例被挂载后才移除。
//vue2 index.html
<html>
<head>
<script src="https://cdn.jsdelivr.net/npm/vue@2"></script>
<style>
[v-cloak] {
  display: none;
}
</style>
</head>
<body>
	<!-- 直到编译完成前,<div> 将不可见 -->
	<div v-cloak id='app'>
		<component-a></component-a>
	</div>
	<script>
		/*组件注册*/
		Vue.component('component-a', {
			template: `<div @click="changeHandle">{{msg}}</div>`,
			data: function(){
				return {
					msg:'我是局部子组件'
				}
			},
			methods:{
				changeHandle(){
					console.log('子组件点击事件');
				},
			}
		})

		/*创建vue实例*/
		new Vue({
		  el: '#app',
		  data(){
		  	return {
		  		count:0
		  	}
		  },
		  mounted(){
		  	console.log('mounted生命周期');
		  },
		  methods:{
		  	/*方法*/
		  }
		})
	</script>
</body>
</html>