1、本地加入购物车
主要步骤如下:
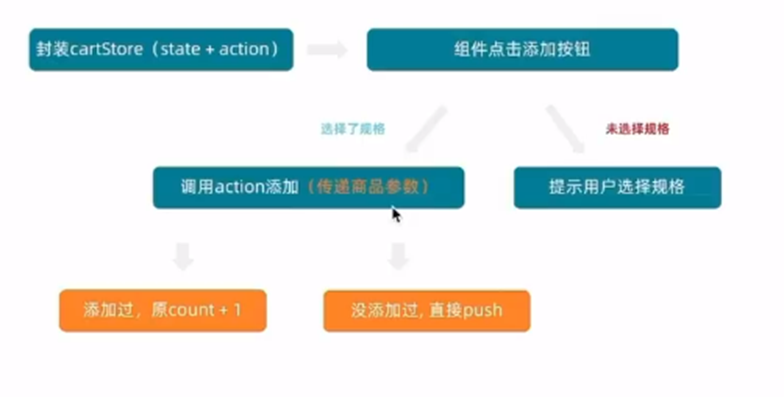
(1)封装cartStore
export const useCartStore = defineStore('cart', () => {
  const userStore = useUserStore()
  const isLogin = computed(() => userStore.userInfo.token)
  // 1. 定义state - cartList
  const cartList = ref([])
  // 获取最新购物车列表action
  const updateNewList = async () => {
    const res = await findNewCartListAPI()
    cartList.value = res.result
  }
  // 2. 定义action - addCart
  const addCart = async (goods) => {
    const { skuId, count } = goods
    if (isLogin.value) {
      // 登录之后的加入购车逻辑
      await insertCartAPI({ skuId, count })
      updateNewList()
    } else {
      // 添加购物车操作
      // 已添加过 - count + 1
      // 没有添加过 - 直接push
      // 通过匹配传递过来的商品对象中的skuId能不能在cartList中找到,找到了就是添加过

    }
  }
(2)组件点击添加按钮
  <div>
                <el-button size="large" class="btn" @click="addCart">
                  加入购物车
                </el-button>
              </div>
(3)两个分支,规格的选择与否
const item = cartList.value.find((item) => goods.skuId === item.skuId)
      if (item) {
        // 找到了
        item.count++
      } else {
        // 没找到
        cartList.value.push(goods)
      }
(4)添加购物车
const addCart = () => {
  if (skuObj.skuId) {
    console.log(skuObj, cartStore.addCart)
    // 规则已经选择  触发action
    cartStore.addCart({
      id: goods.value.id,
      name: goods.value.name,
      picture: goods.value.mainPictures[0],
      price: goods.value.price,
      count: count.value,
      skuId: skuObj.skuId,
      attrsText: skuObj.specsText,
      selected: true
    })
  } else {
    // 规格没有选择 提示用户
    ElMessage.warning('请选择规格')
  }
}
2、本地购物车-头部购物车列表渲染
(1)引入静态模板
(2)使用cartStore中的数据进行渲染
1)先导入(HeadHeader)
import { useCartStore } from '@/stores/cartStore'
const cartStore = useCartStore()
2)数据渲染
<div class="item" v-for="i in cartStore.cartList" :key="i">
<RouterLink to="">
<img :src="i.picture" alt="" />
<div class="center">
<p class="name ellipsis-2">
{{ i.name }}
</p>
<p class="attr ellipsis">{{ i.attrsText }}</p>
</div>
<div class="right">
<p class="price">¥{{ i.price }}</p>
<p class="count">x{{ i.count }}</p>
</div>
</RouterLink>
<i class="iconfont icon-close-new" @click="cartStore.delCart(i.skuId)"></i>
</div>如果不将任何商品添加购物车的话,回到首页,点开右上角的购物车里面是没有任何东西的,反之,如果添加了,都会被渲染出来。

3、本地购物车-头部购物车删除功能
(1)绑定方法
<i class="iconfont icon-close-new" @click="cartStore.delCart(i.skuId)"></i>(2)编写逻辑(cartStore)
  const delCart = async (skuId) => {
    if (isLogin.value) {
      // 调用接口实现接口购物车中的删除功能
      await delCartAPI([skuId])
      updateNewList()
    } else {
      // 思路:
      // 1. 找到要删除项的下标值 - splice(返回从原数组中指定开始下标到结束下标之间的项组成的新数组)
      // 2. 使用数组的过滤方法 - filter
      const idx = cartList.value.findIndex((item) => skuId === item.skuId)
      cartList.value.splice(idx, 1)
    }
  }
4、本地购物车-头部购物车数据统计
一刷新购物车的数据还是会丢失,所以,每次都需要重新添加,可以通过计算属性来实现:依赖的属性一旦发生变化,计算属性的值会立即跟着变化
(1)定义
const allCount = computed(() => cartList.value.reduce((a, c) => a + c.count, 0))
  // 2. 总价 所有项的count*price之和
  const allPrice = computed(() => cartList.value.reduce((a, c) => a + c.count * c.price, 0))

  // 3. 已选择数量
  const selectedCount = computed(() => cartList.value.filter(item => item.selected).reduce((a, c) => a + c.count, 0))
  // 4. 已选择商品价钱合计
  const selectedPrice = computed(() => cartList.value.filter(item => item.selected).reduce((a, c) => a + c.count * c.price, 0))
(2)组件中渲染
<div class="foot">
<div class="total">
<p>共 {{ cartStore.allCount }} 件商品</p>
<p>¥ {{ cartStore.allPrice.toFixed(2) }} </p>
</div>
<el-button size="large" type="primary" @click="$router.push('/cartlist')">去购物车结算</el-button>
</div>5、本地购物车-列表购物车数据渲染
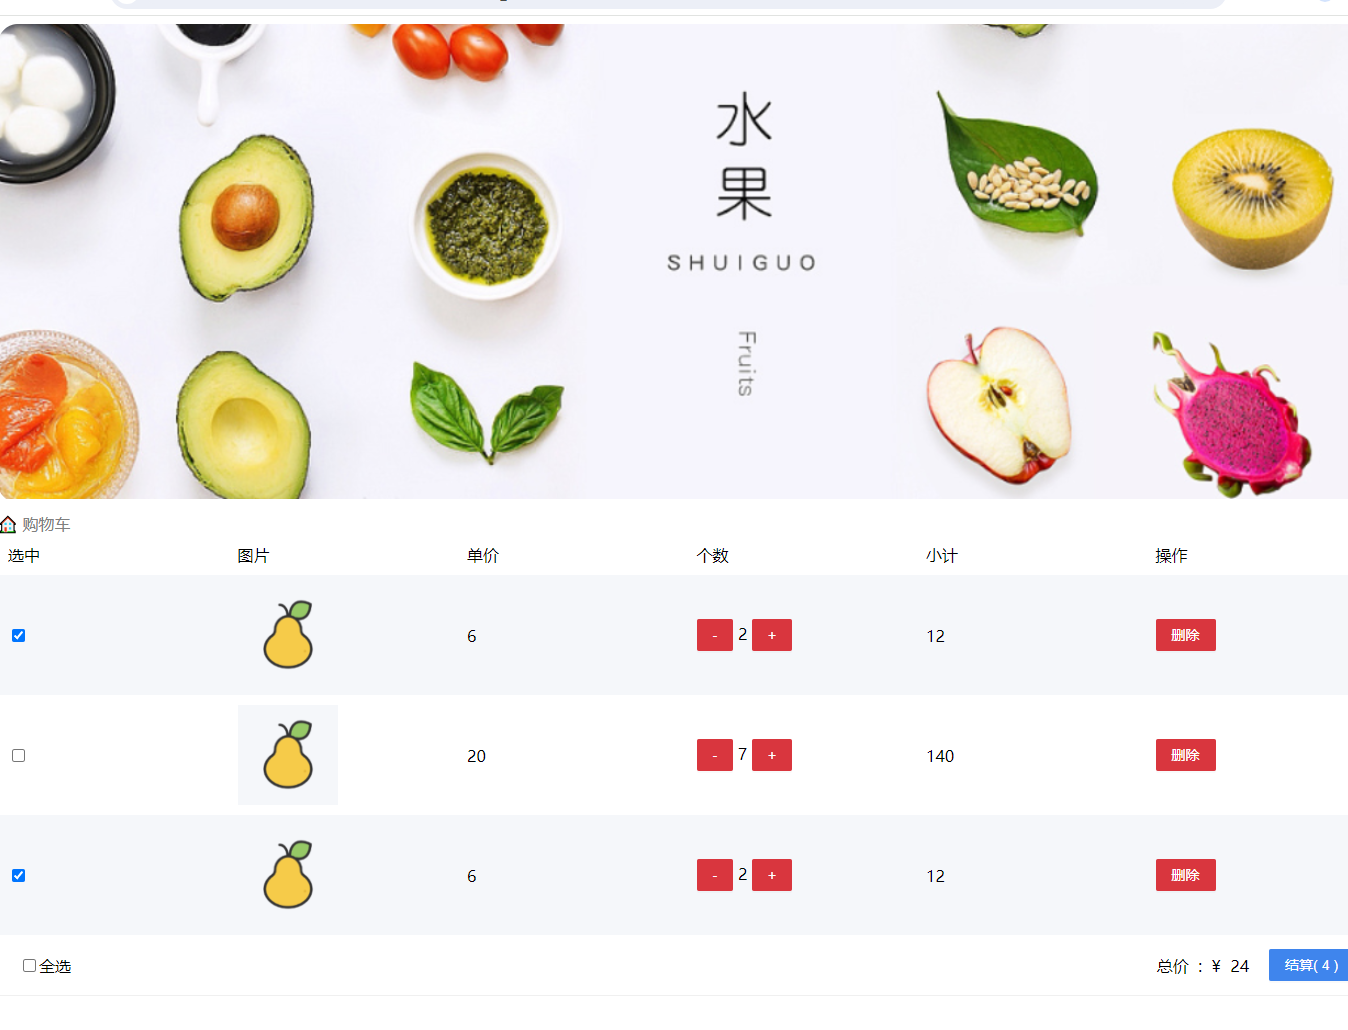
在这里,我们要实现以下功能:商品列表渲染,全选与反选,统计功能
接下来看看详细步骤:
首先,准备静态模板
其次,配置路由,同样,它是二级路由
{
          path: 'cartlist',
          component: CartList
        },
渲染基础模板
1)先导入
import { useCartStore } from '@/stores/cartStore'
const cartStore = useCartStore()
2)渲染基础内容
<tr v-for="i in cartStore.cartList" :key="i.id">回到首页,添加商品后,点击去购物车结算的时候就会跳转到结算页面,一起来看看配置
<el-button size="large" type="primary" @click="$router.push('/cartlist')">去购物车结算</el-button>6、本地购物车-列表购物车单选/全选功能
(1)单选

1)可以为单选框绑定事件
<el-checkbox :model-value="i.selected" @change="(selected) => singleCheck(i, selected)" />如果被选中,通过回调函数返回结果
保存之后,回到浏览器,点击选中与否,可以看到控制台打印出了两组数据,选中的商品和选中状态:

2)在cartStore中对数据进行同步更新
  // 单选功能
  const singleCheck = (skuId, selected) => {
    // 通过skuId找到要修改的那一项 然后把它的selected修改为传过来的selected
    const item = cartList.value.find((item) => item.skuId === skuId)
    item.selected = selected
  }
单选功能实现
1)默认参数的位置上再增加一个参数:
<el-checkbox :model-value="i.selected" @change="(selected) => singleCheck(i, selected)" />2)单选回调
const singleCheck = (i, selected) => {
  console.log(i, selected)
  // store cartList 数组 无法知道要修改谁的选中状态?
  // 除了selected补充一个用来筛选的参数 - skuId
  cartStore.singleCheck(i.skuId, selected)
}
结果演示:
左侧商品列表选择选中与否,右侧控制台会返回对应的值

(2)全选功能实现

点击下面选中上面:cartstore.js
1)cartstore.js
const isAll = computed(() => cartList.value.every((item) => item.selected))2)绑定事件
<tr>
              <th width="120">
                <el-checkbox :model-value="cartStore.isAll" @change="allCheck" />
              </th>
              <th width="400">商品信息</th>
              <th width="220">单价</th>
              <th width="180">数量</th>
              <th width="180">小计</th>
              <!-- <th width="140">操作</th> -->
            </tr>
运行的时候:只要有一个未勾选,上面就不会自动勾选
点击上面选中下面
1)在cartstore.js中定义方法:
const allCheck = (selected) => {
    // 把cartList中的每一项的selected都设置为当前的全选框状态
    cartList.value.forEach(item => item.selected = selected)
  }
2)绑定点击事件
<tr>
              <th width="120">
                <el-checkbox :model-value="cartStore.isAll" @change="allCheck" />
              </th>
              <th width="400">商品信息</th>
              <th width="220">单价</th>
              <th width="180">数量</th>
              <th width="180">小计</th>
              <!-- <th width="140">操作</th> -->
            </tr>
3)声明并调用方法:
const allCheck = (selected) => {
  cartStore.allCheck(selected)
}
7、本地购物车-列表购物车统计数据
(1)在cartstore.js中定义方法并return出去:
  // 3. 已选择数量
  const selectedCount = computed(() => cartList.value.filter(item => item.selected).reduce((a, c) => a + c.count, 0))
  // 4. 已选择商品价钱合计
  const selectedPrice = computed(() => cartList.value.filter(item => item.selected).reduce((a, c) => a + c.count * c.price, 0))
(2)index.vue中渲染:
 <div class="batch">
          共 {{ cartStore.allCount }} 件商品,已选择 {{ cartStore.selectedCount }} 件,商品合计:
          <span class="red">¥ {{ cartStore.selectedPrice.toFixed(2) }} </span>
        </div>
8、本地购物车-接口-加入购物车
在这里,需要请求接口,告诉服务器要往购物车添加商品了
(1)封装接口(apis/cart.js)
export const insertCartAPI = ({ skuId, count }) => {
  return request({
    url: '/member/cart',
    method: 'POST',
    data: {
      skuId,
      count
    }
  })
}
export const findNewCartListAPI = () => {
  return request({
    url: '/member/cart'
  })
}
(2)调用接口拿到数据:登录状态-接口购物车/未登录状态-本地购物车,以下代码包含拆分阶段。(cartstore.js)
import {insertCartAPI,findNewCartListAPI} from '@/apis/cart'
const isLogin = ref(false)
export const useCartStore = defineStore('cart',() =>{
  const cartList = ref([])
  const addCart = async (goods) => {
    const { skuId,count } = goods
    if(isLogin.value) {
      //走接口购物车
      await insertCartAPI({skuId,count})
      const res = await findNewCartListAPI()
      cartList.value = res.result


    }
    else {
      //走本地购物车
       //判断购物车中是否已经存在该商品,通过匹配传递过来的商品对象能不能在cartList中找到,找到了就是添加过
    const item = cartList.value.find((item) => goods.id === item.skuId)
    if(item){
      //找到了
      item.count++
    }
    //未找到
    else {
      cartList.value.push(goods)
    }

    }

  }
9、本地购物车-接口-删除购物车
(1)封装接口
export const delCartAPI = (ids) => {
  return request({
    url: '/member/cart',
    method: 'DELETE',
    data: {
      ids
    }
  })
}
(2)编写逻辑代码
const delCart = async (skuId) => {
    if (isLogin.value) {
      // 调用接口实现接口购物车中的删除功能
      await delCartAPI([skuId])
      updateNewList()
    } else {
      // 思路:
      // 1. 找到要删除项的下标值 - splice(返回从原数组中指定开始下标到结束下标之间的项组成的新数组)
      // 2. 使用数组的过滤方法 - filter
      const idx = cartList.value.findIndex((item) => skuId === item.skuId)
      cartList.value.splice(idx, 1)
    }
  }
(3)
//  const delCart = async (item) => {
//    // 思路:
//       // 1. 找到要删除项的下标值 - splice(返回从原数组中指定开始下标到结束下标之间的项组成的新数组)
//       // 2. 使用数组的过滤方法 - filter
//       const idx = cartStore.cartList.value.findIndex((item) => skuId === item.skuId)
//       cartList.value.splice(idx,1)
//       // 3. 更新购物车列表
//       updateNewList()
//       // // 4. 删除成功后,调用接口实现删除功能
//       // await deleteCart(skuId)

//       // // 5. 删除成功后,删除本地存储中的数据
//       // deleteLocalCart(skuId)
//   }
10、本地购物车-清空购物车
 const clearCart = () => {
    cartList.value = []
  }
11、合并本地购物车到服务器
(1)封装接口
export const mergeCartAPI = (data) => {
  return request({
    url: '/member/cart/merge',
    method: 'POST',
    data
  })
}
(2)获取最新购物车列表
  const updateNewList = async () => {
    const res = await findNewCartListAPI()
    cartList.value= res.result
  }
(3)合并购物车
  await mergeCartAPI(cartStore.cartList.map(item => {
      return {
        skuId:item.skuId,
        count:item.count,
        selected:item.selected

      }
      }))
      cartStore.updateNewList()
  }
(4)覆盖本地购物车列表
cartStore.updateNewList()在这一环节,实现的主要功能是:用户先添加一些商品,然后退出登录后,再重新登录,进去之后发现原来的商品还在,继续添加,发现购物车商品列表也在发生变化。
下期见~







![关于tensor.shape[0]的理解](https://img-blog.csdnimg.cn/direct/20ccbf0fbb954f45a731900d2742b994.png)
