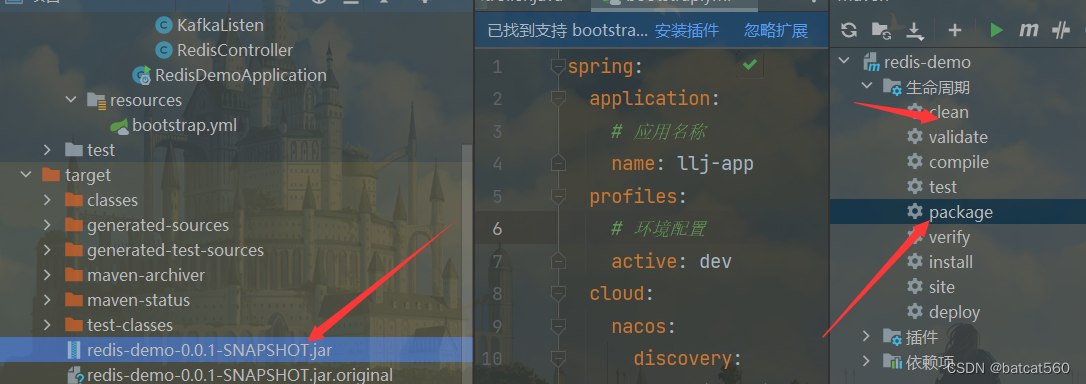
在tictoc3中,实现了让 tic 和 toc 这两个简单模块之间传递消息,传递十次后结束仿真。
首先来介绍一下程序中用到的两个函数:
1.omnetpp中获取模块名称的函数
 virtual const char *getName() const override  {
     return name ? name : "";
 }
2.定义及初始化消息的函数
cMessage *msg = new cMessage("tictocMsg");
接着来看一下网络描述文件 tictoc3.ned, 这个文件中定义了所仿真的网络是什么样子的。
//
// This file is part of an OMNeT++/OMNEST simulation example.
//
// Copyright (C) 2003-2015 Andras Varga
//
// This file is distributed WITHOUT ANY WARRANTY. See the file
// `license' for details on this and other legal matters.
//
simple Txc3
{
    parameters:
        @display("i=block/routing");
    gates:
        input in;
        output out;
}

//
// Same as Tictoc2.
//
network Tictoc3
{
    submodules:
        tic: Txc3 {
            parameters:
                @display("i=,cyan");
        }
        toc: Txc3 {
            parameters:
                @display("i=,gold");
        }
    connections:
        tic.out --> {  delay = 100ms; } --> toc.in;
        tic.in <-- {  delay = 100ms; } <-- toc.out;
}
可以看到,在上述的代码段中,定义了一个简单模块的结构Txc3,里面包含了一个输入门in 和输出门 out 。随后在 Tictoc3 这个网络中,创建了Txc3 的两个实例 tic 和 toc ,并创建了它们之间的连接,即两条时延为100ms 的信道,使两模块可以互相通信。
定义好了ned文件后需要把Tictoc3这个网络配置到初始化文件omnetpp.ini当中,指明仿真所使用的是哪个网络。
[Config Tictoc3]
network = Tictoc3
最后我们来看一下tic 和 toc 之间的消息传递是怎么实现的,这就要前往表示行为的.cpp文件了。
//
// This file is part of an OMNeT++/OMNEST simulation example.
//
// Copyright (C) 2003-2015 Andras Varga
//
// This file is distributed WITHOUT ANY WARRANTY. See the file
// `license' for details on this and other legal matters.
//

#include <stdio.h>
#include <string.h>
#include <omnetpp.h>

using namespace omnetpp;

/**
 * In this class we add a counter, and delete the message after ten exchanges.
 */
class Txc3 : public cSimpleModule
{
  private:
    int counter;  // Note the counter here

  protected:
    virtual void initialize() override;
    virtual void handleMessage(cMessage *msg) override;
};

Define_Module(Txc3);   //识别Txc3这个类

void Txc3::initialize()
{
    // Initialize counter to ten. We'll decrement it every time and delete
    // the message when it reaches zero.
    counter = 10;

    // The WATCH() statement below will let you examine the variable under
    // Tkenv. After doing a few steps in the simulation, double-click either
    // `tic' or `toc', select the Contents tab in the dialog that pops up,
    // and you'll find "counter" in the list.
    WATCH(counter);      //表示在仿真中可以查看当前这个变量的状态

    if (strcmp("tic", getName()) == 0) {
        EV << "Sending initial message\n";            //仿真界面输出信息
        cMessage *msg = new cMessage("tictocMsg");
        send(msg, "out");          //
    }
}

void Txc3::handleMessage(cMessage *msg)
{
    // Increment counter and check value.
    counter--;
    if (counter == 0) {
        // If counter is zero, delete message. If you run the model, you'll
        // find that the simulation will stop at this point with the message
        // "no more events".
        EV << getName() << "'s counter reached zero, deleting message\n";
        delete msg;
    }
    else {
        EV << getName() << "'s counter is " << counter << ", sending back message\n";
        send(msg, "out");
    }
}
我们来分析一下这个程序。首先在Txc3这个类中,定义了一个成员变量counter,这个是用来标记模块发送了多少的消息的;接着声明了两个方法:initialize() 和 handleMessage() , 其中 initialize()指明初始化的时候要做出什么样的操作,handleMessage(cMessage *msg)指明接收到消息的时候要做出什么样的处理。接下来分别解读一下这两个函数。
initialize()
void Txc3::initialize()
{
    // Initialize counter to ten. We'll decrement it every time and delete
    // the message when it reaches zero.
    counter = 10;

    // The WATCH() statement below will let you examine the variable under
    // Tkenv. After doing a few steps in the simulation, double-click either
    // `tic' or `toc', select the Contents tab in the dialog that pops up,
    // and you'll find "counter" in the list.
    WATCH(counter);      //表示

    if (strcmp("tic", getName()) == 0) {
        EV << "Sending initial message\n";
        cMessage *msg = new cMessage("tictocMsg");
        send(msg, "out");
    }
}
在这个函数中,首先初始化了Txc3类中的成员变量值为10; WATCH(counter)这条语句的作用是为了能够在仿真中可以查看当前这个变量的状态;接下来是判断当前模块是否为 tic,如果是的话就在仿真界面输出信息"Sending initial message",并创建一个新消息msg从tic模块的 out 门发送出去。这样就实现了让 tic 模块先传递消息给toc。然后我们来看一下初始化之后的样子,如下图所示:
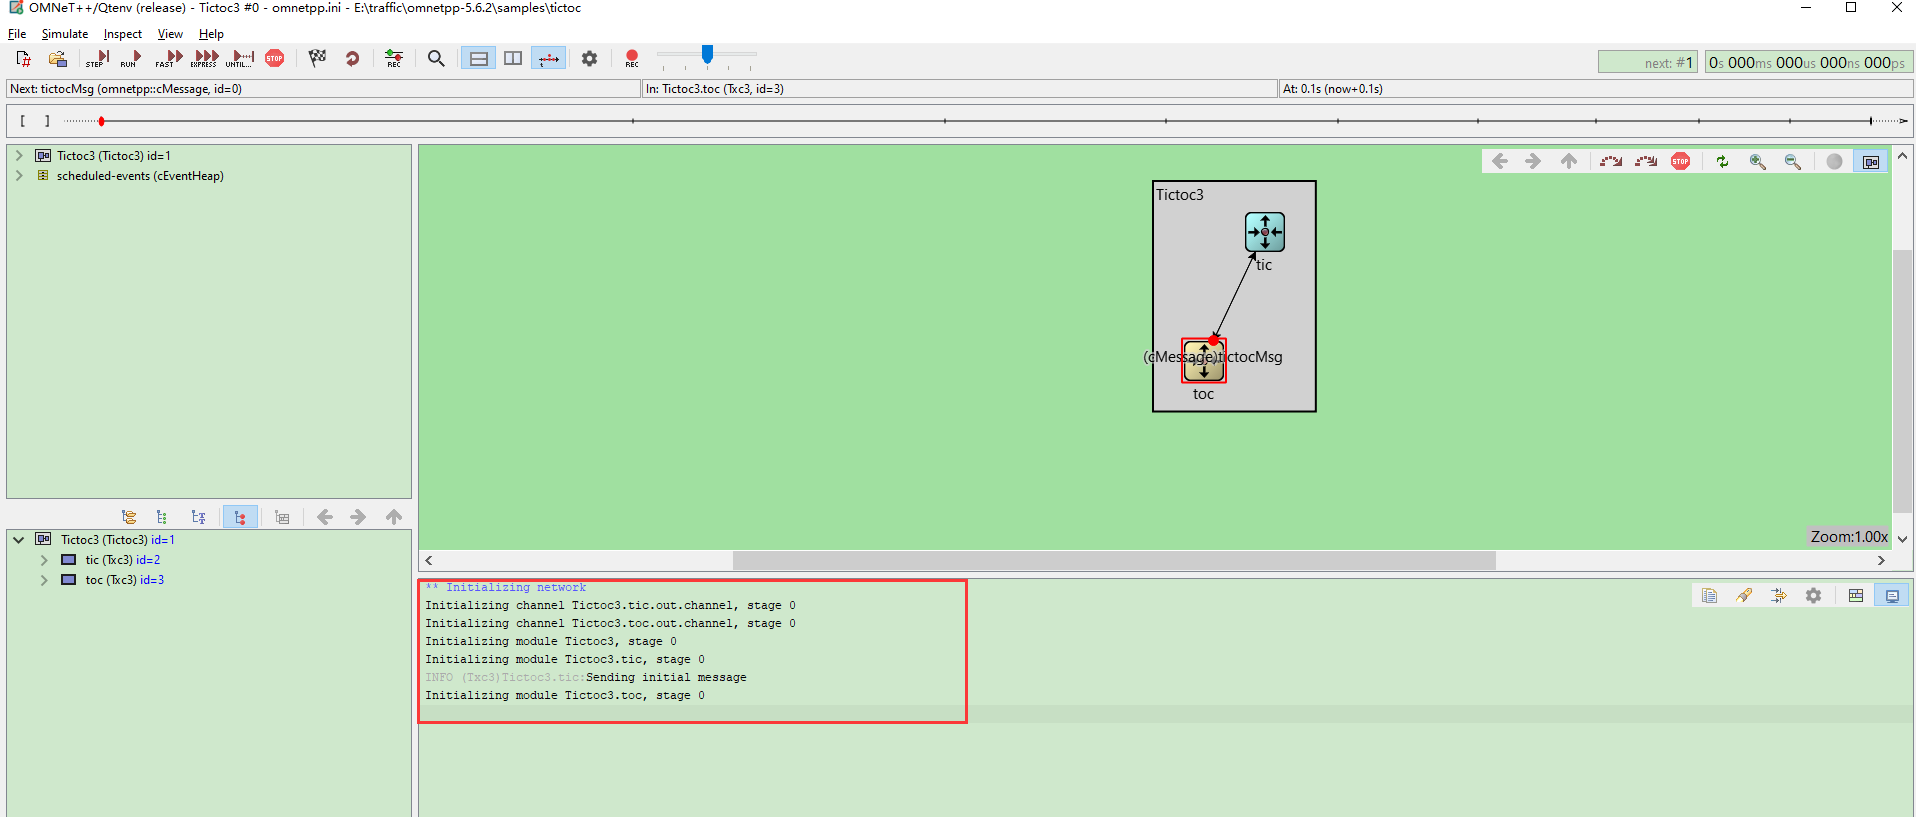
从仿真日志里可以看出,在还没有开始tictoc3的仿真时,就完成了初始化网络的操作,即构建好tictoc3这个网络,并初始化 tic 和 toc 两模块之间的信道;而且初始化的时候会调用 initialize() 初始化两个模块tic 和 toc,对于toc模块的初始化就是创建出了这个模块,而对于 tic 模块则是在创建后向 toc 模块发送了一个cMessage消息,但是这个时候 toc 还没有收到,因为handleMessage(cMessage *msg)函数是在开始仿真的时候才会执行的。从下图中就可以看出,此时这个代表消息的红点还没有到达 toc 模块。

*handleMessage(cMessage msg)
void Txc3::handleMessage(cMessage *msg)
{
    // Increment counter and check value.
    counter--;
    if (counter == 0) {
        // If counter is zero, delete message. If you run the model, you'll
        // find that the simulation will stop at this point with the message
        // "no more events".
        EV << getName() << "'s counter reached zero, deleting message\n";
        delete msg;
    }
    else {
        EV << getName() << "'s counter is " << counter << ", sending back message\n";
        send(msg, "out");
    }
}
可以看到在这个函数中就没有区分是 tic 模块还是toc 模块了,那也就是说tic 和 toc 在收到对方发来的消息时所作的处理是一样的。首先会把自己的计时器counter减一,表示已经收到了一次消息了,接着判断counter的值有没有减到零,是的话就表示已经收到十次来自对方的消息了,这个时候就删除掉该消息,然后不再发送;如果没有减为零,先在仿真界面输出一下此时的counter值,接着把收到的消息 tictocMsg 从自己的 out 门发送出去。
接下来点击运行仿真,跟踪整体的仿真事件:
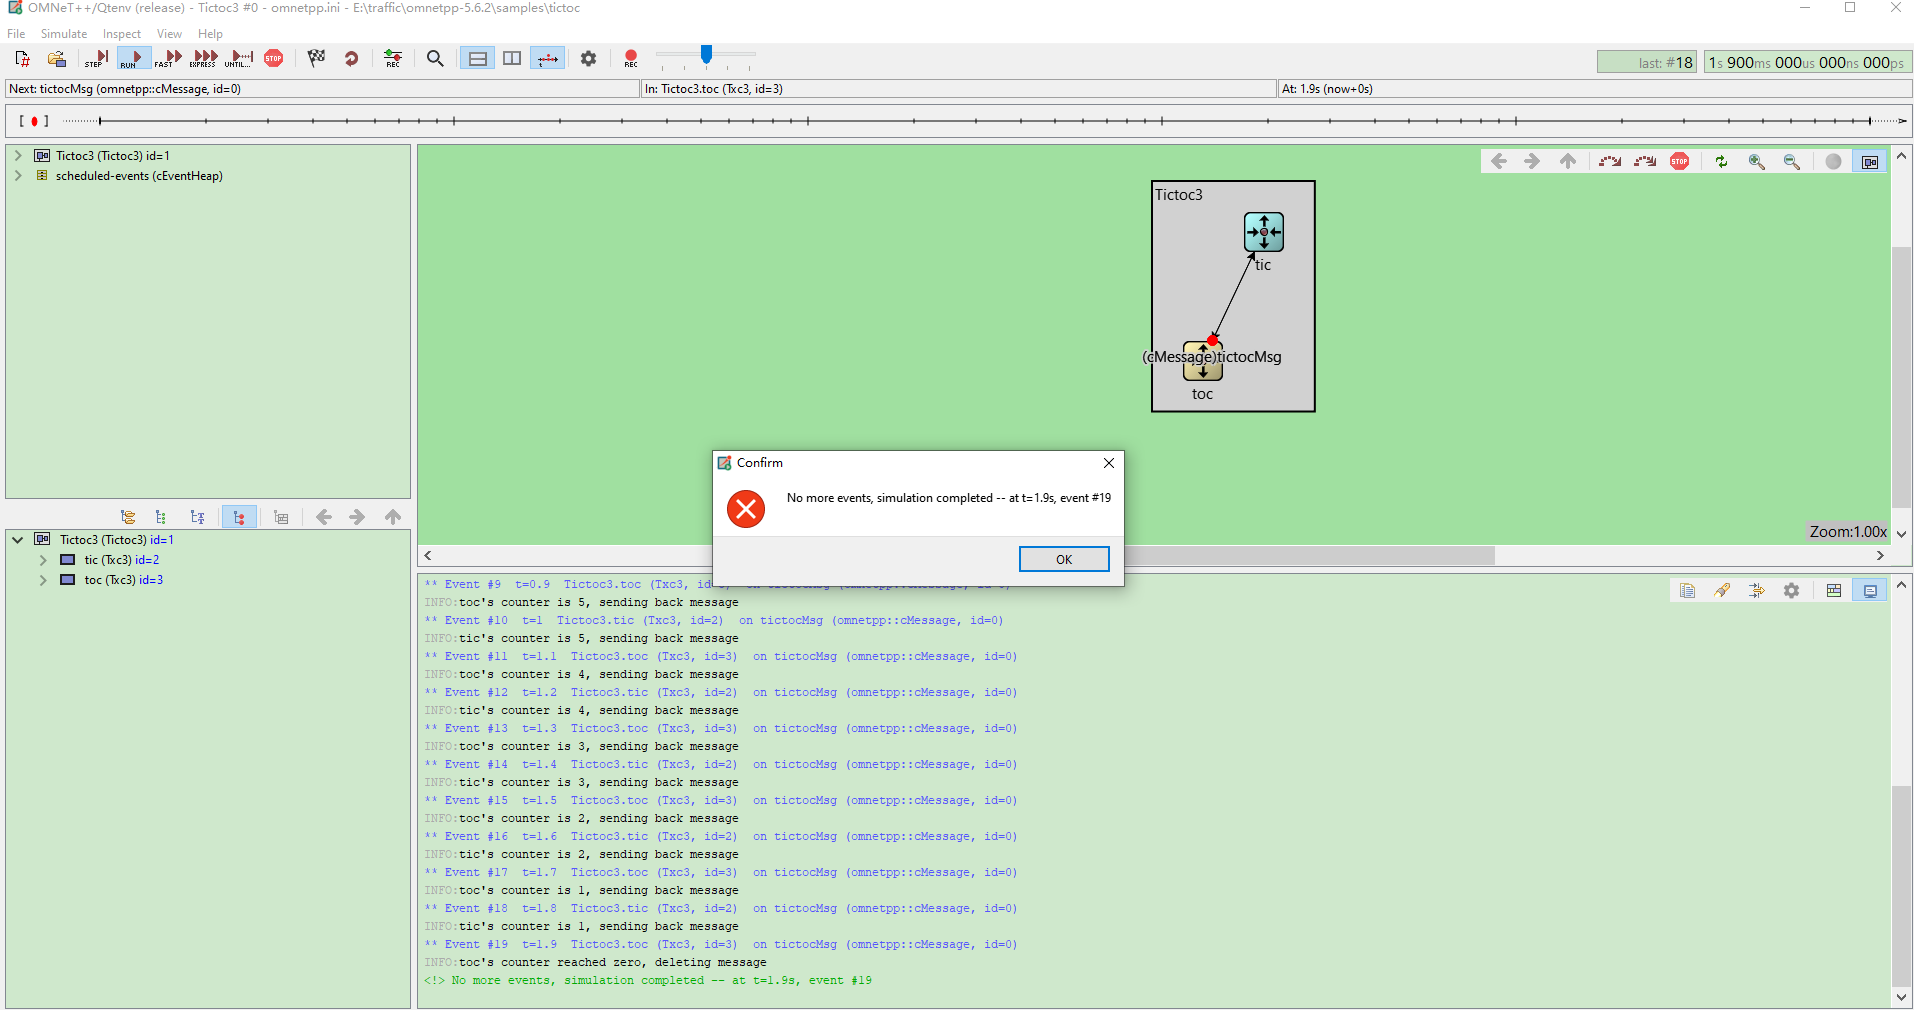
可以看到,在没有了事件时,仿真就会结束。
下面详细看一下仿真日志的输出:

当toc模块第十次收到tictocMsg这个消息时,它的counter值就递减到零了,所以Event19 就是最后一个事件。由于是 tic 先发送消息给 toc 的,所以在传递的过程中,一定是 toc 模块先收到最后一个消息。
此外,前面提到WATCH(counter)语句是保证在仿真中可以查看counter的状态,所以在仿真中只需双击 tic 或 toc 模块就可以看到对应模块的 counter 值了。如下图所示:

可见,此时toc模块的 counter 值为8,也就是说toc已经收到了两次来自tic的消息了。
以上就是对 tictoc 的第三个例子的解读,若有更加通透的见解欢迎评论区留言分享。