在vue3中使用canvas实现雨滴效果
这是封装的一个组件DotAndRain(
)
<script setup>
import {
    ref, onMounted } from "vue";
import {
    onUnmounted } from "vue";

let animationFrameId = null;

const el = ref(null);
let canvas = null;
let ctx = null;
let dots = [];
let rains = [];

onMounted(() => {

	canvas = el.value;
	canvas.width = 162;
	canvas.height = 146;
	ctx = canvas.getContext("2d");
	draw();
	animate();
});

onUnmounted(() => {

	cancelAnimationFrame(animationFrameId);
});

function draw() {

	const positions = [
		[[54, 16], 10],
		[[28, 80], 80],
		[[130, 114], 120]
	];
	for (const arr of positions) {

		const dot = new Dot(...arr[0]);
		dot.draw();
		dots.push(dot);
		const rain = new Rain(arr[1]);
		rain.draw();
		rains.push(rain);
	}
}

function animate() {

	ctx.clearRect(0, 0, canvas.width, canvas.height);
	dots.forEach((dot) => {

		dot.move();
	});
	rains.forEach((rain) => {

		rain.move();
	});
	animationFrameId = requestAnimationFrame(animate);
}

class Dot {

	radius = 3;
	speed = 0.08;
	range = 10;
	angle = Math.random() * Math.PI * 2;
	constructor(x, y) {

		this.x = x;
		this.y = y;
		this.originX = x;
		this.originY = y;
	}
	draw() {

		ctx.beginPath();
		ctx.arc(this.x, this.y, this.radius, 0, 2 * Math.PI);

		const line = ctx.createRadialGradient(this.x, this.y, 0, this.x, this.y, this.radius);
		line.addColorStop(0, "#fff");
		line.addColorStop(1, "#62E9F9");
		ctx.fillStyle = line;

		// ctx.fillStyle = "#62E9F9";
		ctx.fill();
		ctx.closePath();
	}
	move() {

		// 计算下一个位置
		const nextX = this.x + Math.cos(this.angle) * this.speed;
		const nextY = this.y + Math.sin(this.angle) * this.speed;

		// 判断是否超出边界
		if (nextX > this.originX - this.range && nextX < this.originX + this.range && nextY > this.originY - this.range && nextY < this.originY + this.range) {

			this.x = nextX;
			this.y = nextY;
		} else {

			// 如果超出边界,则随机生成新的角度
			this.angle = Math.random() * Math.PI * 2;
		}
		this.draw();
	}
}

class Rain {

	alpha = 0.8;
	width = 2;
	y = canvas.height;
	constructor(x) {

		this.x = x;
		this.init();
	}
	init() {

		this.alpha = 1;
		this.speed = Math.random() + 1;
		this.height = Math.random() * 40 + 30;
		this.y = canvas.height;
	}
	draw() {

		ctx.beginPath();
		ctx.lineWidth = 3; //宽度
		// ctx.globalAlpha = this.alpha; //设置透明度
		//创建横向渐变颜色,起点坐标至终点坐标
		const line = ctx.createLinearGradient(this.x, this.y, this.x + this.width, this.y + this.height);
		line.addColorStop(0, `rgba(62, 192, 255, ${
     this.alpha})`);
		line.addColorStop(0.6, `rgba(62, 192, 255, ${
     this.alpha / 2})`);
		line.addColorStop(1, "transparent");
		ctx.strokeStyle = line;
		ctx.moveTo(this.x, this.y);
		ctx.lineTo(this.x, this.y + this.height);
		ctx.closePath();
		ctx.stroke();
	}

	move() {

		this.alpha -= 0.01;
		this.y -= this.speed;
		if (this.y < 0) {

			this.init();
		}
		this.draw();
	}
}
</script>

<template>
	<canvas ref="el" style="width: 162px; height: 146px"></canvas>
</template>

<style scoped lang="scss"></style>
上述代码实现了一个简单的雨滴效果,主要包括绘制雨滴和下落动画两个部分。下面我会详细解释代码中涉及到的关键部分:
1.初始化和绘制:
- 在
draw()函数中,首先定义了三个雨滴和雨点的初始位置和大小,并通过循环创建了对应数量的Dot和Rain对象,并调用它们的draw()方法进行绘制。 Dot类用于绘制雨滴的水滴效果,包括设置半径、速度、范围、角度等属性,并实现了draw()和move()
方法来绘制和移动雨滴。Rain类用于绘制雨滴的下落效果,包括设置透明度、宽度、高度等属性,并实现了init()、draw()和move()
方法来初始化、绘制和控制雨滴的下落。
2.动画循环:
- 在
animate()函数中,使用requestAnimationFrame()
创建了一个动画循环,不断清除画布内容并重新绘制雨滴和雨点,实现动态效果。 - 在每一帧中,分别调用雨滴和雨点对象的
move()方法,更新它们的位置和状态,并重新绘制在画布上。
3.雨滴效果绘制:
Dot类通过绘制圆形并利用径向渐变填充,实现了水滴的效果,颜色由白色渐变为蓝色。Rain类通过绘制线条并利用线性渐变描边,实现了雨滴的下落效果,颜色从蓝色透明度逐渐减小到透明。
在App.vue文件中直接使用即可
<script setup>
import assets from '/src/assets/assets_item.png';
import DotAndRain from './components/DotAndRain.vue';
</script>

<template>
  <div style="position: relative;width: 162px; height: 146px;">
    <div class="item-shadow"></div>
    <div class="item-bg"></div>
    <DotAndRain/>
  </div>
</template>

<style scoped>
/* 电子围墙 */
.item-bg {

  background-image: url("/src/assets/assets_item.png");
  width: 162px;
  height: 146px;
  position: absolute;
  z-index: 4;
}

.item-shadow::before {

  content: "";
  position: absolute;
  left: 0;
  bottom: 40px;
  width: 100%;
  height: 0;
  z-index: 2;
  background-image: linear-gradient(0deg, rgba(21, 54, 90, 1), transparent);
  background-repeat: repeat-y;
  background-size: 100% 100%;
  animation: wall 3s linear infinite;
}

.item-shadow::after {

  content: "";
  position: absolute;
  left: 0;
  bottom: 40px;
  width: 100%;
  height: 0;
  z-index: 3;
  background-image: linear-gradient(0deg, rgba(21, 54, 90, 1), transparent);
  background-repeat: repeat-y;
  background-size: 100% 100%;
  animation: wall 3s linear infinite 1.5s;
}

@keyframes wall {

  0% {

    height: 0;
  }

  20% {

    opacity: 1;
  }

  60% {

    height: calc(100% - 50px);
  }

  100% {

    opacity: 0;
  }
}
</style>
实现效果如下:
cavans实现雨滴
cavans快速入门
1.创建cavans
<script setup>
</script>

<template>
  <div>
    <canvas ref="canvas" height="600px" width="600px"></canvas>
  </div>
</template>

<style scoped>
canvas {

  border: 1px solid #ccc;
}
2.获取CanvasRenderingContext2D对象进行绘制
- 给canvas添加一个ref属性:
<canvas ref="canvas" height="300px" width="300px"></canvas>
- 获取canvas对象:
<script setup>
import {
    ref} from 'vue';

const canvas = ref(null);
</script>
- 渲染完成后获取CanvasRenderingContext2D对象:
<script setup>
import {
    ref, onMounted } from 'vue';

const canvas = ref(null);
onMounted(() => {

  const ctx = canvas.value.getContext('2d');
});
</script>
- 直线、圆圈、圆弧的绘制:
具体请参考HTML Canvas参考手册
<script setup>
import {
    ref, onMounted } from 'vue';
const canvas = ref(null);

onMounted(() => {

  const ctx = canvas.value.getContext('2d');

  //直线绘制
  // ctx.moveTo(100, 100);
  // ctx.lineTo(200, 200);
  // ctx.stroke();

  //圆圈绘制
  ctx.beginPath();
  ctx.arc(100, 75, 50, 0, 2 * Math.PI);
  ctx.stroke();

  //圆弧绘制
  // ctx.beginPath();
  // ctx.arc(100,75,50,90/180*Math.PI,2*Math.PI);
  // ctx.stroke();
});
</script>
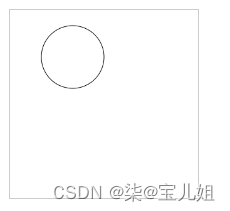
完整模板如下:
<script setup>
import {
    ref, onMounted } from 'vue';
const canvas = ref(null);

onMounted(() => {

  const ctx = canvas.value.getContext('2d');
  ctx.beginPath();
  ctx.arc(100, 75, 50, 0, 2 * Math.PI);
  ctx.stroke();
});
</script>

<template>
  <div>
    <canvas ref="canvas" height="300px" width="300px"></canvas>
  </div>
</template>

<style scoped>
canvas {

  border: 1px solid #ccc;
}
</style>
效果如下: