一 Nginx的简介
1 Nginx:
①Nginx 是开源、高性能、高可靠的 Web 和反向代理服务器,而且支持热部署,几乎可以做到 7 * 24 小时不间断运行,即使运行几个月也不需要重新启动,还能在不间断服务的情况下对软件版本进行热更新
②Nginx的主要使用场景: 虚拟主机,反向代理,缓存,http
③可以跨平台,配置简单,内存消耗少,10个nginx才占用150M内存。
④使用的是epoll模型,这种模型是I/O多路复用技术(I/O多路复用是一种技术,它允许一个进程或线程监控多个网络连接,当其中某个或某几个连接有数据时,当前程序可以拿到网卡收到的数据进行下一步的处理;),异步非阻塞的模型(异步非阻塞模型可以提高程序的效率,在等待I/O操作完成的同时,可以继续执行其他代码。)
⑥nginx支持高并发连接,处理2-3万并发连接数,官方监测能支持5万并发。对HTTP并发连接的处理能力高,单台物理服务器可支持30000~50000个并发请求。(实际操作,很多公司为了服务器的稳定,都会设置在20000个左右)
⑦成本低,且开源,稳定性高,宕机概率非常小;
⑧内置的健康检查功能,可以允许在服务器宕机的时候,做健康检查,再发送的请求就不会发给宕机的服务器,会重新提交到其他节点上。
Apache:
Apache是以进程为基础的结构,进程要比线程消耗更多的系统开支,不太适用于多处理器环境,因此,在一个apache Web站点扩容时,通常是增加服务器或扩充群集节点而不是增加处理器
nginx的缺点:
nginx不方便处理动态资源,可以进行动静分离,将动态请求交给后端程序去进行处理。
2 Apache与Nginx的区别
1 nginx是轻量级,nginx比apache 占用更少的内存及资源;
2 静态处理,Nginx 静态处理性能比 Apache 高 ;
3 Nginx可以实现无缓存的反向代理加速,提高网站运行速度;
4 Nginx的性能和可伸缩性不依赖于硬件,Apache依赖于硬件;
5 Nginx支持热部署,启动速度迅速,可以在不间断服务的情况下,对软件版本或者配置进行升级;
6 nginx是异步进程,基于事件的web服务器,多个连接对应一个进程 ;apache是同步多进程,基于流程的web服务器,单个线程处理单个请求;
7 Nginx高度模块化,编写模块相对简单,且组件比Apache少
8 nginx抗并发,nginx处理请求是异步非阻塞的,而Apache则是阻塞性的,在高并发下的nginx能够保持低资源,低消耗高性能。
9 nginx类似于速度,apache类似于功率.
10 nginx在负载均衡方面比较好,apache当流量进程达到极限时,将拒绝新的连接
Nginx对比Apache的优势:
轻量级,nginx比apache 占用更少的内存及资源
静态处理,Nginx 静态处理性能比 Apache 高
Nginx可以实现无缓存的反向代理加速,提高网站运行速度
Nginx的性能和可伸缩性不依赖于硬件,Apache依赖于硬件
Nginx支持热部署,启动速度迅速,可以在不间断服务的情况下,对软件版本或者配置进行升级
nginx是异步进程,多个连接可以对应一个进程 ;apache是同步多进程,一个连接对应一个进程
Nginx高度模块化,编写模块相对简单,且组件比Apache少
高并发下nginx 能保持低资源低消耗高性能
Nginx 配置简洁, Apache配置复杂
apache相对于nginx的优点 :
Rewrite比nginx的rewrite强大 (rewrite的主要功能就是实现统一资源定位符URL的跳转)
模块多,基本想到的都可以找到
少bug, nginx的bug相对较多
超稳定
Nginx处理动态请求是弱项,动态请求要Apache去做
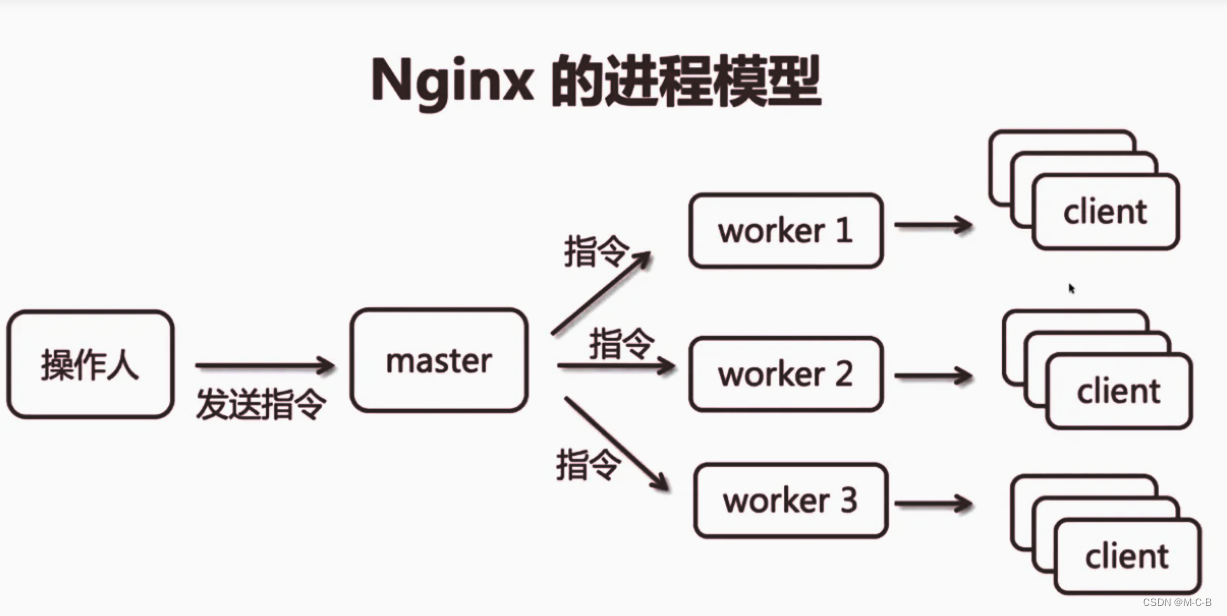
3 Nginx的进程
Apache和Nginx的默认端口都是80,当你发先Nginx启动失败,导致的原因可能就是80端口被占用,而导致服务启动失败,可以修改服务的端口,从而实现两个服务的同时进行
Nginx有两个进程:
master process:主进程(守护进程),用来管理工作进程,读取nginx的配置文件信息
worker process:工作进程,用来处理用户的连接请求
nginx的应用场景
1 可以做web服务器,nginx是一个http服务,可以独立地提供http服务,可以做静态服务器;
2 虚拟主机。可以实现一台服务器,虚拟多个站点,例如基于ip、不同端口、或者不同域名的站点
3 反向代理服务器,负载均衡。当网站的访问量达到一定的程度时,单台服务器就不能满足用户的请求,此时需要多台服务器集群,此时可以使用nginx做反向代理,并且多台服务器可以平均分担负载,不会让某台服务器负载高或者闲置。(也可以使用ip hash技术 进行负载均衡分配)
4 nginx中还可以配置安全管理,比如支持nginx搭建API接口网关,对每一个接口服务进行拦截;
5 nginx还能做缓存服务器;
Nginx 是如何实现高并发的?
异步,非阻塞,使用了epoll 和大量的底层代码优化
如果一个server采用一个进程负责一个request的方式,那么进程数就是并发数。正常情况下,会有很多进程一直在等待中
而nginx采用一个master进程,多个woker进程的模式
master进程主要负责收集、分发请求。每当一个请求过来时,master就拉起一个worker进程负责处理这个请求。同时master进程也负责监控woker的状态,保证高可靠性
woker进程一般设置为跟cpu核心数一致。nginx的woker进程在同一时间可以处理的请求数只受内存限制,可以处理多个请求
Nginx 的异步非阻塞工作方式正把当中的等待时间利用起来了。在需要等待的时候,这些进程就空闲出来待命了,因此表现为少数几个进程就解决了大量的并发问题
同步和异步
同步:一个服务的完成需要依赖其他服务时,只有等待被依赖的服务完成后,才算完成,这是一种可靠的服务序列。要么成功都成功,失败都失败,服务的状态可以保持一致
异步:一个服务的完成需要依赖其他服务时,只通知其他依赖服务开始执行,而不需要等待被依赖的服务完成,此时该服务就算完成了。被依赖的服务是否最终完成无法确定,因此它是一个不可靠的服务序列
阻塞与非阻塞
阻塞:阻塞调用是指调用结果返回之前,当前线程会被挂起,一直处于等待消息通知,不能够执行其他业务,函数只有在得到结果之后才会返回。
非阻塞:非阻塞和阻塞的概念相对应,指在不能立刻得到结果之前,该函数不会阻塞当前线程,而会立刻返回
Nginx为什么不使用多线程?
Apache: 创建多个进程或线程,而每个进程或线程都会为其分配 cpu 和内存(线程要比进程小的多,所以worker支持比perfork高的并发),并发过大会耗光服务器资源
Nginx: 采用单线程来异步非阻塞处理请求(管理员可以配置Nginx主进程的工作进程的数量)(epoll),不会为每个请求分配cpu和内存资源,节省了大量资源,同时也减少了大量的CPU的上下文切换。所以才使得Nginx支持更高的并发
nginx 模块
核心模块:是 Nginx 服务器正常运行必不可少的模块,提供错误日志记录 、配置文件解析 、事件驱动机制 、进程管理等核心功能
标准HTTP模块:提供 HTTP 协议解析相关的功能,比如: 端口配置 、 网页编码设置 、 HTTP响应头设置 等等
可选HTTP模块:主要用于扩展标准的 HTTP 功能,让 Nginx 能处理一些特殊的服务,比如:Flash 多媒体传输 、解析 GeoIP 请求、 网络传输压缩 、 安全协议 SSL 支持等
邮件服务模块:主要用于支持 Nginx 的 邮件服务 ,包括对 POP3 协议、 IMAP 协议和 SMTP协议的支持
Stream服务模块: 实现反向代理功能,包括TCP协议代理 反向
第三方模块:是为了扩展 Nginx 服务器应用,完成开发者自定义功能,比如: Json 支持、 Lua 支持等
nginx高度模块化,但其模块早期不支持DSO机制;1.9.11 版本支持动态装载和卸载
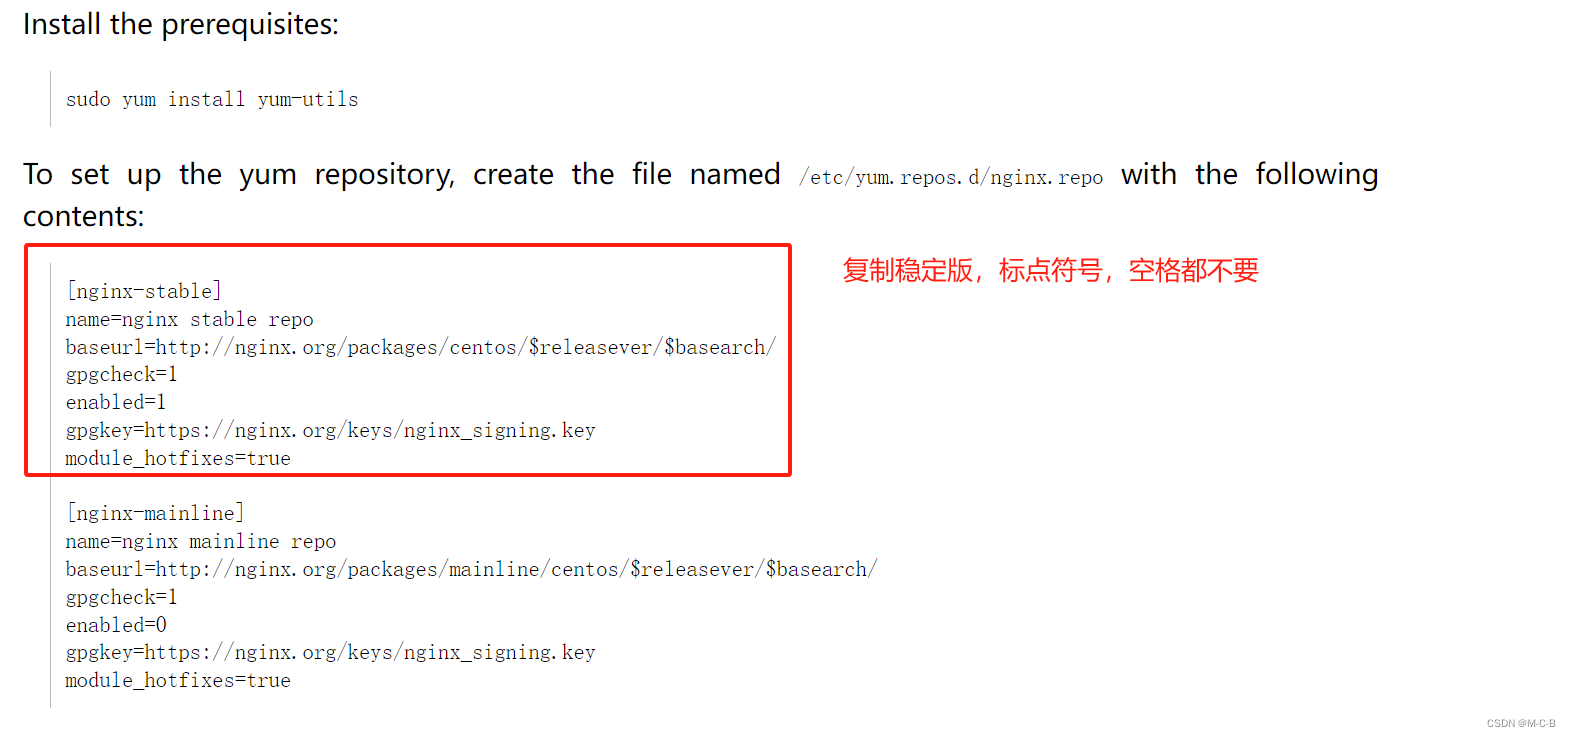
yum安装nginx
①yum install -y epel-release #安装epel源 centos7 需要安装epel源
②yum install nginx -y
[root@localhost ~]# yum install -y epel-release

[root@localhost ~]# yum install -y nginx
③ 使用yum安装的nginx
配置文件位置在:/etc/nginx/nginx.conf;
默认根目录在:/usr/share/nginx/html;
默认日志文件在:/var/log/nginx/路径下
二 编译安装Nginx服务
1 初步编译安装
①关闭防火墙,将安装nginx所需软件包传到/opt目录下
systemctl stop firewalld

systemctl disable firewalld   开机不自启

setenforce 0
2 安装依赖包
nginx的配置及运行需要pcre、zlib、openssl等软件包的支持,因此需要安装这些软件的开发包,以便提供相应的库和头文件。
yum -y install pcre-devel zlib-devel openssl-devel gcc gcc-c++ make3 创建运行用户、组
(Nginx 服务程序默认以 nobody 身份运行,建议为其创建专门的用户账号,以便更准确地控制其访问权限)
useradd -M -s /sbin/nologin nginx4 下载安装包
先从官网下载安装包 www.nginx.org.com


 步骤如下
步骤如下
cd /opt
wget http://nginx.org/download/nginx-1.18.0.tar.gz
tar zxvf nginx-1.18.0.tar.gz -C /opt/
cd nginx-1.18.0/
./configure --prefix=/apps/nginx \
--prefix=/usr/local/nginx \ #指定nginx的安装路径
--user=nginx \ #指定用户名
--group=nginx \ #指定组名
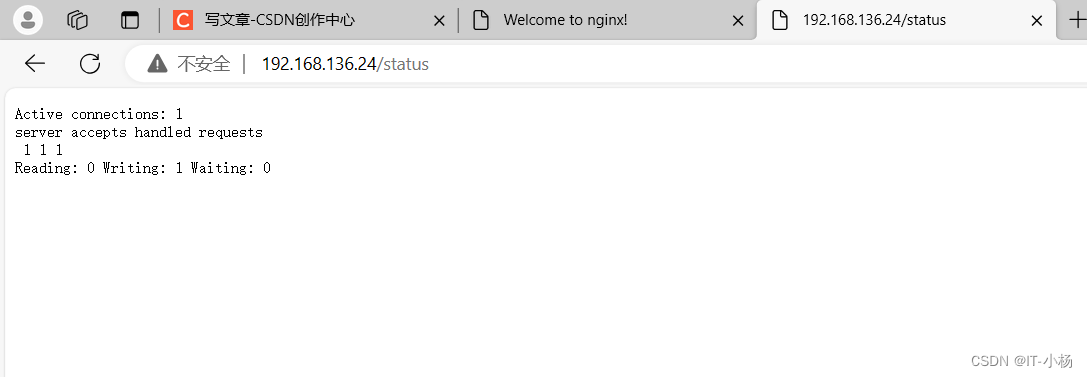
--with-http_stub_status_module #启用 http_stub_status_module 模块以支持状态统计
make -j2 && make install 编译安装
(ln -s /usr/local/nginx/sbin/nginx /usr/local/sbin/ #建立软连接补全便宜,)
ln -s /apps/nginx/sbin/nginx /usr/sbin/
chown -R nginx.nginx /apps/nginx
①绝对路径启动
/apps/nginx/sbin/nginx 若启动不起来,看看端口是否被占用,占用关闭
pstree -p | grep nginx
②做完软链接直接启动nginx
[root@localhost ~]#nginx
[root@localhost ~]#pstree -p | grep nginx
|-nginx(27991)---nginx(27992)
ll /usr/local/sbin/

三 Nginx的初始命令
①启动Nginx服务
nginx  -t  #检查nginx服务配置是否正确


/usr/local/sbin/nginx  #启动nginx服务


nginx  #快捷运行
启动nginx方法二
ln -s /usr/local/nginx/sbin/nginx /usr/local/sbin/		#让系统识别nginx的操作命令
##做软连接,创建二进制文件到PATH路径中
##一般是安装在/usr/local中,就放到/usr/local下的/sbin下


还有一种当时是在PATH环境变量中加入nginx程序的目录,这种不常用
启动nginx方法三
写进磁盘完成后进入部署的文件夹使用绝对路径启动nginx服务,然后查看是否有nginx进程
/apps/nginx/sbin/nginx
#使用绝对路径启动nginx

ps aux |grep nginx
#查看是否有nginx进程
②停止nginx服务
cat /usr/local/nginx/logs/nginx.pid		#先查看nginx的PID号

kill -3 <PID号>

kill -s QUIT <PID号>

killall -3 nginx

killall -s QUIT nginx
多种方式可以查看nginx进程号
cat /usr/local/nginx/logs/nginx.pid //查看nginx主进程的PID
pgrep nginx -l //查看nginx的主进程号和工作进程号
lsof -i :80 //查看nginx的主进程号和工作进程号
ss -ntap | grep nginx //查看nginx的主进程号和工作进程号
netstat -ntap | grep nginx //查看nginx主进程的PID启动关闭nginx查看进程
[root@localhost nginx-1.18.0]# nginx
[root@localhost nginx-1.18.0]# ps aux | grep nginx
root      49343  0.0  0.0  20564   616 ?        Ss   18:39   0:00 nginx: master process nginx
nobody    49344  0.0  0.0  23084  1380 ?        S    18:39   0:00 nginx: worker process
root      49358  0.0  0.0 112824   984 pts/0    S+   18:39   0:00 grep --color=auto nginx

文件夹功能
[root@localhost nginx-1.18.0]# ll /apps/nginx
总用量 4
drwxr-xr-x. 2 root root 4096 2月  21 18:22 conf
drwxr-xr-x. 2 root root   40 2月  21 18:22 html
drwxr-xr-x. 2 root root    6 2月  21 18:22 logs
drwxr-xr-x. 2 root root   36 2月  21 18:24 sbin
[root@localhost nginx-1.18.0]#
- conf:保存nginx所有的配置文件,其中nginx.conf是nginx服务器的最核心最主要的配置文件,其他的.conf则是用来配置nginx相关的功能的,例如fastcgi功能使用的是fastcgi.conf和
- fastcgi_params两个文件,配置文件一般都有个样板配置文件,是文件名.default结尾,使用的使用将其复制为并将default去掉即可。
- html目录中保存了nginx服务器的web文件,但是可以更改为其他目录保存web文件,另外还有一个50x的web文件是默认的错误页面提示页面。
- logs:用来保存nginx服务器的访问日志错误日志等日志,logs目录可以放在其他路径,比如/var/logs/nginx里面。
- sbin:保存nginx二进制启动脚本,可以接受不同的参数以实现不同的功能。
③重载nginx服务
kill -1 <PID号>
kill -s HUP <PID号>
killall -1 nginx
killall -s HUP nginx
④nginx的其余命令
①nginx -V 查看安装了那些模块

②nginx -v 查看版本号

③nginx -s 发送信号 后面可以跟stop、reload、quit、reopen

④nginx -t 检查著配置文件语法

nginx -g 修改执行用户ps aux |grep nginx中查看。需要注销配置文件中的user nginx中。nginx -g "daemon off"前台运行,默认后台运行容器中需要使用。

⑥nginx -c 指定配置文件,一般用于.service文件中

⑤日志分割,重新打开日志文件
[root@localhost logs]#ls
access.log  error.log  nginx.pid

[root@localhost logs]#mv access.log    access.`date +%F`.log

[root@localhost logs]#ls
access.2022-09-27.log  error.log  nginx.pid

[root@localhost logs]#kill -USR1 8468

[root@localhost logs]#ls
access.2022-09-27.log  access.log  error.log  nginx.pid

[root@localhost logs]#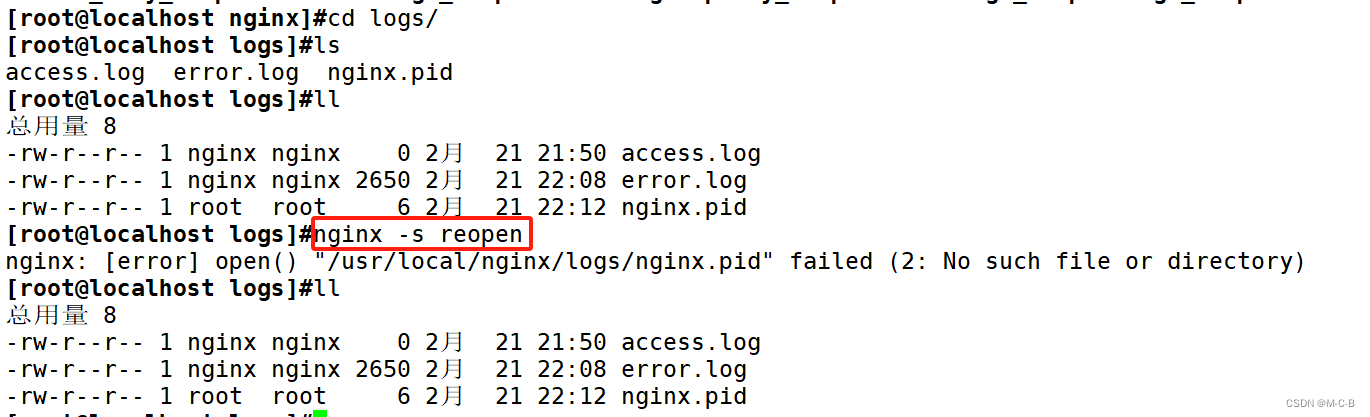
创建nginx自启动文件
注意:创建自启动前需确保nginx软件安装,不仅仅时下载。

[root@localhost ~]# vim /usr/lib/systemd/system/nginx.service
[Unit]
Description=nginx - high performance web server
Documentation=http://nginx.org/en/docs/
After=network-online.target remote-fs.target nss-lookup.target
Wants=network-online.target
[Service]
Type=forking
PIDFile=/apps/nginx/logs/nginx.pid
#注意文件位置,如果不对 启动不了
ExecStart=/apps/nginx/sbin/nginx -c /apps/nginx/conf/nginx.conf
#注意启动文件位置
ExecReload=/bin/kill -s HUP $MAINPID
ExecStop=/bin/kill -s TERM $MAINPID
LimitNOFILE=100000
[Install]
WantedBy=multi-user.target


[root@localhost ~]# systemctl daemon-reload
#重新加载配置
[root@localhost ~]# systemctl start nginx
[root@localhost ~]# systemctl status nginx
[root@localhost ~]# systemctl stop nginx
[root@localhost ~]# systemctl enable --now nginx
#开机自启并立即启动
指定配置,不以配置文件中的为准
[root@localhost ~]# nginx -v
nginx version: nginx/1.18.0
[root@localhost ~]# vim /apps/nginx/conf/nginx.conf

  1
  2 #user  nobody;
  3 #worker_processes  1;  (此脚本不对,记录总结)
  4
  5 #error_log  logs/error.log;
  6 #error_log  logs/error.log  notice;
  7 #error_log  logs/error.log  info;
  8
  9 #pid        logs/nginx.pid;
[root@localhost ~]# vim /apps/nginx/conf/nginx.conf
3 #worker_processes  1;                                #避免冲突注释此行

[root@localhost ~]# nginx -g 'worker_processes  2;'
[root@localhost ~]# pstree -p | grep nginx
           |-nginx(6068)-+-nginx(6069)
           |             `-nginx(6070)
⑤平滑升级
下载新版本安装包,重新编译安装
[root@localhost ~]#wget https://nginx.org/download/nginx-1.20.2.tar.gz -P /usr/local/src/
#下载安装包到/usr/local/src/目录
[root@localhost ~]#cd /usr/local/src/
[root@localhost src]#ls
nginx-1.20.2.tar.gz
[root@localhost src]#tar xf nginx-1.20.2.tar.gz
[root@localhost src]#cd nginx-1.20.2/
[root@localhost nginx-1.20.2]#ls
auto  CHANGES  CHANGES.ru  conf  configure  contrib  html  LICENSE  man  README  src
[root@localhost nginx-1.20.2]# nginx -V
nginx version: nginx/1.18.0
built by gcc 4.8.5 20150623 (Red Hat 4.8.5-44) (GCC)
built with OpenSSL 1.0.2k-fips  26 Jan 2017
TLS SNI support enabled
configure arguments: --prefix=/apps/nginx --user=nginx --group=nginx --with-http_ssl_module --with-http_v2_module --with-http_realip_module --with-http_stub_status_module --with-http_gzip_static_module --with-pcre --with-stream --with-stream_ssl_module --with-stream_realip_module
[root@localhost nginx-1.20.2]# ./configure --prefix=/apps/nginx --user=nginx --group=nginx --with-http_ssl_module --with-http_v2_module --with-http_realip_module --with-http_stub_status_module --with-http_gzip_static_module --with-pcre --with-stream --with-stream_ssl_module --with-stream_realip_module
#重新编译
[root@localhost nginx-1.20.2]# ls
auto  CHANGES  CHANGES.ru  conf  configure  contrib  html  LICENSE  Makefile  man  objs  README  src
[root@localhost nginx-1.20.2]# make
[root@localhost nginx-1.20.2]# cd objs/
#此文件夹中有新版本的nginx运行程序
[root@localhost objs]# ls
autoconf.err  Makefile  nginx  nginx.8  ngx_auto_config.h  ngx_auto_headers.h  ngx_modules.c  ngx_modules.o  src
[root@localhost objs]# ./nginx -v
nginx version: nginx/1.20.2
#查看版本
拷贝新版本至原安装路径
[root@localhost objs]# mv /apps/nginx/sbin/nginx /apps/nginx/sbin/nginx.bak
#将低版本的nginx主程序改名
[root@localhost objs]# cp nginx /apps/nginx/sbin/
#将新版本拷入原安装路径
[root@localhost objs]# cd /apps/nginx/sbin/
[root@localhost sbin]# ls
nginx  nginx.bak
[root@localhost nginx-1.20.2]# ll /apps/nginx/sbin/
总用量 15308
-rwxr-xr-x. 1 root  root  7896080 2月  20 21:15 nginx
-rwxr-xr-x. 1 nginx nginx 7774624 2月  20 20:52 nginx.bak
[root@localhost nginx-1.20.2]# nginx -v
nginx version: nginx/1.20.2
#nginx文件为新版本
[root@localhost sbin]# /apps/nginx/sbin/nginx -t
#检查下语法问题
4生成新进程
[root@localhost nginx-1.20.2]# kill -USR2 `cat /apps/nginx/logs/nginx.pid`
#发送 2 信号

[root@localhost sbin]# pstree -p | grep nginx
           |-nginx(5073)-+-nginx(8717)-+-nginx(8718)
           |             |             `-nginx(8719)
           |             |-nginx(5623)
           |             `-nginx(5624)
[root@localhost sbin]#  ps aux | grep -v grep | grep nginx
root       5073  0.0  0.1  46344  2020 ?        Ss   22:33   0:00 nginx: master process /apps/nginx/sbin/nginx -c /apps/nginx/conf/nginx.conf
nginx      5623  0.0  0.1  48856  2092 ?        S    22:37   0:00 nginx: worker process
nginx      5624  0.0  0.1  48856  2084 ?        S    22:37   0:00 nginx: worker process
root       8717  0.0  0.1  46220  3368 ?        S    22:43   0:00 nginx: master process /apps/nginx/sbin/nginx -c /apps/nginx/conf/nginx.conf
nginx      8718  0.0  0.1  48756  1992 ?        S    22:43   0:00 nginx: worker process
nginx      8719  0.0  0.1  48756  1992 ?        S    22:43   0:00 nginx: worker process
#生成新的master8717
[root@localhost ~]# cd /apps/nginx/logs
[root@localhost logs]# ls
access.log  error.log  nginx.pid  nginx.pid.oldbin
[root@localhost logs]# cat nginx.pid
8717         #新的master进程
[root@localhost logs]# cat nginx.pid.oldbin
5073         #旧的master进程
192.168.11.4:(下载版本的虚拟机)
[root@localhost ~]# cd /apps/nginx/html
[root@localhost html]# ls
50x.html index.html
#会有新老两个进程
[root@localhost html]# dd if=/dev/zero of=/apps/nginx/html/m.img bs=1G count=10
#生成大文件
[root@localhost html]# ll -h
总用量 1.1G
-rw-r--r--. 1 root root 494 2月 21 18:22 50x.html
-rw-r--r--. 1 root root 612 2月 21 18:22 index.html
-rw-r--r--. 1 root root 10G 2月 21 19:44 m.img
192.168.11.3:
[root@localhost data]# wget --limit-rate=1M http://192.168.11.4/m.img
#下载文件
192.168.11.9:
[root@localhost html]# kill -WINCH `cat /apps/nginx/logs/nginx.pid.oldbin`
#优雅关闭旧进程的worker进程,此时旧进程不会再接收新的任务,后期可以直接退出
192.168.11.3:
[root@localhost ~]# curl 192.168.11.4 -I
HTTP/1.1 200 OK
Server: nginx/1.20.2
#新版本接替接收任务,即升级成功引入新的升级安装包:
3)nginx添加到系统服务
我们使用yum安装的服务时,一般启动方式均为 :systemctl 服务名 操作 。对于源码安装后的nginx并不能直接像这样使用。所以我们可以通过脚本或则系统服务的更改来实现系统服务的启动方式