任务块
- 可以通过block关键字,将多个任务组合到一起
- 可以将整个block任务组,一起控制是否要执行
# 如果webservers组中的主机系统发行版是Rocky,则安装并启动nginx

[root@pubserver ansible]# vim block1.yml

---

- name: block tasks

  hosts: webservers

  tasks:

    - name: define a group of tasks

      block:

        - name: install nginx   # 通过yum安装nginx

          yum:

            name: nginx

            state: present


        - name: start nginx     # 通过service启动nginx服务

          service:

            name: nginx

            state: started

            enabled: yes


      when: ansible_distribution=="Rocky"   # 条件为真才会执行上面的任务


[root@pubserver ansible]# ansible-playbook block1.yml
rescue和always
block和rescue、always联合使用:
- block中的任务都成功,rescue中的任务不执行
- block中的任务出现失败(failed),rescue中的任务执行
- block中的任务不管怎么样,always中的任务总是执行
[root@pubserver ansible]# vim block2.yml

---

- name: block test

  hosts: webservers

  tasks:

    - name: block / rescue / always test1

      block:

        - name: touch a file

          file:

            path: /tmp/test1.txt

            state: touch

      rescue:

        - name: touch file test2.txt

          file:

            path: /tmp/test2.txt

            state: touch

      always:

        - name: touch file test3.txt

          file:

            path: /tmp/test3.txt

            state: touch


# 执行playbook web1上将会出现/tmp/test1.txt和/tmp/test3.txt

[root@pubserver ansible]# ansible-playbook block2.yml

[root@web1 ~]# ls /tmp/test*.txt

/tmp/test1.txt  /tmp/test3.txt


# 修改上面的playbook,使block中的任务出错

[root@web1 ~]# rm -f /tmp/test*.txt

[root@pubserver ansible]# vim block2.yml

---

- name: block test

  hosts: webservers

  tasks:

    - name: block / rescue / always test1

      block:

        - name: touch a file

          file:

            path: /tmp/abcd/test11.txt

            state: touch

      rescue:

        - name: touch file test22.txt

          file:

            path: /tmp/test22.txt

            state: touch

      always:

        - name: touch file test33.txt

          file:

            path: /tmp/test33.txt

            state: touch

# 因为web1上没有/tmp/abcd目录,所以block中的任务失败。但是playbook不再崩溃,而是执行rescue中的任务。always中的任务总是执行

[root@pubserver ansible]# ansible-playbook block2.yml

[root@web1 ~]# ls /tmp/test*.txt

/tmp/test22.txt  /tmp/test33.txt
loop循环
- 相当于shell中for循环
- ansible中循环用到的变量名是固定的,叫item
# 在test组中的主机上创建5个目录/tmp/{aaa,bbb,ccc,ddd,eee}

[root@pubserver ansible]# vim loop1.yml

---

- name: use loop

  hosts: webservers

  tasks:

    - name: create directory

      file:

        path: /tmp/{
  {item}}

        state: directory

      loop: [aaa,bbb,ccc,ddd,eee]


# 上面写法,也可以改为:

---

- name: use loop

  hosts: webservers

  tasks:

    - name: create directory

      file:

        path: /tmp/{
  {item}}

        state: directory

      loop:

        - aaa

        - bbb

        - ccc

        - ddd

        - eee


[root@pubserver ansible]# ansible-playbook loop1.yml


# 使用复杂变量。创建zhangsan用户,密码是123;创建lisi用户,密码是456

# item是固定的,用于表示循环中的变量

# 循环时,loop中每个-后面的内容作为一个整体赋值给item。

# loop中{}中的内容是自己定义的,写法为key:val

# 取值时使用句点表示。如下例中取出用户名就是{
  {item.uname}}

[root@pubserver ansible]# vim loop_user.yml

---

- name: create users

  hosts: webservers

  tasks:

    - name: create multiple users

      user:

        name: "{
  {item.uname}}"

        password: "{
  {item.upass|password_hash('sha512')}}"

      loop:

        - {"uname": "zhangsan", "upass": "123"}

        - {"uname": "lisi", "upass": "456"}

[root@pubserver ansible]# ansible-playbook  loop_user.yml
role角色
- 为了实现playbook重用,可以使用role角色
- 角色role相当于把任务打散,放到不同的目录中
- 再把一些固定的值,如用户名、软件包、服务等,用变量来表示
- role角色定义好之后,可以在其他playbook中直接调用
# 使用常规playbook,修改/etc/motd的内容
# 1. 创建motd模板文件
[root@pubserver ansible]# vim motd
Hostname: {
{ansible_hostname}} # facts变量,主机名
Date: {
{ansible_date_time.date}} # facts变量,日期
Contact to: {
{admin}} # 自定义变量
# 2. 编写playbook
[root@pubserver ansible]# vim motd.yml
---
- name: modifty /etc/motd
hosts: webservers
vars:
admin: root@tedu.cn # 自定义名为admin的变量
tasks:
- name: modify motd
template:
src: motd
dest: /etc/motd
[root@pubserver ansible]# ansible-playbook motd.yml
[root@web1 ~]# cat /etc/motd
Hostname: web1
Date: 2021-11-01
Contact to: root@tedu.cn
# 创建角色
# 1. 声明角色存放的位置
[root@pubserver ansible]# vim ansible.cfg
[defaults]
inventory = hosts
roles_path = roles # 定义角色存在当前目录的roles子目录中
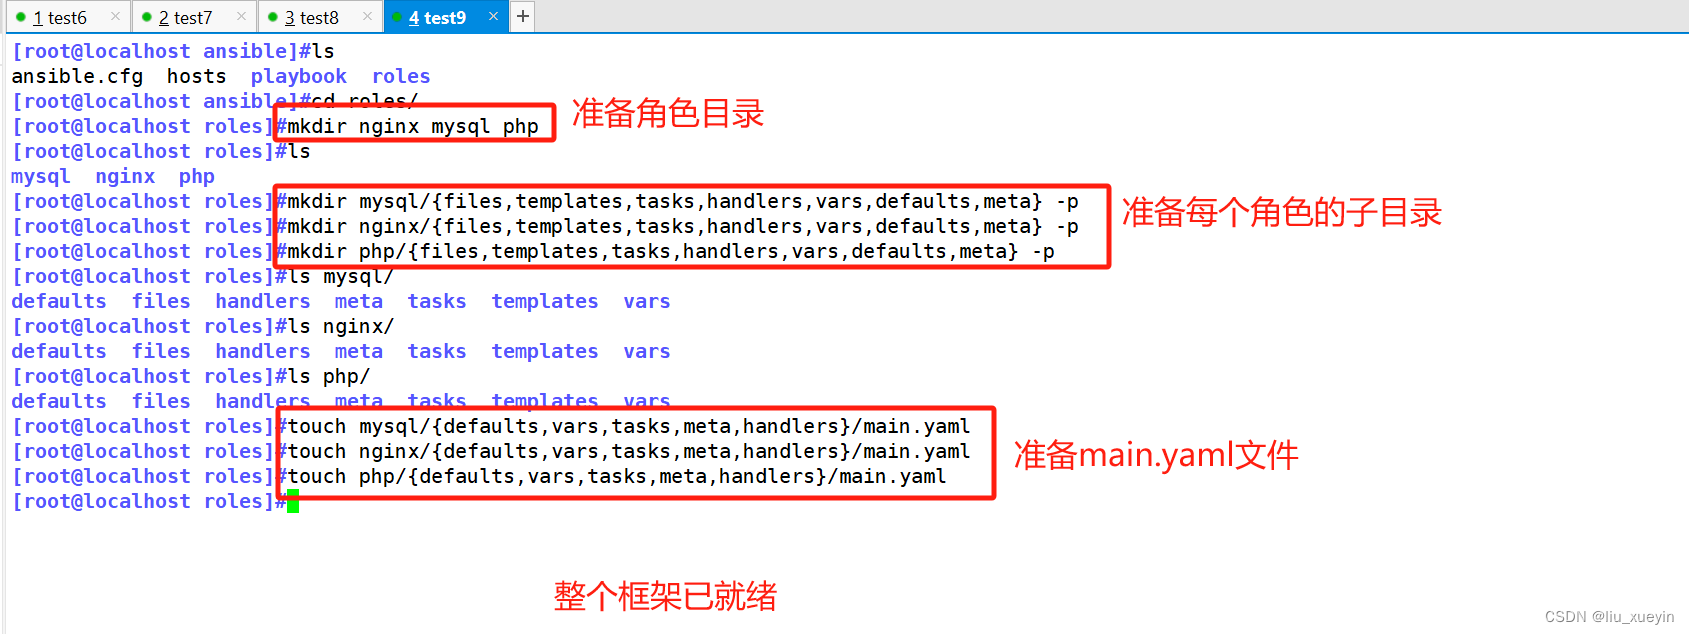
# 2. 创建角色目录
[root@pubserver ansible]# mkdir roles
# 3. 创建名为motd的角色
[root@pubserver ansible]# ansible-galaxy init roles/motd
[root@pubserver ansible]# ls roles/
motd # 生成了motd角色目录
[root@pubserver ansible]# yum install -y tree
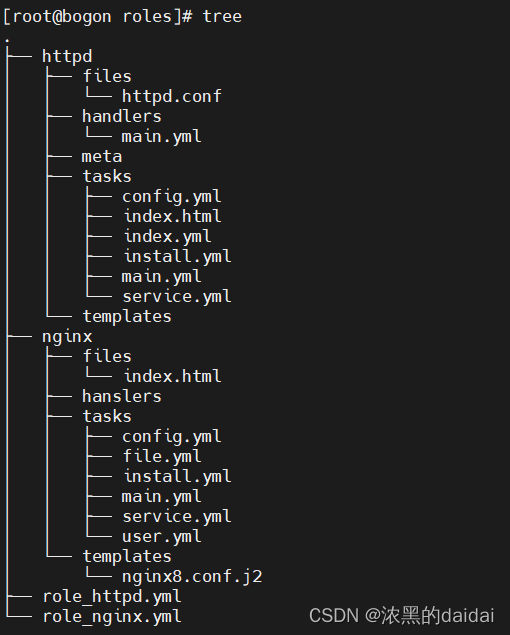
[root@pubserver ansible]# tree roles/motd/
roles/motd/
├── defaults # 定义变量的目录,优先级最低
│ └── main.yml
├── files # 保存上传的文件(如copy模块用到的文件)
├── handlers # handlers任务写到这个目录的main.yml中
│ └── main.yml
├── meta # 保存说明数据,如角色作者、版本等
│ └── main.yml
├── README.md # 保存角色如何使用之类的说明
├── tasks # 保存任务
│ └── main.yml
├── templates # 保存template模块上传的模板文件
├── tests # 保存测试用的playbook。可选
│ ├── inventory
│ └── test.yml
└── vars # 定义变量的位置,推荐使用的位置
└── main.yml
# 4. 将不同的内容分别写到对应目录的main.yml中
# 4.1 创建motd模板文件
[root@pubserver ansible]# vim roles/motd/templates/motd
Hostname: {
{ansible_hostname}}
Date: {
{ansible_date_time.date}}
Contact to: {
{admin}}
# 4.2 创建变量
[root@pubserver ansible]# vim roles/motd/vars/main.yml # 追加一行
admin: zzg@tedu.cn
# 4.3 创建任务
[root@pubserver ansible]# vim roles/motd/tasks/main.yml # 追加
- name: modify motd
template:
src: motd # 这里的文件,自动到templates目录下查找
dest: /etc/motd
# 5. 创建playbook,调用motd角色
[root@pubserver ansible]# vim role_motd.yml
---
- name: modify motd with role
hosts: webservers
roles:
- motd
# 6. 执行playbook
[root@pubserver ansible]# ansible-playbook role_motd.yml role练习
- 创建名为pkgs的角色。用于装包。包名使用变量pkg代表
- 创建inst_nginx.yml,调用pkgs角色,安装nginx
- 创建inst_mysql.yml,调用pkgs角色,安装mysql
# 1. 创建名为pkgs的角色。

# 1.1 创建角色目录

[root@pubserver ansible]# ansible-galaxy init roles/pkgs

# 1.2 创建装包的任务,包名使用变量pkg代表

[root@pubserver ansible]# vim roles/pkgs/tasks/main.yml

---

# tasks file for roles/pkgs

- name: install rpm pkg

  yum:

    name: "{
  {pkg}}"

    state: present

# 1.3 定义变量

[root@pubserver ansible]# vim roles/pkgs/defaults/main.yml

---

# defaults file for roles/pkgs

pkg: nginx


# 2. 创建inst_nginx.yml,调用pkgs角色,安装nginx

[root@pubserver ansible]# vim inst_nginx.yml

---

- name: install nginx pkg

  hosts: webservers

  roles:

    - pkgs

[root@pubserver ansible]# ansible-playbook inst_nginx.yml


# 3. 创建inst_mysql.yml,调用pkgs角色,安装mysql-server

[root@pubserver ansible]# vim inst_mysql.yml

---

- name: install mysql pkg

  hosts: dbs

  vars:

    pkg: mysql-server

  roles:

    - pkgs

[root@pubserver ansible]# ansible-playbook inst_mysql.yml- ansible的公共角色仓库:Ansible Galaxy
# 在公共仓库中搜索与nginx相关的角色

[root@myhost ~]# ansible-galaxy search nginx

# 如果找到相应的角色,如名字为mynginx,可以下载它到roles目录

[root@myhost ~]# ansible-galaxy install mynginx -p roles/
ansible加解密文件
- ansible加解密文件使用ansible-vault命令
[root@pubserver ansible]# echo "Hi ni hao" > hello.txt

[root@pubserver ansible]# cat hello.txt

Hi ni hao


# 加密文件

[root@pubserver ansible]# ansible-vault encrypt hello.txt

New Vault password: 123456

Confirm New Vault password: 123456

Encryption successful

[root@pubserver ansible]# cat hello.txt

$ANSIBLE_VAULT;1.1;AES256

37373366353566346235613731396566646533393361386131313632306563633336333963373465

6164323461356130303863633964393339363738653036310a666564313832316263393061616330

32373133323162353864316435366439386266616661373936363563373634356365326637336165

6336636230366564650a383239636230623633356565623461326431393634656666306330663533

6235


# 解密

[root@pubserver ansible]# ansible-vault decrypt hello.txt

Vault password: 123456

Decryption successful

[root@pubserver ansible]# cat hello.txt

Hi ni hao


# 加密后更改密码

[root@pubserver ansible]# ansible-vault encrypt hello.txt

New Vault password: 123456

Confirm New Vault password: 123456

Encryption successful


[root@pubserver ansible]# ansible-vault rekey hello.txt   # 改密码

Vault password: 123456    # 旧密码

New Vault password: abcd  # 新密码

Confirm New Vault password: abcd

Rekey successful


# 不解密文件,查看内容

[root@pubserver ansible]# ansible-vault view hello.txt

Vault password: abcd

Hi ni hao


# 使用密码文件进行加解密

# 1. 将密码写入文件

[root@pubserver ansible]# echo 'tedu.cn' > pass.txt

# 2. 创建明文文件

[root@pubserver ansible]# echo 'hello world' > data.txt

# 3. 使用pass.txt中的内容作为密码加密文件

[root@pubserver ansible]# ansible-vault encrypt --vault-id=pass.txt data.txt

Encryption successful

[root@pubserver ansible]# cat data.txt    # 文件已加密

# 4. 使用pass.txt中的内容作为密码解密文件

[root@pubserver ansible]# ansible-vault decrypt --vault-id=pass.txt data.txt

Decryption successful

[root@pubserver ansible]# cat data.txt

hello world- 使用ansible管理远程主机,存储敏感数据时(如,文件中包含密码),应该将其加密
- 执行playbook时,通过
--ask-vault-password选项提示输入密码
# 1. 编写有密码的playbook

[root@pubserver ansible]# vim user_zhangsan.yml

---

- name: create a user

  hosts: webservers

  tasks:

    - name: create user zhangsan

      user:

        name: zhangsan

        password: "{
  {'123'|password_hash('sha512')}}"


# 2. 加密playbook

[root@pubserver ansible]# ansible-vault encrypt user_zhangsan.yml

New Vault password: 123456

Confirm New Vault password: 123456

Encryption successful


# 3. 直接执行playbook,报错

[root@pubserver ansible]# ansible-playbook user_zhangsan.yml

ERROR! Attempting to decrypt but no vault secrets found


# 4. 使用--ask-vault-password选项

[root@pubserver ansible]# ansible-playbook --ask-vault-password user_zhangsan.yml

Vault password: 123456
sudo命令
- 一般用于普通用户执行需要root权限的命令
- 在web1上配置zhangsan拥有sudo权限
# 如果没有zhangsan,手工创建

[root@web1 ~]# visudo   # 将会打开vi,在尾部追加以下一行

zhangsan        ALL=(ALL)       ALL

# 中间的ALL=(ALL)在集中认证的域环境中才有效,单机忽略即可

# zhangsan是用户名,最后的ALL表示zhangsan可以以管理员的身份执行所有命令


# 切换成zhangsan用户,执行命令

[root@web1 ~]# su - zhangsan

[zhangsan@web1 ~]$ useradd wangwu   # 失败,因为还是张三身份

[zhangsan@web1 ~]$ sudo useradd wangwu  # 以管理员身份执行

... ...

[sudo] password for zhangsan: # 输入zhangsan的密码,不是root


# 配置lisi不输入密码可以直接运行sudo

[root@web1 ~]# visudo    # 在最后追加一行

lisi    ALL=(ALL)       NOPASSWD: ALL


# 切换成lisi运行

[root@web1 ~]# su - lisi

[lisi@web1 ~]$ ls /root/   # 没权限

ls: cannot open directory '/root/': Permission denied

[lisi@web1 ~]$ sudo ls /root/    # 成功运行,无需输入密码

a3.txt  anaconda-ks.cfg
特殊的主机清单变量
- 如果远程主机没有使用免密登陆,如果远程主机ssh不是标准的22端口,可以设置特殊的主机清单变量
ansible_ssh_user:指定登陆远程主机的用户名ansible_ssh_pass:指定登陆远程主机的密码ansible_ssh_port:指定登陆远程主机的端口号
# 删除远程主机的/root/.ssh/authorized_keys,以便恢复通过密码登陆

[root@pubserver ansible]# ansible all -m file -a "path=/root/.ssh/authorized_keys state=absent"


# 创建新的工作目录

[root@pubserver ~]# mkdir myansible

[root@pubserver ~]# cd myansible

[root@pubserver myansible]# vim ansible.cfg

[defaults]

inventory = inventory

[root@pubserver myansible]# vim inventory

[group1]

web1

web2

db1

[root@pubserver myansible]# ansible all -m ping  # 报错,因为无法免密执行


# 修改web1 ssh服务的端口为220

[root@web1 ~]# systemctl stop firewalld

[root@web1 ~]# echo 'Port 220' >> /etc/ssh/sshd_config

[root@web1 ~]# systemctl restart sshd

# 退出再登陆时,需要指定端口号

[root@myhost ~]# ssh -p220 192.168.88.11


# 配置ssh通过用户名、密码管理远程主机,通过220端口连接web1

[root@pubserver myansible]# vim inventory

[group1]

web1 ansible_ssh_user=root ansible_ssh_pass=a ansible_ssh_port=220

web2 ansible_ssh_user=root ansible_ssh_pass=a

db1 ansible_ssh_user=root ansible_ssh_pass=a


[root@pubserver myansible]# ansible all -m ping