zabbix部署
部署环境:centos7.9
防火墙和selinux已关闭或已禁用
1.安装zabbix仓库
[root@chang ~]# rpm -Uvh https://repo.zabbix.com/zabbix/5.0/rhel/7/x86_64/zabbix-release-5.0-1.el7.noarch.rpm
[root@chang ~]# mount /dev/cdrom /mnt
[root@chang ~]# yum clean all && yum repolist
2.安装Zabbix server,Web前端,agent
[root@chang ~]# yum install zabbix-server-mysql zabbix-agent
3.安装Zabbix前端
[root@chang ~]# yum -y install wget
[root@chang ~]# wget -O /etc/yum.repos.d/CentOS-Base.repo https://mirrors.aliyun.com/repo/Centos-7.repo
[root@chang ~]# yum clean all && yum repolist
[root@chang ~]# yum install centos-release-scl
4.编辑配置文件 /etc/yum.repos.d/zabbix.repo 和启用 Zabbix-frontend 存储库。
[root@chang ~]# vim  /etc/yum.repos.d/zabbix.repo
[zabbix-frontend]
name=Zabbix Official Repository frontend - $basearch
baseurl=http://repo.zabbix.com/zabbix/5.0/rhel/7/$basearch/frontend
enabled=1 修改成1
gpgcheck=1
gpgkey=file:///etc/pki/rpm-gpg/RPM-GPG-KEY-ZABBIX-A14FE591
5.安装Zabbix前端软件包。
[root@chang ~]# yum install zabbix-web-mysql-scl zabbix-nginx-conf-scl
6.创建初始数据库
[root@chang ~]# vim /etc/yum.repos.d/mariadb.repo
[mariadb]
name = MariaDB
baseurl = https://mirrors.tuna.tsinghua.edu.cn/mariadb/yum/chang.5/centos7-amd64
gpgkey=https://mirrors.tuna.tsinghua.edu.cn/mariadb/yum/RPM-GPG-KEY-MariaDB
gpgcheck=1
[root@chang ~]# yum clean all && yum repolist
[root@chang ~]# yum install -y mariadb-server
[root@chang ~]# systemctl start mariadb
[root@chang ~]# systemctl enable mariadb
[root@chang ~]# mysql
MariaDB [(none)]> alter user 'root'@'localhost' identified by '123qqq.A';
Query OK, 0 rows affected (0.001 sec)
MariaDB [(none)]> CREATE USER 'root'@'%' IDENTIFIED BY '123qqq.A';
Query OK, 0 rows affected (0.002 sec)
MariaDB [(none)]> GRANT ALL PRIVILEGES ON *.* TO 'root'@'%' identified by '123qqq.A';
Query OK, 0 rows affected (0.001 sec)
MariaDB [(none)]> flush privileges;
Query OK, 0 rows affected (0.000 sec)
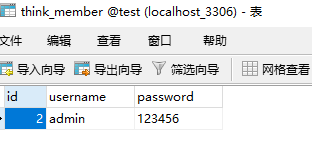
验证账号root密码123qqq.A
[root@chang ~]# mysql -uroot -p123qqq.A
MariaDB [(none)]> create database zabbix character set utf8 collate utf8_bin;
MariaDB [(none)]> create user zabbix@localhost identified by '123qqq.A';
MariaDB [(none)]> grant all privileges on zabbix.* to zabbix@localhost;
MariaDB [(none)]> set global log_bin_trust_function_creators = 1;
MariaDB [(none)]> quit;
7.导入初始架构和数据,系统将提示您输入新创建的密码。
[root@chang ~]# zcat /usr/share/doc/zabbix-server-mysql*/create.sql.gz | mysql -uzabbix -p zabbix
Enter password: 123qqq.A
8.导入数据库架构后禁用log_bin_trust_function_creators选项。
[root@chang ~]# mysql -uroot -p123qqq.A
MariaDB [(none)]> set global log_bin_trust_function_creators = 0;
Query OK, 0 rows affected (0.000 sec)
MariaDB [(none)]> quit;
Bye
9.为Zabbix server配置数据库
编辑配置文件 /etc/zabbix/zabbix_server.conf
[root@chang ~]# vim /etc/zabbix/zabbix_server.conf
# DBPassword=  124行注销#号,修改密码
DBPassword=123qqq.A
10.为Zabbix前端配置PHP
编辑配置文件 /etc/opt/rh/rh-nginx116/nginx/conf.d/zabbix.conf 取消注释并设置“listen”和“server_name”指令.
[root@chang ~]# vim /etc/opt/rh/rh-nginx116/nginx/conf.d/zabbix.conf
#        listen          888;
#        server_name     example.com;
        listen          80;
        server_name     chang.com;
11.编辑配置文件 /etc/opt/rh/rh-php72/php-fpm.d/zabbix.conf 将 nginx 添加到listen.acl_users指令中。
[root@chang ~]# vim /etc/opt/rh/rh-php72/php-fpm.d/zabbix.conf
listen.acl_users = apache  第6行 添加nginx
listen.acl_users = apache,nginx
12.然后取消注释并为您设置正确的时区。
; php_value[date.timezone] = Europe/Riga  #第25行 取消前面的分号,并把Europe/Riga修改成Asia/Shanghai
[root@chang ~]# vim /etc/opt/rh/rh-php72/php-fpm.d/zabbix.conf
php_value[date.timezone] = Asia/Shanghai
13.启动Zabbix server和agent进程
启动Zabbix server和agent进程,并为它们设置开机自启:
[root@chang ~]# systemctl restart zabbix-server zabbix-agent rh-nginx116-nginx rh-php72-php-fpm
[root@chang ~]# systemctl enable zabbix-server zabbix-agent rh-nginx116-nginx rh-php72-php-fpm
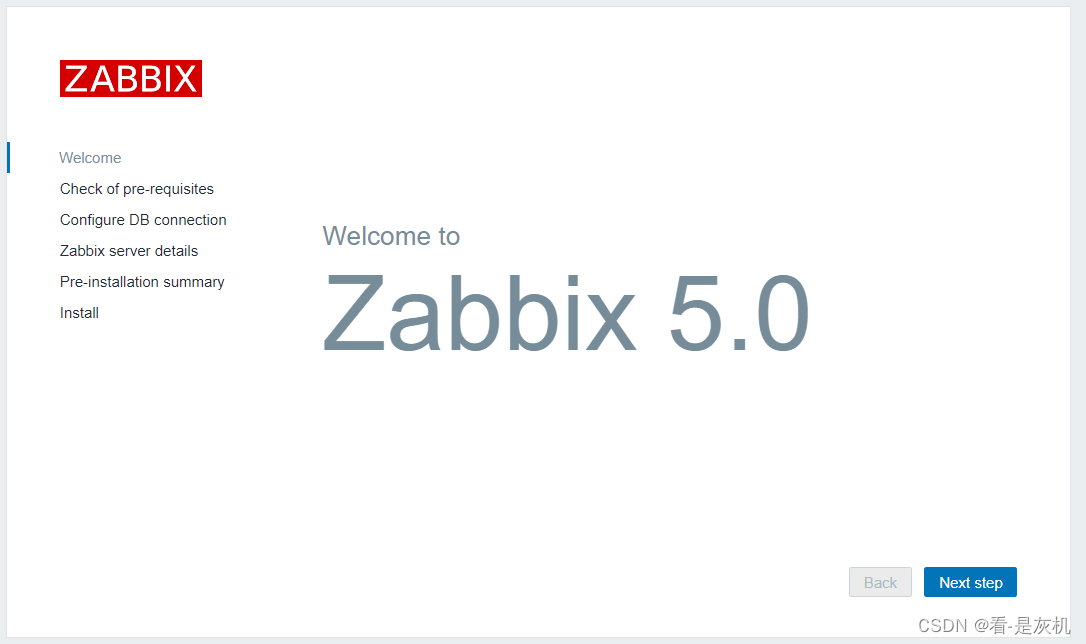
14.访问zabbix面板,ip:888
点击next
点击next

输入mysql密码123qqq.a,点击next

name一栏,可写可不写,点击next
 确认信息,点击next
 点击完成
点击完成

输入用户名 Admin,密码为 zabbix


进入首页,把语言设置成中文,点击User settings
 language选择中文,点击update

中文设置成功

\


![<span style='color:red;'>Zabbix</span>最详细教程Ubuntu<span style='color:red;'>部署</span><span style='color:red;'>Zabbix</span>6.0[图文]](https://img-blog.csdnimg.cn/direct/bd2f541731584b0592751414d075be85.png)


![[SWPUCTF 2021 新生赛]Do_you_know_http](https://img-blog.csdnimg.cn/direct/5f6e966753a04f50ac19fc9635cfb2d5.png)