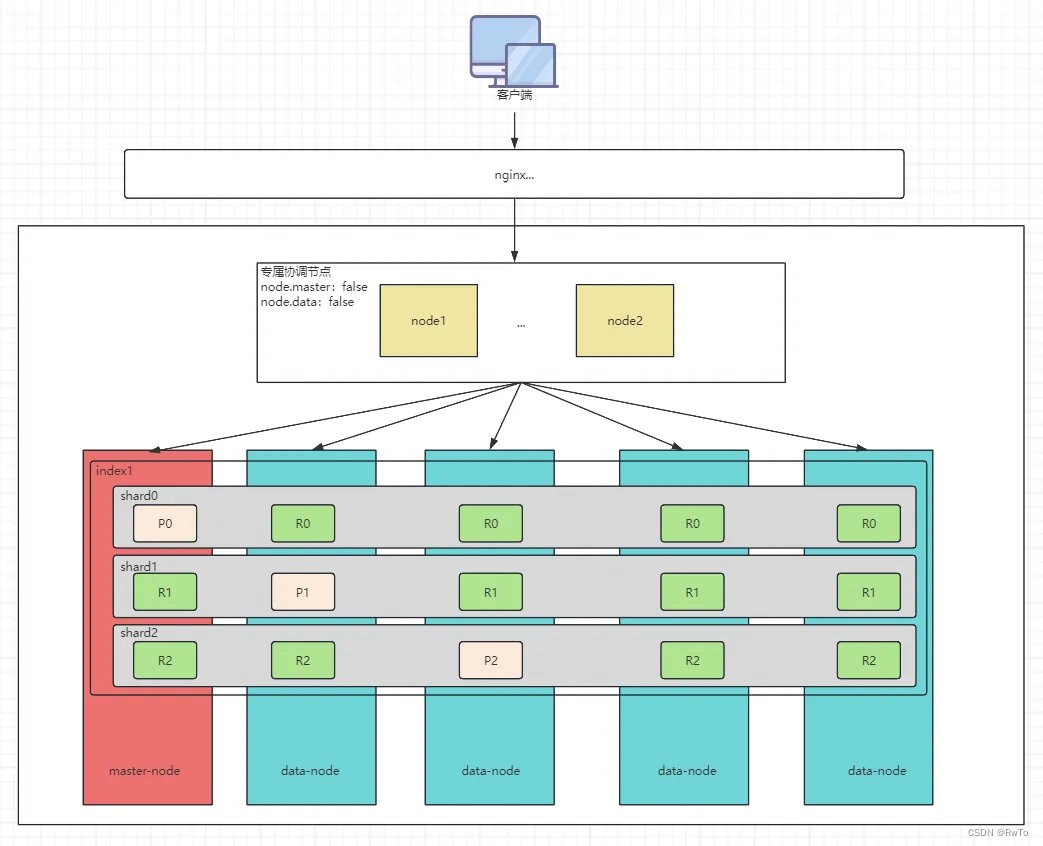
集群就是多个node统一对外提供服务,避免单机故障带来的服务中断,保证了服务的高可用,也因为多台节点协同运作,提高了集群服务的计算能力和吞吐量。ES是一个去中心化的集群,操作一个节点和操作一个集群是一样的,任何一个节点出现故障都不会影响其他节点
1. 安装ES
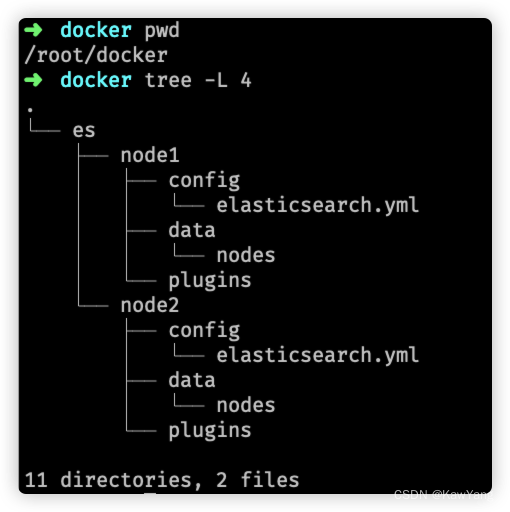
| 目录结构 | 说明 |
|---|---|
| bin | 可执行脚本文件 |
| config | 配置文件 |
| jdk | es自带的jdk文件 |
| lib | 类库 |
| logs | 日志 |
| modules | 模块 |
| plugins | 插件位置 |
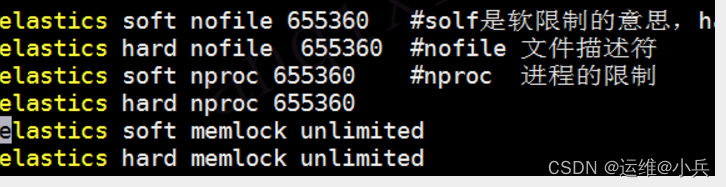
#创建es用户
[root@k8s-master ~]# useradd es
#设置es用户密码
[root@k8s-master ~]# passwd es
#解压文件
[root@k8s-master ~]# tar -xf elasticsearch-8.11.3-linux-x86_64.tar.gz -C /usr/local/
#创建证书目录
[root@k8s-master ~]# mkdir /usr/local/elasticsearch-8.11.3/config/certs
#修改文件拥有者
[root@k8s-master local]# chown -R es:es /usr/local/elasticsearch-8.11.3/

====================================================================================================
##在第一台服务器节点node1设置集群多节点通信密钥
#切换用户
[root@k8s-master local]# su - es
#签发ca证书
[es@k8s-master elasticsearch-8.11.3]$ ./bin/elasticsearch-certutil ca
warning: ignoring JAVA_HOME=/usr/local/jdk1.8.0_221; using bundled JDK
...
Please enter the desired output file [elastic-stack-ca.p12]: 【回车】
Enter password for elastic-stack-ca.p12 :【回车】

#用ca证书签发节点证书
[es@k8s-master elasticsearch-8.11.3]$ ./bin/elasticsearch-certutil cert --ca elastic-stack-ca.p12
warning: ignoring JAVA_HOME=/usr/local/jdk1.8.0_221; using bundled JDK
...
Enter password for CA (elastic-stack-ca.p12) :【回车】
Please enter the desired output file [elastic-certificates.p12]:【回车】
Enter password for elastic-certificates.p12 :【回车】

Certificates written to /usr/local/elasticsearch-8.11.3/elastic-certificates.p12
...
For client applications, you may only need to copy the CA certificate and
configure the client to trust this certificate.

#将生成证书文件移动至config/certs/目录中
[es@k8s-master elasticsearch-8.11.3]$ mv elastic-* config/certs/

====================================================================================================
##在第一台服务器节点node1设置集群多节点http证书
#签发https证书
[es@k8s-master elasticsearch-8.11.3]$ ./bin/elasticsearch-certutil http
warning: ignoring JAVA_HOME=/usr/local/jdk1.8.0_221; using bundled JDK

...
#是否需要证书认证请求
Generate a CSR? [y/N]n

...
#是否需要选择已存在得证书
Use an existing CA? [y/N]y

#已存在ca证书路径
Please enter the full pathname to the Certificate Authority that you wish to
use for signing your new http certificate. This can be in PKCS#12 (.p12), JKS
(.jks) or PEM (.crt, .key, .pem) format.
CA Path: /usr/local/elasticsearch-8.11.3/config/certs/elastic-stack-ca.p12

#输入已存在证书密码,没有
Password for elastic-stack-ca.p12:【回车】

#证书有效时间
For how long should your certificate be valid? [5y] 5y

...
#是否每个节点都需要生成
Generate a certificate per node? [y/N]n

#输入集群所有节点主机名
Enter all the hostnames that you need, one per line.
When you are done, press <ENTER> once more to move on to the next step.

master
node1
node2

You entered the following hostnames.

 - master
 - node1
 - node2

Is this correct [Y/n]y

#输入集群所有节点ip地址

Enter all the IP addresses that you need, one per line.
When you are done, press <ENTER> once more to move on to the next step.

10.1.7.20
10.1.7.21
10.1.7.22

You entered the following IP addresses.

 - 10.1.7.20
 - 10.1.7.21
 - 10.1.7.22

Is this correct [Y/n]y

#是否修改证书配置
Do you wish to change any of these options? [y/N]n

#输入密码
If you wish to use a blank password, simply press <enter> at the prompt below.
Provide a password for the "http.p12" file:  [<ENTER> for none]【回车】

#证书文件保存位置
What filename should be used for the output zip file? [/usr/local/elasticsearch-8.11.3/elasticsearch-ssl-http.zip]【回车】

Zip file written to /usr/local/elasticsearch-8.11.3/elasticsearch-ssl-http.zip


#解压缩刚生成得证书zip文件
[es@k8s-master elasticsearch-8.11.3]$ unzip elasticsearch-ssl-http.zip
Archive:  elasticsearch-ssl-http.zip
   creating: elasticsearch/
  inflating: elasticsearch/README.txt
  inflating: elasticsearch/http.p12
...
#移动解压后得文件至config/certs/目录中
[es@k8s-master elasticsearch-8.11.3]$ mv elasticsearch/http.p12 kibana/elasticsearch-ca.pem config/certs/
2. ES配置文件
############修改主配置文件############
[root@k8s-master ~]# vi elasticsearch.yml
#设置集群名称
cluster.name: es-cluster
#设置节点当前节点名称【其他节点修改项】
node.name: es-node-1
#设置数据,日志文件路径
path.data: /usr/local/elasticsearch-8.11.3/data
path.logs: /usr/local/elasticsearch-8.11.3/logs
#设置网络访问节点【其他节点修改项】
network.host: 10.1.7.20
#设置网络访问端口
http.port: 9200
transport.port: 9300
node.roles: [master,data]
#初始节点【其他节点修改项】
discovery.seed_hosts: ["10.1.7.20:9300","10.1.7.22:9300","10.1.7.21:9300"]
#启用安全
xpack.security.enabled: true
xpack.security.enrollment.enabled: true

#客户端连接加密
xpack.security.http.ssl:
  enabled: true
  keystore.path: /usr/local/elasticsearch-8.11.3/config/certs/http.p12
  truststore.path: /usr/local/elasticsearch-8.11.3/config/certs/http.p12
#集群内节点连接加密
xpack.security.transport.ssl:
  enabled: true
  verification_mode: certificate
  keystore.path: /usr/local/elasticsearch-8.11.3/config/certs/elastic-certificates.p12
  truststore.path: /usr/local/elasticsearch-8.11.3/config/certs/elastic-certificates.p12

#初始化集群
cluster.initial_master_nodes: ["es-node-1"]
#禁用geoip下载
ingest.geoip.downloader.enabled: false

#启动程序
	9200:浏览器访问http协议RESTful端口
	9300:集群组件内部通讯端口
2. 1 启动报错【jar hell问题】
#启动报错
[es@k8s-master bin]$ ./elasticsearch
warning: ignoring JAVA_HOME=/usr/local/jdk1.8.0_221; using bundled JDK
Jan 19, 2024 11:42:09 AM sun.util.locale.provider.LocaleProviderAdapter <clinit>
WARNING: COMPAT locale provider will be removed in a future release
[2024-01-19T11:42:09,994][ERROR][o.e.b.Elasticsearch      ] [es-node-1] fatal exception while booting Elasticsearchjava.lang.IllegalStateException: jar hell!
class: sun.applet.AppletResourceLoader
jar1: /usr/local/jdk1.8.0_221/jre/lib/rt.jar
jar2: /usr/local/jdk1.8.0_221/lib/tools.jar
	at org.elasticsearch.base@8.11.3/org.elasticsearch.jdk.JarHell.checkClass(JarHell.java:315)
	at org.elasticsearch.base@8.11.3/org.elasticsearch.jdk.JarHell.checkJarHell(JarHell.java:233)
	at org.elasticsearch.base@8.11.3/org.elasticsearch.jdk.JarHell.checkJarHell(JarHell.java:84)
	at org.elasticsearch.server@8.11.3/org.elasticsearch.bootstrap.Elasticsearch.initPhase2(Elasticsearch.java:181)
	at org.elasticsearch.server@8.11.3/org.elasticsearch.bootstrap.Elasticsearch.main(Elasticsearch.java:72)

See logs for more details.

ERROR: Elasticsearch did not exit normally - check the logs at /usr/local/elasticsearch-8.11.3/logs/es-cluster.log

ERROR: Elasticsearch exited unexpectedly, with exit code 1


#修改jdk环境变量
#将原来的CLASSPATH
export JAVA_HOME=/usr/local/jdk1.8.0_221
export CLASSPATH=.:$JAVA_HOME/jre/lib/rt.jar:$JAVA_HOME/lib/tools.jar:$JAVA_HOME/lib/dt.jar
export PATH=$JAVA_HOME/bin:$PATH

#修改为
export CLASSPATH=.:$JAVA_HOME/jre/lib:$JAVA_HOME/lib:$CLASSPATH
2. 2 启动报错【max virtual memory areas vm.max_map_count [65530] is too low】
#修改内核参数,增加虚拟内存的最大数
[es@k8s-master ~]$ vi /etc/sysctl.conf
vm.max_map_count=262144

#生效配置
[root@k8s-master ~]# sysctl -p
...
2.3 启动报错【ERROR: Elasticsearch exited unexpectedly, with exit code 137】
#调整jvm参数,es默认jvm配置为1G
[root@k8s-node1 config]# vi jvm.options
-Xms4g
-Xmx4g
2.4 各节点启动后,没有自动加入集群
#如果不是一次性顺序启动,等调试好配置文件后,将所有节点得data\/* 完全删除后再重启启动就正常了
2.5 启动后忘记密码
#使用自带命令重置
[root@k8s-node2 bin]# ./elasticsearch-reset-password -u elastic
3. 配置其他节点(不同节点都需操作)
#复制文件到其他节点目录
[root@k8s-master local]# scp -r elasticsearch-8.11.3/ root@10.1.7.21:/usr/local/
[root@k8s-master local]# scp -r elasticsearch-8.11.3/ root@10.1.7.22:/usr/local/

#删除原数据文件和原日志文件
[root@k8s-node1 elasticsearch-8.11.3]# rm -fr data/\* #此处转义无意义
[root@k8s-node1 elasticsearch-8.11.3]# rm -fr logs/\* #此处转义无意义

#添加es用户并授权目录权限
[root@k8s-node1 local]# useradd es
[root@k8s-node1 local]# passwd es
[root@k8s-node1 local]# chown -R es:es elasticsearch-8.11.3/

#修改配置文件(修改项,其余按照自己需求配置即可)
#设置节点当前节点名称
node.name: es-node-2
#设置网络访问节点
network.host: 10.1.7.21

#依次启动三节点集群(使用es用户启动)
#节点1,后台启动
[es@k8s-master bin]$ ./elasticsearch -d
#节点2
[es@k8s-node1 bin]$ ./elasticsearch
#节点3
[es@k8s-node2 bin]$ ./elasticsearch
4. 安装kibana
#解压文件到指定目录
[root@k8s-node2 ~]# tar -zxf kibana-8.11.3-linux-x86_64.tar.gz -C /usr/local/

#在ES服务器中生成证书
[root@k8s-node2 bin]# pwd
/usr/local/elasticsearch-8.11.3/bin
[root@k8s-node2 bin]# cd ^C
[root@k8s-node2 bin]# ./elasticsearch-certutil csr -name kibana -dns 10.1.74.22
This tool assists you in the generation of X.509 certificates and certificate
...
Please enter the desired output file [csr-bundle.zip]:【回车】

#解压csr文件
[root@k8s-node2 elasticsearch-8.11.3]# unzip csr-bundle.zip
Archive:  csr-bundle.zip
  inflating: kibana/kibana.csr
  inflating: kibana/kibana.key

#将解压文件移动kibana得config目录中
[root@k8s-node2 kibana]# mv kibana.csr kibana.key /usr/local/kibana-8.11.3/config/

#生成crt文件
[root@k8s-node2 config]# openssl x509 -req -in kibana.csr -signkey kibana.key -out kibana.crt
Signature ok
subject=/CN=kibana
Getting Private key

-------------------------------------------------------------------------
#修改kibana.yml配置文件
#服务端口
server.port: 5601
#服务主机名
server.host: "10.1.7.22"
#中文
i18n.locale: "zh-CN"
#ES服务地址
elasticsearch.hosts: ["https://10.1.7.22:9200"]

#访问es账号密码
#重置-[root@k8s-node2 bin]# ./elasticsearch-reset-password -u kibana
elasticsearch.username: "kibana"
elasticsearch.password: "_kO4nadnS3yLAxl5r9go"
elasticsearch.ssl.verificationMode: none
elasticsearch.ssl.certificateAuthorities: [ "/usr/local/elasticsearch-8.11.3/config/certs/elasticsearch-ca.pem" ]
server.ssl.enabled: true
server.ssl.certificate: /usr/local/kibana-8.11.3/config/kibana.crt
server.ssl.key: /usr/local/kibana-8.11.3/config/kibana.key

#修改目录权限
[root@k8s-node2 local]# chown -R es:es kibana-8.11.3/

#切换es用户,启动文件
[root@k8s-node2 local]# su - es
[es@k8s-node2 bin]$ ./kibana

#后台启动
[es@k8s-node2 bin]$ nohup ./kibana > kibana.log 2>&1 &