SpringCache
SpringCache,就是一个缓存框架,为的是减少编写代码,我觉得最大的作用是让缓存代码和业务代码的解耦,我之前也是这么想过,redis的缓存代码要是能分开就好了,但是实际上我用了SpringCache之后,体验也不是那么的好,但是这已经是现在最好的了
SpringCache的使用很简单,我觉得比较麻烦的是,SpringCache的配置,所以,我们研究SpringCache的时候,应该搞清楚他的配置是怎么搞的,那是最好的
基础配置
导入依赖
 <dependency>
     <groupId>org.springframework.boot</groupId>
     <artifactId>spring-boot-starter-cache</artifactId>
 </dependency>
这个是SpringBoot自带的
yml 配置
  cache:
    type: redis
这里我们使用redis作为缓存,有其他的缓存框架
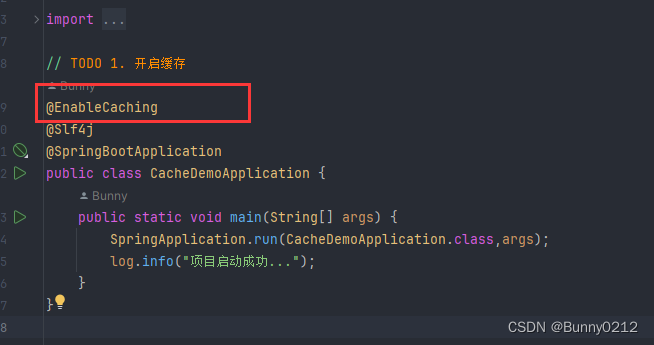
主启动类配置
@EnableCaching //开启spring cache
开启SpringCache
基础用法
我们要使用SpringCache的化,就要了解几个它最基础的注解,用注解开发,也是它的方便之处
@Cacheable:
- 根据传过来的key,去缓存中查找,查到了,返回数据
- 没查到执行我们的Controller的类的方法,并且存到缓存中
这个注解,最好就是业务要list的时候,写这个注解
@CachePut:根据方法的请求参数对其结果进行缓存,它每次都会触发真实方法的调用;
这个方法,最好就是业务需要保存某一个数据的时候,写这个注解
@CacheEvict:根据一定的条件删除缓存;
这个注解就是要删除的时候,要这个注解
上面这三个注解就是增删改查的样子,我们需要注意也就是注解里边的其他设置
对比
我们以我这里的方法做举例.我们来看用了SpringCache和没用的区别
没用之前
    @ApiOperation("根据分类id查询套餐菜品")
    @GetMapping("/list")
    public Result getByCategoryId(Long categoryId) {

        log.info("根据分类id查询套餐菜品 参数为{}",categoryId);
        List<Setmeal> setmeals = redisCache.getCacheObject(RedisContants.DISH_CATEGORY + categoryId);

        if(setmeals != null && setmeals.size() > 0) {

            return Result.success(setmeals);
        }
        List<Setmeal> setmeals = setmealService.getSetmealUser(categoryId);
        redisCache.setCacheObject(RedisContants.DISH_CATEGORY + categoryId,setmeals);
        return Result.success(setmeals);
    }
没用之前,我们看到,虽然我已经把redis的操作封装起来了,封装成了一个RedisCache工具类了,但是它的代码还是要这么多,一共要干三件事
- 查redis数据库,返回数据
- 判断数据是不是为空,为空,执行第三步,不为空,返回数据,controller方法不执行
- 缓存里边没有,所以查数据库
使用之后
@ApiOperation("根据分类id查询套餐菜品")
@GetMapping("/list")
@Cacheable(cacheNames = "SetmealCache",key = "#categoryId")
 public Result getByCategoryId(Long categoryId) {

     log.info("根据分类id查询套餐菜品 参数为{}",categoryId);
     List<Setmeal> setmeals = setmealService.getSetmealUser(categoryId);
     return Result.success(setmeals);
 }
使用SpringCache之后,代码就少了很多,并且简洁多了
我们来看这里的注解中的设置
cacheNames: 缓存的名字
key: 是类似与Redis的key
key里边的表达式是spEL表达式,这种表达式不是特别难,我们自己学一下就行
我这里贴几个比较常见的使用方法
- #参数名字 像我这里直接用参数的名字 ,可以直接得到,参数的对象
- #result 如果用result的化,就是返回值的对象
各个注解的详细用法
@Cacheable
如上面,对比中所说
@CachePut
@ApiOperation("新增菜品")
@PostMapping
@CachePut(cacheNames = SpringCacheConstant.DISH_CATEGORY,key = "#dishDTO.getCategoryId()")
public Result<PageResult> add(@RequestBody DishDTO dishDTO) {

   log.info("新增菜品 参数为{}",dishDTO);
   dishService.addDish(dishDTO);
   return Result.success();
}
像这里是,先执行controller的方法,再去添加缓存
@CacheEvict
删除缓存,这里删除缓存有点鸡肋,其实用SpringCache删除的化也是一行代码,我用redis删除也是一行代码,没什么更好的,像我门刚刚那种查询的redis,用这个比较舒服
@ApiOperation("修改菜品")
@PutMapping
@CacheEvict(cacheNames = RedisContants.DISH_CATEGORY ,key = "#dishDTO.getCategoryId")
public Result<PageResult> update(@RequestBody DishDTO dishDTO) {

    log.info("修改菜品 参数为{}",dishDTO);
    dishService.updateDish(dishDTO);

    //删除缓存
//        redisCache.deleteObject(RedisContants.DISH_CATEGORY + dishDTO.getCategoryId());
    return Result.success();
}
我这里也贴出了redis的写法
全部删除
有的时候我们需要按照一个前缀删除这个前缀下的所有缓存,例如我这里的业务
我需要删除以 "dish:category"为前提的所有的缓存
@ApiOperation("删除菜品")
@DeleteMapping
@CacheEvict(cacheNames = RedisContants.DISH_CATEGORY , allEntries = true)
public Result delete(String ids) {

   log.info("删除菜品 参数为{}",ids);
   String[] split = ids.split(",");
   List<Long> list = Arrays.stream(split)
           .map((str) -> Long.parseLong(str)).collect(Collectors.toList());
   dishService.deleteById(list);


//        Collection<String> keys = redisCache.keys(RedisContants.DISH_CATEGORY + "*");
   //删除所有的菜品
//        redisCache.deleteObject(keys);
   return Result.success();
}
我这里的key的设置,并没有双冒号,我在配置中设置了,我十分讨厌它的双冒号,我在配置中配置了之后,这样的key就和redis中一模一样了
各种配置
序列化问题
如果我们不像redis那样配置它的底层的key 和 value的序列化,它采用的是默认的,SpringCache key采用的string,但是value的序列化采用的是jdk的自带的序列化,所以我们得设置一下
    @Bean
    public RedisCacheConfiguration redisCacheConfiguration(CacheProperties cacheProperties){

        CacheProperties.Redis redisProperties = cacheProperties.getRedis();

        RedisCacheConfiguration config = RedisCacheConfiguration.defaultCacheConfig();
        //设置前缀的name 不加双冒号,直接就是常量类中的加上冒号的样子,这样redis 和 springcache就能统一了
        config = config.computePrefixWith(name -> name);
        //设置key的序列化方式
        config = config.serializeKeysWith(RedisSerializationContext.SerializationPair.fromSerializer(new StringRedisSerializer()));
        //设置value的序列化方式
        config = config.serializeValuesWith(RedisSerializationContext.SerializationPair.fromSerializer(new FastJsonRedisSerializer(Object.class)));


        //ttl设置
        if (redisProperties.getTimeToLive() != null) {

            config = config.entryTtl(redisProperties.getTimeToLive());
        }
        //设置缓存前缀
        if (redisProperties.getKeyPrefix() != null) {

            config = config.prefixCacheNameWith(redisProperties.getKeyPrefix());
        }
        //设置是否禁用缓存null值
        if (!redisProperties.isCacheNullValues()) {

            config = config.disableCachingNullValues();
        }
        //设置是否禁用缓存key的前缀
        if (!redisProperties.isUseKeyPrefix()) {

            config = config.disableKeyPrefix();
        }
        return config;
    }
我这里的配置类,可以放到任何一个有@Configuration类下,只要spring里边有就行

我这里的配置,serializeValuesWith 配置的序列化器,是我自己写的,大家可以用别的序列化器
我这里也贴出我写的
package com.sky.config;
/**
 * Redis使用FastJson序列化
 * @author 35238
 * @date 2023/7/22 0022 21:12
 */
public class FastJsonRedisSerializer<T> implements RedisSerializer<T>{


    public static final Charset DEFAULT_CHARSET = Charset.forName("UTF-8");

    private Class<T> clazz;

    static
    {

        ParserConfig.getGlobalInstance().setAutoTypeSupport(true);
    }

    public FastJsonRedisSerializer(Class<T> clazz)
    {

        super();
        this.clazz = clazz;
    }

    @Override
    public byte[] serialize(T t) throws SerializationException
    {

        if (t == null)
        {

            return new byte[0];
        }
        return JSON.toJSONString(t, SerializerFeature.WriteClassName).getBytes(DEFAULT_CHARSET);
    }

    @Override
    public T deserialize(byte[] bytes) throws SerializationException
    {

        if (bytes == null || bytes.length <= 0)
        {

            return null;
        }
        String str = new String(bytes, DEFAULT_CHARSET);

        return JSON.parseObject(str, clazz);
    }


    protected JavaType getJavaType(Class<?> clazz)
    {

        return TypeFactory.defaultInstance().constructType(clazz);
    }
}
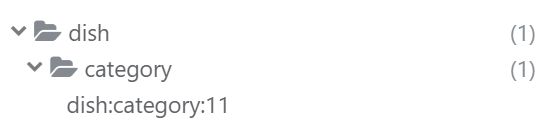
key的问题 和 Redis做统一
因为我们平常用的时候,用redis比较常见,所以我这里的key就希望是像redis那样子,但是默认情况下,是有双冒号的,我有强迫症,不能看到这个双冒号
所以我需要配置
config = config.computePrefixWith(name -> name);
总的配置,在序列化问题下,我这里的配置就是直接不加 双冒号,正常来说
它应该是这样
config = config.computePrefixWith(name -> name + "::");
这样子设置了之后,就能很好的和redis一起统一起来了,是怎么统一起来的呢?
如下
    @ApiOperation("根据分类id查询菜品")
    @GetMapping("/list")
    @Cacheable(cacheNames = RedisContants.DISH_CATEGORY ,key = "#categoryId")
    public Result getByCategoryId(Long categoryId) {

        log.info("根据分类id查询菜品 参数为{}",categoryId);
        //没查到redis,去mysql查,并且更新redis
        List<DishVO> dishVOs = dishService.getByCategoryIdUser(categoryId);
        return Result.success(dishVOs);
    }
我们只用看这一行
@Cacheable(cacheNames = RedisContants.DISH_CATEGORY ,key = "#categoryId")
我这里的key是 cacheNames + key
我这里的DISH_CATEGORY也是直接封装起来了,这样redis能用,springcache也能用
public class RedisContants {

    public static final String DISH_CATEGORY = "dish:category:";
}
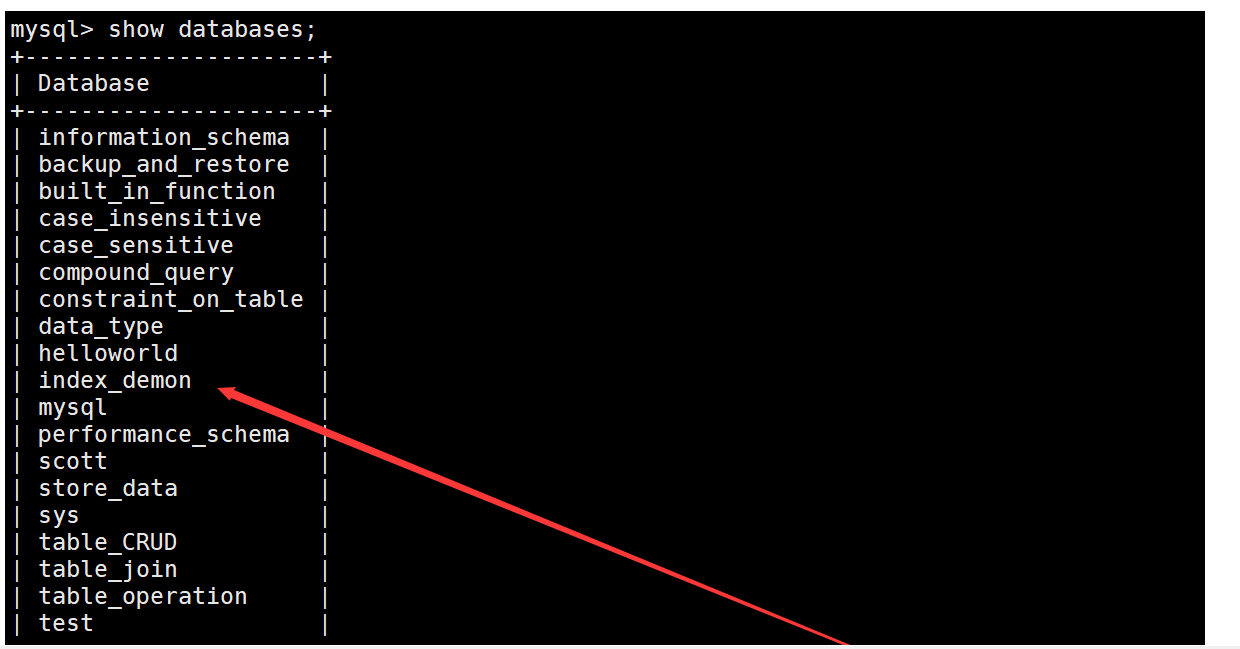
最后的效果是这样的


![如何用一根网线和51单片机做简单门禁[带破解器]](https://img-blog.csdnimg.cn/img_convert/7546d738ed329e018cd87fd287559f11.jpeg)