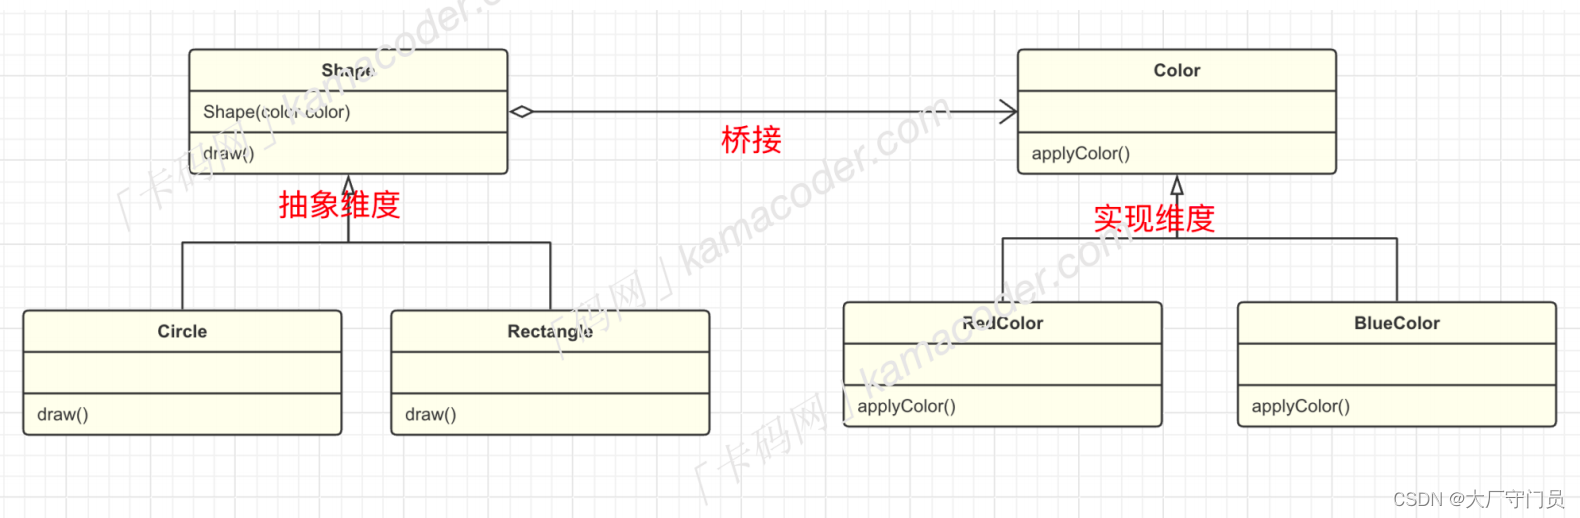
在Unity游戏开发中,桥接模式(Bridge Pattern)是一种设计模式,它用于将抽象部分与其实现部分分离,从而允许它们独立变化。这种模式适用于以下场景:
- 当一个类有多个维度的变化,并且希望这些变化可以独立扩展而不影响彼此时。
- 如果直接使用继承来处理多维度变化会导致类爆炸问题,即需要创建大量子类。
桥接模式的组成部分:
- 抽象(Abstraction):定义了抽象接口,并包含对实现部分(Implementor)的操作。在Unity中,这可能是某个基础组件或接口,它提供了通用的功能描述,但不关心具体的实现细节。
例如:
public interface ICharacterControl
{

    void Move();
    void Attack();
    void SetWeapon(IWeapon weapon);
}

public interface IWeapon
{

    void Fire();
    void Reload();
}
- 提炼的抽象(Refined Abstraction):继承自抽象类的具体角色,它可能会添加更多特定的行为,同时调用实现部分的方法。
public class Soldier : MonoBehaviour, ICharacterControl
{

    private IWeapon _currentWeapon;

    public void Move()
    {

        // 实现移动逻辑
    }

    public void Attack()
    {

        if (_currentWeapon != null)
            _currentWeapon.Fire();
    }

    public void SetWeapon(IWeapon weapon)
    {

        _currentWeapon = weapon;
    }
}
- 实现(Implementor):定义了实现接口,这个接口通常代表了可变的部分,如不同的武器类型。
public abstract class WeaponBase : IWeapon
{

    public abstract void Fire();
    public abstract void Reload();
}

public class Pistol : WeaponBase
{

    public override void Fire()
    {

        Debug.Log("Pistol fires!");
    }

    public override void Reload()
    {

        Debug.Log("Pistol is reloading...");
    }
}

public class Shotgun : WeaponBase
{

    public override void Fire()
    {

        Debug.Log("Shotgun fires!");
    }

    public override void Reload()
    {

        Debug.Log("Shotgun is reloading...");
    }
}
五个实例说明:
角色和装备系统:游戏角色可以有不同的移动方式(跑、走、跳等)以及不同的武器(枪、剑、魔法等),通过桥接模式可以使角色类型和武器类型相互独立地扩展。
渲染引擎模块:抽象层为渲染器接口,具体实现包括不同的渲染技术(如Direct3D、OpenGL、Vulkan等)。不论游戏采用哪种渲染技术,上层的游戏对象渲染逻辑保持不变。
UI控件库:抽象层定义了一系列UI控件(按钮、文本框、滑块等)的公共行为,而具体实现可能基于不同的图形API或框架(Unity UI、NGUI、TextMeshPro等)。
AI决策树算法:抽象层是决策树接口,不同类型的AI实体可以根据需求选择不同的决策树实现(简单状态机、有限状态机、蒙特卡洛搜索树等)。
物理模拟引擎:抽象层提供物理模拟功能,如碰撞检测、刚体运动等,而具体实现可以切换为不同的物理引擎(Unity内置物理引擎、PhysX、Box2D等)。
以下是在Unity中应用桥接模式的五个不同场景的简化代码示例:
示例1:角色与装备系统
// 抽象部分 - 角色接口
public interface ICharacter
{

    void Move();
    void ChangeWeapon(IWeapon weapon);
}

// 实现部分 - 武器接口
public interface IWeapon
{

    void Use();
    void Reload();
}

// 具体抽象 - 战士类,继承自ICharacter
public class Warrior : MonoBehaviour, ICharacter
{

    private IWeapon currentWeapon;

    public void Move()
    {

        // 移动逻辑
    }

    public void ChangeWeapon(IWeapon weapon)
    {

        currentWeapon = weapon;
    }

    public void Attack()
    {

        if (currentWeapon != null)
            currentWeapon.Use();
    }
}

// 实现部分的具体类 - 短剑和长弓
public class ShortSword : IWeapon
{

    public void Use()
    {

        Debug.Log("Short sword is used for attack!");
    }

    public void Reload()
    {

        // 无需重新加载
    }
}

public class LongBow : IWeapon
{

    public void Use()
    {

        Debug.Log("Long bow fires an arrow!");
    }

    public void Reload()
    {

        Debug.Log("Reloading the long bow...");
    }
}

// 在游戏运行时切换武器
var warrior = GetComponent<Warrior>();
warrior.ChangeWeapon(new ShortSword());
warrior.Attack(); // 输出:"Short sword is used for attack!"
warrior.ChangeWeapon(new LongBow());
warrior.Attack(); // 输出:"Long bow fires an arrow!"
示例2:UI控件库
// 抽象部分 - UI控件接口
public interface IUIControl
{

    void Render();
    void SetText(string text);
}

// 实现部分 - 不同UI框架下的文本框实现
public abstract class TextControlBase : IUIControl
{

    public abstract void Render();
    public abstract void SetText(string text);
}

public class UnityUITextControl : TextControlBase
{

    public UnityEngine.UI.Text unityText; // Unity UI组件

    public override void Render()
    {

        // 使用Unity UI渲染文本
    }

    public override void SetText(string text)
    {

        unityText.text = text;
    }
}

public class NGUITextControl : TextControlBase
{

    // 假设NGUI有对应的文本组件引用

    public override void Render()
    {

        // 使用NGUI渲染文本
    }

    public override void SetText(string text)
    {

        // 设置NGUI文本内容
    }
}

// 在游戏运行时创建不同的UI文本框实例
var uiText = new UnityUITextControl();
uiText.SetText("Hello from Unity UI");
uiText.Render();

var nguiText = new NGUITextControl();
nguiText.SetText("Hello from NGUI");
nguiText.Render();
示例3:渲染引擎模块
// 抽象部分 - 渲染器接口
public interface IRenderer
{

    void RenderScene(GameObject scene);
}

// 实现部分 - 不同的渲染引擎实现
public class DirectXRenderer : IRenderer
{

    public void RenderScene(GameObject scene)
    {

        // 使用DirectX渲染场景
        Debug.Log("Rendering scene with DirectX...");
    }
}

public class OpenGLRenderer : IRenderer
{

    public void RenderScene(GameObject scene)
    {

        // 使用OpenGL渲染场景
        Debug.Log("Rendering scene with OpenGL...");
    }
}

// 游戏中的场景管理器调用渲染逻辑
public class SceneManager
{

    private IRenderer _renderer;

    public SceneManager(IRenderer renderer)
    {

        _renderer = renderer;
    }

    public void RenderCurrentScene()
    {

        _renderer.RenderScene(currentScene);
    }
}

// 在游戏启动时根据需要选择渲染引擎
var directXRenderer = new DirectXRenderer();
var sceneManager = new SceneManager(directXRenderer);
sceneManager.RenderCurrentScene(); // 输出:"Rendering scene with DirectX..."

// 如果需要切换到OpenGL,只需更改渲染器实例
var openGLRenderer = new OpenGLRenderer();
sceneManager._renderer = openGLRenderer;
sceneManager.RenderCurrentScene(); // 输出:"Rendering scene with OpenGL..."
示例4:AI决策树算法
// 抽象部分 - 决策树接口
public interface IDecisionTree
{

    Action Decide(AIState state);
}

// 实现部分 - 简单状态机和有限状态机
public class SimpleStateMachine : IDecisionTree
{

    public Action Decide(AIState state)
    {

        // 根据简单状态机决定动作
        Debug.Log($"Decided action based on Simple State Machine: {
     state}");
        return () => {
    /* 执行具体动作 */ };
    }
}

public class FiniteStateMachine : IDecisionTree
{

    public Action Decide(AIState state)
    {

        // 根据有限状态机决定动作
        Debug.Log($"Decided action based on Finite State Machine: {
     state}");
        return () => {
    /* 执行具体动作 */ };
    }
}

// AI角色类使用决策树接口
public class AIBot
{

    private IDecisionTree _decisionTree;

    public AIBot(IDecisionTree decisionTree)
    {

        _decisionTree = decisionTree;
    }

    public void TakeAction(AIState currentState)
    {

        var action = _decisionTree.Decide(currentState);
        action?.Invoke();
    }
}

// 在游戏运行时选择不同的决策树
var simpleBot = new AIBot(new SimpleStateMachine());
simpleBot.TakeAction(AIState.Idle);

var fsmBot = new AIBot(new FiniteStateMachine());
fsmBot.TakeAction(AIState.Patrolling);
示例5:物理模拟引擎
// 抽象部分 - 物理引擎接口
public interface IPhysicsEngine
{

    void Simulate();
    Rigidbody CreateRigidbody(GameObject obj);
}

// 实现部分 - Unity内置物理引擎和Box2D
public class UnityPhysicsEngine : IPhysicsEngine
{

    public void Simulate()
    {

        // 调用Unity内置物理引擎进行模拟
        Physics.Simulate(Time.fixedDeltaTime);
    }

    public Rigidbody CreateRigidbody(GameObject obj)
    {

        return obj.AddComponent<Rigidbody>();
    }
}

public class Box2DPhysicsEngine : IPhysicsEngine
{

    // 假设有一个用于与Box2D交互的封装类Box2DBody

    public void Simulate()
    {

        // 使用Box2D进行物理模拟
        // ...
    }

    public Rigidbody CreateRigidbody(GameObject obj)
    {

        // 创建一个Box2D对应的刚体组件并附加到对象上
        // 返回Box2DBody的引用或包装对象
        return null; // 这里简化处理,实际需要实现创建Box2D刚体
    }
}

// 游戏中的物理世界管理器使用物理引擎接口
public class PhysicsWorldManager
{

    private IPhysicsEngine _physicsEngine;

    public PhysicsWorldManager(IPhysicsEngine physicsEngine)
    {

        _physicsEngine = physicsEngine;
    }

    public void UpdatePhysics()
    {

        _physicsEngine.Simulate();
    }

    public Rigidbody AddRigidbody(GameObject obj)
    {

        return _physicsEngine.CreateRigidbody(obj);
    }
}

// 在游戏启动时选择物理引擎
var unityPhysics = new UnityPhysicsEngine();
var physicsManager = new PhysicsWorldManager(unityPhysics);
// ...

// 如果要切换到Box2D
var box2DPhysics = new Box2DPhysicsEngine();
physicsManager._physicsEngine = box2DPhysics;
python推荐学习汇总连接:
50个开发必备的Python经典脚本(1-10)
50个开发必备的Python经典脚本(41-50)
————————————————
最后我们放松一下眼睛