一、前言
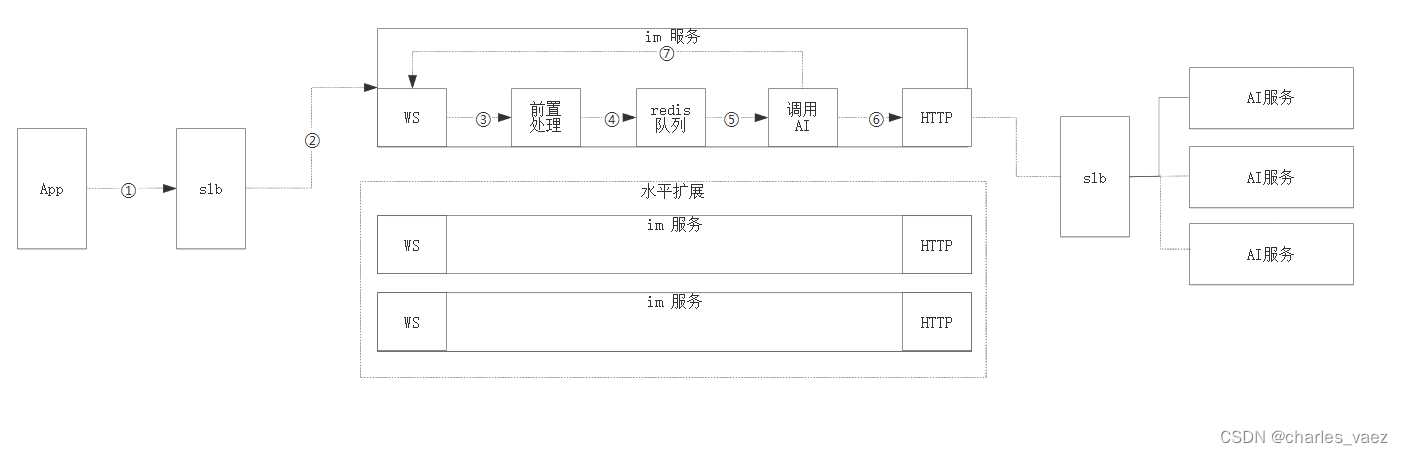
在之前的两篇文章中,我们学习了如何构建基本的即时消息(IM)功能。今天,我们将进一步将IM模块与AI服务进行连接,实现用户提问并由模型进行回答,最后将结果展示在用户界面上。
二、术语
2.1. Spring Boot
是一个用于快速构建基于Spring框架的Java应用程序的开源框架。它简化了Spring应用程序的初始化和配置过程,使开发人员能够更专注于业务逻辑的实现。
2.2. 读超时时间(Read Timeout)
是指在进行网络通信时,接收数据的操作所允许的最长等待时间。当一个请求被发送到服务器,并且在规定的时间内没有收到服务器的响应数据,就会触发读超时错误。读超时时间用于控制客户端等待服务器响应的时间,以防止长时间的阻塞。
2.3. 写超时时间(Write Timeout)
是指在进行网络通信时,发送数据的操作所允许的最长等待时间。当一个请求被发送到服务器,但在规定的时间内无法将数据完全发送完成,就会触发写超时错误。写超时时间用于控制客户端发送数据的时间,以防止长时间的阻塞。
2.4. 连接超时时间(Connection Timeout)
是指在建立网络连接时,客户端尝试连接到服务器所允许的最长等待时间。当一个客户端尝试连接到服务器时,如果在规定的时间内无法建立连接,就会触发连接超时错误。连接超时时间用于控制客户端与服务器建立连接的时间,以防止长时间的等待。
三、前置条件
3.1. 调通最基本的WebSocket流程(参见开源模型应用落地-业务整合篇(二))
3.2. 已经部署至少单节点的AI服务
四、技术实现
# 打通IM和AI服务之间的通道
4.1. 新增AI服务调用的公共类
import com.alibaba.fastjson.JSON;
import lombok.extern.slf4j.Slf4j;
import okhttp3.MediaType;
import okhttp3.Request;
import okhttp3.RequestBody;
import okhttp3.Response;
import org.springframework.beans.factory.annotation.Autowired;
import org.springframework.stereotype.Component;

import java.io.ByteArrayOutputStream;
import java.io.InputStream;
import java.nio.charset.StandardCharsets;
import java.security.MessageDigest;
import java.util.Objects;

@Slf4j
@Component
public class AIChatUtils {
    @Autowired
    private AIConfig aiConfig;

    private Request buildRequest(Long userId, String prompt) throws Exception {
        //创建一个请求体对象(body)
        MediaType mediaType = MediaType.parse("application/json");
        RequestBody requestBody = RequestBody.create(mediaType, prompt);

        return buildHeader(userId, new Request.Builder().post(requestBody))
                .url(aiConfig.getUrl()).build();
    }

    private Request.Builder buildHeader(Long userId, Request.Builder builder) throws Exception {
        return builder
                .addHeader("Content-Type", "application/json")
                .addHeader("userId", String.valueOf(userId))
                .addHeader("secret",generateSecret(userId))

    }


    /**
     * 生成请求密钥
     *
     * @param userId 用户ID
     * @return
     */
    private String generateSecret(Long userId) throws Exception {
        String key = aiConfig.getServerKey();
        String content = key + userId + key;

        MessageDigest digest = MessageDigest.getInstance("SHA-256");
        byte[] hash = digest.digest(content.getBytes(StandardCharsets.UTF_8));

        StringBuilder hexString = new StringBuilder();
        for (byte b : hash) {
            String hex = Integer.toHexString(0xff & b);
            if (hex.length() == 1) {
                hexString.append('0');
            }
            hexString.append(hex);
        }
        return hexString.toString();
    }

    public String chatStream(ApiReqMessage apiReqMessage) throws Exception {

        //定义请求的参数
        String prompt = JSON.toJSONString(AIChatReqVO.init(apiReqMessage.getContents(), apiReqMessage.getHistory()));
        log.info("【AIChatUtils】调用AI聊天,用户({}),prompt:{}",  apiReqMessage.getUserId(), prompt);

        //创建一个请求对象
        Request request = buildRequest(apiReqMessage.getUserId(), prompt);

        InputStream is = null;
        try {

            // 从线程池获取http请求并执行
            Response response =OkHttpUtils.getInstance(aiConfig).getOkHttpClient().newCall(request).execute();

            // 响应结果
            StringBuffer resultBuff = new StringBuffer();
            //正常返回
            if (response.code() == 200) {
                //打印返回的字符数据
                is = response.body().byteStream();
                byte[] bytes = new byte[1024];

                int len = is.read(bytes);
                while (len != -1) {
                    ByteArrayOutputStream outputStream = new ByteArrayOutputStream();
                    outputStream.write(bytes, 0, len);
                    outputStream.flush();
                    // 本轮读取到的数据
                    String result = new String(outputStream.toByteArray(), StandardCharsets.UTF_8);
                    resultBuff.append(result);

                    len = is.read(bytes);

                    // 将数据逐个传输给用户
                    AbstractBusinessLogicHandler.pushChatMessageForUser(apiReqMessage.getUserId(), result);
                }

                // 正常响应
                return resultBuff.toString();
            }
            else {
                String result = response.body().string();
                log.warn("处理异常,异常描述:{}",result);
            }
        } catch (Throwable e) {
            log.error("【AIChatUtils】消息({})调用AI聊天 chatStream 异常,异常消息:{}", apiReqMessage.getMessageId(), e.getMessage(), e);

        } finally {
            if (!Objects.isNull(is)) {
                try {
                    is.close();
                } catch (Exception e) {
                    e.printStackTrace();
                }
            }
        }
        return null;
    }


}
4.2. 新增OkHttp调用的公共类
import lombok.Getter;
import okhttp3.ConnectionPool;
import okhttp3.OkHttpClient;
import java.util.concurrent.TimeUnit;

/**
 * http线程池工具类
 **/
public class OkHttpUtils {

    private static OkHttpUtils okHttpUtils ;
    @Getter
    private OkHttpClient okHttpClient;

    public OkHttpUtils(AIConfig aiConfig){
         this.okHttpClient = new OkHttpClient.Builder().readTimeout(aiConfig.getReadTimeout(), TimeUnit.SECONDS)
                .connectTimeout(aiConfig.getConnectionTimeout(), TimeUnit.SECONDS)
                .writeTimeout(aiConfig.getWriteTimeout(), TimeUnit.SECONDS)
                .connectionPool(new ConnectionPool(aiConfig.getKeepAliveConnections(), aiConfig.getKeepAliveDuration(), TimeUnit.SECONDS))
                .build();
    }

    public static OkHttpUtils getInstance(AIConfig aiConfig){
        if (null == okHttpUtils){
            synchronized (OkHttpUtils.class){
                if (null == okHttpUtils){
                    return new OkHttpUtils(aiConfig);
                }
            }
        }
        return okHttpUtils;
    }

}
4.3. 修改第二篇定义好的具体业务处理类
import com.alibaba.fastjson.JSON;
import io.netty.channel.ChannelHandler;
import lombok.extern.slf4j.Slf4j;
import io.netty.channel.ChannelHandlerContext;
import io.netty.handler.codec.http.websocketx.TextWebSocketFrame;
import org.apache.commons.lang3.StringUtils;
import org.springframework.beans.factory.annotation.Autowired;
import org.springframework.stereotype.Component;


/**
 * @Description: 处理消息的handler
 */
@Slf4j
@ChannelHandler.Sharable
@Component
public class BusinessHandler extends AbstractBusinessLogicHandler<TextWebSocketFrame> {
    @Autowired
    private AIChatUtils aiChatUtils;

    @Override
    public void handlerAdded(ChannelHandlerContext ctx) throws Exception {
        String channelId = ctx.channel().id().asShortText();
        log.info("add client,channelId:{}", channelId);
    }

    @Override
    public void handlerRemoved(ChannelHandlerContext ctx) throws Exception {
        String channelId = ctx.channel().id().asShortText();
        log.info("remove client,channelId:{}", channelId);
    }


    @Override
    protected void channelRead0(ChannelHandlerContext channelHandlerContext, TextWebSocketFrame textWebSocketFrame)
            throws Exception {
        // 获取客户端传输过来的消息
        String content = textWebSocketFrame.text();
        log.info("接收到客户端发送的信息: {}",content);

        Long userIdForReq;
        String msgType = "";
        String contents = "";

        try {
            ApiReqMessage apiReqMessage = JSON.parseObject(content, ApiReqMessage.class);
            msgType = apiReqMessage.getMsgType();
            contents = apiReqMessage.getContents();

            userIdForReq = apiReqMessage.getUserId();

            // 添加用户
            if(!isExists(userIdForReq)){
                addChannel(channelHandlerContext, userIdForReq);
            }


            log.info("用户标识: {}, 消息类型: {}, 消息内容: {}",userIdForReq,msgType,contents);

            if(StringUtils.equals(msgType,String.valueOf(MsgType.CHAT.getCode()))){
//                ApiRespMessage apiRespMessage = ApiRespMessage.builder().code(String.valueOf(StatusCode.SUCCESS.getCode()))
//                        .respTime(String.valueOf(System.currentTimeMillis()))
//                        .contents("测试通过,很高兴收到你的信息")
//                        .msgType(String.valueOf(MsgType.CHAT.getCode()))
//                        .build();
//                String response = JSON.toJSONString(apiRespMessage);
//                channelHandlerContext.writeAndFlush(new TextWebSocketFrame(response));

                aiChatUtils.chatStream(apiReqMessage);

            }else{
                log.info("用户标识: {}, 消息类型有误,不支持类型: {}",userIdForReq,msgType);
            }


        } catch (Exception e) {
            log.warn("【BusinessHandler】接收到请求内容:{},异常信息:{}", content, e.getMessage(), e);
            // 异常返回
            return;
        }

    }

}
PS:
1. 原继承SimpleChannelInboundHandler<TextWebSocketFrame>,现在继承自定义的AbstractBusinessLogicHandler<TextWebSocketFrame>
2. 用户连接上WebSocketServer之后,需要保存用户与channel之间的关系。此处采用userId(全局唯一)关联channel。具体参见:AbstractBusinessLogicHandler
4.4. 新增AbstractBusinessLogicHandler
import com.alibaba.fastjson.JSON;
import io.netty.channel.ChannelHandlerContext;
import io.netty.channel.SimpleChannelInboundHandler;
import io.netty.channel.group.ChannelGroup;
import io.netty.channel.group.DefaultChannelGroup;
import io.netty.handler.codec.http.websocketx.TextWebSocketFrame;
import io.netty.util.AttributeKey;
import io.netty.util.concurrent.GlobalEventExecutor;
import lombok.extern.slf4j.Slf4j;
import org.apache.commons.lang3.StringUtils;
import org.springframework.beans.factory.DisposableBean;
import java.util.concurrent.ConcurrentHashMap;


@SuppressWarnings("all")
@Slf4j
public abstract class AbstractBusinessLogicHandler<I> extends SimpleChannelInboundHandler<I> implements DisposableBean {


    protected static final ConcurrentHashMap<Long, ChannelHandlerContext> USER_ID_TO_CHANNEL = new ConcurrentHashMap<>();


    /**
     * 添加socket通道
     *
     * @param channelHandlerContext socket通道上下文
     */
    protected void addChannel(ChannelHandlerContext channelHandlerContext, Long userId) {
        // 将当前通道存放起来
        USER_ID_TO_CHANNEL.put(userId, channelHandlerContext);
    }

    /**
     * 判斷用戶是否存在
     * @param userId
     * @return
     */
    protected boolean isExists(Long userId){
        return USER_ID_TO_CHANNEL.containsKey(userId);
    }

    protected static void buildResponse(ChannelHandlerContext channelHandlerContext, int code, long respTime, int msgType, String msg) {
        buildResponse(channelHandlerContext, ApiRespMessage.builder().code(String.valueOf(code))
                .respTime(String.valueOf(respTime))
                .msgType(String.valueOf(msgType))
                .contents(msg).build());
    }

    protected static void buildResponseIncludeOperateId(ChannelHandlerContext channelHandlerContext, int code, long respTime, int msgType, String msg, String operateId) {
        buildResponse(channelHandlerContext, ApiRespMessage.builder().code(String.valueOf(code))
                .respTime(String.valueOf(respTime))
                .msgType(String.valueOf(msgType))
                .operateId(operateId)
                .contents(msg).build());
    }


    protected static void buildResponse(ChannelHandlerContext channelHandlerContext, ApiRespMessage apiRespMessage) {
        String response = JSON.toJSONString(apiRespMessage);
        channelHandlerContext.writeAndFlush(new TextWebSocketFrame(response));
    }


    @Override
    public void destroy() throws Exception {
        try {
            USER_ID_TO_CHANNEL.clear();
        } catch (Throwable e) {

        }
    }


    public static void pushChatMessageForUser(Long userId,String chatRespMessage) {
        ChannelHandlerContext channelHandlerContext = USER_ID_TO_CHANNEL.get(userId);

        if (channelHandlerContext != null ) {
            buildResponse(channelHandlerContext, ApiRespMessage.builder().code("200")
                    .respTime(String.valueOf(System.currentTimeMillis()))
                    .msgType(String.valueOf(MsgType.CHAT.getCode()))
                    .contents(chatRespMessage)
                    .build());
            return;
        }
    }

}
4.5. AI配置类
import lombok.Getter;
import lombok.Setter;
import lombok.ToString;
import org.springframework.boot.context.properties.ConfigurationProperties;
import org.springframework.stereotype.Component;

@ConfigurationProperties(prefix="ai.server")
@Component("aiConfig")
@Setter
@Getter
@ToString
public class AIConfig {
    private String url;
    private Integer connectionTimeout;
    private Integer writeTimeout;
    private Integer readTimeout;
    private String serverKey;
    private Integer keepAliveConnections;
    private Integer keepAliveDuration;
}
4.6. AI配置类对应的具体配置
ai:
  server:
    url: http://127.0.0.1:9999/api/chat
    connection_timeout: 3
    write_timeout: 30
    read_timeout: 30
    server_key: 88888888
    keep_alive_connections: 30
    keep_alive_duration: 60
PS:
1. 需要根据实际情况修改url和server_key
4.7.Netty配置类
package com.zwzt.communication.config;

import lombok.Getter;
import lombok.Setter;
import lombok.ToString;
import org.springframework.beans.factory.annotation.Value;
import org.springframework.boot.context.properties.ConfigurationProperties;
import org.springframework.stereotype.Component;

@ConfigurationProperties(prefix="ws.server")
@Component
@Setter
@Getter
@ToString
public class NettyConfig {
    private String path;
    private int port;
    private int backlog;
    private int bossThread;
    private int workThread;
    private int businessThread;
    private int idleRead;
    private int idleWrite;
    private int idleAll;
    private int aggregator;
}
4.8.Netty配置类对应的具体配置
ws:
  server:
    path: /ws
    port: 7778
    backlog: 1024
    boss_thread: 1
    work_thread: 8
    business_thread: 16
    idle_read: 30
    idle_write: 30
    idle_all: 60
    aggregator: 65536
4.9.VO类
import lombok.AllArgsConstructor;
import lombok.Builder;
import lombok.Data;
import lombok.NoArgsConstructor;

import java.util.List;

@Data
@Builder
@NoArgsConstructor
@AllArgsConstructor
public class AIChatReqVO {

    // 问题
    private String prompt;

    // 对话历史
    private List<ChatContext> history;

    // AI模型参数
    private Double top_p;
    private Double temperature;
    private Double repetition_penalty;
    private Long max_new_tokens;

    public static AIChatReqVO init(String prompt, List<ChatContext> history) {
        return AIChatReqVO.builder()
                .prompt(prompt)
                .history(history)
                .top_p(0.9)
                .temperature(0.45)
                .repetition_penalty(1.1)
                .max_new_tokens(8192L)
                .build();
    }


}
4.10.实体类
import lombok.AllArgsConstructor;
import lombok.Builder;
import lombok.Data;
import lombok.NoArgsConstructor;

@Data
@Builder
@NoArgsConstructor
@AllArgsConstructor
public class ChatContext {
    // 发送者
    private String from;
    // 发送数据
    private String value;
}
# 将Netty集成进SpringBoot项目
4.11.新增SpringBoot启动类
package com.zwzt.communication;

import com.zwzt.communication.netty.server.Server;
import com.zwzt.communication.utils.SpringContextUtils;
import lombok.extern.slf4j.Slf4j;
import org.springframework.beans.BeansException;
import org.springframework.beans.factory.DisposableBean;
import org.springframework.boot.SpringApplication;
import org.springframework.boot.autoconfigure.SpringBootApplication;
import org.springframework.context.ApplicationContext;
import org.springframework.context.ApplicationContextAware;
import org.springframework.context.ApplicationListener;
import org.springframework.context.event.ContextRefreshedEvent;

import java.util.concurrent.Executors;
import java.util.concurrent.ScheduledExecutorService;


@SpringBootApplication
@Slf4j
public class Application implements ApplicationListener<ContextRefreshedEvent> , ApplicationContextAware , DisposableBean {

    public static void main(String[] args) {
        SpringApplication.run(Application.class, args);
    }

    @Override
    public void onApplicationEvent(ContextRefreshedEvent contextRefreshedEvent) {
        if (contextRefreshedEvent.getApplicationContext().getParent() == null) {
            try {
                //启动websocket服务
                new Thread(){
                    @Override
                    public void run() {
                        Server.getInstance().start();
                    }
                }.start();
            } catch (Exception e) {
                log.error("webSocket server startup exception!",e);
                System.exit(-1);
            }


        }
    }

    @Override
    public void setApplicationContext(ApplicationContext applicationContext) throws BeansException {
        SpringContextUtils.setApplicationContext(applicationContext);
    }

    @Override
    public void destroy() throws Exception {
        try{
            Server.getInstance().close();
        }catch(Throwable e){

        }


    }
}
4.12.SpringBoot对应的配置
application.yml
server:
  port: 7777
  tomcat:
    uri-encoding: UTF-8
spring:
  application:
    name: ai_business_project
  main:
    banner-mode: "off"
  profiles:
    active: ai-dev
# 日志配置
logging:
  config: classpath:logback-spring.xml
application-ai-dev.yml
ai:
  server:
    url: http://127.0.0.1:9999/api/chat
    connection_timeout: 3
    write_timeout: 30
    read_timeout: 30
    server_key: 88888888
    keep_alive_connections: 30
    keep_alive_duration: 60
ws:
  server:
    path: /ws
    port: 7778
    backlog: 1024
    boss_thread: 1
    work_thread: 8
    business_thread: 16
    idle_read: 30
    idle_write: 30
    idle_all: 60
    aggregator: 65536
4.13.Spring上下文公共类
import org.springframework.context.ApplicationContext;

public class SpringContextUtils {
    private static ApplicationContext applicationContext;

    public static void setApplicationContext(ApplicationContext applicationContext){
        SpringContextUtils.applicationContext = applicationContext;
    }

    public static ApplicationContext getApplicationContext(){
        return applicationContext;
    }
}
4.14. 启动服务,执行Application类

启动成功后SpringBoot监听7777端口,WebSocket监听7778端口
五、测试
#沿用上一篇的代码,不需要调整
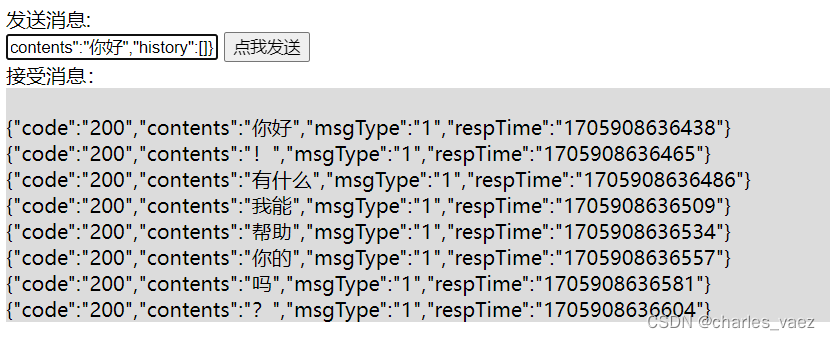
6.1. 页面测试
6.2. 在线测试

到此我们已经成功调通了整个IM与AI服务交互的链路
六、附带说明
6.1. 上面的代码还有很多需要改进的地方,尤其是没有考虑到一些非功能性需求。我们的主要目标是确保整个程序能够顺利运行,然后逐步进行改进和完善。
6.2.关于搭建Spring Boot项目,网上已经有很多成熟的案例可供参考。由于内容过长,这里就不再详细介绍了。