这一节完成基本信息的编辑和保存
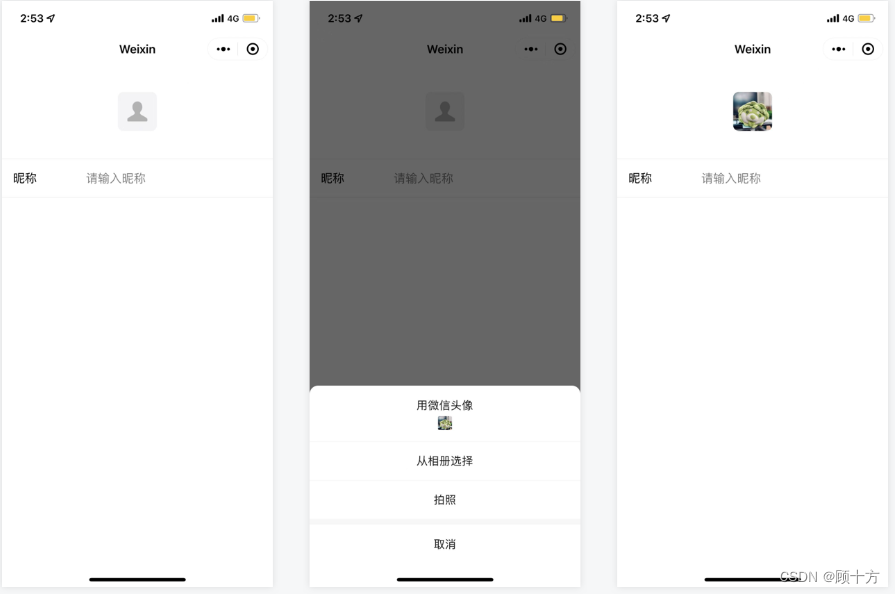
首先完成用户头像的获取
头像选择
需要将 button 组件 open-type 的值设置为 chooseAvatar,当用户选择需要使用的头像之后,可以通过 bindchooseavatar 事件回调获取到头像信息的临时路径。
从基础库2.24.4版本起,若用户上传的图片未通过安全监测,不触发bindchooseavatar 事件。
<!-- 用户头像 -->
    <view class="user_avatar_wrap">
        <button class="avatar-wrapper" open-type="chooseAvatar" bind:chooseavatar="onChooseAvatar">
            <image src="{
  {userInfo.avatarUrl}}"  mode="widthFix" />
        </button>
    </view>
onChooseAvatar(e) {
    const { avatarUrl } = e.detail
    app.globalData.userInfo.avatarUrl = avatarUrl
    this.setData({
      userInfo: {
          avatarUrl: avatarUrl,
          nickName: this.data.userInfo.nickName,
          userId: this.data.userInfo.userId
      }
    })
  },
日期组件
使用微信小程序的原生组件picker
使用示例如下:
<view class="section">
  <view class="section__title">日期选择器</view>
  <picker mode="date" value="{
  {date}}" start="2015-09-01" end="2017-09-01" bindchange="bindDateChange">
    <view class="picker">
      当前选择: {
  {date}}
    </view>
  </picker>
</view>
date: '2016-09-01',
bindDateChange: function(e) {
console.log('picker发送选择改变,携带值为', e.detail.value)
this.setData({
date: e.detail.value
})
},首先修改页面和样式
userInfo.wxml
<view class="user_birthday">
                <picker class="birthday_picker" mode="date" value="{
  {date}}" start="1900-09-01" end="2100-09-01" bindchange="bindDateChange">
                    <view class="picker">
                        <text class="birthday_text">生日</text>
                        <block wx:if="{
  {!dateStatus}}">
                            <text class="selectBirthday">请选择生日</text><view class="next_icon iconfont icon-xiayiyeqianjinchakangengduo"> </view>
                        </block>
                        <block wx:if="{
  {dateStatus}}">
                            {
  {date}}
                        </block>
                    </view>
               </picker>
            </view>
userInfo.less
 .user_birthday{
                display: flex;
                margin: 30rpx;
                border-bottom: 1rpx solid #f5f5ed;
                .birthday_picker{
                    width: 100%;
                    .picker{
                        display: flex;
                        .birthday_text{
                            flex: 1;
                            color: #615839;
                            font-size: 30rpx;
                        }
                        .selectBirthday{

                        }
                        .next_icon{
                            color: #666;
                        }
                    }
                }
            }
        }
userInfo.js
data: {
    userInfo: {
        nickName: '',
        avatarUrl: '',
        userId: ''
    },
    date: '2000-09-01',
    dataStatus: false
  },
bindDateChange(e){
    console.log('picker发送选择改变,携带值为', e.detail.value)
    this.setData({
      date: e.detail.value,
      dateStatus: true
    })
  },
性别和地区
也采用picker组件实现效果
userInfo.wxml
<view class="user_sex">
    <picker bindchange="bindSexChange" value="{
  {index}}" range="{
  {array}}" class="sex_picker">
        <view class="picker">
            <text class="sex_text">性别</text>
            <block wx:if="{
  {!sexStatus}}">
                <text class="selectSex">请选择性别</text><view class="next_icon iconfont icon-xiayiyeqianjinchakangengduo"> </view>
            </block>
            <block wx:if="{
  {sexStatus}}">
                {
  {array[index]}}
            </block>
        </view>
    </picker>
</view>
<view class="user_address">
    <picker class="region_picker" mode="region" bindchange="bindRegionChange" value="{
  {region}}" custom-item="{
  {customItem}}">
        <view class="picker">
            <text class="region_text">地区</text>
            <block wx:if="{
  {!regionStatus}}">
                <text class="selectRegion">请选择地区</text><view class="next_icon iconfont icon-xiayiyeqianjinchakangengduo"> </view>
            </block>
            <block wx:if="{
  {regionStatus}}">
                {
  {region[0]}} {
  {region[1]}} {
  {region[2]}}
            </block>
        </view>
    </picker>
</view>
userInfo.less
.user_sex{
    margin: 30rpx;
    border-bottom: 1rpx solid #f5f5ed;
    .sex_picker{
        .picker{
            display: flex;
            .sex_text{
                flex: 1;
                color: #615839;
                font-size: 30rpx;
            }
            .selectSex{

            }
            .next_icon{
                color: #666;
            }
        }
    }


}

.user_address{
    margin: 30rpx;
    .region_picker{
        .picker{
            display: flex;
            .region_text{
                flex: 1;
                color: #615839;
                font-size: 30rpx;
            }
            .selectRegion{

            }
            .next_icon{
                color: #666;
            }
        }
    }
}
}

.phone_wrap{
    background-color: #fff;
    border-radius: 25rpx;
    .userId_wrap{
        display: flex;
        margin: 30rpx;
        border-bottom: 1rpx solid #f5f5ed;
        text{
            flex: 1;
            color: #615839;
            font-size: 30rpx;
        }
        .next_icon{
            color: #666;
        }
    }
userInfo.js
// pages/userInfo/userInfo.js
const app = getApp()
Page({

  /**
   * 页面的初始数据
   */
  data: {
    userInfo: {
        nickName: '',
        avatarUrl: '',
        userId: ''
    },
    date: '2000-09-01',
    dateStatus: false,
    sexStatus: false,
    regionStatus: false,
    array: ['男', '女', '未知'],
    index: 0,
    region:  ['广东省', '广州市', '海珠区'],
    customItem: '全部'
  },

  /**
   * 生命周期函数--监听页面加载
   */
  onLoad(options) {
     this.setData({
         userInfo: {
             nickName: app.globalData.userInfo.nickName,
             avatarUrl: app.globalData.userInfo.avatarUrl,
             userId: app.globalData.userInfo.userId
         }
     })
  },
  bindRegionChange: function (e) {
    this.setData({
      region: e.detail.value,
      regionStatus: true
    })
  },
  bindSexChange(e){
    this.setData({
      index: e.detail.value,
      sexStatus: true
    })
  },
  bindDateChange(e){
    console.log('picker发送选择改变,携带值为', e.detail.value)
    this.setData({
      date: e.detail.value,
      dateStatus: true
    })
  },
  onChooseAvatar(e) {
    const { avatarUrl } = e.detail
    app.globalData.userInfo.avatarUrl = avatarUrl
    this.setData({
      userInfo: {
          avatarUrl: avatarUrl,
          nickName: this.data.userInfo.nickName,
          userId: this.data.userInfo.userId
      }
    })
  },

  /**
   * 生命周期函数--监听页面初次渲染完成
   */
  onReady() {

  },

  /**
   * 生命周期函数--监听页面显示
   */
  onShow() {

  },

  /**
   * 生命周期函数--监听页面隐藏
   */
  onHide() {

  },

  /**
   * 生命周期函数--监听页面卸载
   */
  onUnload() {

  },

  /**
   * 页面相关事件处理函数--监听用户下拉动作
   */
  onPullDownRefresh() {

  },

  /**
   * 页面上拉触底事件的处理函数
   */
  onReachBottom() {

  },

  /**
   * 用户点击右上角分享
   */
  onShareAppMessage() {

  }
})
获取用户手机号
获取手机号需要小程序的授权,这个功能要钱,而且需要条件

体验额度:每个小程序账号将有1000次体验额度,用于开发、调试和体验。该1000次的体验额度为正式版、体验版和开发版小程序共用,超额后,体验版和开发版小程序调用同正式版小程序一样,均收费;
使用步骤:
步骤1:需要将 button 组件 open-type 的值设置为 getPhoneNumber,当用户点击并同意之后,通过 bindgetphonenumber 事件获取回调信息;
步骤2:将 bindgetphonenumber 事件回调中的动态令牌code传到开发者后台,并在开发者后台调用微信后台提供的 phonenumber.getPhoneNumber 接口,消费code来换取用户手机号。每个code有效期为5分钟,且只能消费一次。
注:getPhoneNumber 返回的 code 与 wx.login 返回的 code 作用是不一样的,不能混用。
注意
从基础库2.21.2开始,对步骤2中换取手机号信息的方式进行了安全升级,上述为新方式使用指南。(旧方式目前可以继续使用,但建议开发者使用新方式,以增强小程序安全性)另外,新方式不再需要提前调用wx.login进行登录
代码示例
<button open-type="getPhoneNumber" bindgetphonenumber="getPhoneNumber"></button>Page({
getPhoneNumber (e) {
console.log(e.detail.code) // 动态令牌
console.log(e.detail.errMsg) // 回调信息(成功失败都会返回)
console.log(e.detail.errno) // 错误码(失败时返回)
}
})
通过调用接口获取手机号
接口英文名
getPhoneNumber
功能描述
该接口用于将code换取用户手机号。 说明,每个code只能使用一次,code的有效期为5min。
调用方式
HTTPS 调用
POST https://api.weixin.qq.com/wxa/business/getuserphonenumber?access_token=ACCESS_TOKEN 请求数据示例
{
"code": "e31968a7f94cc5ee25fafc2aef2773f0bb8c3937b22520eb8ee345274d00c144"
}
返回数据示例
{
    "errcode":0,
    "errmsg":"ok",
    "phone_info": {
        "phoneNumber":"xxxxxx",
        "purePhoneNumber": "xxxxxx",
        "countryCode": 86,
        "watermark": {
            "timestamp": 1637744274,
            "appid": "xxxx"
        }
    }
}
使用input来手动输入
<!-- 手机号设置 -->
        <view class="phone_wrap">
            <view class="userId_wrap">
                <text>ID</text>
                {
  {userInfo.userId}}
            </view>
            <view class="user_telPhone">
                <text class="phoneNumber_text">手机号</text>
                <input type="text" class="phoneNumber_input" placeholder="请输入手机号" placeholder-style="text-align: right"
                bindblur="phoneNumberMethod"/>
            </view>
        </view>
.user_telPhone{
display: flex;
margin: 30rpx;
.phoneNumber_text{
flex: 1;
color: #615839;
font-size: 30rpx;
}
.phoneNumber_input{
height: auto;
width: 175rpx;
}
}data{
phoneNumber: ''
},
phoneNumberMethod(e){
const data = e.detail.value;
if(data.length == 0){
wx.showToast({
title: '请输入手机号',
icon:'none'
})
}
if(data.length != 11 || !/^1[3456789]\d{9}$/.test(data)){
wx.showToast({
title: '请输入正确的手机号',
icon:'none'
})
}
this.setData({
phoneNumber: data
})
},最后展示当前效果


![P1059 [NOIP2006 普及组] 明明的随机数————C++、Python](https://img-blog.csdnimg.cn/direct/bba9d0da5f8643c3ad2fe4a76973e062.png)


![[每周一更]-(第83期):Go新项目-Gin中间件的使用和案例(10)](https://img-blog.csdnimg.cn/direct/ba5addccbb5a4aafae0dde5224c9a0e6.png#pic_center)